Nielsen-Kellerman CoxBox Core User manual

USER GUIDE
FOR COXBOX GPS AND
COXBOX CORE
www.coxbox.com

www.coxbox.com
2
CONTENTS
Service ............................................... 3
CoxBox GPS + Core Features .......... 4
Installation Instructions..................... 5
Quick Start Guide .............................. 6
Button Functionality .......................... 7
Rowing Screen Icons ........................ 8
Live Stream........................................ 9
NK LiNK™ Logbook Guide ............... 10
Memory ............................................. 12
Data LiNK™ ....................................... 14
Setup Menu ....................................... 15
Advanced Setup Menu ..................... 16
Workouts ........................................... 18
Battery Use and Charging................. 21
Maintenance ...................................... 24
Limited Warranty ............................... 26
Compliance........................................ 28
Specications .................................... 29

www.coxbox.com 3
We provide full factory service on every product we manufacture for as long as
we make the product (and as long after as component availability permits). If we
can’t repair a product, we will offer you a brand new replacement under our Trade
In Trade Up program - even for accidental damage and misuse. If you have a
problem with an NK product, visit www.nksports.com or contact us by phone,
e-mail or in person and we’ll do our best to make it right.
For fastest service, you can initiate a service request 24-7 at
www.nksports.com/nk-sports-service-request
For FAQ’s, chat and e-mail support, visit www.NKSports.com.
US Toll-Free 800-784-4221
Int’l Phone +1 610-447-1555
GENERAL INFO
TECHNICAL SUPPORT
REPAIRS
SERVICE

www.coxbox.com
4
MENU NAVIGATION /
FLEX FIELD BUTTONS
SEAT DISPLAY VIEW MODE
(coming soon) POWER ON/OFF &
MENU MODE
DEDICATED VOLUME
CONTROL
MONOBLOCK™CONNECTOR
PORTS WITH STABLESOCKET™
TECHNOLOGY.
CoxBox GPS™
+
Core Front View
ATHLETE PERFORMANCE MODE
(coming soon)
HOME SCREEN MODE
START/PAUSE/RESET
BUMPER
CoxBox Core
is upgradable
to GPS
www.coxbox.com 5
»CoxBox Core and GPS are both completely compatible with all current NK
wiring, microphone, speaker, chargers and mounting cups.
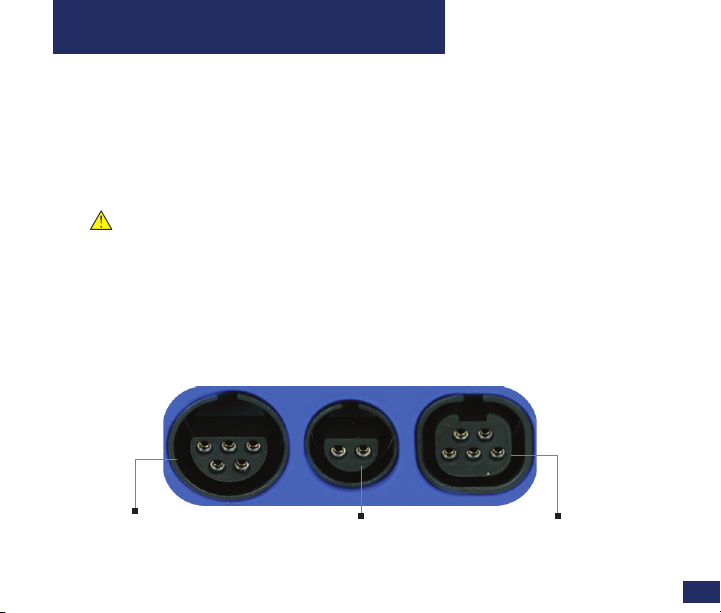
»Attach the 5-pin receptacle end of your NK audio harness to the Audio
Connector Port. If present, be sure to align the rib on the receptable with the
notch on the Connector Port.
»Press the receptable straight in rmly to ensure a good connection.
Try not to twist the receptacle to avoid damaging the pins, sockets or plug.
»Since a rate sensor is no longer needed, you can remove the R harness and seat
magnet from your boat when using the new model. However leaving the rate
sensor attached will not cause any issues and you may want to keep it if you still
use older CoxBox Ampliers.
»Attach a NK R2 Microphone to the Microphone Connector Port to complete
installation.
INSTALLATION INSTRUCTIONS
AUDIO
CONNECTOR
MICROPHONE
CONNECTOR
SMART
CONNECTOR

www.coxbox.com
6
»Press and hold the power button to turn the unit on.
Use the arrow keys to adjust any ex elds on the display to change
measurements for current row.
»Press the Start/Pause/Reset button to enter Ready mode (Ready will appear
in middle of screen)
»Timer and recording will start when the rst stroke is detected.
»Press the Start/Pause/Reset button to Stop the timer and recording. Press
again to resume rowing.
»Hold the Start/Pause/Reset button until Reset appears and release to reset
row and save stats in memory.
»Hold the Power button until Turn Off appears and release to turn off the
unit. Turning off will save the correct session as well.
QUICK START GUIDE
Throughout this manual, features and functions specic
to the GPS model are indicated by this icon.

www.coxbox.com 7
When on the main rowing screen, use left and right arrows to
enter ex elds. Use up and down arrows to toggle the ex
eld to different measurements.
When in the menu screen, use up and down arrows to toggle
between menu items. Use right arrow to enter menu item and
use left arrow to exit menu item.
Use +to toggle volume higher and –to toggle volume lower.
Press and hold – to lower volume quickly to zero. These
buttons will change volume regardless of which screen is
showing.
Press to enter Ready mode (for use right before starting
rowing). Press again to Stop session. Hold and release when
Reset is on the screen to reset values and save rowing session.
Press on any screen to immediately return to the main
rowing screen.
Press to go into Seat Display Settings.
(Supported on a future release)
Press to go into Seat Display Measurements.
(Supported on a future release)
Press to enter Main Menu. Hold down to power on or power off
(while on main rowing screen only). The unit will also power off
automatically after - minutes of - .
BUTTON FUNCTIONALITY
www.coxbox.com
8
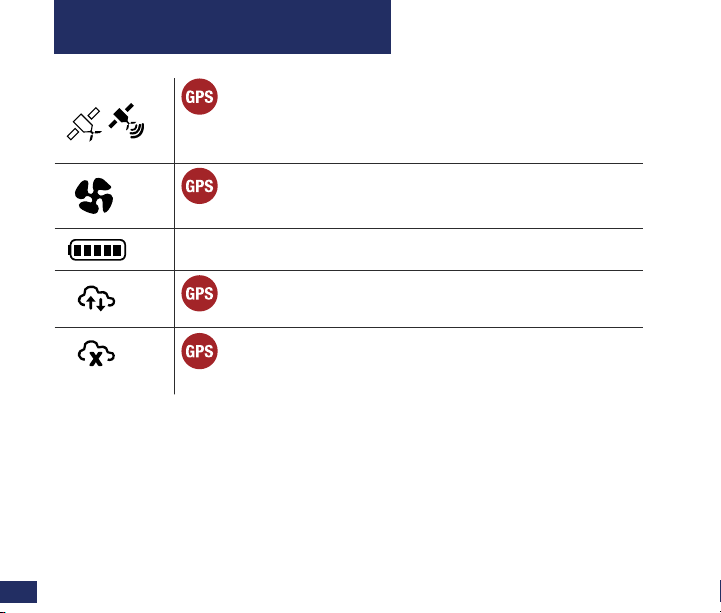
GPS Mode / Satellite coverage: hollow icon means
no satellite connection, lled-in means adequate satellite
connection. It is recommend to wait until symbol is lled-
in before starting your row.
Impeller Mode: Denotes connected to an impeller
Speed and distance will be reported from impeller instead
of GPS.
Battery Life. Each bar represents about 20% of a full charge.
Connected to mobile device for Live Streaming.
CoxBox is connected to mobile device, but mobile device
has no cell service.
ROWING SCREEN ICONS

www.coxbox.com 9
GPS Mode / Satellite coverage: hollow icon means
no satellite connection, lled-in means adequate satellite
connection. It is recommend to wait until symbol is lled-
in before starting your row.
Impeller Mode: Denotes connected to an impeller
Speed and distance will be reported from impeller instead
of GPS.
Battery Life. Each bar represents about 20% of a full charge.
Connected to mobile device for Live Streaming.
CoxBox is connected to mobile device, but mobile device
has no cell service.
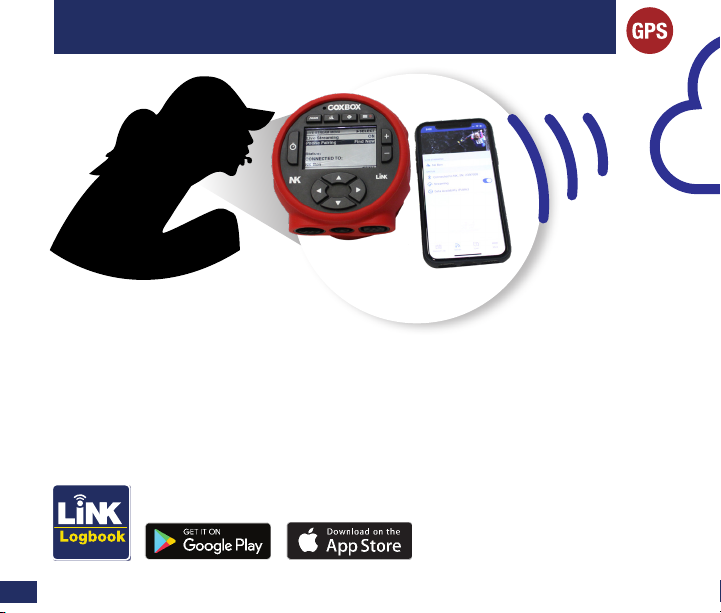
Select Live Stream to broadcast your CoxBox GPS measurements to the cloud for
remote viewing. You will need to pair the CoxBox to a mobile phone and have the
phone in range of CoxBox to broadcast your data live. We recommend keeping the
phone in a waterproof bag.
NK is not responsible for damage to your phone. Be sure to use a waterproof
bag or case designed for phones!
»Download NK LiNK Logbook application to your mobile device.
»Make sure Bluetooth is enabled on mobile device and has cellular coverage.
»Open the NK LiNK Logbook application. Go to the Stream page in the app.
»Enter a Boat ID and make sure Streaming is toggled to ON.
»Select Live Streaming option on the CoxBox. Then go to
Phone Pairing-> Find New.
»You should show as connected fairly quickly. Use CoxBox normally to
broadcast live. Connected phone must stay near CoxBox in boat.
»Go to the Logbook app or logbook.nksports.com to view live results.
LIVE STREAM
www.coxbox.com
10
»Coxswain pairs CoxBox GPS to a mobile device using LiNK Logbook
application on the Stream page.
»Coxswain places mobile device in waterproof bag and brings into boat.
»Live streaming results are broadcast to the cloud.
NK LINK LOGBOOK LIVE STREAMING GUIDE
C
O
X
S
W
A
I
N
Other manuals for CoxBox Core
1
This manual suits for next models
1
Table of contents
Other Nielsen-Kellerman Accessories manuals


