Nikai NDVD1073VR User manual
DVD Player + Video Ca ette Recorder
Please read this manual carefully before connecting your DVD+VCR and o erating it
for the first time.
Kee the manual in a safe lace for future reference.
NDVD1073VR
INSTRUCTION MANUAL
P/N:97P95600D0-
Downloaded from www.Manualslib.com manuals search engine

Product information
1
Contents
Product Information
Important Safeguards ................................................ 2
Advantages of This Product Are .... ....................... 5
Read Carefully before sing .................................... 6
Identification of Controls .......................................... 7
Remote Control .........................................................11
Installation
Connecting up your player with RF lead............. 12
Connecting with Other VCR or Camcorder ........ 14
Connecting with Audio ............................................16
Connecting to a television with Component jack
and a Dolby Digital Amp. ....................................... 17
Basic Operation
Initial Installation ...................................................... 18
Setting time and date, OSD ON & OFF ............... 20
Output Select ............................................................. 21
DVD Playback ...........................................................22
VCR Playback .......................................................... 23
Recording ................................................................... 24
VCR Operation
Tuning in New Stations .......................................... 27
Timer Recording ....................................................... 30
More Functions ......................................................... 32
Connections and Assembling ................................ 35
DVD Operation
Playing a desired scene ........................................... 37
Confirming the current PLAYING TIME ............ 41
Selecting an A DIO language and S BTITLE
language...................................................................... 43
Selecting ZOOM and Multi Angle......................... 44
About MP3 and JPG discs........................................ 45
Displaying menus in a disc, Progressive Scan
Mode............................................................................ 48
Set-up
Language Setup......................................................... 49
Video Setup .................................................................51
Audio Setup................................................................ 52
Others Setup .............................................................. 53
The others
About DVD................................................................. 55
Basic information about VCR and Videotape..... 57
Trouble Shooting (VCR)........................................... 58
Trouble Shooting (DVD) ......................................... 60
Specifications ............................................................. 61
Downloaded from www.Manualslib.com manuals search engine
Product information
23
Important Safeguards
CAUTION: TO RED CE THE RISK OF ELECTRIC
SHOCK, DO NOT REMOVE COVER (OR BACK). NO
SER-SERVICEABLE PARTS INSIDE. REFER
SERVICING TO Q ALIFIED SERVICE PERSONNEL.
CAUTION
RISK OF ELECTRIC SHOCK
DO NOT OPEN
The lightning flash with arrowhead symbol,
within an equilateral triangle, is intended to
alert the user to the presence of uninsulated
“dangerous voltage” within the product’s
enclosure that may be of sufficient magnitude
to constitute a risk of electric shock.
The exclamation point within an equilateral
triangle is intended to alert the user to the
presence of important operating and servicing
instructions in the literature accompanying the
appliance.
WARNING : TO RED CE THE RISK OF FIRE OR ELECTRIC SHOCK, DO NOT EXPOSE THIS
APPLIANCE TO RAIN OR MOIST RE.
CAUTION : TO PREVENT ELECTRIC SHOCK, MATCH WIDE BLADE OF PL G TO WIDE SLOT,
F LLY INSERT.
IMPORTANT FOR LASER PRODUCTS
• LASER : This Digital Video Disc Player employs a Laser System. To ensure proper use of this
product please read this instruction manual carefully and retain for future reference.
Should the unit require maintenance, contact an authorized service location - see
service procedure.
se of control adjustments or the performance of procedures other than those
specified may result in hazardous radiation exposure.
To prevent direct exposure to the laser beam, do not try to open the enclosure. Visible
laser radiation when open and interlocks defeated.
DO NOT STARE INTO THE BEAM.
• DANGER : Visible laser radiation when open and interlock
failed or defeated. Avoid direct exposure to beam.
• CAUTION :Do not open the top cover. There are no user
serviceable parts inside the nit; leave all servicing to qualified service personnel.
CLASS 1 LASER PRODUCT
LUOKAN 1 LASERLAITE
KLASS 1 LASERAPPARAT
CA TION: Any changes or modification in construction of this device which are not expressly approved by
the party responsible for compliance could void the user’s authority to operate the equipment.
• Make sure the unit shou d be p aced at east 8cm apart from the other home app iances or the
obstac es to get sufficient venti ation.
• This unit sha not be exposed to dripping or sp ashing and no objects fi ed with iquids, such
as vases, sha be p aced on this unit.
• Switching it off does not disconnect it from the mains (stand-by). To disconnect it from the
mains, you have to unp ug it.
• The system is not comp ete y disconnected from the mains when the / Ibutton is set to
the position.
Product information
This set has been designed and manufactured to assure
personal safety. Improper use can result in electric
shock or fire hazard. The safeguards incorporated in
this unit will protect you if you observe the following
procedures for installation, use and servicing. This unit
is fully transistorized and does not contain any parts
that can be repaired by the user.
1 READ INSTRUCTIONS
All the safety and operating instructions should be
read before the unit is operated.
2 RETAIN INSTRUCTIONS
The safety and operating instructions should be
retained for future reference.
3 HEED WARNINGS
All warnings on the unit and in the operating
instructions should be adhered to.
4 FOLLOW INSTRUCTIONS
All operating and use instructions should be
followed.
5 CLEANING
nplug this unit from the wall outlet before
cleaning. Do not use liquid cleaners or aerosol
cleaners. se a damp cloth for cleaning.
6 ATTACHMENTS
Do not use attachments unless recommended by
the unit’s manufacturer as they may cause
hazards.
7 WATER AND MOISTURE
Do not use this unit near water- for example, near a
bath tub, wash bowl, kitchen sink or laundry tub,
in a wet basement, or near a swimming pool.
8 ACCESSORIES
Do not place this unit on an
unstable cart, stand, tripod,
bracket, or table. The unit
may fall, causing serious
injury to a child or adult as well as serious damage
to the unit. se this unit only with a cart, stand ,
tripod, bracket, or table recommended by the
manufacturer.
8A A unit and cart combination should be moved
with care. Quick stops, excessive force, and uneven
surfaces may cause the product and cart
combination to overturn.
9 VENTILATION
Slots and openings in the case are provided for
ventilation to ensure reliable operation of the unit
and to protect it from overheating. These openings
must not be blocked or covered. These openings
must not be blocked by placing the unit on a bed,
sofa, rug, or other similar surface. This unit should
never be placed near or over a radiator or heat
radiator. This unit should not be placed in a built-
in installation such as a bookcase or rack unless
proper ventilation is provided or the
manufacturer’s instructions have been adhered to.
10 POWER SOURCES
This unit should be operated only from the type of
power source indicated on the marking label. If
you are not sure of the type of power supply to
your home, consult your dealer or local power
company. For units intended to operate from
battery power, or other sources, refer to the
operating instructions.
11 GROUNDING OR POLARIZATION
This unit is equipped with a polarized alternating -
current line plug (a plug having one blade wider
than the other). This plug will fit into the power
outlet only one way.
This is a safety feature. If you are unable to insert
the plug fully into the outlet, try reversing the
plug. If the plug still fails to fit, contact your
electrician to replace your obsolete outlet.To
prevent electric shock, do not use this polarized
plug with an extension cord, receptacle, or other
outlet unless the blades can be fully inserted
without blade exposure. If you need an extension
cord, use a polarized cord.
12 POWER-CORD PROTECTION
Power-supply cords should be routed so that they
are not likely to be walked on or pinched by items
placed upon or against them, paying particular
attention to cords at plugs, convenience
receptacles, and the point where they exit from the
unit.
Important Safeguards
PORTABLE CART WARNING
(symbol provided by RETAC)
Downloaded from www.Manualslib.com manuals search engine

Product information
4 5
Important Safeguards
13 LIGHTNING
For added protection for this unit during a
lightning storm, or when it is left unattended and
unused for long periods of time, unplug it from the
wall outlet and disconnect the antenna or cable
system. This will prevent damage to the unit due to
lightning and power line surges.
14 DISC TRAY
Keep your fingers well clear of the disc as it is
closing. It may cause serious personal injury.
15 OVERLOADING
Do not overload wall outlets of extension cords as
this can result in a risk of fire or electric shock.
16 OBJECT AND LIQUID ENTRY
Never push objects of any kind into this unit
through openings as they may touch dangerous
voltage points or “short-out” parts that could result
in a fire or electric shock. Never spill liquid of any
kind on the unit.
17 BURDEN
Do not place a heavy object on or step on the
product. The object may fall, causing serious
personal injury and serious damage to the product.
18 DISC
Do not use a cracked, deformed or repaired disc.
These discs are easily broken and may cause
serious personal injury and product malfunction.
19 SERVICING
Do not attempt to service this unit yourself as
opening or removing covers may expose you to
dangerous voltage or other hazards. Refer all
servicing to qualified service personnel.
20 DAMAGE REQUIRING SERVICE
nplug this unit from the wall outlet and refer
servicing to qualified service personnel under the
following conditions.
A. When the power-supply cord or plug is
damaged.
B. If liquid has been spilled, or objects have fallen
into the unit.
C. If the unit has been exposed to rain or water.
D. If the unit does not operate normally by
following the operating instructions. Adjust only
those controls that are covered by the operating
instructions. Improper adjustment of other
controls may result in damage and will often
require extensive work by a qualified technician
to restore the unit to its normal operation.
E. If the unit has been dropped or the cabinet has
been damaged.
F. When the unit exhibits a distinct change in
performance-this indicates a need for service.
21 REPLACEMENT PARTS
When replacement parts are required, have the
service technician verify that the replacements he
uses have the same safety characteristics as the
original parts. se of replacements specified by the
unit manufacturer can prevent fire, electric shock,
or other hazards.
22 SAFETY CHECK
pon completion of any service or repairs to this
unit, ask the service technician to perform safety
checks recommended by the manufacturer to
determine that the unit is in safe operating
condition.
23 WALL OR CEILING MOUNTING
The product should be mounted to a wall or ceiling
only as recommended by the manufacturer.
24 HEAT
The product should be situated away from heat
sources such as radiators, heat registers, stoves, or
other products (including amplifiers) that produce
heat.
25 To prevent battery electrolyte leakage, which may
result in injury and damage to the unit or other
objects, observe the following precautions:
A. All batteries must be installed with the proper
polarity.
B. Do not mix new with old or used batteries.
C.
Only use batteries of the same type and brand.
D. Remove the batteries when they are not to be
used for a long period time.
E. When the batteries have become discharged,
they must be disposed of in a safe manner
which complies with all applicable laws.
Advantages of This Product Are
• DVD, VCD, CD, CD-R(MP3), CD-RW, VHS
• Watching DVD for recording broadcast
• Integrated remote contro (VCR, DVD)
• VISS function
• Mu tip ex sound p ayback/record
• High Sound Qua ity of 6 head Hi-Fi
• Simp e record function
• MP3 fi e p ayback function (CD-R disc
having records of MP3 fi es)
• Screensaver function (DVD)
• Coaxia digita Audio output (PCM, Do by
Digita , dts)
You can enjoy high- eve digita audio by
connecting with amp embedded with Do by
Digita / dts decoder.
• Ana og audio 2-channe s output for
DOWNMIX (x1)
• Composite video output (x1)
• S ow Forward p ayback (DVD)
• Fast Forward / Reverse p ayback
• Search of tit e, chapter, and time in DVD
disc, and search of time and track time in
VCD.
• Various TV aspect (DVD)
4:3 for Pan and Scan, 4:3 for Letter Box, and 16:9
for Wide
• Repeat p ayback (tit e, chapter, and part for
DVD/ track, disc, and part for VCD/CD)
• Se ective P ay (DVD/VCD/CD)
You can se ect and p ay the desired tit e / chapter
of DVD and track of Video CD/CD in STOP
mode.
• 11 anguages OSD (On Screen Disp ay)
function (DVD)
You can se ect and disp ay OSD in 11 anguages.
• Parenta Lock function (DVD)
This function can prevent p ayback of software
that may be unsuitab e for chi dren.
• Mu ti Audio function (DVD)
The audio soundtrack can be heard in up to 8
anguages. In the case of SVCD or VCD, it
depends on the disc. (The number of audio
anguages depends on the software.)
• Mu ti Subtit e function (DVD)
The subtit e can be seem in up to 32 anguages. In
the case of SVCD or VCD, it depends on the disc.
(The number of subtit e anguages depends on
the software.)
• Mu ti Ang e function (DVD)
This function a ows you to choose the viewing
ang e of scenes which were shot from a number of
different ang es. (The number of ang es depends
on the software.)
• Screen zoom function (DVD/VCD)
Downloaded from www.Manualslib.com manuals search engine
Product information
6 7
Read Carefully before Using
Cautions in use of DVD-Video player are described
below.
Please read carefully before using a DVD-Video player.
✔Insta ation p ace and hand ing
• When you p ace this p ayer near other devices,
they may affect poor y together.
• When you p ace DVD-Video p ayer and TV in
the upper and ower sides, it may cause
f ickering of pictures or fai ure (tape is not
ejected).
• When you p ace this p ayer near strong magnetic
materia s, it may affect image or voice poor y or
damage recording.
• Do not spi vo ati e iquids ike insect spray
over the p ayer. Do not eave rubber or p astic
products in contact with the p ayer for a ong
time. They wi cause deterioration or paint pee -
off.
✔Not in use
• When the unit is not in use, be sure to remove
the disc or tape and turn off the power.
• If you do not use the unit for a ong period,
remove batteries in remote contro to prevent
eakage.
• In case you don’t use the unit for a ong time, the
unit may not function proper y in the future.
Turn on and use the p ayer occasiona y.
✔Moving
• Repack the unit as it was origina y packed at the
factory. A ternative y, pack this product with
towe not to be damaged.
• Eject any videotape.
✔C eaning
• Dust off dirt in cabinet or contro pane part
smooth y with a soft c oth.
• For heavy dirt, soak the c oth in a weak detergent
so ution, wring it we and wipe. Use a dry c oth
to wipe it out.
• Fo ow instructions in using chemica c eaners.
• Do not use any type of so vent such as gaso ine
or benzene, as they may cause deterioration or
paint pee -off.
✔Checking
• Video is a high precision device. To obtain a
c ear screen, we recommend regu ar inspection
and maintenance every 1,000 hours of use by
technica engineers.
• For checking, contact your dea er or your nearest
service center.
✔Checking and Rep acement of Antenna
• Antenna is subject to change in its direction or
damage by wind and rain. For c ean screen,
contact and consu t your nearest service center
about checking and rep acement.
✔In recording important screen
• Be sure to record the screen and check whether
recording is performed proper y. We beg you to
understand compensation of recording if
recording is not performed by badness of used
tape or video.
✔Copyright
• Do not use your recordings without permission
of a copyrighter except persona usage.
✔Tape and Disc Hand ing
• Do not use any tape and disc be ow. Damage of
video head or cut/coi ing of tape may cause
fai ure.
- Tape with mo d
- Tape or disc stained with juice or attachments
- Tape having breakage connection
- Disassemb ed tape
- Disc with severe scratch
• Moisture condensation may occur in tape.
Moisture condensation damages the tape. P ease
use the tape after the moisture condensation is
disappeared.
• After use, store tape vertica y in a case to
prevent oose.
• Do not store the fo owing p aces.
- High temperature and humidity
- Subject generation of mo d
- Subject to direct sun ight
- Much dirt or dust
- Near strong magnetic materia s such as speaker
✔Video head c eaning
• Video head c eaning is needed when the
p ayback picture becomes unc ear. Use an
equiva ent high qua ity chemica non-abreasive
head c eaning tape or have them c eaned
professiona y.
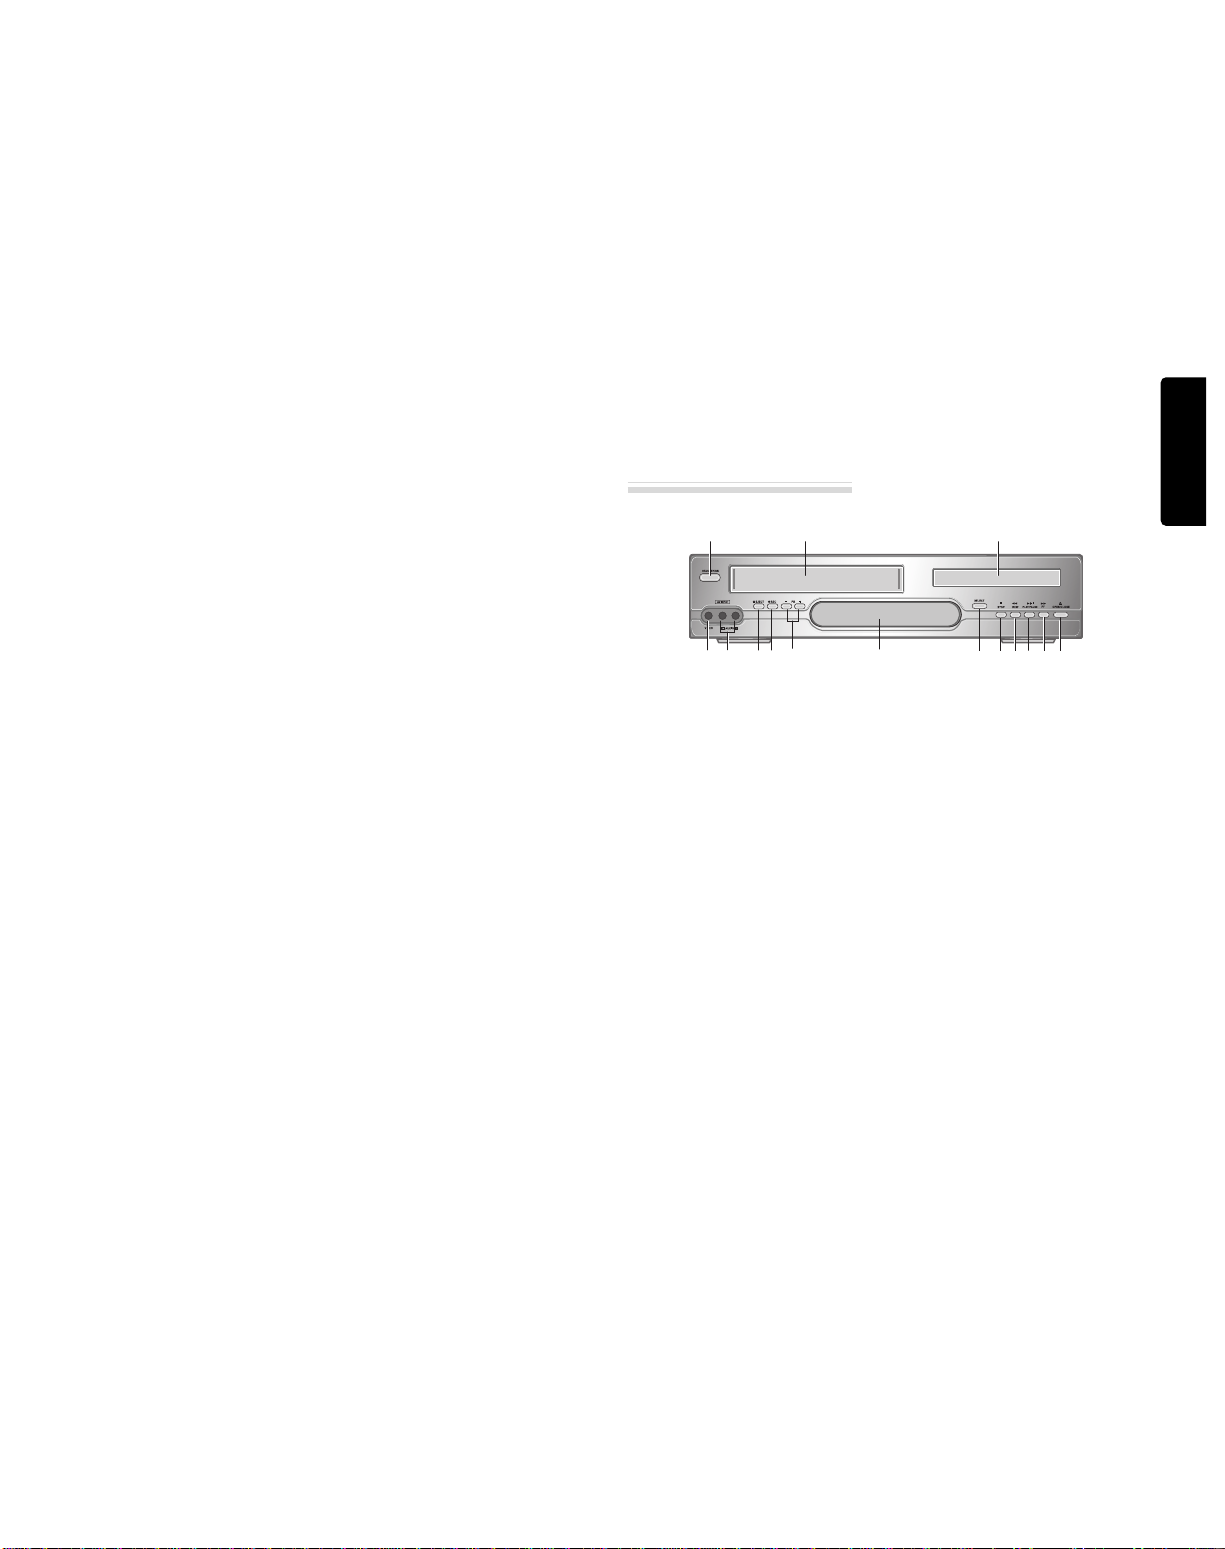
Identification of Controls
!
POWER (STANDBY/ON) button
se to power the device on/off if AC power
supply is connected.
@
P ace to insert videotape
#
Disc tray
$
VIDEO INPUT jack
%
AUDIO INPUT jack
^
EJECT button
&
RECORD button
*
PR -/+ (Programme Down/Up) button
(
Operation Disp ay Window
Display operation of device. For more
information, see “Operation Display Window”
as next page.
)
SELECT button
se to change DVD mode to VCR mode, and
vice versa.
1
STOP button
se to stop playing.
2
REWIND button
se to rewind currently being played videotape
or disc; or to playback back rapidly.
3
P ayback/PAUSE button
Playback videotape or disc.
Press this button to pause a screen.
4
FAST FORWARD button
se to wind currently being played videotape or
disc; or to playback rapidly.
5
OPEN/CLOSE Tray button
Main body (front panel)
!
%& * )123 4 5
^
@#
$(
Downloaded from www.Manualslib.com manuals search engine
Product information
8 9
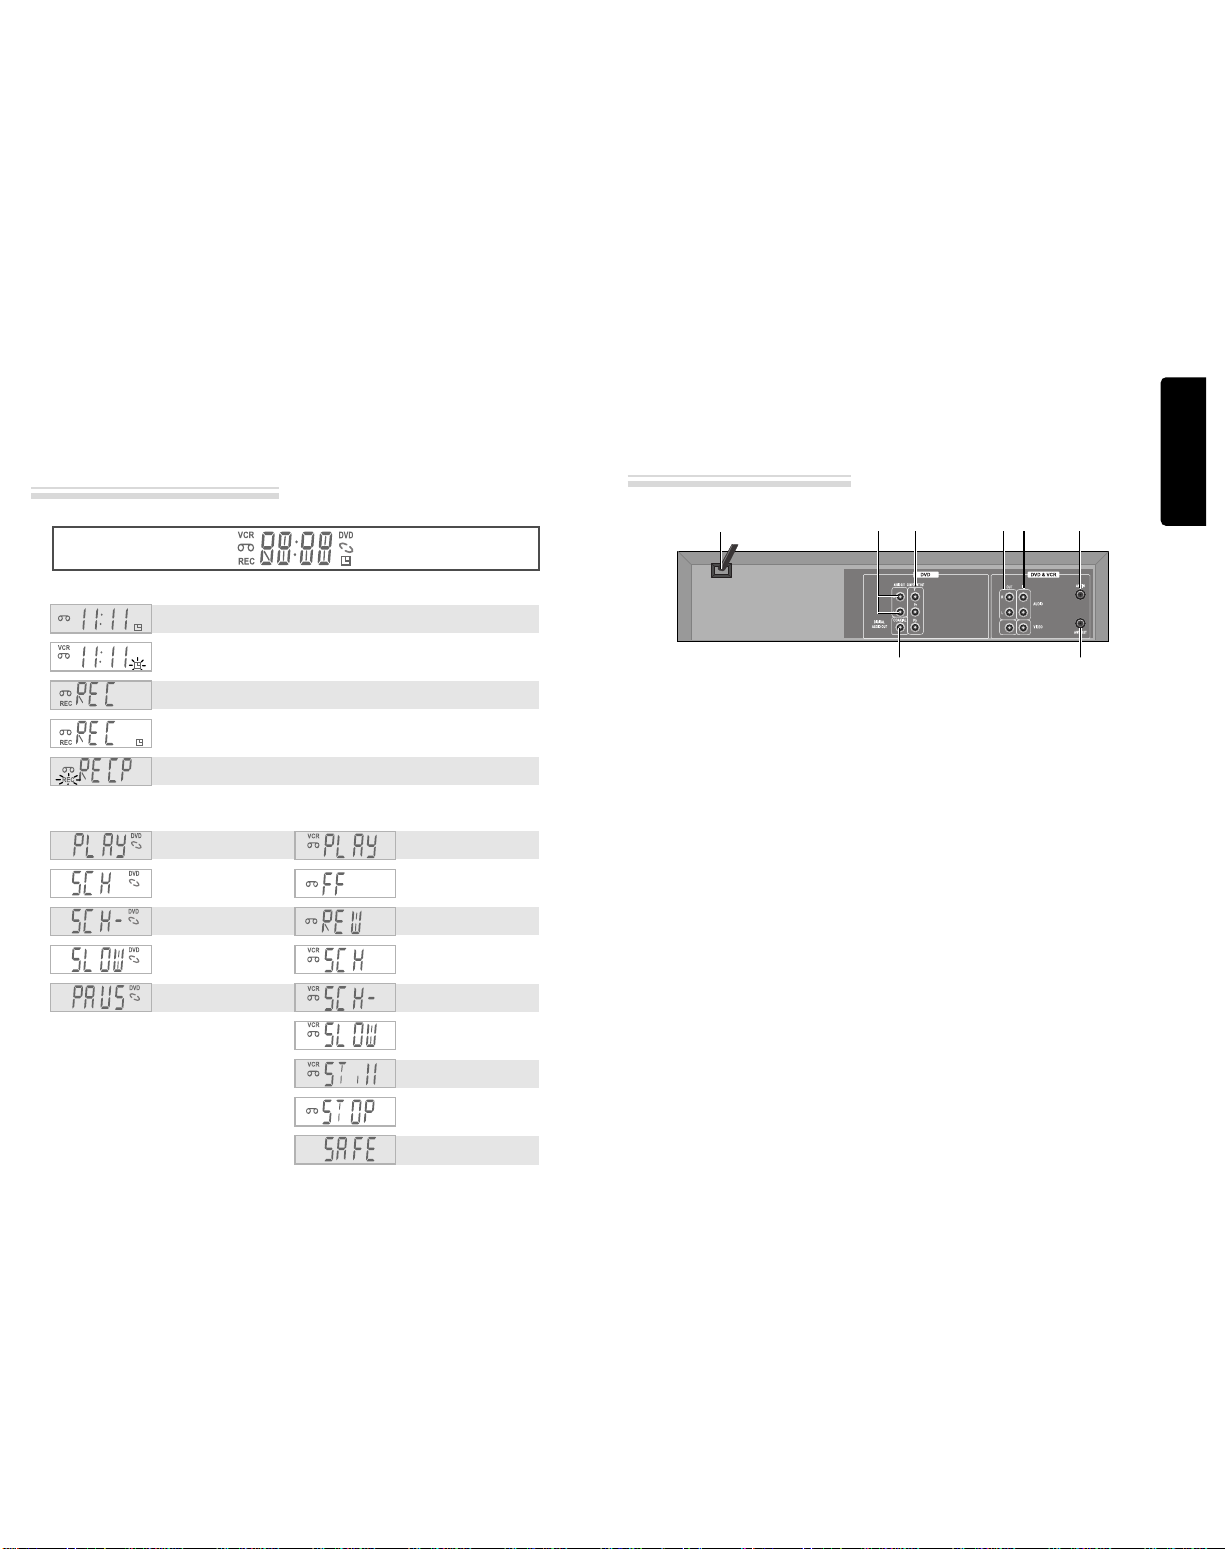
Identification of Controls
Operation Display Window
Identification of Controls
!
POWER CORD
It is a jack for supp ying power to the unit.
Connect to out et in a wa .
@
AUDIO OUTPUT Jack
#
COMPONENT OUTPUT Jack
$
DIGITAL OUTPUT (COAXIAL) Jack
To enjoy sound qua ity of theater eve in
home, connect this jack with amp or unit
embedded with digita audio decoder.
%
A/V OUTPUT Jack
^
A/V INPUT Jack
&
Connection to ANTENNA Cab e
*
Connection to TV
Main body (Rear Panel)
Timer Recording Standby
Timer Recording Error
Recording in Progress
Timer Recording in
Progress
Recording Pause
- RECORDING MODE -
DVD playback
Fast playback
Fast reverse playback
Slow playback
Pause picture
- DVD OPERATION -
VCR playback
Fast forward
Rewinding
Fast playback (CUE)
Fast reverse playback
(REVIEW)
Slow playback
Still picture
Stop
Child Lock
- VCR OPERATION -
!@ # % ^ &
$ *
Downloaded from www.Manualslib.com manuals search engine

Product information
10 11
Identification of Controls
Remote contro 2 Batteries RF cab e Instruction
Manua
• To purchase accessories or not supplied parts additionally, contact your nearest dealer or service center. But,
instruction manual is not sold additionally.
• Operate remote contro within 7m from the unit.
• Do not press 2(two) buttons at the same time.
• Do not ight up sending and receiving part of remote contro .
• Do not keep in the p ace with much dust and humidity.
Instructions in using REMOTE
Accessories
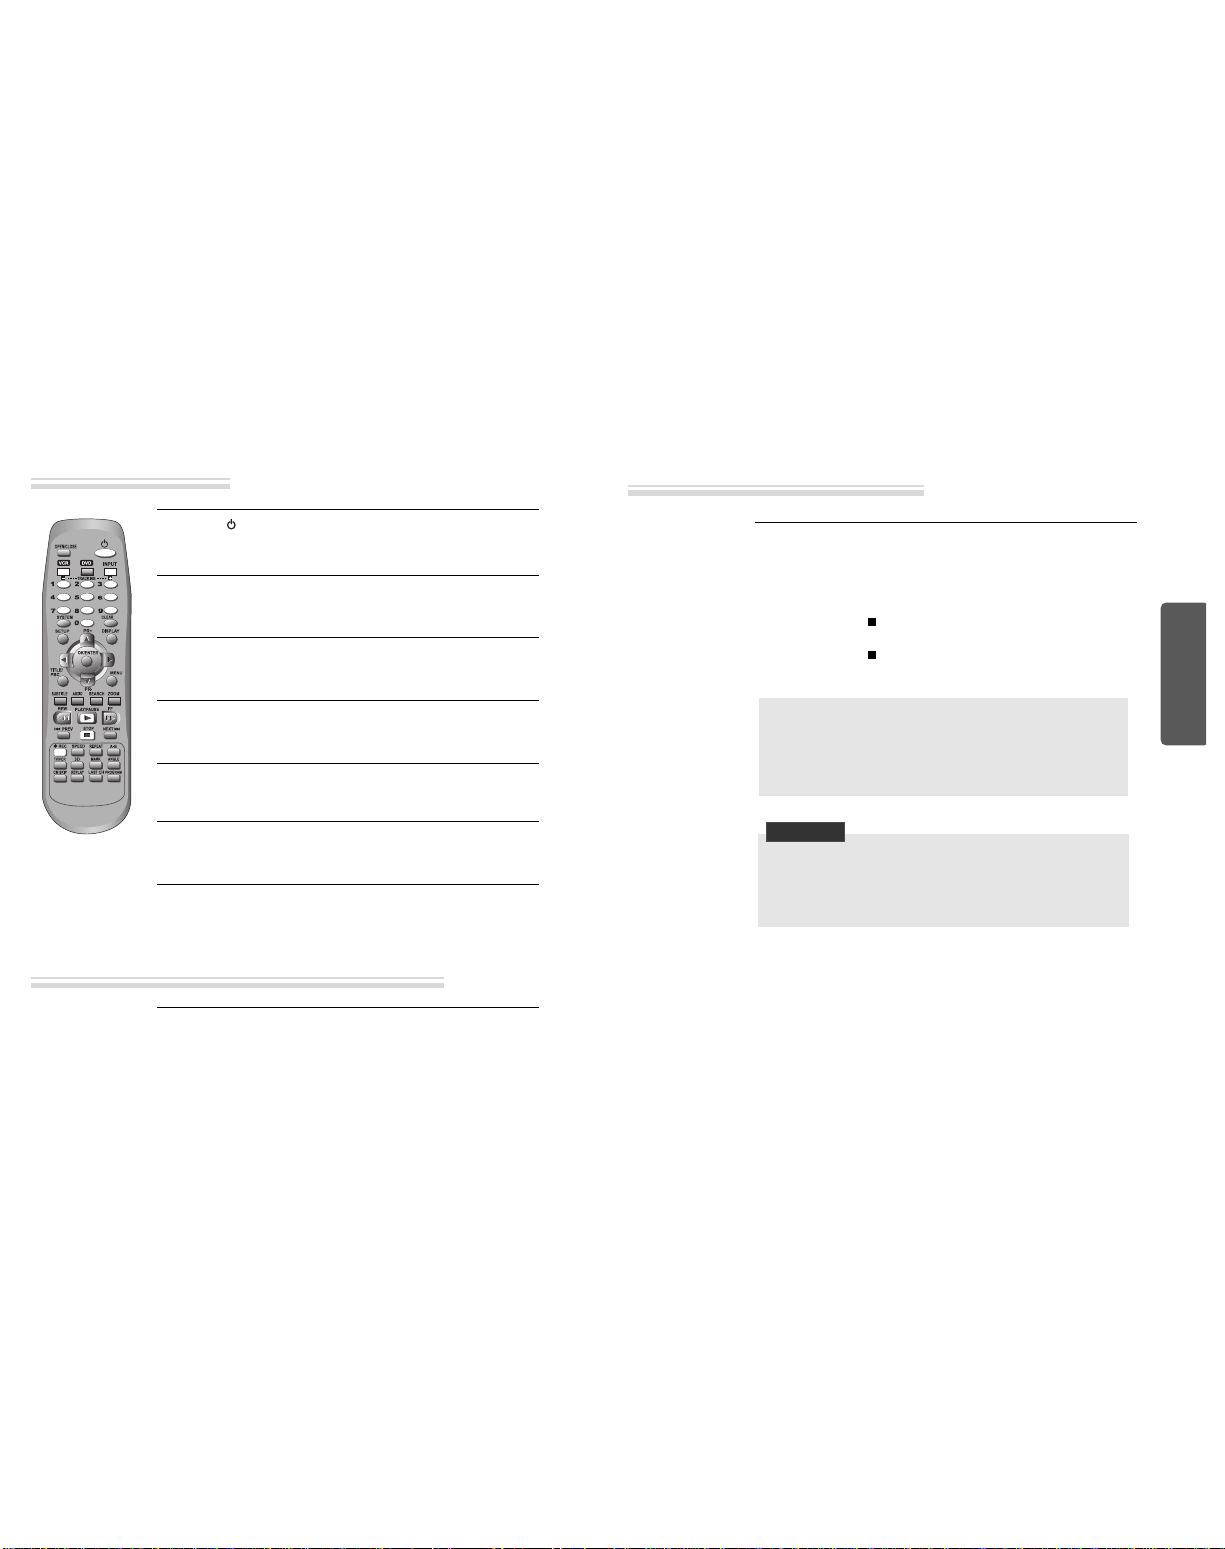
Remote Control
!
#
@
$
%
^
&
(
)
2
4
5
7
9
“
#
‘
=
q
w
eR
r
T
Y
0
+
E
y
W
Q
*
3
1
6
8
!
[DVD] OPEN/CLOSE button, [VCR] EJECT button
@
VCR SELECT button
#
[DVD, VCR] NUMBER button, [VCR] TRACKING -/+ button
$
SYSTEM button
[VCR] `
This button is not avai ab e for this
set
[DVD] Activates Progressive Scan button
%
SETUP button
^
[DVD, VCR] MOVE/SELECT in OSD, [VCR] Channe
Up/Down button
&
[DVD] TITLE /PBC button
*
[DVD] AUDIO LANGUAGE Se ect, [VCR] AUDIO Se ect
button
(
[DVD] SUBTITLE Se ect button
)
REVERSE SEARCH button
1
PLAY/PAUSE button
2
[DVD] PREVIOUS button (move into a previous chapter
or track)
3
[VCR] Record SPEED button
4
[VCR] Record button
5
[VCR] TV/VCR button
6
3D button (This button is not avai ab e for this set)
7
[VCR] CM SKIP
8
[VCR] Rep ay button
9
POWER button
0
DVD SELECT button
“
[VCR] INPUT Se ection button
‘
CLEAR button
+
[DVD, VCR] OSD DISPLAY button
=
OK/ENTER button
Q
[DVD] MENU button
q
[DVD] Chapter/Tit e/Time SEARCH button
W
[DVD] ZOOM button
w
FORWARD SEARCH button
E
STOP button
e
[DVD] NEXT button (Move into a next chapter or track) ,
[VCR] Frame Advance button in pause mode
R
[DVD] REPEAT P ayback button
r
[DVD] REPEAT a defined period from A to B button
T
[DVD] ANGLE button
[DVD] MARK button
Y
[DVD, VCR] PROGRAM button
y
[VCR] LAST CHANNEL button (If you move channe s
using the [PR+/PR-] button, return to the previous TV
channe which was being watched)
Press the power [ ] button of the remote for about
5 seconds. No buttons of front panel can be operated
now and Lock indicator (“ ”) will be
displa ed on window displa . To release child lock,
press an button of the remote control.
POWER ON
Pla er will be POWER ON if an button of the
remote control is pressed.
Child ock !
AAA
AAA
✔
Remote control battery installation
Detach the battery cover on the rear of the
remote contro , and insert two AAA
batteries with the + and - ends a igned
correct y.
Two “AAA”
batteries
(supplied).
Downloaded from www.Manualslib.com manuals search engine

Installation
12 13
Connecting up your player with RF lead
■Before you start, unplug all the equipment from the mains supply.
(Option 1) - How to connect with RF lead
■Before you start, unplug all the equipment from the mains supply.
(Option 2) - How to Connect with Audio/Video jack
Aeria
The type of aerial you should use,
depends on local interference and
how far you are from the
transmitter. You should contact a
local retailer if you have any
questions about your aerial.
In option (1) you need to tune your television to the player so you can see the picture from the player. When
it is on the player generates a signal on HF transmission channel 52, but this might change after tuning in
the stations with 'A TO-SEARCH' . See the 'Check it out' box on page 18. See your television manual for
how to tune in a new channel.
INPUT 1
ANT IN
INPUT 2
REAR PANEL OF DVD-VIDEO
OUTSIDE ANTENNA OR
WALL ANTENNA OUTLET
REAR PANEL OF TV
RF CABLE
¡Remove circular cable (RF cable) (surplus cable) plugged in “ANT.IN” jack in rear panel of TV.
Connect the cable to “ANT” jack in rear panel of DVD-Video.
™Connect TV to DVD-Video. Connect “TV” jack in DVD-Video with “ANT.IN” jack in TV with RF
cable.
INPUT 1
ANT IN
INPUT 2
REAR PANEL OF DVD-VIDEO REAR PANEL OF TV
AUDIO/VIDEO CABLE
£(If there is AUDIO/VIDEO INPUT jack in TV)
Connect VIDEO OUT jack in DVD-Video to VIDEO IN jack in TV, and AUDIO OUT jack in
DVD-Video to AUDIO IN jack in TV with connecting cable of Audio/Video jack.
Select VCR mode by pressing TV/INP T button in TV, you can view more clear screen and sound
than connection with RF cable only.
• VHF: 2 ~13 channels of TV
• HF: 14~69 channels of TV
• CATV: Broadcasting is transmitted with cable from broadcasting station by contract with the station
and consumers. It does not need any antenna.
• In/Out jack in Audio/Video terminal:
- In : A jack used to receive signal required in this unit from other units.
- Out : A jack used to send signal of this unit to other units.
• Connect with Audio/Video terminal, you can enjoy more clear video and audio.
( se INP T button in this REMOTE to select video mode.)
Downloaded from www.Manualslib.com manuals search engine

Installation
14 15
Connecting with Other VCR or Camcorder
How to Connect with Jack in Front Panel
INPUT 1
OUT
VIDEO (L) AUDIO (R)
ANT IN
INPUT 2
REAR PANEL OF DVD-VIDEO REAR PANEL OF TV
RF CABLE
How to Connect with Jack in Rear Panel
INPUT 1
OUT
VIDEO (L) AUDIO (R)
ANT IN
INPUT 2
REAR PANEL OF DVD-VIDEO REAR PANEL OF TV
RF CABLE
¡Connect AUDIO/VIDEO OUT jack in Camcorder(or playback video) to AUDIO/VIDEO IN jack
in rear panel (or front panel) of DVD-Video with connecting cable.
™Connect “ANT. IN” jack in TV to “TV” jack in DVD-Video with RF cable.
£To record contents of camcorder or playback video with DVD-Video, insert recording tape attached
recording tab in DVD-Video.
¡Turn on DVD-Video.
™Press [INP T] button of remote control and adjust DVD-Video to display “AV” or “AV.F” in TV
screen.
£Press [PLAY] button in Camcorder or playback video.
¢Press [REC] button in DVD-Video if you want to record contents of camcorder or playback video.
∞Press [Pause] button in DVD-Video when unnecessary or undesired scene is displayed in
recording.
(Caution) Recording is re eased automatica y after 5 minutes since pressing [PAUSE] button.
Press [REC] button if you want to record again.
¡Turn DVD-Video on.
™Press [INP T] button of remote control and adjust DVD-Video to display “AV” or “AV.F” in TV
screen.
£Insert tape in camcorder and playback it.
How to Copy(Edit) Tape with Other VCR or Camcorder
How to Playback Chapter Photographed by Camcorder
FRONT PANEL OF DVD-VIDEO
REAR PANEL OF PLAYBACK VCR(CAMCORDER)
Downloaded from www.Manualslib.com manuals search engine
Installation
16 17
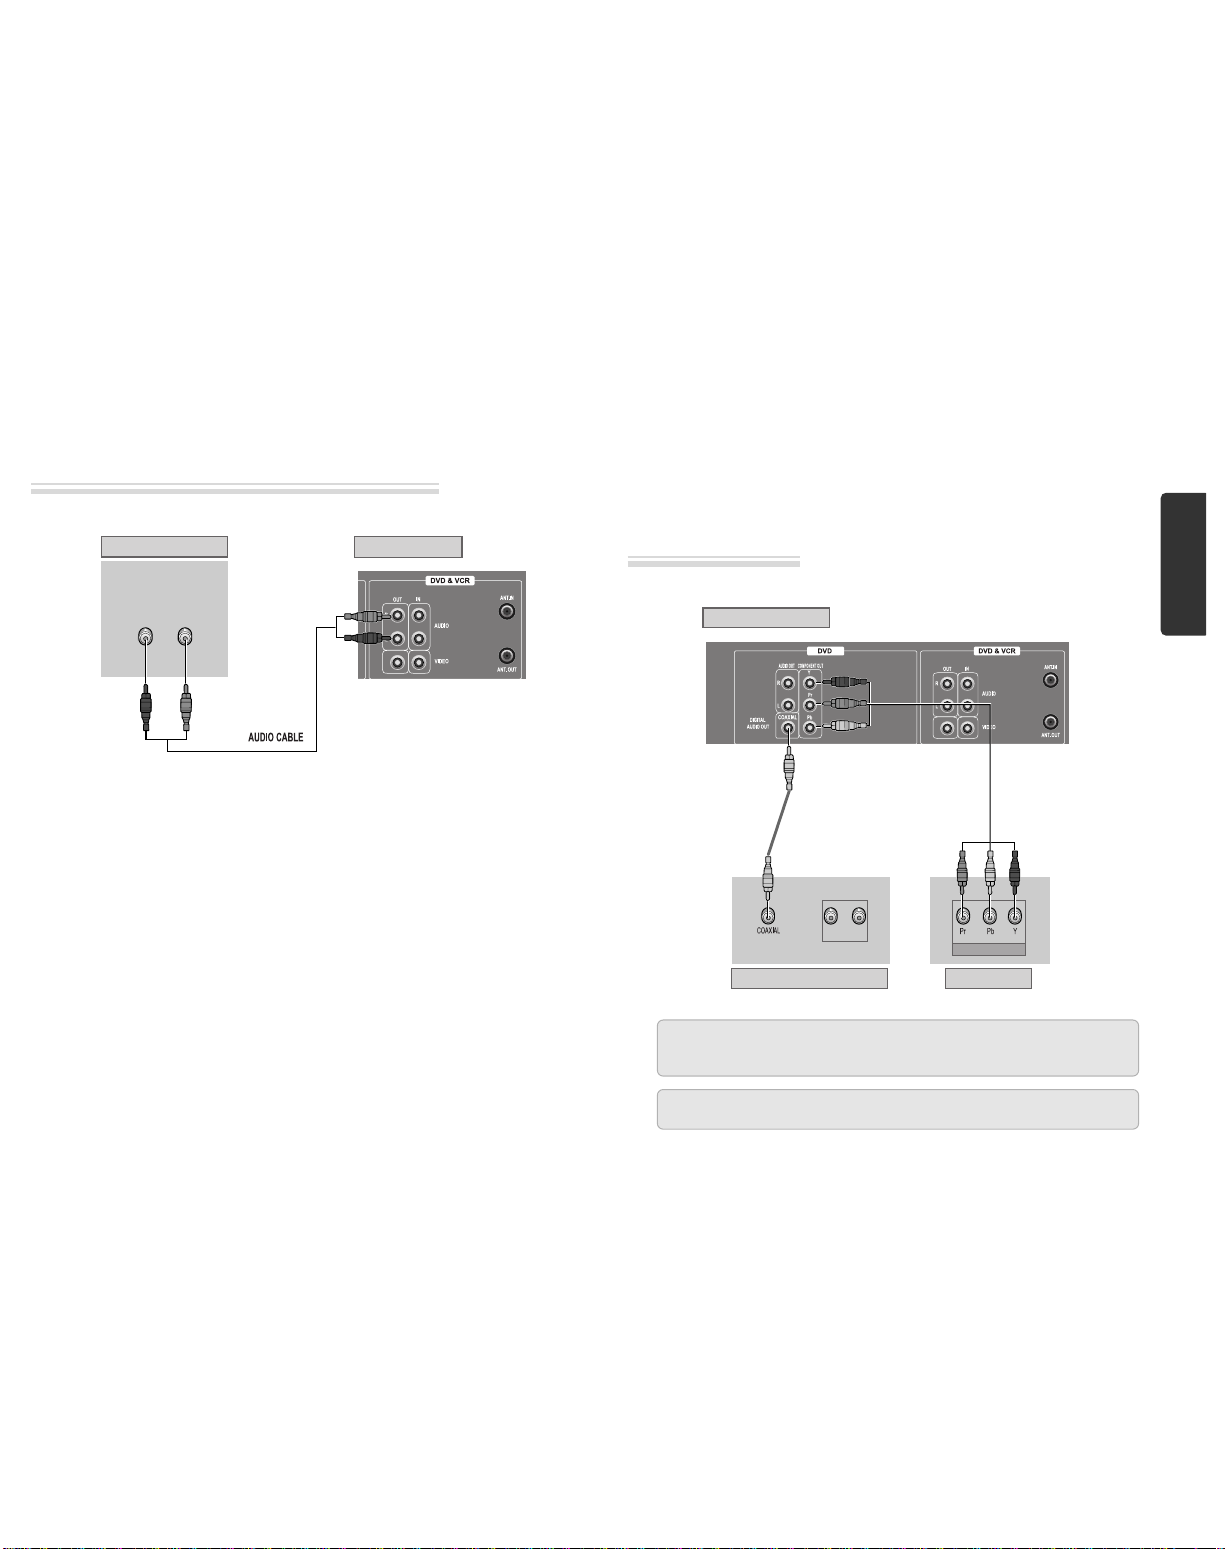
Connecting with Audio
How to Connect with Stereo Unit such as Audio
Connecting to a television with Component
jack and a Dolby Digital Amp
How to Connect
(L) AUDIO (R)
REAR PANEL OF DVD-VIDEOREAR PANEL OF STEREO UNIT
¡Connect Audio jack. Connect AUDIO OUT in rear panel of DVD-Video to IN jack of stereo sound
unit.
™For Input Select in stereo unit, Select “External Input” connected with DVD-Video.
£Playback DVD disc or Hi-Fi videotape, you can hear sound in speaker of stereo unit.
■se in COMPONENT In jack attached in TV or amp supporting Dolby Digital.
(NOT SUPPLIED)
(L) AUDIO IN (R)
REAR PANEL OF DVD-VIDEO
DOLBY DIGITAL DECODER-AMPLIFIER
TV CONNECTIONS
COMPONENT IN
CONNECTING CABLE
Manufactured under license from Dolby Laboratories.
"Dolby" and the double-D symbol are registered trademarks of Dolby Laboratories.
“DTS” and “DTS Digital Out” are trademarks of Digital Theater Systems, Inc.
Downloaded from www.Manualslib.com manuals search engine

Basic Operation
18 19
Initial Installation
Setting up the player
■Switch the TV on.
■You can also start "A TO SEARCH" in the SET P "PR PRESET"
➝
"A TO SEARCH".
■To tune in new stations (manual tuning) and to enter station names see page 27-28.
SETUP:END
PLEASE WAIT...
CH 25
You should see this picture the first time you switch on the TV
and player.
Select the wanted language with PR+ or PR- button. Press OK to
confirm.
2
Press on the remote control and RF52 will be displayed on
the front of your player.
Select a free channel on your TV and manual tune the channel
until the blue screen as shown in step 2 appears. Refer to the TV
manual for more details.
1
OK for "AUTO SEARCH!".
"A TO SEARCH" tunes in all the stations you can receive in your
country.
3
• If you don't see the menu picture below after you press the menu button it may be because you
don't use a RCA cable and you need to tune the television to the player (see 'Connecting your
player through RF lead' on page 12). Normally a new player outputs a signal via the RF lead on
transmission channel 52. Search for the menu picture with the channel tuning function of your TV
set (see its user manual). Some televisions allow you to key in the transmission channel number in
their tuning set-up menu.
• In case there will be interference problems with other transmission channels when the player
outputs a signal on transmission channel 52, the A TO SEARCH process usually recommends an
alternative, as in step 4.
• There is a another way of setting RF output channel, if needed please see 'Connections and
Assembling on page 35'. It does not apply to models which do not generate the RF output signal.
CHECK IT!
Press the [OK] button to confirm the recommended RF channel.
Should you wish the stations to have the same numbers as those
used on the TV, follow the instructions in "Sorting programme
locations" on page 29.
Else ...
exit the basic installation function and enjoy your player.
6
Should you wish the stations to have the same numbers as those
used on the TV, follow the instructions in "Sorting programme
locations" on page 29.
Else ...
Press the SET P button to exit the set-up menu and enjoy your
player
7
PLEASE CHANGE THE TV
CH TO 54.
IMPORTANT!
If other stations are positioned on near the current RF O TP T
CH, the guide message appears automatically.
The player recommends the optimal RF O TP T CH number
automatically.
5
• If the signal from the player is coming into the TV through
the RF lead, the picture will disappear when you press OK
at step 7. You will need to re-tune your television to the new
HF transmission channel.
MANUAL SET
PR01 P-01 PR08 P-08
PR02 P-02 PR09 P-09
PR03 P-03 PR10 P-10
PR04 P-04 PR11 P-11
PR05 P-05 PR12 ----
PR06 P-06 PR13 ----
PR07 P-07 PR14 ----
PR+/-:SELECT
OK:CONFIRM SETUP:END
Up [PR+], down [PR-], OK and 'confirm'
• Notice the on-screen prompts which the video recorder generates to tell you which button to press. In general
the up and down 'navigation' buttons select or highlight something and the OK button confirms it .
• [PR+] and [PR-] are the same buttons as 'up' and 'down'.
• In the DVD section it is usually the left and right buttons which 'select'.
LANGUAGE SET
ENGLISH
PYCCKNZ
ÔESKY
MAGYAR
PR+/-:SELECT
OK:CONFIRM SETUP:END
If the clock has not been set, the clock setting screen will appear.
Please see “Setting time and date” on page 20.
4
CLOCK SET
0-9:SETUP (HOUR)
/➝:CORRECT SETUP:END
TIME - - : - -
DATE - - / - - /- - - -
➝
RF OUTPUT SET
0-9:SELECT(21-69)
OK:CONFIRM SETUP:END
CURRENT CH 52
RECOMMENDED CH 54
Downloaded from www.Manualslib.com manuals search engine

Basic Operation
20 21
OSD ON & OFF
Output Select
Press [DVD] button.
If DVD mode is correctly selected, DVD on the operation display
window is lit. Then, REMOTE button works as DVD function. Press the
[DVD] button, then the mode of DVD-Video Player becomes to the
OPERATION mode.
Press [VCR] button.
If VCR mode is correctly selected, DVD on the operation display
window goes out. Then, REMOTE button works as VCR function. Press
the [VCR] button, then it becomes to the VCR OPERATION mode.
Press [INPUT] button.
When you press [INP T] button, BROADCASTING RECEPTION and EXTERNAL INP T is selected. But, it
is not operated in PLAY, REC and DVD mode.
Call the player’s "SET P".
1
Choose “VCR SET P”.
And press the [OK] button.
2
Select “OSD ON/OFF”.
If you want OSD OFF mode, select it and press [OK] button to
confirm.
Then OSD characters are not displayed in the normal picture.
3
This player is set to “OSD (On Screen Display) ON” mode before shipping and you can change it
to OFF mode.
VCR SETUP
CLOCK SET
LANGUAGE SET
RF OUTPUT SET
OSD ON/OFF
PR+/-:SELECT
OK:CONFIRM SETUP:END
OSD ON/OFF
ON
OFF
PR+/-:SELECT
OK:CONFIRM SETUP:END
SETUP
TIMER PROGRAM
PR PRESET
VCR SETUP
TAPE CONTROL
PR+/-:SELECT
OK:CONFIRM SETUP:END
OSD (On Screen Display) ON & OFF
To Select DVD
To Select VCR
To Select Watch Modes or External Input
■Press [VCR] button on the remote control to change into VCR Mode and follow the procedure
below.
Call the player’s "SET P",
choose "VCR SET P", then "CLOCK SET".
1
Move to the position you want to change and type in the
new values.
Wait a few seconds after typing a one-digit number.
2
Store with [OK] button and exit with [SET P] button.
CLOCK SET
0-9:SETUP (HOUR)
/➝:CORRECT SETUP:END
TIME - - : - -
DATE - - / - - /- - - -
CLOCK SET
0-9:SETUP (HOUR)
/➝:CORRECT
OK:CONFIRM SETUP:END
TIME 06:05
DATE 06/08/2006(SUN)
Setting time and date
Setting time and date
➝
➝
Downloaded from www.Manualslib.com manuals search engine

Basic Operation
2322
DVD Playback
Press [ ] button to power on.
Press [DVD] button of REMOTE to change into DVD mode.
Press [OPEN/CLOSE] button to open the disc tray.
Place a disc firmly on the disc tray, making its label look upward.
Insert the disc and press [OPEN/CLOSE] button to c ose the tray.
The disc tray is closed and after checking the disc’s condition, Playback or Stop
function starts to operate.
1
2
3
To p ayback it, press [PLAY/PAUSE] button.
• In the case of DVD,
DVD menus and titles are displayed on TV screen.
• In the case of S-VCD and VCD2.0
the menus are displayed on TV screen and it is converted into PBC(Playback
Control) mode.
• In the case of CD, VCD1.1 and MP3,
the disc plays.
4
To stop it, press [ ] button.
If you want to stop playback, press [STOP] button.
5
Press [OPEN/CLOSE] button to remove the disc.
6
Various P ayback Methods
■If you want fast forward (or reverse) p ayback, press [√√√√] or [œœœœ ]button in
Playback mode. You can watch fast playing (reverse ) screen.
* This reverse playback can be unavailable for certain DVD.
■If you want s ow p ayback, press [√√√√] in Pause mode.
You can watch the desired screen in the slow forward playback.
■If you want still picture, press [PA SE] button in Playback mode. You can watch
the desired screen in Pause status.
VCR Playback
Press [ ] button to power on.
Press [VCR] button of remote control to change into VCR mode.
Insert the desired tape.
If you want to p ayback it, press [PLAY/PAUSE] button.
When the operational status is flickering or poor, adjust it with [TRACKING
+/-] button.
1
2
3
To stop it, press [ ] button.
If you want to stop playback, press [STOP] button.
4
Press [EJECT] button in the front part or [OPEN/CLOSE] button on remote
contro to remove the tape.
5
If the product, which
has a auto-detector,
detects a contaminated
head(s), it shows the
conditions to notice the
contamination on
screen.
* In case of the notice
on screen, please rub
the heads with a head-
cleaner followed b
“How to use a head-
cleaner”.
Various P ayback Methods
■If you want fast forward (or reverse) p ayback, press [√√√√] or [œœœœ ] button in
Playback mode. You can watch fast playing (rewinding) screen.
* NOTE: You might see no color noise band when you fast forward (or reverse)
playback the tape which is recorded in LP mode.
■If you want Sti picture, press [PLAY/PA SE] in Playback mode. You can watch
the desired screen in pause status.
■If you want s ow-motion p ayback, press [√√√√] button in Pause mode. You can
watch the desired screen in the slow forward playback.
* NOTE: VCR doesn’t have Slow Reverse Pla back function.
■If you want to watch a series of screens one by one, (FRAME ADVANCE) press
[NEXT √√√√❚ ] button in Pause mode. Each time you press this button, the picture
advances one frame.
■If you press [REPLAY] button in p ayback mode, the player quickly rewinds 15
seconds of the tape and plays it.
■If you press [CM SKIP] button in p ayback mode, the player quickly skips 30
seconds of the tape and plays it.
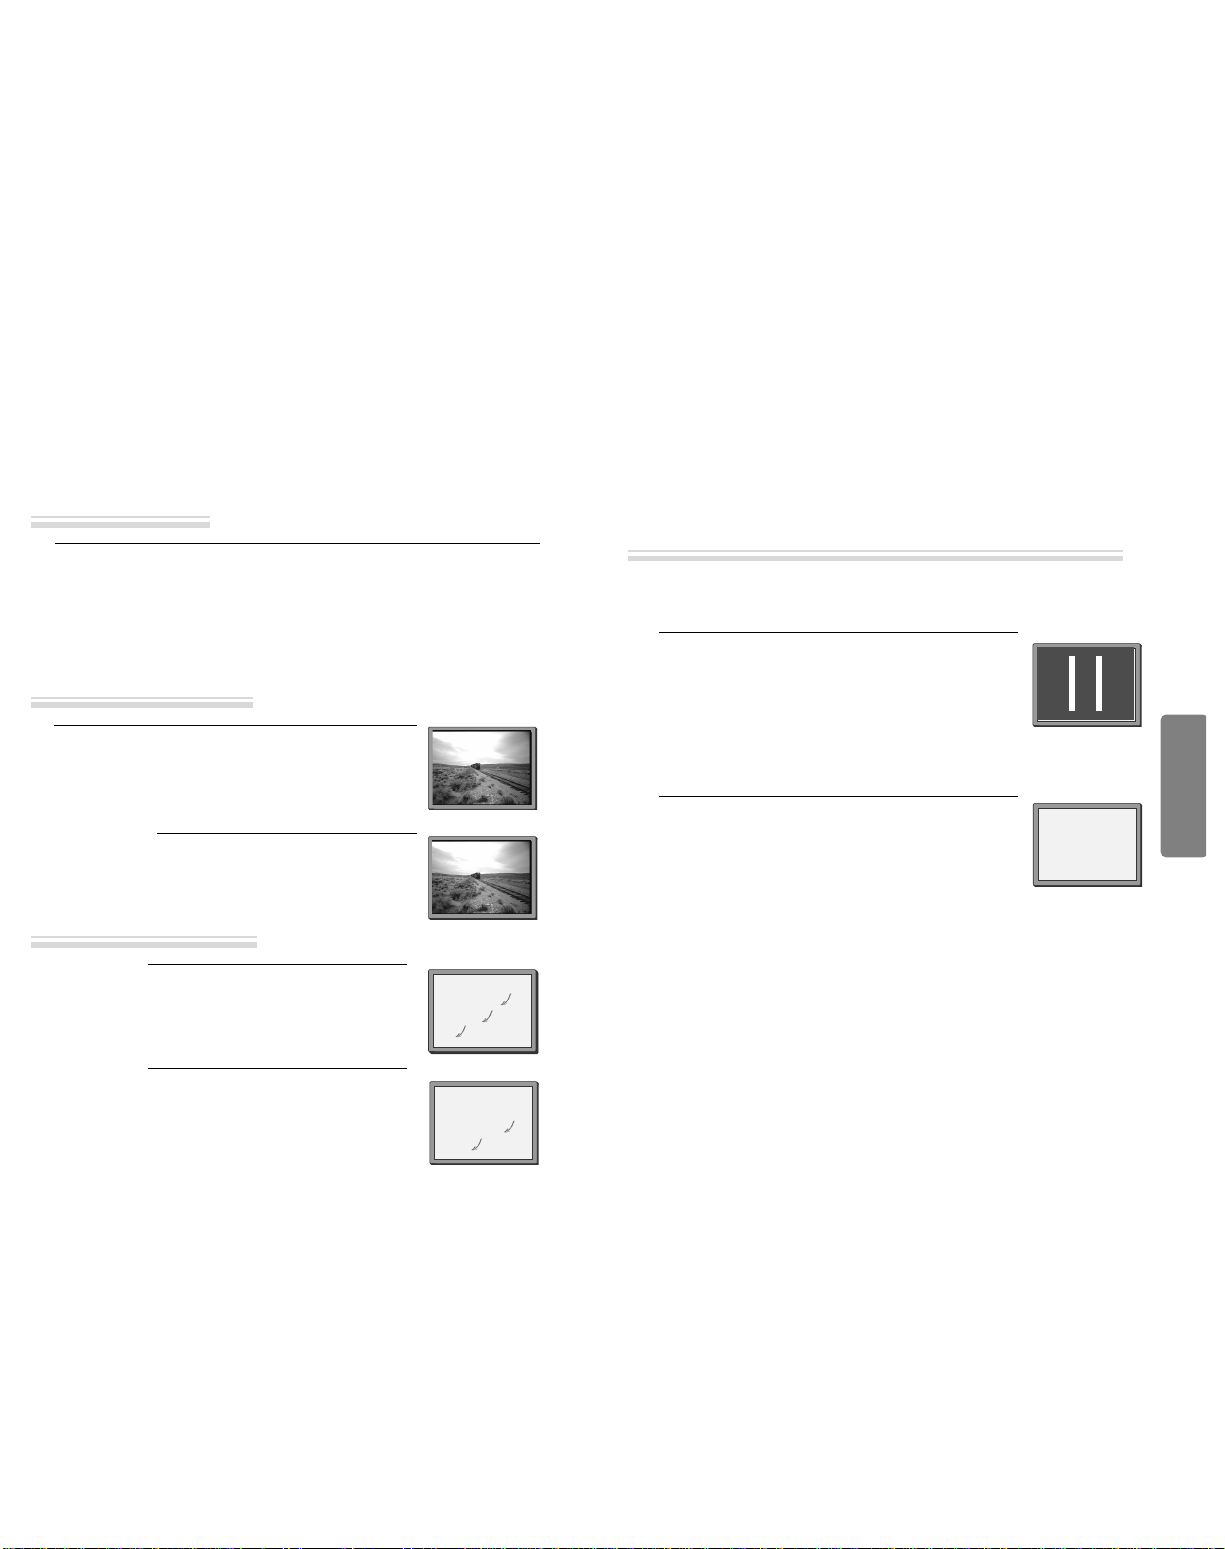
To Adjust Disp ay
This product includes automatic Tracking function and enables users to enjoy clear
picture without an additional operation. Provided that the following problems can be
solved by the manual adjustment, which improves display quality. (During automatic
display adjustment, “Adjusting Display” are displayed on TV screen.)
- If the screen is poor in P ayback mode,
- If noises occur in the upper or ower part of screen in s ow p ayback mode,
-If paused picture vibrates up and down.
se [TRACKING +/-] buttons of remote control to adjust the display suitable for watching.
Downloaded from www.Manualslib.com manuals search engine
Basic Operation
24 25
1
1If you want to p ayback DVD during recording with video, insert a DVD disc.
Place the desired DVD disc on DVD tray, press [DVD] button to convert O TP T
into DVD mode and press [PLAY] button. Then, you can watch DVD.
2
2If you want to watch a TV channe during DVD recording with video, press
[VCR] button to convert OUTPUT into VCR mode and press [PR+/-] button.
Then , you can watch a TV channel.
Press [ ] button to power on.
• Press [VCR] button of remote control to change into VCR mode.
Insert a recordab e tape.
Insert a tape with recording tab.
With [CHANNEL], [NUMBER] and [INPUT] buttons, se ect the desired
broadcasting channe or externa input unit to record.
1
2
3
Se ect the desired speed (SP or LP) with [SPEED] button.
4
Press [REC] button.
Then, it starts recording.
5
If you want to pause recording, press [PAUSE] button.
After pressing [PA SE] button, if the pause status continues for five minutes,
the recording is released automatically.
6
To exit recording, press [STOP] button.
7
Recording
To Record With VCR
To Enjoy a TV Channel or DVD during recording
Recording
“This product incorporates copyright protection technology that is protected by
.S patents and other intellectual property rights.
se of this copyright protection technology must be authorized by Macrovision,
and is intended for home and other limited viewing uses only unless otherwise
authorized by Macrovision. Reverse engineering or disassembly is prohibited.”
1
1Insert the desired DVD disc.
When it is a DVD disc with copy protect function, you can’t copy it.
Insert a recordab e tape.
2
2Press [REC] button during p aying of DVD.
DVD plays and VCR starts recording.
3
3If you press STOP [ ] button in DVD mode, DVD and VCR wi stop at the
same time.
If you press STOP [ ] button in VCR mode, VCR stops to record and DVD
continues to p ay.
To Copy From DVD To Videotape
CHECK IT!
* Only record in interlaced mode
This DVD+VCR can only record in interlaced mode.
To get proper picture, press [SYSTEM] to “INTERLACED” before recording.
Downloaded from www.Manualslib.com manuals search engine

VCR Operation
26 27
Recording
■When your urgent business happens suddenly in watching TV or you want to record the current TV
program for the desired time, follow the procedures below.
1
1First, fo ow the steps 1 to 4 in “Recording With VCR”.
2
2Press [REC] button as much as you want. See the “Recording Times Tab e”
be ow.
Once continuous recording until you press STOP button
Twice recording for 30 mins from current time
3 (times) recording for 1 hour
21 recording for 10 hours
22 returning to the status of Once Press
3
3To stop Recording mode, press [STOP] button more than 5 seconds.
One Touch timer Recording (OTR)
Tuning in New Stations
■The TV and player are switched on.
■To see the picture from your player, press the input or AV (Audio/Video) button on the TV.
To complete the set-up of your video recorder when the
auto set has not stored all of the channels or when you wish
to store a new channel.
Call the video’s "SET P", choose "PR PRESET".
1
Select "MAN AL SET".
2
Choose any unused location number "----" or "P-xx" ...
It's simplest to use the same location number on both the
TV and video.
... and confirm.
3
Set the station you want:
• the programme location number;
• the proper broadcast system for your location (BG/DK)
• the broadcast system you want (Aerial(CH) or
Cable(CC)),
• You can directly enter the real channel number with the
[0 to 9] buttons, or search by pressing [œœ /√√],
• The fine tuning you can adjust,
• Change or create the station name.
4
Once you see the station you want, store it.
Tune in further stations (from step 3 onwards) or exit
tuning mode.
5
PR PRESET
AUTO SEARCH
MANUAL SET
PR ERASE
PR ALIGN
PR+/-:SELECT
OK:CONFIRM SETUP:END
MANUAL SET
PR+/-: UP/DOWN
/➝: SELECT
OK:CONFIRM SETUP:END
MANUAL SET
PR01 P-01 PR08 P-08
PR02 P-02 PR09 P-09
PR03 P-03 PR10 P-10
PR04 P-04 PR11 P-11
PR05 P-05 PR12 ----
PR06 P-06 PR13 ----
PR07 P-07 PR14 ----
PR+/-:SELECT
OK:CONFIRM SETUP:END
PR 04
STANDARD BG
RECEPTION AERIAL
AUTOSEARCH CH
__
FINE TUNING
NAME
___ _
MANUAL SET
PR+/-: UP/DOWN
/➝: SELECT
OK:CONFIRM SETUP:END
PR 03
STANDARD BG
RECEPTION AERIAL
AUTOSEARCH CH 03
FINE TUNING
NAME
___ _
MANUAL SET
PR+/-: UP/DOWN
0/1: CHANGE/CREATE
OK:CONFIRM SETUP:END
PR 03
STANDARD BG
RECEPTION AERIAL
AUTOSEARCH CH
__
FINE TUNING
NAME
___ _
Tuning
➝
➝
Downloaded from www.Manualslib.com manuals search engine

VCR Operation
28 29
■If your player is showing no station name or is showing a station name incorrectly, you can correct
this.
Call this menu (just see the previous page),
if it isn't displayed.
Select NAME position.
Press the [0] button to change the given name.
Or press the [1] button to create the station name.
1
Either select the name from the stored list or you
create the station name and enter a 4-digit name.
Change the letters with the [PR +/–] buttons,
move to the next letter with the [œœ /√√] buttons.
2
Store and exit.
3
MANUAL SET
PR+/-:SELECT
OK:CONFIRM SETUP:END
PR01 P-01 PR08 P-08
PR02 P-02 PR09 P-09
PR03 P-03 PR10 P-10
PR04 P-04 PR11 P-11
PR05 P-05 PR12 ----
PR06 P-06 PR13 ----
PR07 P-07 PR14 ----
MANUAL SET
PR+/-: UP/DOWN
0/1: CHANGE/CREATE
OK:CONFIRM SETUP:END
PR 01
STANDARD BG
RECEPTION AERIAL
AUTOSEARCH CH01
FINE TUNING
NAME
___ _
MANUAL SET
PR+/-: SELECT CHARACTER
/➝: SELECT POSITION
OK:CONFIRM SETUP:END
PR 01
STANDARD BG
RECEPTION AERIAL
AUTOSEARCH CH
__
FINE TUNING
NAME O
___
If the location numbers used for programmes stored in your TV and player are different, you can change them on
the player. To do this, move the stations to the right numbers, until they are arranged the way you want.
1
1Call the player’s "SET P",
choose "PR PRESET" then "PR ALIGN".
2
2Select the programme to swap.
Confirm by pressing OK button.
Move the station to the desired location number.
Confirm by pressing OK button.
1
1Call the player’s "SET P",
choose "PR PRESET" then "PR ERASE".
2
2Select the station (location number) you want to clear.
Review the picture by pressing [œœ ] button.
Clear by pressing OK button.
PR ERASE
PR+/-:SELECT
:PR VIEW
OK:ERASE SETUP:END
PR ALIGN
PR+/-:ALIGN
:PR VIEW
OK:CONFIRM SETUP:END
PR01 P-01 PR08 P-08
PR02 P-02 PR09 P-09
PR03 P-03 PR10 P-10
PR04 P-04 PR11 P-11
PR05 P-05 PR12 ----
PR06 P-06 PR13 ----
PR07 P-07 PR14 ----
PR01 P-01 PR08 P-08
PR02 P-02 PR09 P-09
PR03 P-03 PR10 P-10
PR04 P-04 PR11 P-11
PR05 P-05 PR12 ----
PR06 P-06 PR13 ----
PR07 P-07 PR14 ----
Tuning in New Stations Tuning in New Stations
Station names Sorting programme locations
Clearing programme locations
➝
➝
➝
Downloaded from www.Manualslib.com manuals search engine

VCR Operation
30 31
Timer Recording
■For timer recordings, clock, date, and stations must be set correctly.
■Load a cassette with its safety tab in place and with sufficient free space for the recording.
Press "SET P", choose "TIMER PROGRAM". Press OK.
Choose a free programme location. Press OK.
You will be asked if you want to record "ONCE", "WEEKLY"
or "DAILY".
Please decide and confirm with OK.
1
Type in one after the other:
• The programme location number;
• the time the broadcast starts,
• the time the broadcast ends,
• the day of the broadcast, if it is not today.
• Select LP if you wish to make a very long recording .
2
If you wish to make changes:
Move to the position you want to change using the [
œœ
/
√√]
buttons. Change the setting using the [PR+/- ] or [number]
buttons.
If all setting are ok, press [
œœ
or √√], till you see “OK :
CONFIRM” in the bottom line.
Confirm.
3
Switch your p ayer off.
• Wait a few seconds after typing a one-digit-number.
• If you have made a mistake, move to the position you want to change using the [
œœ
/
√√] buttons
and change the setting.
• If programme timings overlap, the machine will give a warning message. If you don’t adjust
the times, the machine will record the first programme completely then continue with the
second one.
• If there is no sufficient free space for the recording on the cassette the video switches
automatically to “LP” for double recording capacity.
• The recorder will eject cassettes which have the safety tab removed.
• The player will be powered on and record the program at the set time.
• In case the player is powered on after setting of timer recording, the player cannot record in
VCR mode but can record in DVD mode.
PR+/-:SELECT(AV)
0-9 :SETUP(PR)
/➝:CORRECT SETUP:END
PR --
START TIME --:--
END TIME --:--
START DATE --/--
TAPE SPEED SP
TIMER PROGRAM (ONCE)
PR 01
START TIME 18:10
END TIME 20:30
START DATE 12/08(FRI)
TAPE SPEED LP
PR+/-:SELECT(AV)
0-9 : SETUP (PR)
/➝:CORRECT
OK:CONFIRM SETUP:END
TIMER PROGRAM (ONCE)
HOW OFTEN DO YOU WANT
TO RECORD THIS PROGRAM?
PR+/-:SELECT
OK:CONFIRM SETUP:END
ONCE
WEEKLY(ONCE A WEEK)
DAILY(MON-FRI)
DAILY(MON-SAT)
DAILY(MON-SUN)
Normal timer recording
Timer Recording
Call the player’s "SET P",
choose "TIMER PROGRAM".
1
Select the programming to change or erase, press
OK.
If you want to erase this programming press
button [0].
If you wish to make changes, move to the position
you want to change using the [
œœ
or √√] buttons.
Change the settings using the [PR +/–] buttons.
If all settings are correct, press OK to confirm the
changes. Exit the menu with SET P.
2
TIMER PROGRAM
PR START END DATE
03 21:20 22:20 13/08
01 18:10 20:30 12/08
-- -- : -- -- : -- -- / --
-- -- : -- -- : -- -- / --
-- -- : -- -- : -- -- / --
-- -- : -- -- : -- -- / --
-- -- : -- -- : -- -- / --
-- -- : -- -- : -- -- / --
PR+/-:SELECT
OK:CONFIRM SETUP:END
TIMER PROGRAM (ONCE)
PR 03
START TIME 21:20
END TIME 22:20
START DATE 13/08(SAT)
TAPE SPEED SP
0 :ERASE
/➝:CORRECT SETUP:END
Timer Review – changing and erasing
➝
➝
➝
Downloaded from www.Manualslib.com manuals search engine

VCR Operation
32 33
More Functions
■The counter counts in real time from the point you load the cassette. This does not have to be its
beginning! The counter does not count unrecorded parts of the tape.
■If you rewind beyond the zero position, the counter counts in negative values (e.g. – 0:01:15).
Each time you press [DISPLAY] button,
1x: Time and date+current status ➝Time and date
2x: Counter+current status ➝counter
3x: disappear.
• If didn’t wind tape (PLAY, FF, REW,...), it doesn’t appear the tape remain time.
STOP SP PR01 ARD
14:00 07/08 E180 00:48
STEREO ON
When you want the player to show the time remaining from the current player tape position (to find out if
there is sufficient space for a recording, for example).
To ensure the remaining time shown is accurate, select the length of cassette currently loaded by selecting
this function until you reach the correct length.
Call the player’s "SET P",
choose "TAPE CONTROL"
• Remaining time display is
only possible when the
cassette is loaded.
TAPE CONTROL TAPE REMAIN
E-240 01:27
TAPE REMAIN
GO TO ZERO
COUNTER RESET
INDEX+
INDEX-
E-180
E-240
E-300
PR+/-:SELECT
OK:CONFIRM SETUP:END PR+/-:SELECT
OK:CONFIRM SETUP:END
When you record a program, the VCR places an index mark at the start of
the recording.
To search for an index mark
1. Press "SET P", choose "TAPE CONTROL"
2. Choose INDEX + to search forward, or INDEX - to search backward.
The VCR will locate your index mark and will start playing the tape at
the previously set index mark.
TAPE CONTROL
TAPE REMAIN
GO TO ZERO
COUNTER RESET
INDEX+
INDEX-
PR+/- :SELECT
OK:CONFIRM SETUP:END
Clock / counter display
Remaining time and cassette length
Searching for a recorded program via index
Reset the counter.
COUNTER RESET
0:00:00
If you press the [PLAY] button for 5secs during stop or still mode, it goes Auto repeat mode. This player plays
repeatedly the tape from the beginning to end parts.
To release this mode, press the [ ] button or mode operation button. (PLAY, FF, REW or STOP)
Call the player’s "SET P", choose
"VCR SET P", then "LANG AGE SET".
Select your language.
Confirm.
More Functions
Resetting the counter to zero
AUTO REPEAT
SETUP languages
The player will wind to the position 0:00:00 and stop.
REW SP
GO TO ZERO
0:02:13
Accessing counter zero position
Dimmer : Your player dims its display when switched to stand-by mode.
Auto power off : Your player switches to stand-by when no tape is played and no station is received for more
than 5 minutes.
Press the [ ] button for about 5 seconds.
No buttons of front panel can be operated now and LOCK INDICATOR (“ ”)
will be displayed on window display. Keep your remote control in a safe place.
To release child lock, press any button of the remote control.
se only good quality tape cassettes with the VHS logo.
•Keep cassettes away from excessive moisture or dust, magnetic and electrical fields
(loud speakers and computer monitors, for example).
•Always wind the tape to the beginning when you have finished. Store with the full
spool at the bottom and with the cassette in its cover.
You can protect your precious recordings from being wiped by breaking out the safety
tab on the side of the cassette (some cassettes have a slide). Should you wish to re-use
the tape after removing the tab, cover the hole with adhesive tape.
PAL
Cassettes
and
Child lock
LANGUAGE SET
ENGLISH
PYCCKNZ
ÔESKY
MAGYAR
PR+/-:SELECT
OK:CONFIRM SETUP:END
Downloaded from www.Manualslib.com manuals search engine
VCR Operation
34 35
More Functions
■The player machine records the complete sound signal transmitted by the TV station.
■On the mono VCR, you will hear the normal mono sound.
In addition to the normal mono sound track of VHS video recorders, your player machine is equipped with a
high-quality Hi-Fi sound system.
This means you can enjoy
• films with excellent stereo sound
• films of full-length concerts in high quality stereo
• films with impressive Surround Sound using additional Surround equipment
• films with two dialogue modes (dual, bilingual), usually the original sound track and dubbed sound track
• VHS cassettes with Hi-Fi stereo sound and VHS cassette with normal sound
During Stop, the player displays what the current station is broadcasting. When
you switch to another station or the current station changes the sound mode, your
player displays the programme and sound mode on screen (if not, press A DIO).
• “STEREO” = stereo
“BIL I / BIL II ”=bilingual
nothing= monaural sound
During Playback, the player displays what is recorded on
the cassette (if not, press A DIO).
• “Hi-Fi” = stereo/bilingual
nothing = monaural sound
STOP SP PR10 EURO
STEREO ON
PLAY SP Hi-Fi
L+R
During a stereo performance (playback-”Hi-Fi”/ broadcast
- “STEREO”):
Hi-Fi stereo
➝
left audio channel only
➝
right channel
only
➝
the normal mono sound track of a Hi-Fi cassette
• During broadcasting a bilingual performance : Main
language (original sound track)
➝
sub-language
(dubbed)
➝
both main language and sub-language.
• For mono performances , there is no choice available.
PLAY SP Hi-Fi
L+R
HI-Fi
LEFT
Hi-Fi
RIGHT
Hi-Fi
OFF
The Hi-Fi system
What you can listen to
Choice of sound output
Connections and Assembling
■If you are using a RCA cable, select the AV input on the TV to see the picture from the player.
■If you are not using a RCA cable, select the button number on the TV reserved for video input to
see the picture from the player.
If you are not using a RCA cable, your player can transmit pictures and sound to the TV via the coax aerial
cable. Just tune the TV to the player's transmitting channel (factory set to HF CH52). Tune the TV carefully to
ensure the best pictures and sound.
Once you have carried out the steps in "Connecting up your player
with RF lead" , switch on your TV.
Press the [OK/ENTER] button of the player’s remote control longer
than 5 seconds to call the player´s test picture.
Tune the TV to the test picture using the channel pre-set functions of
your TV as described in its manual.
When you have found the test picture, store it under the button
number on your TV for player input.
Press the [OK/ENTER] button of the player’s remote control again
longer than 5 seconds to release the test picture.
1
• If the quality of the test picture transmitted to the TV is poor due
to interference caused by a station transmitting on channel 52,
you can tune the player to a different transmitting channel. Find
a free channel between 21 and 69 on your TV.
Call the player’s "SET P" choose "VCR SET P" then "RF
O TP T SET".
Type in the free channel.
Store and exit.
2
• If the quality of the test picture transmitted to the TV is poor, fine-tuning on the TV
may help (refer to the TV manual).
• Without a RCA cable, you will not get stereo sound from a TV capable of stereo sound.
To the TV via antenna cable (if you are not using a RCA cable)
STOP SP PR10 EURO
BIL
I
BIL
II
BIL
I+II
RF OUTPUT SET
0-9:SELECT (21-69)
/➝:SELECT (BG/DK)
OK:CONFIRM SETUP:END
CH 52
SYSTEM BG DK
➝
Downloaded from www.Manualslib.com manuals search engine

36 37
Connections and Assembling
Should you wish to assemble your own film, from camcorder footage for example, use the assembly technique
for smooth edit points:
• The symbol is lit in VCR mode and goes out in TV
mode.
• This symbol means the cassette is in.
• This symbol means a timer recording is setting.
For the best results, the source cassette from which
you are recording should already be playing back
when you start recording.
Assembling
To move to next chapter (or track), press [
√√
❚
NEXT] button.
The current chapter (or track) moves to the next chapter (or track).
Press [
❚
œœ
PREV] button.
The current scene moves to the previous chapter (or track) or first scene of current
chapter (or track).
Press the [TITLE/PBC] or [MENU] button.
A list of the titles on the disc is displayed.
* For the case of VCD disc, menu screen will
appear only when the disc has PBC function
and PBC ON is activated.
1
Press the [ENTER] button or [PLAY] button
after pressing the [
œ √…†
] button to se ect
the desired tit e.
For the case of VCD disc, press the [Number]
button.
The selected title now starts playing.
2
■
Some movie discs may contain multiple titles. If the disc has a movie title menu recorded on it, the [TITLE/PBC] or
[MEN ] button can be used to select the movie title. Details of operation may differ depending on the disc used.
* Selecting a title ma not be available on certain DVD discs.
Playing a desired scene
To skip scenes in a disc
Directly moving to a desired title
DVD Operation
Downloaded from www.Manualslib.com manuals search engine
Other manuals for NDVD1073VR
2
Table of contents
Other Nikai DVD VCR Combo manuals


