NIKONOS II User manual

1
NIKONOS II
INSTRUCTION MANUAL

2
The Nikonos II amphibious camera is buillt to go
with you wherever your imagination leads you.
Underwater, it performs at depths down to 160
feet (50m) without a bulky accessory housing. On
land, it takes rain, snow, dust, dirt and salt water
in stride. If you can take it, so can the Nilonos.
Despite its rugged construction, the Nikonos II is
as sleek and compact as other 35mm cameras.
Precision engineering and superior Nikkor optics
deliver perfect images in places where other
cameras wouldnÕt dare to venture. And when
youÕve finished your shooting session, just rinse
the Nikonos in tap water and itÕs ready for the
next assignment. To get the best results from
your camera, read these instructions carefully
and pratice using the controls before you load
any film in the camera. Keep this booklet handy
for ready reference until you have mastered its
basics. The few minutes you spend familiarizing
yourself with the camera will increase your
picture-taking pleasure as you explore a whole
new world of photography.
Agood rinse after one
assignment and itÕs
ready for the next.
FOREWARD

CONTENTS
Camera Design 4
Loading the Camera 8
Opening the Camera
Loading
Closing the Camera
Film Advancement and Shutter Release 14
Film-Advance Lever
Frame Counter
Safety Lock
How to Hold the Camera 16
Viewfinder 17
Underwater ViewEinder
Focusing 18
Exposure Control 19
Setting the Shutter Speed
Setting the Aperture
Depth of Field
Depth-of-Field Indicator
Flash Synchronization 24
Unloading 25
Tips for Underwater Picture-Taking 26
Interchangeable Lenses 29
Accessories 30
Features/Specifications 32
3

4
CAMERA DESIGN
O-Ring Gasket
All joints of the Nikonos are sealed by means of O-ring gaskets. These
synthetic rubber rings insure absolute watertiahtness and can withstand
water pressure at depths down to 160 feet (50m)Ñ as deep as you can dive
with Scuba equipment. As pressure increases, the seal becomes even
tighter.
Occasional lubrication improves the life of the gaskets and makes
attaching and removing the lens easier. Make it a practice to lubricate
the camera before each underwater picture-taking expedition using the
lubricant supplied with the camera for this purpose.
The gaskets should be protected froÕ cuts or scratches caused by sharp
objects or grains of sand. Whenever they appear the least bit worn, they
should be replaced. Spare gaskets for the base of the lens and around the
top edge of the interior body are furnished with the Nikonos.
Note: Replacement of all gaskets except the
ones on the lens and around the top edge
of the interior body should be left to an
authorized serviceman Send the camera
to an authorized dealer or distributor, or
directly to the manufacturer.
The Nikonos II consists of three components which fit together snugly to make this a selfcontained,
watertight camera without any need for a separate bulky underwater housing.
Outer housing: Die-cast from thick aluminum alloy and finished in a knurled surface thatÕs easy to
grip, even with wet hands or gloves.
Interior body: Contains the shutter, film advance lever and other moving parts. Removable for film
loading.
Lens: When mounted in place, the lens locks the entire camera assembly together, safe from
accidentally jarring loose.
Note: The Nikonos is watertight only when completely assembled. The components are susceptible
to damage individually. If the interior body or lens is accidentally dropped into salt water or muddy
water, rinse it immediately in fresh water and take it to an authorized serviceman as soon as possible.
5
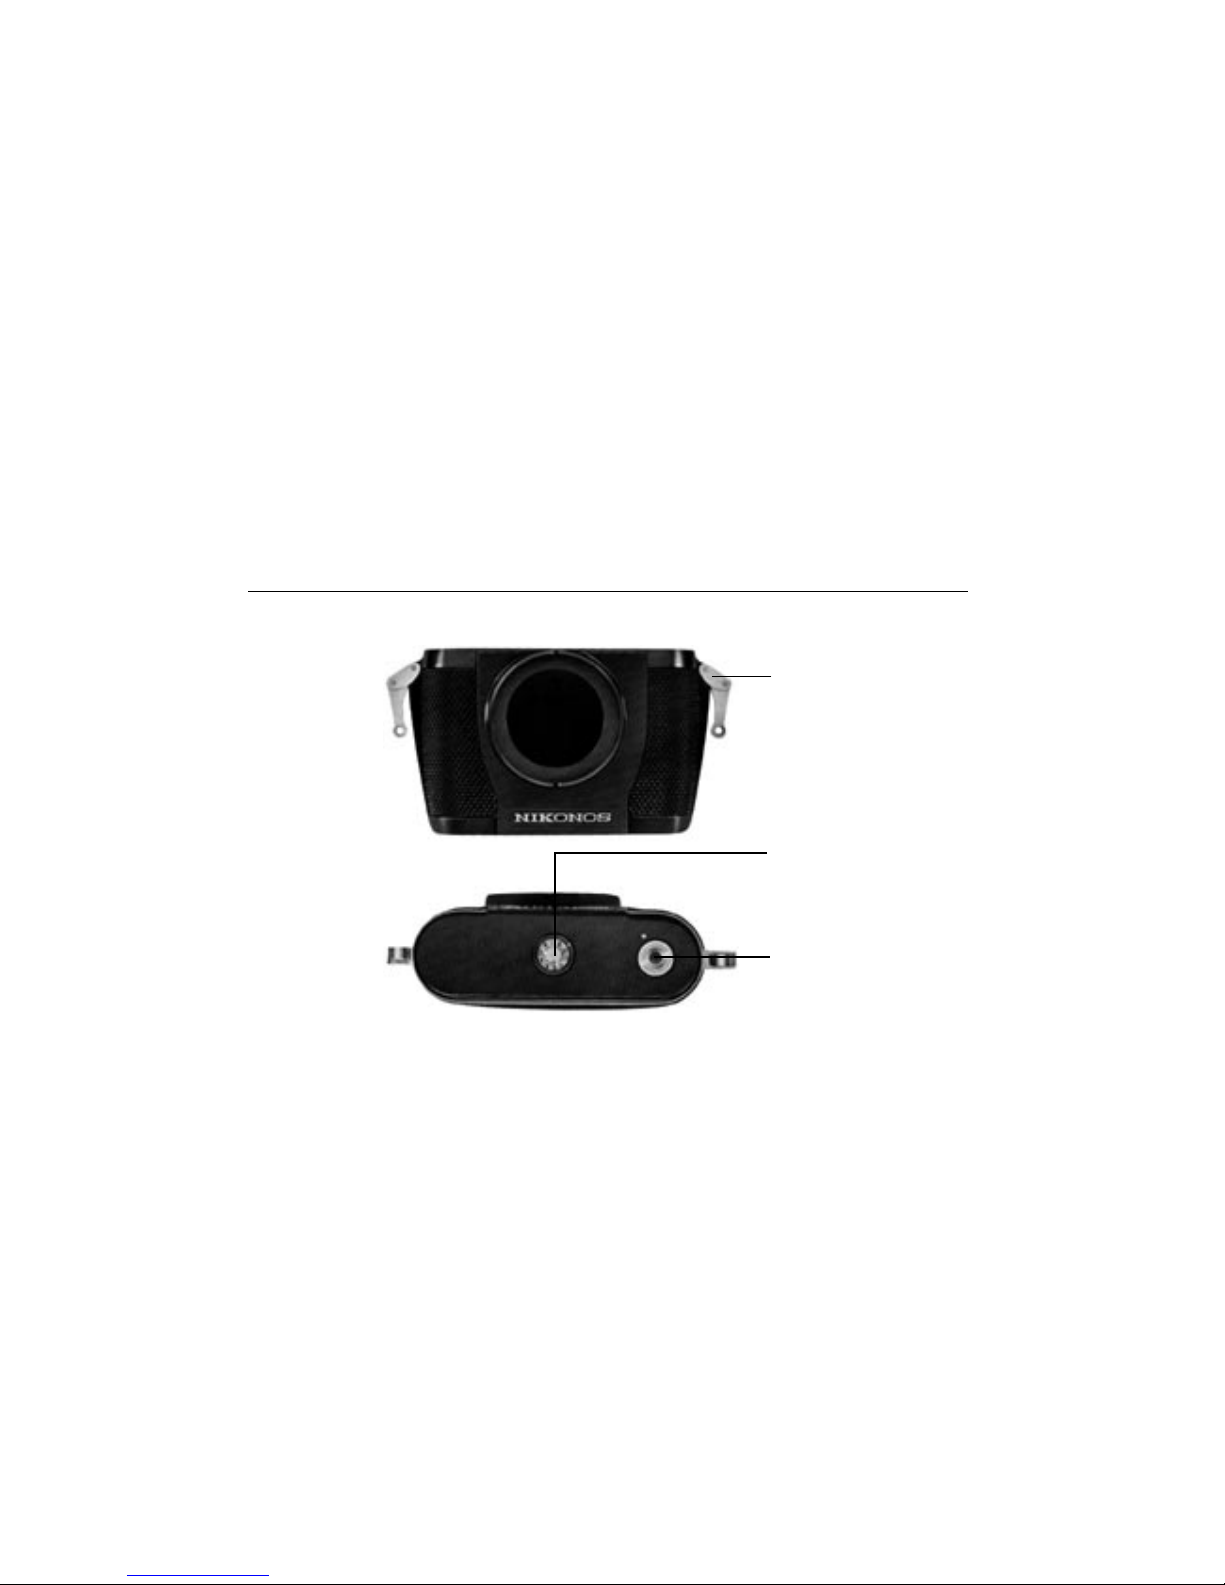
CAMERA DESIGN
Outer housing
Strap-Attachment Levers
Also used to pry open.
Frame Counter
Indicates the number of frames
exposed.
Tripod Socket
Removeable for flash
contacts.

6
Interior body Safety Lock
Locks the film advance lever to
guard againts accidental
exposure.
Safety Lock
Locks the film advance lever to
guard againts accidental
exposure.
Shutter-Speed Dial
Click-stopped settings from 1/30
to 1/500 second plus ÒBÓ. ÒRÓ is
rewind setting.
Spool
Rewind Shank
Film Cartridge Catch
Film-Pressure Plate
Hinged at the top.
Viewfinder
For use with the 35mm
lens on land. Parallax
indicators for close-up
shooting.
Accessory Shoe
Accepts sports-type
viewfinder or flash
unit (on land only)
Rewind Crank and
Rewind Knob
Shutter Curtain

7
Lens
The Nikonos 1I comes fitted with a
W-Nikkor 35mm f/2.5 lens as standard
equipment The lens is sealed behind a
watertight glass plate that also covers the
aperture and distance scales. Large,
easy-togrip knobs on either side of the
lens mount control focus and diaphragm
settings. The front lens mount is threaded
to accept lens hoods, close-up lens
attachment and 52mm screw-in filters.
A UW-Nikkor 15mm f/2.8 28mm f/3.5 (both
for underwater use only) and Nikkor
80mm f/4 are also available (see p. 29,
30). Lenses for the Nikonos 11 are
designed so that their lens mounts move
independently of the inner mechanisms.
This helps to absorb the effect of water
pressure when the lenses are used
underwater.
Distance Scale
Graduated in feet and meters.
Depth-of-Feild Indicator
Red pointers show
the near and far limits of
sharpness at preselected
aperture.
Aperture-Control Knob
Controls diaphragm
aperture settings and
automatically operates the
depth-of-feild indicator.
Aperture Scale
F/stops line up with
triangular index mark.
Focusing Knob
Turn to set the measured
or estimated camera-to-
subject distance.
Positioning Pin
Fits groove on the
bayonet mount to hold
the lens in place.
Groove

8
LOADING THE CAMERA
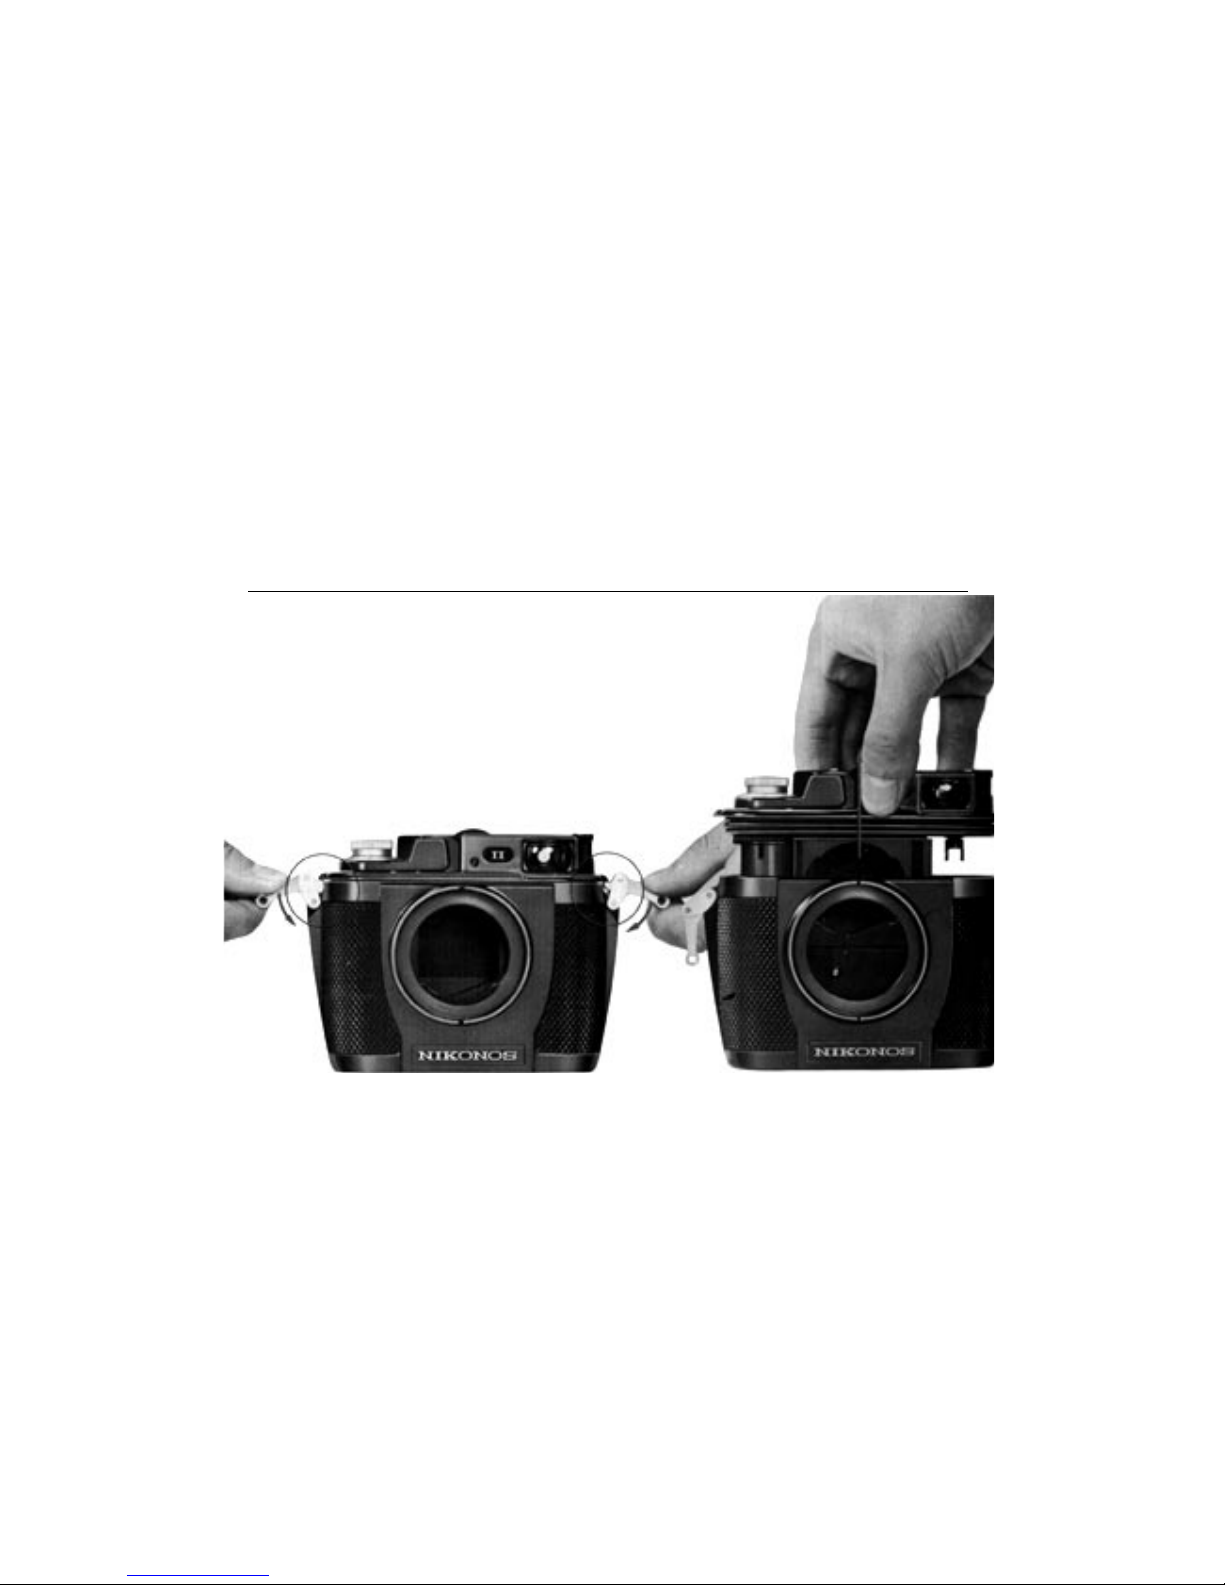
Opening the Camera
The lens in its bayonet mount locks the entire camera together, so it must be
removed first in order to open the camera. Grasp the lens mount and pull the
lens forward slightly until the positioning pins on the lens mount slide out of
the grooves on the bayonet mount. Then rotate the lens in either direction until
the focusing knob or aperture knob points straight up. Pull once more and the
lens will slip free of the bayonet mount. Now you can open the camera by
prying up the interior body with the strap-attachment levers on both sides of
the outer housing. The interior body will come loose and can be lifted out.
9
Caution: After using the camera in salt
water, or if it is dirty, rinse it thoroughly in
fresh running water to remove any dirt or
salt water residue and dry with a soft
cloth before opening. Never dry the
camera near heat.

10
LOADING THE CAMERA
Loading
Lift up the film pressure plate. Position a film cartridge
between the film cartridRe catch and the shank of the rewind
knob. Turn the film take-up spool to the right so the slot faces
out. Slip the end of the film leader under the hinged pressure
plate and insert it into the slot. Advance the film one frame,
making sure that the tooth in the slot catches one of the
perforations along the edge of the film.

11
Closing the Camera
The procedure for closing the Nikonos is just the reverse
of that for opening the camera. Hold down the film
pressure plate and slide the interior body into the outer
housing. Press down firmly until the top edge of the
interior body fits tightly against the top edge of the outer
housing.
Caution: Be careful not to exert excessive pressure
on the shutter-speed dial when inserting the interior
body into the housing.
Place the lens in the bayonet mount with the
focusing knob pointing towards the top. Push
the lens inward and twist it clockwise until the
distance scale comes to the top and the
positioning pins click into the grooves.
Note: The lens can also be mounted upside down for
greater convenience in reading the distance scale when
the camera is carried on a neck strap. If the lens cannot
be mounted smoothly luhricate the O-ring gasket around
the lens base.

12
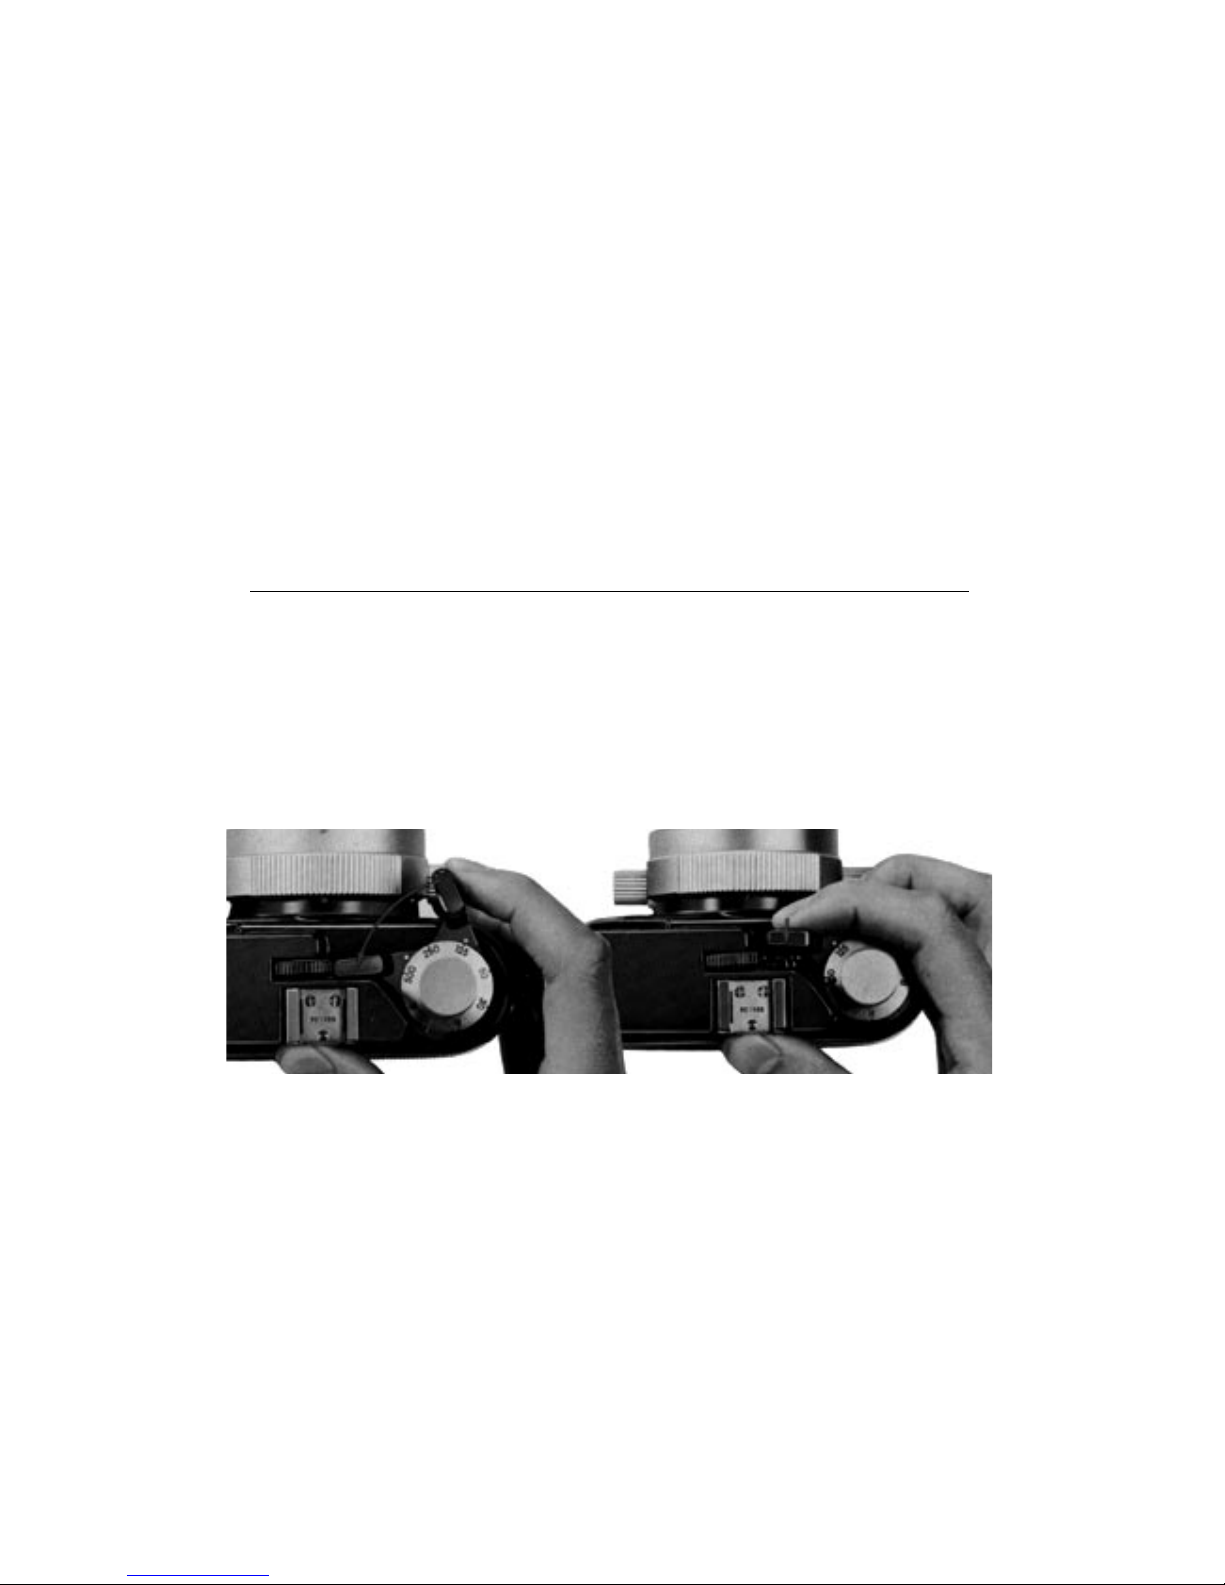
Set the shutter-speed dial for any speed except ÒRÓ. Fold out
the rewind crank and pull up the rewind knob as far as it will go.
Continue to pull up on the rewind crank while turning it back
and forth until the rewind knob locks in place and cannot be
pushed down. This meshes the rewind knob with its shank.
Now turn the rewind crank gently in the direction of the arrow
until you feel a slight tension which indicates that there is no
slack in the film cartridge. Be careful not to exert too
much pressure on the crank.
LOADING THE CAMERA

13
Loading exposes a portion of film. To dispose of this exposed
portion, take two blank exposures. Squeeze the filmadvance
lever slightly so that it springs forward then push down the
safety lock and squeeze the film advance lever twice (see also
p.14) to dispose of the exposed portion of the film. While
advancing the film check to see that the rewind crank turns in
the direction opposite the arrow. This will indicate that the film
has been loaded correctly and is being advanced.
Turn the rewind knob in the direction opposite the arrow and it
will drop back to its recessed position. When not in use, the
rewind crank should be folded flat with its end pointing towards
the front of the camera.
Note: If the film-advance lever is squeezed while the safety lock is off, the
shutter will be released and the frame counter wiH advance one frame. The
frame counter will not rest at 1 when the first exposure is made.
14
Film-Advance Lever
This single lever on top of the camera winds the film cocks
and releases the shutter and operates the frame counter all in
two simple operations. To wind the film squeeze the lever until
it stops with a click. This also cocks the shutter and operates
the frame counter. When you are ready to shoot, squeeze
the lever again and it releases the shutter and operates the
frame counter. After each exposure the lever swings out
automatically, ready to be wound for the next frame.
FILM ADVANCEMENT AND SHUTTER RELEASE

15
Frame Counter
The frame counter located on the bottom of the camera shows how many frames have
been exposed. A black dot advances half a mark for each frame up to 36 exposures.
The counter stops just past the 36 mark and resets itself to zero when the camera is
opened.
Safety Lock
Between pictures, push down the safety lock on top of the camera to guard against
accidental exposures. The safety lock should also be pressed down whenever the
camera is stored in the leather case to prevent the filmadvance lever from swinging out.

16
Camera shake is one of the commonest causes of unsharp
pictures, especially at slow shutter speeds. Learn to hold the
camera correctly and practice steady shutter squeezing, The
photos show the best way to hold the Nikonos for sharp
picture-taking.
Grasp the camera firmly so that the end of the baseplate rests
comfortably in the palm of the left hand. Wrap your right hand
around the camera with the right index finger resting on the
film advance lever. Position the camera solidly so the eye
looks through the center of the viewfinder and steady it with
both hands held against the head. The camera may be
switched from a horizontal to vertical format in this position.
Underwater, weightlessness makes steady camera holding
even more difficult than on land. Concentrate on steadiness
even at fast shutter speeds.
HOW TO HOLD THE CAMERA

17
VIEWFINDER
The Nikonos 1I has a built-in bright-line viewfinder on top
of the camera for use on land. The viewfinder image
corresponds to the picture area of the 35mm lens. At a
camera-to-subject distance as close as 2.75 feet (0.8m),
however, a slight parallax is evident. In this case, compose
with the aid of the parallax indicator lines in the viewfinder to
see what the final picture will include.
Note: An accessory viewfinder for use with the 80mm lens on land is
available separately.
Underwater Viewfinder
Asports-type viewfinder slides into the accessory shoe on top
of the camera for underwater photography. Individual
viewfinders are available for each of the interchangeable
lenses. They indicate the edges of the picture area and have
crossbars to show the center of the frame. Underwater
viewfinders are also useful on land for following fast-moving
action. For details refer to the instructions supplied with the
underwater viewfinders.
Picture seen in viewfinder
Picture to appear on film

18
FOCUSING
Since the Nikonos II has no optical rangefinder,
camerato-subject distances are normally estimated. The
depthof-field indicator on the distance scale shows just how
much error you can tolerate and still get sharp
pictures Since the 35mm lens has considerable depth of field,
a reasonable estimate will usually result in sharp pictures.
Remember too that as the camera-to-subject distance
increases (and becomes harder to estimate), the depth of
field also increases, thus lowering the chance of error. (See
also ÒDepth of Field,Ó p. 22).
Turn the focusing knob on the right side of the lens mount until
the estimated distance appears opposite the white triangular
index mark. As long as the subject remains within the limits of
sharpness shown by the red pointers on the distance scale, it
is in sharp focus. Depth of field decreases sharply at
distances closer than 5 feet (1.5m), so it is good practice to
stop down the lens to the smallest possible aperture or else
measure the actual distance when shooting close-ups. The
closest distance at which the 35mm lens can be focused is
2.75 feet (0.8m).

19
EXPOSURE CONTROL
The amount of exposure the film receives is determined by a
combination of shutter speed and aperture. The larger the lens
aperture, the more exposure. Likewise, the slower the shutter speed
the greater the exposure. Aperture is expressed in f/numbers with
larger numbers representing smaller apertures and vice versa. For
example, f/8 gives twice as much exposure as f/11.
Camera aperture and shutter-speed controls are calculated so that an
increase of one f/number compensates for a onestep decrease in
shutter speed. For example, 1/250 second at f/4 is the same as 1/60
second at f/8. The table below shows how aperture and shutter speed
are interrelated. All the combinations give the same exposure.
The choice of aperture and shutter-speed combination depends on
the desired results. Use a fast shutter speed to freeze move~ent or a
slow one to create deliberate blur. Small apertures give greater depth
of field, large ones make the main subject stand out in sharp focus
and throw unimportant background out of focus.
Aperture f/2.8 f/4 f/5.6 f/8 f/11
Shutter Speed 1/500 1/250 1/125 1/60 1/30
(Second)

20
EXPOSURE CONTROL
Setting the Shutter Speed
The f1gures on the shutter-speed dial stand for fractions of a
second. For example, 125 represents 1/125 second. Turn the
shutter speed dial until the desired speed appears opposite the
white indicator dot on the film advance lever. You can change
shutter speeds either before or after the shutter is wound.
Click-stopped settings for speeds from 1/30 to 1/500 second plus
ÒBÓ are engraved on the dial. At the ÒBÓ setting the shutter will
remain open as long as the f1lmadvance lever is squeezed all
the way back. The number Ò60Ó is colored red as a reminder that
1/60 second is the highest speed at which electronic flash will
synchronize. The ÒRÓ setting is used when rewinding the film.
Intermediate settings between the marked shutter speeds are not
recommended.
Table of contents
Popular Digital Camera manuals by other brands


Foscam
Foscam FI8903W How to upgrade firmware

Insignia
Insignia NS-DSC1112SL Guide de l'utilisateur

Omron Microscan
Omron Microscan HAWK MV-4000 Series quick start guide

Genius KYE Systems
Genius KYE Systems DSC-1.3M user guide

Brickhouse Security
Brickhouse Security SG-DVR user guide

PhaseOne
PhaseOne Studiokit owner's manual