no!no! NONO024 User manual

Visit www.HowToNoNo.com
for Videos, Tips & Tricks
Getting Started
EPILATOR

2 3
Getting to Know no!no!®Epilator
4Getting to Know no!no!®Epilator
5The no!no!®Epilator
6Safety Information
7Safety Warnings
How to no!no!®Epilator
11 A Quick Introduction to no!no!®Epilator
12 Operating
18 Taking Care of Your no!no!®Epilator
21 Customer Support
Warranty and Technical Specifications
24 Warranty
26 Technical Specifications
Contents

4 5
The no!no!®Epilator
The no!no!®Epilator glides effortlessly along the contours of your body to closely grip and
remove unwanted body hair. Designed for a comfortable epilation experience to efficiently
remove even the finest hair at home.
READ this entire GETTING STARTED guide completely before using the device to
ensure safety and results.
Getting to know no!no!®Epilator
Getting to Know no!no!
132 Tweezer Head
4
6Spot Light
108Control Dial With
Speed (I) Fine Hair
Speed (II) Coarse Hair
10 16 Tweezer Efficiency
Cap For Sensitive Areas
5Release Buttons To
Change Heads
7Shaver Head
(trimmer blades and foil)
2
3
Comb
Grip Points
32 Tweezer Head Cap
9Charging Indicator
11 Power
Supply
12 Cleaning Brush

6 7
Read this GETTING STARTED guide carefully before using this device, especially
the safety instructions, and keep this GETTING STARTED guide for future use.
Should you give this device to another person, it is vital that you also pass on
this GETTING STARTED guide for use.
Explanation of symbols
This GETTING STARTED guide belongs to this device. It contains important information
about starting up and operation. Read this GETTNIG STARTED guide thoroughly. Non-
observance of these instructions can result in serious injury or damage to the device.
WARNING
These warning notes must be observed to prevent any injury to the user and
damage to the device.
LOT number
Manufacturer
IMPORTANT INFORMATION!
RETAIN FOR FUTURE USE!
Safety Information Protect against moisture!
Keep the device dry.
Only for indoor use!
Safety Warnings
> This appliance can be used by children aged from 8 years and above and persons
with reduced physical, sensory or mental capabilities or lack of experience and
knowledge if they have been given supervision or instruction concerning use of
the appliance in a safe way and understand the hazards involved. Children shall
not play with the appliance. Cleaning and user maintenance shall not be made by
children without supervision.
> Do not use the appliance on irritated skin (e.g. eczema or inflamed skin reactions such
as folliculitis (purulent hair follicles), skin with varicose veins, rashes, spots, moles (with
hairs) or wounds without first consulting your doctor. Persons with reduced immune
response, during pregnancy or people who suffer from diabetes mellitus, haemophilia or
immunodeficiency should also consult with their doctor before use.
> Do not use if you have allergic or sensitive skin that reacts to cosmetics, metals, etc. or
when you skin has rashes, severe acne, recent scar tissue (less than 3 months) or is
sunburned, inflamed, irritated or other skin aliments. Consult your doctor before use.
Getting to Know no!no!

8 9
Getting to Know no!no!
> Do not use before or during menstruation, during pregnancy or for one month after giving
birth unless you consult with your healthcare provider prior to use.
> Do not use attachments other than those we supply.
> Do not use the appliance if it damaged or malfunctions.
>
Do not immerse the product in liquid; do not use it near water in a bath, basin
or other vessel; and don’t use it outdoors.
> Do not use the appliance or charging adaptor if there are any signs of damage.
> Do not charge when the temperature is below 0ºC or above 40°C, when the shaver has
been exposed to direct sunlight, a heat source, or where there is a lot of moisture.
> Do not use salt water or boiling water to clean the blades or foil.
> Do not submerge the appliance.
> Do not place, store or charge the appliance where it can fall or be pulled into the bath or
sink. Only the removable shaver head parts can be washed but the device itself should
stay dry.
> Do not reach for an appliance that has fallen into water. Unplug it immediately.
> Do not share use of the appliance. For hygiene reasons, the appliance should only be
used by one person.
> Do not wipe any part of the appliance with abrasive cleaning agents or aggressive liquids,
such as petrol, benzene or alcohol.
> Do not separate the body of the as this can affect the watertight protection and lead
to damage and invalidate the warranty.
> Do not attempt to repair this product. It contains no user serviceable parts.
> Do not insert metal-containing objects into the charging socket to avoid short-circuiting.
> Do not use any other power supply other than the one supplied to charge the appliance.
> Do not use if the power supply is damaged. If damage is found it must be replaced
by the manufacturer to avoid an electrical hazard.
> Do not use where any aerosol (spray) products are being used or where oxygen is
being used.
> Always use the appliance for its intended purpose as described in this manual. This
appliance is for household use only.
> Always check the appliance before use and carry out regular checks of the power
cord periodically for damage, particularly at each end where the cord enters the plug
and appliance.
> Always ensure that the main body of the appliance does not get wet (water
splashing, etc.) and do not use with wet hands.
> Always unplug the appliance before cleaning.
> Always keep the appliance dry.
> Always keep the appliance out of reach of children and ensure that the appliance is

10 11
How to no!no!
stored out of the reach of children to prevent them using or playing with it unsupervised.
> Always keep the operating appliance away from scalp hair, face, eyebrows, eyelashes,
clothes, threads, cords brushes, etc. to prevent damage and injuries.
> Always consult your doctor before use if you have a pacemaker.
> Always avoid using irritating substances, such as deodorants with alcohol after epilating
as the skin may be more sensitive immediately after use.
> Always avoid direct exposure to the sun 24 hours after use.
>
The appliance (except for the power supply) is with IPX4 waterproof
protection. Only the removable epilator or shaver head can be cleaned under
the open tap. Please never immerse the appliance into the water for cleaning.
2
A Quick Introduction to no!no!®Epilator
READ this entire GETTING STARTED guide before using the no!no!®Epilator to
ensure safety and results.
1 3 4
Charge the Epilator
for 1 hour before first
use.
Switch on by rotating
the control dial to the
‘I’ position.
Pull your skin taut
with one hand to
ensure each hair is
upright.
Glide the Epilator on
your skin at a 90°
angle.
Get Started

12 13
Operating
Charging
1. Before first use you should charge the appliance for 1 hour.
2. Connect the small plug of the power supply 11 into the 2-pin socket at the bottom of the
appliance (it is designed to only fit one way round) and insert the 3-pin plug into the wall
socket.
3. The charging indicator 9glows red when the appliance is being charged.
4. The charging indicator 9glows green when the appliance is fully charged.
5. Do not operate the appliance when charging.
6. If the speed of the appliance starts to lose speed, this is a sign that it needs to be
recharged.
Note: If the appliance is charged more than 10 hours frequently, the battery capacity will be reduced.
Before travelling, charge the appliance fully if you will not be taking the power supply 11 with you.
How to no!no!
If epilating for the first time, we recommend doing it in the evening to allow any
redness to disappear overnight.
Removing hair from the root can cause ingrown hairs and your skin may become
a little red and irritated the first few times you use the appliance. This is perfectly
normal and should quickly disappear as your skin becomes adjusted to epilating. As
you use the appliance more often, your skin will get used to it and skin irritation will
start to decrease.
If you are prone to ingrown hair, removing hair from the root may not be for you.
Regular skin massaging with an exfoliation glove or massage sponge may help to
reduce the chance or occurrence of ingrown hairs.
The appliance can be used in the shower, but you can also use it dry. When you want
to use the appliance to trim hairs with the shaver head 7and comb 2, use it dry for
best results.
If the irritation has not disappeared within 3 days, we advise consulting with your doctor.

14 15
Epilation
The tweezer head 1will completely remove hair from the body. If the hair is long it is always
better to trim the hair first and then epilate afterwards. This will give best results.
Before removing hair from the bikini line and/or underarms it is important to use an
exfoliation glove, massage sponge or exfoliation cream in a warm shower or bath to remove
residue (such as deodorant), dead skin and prevent ingrown hairs.
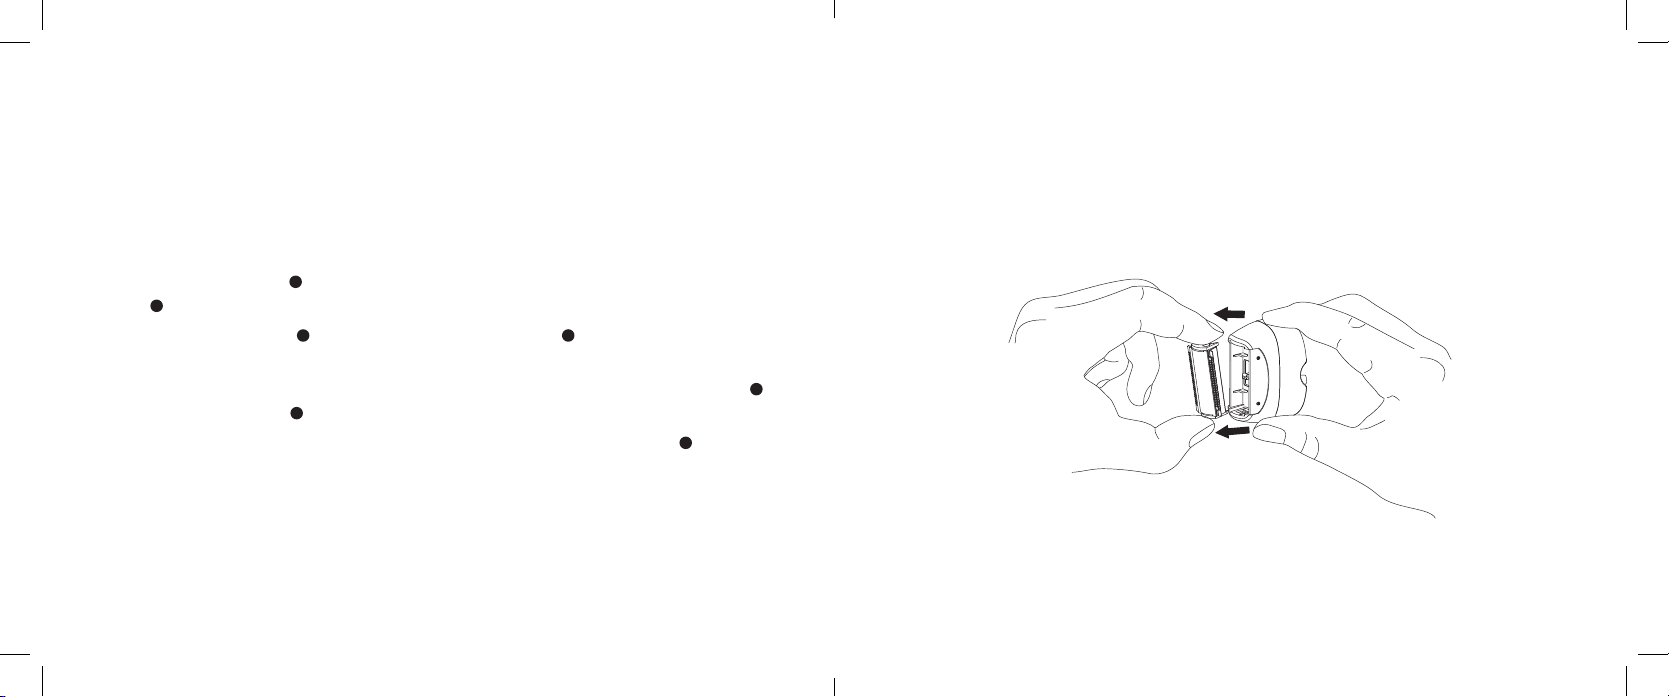
Use the 16 tweezer efficiency cap 10 to remove hair from sensitive areas. Grip the grip points
3on either side of the 32 tweezer head cap 4and gently lift it up and off the appliance and
replace it with the 16 tweezer efficiency cap 10 . Press down gently until it ‘clicks’ back into
place.
1. Ensure your skin is clean, dry and lotion free. Use in a location that has a comfortable
temperature to avoid perspiration.
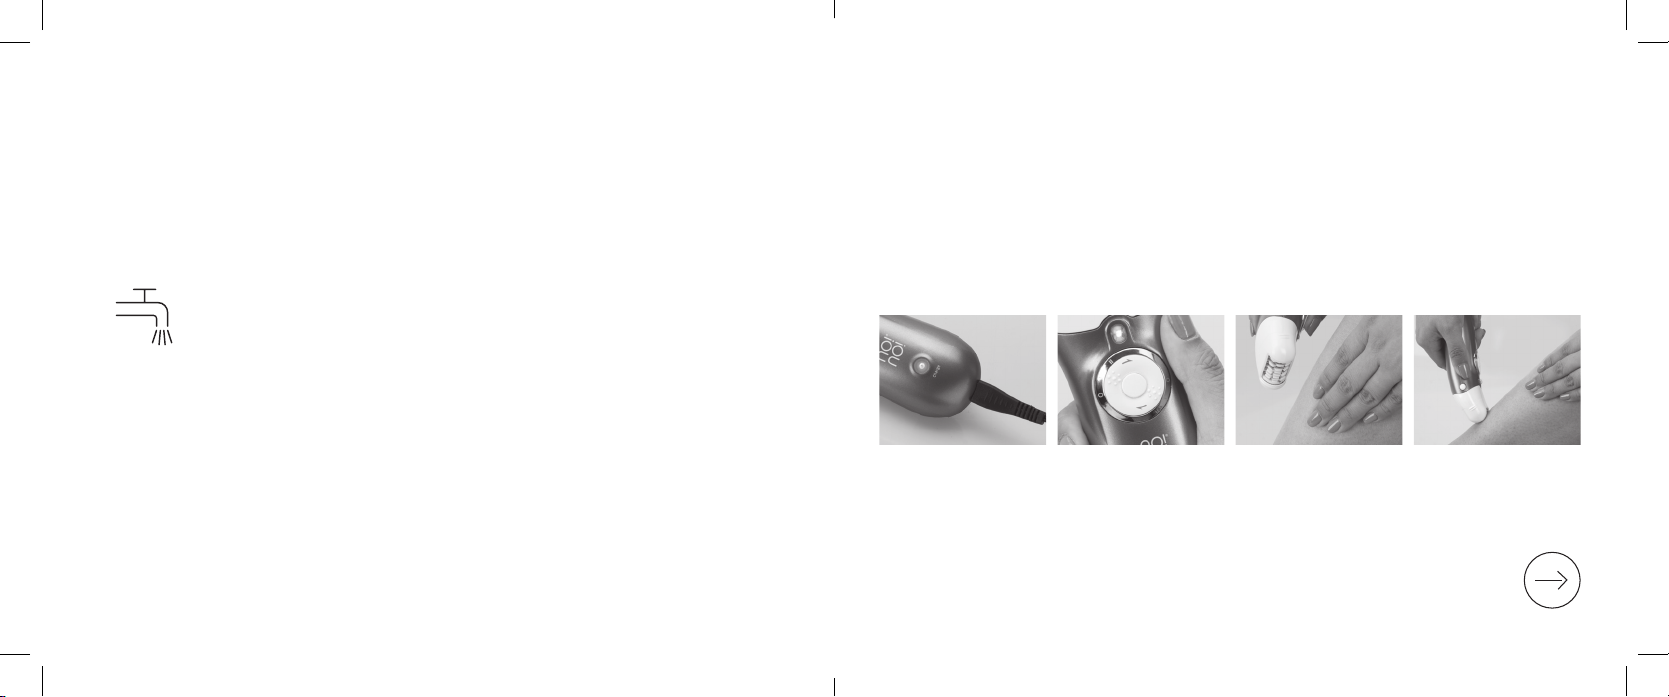
2. Turn on the appliance by rotating the control dial 8clockwise to select the desired speed
setting. Push the dial forward one position for speed one (I) or forward again for speed
two (II). For your protection, the appliance may slow down or stop completely if pressed
too hard against the skin. For sensitive and hard to reach areas such as underarm, knees
and bikini line, use speed one (I) . For larger areas such as legs, use speed two (II) for
best results.
3. The spot light 6will illuminate to help reveal even the finest hair when epilating in hard to
view areas such as the underarm or behind the knee.
How to no!no!
4. Gently rub the skin, then pull your skin taut to help lift short hairs.
5. Glide the appliance slowly over your skin at a 90° angle and use short, quick,
gentle brush like sweeping motions in the direction of hair growth.
6. To minimise discomfort, hold the skin taut surrounding the area you are
removing hair from. Do not apply pressure, just glide the appliance over the
surface of the skin.
7. Hair can grow in different directions. Guide the appliance in different
directions to achieve best results.
8. When epilating is complete switch off by rotating the control dial 8
anti-clockwise to the (0) position.
Apply a moisturising cream or aloe vera after use to relax and cool the skin.
Gently exfoliate the treated area daily to help prevent ingrown hair.
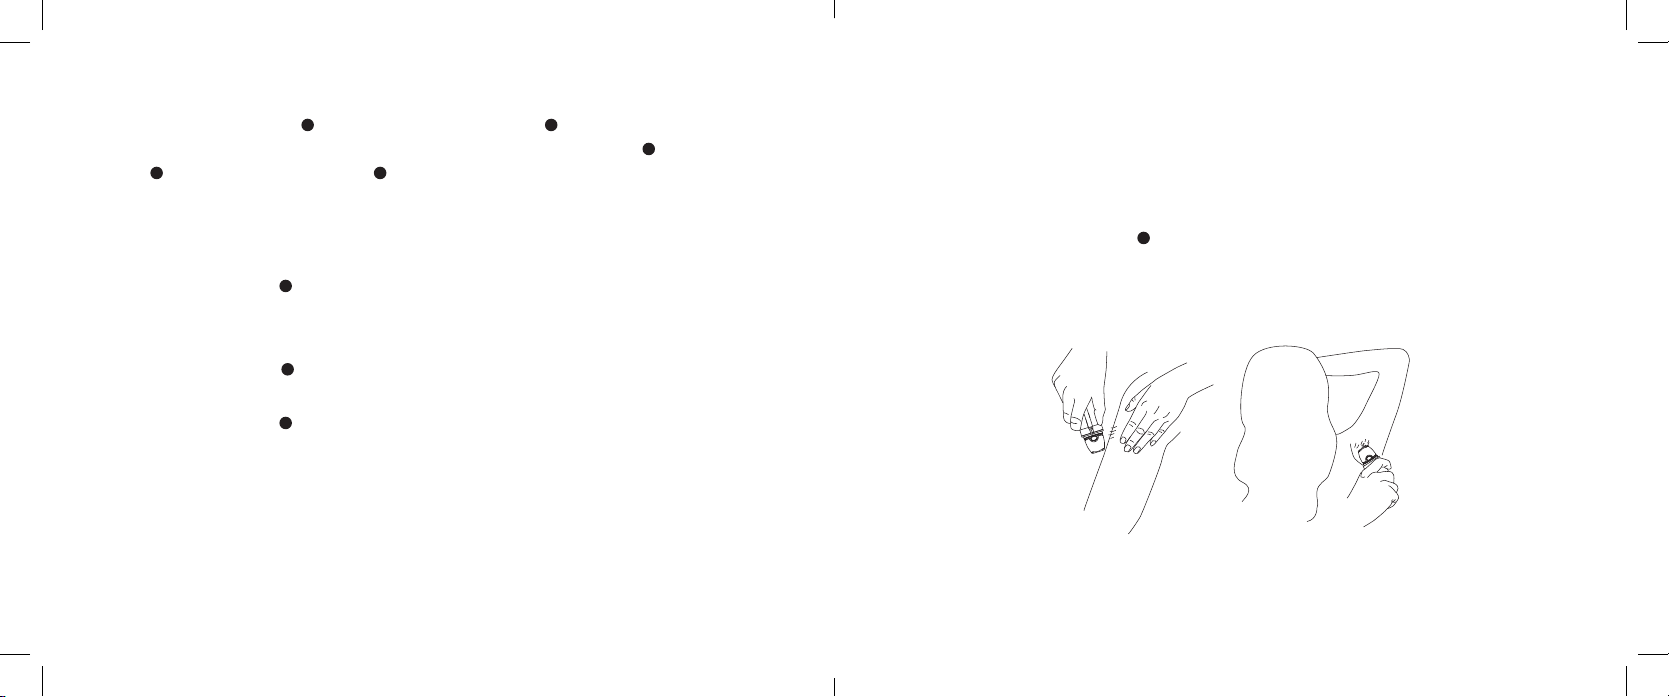
When removing hair from the underarms, place the arm of the underarm you
wish to epilate behind your head to keep the skin taut. For more comfort ensure
the hair is at a length of 2-5mm.
Epilate your legs from the lower leg in an upwards direction. Take extra care to
extend the leg before epilating behind the knee and keep your leg stretched out
straight.

16 17
Shaving your body
1. Push the release buttons 5to change to the shaver head 7. Attach the shaver head to
the appliance and push down until it ‘clicks’ into place. Use the comb 2on the shaver
head 7to trim hair or shaver head 7on its own to completely remove hair.
2. If the hair is long, it is always better to trim first and then go over the same area again
with the foil to achieve best results.
3. When you use the appliance to trim hairs, use it dry to achieve best results.
4. Rotate the control dial 8clockwise to the (I) position. Only use speed one (I) when using
the shaver head.
5. Stretch the skin with your free hand to make the hairs stand upright.
6. Place the shaver head 7lightly and in full contact with the skin and move the appliance
slowly over the skin against the direction of hair growth.
7. Rotate the control dial 8to switch the appliance off.
Shaving your legs and underarms
When shaving your legs, stretch the skin with your free hand to make the hairs stand
upright.
When shaving the underarm area, place one arm behind your head to stretch the skin.
Move the foil slowly and gently over the skin against the direction of hair growth.
The trimmers on the shaver head 7allows the appliance to be used in two directions
for easier and quicker shaving of underarms.
How to no!no!

18 19
Taking care of your no!no!®Epilator
It’s recommended that you clean the appliance with water after every use to keep it in good
condition.
Cleaning the shaver head
1. Switch off the appliance.
2. Use the cleaning brush 12 to remove hairs collected under the trimmers of the shaver
head 7.
3. Push the release buttons 5on either side of the shaver head 7and gently lift the shaver
head up and off the appliance. Remove the trimmer blades and foil as shown on page 19.
4. Clean the trimmer blades and foil under clean running water. Clean the shaver head 7
with the cleaning brush 12 .
5. Dry the trimmer blades and foil and place them back onto the shaver head 7and press
down gently until they ‘click’ back into place.
6. Clean the outer body of the appliance with a damp cloth.
7. Lubricate the teeth of the trimmer blades and foil with a drop of sewing machine oil every
6 weeks for optimal performance.
8. To ensure optimum results, we recommend replacing the shaving head once a year.
Please contact Customer Support quoting the item code and LOT number.
See page 21 for more information. They will give you up-to-date prices.

20 21
Cleaning the tweezer head
1. Switch off the appliance.
2. Push the release buttons 5on either side of the tweezer head 1and gently lift the
tweezer head up and off the appliance.
3. Use the cleaning brush 12 to remove hairs collected around the tweezers.
4. Remove the efficiency cap used (16 tweezer efficiency cap 10 or 32 tweezer efficiency
cap 4) by pressing firmly on the grip points 3and gently lift the efficiency cap up and
off the tweezer head.
5. Clean the tweezer head under clean running water.
6. Dry the tweezer head and place it back onto the appliance and press down gently until it
‘clicks’ back into place.
7. Clean the outer body of the appliance with a damp cloth.
If the device is not working properly contact Customer Support for more troubleshooting
tips or go to www.HowToNoNo.com.
The no!no!®warranty is only valid if no!no!®Epilator has been used according to the
instructions in this guide. Retain all receipts and original packaging.
Customer Support
US & Canada Customer Support: 888.525.7580
European Customer Support: +44 (0) 344 482 5089
For additional no!no!®products make sure to visit:
US & Canada: www.officialnono.com
United Kingdom: www.officialnono.co.uk
© 2017 ICTV Brands®, Inc.
no!no!®is a registered trademark of ICTV Brands®, Inc.
How to no!no!

22 23
Disposal
This product must not be disposed together with the domestic waste. All users are
obliged to hand in all electrical or electronic devices, regardless of whether or not
they contain toxic substances, at a municipal or commercial collection point so that
they can be disposed of in an environmentally acceptable manner. Consult your
local authority or your dealer for information about disposal.
The packaging can be reused or recycled. Please dispose properly of
any packaging material no longer required. If you notice any transport
damage during unpacking, please contact your supplier without delay.
Removing the rechargeable battery
1. Remove the tweezer head 1and remove the 4 screws.
2. Remove the back and/or front panel of the appliance with a screwdriver. If necessary,
also remove additional screws and/or parts until you see the printed circuit board with the
rechargeable battery.
3. Remove the rechargeable battery.
Only remove the chargeable battery when you discard the appliance.
Make sure the battery is completely empty when you remove it.
In accordance with our policy of continual product improvement, we
reserve the right for technical and design changes without notice.
Manufacturer
MPL Home Ltd., IMEX, 575 - 599 Maxted Road, Hemel Hempstead, Hertfordshire,
HP2 7DX, United Kingdom
EC Representative
MPL Home Ltd., IMEX, 575 - 599 Maxted Road, Hemel Hempstead,
Hertfordshire, HP2 7DX, United Kingdom
EC REP

24 25
Limited Warranty
This Limited Warranty covers
the no!no!®product. The
warranty provides for the
repair or replacement of the
device or its component parts,
free of charge, within the
warranty period.
Note: Certain items, such as
the tweezer head and shaver
head, are excluded from the
coverage of this warranty,
as they are spare parts/
consumables and subject to
wear and tear.
The warranty period is valid
for one (1) year. In certain
circumstances, an extended
warranty may be available)
from the date of the original
purchase of the device. When
making a warranty claim, you
must provide the following
information: product serial
number, date of purchase,
guarantor’s name, address
and phone number, together
with the original sales receipt
or invoice to verify the date of
purchase. Any alteration or
amendment of the purchase
documents, including the
sales receipt or invoice, or
failure to present the purchase
documents at the time a
warranty claim is made, will
invalidate this warranty.
This warranty does
not cover damage or
deterioration:
1. Incurred or reported
more than one (1)
year or more when an
extended warranty is
purchased) after the date
of purchase;
2. Incurred due to improper
use of the device;
3. Due to the modification
or repair of the device
by an unauthorized third
party;
4. Due to damage or
defects incurred
during transportation
Warranty or improper handling
which were not reported
at the time the product
was received;
5. Due to humidity or any
liquid or foreign body
placed inside the device;
6. Due to the use of
unapproved accessories
or attachments with the
device;
7. Due to use contradictory
to the procedures shown
in the device’s user
manual;
8. Due to Acts of God,
natural events (floods,
fire, lightning, etc.),
force majeure or
accidental or deliberate
damage; or
9. Due to the device
being subjected to high
dust environments or
excessive humidity or
temperatures.
This Limited Warranty
specifically disclaims
and excludes all other
warranties, whether
express or implied in law,
including the warranties of
merchantability and fitness
for a particular purpose.
Manufacturer shall not be
liable for any incidental or
consequential damages
that result from the use of
this device. This warranty
does not extend to any
purchases made from
anyone other than
an authorized dealer in
the no!no!®device.
This Limited Warranty
gives specific rights to
purchasers of the no!no!®
Device; purchasers may
have other rights that vary
from country to country.
Warranty

26 27
Name and model
no!no!®Epliator
Power supply
100-240V~50/60Hz
Adaptor
KT05W050100BSD
Dimensions
approx.
15 x 7.2 x 5.2 cm
Weight
approx. 173 g
Item code
NONO024
EAN number
5020260124150
Battery
600mAh Li-ion
This product is intended for
household use only.
Technical Specifications

28
NONO024 06.17
Table of contents
Other no!no! Epilator manuals
Popular Epilator manuals by other brands

Philips
Philips Lumea Prestige BRI946 manual

Silvercrest
Silvercrest SED 3.7 G3 operating instructions

Silvercrest
Silvercrest SE 32 A1 Operation and safety notes

Silvercrest
Silvercrest 106438 operating instructions

Silvercrest
Silvercrest SED 3.7 C2 operating instructions

Braun
Braun Silk epil 3 Legs & Body 3270 manual