nomadiQ CQ BBQ 002 User manual

Instruction Manual
Portable Gas Grill
WWW.NOMADIQGRILLS.COM

WWW.NOMADIQGRILLS.COM
Language Index
Page
EN Instruction Manual 10
ES Manual de uso 19
FR Manuel d’instructions 29

3
WWW.NOMADIQGRILLS.COM
Drawings &product instruction visuals
1
3
4
2
5
6
7
8
9
10
11
12
14
15
13
17
19
16
18
Visual 1 &2

4WWW.NOMADIQGRILLS.COM
Visual 3 Visual 4
Visual 5 Visual 6
Visual 7 Visual 8

5
WWW.NOMADIQGRILLS.COM
Visual 9
Visual 10 Visual 11
Visual 12 Visual 13

6WWW.NOMADIQGRILLS.COM
Visual 14 Visual 15
Visual 16 Visual 17
Visual 18 Visual 19
Cool down 10 - 15 min!

7
WWW.NOMADIQGRILLS.COM
Visual 20
Visual 21 Visual 22
Visual 23 Visual 24
8WWW.NOMADIQGRILLS.COM
Visual 25 Visual 26
Visual 27
grill everywhere!
9
WWW.NOMADIQGRILLS.COM
Extensive cleaning & annual maintenance
Visual 28 Visual 29
Visual 30 Visual 31
Visual 32 Visual 33.

10 WWW.NOMADIQGRILLS.COM
Instruction Manual
nomadiQ portable gas grill
Thank you!
Thank you for choosing nomadiQ grill, world’s first real portable gas grill. We hope you will find the
instructions of this user manual useful and easy to follow. It will only take a few minutes of your time to learn
how to use the product correctly and experience the best of it. Enjoy grilling (almost) everywhere!
After you have finished reading the instructions, please keep this manual in a safe place for future reference.
Kind regards,
Team nomadiQ
Table of Content
1. Warnings & Safety instructions page 11
2. Drawings &product instruction visuals page 3
3. Gas connections & regulator page 12
4. Instructions for use; page 14
4.1 Prepare for usage
4.2 During operation
4.3 Aer usage
5. Troubleshooting page 15
6. Cleaning &Maintenance page 15
7. Service Department page 16
8. Warranty page 17
9. Technical specifications &Lighting instructions page 18

11
WWW.NOMADIQGRILLS.COM
1. Warnings &Safety instructions
WARNING!
• DO NOT OPERATE THIS APPLIANCE BEFORE READING THE INSTRUCTION MANUAL CAREFULLY
• DO NOT OPERATE THIS APPLIANCE INDOORS; THE APPLIANCE IS FOR OUTDOOR USE ONLY
• DO NOT PLACE ARTICLES ON OR AGAINST THIS APPLIANCE
• DO NOT STORE OR USE ANY CHEMICALS OR FLAMMABLE MATERIALS OR SPRAY AEROSOLS NEAR THIS
APPLIANCE
• READ THESE INSTRUCTIONS FOR USE CAREFULLY SO AS TO FAMILIARIZE YOURSELF WITH THE APPLIANCE
BEFORE CONNECTING IT TO ITS GAS CARTRIDGE/CONTAINER.
DANGER!
IF YOU SMELL GAS,
• SHUT OFF GAS TO THE APPLIANCE.
• EXTINGUISH ANY OPEN FLAMES.
• IF ODOR CONTINUES, KEEP AWAY FROM THE APPLIANCE AND IMMEDIATELY CALL YOUR GAS
SUPPLIER OR YOUR FIRE SERVICE.
Leaking gas may cause a fire or explosion which can cause serious bodily injury or death, or damage to
property.
WARNING!
FOLLOW ALL LEAK-CHECK PROCEDURES CAREFULLY IN THIS INSTRUCTION MANUAL PRIOR TO GRILL
OPERATION. DO THIS EVEN IF THE GAS SUPPLY WAS DEALER ASSEMBLED.
General warnings and safety instructions
1. Follow all warnings and safety instructions when using the appliance.
2. Keep this instruction manual for future reference.
3. Do not use this grill unless all parts are in place. The product must be properly assembled. Please
follow the instructions carefully.
4. When installing the product, ensure it’s on a stable (horizontal) and level surface, which is large and
strong enough to support the product and will withstand temperatures of 140°F (60°C) above ambient
temperature.
5. Ensure that the product has adequate clearance from combustible materials. All combustible
materials must be kept more than 24 inches (610mm) from the sides and rear of the product and more
than 24 inches (610mm) above the cooking surface of the grill.
6. While igniting the appliance or cooking, never lean over the product.
7. This appliance should never be used by children. Accessible parts of the grill may be very hot. Keep
young children and pets at a safe distance while using the product.
8. Caution when using the appliance. It will be hot during and after use, and should never be left
unattended, or moved while in operation.
9. Should the burner go out while the product is in operation, turn the product off by closing the gas valve.
Wait a few minutes before attempting to relight the appliance, following the instructions in this manual.
10. Do not put a grill cover or anything flammable on the grill while appliance is in operation or is hot.
11. People with flammable clothing such as nylon, should keep well away from the grill when it is in
operation.
12. Should an uncontrolled flare-up occur, move food away from the flames until flaring subsides.
13. Should a grease fire occur, turn off the burner/appliance until fire is out.
14. This gas grill is not intended for commercial use.
15. Particular care must be taken when removing the drip trays. Mishandling of hot oil and fats can cause
serious injury.
16. The appliance should be thoroughly cleaned on a regular basis.
17. Use heat-resistant grilling tools and/or oven gloves/mitts when operating the grill.
18. Keep electrical main lead and the fuel supply hose away from heated surfaces.
19. Do not attempt to disconnect the gas regulator, cartridge/canister or any gas fitting while your grill is
in operation.
20. Use the regulator that is supplied with the appliance
21. Only use original accessories or other original parts to work with the product.
22. Do not operate the gas grill if there is a gas leak present.
23. Do not use a flame to check for gas leaks.
24. Use propane (disposable) cartridge/canister only.
25. Propane gas is not natural gas. The conversion or attempted use of natural gas in a propane gas unit
is dangerous and will void your warranty.
12 WWW.NOMADIQGRILLS.COM
26. Do not store an extra (spare) or disconnected gas supply cartridge/canister under or near the grill.
2 7. Although your gas supply cartridge/canister may appear to be empty, gas may still be present, and
the cartridge/canister should be transported and stored accordingly.
28. Make sure you are outdoors and away from any source of ignition when changing or connecting
cartridge/canister.
29. After a period of storage and/or non-use, the gas grill should be checked for gas leaks and burner
obstructions before use. See instructions in this manual for correct procedures.
30. A dented or rusty gas supply cartridge/canister may be hazardous and should be checked by your
gas supplier. Do not use a gas supply cartridge/canister with a damaged valve.
31. Do not use or store this appliance in areas of high salt content (i.e. marine environment) or an area
with caustic fumes or liquids (i.e. pool), as these chemicals can cause the appliance materials to
deteriorate and void the warranty.
32. Do not carry out any servicing on the gas manifold of the grill yourself – this must only be done by
authorized technicians.
33. Do not use charcoal, briquettes or lava rock in this appliance.
34. Do not place grill on a glass or a combustible surface.
35. The use of alcohol, prescription drugs, non-prescription drugs, or illegal drugs may impair the
consumer’s ability to properly and safely assemble, move, store or operate the appliance.
36. This appliance is not intended for, and should never be used as a heater.
3 7. Do not enlarge valve opening or burner ports when cleaning the valve or burner.
38. Do not build this appliance in any built-in or slide-in construction. Ignoring this warning could cause a
fire or an explosion that can damage property and cause serious bodily injury or death.
2. Drawings &product instruction visuals
Assembly drawings & part list - reference visuals 1 & 2 on page 3.
1. Belt 11. Base
2. Belt clips (2x) 12. Ignitor
3. Grates (2x) 13. Grate locking lips (2x)
4. Grate assembly hooks (4x) 14. Igniter spark points (2x)
5. Handles (2x) 15. Burners (2x)
6. Grilling shells (2x) 16. Quick connectors - male (2x)
7. Control knobs (2x) 17. Quick connectors - female (2x)
8. Drip-trays (2x) 18. Gas hose assembly
9. Foot 19. Gas regulator
10. Locking knobs (2x)
Instruction visuals 3-27 for operation are shown on pages 4 to 9. Also, find the related instructions under
section ‘Instructions for use’ in the manual.
3. Gas connections ®ulator
Connecting a disposable gas cartridge
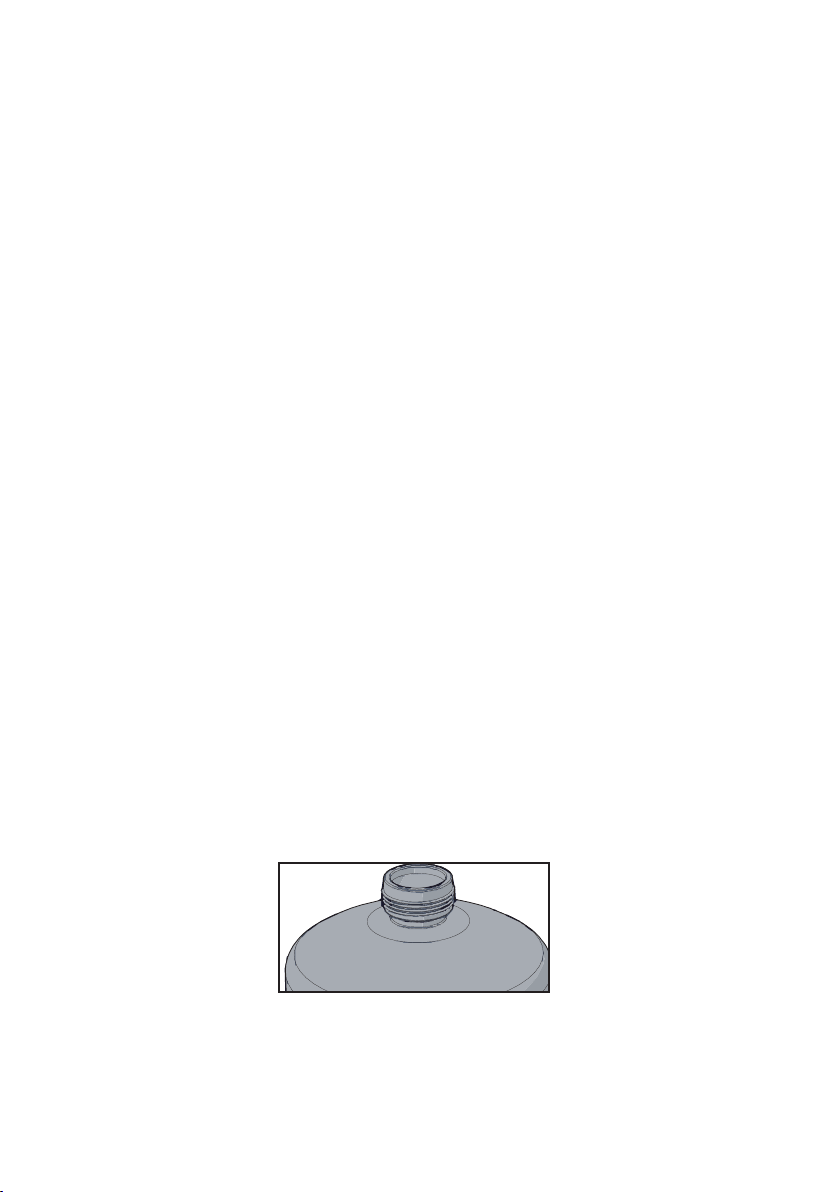
The product is standard configured for disposable gas cartridge/canister and have a screw type connection
as shown in the visual below. The cartridges should contain propane gas. These are common type gas car-
tridge/canister that can be found at almost every outdoor related retailer worldwide.
Propane Camping Gas Cylinder
When connecting or changing the gas cartrigde:
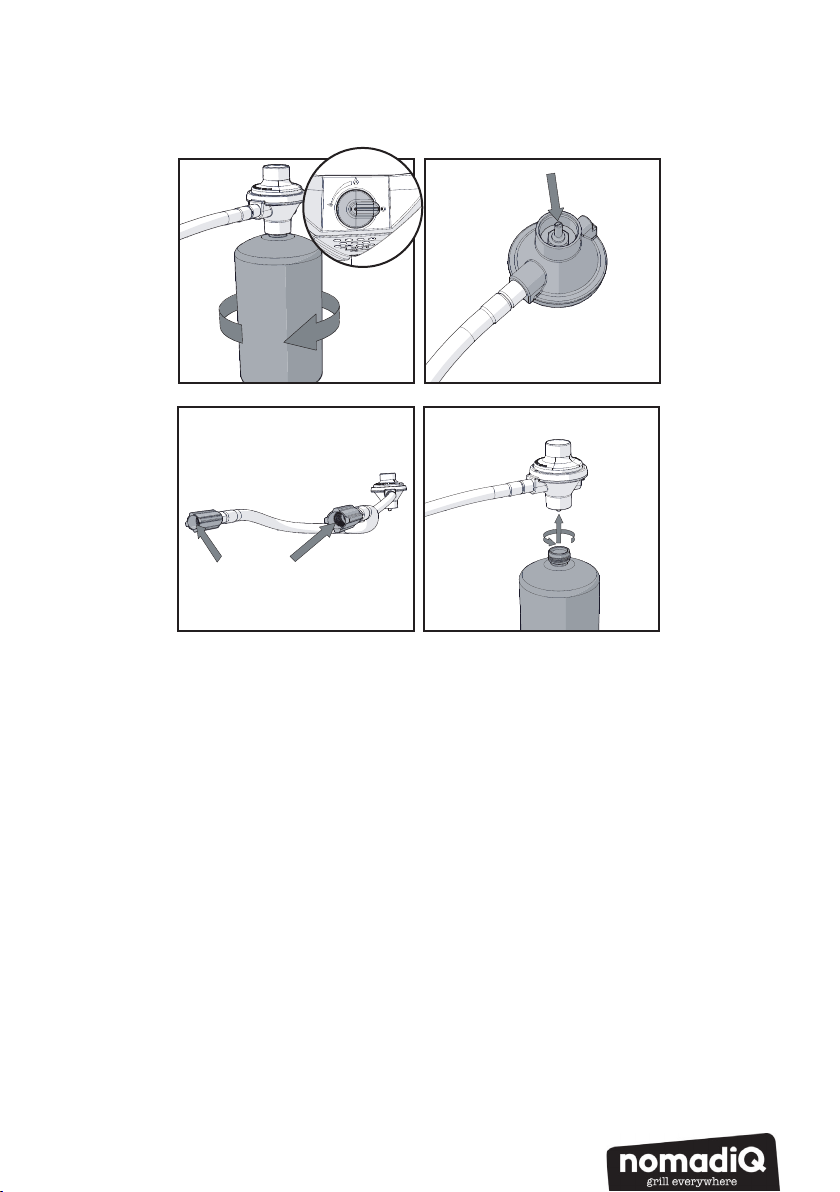
- Check if the burners are extinguished and both control knobs are on the ‘O’ position before disconnecting
the gas cartridge/canister (Visual A)
- Carefully dismantle the empty cartridge, if applicable, from the gas regulator by screwing it clockwise
(Visual A)
- Check if the seal in the gas regulator is in place and in good condition (Visual B)
13
WWW.NOMADIQGRILLS.COM
- Check if the seals of the quick-connectors are in place and in good condition (Visual C)
- Assemble a new cartridge/canister on the gas regulator by screwing it counter-clockwise (Visual D). Always
do this outside and away from people.
- Make sure there is no gas leakage. See ‘Leak detection procedure’ below.
- If everything seems airtight and connected well, you are now able to use the appliance.
Before use, ensure that the valve and screw connection is not damaged! Also, check if the seals (between
the appliance and the gas cartridge/canister) are in place and in good condition before connecting it to
the appliance.
NomadiQ recommends using the provided gas hose assembly with disposable gas cartridge/canister as
shown above. When considering to connect alternative gas supplies, please contact our Service Department
for further advice.
Additional instructions &tips related to the gas supply and connection:
- Disconnect the cartridge/canister if it’s empty.
- Disconnect the cartridge/canister if the grill is being stored in a garage or other enclosed area.
- Disconnect the cartridge/canister if the grill is being transported.
- Avoid kinking the hose.
- Make sure the gas supply is positioned on a stable surface and prevent twisting of the flexible hose.
- Any parts sealed by the manufacturer must not be altered by the user.
- Any modification of the appliance may be dangerous.
- Gas supplies, especially cartridge/canister may cool down during use and can even show icing on the
outside of the cartridge/canister. This phenomenon is quite common, but might also influence the even-
tual grilling performance. Placing the gas supply in a layer of water, keeping the top part of the supply
sufficiently above water level, can prevent this situation.
Leak detection procedure
Make sure the control knobs on the appliance are set to “0” and if applicable, open the valve of the gas
supply/regulator. Check for leaking joints by brushing with solution of half-liquid detergent and half water.
If a leak is present, bubbles will appear (or you may hear a hissing sound). Retightening connections can
generally repair a leaking joint. You must also check the gas hose and connection at the gas cylinder. If a
leak cannot be resolved, do not proceed. Contact Service Department for further advice.
Visual A Visual B
Visual C Visual D

14 WWW.NOMADIQGRILLS.COM
WARNING!
DO NOT USE NAKED FLAME FOR LOCATING GAS LEAKS. IF A LEAK PERSISTS, CONTACT AN AUTHORIZED
GAS FITTER.
BEFORE EACH USE, CHECK THE GAS HOSE FOR CRACKS, CUTS, NICKS OR ABRASIONS. IF THE HOSE IS
DAMAGED IN ANY WAY, DO NOT USE IT. REPLACE THE GAS HOSE USING A NOMADIQ REPLACEMENT HOSE
ONLY.
4. Instructions for use
Please carefully follow the instructions below in combination with the reference visuals shown on pages 4
to 9.
4.1 Prepare for usage
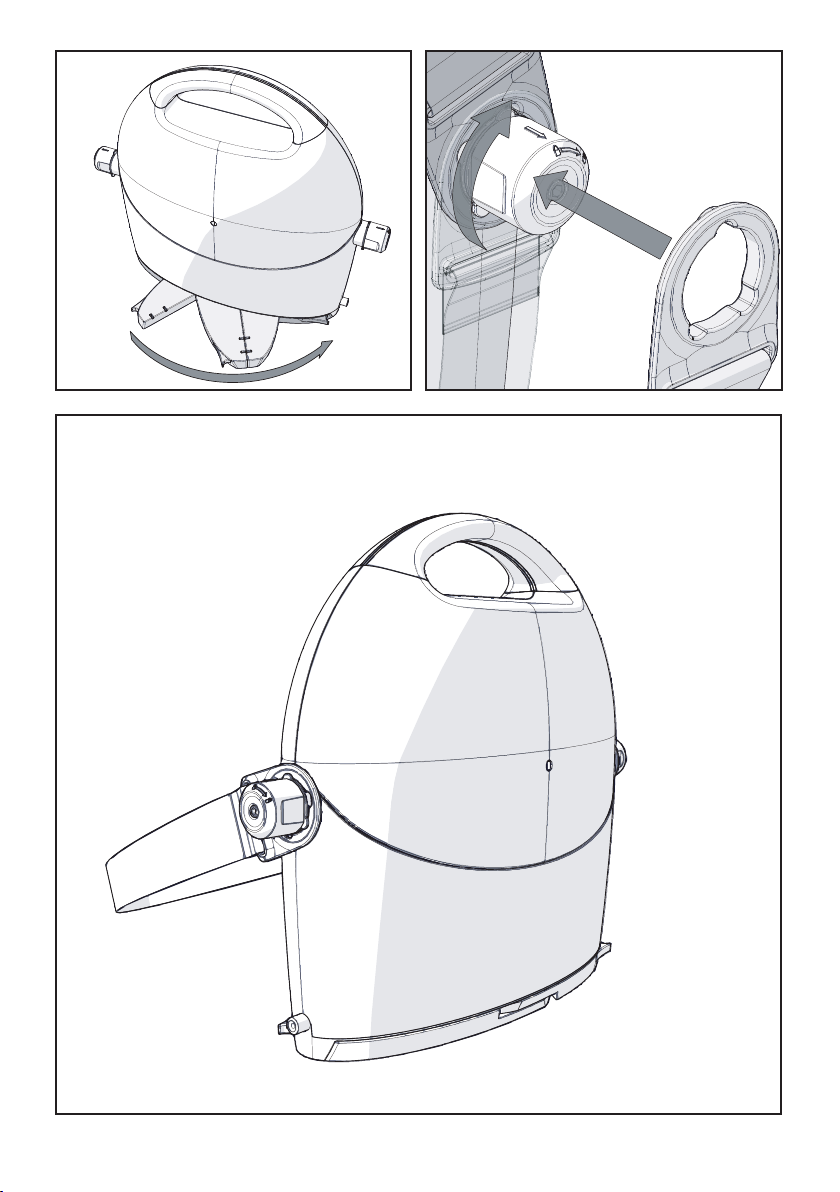
Step 1: Remove the belt. (Visual 3)
Step 2: Remove the protection pouch. (This step is optional, as it depends if the appliance was additionally
delivered with this accessory.)
Step 3: Open first locking mechanism by opening the foot underneath the base. (Visual 4)
Step 4: Open both locking knobs on each side of the product. (Visual 5)
Step 5: The grilling shells are released and can be pulled out and opened. (Visual 6 &7)
Step 6: Close the locking knobs on both sides of the grill. (Visual 8)
Step 7: Install drip-trays on the foot of the appliance. (Visual 9)
Step 8: Assemble quick-connectors of the gas hose assembly on each grilling shell. (Visual 10 &11)
Step 9: Connect gas supply to gas regulator. Make sure that the control knobs on the product are set to ‘O’
(Visual 12)
For further instructions related to the gas (supply) connection, please also find the ‘Gas & Supply Connection’
section in this manual. (Page 16)
4.2 During operation
Step 10: Open valve by setting control knob on the highest setting, wait for a few seconds and press the
igniter on the side of the base of the product. (Visual 13 &14)
This step can be individually applied and controlled for each grilling shell.
Step 11: Control the burner flame and temperature by adjusting the control knob. (Visual 15)
Also find the ‘Lighting Instructions’ of this manual for further instructions. (Page 18)
Tips &Tricks during operation
- A light coating of oil will help brown your food evenly and keep it from sticking to the grates. Always spray
or brush oil onto your ingredients, and not directly on the grill while in use.
- Grilling conditions may require adjustment of the control knobs to achieve the correct grilling tempera-
tures.
- When using a sauce or marinade with a high sugar content or other ingredients that burn easily, only brush
it onto the food during the last 5 to 10 minutes of grilling.
- Remove excess fat from chops, roasts and steaks. Less fat makes cleaning easier and prevents unwanted
flare-ups.
- Always be sure the grilling shells and removable drip-trays are clean before use.
4.3 After usage
Step 12: Turn the appliance OFF by closing the valve and turning the control knobs to setting ‘0’. (Visual 16)
Step 13: Let the unit cool down for 10 – 15 minutes!
Step 14: Dismantle the gas supply and remove the gas hose assembly. (Visual 17)
Step 15: Remove and clean the drip-trays.
Step 16: Remove the grates and clean the inside of the shells and grates with a soft cleaningntowel/napkin
(Visual 18 &19)
Step 17: Assemble the grates - make sure these are positioned correctly over the 2 hooks and locked by
sliding the grates under the lips (located near the hinge). (Visual 20)
Step 18: Open the locking knobs on each side of the appliance. (Visual 21)
Step 19: Close the shells by lifting them back into the base of the appliance. (Visual 22 &23)
Step 20: Close the locking knobs on each side of the appliance. (Visual 24)

15
WWW.NOMADIQGRILLS.COM
Step 21: Close the foot by rotating these back under the base of the appliance (Visual 25)
Step 22: Attach the belt (Visual 26)
Optional: Put on the protection pouch before attaching the belt.
…and you’re good to go again!
5. Trouble shooting
BURNER WILL NOT IGNITE WHEN USING THE IGNITER
Valve is not ON/Open --> Turn ON valve/Open valve.
Gas hose assembly and/or gas supply isn’t installed correctly --> Re-assemble gas supply, gas hose &quick
connectors.
Gas cartridge/cylinder is low or empty --> Replace with a full gas supply.
Igniter is not sparking --> Remove grates and carefully clean spark points with a tooth brush.
Igniter is not sparking --> Open side lockings and move both grilling shells to one side. Visually check that the
cables to ignition point, or from the chassis have not been broken or disconnected.
Injection is blocked --> Contact Service Department for further advice.
BURNER FLAME IS ERRATIC
Burner is blocked --> Remove grates and carefully clean burning holes with a ‘hard’ tooth brush.
Flame is burning inside burner (hissing sound) --> Turn off burner/ appliance, allow to cool down for a few
minutes and re-ignite.
Injector is partially blocked --> Contact Service Department for further advice.
GAS IS LEAKING FROM CONNECTIONS
Connections are loose --> Tighten connections (both quick connectors and regulator/gas supply assembly).
Also check ‘Leak detection procedure’ under the ‘Gas connections ®ulator’ section in this manual or
contact Service Department for further advice.
6. Cleaning & Maintenance
External cleaning
Before cleaning the appliance exterior, ensure the appliance has cooled down and is safe to touch. Painted
and plastic surfaces can be cleaned using a mild household detergent or cleaner and a dry cloth (do not use
scourers or harsh detergents). It is advisable to test cleaners on a small section of the appliance first. NEVER
use paint thinners or similar solvents for cleaning and NEVER pour cold water over hot surfaces. Make sure
all surfaces are dried carefully before covering and storing the product.
Internal cleaning
Before cleaning the internal parts of your grill, ensure the appliance has cooled down completely and is
safe to touch. The inside can be cleaned by using water, mild detergent and a soft sponge or towel. The
non-stick coated surfaces (inside of grilling shells) should be cleaned carefully with a wet towel. For hard to
clean areas, use a little baking soda on a wet sponge and/or soft brush. The grates with non-stick coating
can be taken out and easily cleaned with water and mild detergents. All parts and surfaces need to be dried
afterwards using a soft cloth.
WARNING! Spark points located in the grilling shell near the burner are sharp! Be aware during cleaning to
prevent injury.
Note: Non-stick coated surfaces, like the grates, will stain if food is burned into the surfaces. Do not use
abrasive cleaners or sharp and/or hard equipment, like metal cooking tools or brushes, on these surfaces as
it might damage this type of coating!
Extensive cleaning &annual maintenance
For extensive cleaning, the grilling shells can be removed to clean the inner part of the base occasionally.
Please carefully follow the instructions below in combination with the reference visuals shown on page 9.
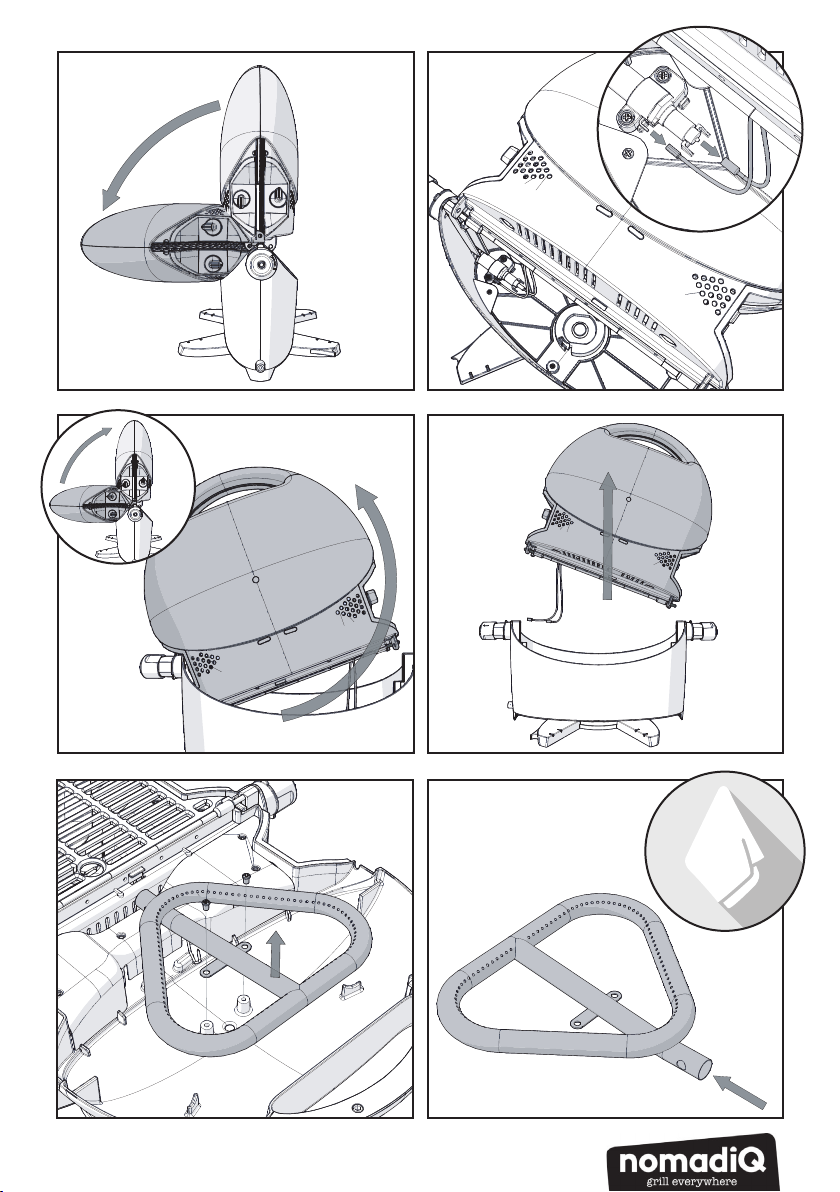
1. Release the grilling shells by following steps 1 to 4 as mentioned in the “instructions for use” section. Pull
out both grilling shells and carefully flip both grilling shells at the end point to one side. (Visual 28)
2. Carefully disconnect/unplug both wires from the ignitoe, located at the bottom of the base. (Visual 29)
3. Return both grilling shells to a vertical position and slide the grilling shells halfway. Tilt the grilling shells
sideways so the guiding pins are released from the base. (Visual 30)
4. Release the grilling shells, still tilted in a vertical movement out of the base. The inner surface of the
base as well as the outer surface of the grilling shells are now accessible for cleaning. (Visual 31)

16 WWW.NOMADIQGRILLS.COM
5. After cleaning, the grilling shells can be placed back in the base by following above steps in reverse
order. To prevent damage, ensure that both guiding pins of the grilling shells are placed correctly in the
designated guiding slots in the base before sliding the shells into the base.
Cleaning and maintenance of the burner
It is strongly recomended to inspect and clean the burner tube at least once a year to keep your gas grill
performing safely and efficiently. To remove the burners for extensive cleaning and inspection, please
carefully follow the instructions below in combination with the reference visuals shown on page 9.
Also follow these steps if an irregular flame pattern is visible.
1. Ensure that the gas supply is closed and the gas grill is cooled down properly. Remove the 2 screws at the
center of the burner from the grilling shells, using a phillips type screwdriver and carefully slide the burner
out from the grilling shell. (Visual 32)
2. The information below should be taken into account during inspection and cleaning (Visual 33):
- From repeated use of the grill, the burner openings can become dirty over time. Dirty and blocked ports
can restrict the gas flow which can cause dangerous situations.
- Inspect the inside of the burner tube with a flashlight to determine if any obstuction is visible that will
restrict the gas flow to the burner openings.
If any obstruction is visible on the inside or outside, clean the area with a steel brittle brush or a steel wire.
Ensure that all blocked areas are clean before reinstalling the burner in the grilling shell.
For installing or replacing the burner, place the burner back in the grilling shell. Ensure that the tube is
placed properly over the gas opening and fasten the 2 screws.
Storage
When the appliance is not in use, the grill and the cylinder together must be stored outdoors in a well
ventilated area. However, it is permissible to store the appliance (but not the cylinder) indoors. Ensure the
appliance is cleaned well, especially the grates, before storing away. When the gas cartridge/canister is
disconnected, replace the plug or cap on the valve outlet if available.
Extended storage
After extended storage, it is recommended to clean and check the burner and gas supply, following the
instructions below.
Burners
Brush the outside of the burners with a stiff brush (i.e. toothbrush) to remove stains and dirt. Be careful not
to damage the igniter spark points.
Gas supply & connection
1. Inspect the gas hose assembly for any deterioration and replace it if necessary.
2. Test the gas circuit for leaks and repair if found. Also see ‘leak detection procedure’ in the ‘Gas
connections & regulator’ section of this manual.
3. Check if the seals of the gas hose assembly (between the appliance and the gas cartridge/canister) are
in place and in good condition. Also, check before connecting a new gas cartridge/canister. These seals are
located in the quick-connectors and gas regulator. The exact location can be found following the visuals on
page 13. If it seems the seals need replacement, contact our Service Department for further advice.
7. Service Department
Contact details
nomadiQ Grills Customer Service
1-855-474-5524 or 1-855-GRILL2GO
E-mail: [email protected]om
Or fill out the online contact form: www.nomadiqgrills.com
8. Warranty
This is nomadiQ’s Warranty provided to you at no extra charge. It contains the information you will need to
have your product repaired in the unlikely event of a failure or defect.

17
WWW.NOMADIQGRILLS.COM
Pursuant to applicable laws, the customer has several rights incase the product is defective. Those rights in-
clude supplementary performance or replacement, abatement of the purchasing price and compensation.
nomadiQ’s Warranty
nomadiQ warrants, to the purchaser of the product (or in the case of a gift or promotional situation, the
person for whom it was purchased as a gift or promotional item), that the product is free from defects
in material and workmanship for the periods of time specified below when assembled and operated in
accordance with the accompanying instruction manual.
Under normal, private single family home or apartment use and maintenance, nomadiQ agrees within the
framework of this warranty to repair or replace defective parts within the applicable time periods.
Limitations and exclusions listed below. TO THE EXTENT ALLOWABLE BY APPLICABLE LAW, THIS WARRANTY
IS EXTENDED ONLY TO THE ORIGINAL PURCHASER AND IS NOT TRANSFERABLE TO SUBSEQUENT OWNERS,
EXCEPT IN THE CASE OF GIFTS AND PROMOTIONAL ITEMS AS NOTED ABOVE.
Owner’s responsibilities under this warranty:
To ensure trouble-free warranty coverage, it is important that you register your nomadiQ grill online at www.
nomadiQgrills.com. Please also retain your original sales receipt and/or invoice. Registering your product
confirms your warranty coverage and provides a direct link between you and nomadiQ in case we need to
contact you. The above warranty only applies if the owner takes reasonable care of the product by following
all instructions as outlined in the accompanying instruction manual, unless the owner can prove that the
defect or failure is independent of non-compliance with the above mentioned obligations. If you live in a
coastal area, or have your product located near a pool, maintenance includes regular washing and rinsing
of the exterior surfaces.
Warranty handling/exclusion of warranty:
If you believe that you have a part which is covered by this warranty, please contact nomadiQ’s Service
Department.
nomadiQ will, upon investigation, repair or replace (at its discretion) a defective part that is covered by this
warranty. In the event that repair or replacements are not possible, nomadiQ may choose (at its discretion)
to replace the appliance in question with a new appliance. nomadiQ may ask you to return parts for in-
spection. This WARRANTY lapses if there are damages, deteriorations, discolorations, and/or rust for which
nomadiQ is not responsible, caused by the following:
• Abuse, misuse, alteration, modification, misapplication, vandalism, neglect, improper assembly or instal-
lation, and failure to properly perform normal and routine maintenance;
• Insects (such as spiders) and rodents (such as squirrels), including but not limited to damage to burner tubes
and/or gas hoses;
• Exposure to salt air and/or chlorine sources such as swimming pools and hot tubs/spas;
• Severe weather conditions such as hail, hurricanes, earthquakes, tsunamis or surges, tornadoes or severe
storms.
The use and/or installation of parts on your product that are not genuine nomadiQ parts will void this war-
ranty, and any damages that result hereby are not covered by this warranty. Any conversion of a appliance
not authorized by nomadiQ and performed by a nomadiQ authorized service technician will void this war-
ranty.
PRODUCT WARRANTY PERIODS
Base & Grilling shells:
5 years - no rust through/burn through
2 years - paint excluding fading or discoloration
Stainless steel burner tubes:
5 years - no rust through/burn through
Aluminium die-cast grates:
5 years - no rust through/burn through
Plastic components:
5 years - excluding fading or discoloration
All remaining parts: 2 years
DISCLAIMERS
APART FROM THE WARRANTY AND DISCLAIMERS AS DESCRIBED IN THIS WARRANTY STATEMENT, THERE ARE
EXPLICITLY NO FURTHER WARRANTY OR VOLUNTARY DECLARATIONS OF LIABILITY GIVEN HERE WHICH GO
BEYOND THE STATUTORY LIABILITY APPLYING TO NOMADIQ. THE PRESENT WARRANTY STATEMENT ALSO
DOES NOT LIMIT OR EXCLUDE SITUATIONS OR CLAIMS WHERE NOMADIQ HAS MANDATORY LIABILITY AS
PRESCRIBED BY STATUTE. NO WARRANTIES SHALL APPLY AFTER THE APPLICABLE PERIODS OF THIS WARRAN

18 WWW.NOMADIQGRILLS.COM
TY. NO OTHER WARRANTIES GIVEN BY ANY PERSON, INCLUDING A DEALER OR RETAILER, WITH RESPECT TO
ANY PRODUCT (SUCH AS ANY “EXTENDED WARRANTIES”), SHALL BIND NOMADIQ. THE EXCLUSIVE REMEDY
OF THIS WARRANTY IS REPAIR OR REPLACEMENT OF THE PART OR PRODUCT. IN NO EVENT UNDER THIS VO-
LUNTARY WARRANTY SHALL RECOVERY OF ANY KIND BE GREATER THAN THE AMOUNT OF THE PURCHASE
PRICE OF THE NOMADIQ PRODUCT SOLD. YOU ASSUME THE RISK AND LIABILITY FOR LOSS, DAMAGE, OR
INJURY TO YOU AND YOUR PROPERTY AND/OR TO OTHERS AND THEIR PROPERTY ARISING OUT OF THE MI-
SUSE OR ABUSE OF THE PRODUCT OR FAILURE TO FOLLOW INSTRUCTIONS PROVIDED BY NOMADIQ IN THE
ACCOMPANYING INSTRUCTION MANUAL. PARTS AND ACCESSORIES REPLACED UNDER THIS WARRANTY ARE
WARRANTED ONLY FOR THE BALANCE OF THE ABOVE MENTIONED ORIGINAL WARRANTY PERIOD(S). THIS
WARRANTY APPLIES TO PRIVATE SINGLE FAMILY HOME OR APARTMENT USE ONLY AND DOES NOT APPLY
TO NOMADIQ APPLIANCES USED IN COMMERCIAL, COMMUNAL OR MULTI-UNIT SETTINGS SUCH AS RES-
TAURANTS, HOTELS, RESORTS, OR RENTAL PROPERTIES. NOMADIQ MAY, FROM TIME TO TIME, CHANGE THE
DESIGN OF ITS PRODUCTS. NOTHING CONTAINED IN THIS WARRANTY SHALL BE CONSTRUED AS OBLIGA-
TING NOMADIQ TO INCORPORATE SUCH DESIGN CHANGES INTO PREVIOUSLY MANUFACTURED PRODUCTS,
NOR SHALL SUCH CHANGES BE CONSTRUED AS AN ADMISSION THAT PREVIOUS DESIGNS WERE DEFECTIVE.
9. Technical specifications &Lighting instructions
Manufacturer:
Product name:
Model number:
Gas Category:
Outlet pressure
of regulator:
Input rate (main):
Serial number:
DANGER:
NEVER OPERATE THIS APPLIANCE UNATTENDED
* FAILURE TO FOLLOW THIS DANGER STATEMENT COULD RESULT IN FIRE, EXPLOSION OR BURN HAZARD THAT COULD CAUSE PROPERTY
DAMAGE, PERSONAL INJURY OR DEATH.
* IF A FIRE SHOULD OCCUR, KEEP AWAY FROM THE APPLIANCE AND IMMEDIATELY CALL YOUR FIRE DEPARTMENT.
DO NOT ATTEMPT TO EXTINGUISH AN OIL/GREASE FIRE WITH WATER.
Outdoor gas grill
CQ_BBQ_002
Propane (LPG)
11 IWC
9200 BTU/hr
4600 BTU/hr per side
See bottom of product
5016109
Minimum clearance from side and back of unit to combustible construction:
24”(610 mm) from sides and 24”(610 mm) from back.
a. Do not store a spare LP-gas cylinder under or near this appliance.
b. Never ll the cylinder beyond 80 percent full;
If the information in (a) and (b) is not followed exactly, a re causing death or
serious injury may occur.
The instruction manual contains important information necessary for the proper
assembly and safe use of the appliance.
Read and follow all warnings and instructions before assembling and using the
appliance.
nomadiQ grills
2913 Crestline Avenue,
Raleigh, NC 27603
This appliance is not intended for commercial use
Conforms to ANSI STD Z21.89-2017
Certied to CSA STD 1.18-2017
Outdoor Specialty Gas Appliance
The gas pressure regulator provided with this appliance must be used.
Replace only with regulator model no. TYQ-4A1
Turn of LP supply when appliance is not in use.
FOR OUTDOOR USE ONLY
If stored indoors, detach and leave cylinder outdoors
If instructions or parts are missing contact support@nomadiqgrills.com
O
+
min
max
off
LIGHTING INSTRUCTIONS - FOR ALL BURNERS
READ THE INSTRUCTIONS CAREFULLY BEFORE LIGHTING.
WARNING: DO NOT LEAN OVER GRILL WHEN LIGHTING.
1. Install the appliance and screw both hoses of the gas hose assembly to the appliance
(refer to manual for correct installation)
2. Turn the control knob on both sides to o “O“ position.
3. Install the gas cannister to the gas regulator connected to the hose assembly
4. Press and turn the control knob counterclockwise to the maximum setting “ “
5. Wait for 5 seconds and press the ignitor, the burner should ignite.
IF IGNITION DOES NOT TAKE PLACE AFTER SEVERAL TRIES, TURN
THE CONTROL KNOB TO OFF“O“ POSITION AND REFER TO
MANUAL FOR TROUBLE SHOOTING.
6. Repeat steps 4 and 5 above for the other burner.

19
WWW.NOMADIQGRILLS.COM
Manual de uso
NomadiQ asador de gas portátil
Gracias!
Gracias por elegir nomadiQ Grill, el primer asador de gas portátil del mundo. Esperamos que encuentre
las instrucciones de este manual de uso útiles y fáciles de seguir. Solo le tomará unos minutos de su tiempo
aprender a usar el asador correctamente y experimentar lo mejor de él. ¡Disfruta asando en (casi) todas
partes!
Una vez que haya terminado de leer las instrucciones, guarde este manual de uso en un lugar seguro para
futuras consultas.
Saludos cordiales,
Equipo nomadiQ
Tabla de contenidos
1. Advertencias e instrucciones de seguridad página 20
2. Dibujos y representaciones visuales página 21
3. Conexiones de gas y regulador página 21
4. Instrucciones de uso: página 23
4.1 Antes de usar
4.2 Durante su uso
4.3 Después de su uso
5. Solución de problemas página 24
6. Limpieza &mantenimiento página 24
7. Servicio al cliente página 26
8. Garantía página 26
9. Especificaciones técnicas e instrucciones de iluminación página 28

20 WWW.NOMADIQGRILLS.COM
1. Advertencias e instrucciones de seguridad
¡ADVERTENCIA!
• NO OPERE ESTE APARATO ANTES DE LEER CUIDADOSAMENTE EL MANUAL DE USO
• NO OPERE ESTE APARATO EN INTERIORES, ES SOLO PARA USO EN EXTERIORES
• NO COLOQUE OBJETOS SOBRE ESTE APARATO
• NO ALMACENE, NI UTILICE PRODUCTOS QUÍMICOS, MATERIALES INFLAMABLES O AEROSOLES VAPORIZADOS
CERCA DE ESTE APARATO
• LEA ATENTAMENTE ESTE MANUAL DE USO PARA FAMILIARIZARSE CON EL APARATO ANTES DE CONECTARLO A SU
TANQUE DE GAS.
¡PELIGRO!
SI HUELES GAS;
• APAGUE EL GAS EN EL APARATO.
• EXTINGUR CUALQUIER TIPO DE FUEGO
• SI EL OLOR CONTINÚA, MANTÉNGASE ALEJADO DEL APARATO Y LLAME INMEDIATAMENTE A SU PROVEEDOR
DE GAS O AL SERVICIO DE BOMBEROS.
Una fuga de gas puede causar un incendio o explosión. Puede causar lesiones corporales graves, la muerte, o daños
a la propiedad.
¡ADVERTENCIA!
SIGA TODOS LOS PROCEDIMIENTOS DE VERIFICACIÓN DE FUGAS CUIDADOSAMENTE EN ESTE MANUAL DE USO
ANTES DE LA OPERACIÓN DEL ASADOR.
Advertencias generales e instrucciones de seguridad:
1. Siga todas las advertencias e instrucciones de seguridad cuando utilice el aparato.
2. Conserve este manual de uso para futuras consultas.
3. No use este asador a menos que todas las piezas estén en su lugar. El producto debe estar bien
ensamblado. Por favor siga las instrucciones cuidadosamente.
4. Cuando instale el producto, asegúrese de que esté sobre una superficie estable (horizontal) y plana,
suficientemente grande para detener el producto y aguante temperaturas de 60°C sobre la tempe-
ratura ambiente.
5. Asegúrese de que el producto tenga una separación adecuada con los materiales inflamables. Todos
los materiales inflamables deben mantenerse a más de 61 cm de los lados y por la parte trasera del
producto a más de 61 cm.
6. Mientras se enciende el aparato o se cocina, nunca se incline sobre el producto.
7. Este aparato nunca debe ser utilizado por niños. Las partes de facil acceso del asador pueden estar
muy calientes. Mantenga a los niños pequeños y mascotas a una distancia segura mientras usa el
producto.
8. Precaución al utilizar el aparato. Estará caliente durante y después de su uso. Nunca debe dejarse
desatendido, ni moverse durante su uso.
9. Si el quemador se apaga mientras el producto está en uso, apague el producto cerrando la válvula de
gas. Espere unos minutos antes de intentar reencender el aparato, siguiendo las instrucciones de uso.
10. No ponga una tapa, ni nada inflamable en el asador mientras el aparato esté en uso o siga caliente.
11. Las personas con ropa inflamable, como el nylon, deben mantenerse lejos del asador cuando esté en
uso.
12. En caso de que ocurra un brote incontrolado, aleje los alimentos de las llamas hasta que el brote
disminuya.
13. Si se produce un incendio de grasa, apague el quemador/equipo hasta que se apague el fuego.
14. Este asador de gas no está diseñado para uso comercial.
15. Se debe tener cuidado especial al retirar las bandejas de goteo. El mal manejo del aceite y las grasas
calientes pueden causar lesiones graves.
16. El aparato debe limpiarse a fondo regularmente.
17. Use herramientas de asador resistentes al calor y/o guantes para horno cuando opere la parrilla.
18. Mantenga la manguera de suministro de gas lejos de superficies calientes.
19. No intente desconectar el regulador de gas, el tanque o cualquier otro accesorio de gas mientras el
asador esté en uso.
20. Utilice el regulador que se suministra con este aparato.
21. Utilice únicamente accesorios originales y otras piezas originales para el uso del producto.
22. No opere el asador de gas si se presenta una fuga de gas.
23. No utilice una llama para comprobar si hay fugas de gas.
24. Use solamente tanques de gas propano portatil (desechables).
25. El gas propano no es gas natural. La conversión o el intento de uso de gas natural en una unidad de
gas propano es peligroso y anulará la garantía.
Table of contents
Languages:
Other nomadiQ Grill manuals


