Norand Mono User manual

2/8/2021 Norand Mono Manual
localhost:3000/manual 1/23
Quick-Start
If you are eager to start making music with Mono right now, this couple of
pages should get you started.
Panel Layout
Synthesis section
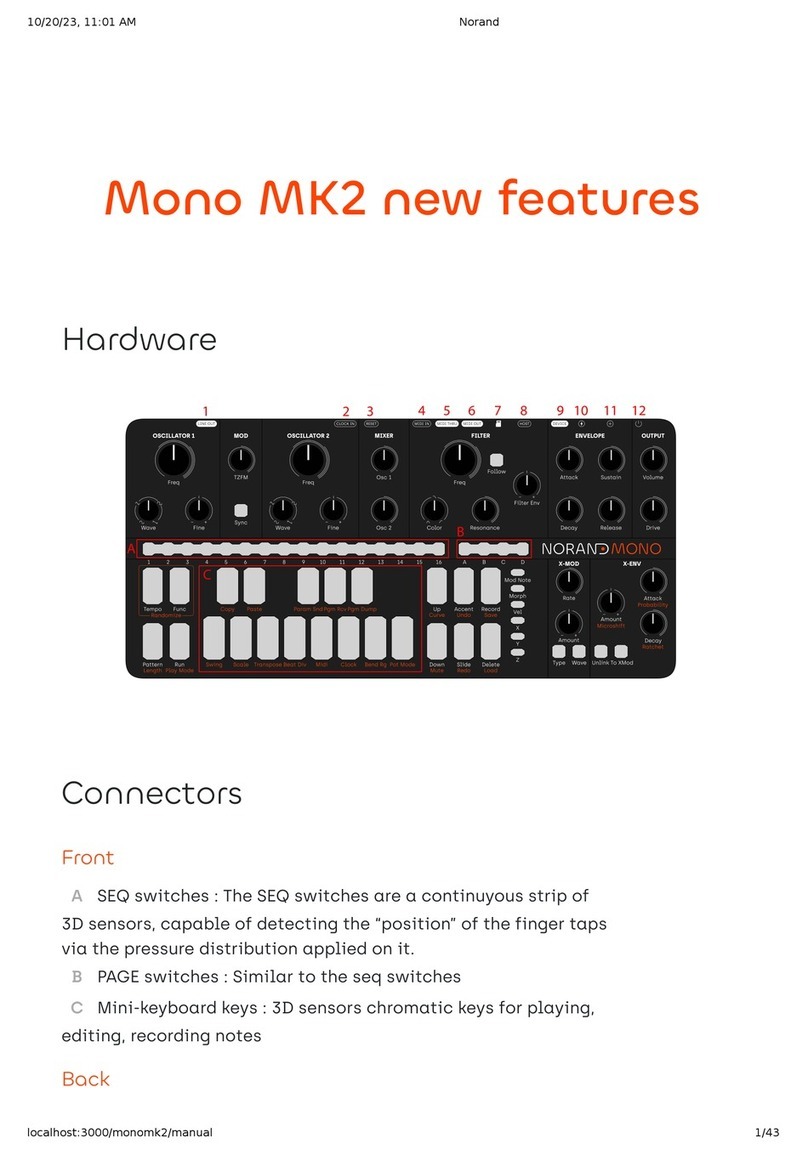
AOscillator section : 2 oscillators with quantized frequency, bipolar
detune and continuously variable waveform controls. Mod section with
Thru-Zero Frequency Modulation (TZFM) and hard-sync from oscillator
1 to oscillator 2.
BMixer section : set oscillators level. Above a certain oscillator level,
the filter will softly saturate said oscillator, resulting in interesting
timbres.
CFilter section : state Variable Filter with cutoff, resonance,
continuously variable state, and bipolar envelope amount controls, as
well as a keyboard tracking “Follow” switch. Filter is self-resonant at
maximum resonance.
DMain envelope : a classic ADSR envelope. It is rettringering,
meaning a new note will restart the cycle.
EOutput volume : pretty self-explanatory, although it’s a digital control
so it can also be modulated (Audio rate amplitude modulation ? Oh
yes.)
FX-Modulator : parameter-dedicated modulation oscillators with 4
types - low frequency, low frequency synced, audio-rate, audio-rate
quantized -, 4 waves - sine, triangle, square, sawtooth-, rate control
and bipolar amount control.
GX-Envelope : parameter-dedicated AD envelope with attack, decay,
and amount controls.
Each of the 20 synthesizer parameters have their own dedicated X-Mod
and X-Env (even sync and follow). To access it, just gently move the knob of
the parameter you want to select and the parameter LED will turn on.
Sequencer section

2/8/2021 Norand Mono Manual
localhost:3000/manual 2/23
1Menu switches :
Run : start and stop the sequencer player
Pattern : select current pattern
Tempo : set tempo using up/down switches, step
switches, or X-Mod amount knob for vinyl-like speed
adjust.
Hold Func + Tempo to randomize something, see
randomize bubble
Up/Down : select current octave. Hold func +
Up/Down to rotate pattern. Press the 2 buttons to
enter Mod Note mode, see mod note bubble.
Accent/Glide : Hold and press steps to add accent or
glide. Hold func and press to undo/redo. Every single
action on Mono can be undone.
Record : enter/leave record mode. In record mode,
incoming notes from external and internal keyboard
will be recorded. Also, knobs movements will be
recorded as automation as well.
Delete : Hold delete and press a page or step switch,
or rotate a knob to delete associated data.
2Step switches : these 16 switches along with the page selection
switches allow users to edit the 64 step-sequence, and access other
settings such as length, pattern, and synth settings.
Add note : press the switch to add selected note
Edit note length : hold start position, then press end
position
Edit pattern length : hold Func and press pattern, then
press a step to set the length
Change pattern : press pattern, press step
Manually enter tempo : hold tempo, enter digits with
steps, release tempo
Edit settings : see settings cheat sheet
3Mini keyboard : Allow to select the note to be added on a step
(shown by bright LED). Pressing the switch will play the associated
note. The LED will reflect the current scale.
4Page switches : Select current page
To Copy/Paste : Hold func and press copy rst (copy will blink), then select
the item to be copied (step, page, knob automation, pattern or project).
Hold func and press paste (paste will blink), then select the paste
destination.
Settings : Hold Func and press desired settings, select value, press Func to
exit
Connectors

2/8/2021 Norand Mono Manual
localhost:3000/manual 3/23
1DC IN : Use the included PSU power adapter connected to a power
outlet.
2POWER : Turns the unit on and off.
3USB : Use an A to B USB 2.0 connector cable to a computer host.
4MIDI OUT : Midi data output, use a standard MIDI cable to connect to
MIDI In of an external MIDI device. Outputs the currently playing
sequence.
5MIDI THRU : Forwards data from MIDI IN. Use a standard MIDI cable
to connect another MIDI device in the chain.
6MIDI IN : MIDI data input, use a standard MIDI cable to connect to
MIDI Out of an external MIDI device.
7ACCENT OUT : Outputs a 5V gate signal for each accented steps,
use a standard Eurorack cable.
8CV2 : Outputs one of the configurable sources as an analog CV, use
a standard Eurorack cable.
9GATE OUT : Outputs the current pattern note trigs as a 5V gate
signal, use a standard ¼” Eurorack cable.
10 CV OUT : Outputs the current pattern pitch as a 1V/Oct signal, use a
standard Eurorack cable.
11 RESET INPUT : CV clock reset input, use a standard Eurorack cable.
12 CLOCK INPUT : CV clock pulse input, use a standard Eurorack
cable.
13 MAIN OUTPUT : Use a ¼” TRS phone plug (Balanced connection)
Mono vocabulary
Project : Top structure of mono data architecture, This holds 64 patterns,
global settings 40 Mod Notes and 4 custom scales.
Pattern : A sequence of steps to be played in a loop
Step : An element holding information to be sent to the synthesis engine to
“play” sound.
Synth parameter : A parameter directly controlling the internal CVs of the
underlying analog synthesis engine, such as Wave, Freq, Cuto … Even
though the envelope is digital, envelope parameters are considered synth
parameters as well.
Modulation parameter : A parameter that modulates a given synth
parameter. Each synth parameters have dedicated modulation parameters.
Patch : All synth and modulation parameters that form a particular sound.
Each pattern holds its own patch.
Note trig : Information held in a step, triggering the synth engine with a
given note.
Parameter oset : Information held in a step, osetting the value of a given
parameter for the duration of that step.
Mono sound architecture

2/8/2021 Norand Mono Manual
localhost:3000/manual 4/23
Mono data architecture
Randomizer
Hold [FUNC] + [TEMPO] and :
Press a [PAGE] key : add between 1 and 4 random notes to
the page, the added note are always in scale.
Press a [SEQ] key : Randomize every parameter of said step
except its pitch
Press [GLIDE] or [ACCENT] key to add random glides and
accents
Move a parameter's knob to create a random automation
Remember you can always undo if you don’t like what you
hear

2/8/2021 Norand Mono Manual
localhost:3000/manual 5/23
Settings cheat sheet
Swing : Set the swing amount from none to max (16 values) with a [SEQ]
key.
Scale : Set root note with [NOTE] keys, and scale with the [SEQ] keys.
1 Chromatic (default)
2 Major
3 Melodic minor
4 Harmonic minor
5 Arabic
6 Dorian
7 Aeolian
8 Phrygian
9 Gypsy
10 Mixolidian
11 Romanian minor
12 Gypsy minor
13 japanese
14 Spanish
15 blues
Transpose : Set transpose with [NOTE] keys for semi-tone transposition
and [UP]/[DOWN] key for octave transposition.
Beat div : Change the beat division of the current pattern with a [SEQ] key,
from 1 step per beat to 16.
MIDI/Clock : Set MIDI channel with [SEQ] key, and clock source with [PAGE]
key.
1 USB 2 MIDI 3 CV
Pot Mode : Sets potentiometer mode.
1 Jump 2 Passthru 3 Relative
Bend Rg : Sets pitch bend range from 1 to 16 semitones with [SEQ] key.
CV2 Src : Sets the CV2 output source.
1 Osc1 freq
2 Osc2 freq
3 Cuto
4 Envelope
5 Output level
6 Clock out
Clock/Trig in : In the CV2 source settings, page A and B are used to set the
clock input behaviour. Default is Clock input (A), B transforms the input into
a trigger input.
Param Snd : Enable/Disable CC parameter send.
Mod note mode
In Mod Note mode, the keyboard no longer act as chromatic,
each of the 8 bottom mini keyboard [NOTE] keys has its own
set of parameters, its own timbre in a way.
Each project has 5 pages of Mod notes, scroll with [UP] or
[DOWN] key. When the mode is activated, both [UP] and
[DOWN] key LED are on.
To edit one of the moded note, hold a mini-keyboard key and
set its parameter. You can then add steps of the selected
moded note, or play live and record it.

2/8/2021 Norand Mono Manual
localhost:3000/manual 6/23
1 Disabled 2 Enabled
Pgm Rcv : Wait to receive a project le as sysex.
Pgm Dump : Dump the current project as a sysex le
Intro
What is Norand Mono ? Well, (not so) simply put, it is an analog monophonic
synthesizer with a large set of performance-oriented digital features. At the
heart of this small synthesizer lies an all analog signal path, with uniquely
designed circuit blocks. The circuits are not cloned from anything, they are
original designs (at least to my knowledge, of course). Each of these analog
blocks are voltage-controlled by powerful Digital-to-Analog converters,
which allow for high-denition, independent audio-rate controls and
modulations. The “brain” of the synth is a last-generation microcontroller
running at a whooping 480MHz, which allows smooth computation of these
voltage source outputs.
Mono’s interface is split in three distinctive blocks :
The synthesis block : where most of the sound timbre is crafted. This is the
top part of Mono - the synthesis block controls synth parameters such as
osc frequency, lter cut-o, etc, are called synth parameters.
The modulation block : where you can program modulations for synth
parameters. This is not a single LFO and Envelope - every single synthesis
parameter has its own dedicated modulation block. The modulation block
controls are called modulation parameters.
The sequencer block : where you can record, edit, and play sequences of
notes, parameters, modulations … On mono, everything is “sequencable”.
Now anyone with a decent understanding of synthesis can just power on
Mono and start making music. However, I want this manual to toroughly
explain each element. The synthesis part of this manual explains a lot of
what Mono can do that other synths can’t do, it’s pretty technical but it's an
important step to master the synth.
“So you expect me to read?!”
Well … yes ! Mono is designed to be programmed by the user from scratch.
The 303-like look is not there just because I nd it beautiful. What was
amazing with these old-school synths was the spontaneity, ease of use,
and instant fun. Now of course the more complicated and feature rich the
synth is, the less spontaneous it could be. Therefore, the boring part :
RTFM. The point of this manual is not just to give you a list of the features
and step-by-step instructions, but to highlight and demonstrate how you
can use these features in real world sound-design examples!
Synthesis Engine
Intro
By the looks of it, Mono has everything of an East Coast synthesizer. There
is a clear signal ow from left to right, starting from the oscillators, through
the lter, and nally to the amplier. But the contextual modulations (X-

2/8/2021 Norand Mono Manual
localhost:3000/manual 7/23
Modulator and X-Envelope) let any user alter each synth parameter so
deeply that one can eectively use west coast synthesis techniques to
craft the timbre. Indeed, one can easily make a good sounding patch using
a single oscillator with Mono ! Let’s dive into each part.
Oscillator block
Mono oers 2 analog oscillators with continuously variable waveforms,
thru-zero frequency modulation, and hard sync. For the electronic geeks
among us, the oscillators are based around a unique discrete asymmetric
East coast synthesis
VCO VCF VCA
East coast synthesis usually describe subtractive synthesis
techniques, where the sound designers start with an oscillator
rich in harmonics, and then shape the sound by removing
(subtracting) harmonics with lters.
West coast synthesis
EG VCO LPG
West Coast synthesis describes a dierent approach. It
tipically feature oscillators with simple shapes, that are then
heavily modulated using FM and waveshaping techniques to
create complex timbre.

2/8/2021 Norand Mono Manual
localhost:3000/manual 8/23
integrator. In “layman” terms, it means that the triangle core waveform is
not perfect, it is a bit “skewed”, which gives it and the sinus wave a slightly
richer harmonic content.
Each oscillator has 3 parameters. The big [FREQ] knob adjusts the pitch in
semitones, from C0 to C8. The [DETUNE] knob has a range of two
semitones, with a pitch perfect 440Hz tuning in the middle.
The [WAVE] parameters smoothly fade from sinus, to triangle, to square
and nally to sawtooth wave. You basically go from the dullest of sounds to
the richest in terms of harmonics.
The two mod parameters give you additional sound design tools : the
[SYNC] key synchronizes the wave cycle of oscillator 2 with oscillator 1; the
[TZFM] parameter modulates the frequency of oscillator 2 · the carrier ·
with oscillator 1 · the modulator ·. It is analog thru-zero frequency
modulation, which has a very rich distinctive sound.
Finally you can adjust the amount of both oscillators fed to the lter with
[OSC1] and [OSC2] parameters. At high gain, the oscillators overdrive the
lter, so you can also use this parameter creatively.
Although limited compared to other big monosynths (only 2 oscillators ?!
No noise ?! What is this ?), this oscillator block allows for a huge landscape
of timbre. This can range from subtle bell-like sounds to very harsh
saturated noise. All this without even touching contextual modulation.
Adding the latter makes for a very complex oscillator system.
Just a simple example : use the X-Modulator at audio rate on the Freq
parameter of both oscillators - you get a 4-operator hybrid FM synth (for
normal people, this translates to: “You can do some pretty cool stu with
this synth”).
Oscillator Sync
I’m lazy so here is the wikipedia denition : As one oscillator ·
the master · nishes a cycle, it resets the period of another
oscillator · the slave ·, forcing the latter to have the same base
frequency. This can produce a harmonically rich sound, the
timbre of which can be altered by varying the synced
oscillator's frequency. And here is a nice schematic with
sawtooth wave example.
Thru-Zero Frequency
modulation

2/8/2021 Norand Mono Manual
localhost:3000/manual 9/23
Filter block
Mono’s lter is a resonant lter with low-pass, high-pass and band-pass
output. Like the oscillator, it is a unique design : discrete integrator cells
arranged in a three cell 18dB slope state-variable lter. It features a stable
self oscillation at maximum resonance and it is precisely tuned like the
oscillators. When driven hard, it saturates the input signal asymmetrically ·
only the negative voltage is clipped ·.
The [CUTOFF] parameter sets the frequency, from C-1 to C10. Although
you won't necessarily hear it because it is smoothed, the lter knob is
quantized to semitones (just the knob, not the modulations). This is a
controversial feature, but this is the only way to make the lter resonance
perfectly tuned with the oscillator.
The [RESONANCE] parameter goes from a very attenuated cuto point to
self-resonant, with lots of nice things in the middle. The resonance peak is
quite shallow, which allows the user to “scan” the harmonic content of the
input when swept.
The [COLOR] parameters continuously fade from band-pass, to low-pass,
to high-pass output. On these types of continous outputs, you’ll usually
nd band-pass in the middle, but I nd that quite boring, so there’s that.
There are some very interesting timbres in between each output. For
example, put the knob halfway between low-pass and high-pass, and you
get a resonant all-pass lter !
The [FOLLOW] key toggles keyboard follow : when enabled, cuto
frequency is linked to the current note pitch.
Finally the [ENV AMOUNT] parameter adjusts how much of the main
envelope contour is applied to the cuto frequency parameter. It’s bipolar :
no eect in the center position, positive envelope in the clockwise
direction, and negative envelope in the counter-clockwise direction.
FM (Frequency Modulation) is a very deep subject with whole
books written about it, I’ll do my best to explain it shortly. Let’s
start with what FM is : the output of one oscillator · the
modulator · is used to control the frequency of another
oscillator · the carrier ·. This will in turn enrich the harmonic
content of the carrier, by eectively “spliting” each of it’s base
harmonic. There are two main type of FM : exponential and
linear. Unlike exponential FM, linear FM can reach zero hertz,
which basically stops the oscillators, which is not very pleasing
in term of musicality. Thru-zero FM alleviate this problem by
introducing “negative” frequency. When the oscilator reaches
zero hertz, it will reverse it’s cycle and start oscillating
backward, and when it crosses zero hertz, it will reverse again
back to “positive” frequencies. Note that I put negative and
positive in quote, in the real world there is no such thing as
negative frequency.

2/8/2021 Norand Mono Manual
localhost:3000/manual 10/23
Amplifier and main envelope
There is not much to say here, the [VOLUME] parameters surprisingly
adjust the output volume. The envelope is a (somewhat) classic exponential
ADSR envelope with no retriggering.
There is a case where it doesn’t behave like a classic analog envelope
though : Usually when given a short trigger, an ADSR will perform its attack
cycle only if very short, and then the release cycle. If the trigger is too short
or the attack is long, it won't even reach the maximum level. If this was the
case here, the attack parameter would be useless when using the
sequencer.
Here is how it works instead : when the gate is shorter than the attack time,
the envelope acts as an AD envelope : it will perform a full attack cycle, and
then a decay cycle down to 0.
Modulation
Intro
This is where all the fun begins … Remember your old synth where you get
to play with one LFO that you can assign to a 2 or 3 parameters ? Those
were great ! Then the digital era introduced the “Modulation Matrix” which
are admittedly much better in terms of synthesis possibilities, but are kind
of a pain in the arse to work with. One of my favourite features with
software synths is the fact that one can have an unlimited amount of
modulators for each and every possible synthesis parameter - Mono
implements this without menu-diving or 200 potentiometers.
Contextual modulators
When you select something in a software instrument, you usually get a
contextual menu appearing somewhere. Mono’s X-modulator and X-
envelope works in the same way. When you slightly move a parameter’s
potentiometer, it will be selected (a selected parameter is indicated by a
bright LED). You can then edit that parameter's AD envelope and modulator.

2/8/2021 Norand Mono Manual
localhost:3000/manual 11/23
Every single parameter of Mono has its own envelope and modulator with
their dedicated settings, there are no limitations. That’s 20 Modulators and
16 AD envelopes. the main envelope parameters don’t have an envelope,
that wouldn’t make sense.
If you have tons of modulation on a patch and you are lost, you can hold the
[FUNC] key, the potentiometer LED intensity will reect the modulation of
each parameter as long as you hold [FUNC].
X-Envelope
The X-Envelopes are AD envelopes triggered by the sequencer’s note trig
or incoming MIDI. Like the main envelope, they always complete their
attack cycle before going to the decay cycle. The [ATTACK] and [DECAY]
potentiometers control attack and decay times, and the [AMOUNT]
potentiometer controls the envelope amount. Like the lter, it is bipolar, you
can have negative or positive envelopes.
X-Modulator
The X-Modulators are simple oscillators, I didn’t call them LFO because one
of their best use cases is in audio rate mode.
The [WAVE] key cycles between sinusoidal, triangle, square and sawtooth
waveforms.
The [TYPE] key lets you select one of the 3 types : LFO (LED o), synced
LFO (LED blinking), and Audio Rate (LED on). LFO mode gives you rates
between 40 seconds and 100ms, synced LFO has 12 dierent sync values,
and resets at the beginning of the pattern. At audio-rate you get a tuned
modulator ranging from C0 to C8. In audio rate, the X-modulators follow
oscillator 1 frequency. The waveform is anti-aliased before analog
conversion.
A few examples
Kick drum
A kick drum starts with a simple tone with a pitch
envelope.
Open the lter
turn up oscillator one
Set oscillator 1 wave to sinus
Set a low frequency to oscillator 1
Select Oscillator 1
Set X-Env Attack to minimum
Set X-Env Decay center
Slowly turn X-Env amount clockwise while triggering Mono
Et voilà, the beginning of your own amazing kick
Evolving phase effect
When 2 oscillator's frequencies are very close, it leads to interesting phase
eects. If you modulate that frequency with an LFO, the eect will evolve in
time, leading to even nicer subtle changes.
Open the lter
Turn up both oscillator
Set both oscillator frequency to the same pitch
Select oscillator 1 detune
Set X-Mod to LFO or Synced LFO

2/8/2021 Norand Mono Manual
localhost:3000/manual 12/23
Set X-Mod Rate as you see t
Slowly turn X-Mod amount, either way
Let the magic happen
Pinged FM sound
Most
string
instruments have a rich harmonic content at the beginning, and then slowly
fade to a more mued sound. In East-Coast synthesis this is usually
imitated with an enveloped low-pass lter. West-Coast approach usually
involve FM instead, here is one way to do it :
Open the lter
Turn up oscillator 2
Set oscillator 2 to sinus wave
Set oscillator 1 and 2 frequency 1 octave apart (or not)
Select FM parameter
Set X-Env Attack to minimum
Set X-Env Decay center
Slowly turn X-Env amount clockwise while triggering Mono
The more you open it, the bigger the eect
Filter FM
Mono’s lter responds really well to frequency
modulation, it’s a cool option to add harmonic
content to any patch.
Start with any patch you want
Select lter cuto parameter
Set X-Mod to audio-rate
Set X-Mod rate dead center (frequency will be the
same as osc1)
Turn X-Mod amount left or right to add FM
Changing X-Mod wave gives a dierent FM “avour”
Sequencer
Intro
Mono’s sequencer does everything you’d expect from an integrated
sequencer, and more. I tried to implement everything that made sense,
without cluttering the interface too much. The sequencer was designed to
give musicians a way to fully customize sequences by recording
automation on any desired parameter. The powerful clocking system
makes Mono extremely versatile, whether you are in the studio, in a live
situation or even in DJ sets. Mod Note mode replaces notes by user
dened timbre.

2/8/2021 Norand Mono Manual
localhost:3000/manual 13/23
Projects and basic pattern operation
Projects
Mono holds 32 projects in memory. Projects need to be saved to be
persisted in memory, save by holding [FUNC] and hitting [SAVE]. To load a
project, hold [FUNC] and hit [LOAD]. Projects are organised into pages of
16, use the [PAGE] key to select a page (projects 1 to 16 are on page A,
projects 17 to 32 on page B), then hit a [SEQ] key to load the desired
project. Don’t forget to save the current project before loading another one
! Saving and loading is very fast (less than a second) and doesn’t break
tempo, you can safely load and save in the middle of a live show.
Projects can be changed while the sequencer is running
While in project load mode, hold [FUNC] + [PASTE] and press a [SEQ] key
to copy the current project to the desired slot. Note that the previous
projects of that slot will be permanently erased.
Patterns
The 64 patterns of a project are organised into 4 pages. Hit the [PATTERN]
key to open pattern selection mode, then select a [PAGE] and hit a [SEQ]
key to set the current pattern. For example, press C, then 5 to select the
C05 pattern. Temporarily holding a [SEQ] key will play the pattern as long as
it is held, the previous pattern will resume playing when releasing the key.
Press [PATTERN] again to quit pattern selection mode. You can also hold
the [PATTERN] key to select a pattern.
Patterns can be changed while the sequencer is running.
Patterns can be changed with program changes messages.
While in pattern selection mode, hold [FUNC] + [COPY] and hit a [SEQ] key
to copy the desired pattern, then hold [FUNC] + [PASTE] and hit the
destination [SEQ] key.
Hold [FUNC] + [DELETE], and hit a [SEQ] key to clear the desired pattern.
Note that undoing a pattern clear can only be done once, if you clear a
pattern, make a new one, and clear that, you won't be able to recall the
rst cleared pattern.
Pattern control
Press [RUN] to start the playback of a pattern, press [RUN] again to stop
and reset. The [SEQ] keys LEDs indicate the playback position. If a pattern
contains more than 16 steps, the [PAGE] keys LED indicate the position.
The currently selected page is indicated by a dimmed LED.
Pattern Length
Hold [FUNC] and hit [LENGTH] to open the pattern length setting. You are
now familiar with the next step : select “page” length with a [PAGE] key, then
the actual length with a [SEQ] key. For example for a 50 step pattern, press
[PAGE] D and [SEQ] 2 (3x16+2), should be doable even after a few beers. Hit
[FUNC] to leave setting mode.
Tempo
When clocked internally, there are several ways to change the current
tempo.
Hold [TEMPO] and press [UP] or [DOWN] to increment or decrement the
tempo by 1.
Hold [TEMPO] and enter a number with the 0 to 9 [SEQ] key. For example,
for 135BPM, hold [TEMPO] press [SEQ] 1, then 3, then 5, and release
[TEMPO].
Tap the [TEMPO] key in a steady rhythm at least 4 times to set a tempo
manually. After four consecutive taps, the average tempo of the taps will

2/8/2021 Norand Mono Manual
localhost:3000/manual 14/23
be calculated. By continuing tapping, the average tempo will keep on
updating.
Hold [TEMPO] and rotate the X-MOD [AMOUNT] potentiometer to speed
up/slow down tempo by +/-16%, the pot center being 0. Similar to a
turntable pitch fader.
Play modes
You can change the behaviour of the sequencer when a pattern switch
occurs with the play mode setting. There are 3 play modes, if you are
familiar with Elektron gear, they are equivalent (no need to reinvent what’s
already great right ?).
Sequential (default) : The pattern switch occurs at the end of the currently
playing pattern
Direct Jump : The pattern switch occurs immediately, the new pattern will
start from the position where the previous pattern left o.
Direct Start : The pattern switch occurs immediately, the new pattern will
start playing from the beginning.
Loop mode
Loop mode is a live oriented feature that allows you to play a small part of a
pattern temporarily. It is especially useful in live situations to create
movement on-the-y. To enable it, hold [FUNC] and select your start point
byt hitting a [SEQ] key, then the end point with another [SEQ] key. The loop
will start at the next step after releasing the [FUNC] key. To leave the loop,
hit [FUNC] again. The full pattern will resume playback as if it was running in
the background. Loop mode only works on a single page, selecting a start
point located after the end point plays the loop backward.
Song mode
It is possible to chain up to 8 patterns to create a song. When a song is
playing, it will play the selected pattern sequentially, and loop back to the
rst one at the end. To create a song, you need to be in pattern mode, press
[PATTERN], the LED should be on. Once in pattern mode, hold [PATTERN]
and hit the [SEQ] key of the pattern you want to add to your song in the
correct order (you can add the same pattern several times). Once you
release [PATTERN], your song will start playing. To leave song mode, press
a [SEQ] key.
Patchless pattern
When playing a song with normal patterns, the patch of the patterns will be
called at each jump, so if you have the same patch on several patterns, it
will be recalled as it was on each jump. If you are modulating a parameter
live, this is not the behaviour you expect from the synth.
To remedy this issue, you can set a pattern in “patchless mode”. A
patchless pattern won’t call it’s associated patch when it starts, it will keep
the previous pattern patch. This way you can create a song with the same
patch by setting each pattern in patchless mode (not the rst one
obviously).
To set a pattern in patchless mode, hold [PATTERN] and hit [RECORD], the
blinking [PATTERN] LED indicates that the current pattern is patchless.
Hold [PATTERN] and press [RECORD] to disable patchless mode.
Editing a pattern
There are two ways of adding notes and automations with Mono : either by
inputting it manually, or by recording it live while the sequencer is running in
record mode. Each step contains information that dictates the behaviour of
the synthesis engine at said step. A step can trigger a note with a note trig,
but can also contain only parameter osets which alters the timbre.

2/8/2021 Norand Mono Manual
localhost:3000/manual 15/23
Mini keyboard
The [NOTE] keys act like a one octave keyboard (without velocity of
course). You can play a note to preview your current patch, use it in record
mode, and select the currently active note. When booting up, the active
note is C4, the selected note is indicated by a bright [NOTE] key LED. Press
a [NOTE] key to change the currently selected note. Use the [UP] and
[DOWN] key to change the current octave. There are 9 octaves available,
from C0 to C10.
Adding notes manually
Adding note trigs manually on Mono is quite simple : just hit the desired
[SEQ] key, it adds a note trig on that step with the currently selected
[NOTE]. An active step is indicated by a bright LED. Select the page where
you want to add a note with the [PAGE] key. To remove a note trig, hit a step
with an active note trig, the led will turn o.
Recording notes
You can record incoming notes live using the [NOTE] keys or an external
keyboard. Enable recording by pressing the [RECORD] key. The [RECORD]
key LED indicates wether the record mode is enabled or not. Recording a
note on top of an already active note trig overwrites it. Notes are recorded
with a precise timestamp and won't be quantized. To quantize the recorded
note you need to reset their microshift value.
Change the pitch of a note
Hold the [SEQ] key of an active step and hit the desired [NOTE] key. You can
also change the octave by holding the [SEQ] key and hitting [UP] or
[DOWN].
Note length
Single step note trigs, and very short recorded notes have a particular
behaviour on Mono. Classic ADSR envelope will not do much with a short
pulse - if the attack is longer than a few ms, you won’t hear anything …
Fortunately Mono’s envelopes are digital ! Basically, when the sequencer
hits a single step note trig, the envelope will act as an AD envelope,
ignoring sustain and release values. It was actually implemented by
mistake, but I found it amazing so I kept it.
Anyway, to edit a note length, hold the [SEQ] key of the desired step, and hit
the [SEQ] key where you want the note to end. The length will be visible
with dimmed [SEQ] LEDs.
Step parameters
Accent
Accent can be added on a per step basis. Hit [ACCENT] to open accent
mode, and hit the desired [SEQ] key to add or remove accents from steps.
In accent mode, the active note trigs are shown by a dim [SEQ] key LED,
active accents are shown by a bright [SEQ] key LED. Hit [ACCENT] again to
leave accent mode. The same can be done when just holding the [ACCENT]
key.
Accent parameters
By default an accent slightly increases the amp level and the lter cut-o
frequency, but this is entirely customisable. To set your own accent
parameters on the active pattern, start by clearing it by holding [DELETE]
and hitting [ACCENT]. Then hold [ACCENT] and turn any parameter
potentiometer to the desired value. The value stored in memory is an oset
from the initial value to the last position of the potentiometer. For example,
if the cuto value is set dead center and you move it 20% to the right while
holding [ACCENT], every accented step will have a higher cut-o frequency

2/8/2021 Norand Mono Manual
localhost:3000/manual 16/23
by this amount, whatever the current value is, or if there is automation on
that step. You can add as many values as you want, be it synth parameters
or modulation parameters.
Slide
Slide can be added on a per step basis. Hit [SLIDE] to open slide mode, and
hit the desired [SEQ] key to add or remove slide to a step. When a slide is
active on a step, all the step parameters will slide linearly to the next step
parameters (note as well as parameter osets). In slide mode, the active
note trigs are shown by a dim [SEQ] key LED. Active slide trigs are shown by
a bright [SEQ] key LED. Hit [SLIDE] again to leave slide mode. The same can
be done when just holding the [SLIDE] key.
Microshift, probability, ratchet
Each step of a pattern contains a microshift, probability, and ratchet value.
These 3 parameters together allow musicians to create very organic
sequences - it’s an excellent way to break the 4/4 monotony that usually
haunts an x0x-style sequencer. To edit one of these parameters, hold
[FUNC] + the desired [SEQ] key, and set the value with [MICROSHIFT],
[PROBABILITY] or [RATCHET] potentiometer.
Microshift : The microshift parameter shifts the starting point of a step
forward or backward by up to ½ step.
Ratchet : The ratchet parameter multiplies the number of note trigs in a
single step. From 1 (default behaviour) when the pot is fully
counterclockwise to 16 fully clockwise. The trigs are evenly distributed on
the time between the start of the selected step and the start of the next
step, even when both have dierent microshift values.
Probability : The probability as its name suggests gives note trigs a
certain probability to be sent to the synth engine or not. From 100%
probability hard left, to 0% hard right. When combined with the ratchet
value, each ratcheted note trigs are subjected to the probability
parameter.
Parameter offsets or automations
Mono's automations work a bit dierently from most of the other hardware
synthesizers I know of. They are not “step-locked” with a xed value but
rather an oset value from the actual position of the potentiometer. When
adding a parameter oset to a step, each time said step is triggered by the
sequencer the parameter will be “oseted” from the potentiometer
position by the amount of the parameter oset value.
Say a parameter value ranges between 0 and 100, and the potentiometer
of this parameter is set dead center. At this setting, the current value, or
potentiometer value is 50. If you add an oset value to a step by holding a
[SEQ] key and turning said potentiometer a bit to the right, say to 60. Then
you are adding a parameter oset of 10 to that step. Now each time the
sequencer plays that step, it will add an oset of 10 to said parameter, and
go back to the current value, or to the actual potentiometer value at the
next step.
Each step can hold up to 48 parameter osets - it is possible to add osets
to every parameter, either synth parameters (lter cut-o, oscillator waves,
enveloppe decay…) or modulation parameters (lter resonance X-MOD
Rate, oscillator frequency X-ENV amount …).
This feature really turns the Mono sequencer into a powerhouse,
everything can be sequenced, and sequencing parameters doesn’t “x” the
parameters value, but it adds a sequence “on top” of the current
potentiometer position. This approach gives the user the freedom to adjust
the knobs while performing in a live situation.

2/8/2021 Norand Mono Manual
localhost:3000/manual 17/23
Parameter offset visualisation
By default, the [SEQ] LEDs don’t show which step holds recorded
parameter osets, and the only way to know that a parameter is automated
is by using your ears, which can be very dicult on complex patterns.
However, there is a way to immediately visualise everything : hold [FUNC].
The synth LEDs will change to show dierent information.
The [SEQ] LEDs indicates weither or not a step holds parameter oset
informations. The brighter they are, the more parameter osets they
holds.
The potentiometer LEDs indicate if a parameter has osets recorded
somewhere on the pattern, they will also ash if one or more modulation
values have osets.
You can, as usual, select a parameter by slightly moving a pot, this way
you can see exactly which modulation parameter have recorded osets.
Adding parameter offsets
To add a parameter oset on a step, hold a [SEQ] key, and turn the desired
knob either way to add an oset - the more you turn the knob, the bigger
the oset. The same can be done to modulation parameters - don’t forget
to select the synth parameter on which you want to add the modulation
parameter oset rst (that’s a lot of words - sorry about that).
Recording parameter offsets
One can also record parameter osets while in record mode. To enable the
mode, press the [RECORD] key, and turn a parameter knob while the
sequencer is playing. This will add a parameter oset on each step where a
parameter knob position change is detected, so you need to continually
move the knob to add osets at every step. This is a bit strange at rst but
it was mandatory, otherwise everything would be recorded at 0 oset as
soon as [RECORD] is enabled, that’s obviously not the best behaviour …
Note that when recording automation on the [FREQ] parameter, the
recorded parameter osets will be quantized to the current scale.
Unlink X-Env Sequence
To create interesting eects in a pattern, it is possible to unlink the X-
Envelope triggers from the note trigs. When doing so, the X-Envelope of
the selected parameter will be replaced by the one entered on the [SEQ]
keys.
To create an unlinked X-Env sequence, start by selecting the desired
parameter - [CUTOFF] for example. Then hold [TYPE] + [WAVE], and hit
[SEQ] keys to create your unlinked sequence. As you see the bright [KEY]
show the unlinked sequence. To disable an unlinked sequence and trig the
X-Env with the note trigs again, you need to disable all the unlinked trigs.
Copy paste and clear
To copy a step, hold [FUNC] + [COPY] then hit the [SEQ] key of the step to
be copied. To paste, hold [FUNC] + [PASTE], and hit the destination [SEQ]
key. Clear a step by holding [DELETE] and hitting the desired [SEQ] key.
These step operations act on every parameter - note, accent, slide,
parameter oset and so on.
The same can be done with full pages, use the desired [PAGE] key instead.
To copy a whole parameter automation (all parameter osets on the
pattern), hold [FUNC] + [COPY] and slightly move the potentiometer of the
desired parameter. To paste, hold [FUNC] + [PASTE] and slightly move the

2/8/2021 Norand Mono Manual
localhost:3000/manual 18/23
target parameter. To clear a whole parameter hold [DELETE] and slightly
move the desired potentiometer.
You can also copy, paste and clear a patch. To do so, use the [RECORD]
button : To copy, hold [FUNC] + [COPY] and press [RECORD]. Navigate to
the pattern where you want to paste the patch, hold [FUNC] + [PASTE] and
hit [RECORD]. To delete a patch, hold [DELETE] and press [RECORD]. The
patch will initialize to the physical position of the knobs.
Undo/Redo operations
Every single action of the sequencer is undoable. If you are not quite happy
with a recorded automation, you can undo it. Hate that change of pitch on
the last 4 notes ? Undo it. Not so bad in the end ? Redo it. Simple hold
[FUNC] and hit [UNDO] to undo and … you guessed it, hold [FUNC] and hit
[REDO] to redo.
Pattern settings
Scale and root note
To set up a scale and a key, hold [FUNC] and hit [SCALE]. Set up the root
note with the [NOTE] key and set the scale with the [SEQ] key. Here is the
list of the scale and their related [SEQ] key. Scale and root are mostly useful
with the randomizer, more on the next section. You can visualize the
selected scale on the mini keyboard. Only the [NOTE] key LED in the
selected scale are on, with the root note a bit brighter. If you are allergic to
music theory, this is a pretty handy tool.
Transpose
To transpose a whole pattern hold [FUNC] and hit [TRANSPOSE], you can
select the transposition level with the [NOTE] keys. Use the [UP] and
[DOWN] key to transpose to a full octave.
Beat division
To set up the pattern beat division, hold [FUNC] and hit [BEAT DIV]. The
selected [SEQ] key denes how many steps are played each beat, default is
4.
Swing
To set up the swing value of the current pattern, hold [FUNC] and hit
[SWING]. Set the swing with the [SEQ] key, 1 being no swing, and 16
maximum swing.
Mod Note mode
The mod note mode is a little bonus mode that allows users to create up to
40 custom temporary patch or timbre settings per project to be played and
recorded. Hit [UP] + [DOWN], both keys LED should be on indicating that
you enabled Mod Note mode. The 8 bottom [NOTE] keys each represent a
timbre, you can’t use them to play pitch anymore.
The mod notes are scoped to the project, each project can hold 40 mod
notes, separated into 5 pages. You can scroll the pages with the [UP] and
[DOWN] key.
To set up the timbre, hold one of those Mod Note keys, say the D [NOTE]
key, and change any parameter you want by setting potentiometter to the
desired position. Every time you play that key, the timbre that you recorded
will be played. It is not recorded as osets, and therefore not limited to the

2/8/2021 Norand Mono Manual
localhost:3000/manual 19/23
48 parameters limit. It will virtually turn the potentiometer to the recorded
positions. You can add note trigs just as you would do in normal mode to
create a sequence.
The next note trig played by the sequencer after a mod note will revert the
synth parameters back to the normal values. So you can use these Mod
Notes to create “happy accidents” in an otherwise simple pattern by
playing it live for example, or to create weird patterns using dierent
timbres. Go back to normal mode by pressing [UP] + [DOWN] again.
Copy and paste operations
One can copy/paste a Mod Note - hold [FUNC] + [COPY], hit the mod note
[NOTE] key you want to copy, then hold [FUNC] + [PASTE] and hit the
destination [NOTE] key.
You can also “import/export” mod note to the current patch. To copy the
current patch to a mod note, hold [RECORD] and press the desired [NOTE]
key. Inversely, hold a [NOTE] key and press [RECORD] to copy a mod note to
the current patch.
Randomizer
Mono features several randomizing features to assist the musician's
creative process. They allow users to explore the depth of Mono’s
synthesis engine. There are dierent randomize options : randomize page,
step, parameter, accent, slide, and Mod Note.
Page randomizer
The page randomizer is useful to get a pattern going quickly, or to create
alternative patterns starting from a base pattern. It adds between 1 and 4
note trigs with random pitch on said page. The pitch is always quantized to
the scale of the pattern - this way, you can safely use it in live situations. Of
course, you can undo/redo this operation. The page randomizer was
designed to be used as an “additive tool” - you can start from scratch on an
empty pattern or create alterations on a rhythmic pattern, and then undo to
go back to the original pattern. The added step won’t contain parameter
osets, probability, ratchet or microshift. They will however be slided or
accented at random.
To randomize a page, hold [FUNC] + [TEMPO], and hit the desired [PAGE]
key.
Pitch randomizer
The pitch randomizer allows the user to randomize the pitch of all the active
notes in the current pattern. It won’t add or remove notes. As you might
expect, the pitch of the randomized pitch will be quantized to the current
scale.
To randomize pitch, hold [FUNC] + [TEMPO], and hit the [PATTERN] key.
Step randomizer
The step randomizer as its name suggests randomizes a single step. It
adds a random note trig to the desired step, the pitch is also quantized to
the pattern. It will also randomize some synth parameter osets. The
parameter osets being randomized are selected at random, and the value

2/8/2021 Norand Mono Manual
localhost:3000/manual 20/23
as well. To avoid going too wild, only the synth parameters are randomized,
not the modulation parameters. The Freq and detune parameter are never
randomized to keep the randomized step in tune.
To randomize a step, hold [FUNC] + [TEMPO], and hit the desired [SEQ] key.
Parameter randomizer
The parameter randomizer basically creates a random automation on a
modulation or synth parameter. There is a 50% chance that a parameter
oset is added on each step. The random value is also restricted to a range
set by the musician, the osets will never exceed these values.
To randomize a parameter, hold [FUNC] + [TEMPO], turn the desired
parameter to the desired lower value, then turn it the other way, to the
desired upper value. On releasing [FUNC], the parameter will be
randomized.
Accent and slide randomizer
To randomize accent or slide on a pattern, hold [FUNC] + [TEMPO], and hit
[ACCENT] or [SLIDE]. This will clear the current accent/slide and place
accent/slide on note trigs at random.
Mod note randomizer
The Mod note randomizer is the wildest of all. It allows musicians to
randomize a Mod Note in the Mod Note mode. Since it is not limited to the
48 parameter osets per step, it randomizes every single synth and
modulation parameters. The result will usually be extremely weird bleeping
noises, but we all love that don’t we ?
To randomize a Mod note you need to enable the Mod Note mode with [UP]
+ [DOWN]. Hold [FUNC] + [TEMPO], then hit one of the 8 bottom [NOTE]
keys to randomize the desired mod note.
Project settings
First things rst, let’s be honest - editing settings on Mono is not the best
user experience. There is no way to make the process easy without a
display, so you either need a good memory, or you need to keep the manual
close. The process is always the same though, hold [FUNC], hit the desired
settings, use the [SEQ] and [PAGE] key to select the desired value. Exit by
hitting [FUNC] again.
MIDI/Clock
This setting allows user to set the Mono MIDI channel and clock source.
Use the [SEQ] button to select the midi channel from 1 to 16, and use the
page button to set the clock source. there are 4 clock source :
Internal [PAGE 1] (default) : Mono uses its internal clock, and [RUN] key to
manage playback.
MIDI [PAGE 2] : Mono uses the clock received on the MIDI port, playback
operation is handled with MIDI start stop messages.
USB [PAGE 3] : Mono uses the clock received on the USB port, playback
operation is handled with MIDI start stop messages.
Table of contents
Other Norand Synthesizer manuals
