Norand Mono MK2 Assembly Instructions

Mono MK2 new features
Hardware
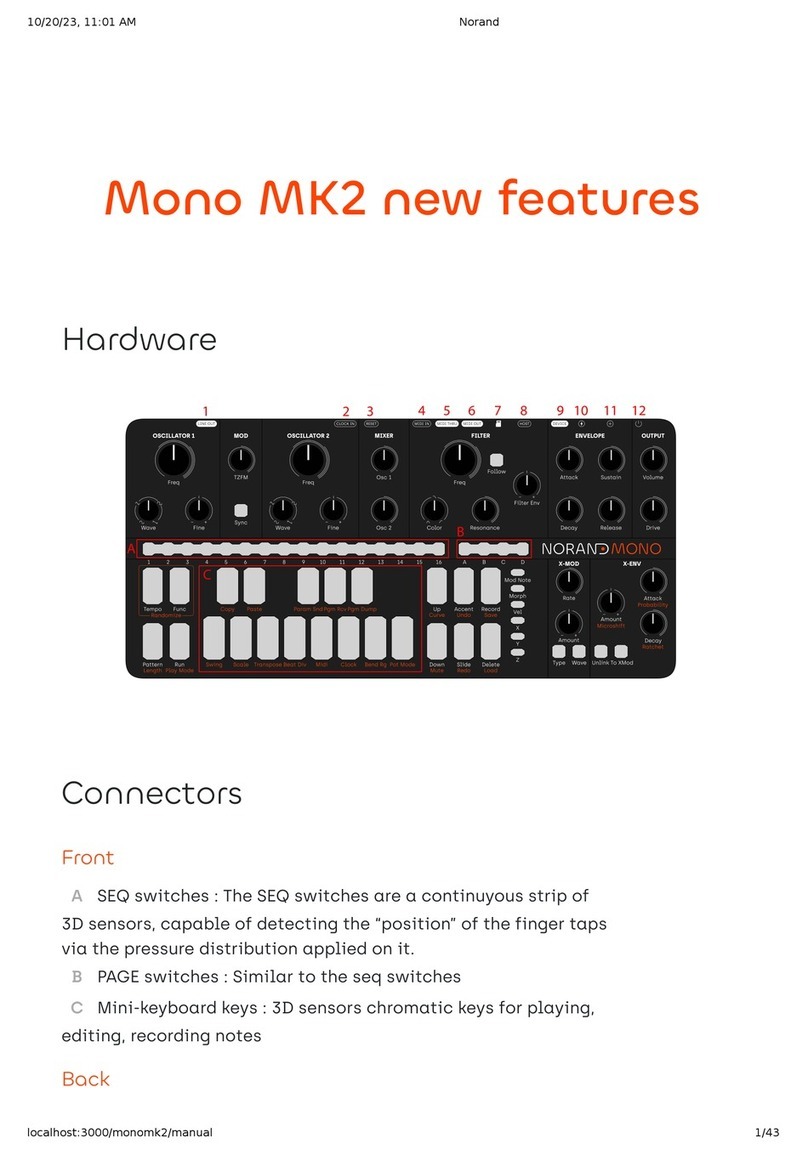
Front
A- SEQ switches : The SEQ switches are a continuyous strip of 3D sensors, capable of
detecting the “position” of the finger taps via the pressure distribution applied on it.
B- PAGE switches : Similar to the seq switches
C- Mini-keyboard keys : 3D sensors chromatic keys for playing, editing, recording notes
Back
1 - Audio output : Stereo output capable of driving line level, and headphones
2 - Clock input : For synchronizing with external analog gear, such as eurorack
3 - Reset input : Reset input for external analog gear
4 - Midi in : MIDI compliant (Type A) 3.5mm jack MIDI input

5 - Midi thru : MIDI compliant (Type A) 3.5mm jack MIDI thru
6 - Midi out : MIDI compliant (Type A) 3.5mm jack MIDI out
7 - MicroSD card slot : Used for storage, note that Mono needs an SD card to boot.
8 - USB-C Host port : Connect to a MIDI device, such as asequencer, external keyboard or
other synth
9 - USB-C Device port : Connect to a MIDI host, such as a computer
10 - USB-C Power port : Dedicated power port. Use the provided power supply.
11 - Extension port : For future semi-modular extension. Note that although it uses a USB-C
port, it IS NOT USB-C. Although it is protected and there is no risk doing it, do not connect to
anything other than the designed extension.
12 - On-Off switch
Power
Mono MK2 can be powered either via its dedicated power port, or via the USB device port. Note
that it require at least 1A capable ports with broadcast capabilities. MK2 senses the power
capabilities of the power source, there are 3 level of power.
- Normal mode : With the included power supply, or a high power capable USB-C host,
Mono boots in high power mode, the LEDs are full brightness.
- Low power mode : With a 1A capable host, such as a USB 2.0 host, mono will be in
low power mode, with the LED in low brightness.
- Standby mode : Mono cannot work correctly with a 0.5A supply, if it sense such a
power supply, it will not boot, or go to standby mode.
Drive
MK2 adds a soft overdrive circuit at the output, it is the only change in the signal path. The
output DAC is software compensated so that driving the signal doesn’t make it louder, it will just
add more and more overtones as you push it harder. Ther drive circuit as been designed to play
extremely well with the resonant filter !
Expressivity
MK2 now has dedicated Vel, X, Y and Z switches for expressivity controls. X is the horizontal
axis, otherwise known as pitchbemd, Y is the vertical axis, it is triggered by moving up or down
on the minikey, Z is the pressure, or aftwertouch, and Vel is the velocity.. Here is an exhaustive
list of the feature.
Enable/Disable :
To enable/disable an expressivity channel, simply press one of the 4 switches. A lit switch
indicate that the expressivity channel is enabled. When enabled, you can play the mini-
keyboard expressively.

Using the expressive keyboard without triggering note :
Sometimes, you want to use the expressivity control on the keyboard without triggering keys, to
add liveliness to a pattern. To do so, hold FUNC and press any of the X,Y, and Z switch. The
switch will blink. You can now use the expressive keyboard without triggering note on a pattern
being played.
Programming the expressive modulation :
The way expressive channels modulate Mono’s sound is completely customizable. It can
modulate ay of the parameter of the synthesizer, even the modulation parameter such as XMod
rate. To program it, hold the desired expressive channel (X,Y,Z or VEL), and turn a knob’s
parameter either clockwise to apply positive modulation, or counterclockwise to apply negative
modulation. When the knob is at noon, no modulation is applied to that parameter. Release the
switch when you’re done with the assignment.
High-resolution automation
One of the most important, if not the most important feature of MK2. All the automation are now
recorded at a very high resolution (1024PPQN). Allowing for very smooth parameter and
expressivity curves. Recording an automation works just like MK1. Enable/disable record with
the [RECORD] key, and turn any knobs to record an automation.
Expressivity
Of course, you can also record expressivity when they are enabled. Simply play the
minikeyboard expressively !
Step-quantized automation
Sometimes, a good old step-quantized automation is actually more suited. When you hold the
[UP] key in record mode, and record any kind of automation, those willb e step-quantized just
like in MK1, release [UP] and it will immediately go back to high-resolution, making it possible to
blend quantized and unquantized steps in the same automation.
Overdub
The standard behaviour is that the automation recoding will shortly stop after you stop moving a
knob. If you want to overdub the automation lane you are currently recording, hold [FUNC]. It
will overwrite the previous automation as the pattern moveforward, as long as [FUNC] is held.

Curve mode
What’s good of an automation if you cant edit it ? Curve mode allow you to precisely edit a
recorded automation. Go to curve mode by holding [FUNC] and pressing [UP]. The [SEQ] LED
will show the recorded automation with a color map.
Edit a curve
In curve mode, the recorded automation has anchor points placed at each maximum and
minimum points of the curve. Similar to how this works in a DAW. When you move an anchor
point, it will move the full curve between the 2 anchor points around the one being moved.
Moving an anchor point
To move an anchor point, simply press a [SEQ] key. If there is no anchor point at that position, it
will create one. To move the anchor point up or down, apply pressure towards the top/bottom of
the touch strip, it will slowly move. The harder you press, the faster the anchor point will move,
sort of like a joystick. To move an anchor point left or right, just move your finger left or right
after selecting the desired anchor.
Morphing
The continuous strips allow for continuouis morphing between all the patterns of a page.To be
able to morph between the patterns, enable morphing with the MORPH switch, go to pattern
mode by pressing pattern, and use your finger to morph between the patterns on the [SEQ]
strip. The “old” morphing feature via [FUNC] + [CUTOFF] is also still available.
Tape playhead
In player mode, if you enable morphing with the MORPH key, you can use your finger as a
playhead. This works in forward or backward direction. When you release the SEQ strip, the
playhead will resume playing where it is supposed to, not ruining your time signature.

Other changes
Pattern rotate :
The shortcut for pattern rotate has been moved, now you need to hold [FUNC], and press
[PAGE A] to rotate left, and [PAGE D] to rotate right.
Storage :
Note that on the first time you open a project that has never been used, mono will create it’s
directory structure, which takes a small amount of time (about 20 seconds).
The projects are now stored on an SD card in a serialized format. At any time, you can copy
these folders to your computer to save it, and change the projects name to reorder it.
Other manuals for Mono MK2
1
Table of contents
Other Norand Synthesizer manuals
