manuals.online logo
Brands
  1. Home
  2. •
  3. Brands
  4. •
  5. Norco
  6. •
  7. Water Pump
  8. •
  9. Norco 910017B User manual

Norco 910017B User manual

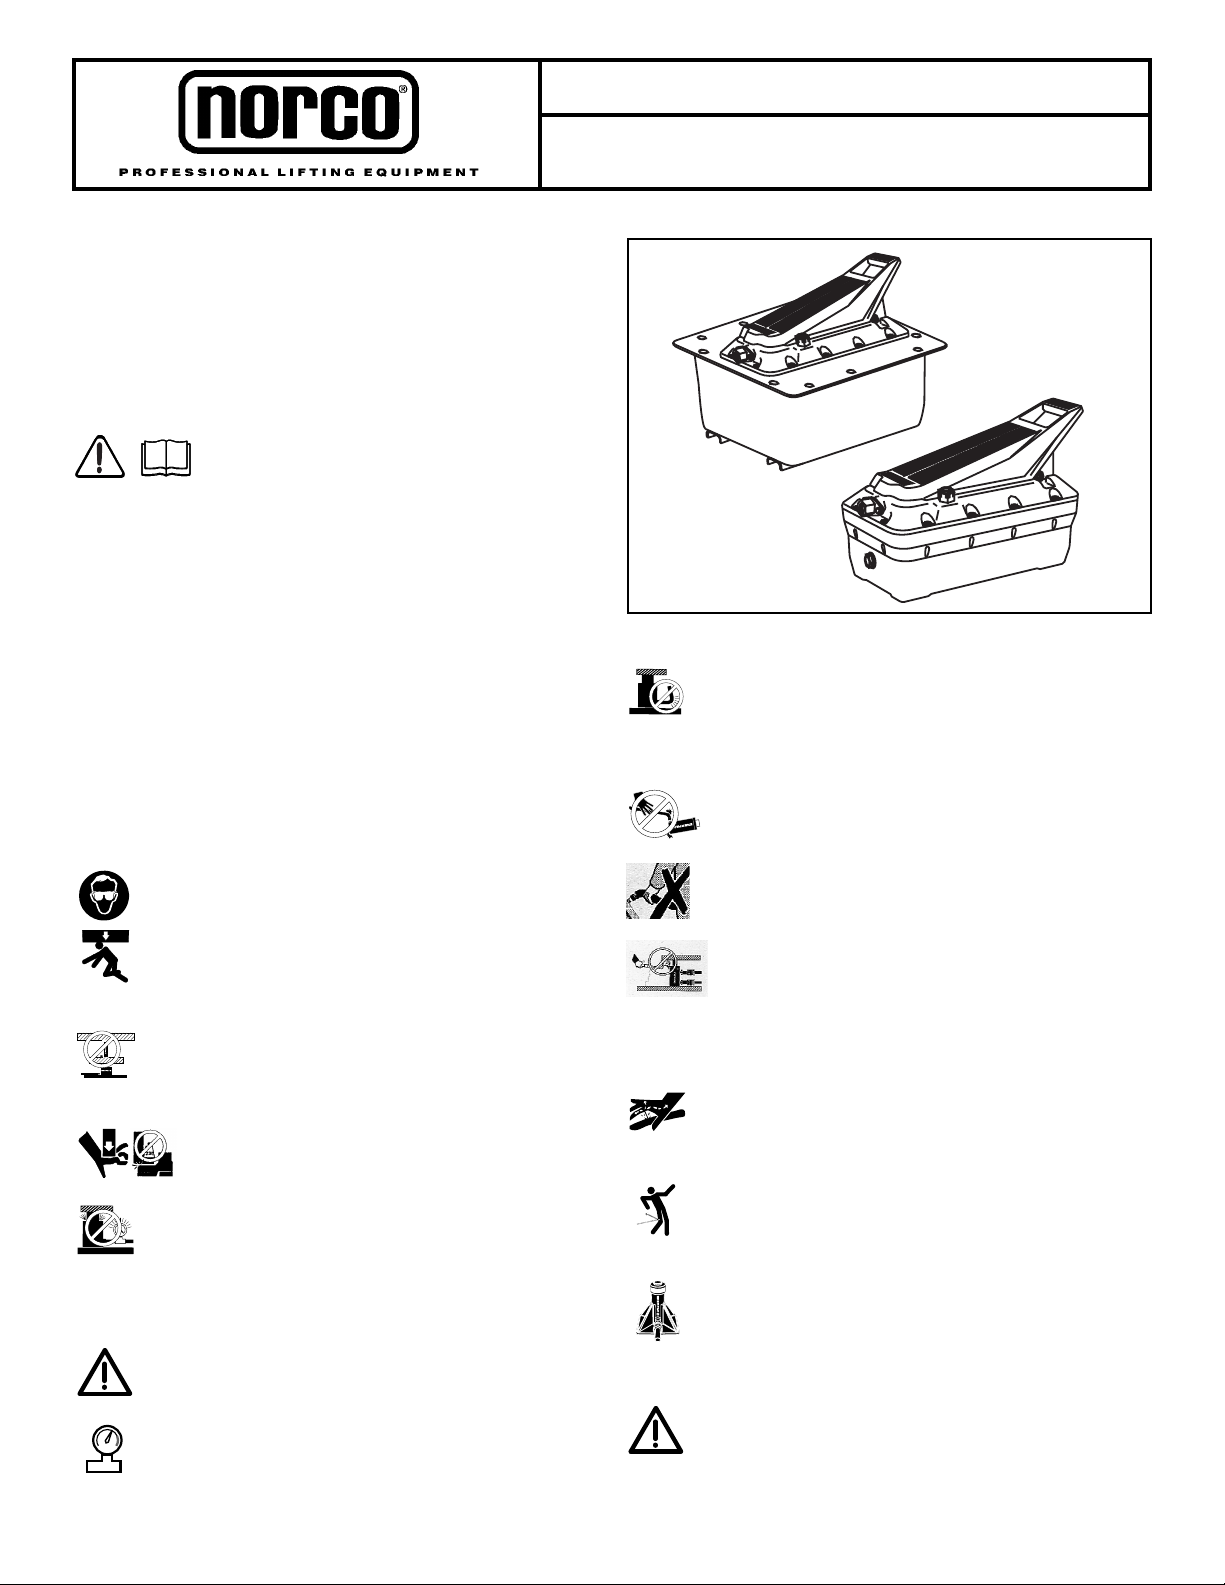
1.0 IMPORTANT RECEIVING INSTRUCTIONS
Visually inspect all components for shipping damage. Shipping
damage is not covered by warranty. If shipping damage is found,
notify carrier at once. The carrier is responsible for all repair and
replacement costs resulting from damage in shipment.
SAFETY FIRST
2.0 SAFETY ISSUES
Read all instructions, warnings and cautions
carefully. Follow all safety precautions to avoid
personal injury or property damage during system
operation. Norco cannot be responsible for damage or injury
resulting from unsafe product use, lack of maintenance or incorrect
product and/or system operation. Contact Norco when in doubt as
to the safety precautions and operations. If you have never been
trained on high-pressure hydraulic safety, consult your distribution
or service center for a safety course.
Failure to comply with the following cautions and warnings could
cause equipment damage and personal injury.
A CAUTION is used to indicate correct operating or maintenance
procedures and practices to prevent damage to, or destruction of
equipment or other property.
A WARNING indicates a potential danger that requires correct
procedures or practices to avoid personal injury.
A DANGER is only used when your action or lack of action may
cause serious injury or even death.
WARNING: Wear proper personal protective gear when
operating hydraulic equipment.
WARNING: Stay clear of loads supported by hydraulics.
A cylinder, when used as a load lifting device, should never
be used as a load holding device. After the load has been
raised or lowered, it must always be blocked mechanically.
WARNING: USE ONLY RIGID PIECES TO HOLD LOADS.
Carefully select steel or wood blocks that are capable of
supporting the load. Never use a hydraulic cylinder as a
shim or spacer in any lifting or pressing application.
DANGER: To avoid personal injury keep hands and
feet away from cylinder and workpiece during
operation.
WARNING: Do not exceed equipment ratings. Never
attempt to lift a load weighing more than the capacity of
the cylinder. Overloading causes equipment failure and
possible personal injury. The cylinders are designed for a max.
pressure of 700 bar [10,000 psi]. Do not connect a jack or cylinder
to a pump with a higher pressure rating.
Never set the relief valve to a higher pressure than the
maximum rated pressure of the pump. Higher settings may
result in equipment damage and/or personal injury.
WARNING: The system operating pressure must not
exceed the pressure rating of the lowest rated component
in the system. Install pressure gauges in the system to
monitor operating pressure. It is your window to what is happening
in the system.
CAUTION: Avoid damaging hydraulic hose. Avoid sharp
bends and kinks when routing hydraulic hoses. Using a
bent or kinked hose will cause severe back-pressure.
Sharp bends and kinks will internally damage the hose leading to
premature hose failure.
Do not drop heavy objects on hose. A sharp impact may
cause internal damage to hose wire strands. Applying
pressure to a damaged hose may cause it to rupture.
IMPORTANT: Do not lift hydraulic equipment by the
hoses or swivel couplers. Use the carrying handle or
other means of safe transport.
CAUTION: Keep hydraulic equipment away from
flames and heat. Excessive heat will soften packings
and seals, resulting in fluid leaks. Heat also weakens
hose materials and packings. For optimum performance do not
expose equipment to temperatures of 65°C [150°F] or higher.
Protect hoses and cylinders from weld spatter.
DANGER: Do not handle pressurized hoses. Escaping
oil under pressure can penetrate the skin, causing serious
injury. If oil is injected under the skin, see a doctor
immediately.
WARNING: Only use hydraulic cylinders in a coupled
system. Never use a cylinder with unconnected couplers. If
the cylinder becomes extremely overloaded, components
can fail catastrophically causing severe personal injury.
WARNING: BE SURE SETUP IS STABLE BEFORE
LIFTING LOAD. Cylinders should be placed on a flat
surface that can support the load. Where applicable, use a
cylinder base for added stability. Do not weld or otherwise modify
the cylinder to attach a base or other support.
Avoid situations where loads are not directly centered on
the cylinder plunger. Off-center loads produce
considerable strain on cylinders and plungers. In addition,
the load may slip or fall, causing potentially dangerous results.
®
®
®
®
Instruction Sheet
910017B, 910018A
AIR HYDRAULIC PUMP
L2550 Rev. A 06/03
910018A
L2550CV
910017B
2
Distribute the load evenly across the entire saddle
surface. Always use a saddle to protect the plunger.
IMPORTANT: Hydraulic equipment must only be serviced
by a qualified hydraulic technician. For repair service,
contact the Authorized Service Center in your area. To
protect your warranty, use only high-grade oil.
WARNING: Immediately replace worn or damaged parts
parts.
3.0 DESCRIPTION
The 10,000 psi TURBO II Air Pumps have an operating pressure
of 10,000 psi at 85 psi inlet pressure. They are suited for plant
maintenance, fabrication, production, bolting, vehicle repair, and
any task that requires hydraulic pressure from air input.
4.0 SPECIFICATIONS
See table below.
5.0 INSTALLATION
5.1 Air Supply
Pump operates with 25-125 psi [1,7-8,6 bar] air pressure. A
regulator/filter/lubricator should be installed upstream from pump to
provide clean, lubricated air and allow for air pressure adjustment.
5.2 Air Connections
See Figure 1. Attach air supply to the 1/4NPT swivel connection
on the end of the pump. Use Teflon tape or similar thread sealant.
Torque to 20-25 ft. lbs [27-34 Nm].
Figure 1
5.3 Hydraulic Connections
See Figure 2. Thread hose(s) into outlet port of pump (A). Hose
fittings must be torqued.
Figure 2
Torque Specifications:
NOTE: Use 11/2wraps of Teflon tape the NPTF hose fittings only,
leaving the first complete thread free of tape to ensure that pieces
of tape do not break off and enter the system. Torque: 65-75 Ft-lbs
[88-102 Nm].
NOTE: Valve block or treadle should be restrained when torquing
fittings. The reservoir base should not be bolted down or restrained
to compensate for the fitting installation torque.
5.4 Venting
This pump must always be vented prior to use. Use either the "Vent
Screw" or "Vent/Fill Plug".
a) Vent Screw: See Figure 3, item 1. The vent screw is the primary
means to vent the reservoir when the pump is operated in the
horizontal position. It is located near the hydraulic outlet port on top
of the reservoir. To use this plug, open the screw 1-2 turns. To avoid
damaging the threads when closing the vent screw, tighten only
until screw head contacts the reservoir cover. The vent screw can
NOT be used when pump is mounted vertically! When mounting in
the vertical position, use the vent/fill plug.
Figure 3
b) Vent/Fill Plug: See Figure 4, item 2. The Vent/Fill plug is located
on the air inlet end of the pump, opposite the vent screw. This plug
serves three functions: vent plug, fill port, and return-to-tank port.
Model Weight-add 1 lb. Reservoir Useable Oil Usable Oil
No. (.5 kg) for bracket Capacity Horizontal Vertical
Mount Mount
910017B 18 lbs. [8,2 Kg] 150 cu.in 127 cu.in 70 cu.in
(2.5 liters) (2.1 liters) (1.2 liters)
910018A 40 lbs. [18,1 Kg] 2.11 Gal 1.85 Gal. N/A
(8.0 liters) (7.0 liters) N/A
Hydraulic Hydraulic Oil Flow Oil Flow Air Pressure Air Operating
Air Ratio Output Ports @ 100 psi @ 10,000 psi Range Consumption @ Noise
(6.9 bar) (700 bar) 100 psi (6.9 bar) Level (dBA)
100:1 .375-18 NPTF 60 cu.in/min. 10 cu.in/min. 25-125 psi 12 SCFM 76
(1.0 liters/min.) (0.16 liters/min.) ( 1,7-8,6 bar) (0.34 cu.m/min)
SPECIFICATION TABLES
3
Figure 4
To use as a vent (for vertical applications or temporary venting) pull
up on hex plug until first detent is reached (see Figure 5). This is
the vented position.
Figure 5
To use as a return-to-tank port, remove flush plug from hex and
install compatible return line. Torque return line to 15-20 ft. lbs. [20-
27 Nm] in hex plug.
CAUTION: Pump reservoir must be vented using one of
the two vent options. Failure to do so may cause cavitation
and pump damage.
5.5 Mounting Pump
910017B: Pump can be mounted horizontally or vertically. If
mounted vertically, position pump with hydraulic outlet port(s)
facing down. The four holes in the bottom of the reservoir should
be used for bolting through the mounting surface into the
reservoir. Use the #10 x 5/8" fasteners included with pump, or
allow no more than 3/4" [19 mm] thread engagement into
reservoir.
CAUTION: When mounting the pump in the vertical
position, the vent screw must remain closed.
910018A: The U-shaped mounting rails on the bottom of the
reservoir have four .26 in. [6,6 mm] holes for mounting.
5.6 Oil Level
Always check oil level with all cylinders or tools in the fully retracted
position. If they are advanced when the pump is filled, the reservoir
will be over-filled when they are retracted.
Use the low-level sight glass on the end of the pump to check the
oil level. When the pump is mounted horizontally, the reservoir is
full when oil is at the bottom of the fill port. If oil is not visible, then
oil must be added. To add oil, remove Vent/Fill plug from reservoir
(See section 5.4b).
When the pump is mounted vertically, 910017B, the oil level should
be checked periodically by removing the pump and placing it on a
horizontal surface.
NOTE: Prior to mounting the 910017B pump in the vertical position,
oil volume in the reservoir must be reduced to 127 in3[2,1 L] prevent
leakage through the vent/fill plug. See the specification table on
page 2 for usable oil capacity in vertical position.
6.0 OPERATION
6.1 Oil Level
Check the oil level of pump and add oil if necessary (See
Installation section, step 5.6).
6.2 Venting Pump
Make sure the pump reservoir is vented (See Installation section,
step 5.4).
6.3 Treadle Operation
See figure 6.
a) To Advance Cylinder: Depress the "PRESSURE" end of
treadle and the pump will start to pump hydraulic oil to the system.
b) To Hold The Cylinder
Position: The pump will
stop and hold pressure
when the treadle is in the
free/neutral position
(treadle is not depressed
in either "PRESSURE" or
"RELEASE" positions.)
c) To Retract Cylinder:
Depress the "RELEASE"
end of the treadle to
retract cylinder. To stop
the cylinder from
retracting, release the
treadle and return it to
the hold position.
6.4 Priming
Priming of the hydraulic pump is normally not required. If the air motor
runs very fast, but no hydraulic pressure is built, the pump may have
lost its prime. This pump can lose prime if it is run completely out of
oil or if an air bubble is trapped in the pumping chamber. An air bubble
could occur during shipment, or when the shipping plug is removed
while the pump is held in the vertical (shipping plug up) position.
a) Place the pump on a flat, horizontal surface. Remove the
shipping plug only when in a horizontal position! Attach an
approved 10,000 psi rated hydraulic hose and cylinder
assembly to the hydraulic outlet 3/8” NPT port. Torque fittings
to 65-75 ft.lbs. (88-102 Nm.)
b) Attach air supply to the 1/4” NPT swivel connection. Torque to
20-25 ft. Lbs (27-34 Nm).
c) Fill pump with only high-quality hydraulic Oil, 32 cSt hydraulic
oil.
d) Prime the pump with air pressure set to 30-40 psi. If air
pressure is different than 30-40 psi follow the procedure
below:
e) ON MODELS WITH TREADLE: While holding the treadle
down firmly in the RELEASE position, slowly depress the
PRESSURE button located under the toe of the treadle near
the air supply fitting. Try to get the air motor to operate one or
two cycles at a time. Slowly depressing the PRESSURE
button will allow you to “throttle” the inlet air pressure.
f) Pressing the operating buttons in this manner effectively
draws oil through the intake tube to refill the pressure
chamber. You may need to hold the treadle and “throttle” the
Figure 6
Closed Vented
PRESSURE button for a few minutes to completely remove
the air and prime the pump models with an air pendant, hold
"RET" button down while cycling.
g) ON MODELS WITH 4-WAY VALVES: Shift valve to neutral
position, press the treadle, and run the pump momentarily
several times.
h) On models with an air pendant, hold “RET” button down
while cycling “ADV” button momentarily several times.
i) To verify that the pump is primed, operate as normal with
cylinder attached.
7.0 MAINTENANCE
7.1 Maintaining Proper Oil Level
Check the oil level of the pump prior to start-up, and add only high-
quality hydraulic oil, if necessary, by removing the vent/fill plug
(refer to Installation section, step 5.4).
7.2 Cleaning The Muffler
Clean the muffler every 250 hours, or more frequently if pump is used
in dirty environments. First remove 2 shoulder bolts (A) and treadle
(B).See Illustration 7. Wash muffler element in soapy water, dry, and
reassemble, installing screws hand tight.
Figure 7
7.3 Changing The Oil
Change the oil every 250 hours. The vent/fill plug serves as a drain
plug for use in changing oil. Refill pump with only high-quality
hydraulic oil. Dispose of used oil properly.
7.4 Cleaning The Air Inlet Filter
Remove the swivel air connector by removing the two cap screws
and pulling air filter out of cavity. Using an air nozzle blow debris off
filter. (Always use proper eye protection). Re-install filter and swivel
connector. Torque cap screws to 16-18 in.lbs [1,8-2,0 Nm].
8.0 TROUBLESHOOTING
Only qualified hydraulic technicians should service the pump or
system components. A system failure may or may not be the result
of a pump malfunction. To determine the cause of the problem, the
complete system must be included in any diagnostic procedure.
The following information is intended to be used only as an aid in
determining if a problem exists. DO NOT disassemble the pump.
For repair service, contact NORCO at 1-310-639-4000 for a list of
Authorized Service Centers in your area.
PROBLEM CAUSE
1) Pump will not start Air turned off or line blocked
2) Motor stalls under load Low air pressure*
Inlet filter plugged, insufficient air flow
3) Pump fails to build pressure External leak in system
Internal leak in pump
Internal leak in system component
Low oil level
4) Pump builds less than full pressure Low air pressure*
Internal relief valve set low
External system leak
Internal leak in system component
5) Pump builds pressure, but load does not move Load greater than cylinder capacity at full pressure
Flow to cylinder blocked
6) Cylinder drifts back on its own External system leak
Internal leak in system component
7) Cylinder will not return Return flow or coupler restricted/blocked
No load on a "load return" cylinder
Return spring broken on cylinder
Release Valve Malfunction
8) Low oil flow rate Reservoir not vented
Inadequate air supply
Dirty air filter
Clogged inlet filter
* 85 psi (5,86 Bar) air pressure required to obtain 10,000 psi (700 Bar) hydraulic pressure.
TEL. (310) 639-4000
EMC0306038-DAL-06/03

This manual suits for next models

1

Other Norco Water Pump manuals

Norco 910052A User manual

Norco

Norco 910052A User manual

Norco 910130 Manual

Norco

Norco 910130 Manual

Popular Water Pump manuals by other brands

Little Giant ES33D1-10 introduction

Little Giant

Little Giant ES33D1-10 introduction

Astral Pool OPTIMA PRO NEXT Series installation manual

Astral Pool

Astral Pool OPTIMA PRO NEXT Series installation manual

Goldmedal 2114E instruction manual

Goldmedal

Goldmedal 2114E instruction manual

ThePondguy SuperFlo 9000 product manual

ThePondguy

ThePondguy SuperFlo 9000 product manual

Aqua PRO AP400s instruction manual

Aqua PRO

Aqua PRO AP400s instruction manual

ThePondguy MagFlo Mini 210 Installation and Maintenance

ThePondguy

ThePondguy MagFlo Mini 210 Installation and Maintenance

AME 15924 Instruction manual & parts breakdown

AME

AME 15924 Instruction manual & parts breakdown

Oleo-Mac SA 18 Operators instruction book

Oleo-Mac

Oleo-Mac SA 18 Operators instruction book

Little Giant 12E Series owner's manual

Little Giant

Little Giant 12E Series owner's manual

Little Giant JPC Series manual

Little Giant

Little Giant JPC Series manual

Pentair HPD200 Installation and service manual

Pentair

Pentair HPD200 Installation and service manual

dosatron D14MZ5AFII instructions

dosatron

dosatron D14MZ5AFII instructions

Speck pumpen BADU Block Series Installation & operating manual

Speck pumpen

Speck pumpen BADU Block Series Installation & operating manual

Bestway P3122 owner's manual

Bestway

Bestway P3122 owner's manual

KSB Etanorm-R Installation & operating manual

KSB

KSB Etanorm-R Installation & operating manual

Oase biOrb AIR 30 manual

Oase

Oase biOrb AIR 30 manual

Graco Fast-Flo Instructions and parts list

Graco

Graco Fast-Flo Instructions and parts list

Varian Turbo-V250 instruction manual

Varian

Varian Turbo-V250 instruction manual

manuals.online logo
manuals.online logoBrands
  • About & Mission
  • Contact us
  • Privacy Policy
  • Terms and Conditions

Copyright 2025 Manuals.Online. All Rights Reserved.