Northern Tool and Equipment QCPS?28000 User manual
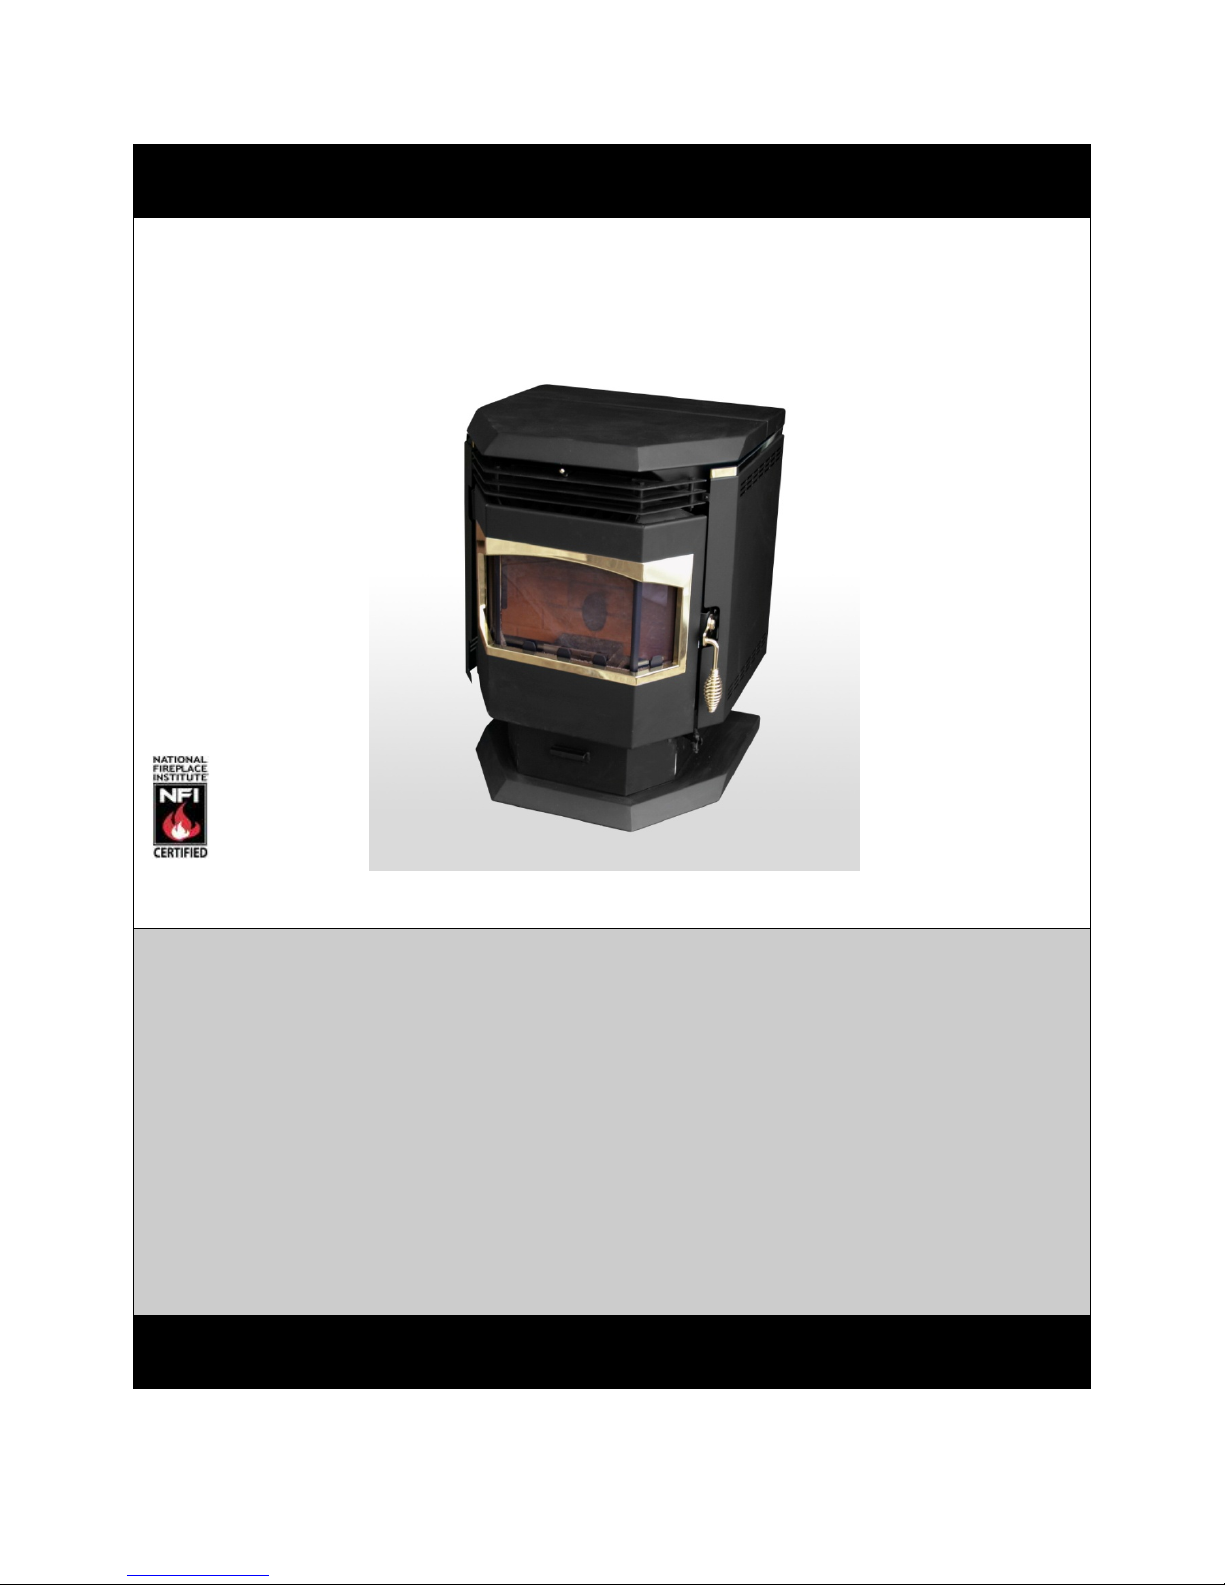
1
InstallationandOperatingManual
QCPS‐28000PelletStoveOwner’sManual
SAFETYNOTICE
PLEASEREADTHISENTIREMANUALBEFOREYOUINSTALLANDUSEYOURNEWPELLETSTOVE.FAILURE
TOFOLLOWINSTRUCTIONSMAYRESULTINPROPERTYDAMAGE,BODILYINJURY,OREVENDEATH.
IFTHISPELLETSTOVEISNOTPROPERLYINSTALLED,AHOUSEFIREMAYRESULT.FORYOURSAFETY
CAREFULLYFOLLOWINSTALLATIONINSTRUCTIONS.
CONTACTYOURLOCALBUILDINGORFIREOFFICIALSABOUTRESTRICTIONSANDINSTALLATION
INSPECTIONREQUIREMENTSINYOURAREA.
CONTACTYOURLOCALAUTHORITY(SUCHASMUNICPALBUILDINGDEPARTMENT,FIREDEPARTMENT,
FIREPREVENTIONBUREAU,ETC.)TODETERMINETHENEEDFORAPERMIT.
THISUNITISFORRESIDENTIALUSEBUTISNOTSUITABLEFORMOBILEHOMES.
SAVETHESEINSTRUCTIONS
We suggest that our products
be installed and serviced by
professionals who are
certified in the US by the
National Fireplace Institute
(NFI) as NFI specialists.
2
IMPORTANTNOTES
Thismanualidentifieshazardsandhasspecialsafetymessagesthathelpyouandothersavoidpersonal
injuryandevendeath.WarningandCautionsignalwordsareusedtoidentifythelevelofhazard.
However,regardlessofthehazard,beextremelycareful.
WARNING
Signalsahazardthatmaycauseseriousinjuryor
deathifyoudonotfollowtherecommended
precautions.
ImportantNotes2
ImportantSafetyInstructions3
PelletStoveOperationNotes4
StoveAccessories5
Installation5
Venting7
UsingCorrectFuel14
OperatingInstructions15
Refill16
ShutDownProcedure16
CleaningandMaintenance17
Specifications20
TroubleshootingandHelpfulHints21
Warranty22
CAUTION
Signalsahazardthatmightcauseminoror
moderateinjuryifyoudonotfollowthe
recommendedprecautions.
PLEASEREADTHISENTIREMANUALBEFORE
YOUINSTALLANDUSEYOURNEWPELLET
STOVE.FAILURETOFOLLOWINSTRUCTIONS
MAYRESULTINPROPERTYDAMAGE,BODILY
INJURY,OREVENDEATH.
FUEL:TheQCPS‐28000isapprovedtoburnPremiumWoodPelletsonly.Burningpeacoal,cherrypits,
oranythingotherthanwoodpelletsisnotadvisedandwillvoidyourwarranty.
EACHUNITHASBEENTESTEDBEFORELEAVINGTHEFACTORYSOTHEREMAYBEALITTLERESIDUEOF
ASHESORPELLETSINSIDE.
STORETHISMANUALINASAFEPLACEFORFUTUREREFERENCE.
TABLEOFCONTENTS
We suggest that our products be
installed and serviced by
professionals who are certified in the
US by the National Fireplace Institute
(NFI) as NFI specialists.
3
IMPORTANTSAFETYINSTRUCTIONS
Werecommendtheuseofsmokedetectorsandcarbonmonoxidedetectorswiththistypeofproductin
yourhome.Whenusingthesmokeorcarbonmonoxidedetectors,followthemanufacturer’s
instructionsforplacementandoperationinyourhome.
WARNING
•Donottouchthepelletstovewhileitisburning.Allowatleast30minutestocooldownafterthe
flameisextinguishedforanyrefill,restart,cleaning,ormaintenance.
•Donotoperatetheunitwiththehopperopen.
•Thelidmustbeshutandtightlysecured.
•Donotoperatewiththedooropen.
•Donottouchtheunitwhileoperatingorisstillhot.Contactcancauseskinburns.
•Keepchildrenandsmallanimalsawayfromthepelletstoveatalltimes.
•Donotstoreorplaceflammablematerialsclosethepelletstove.
•Keepcombustiblematerials(suchasgrass,leaves,etc.)atleast3feetawayfromtheflueoutleton
theoutsideofthebuilding.
•Restricttheuseofthisproducttopersonswhoread,understand,andfollowthewarningsand
instructionsinthismanualandontheunit.
CAUTION
•Professionalinstallationisrequiredforthisstove.
•Thepelletstovemustbeelectricallygroundedinaccordancewithlocalcodesorwithnational
electricalcodeANSI/NEPA70andCSA‐C22.1.
•Thestoveisdesignedforusewithpelletizedwoodonly.Donotburncoalorwoodlogsofanykind.
Onlyburnpremiumwoodpellets.
•Thisstoveshallbeoperatedwithapowersourceforblowers,exhaustsystem,andfuelfeeding
system.
•Neverblocktheairsupplytoorfromthisstoveasitwillseriouslydegradetheperformanceand
causesmokingandsoot.
•Donotburnhighashcontentpelletsbecauseitwillrapidlyfilluptheburningpotandaffectthe
combustion.
•Theunitisnotsuitableformobilehomes.

4
PELLETSTOVEOPERATIONNOTES
•Contactyourlocalbuildingorfireofficialsaboutrestrictionsandinstallationinspection
requirementsinyourarea.Callyourhomeowner’sinsurancerepresentativeforinspectionofyour
stove’sinstallation.
•Readandcomplywiththeinstructionsinthismanual.
•ThisstoveisdesignedtoburnPremiumWoodPelletsonly.Burningpeacoal,cherrypitsoranything
otherthanpremiumwoodpelletswillvoidyourwarranty.Pelletswithhighashcontentwillnot
burncleanandwillrequiretheunittobecleanedmoreoften.Thisunitisdesignedforusewith
6mm(1/4in)diameterpelletfuel.Usingpelletslongerthan50mm(2in)canbindtheaugerand
requirefrequentmanualremoval.
•Besureyourpelletsarenotdamporwet.Keepsawdustoutoftheunit.
•Use76mm(3in)ULapprovedPelletVentTwist‐LockPipewheninstallingthisstoveandfollowthe
manufacturer’sspecificationsforinstallationandclearances.Eventhoughthispipeinterlocks,itis
recommendedtosealallconnectionswithhightemperaturesilicone.Useatleastthreescrewsto
securethepipetothisunit’sexhaustblower.IfyoudonotuseULapprovedtwist‐lockpelletpipe,
besuretouseULapprovedpelletventpipeandfasteneachjointwithatleastthreescrews.
•Outsidecombustionairismandatoryforthisunittoworkproperly.Makethisconnectionusing
48mm(1‐7/8in)IDmetalpipeandcoupler.Besuretosecurethepipetotheunitwithaclamp.The
outsideendshouldbecovered(screened)topreventanyforeignmatterfromenteringthesystem.
Trytokeepthenumberofbendsinthispipetoaminimum.
•Regularlyinspecttheburnpotareaandifanycrustforms,removeitwithapoker.
•Theashintheburnpotshouldberemovedregularlydependingontheburnrate.Keeptheairholes
oftheburnpotcleanforamoreefficientburning.Checkyourexhaustsystemfrequently.
•Keeppelletsandallothercombustiblematerialsatasafedistancefromtheunit.
•Thisunitrequiresfloorprotectionifinstalledonacombustiblesurface.Theminimumfloor
protectionshouldgiveatleast152mm(6in)ofprotectionattherear,and101mm(4in)oneach
sideand152mm(6in)minimumatthefrontoftheunit.
•Horizontalrunsshouldnotexceed1.2m(4ft)withamaximumverticalflueheightof10.6m(35ft).
•Thisunitshouldbeturnedoffandallowedtocoolpriortocleaning.Anyashesshouldbekeptinan
airtightmetalcontainerandnotdisposedofuntiltheyarecompletelycooled.
•Readtheinstructionsthoroughlyandsavethemforfutureuse.
•Donotallowpaint,chemicalsorconstructiondustonorneartheunit.Donotallowliquidorany
foreignmaterialsonorinsideyourunit.Shutyourunitdown,letcoolandthencoveritwhen
painting,duringconstructionorsimilaractivity.Wipeandcleanyourunitifanyforeignmaterial
getsonorinsideyourunit.Unplugunitfirst,andthenvacuumandcleanthemotorandinsideof
theunit.
•Impropergasketmaintenance,includingfailuretoreplacegaskets,cancauseairleaksresultingin
smoke‐backproblems.
5
•Thisunitisforresidentialusebutisnotsuitableformobilehomes.
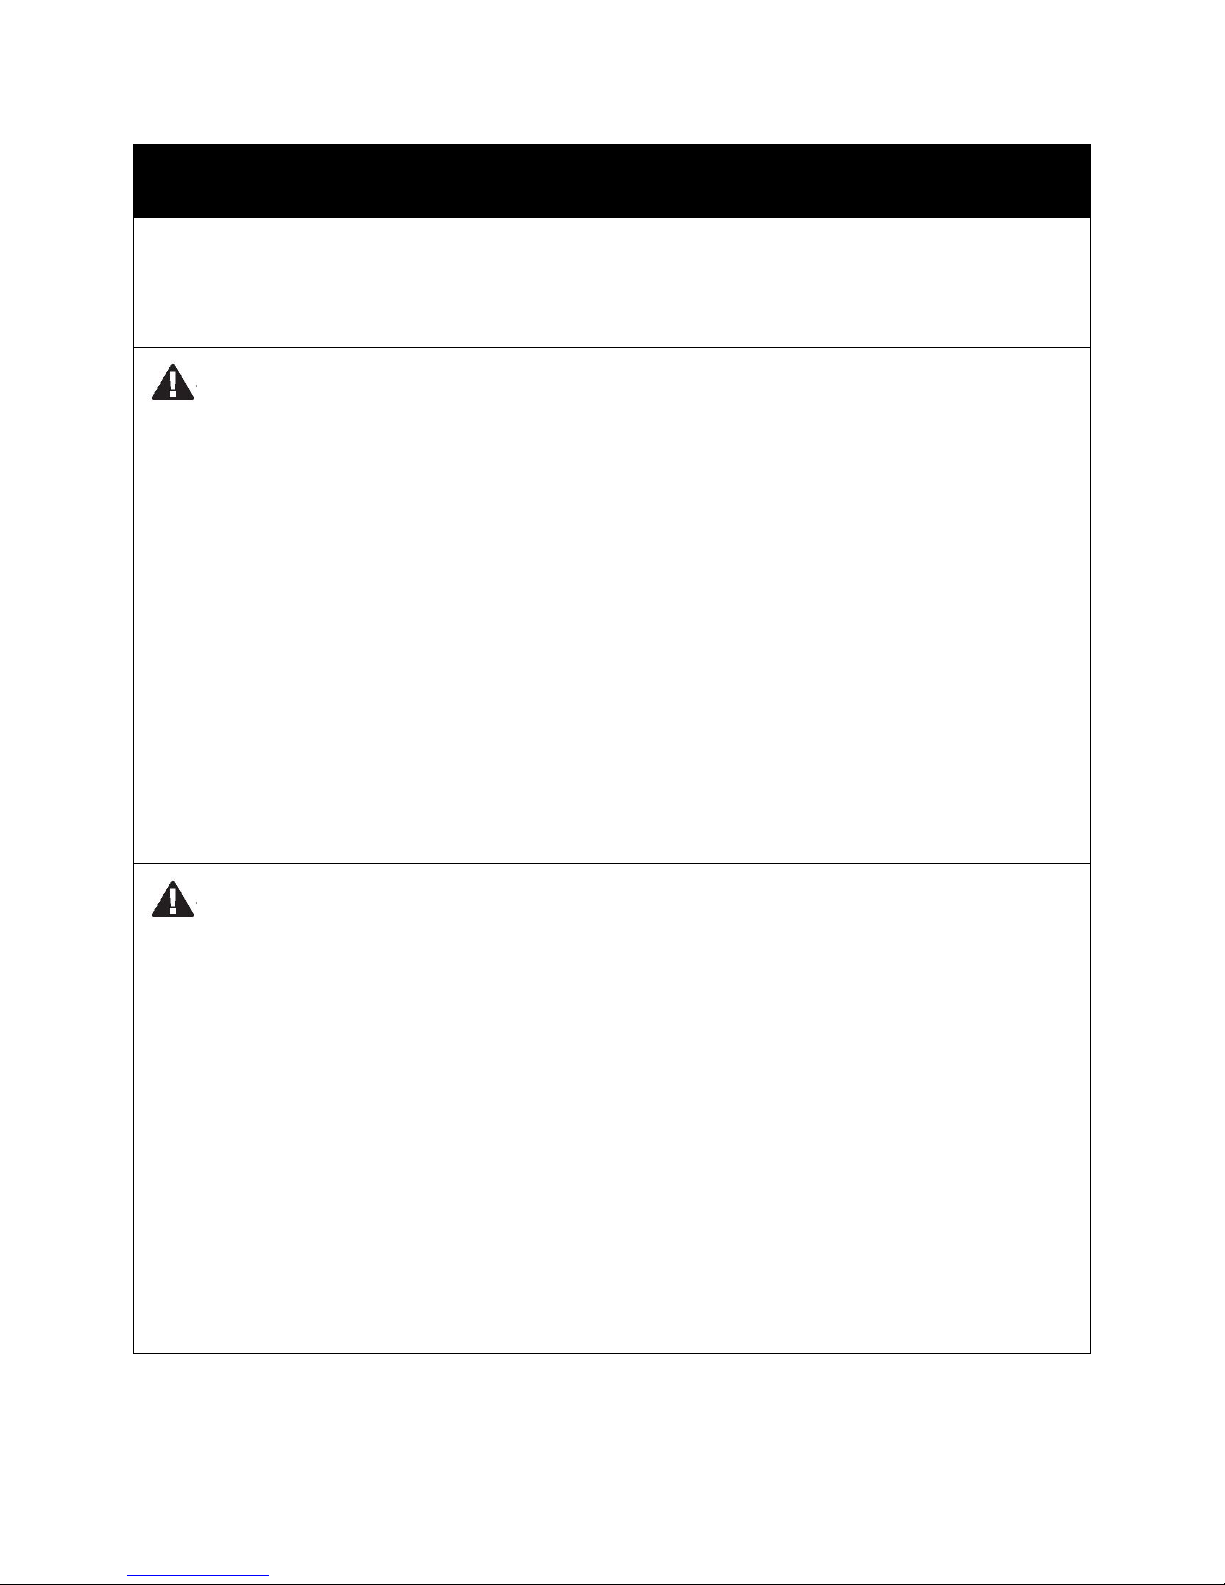
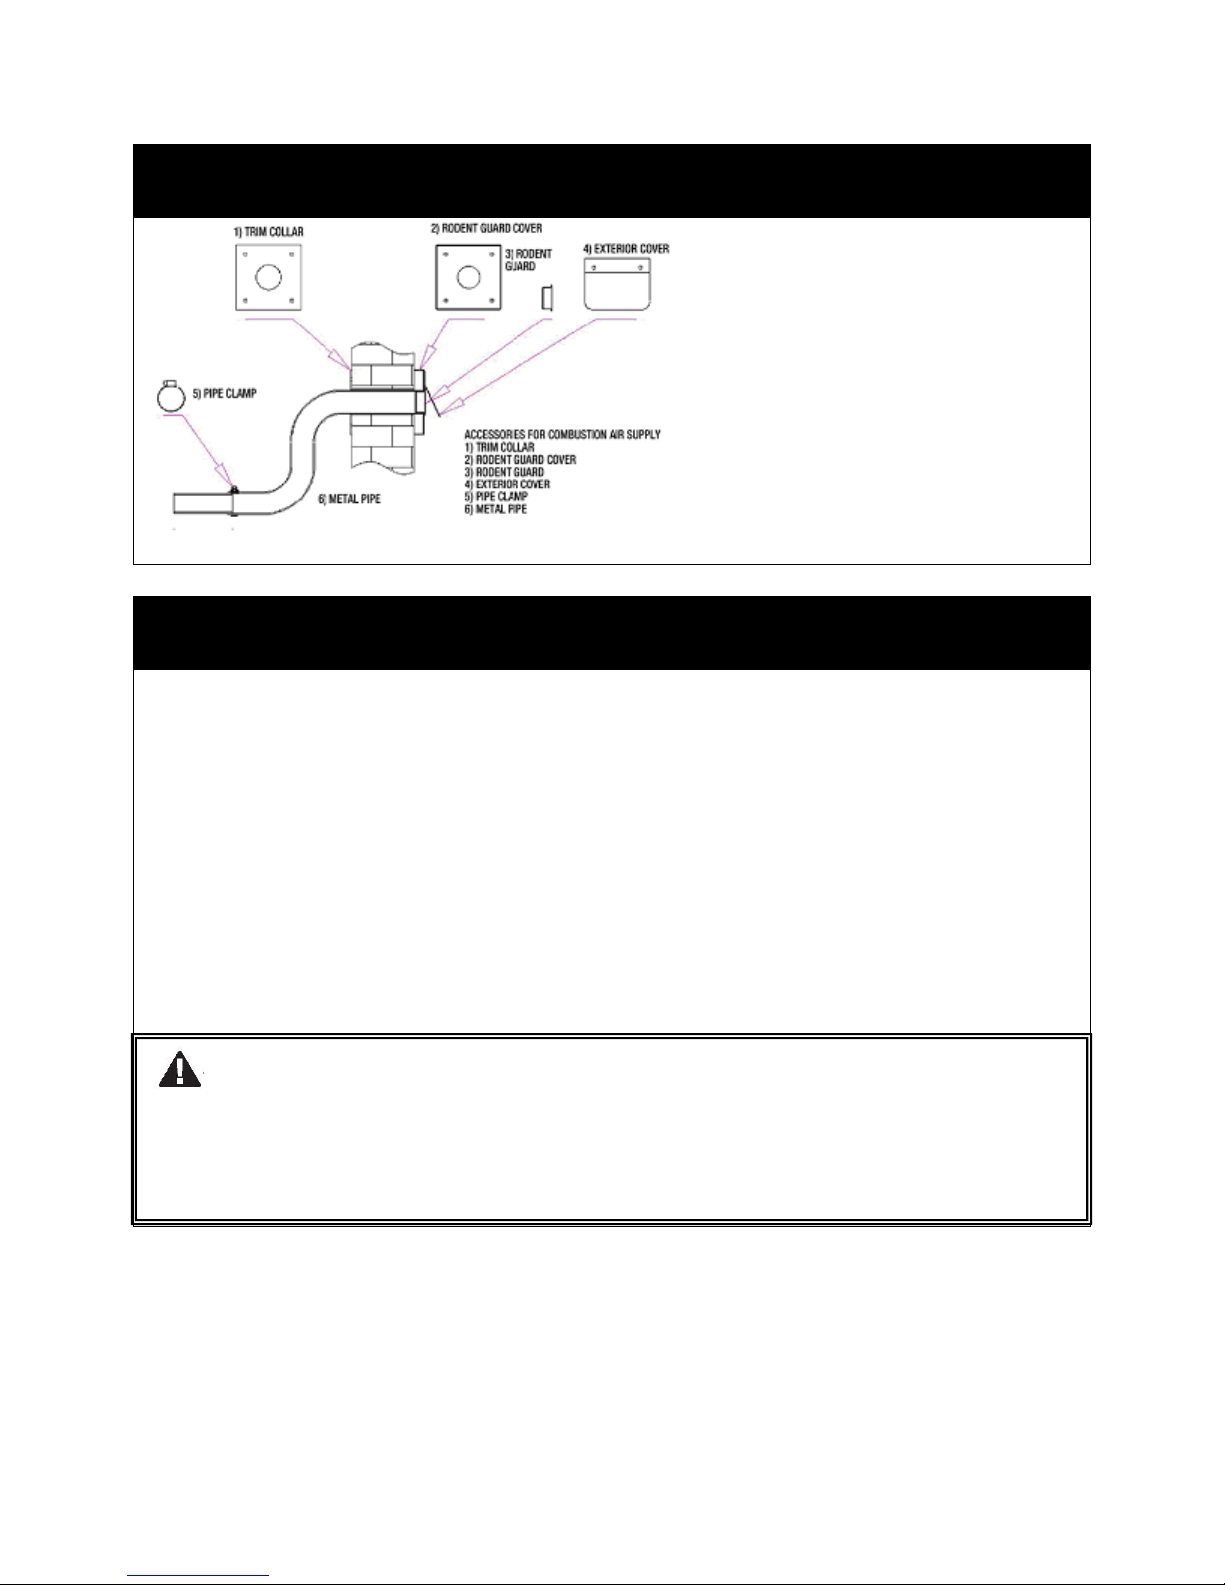
STOVEACCESSORIES
Seebelowforaccessoriesincludedwithyourunit.
INSTALLATION
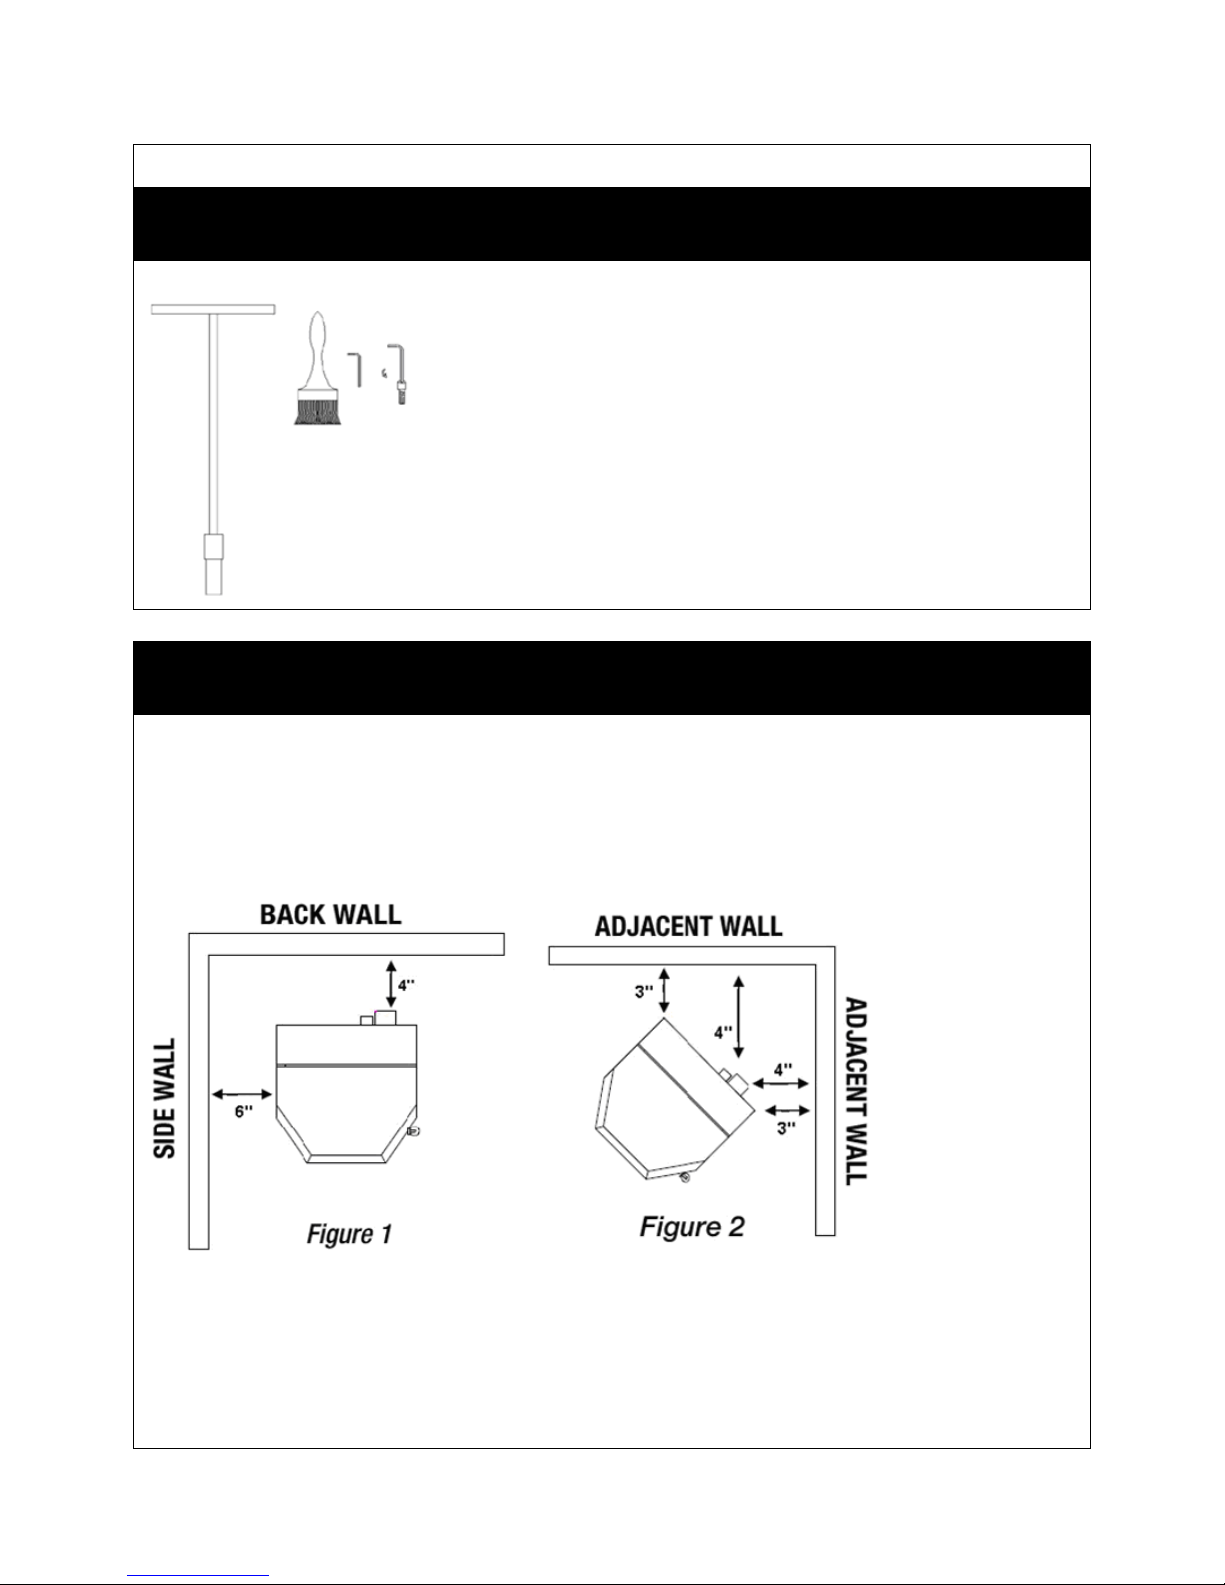
Removethefactorypackagingandfindasuitablelocationaccordingtothefollowingguidelines.
CLEARANCETOCOMBUSTIBLES
Thisstovemustbeinstalledwiththefollowingminimumclearancestothesideandbackwall
combustiblematerial.RefertoFigure1forverticalinstallationandFigure2forverticalcorner
installation.
Floorprotection:Minimum152mm(6in)inthefrontand152mm(6in)oneachside.Thestovemust
beplacedoncontinuous(groutedjoints)ofnon‐combustiblematerialsuchasceramictile,cement
board,brick,9.5mm(3/8in)millboardorequivalentorotherapprovedmaterialsuitableforfloor
protection.
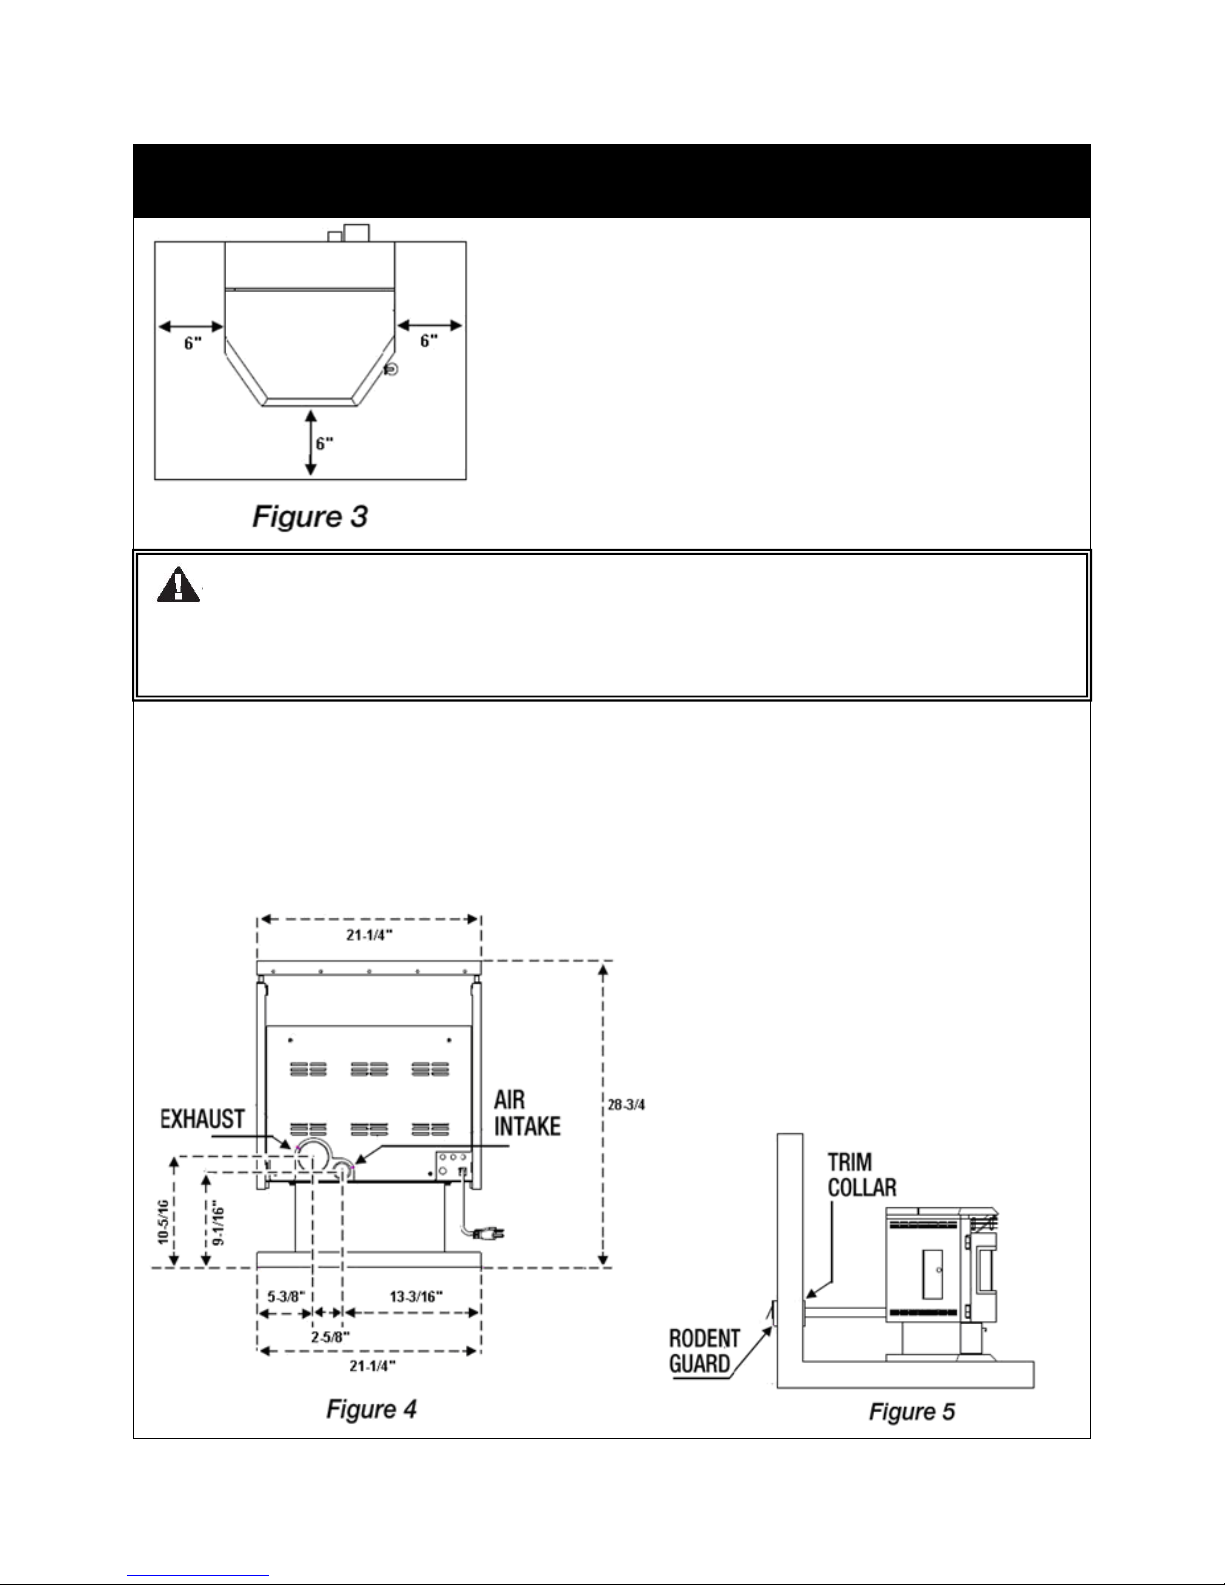
Note:Ceramictileoranytilemustbelaidonacontinuousnon‐combustiblesheettopreventthe
possibilityofembersfallingthroughthesurface.SeeFigure3.
6
INSTALLATION
COMBUSTIONAIRSUPPLY
Aflexiblemetalpipeisprovidedwiththisstove.Attachthepipetotheinletatthestove’srear.See
Figure4fortheairintakeattherearofstove.AttachaRODENTGUARD–notincludedwiththisunit–
attheendandattachtothewall.RefertoFigure5forinstallationofairintake.Fastenthepipeby
attachingtheTRIMCOLLARtowall.Allconnectionsmustbesecuredandmadeairtightbyusingeither
anappropriatelysizedhoseclampand/orUL‐181‐APfoiltape.
WARNING
•Donotusemakeshiftmaterialsorcompromisesintheinstallationofthisunit.
•Installventwithclearancespecifiedbytheventmanufacture.
7
INSTALLATION
Ifoutsideairisnotused,itisimportantthatcombustionairbeeasilyavailabletotheairinlet.Anair
registerthatcanbeopenedshouldbeusedintightlyinsulatedhomes.
VENTING
ThisunitiscertifiedforusewithULcertified/Listed76mm(3in)or101mm(4in)diameterinsize.This
unitcanbeventedinanexistingchimneywiththeadditionofalinerifthechimneyismorethan101
mm(4in)indiameter.Refertotheinstructionsprovidedbytheventorchimneymanufacturer,
especiallywhenpassingthroughawall,ceilingorroof.
Thisisapressurizedexhaustsystem.Allventconnectorjointsmustbesealedwith500F(260C)RTV
siliconesealanttoensureconsistentperformanceandavoidsmokeandashspillage.Allhorizontal
connectorjointsmustbesealedwithUL181APfoiltape.Werecommendthatallverticalventconnector
jointsbesecuredwithaminimumof3screws.
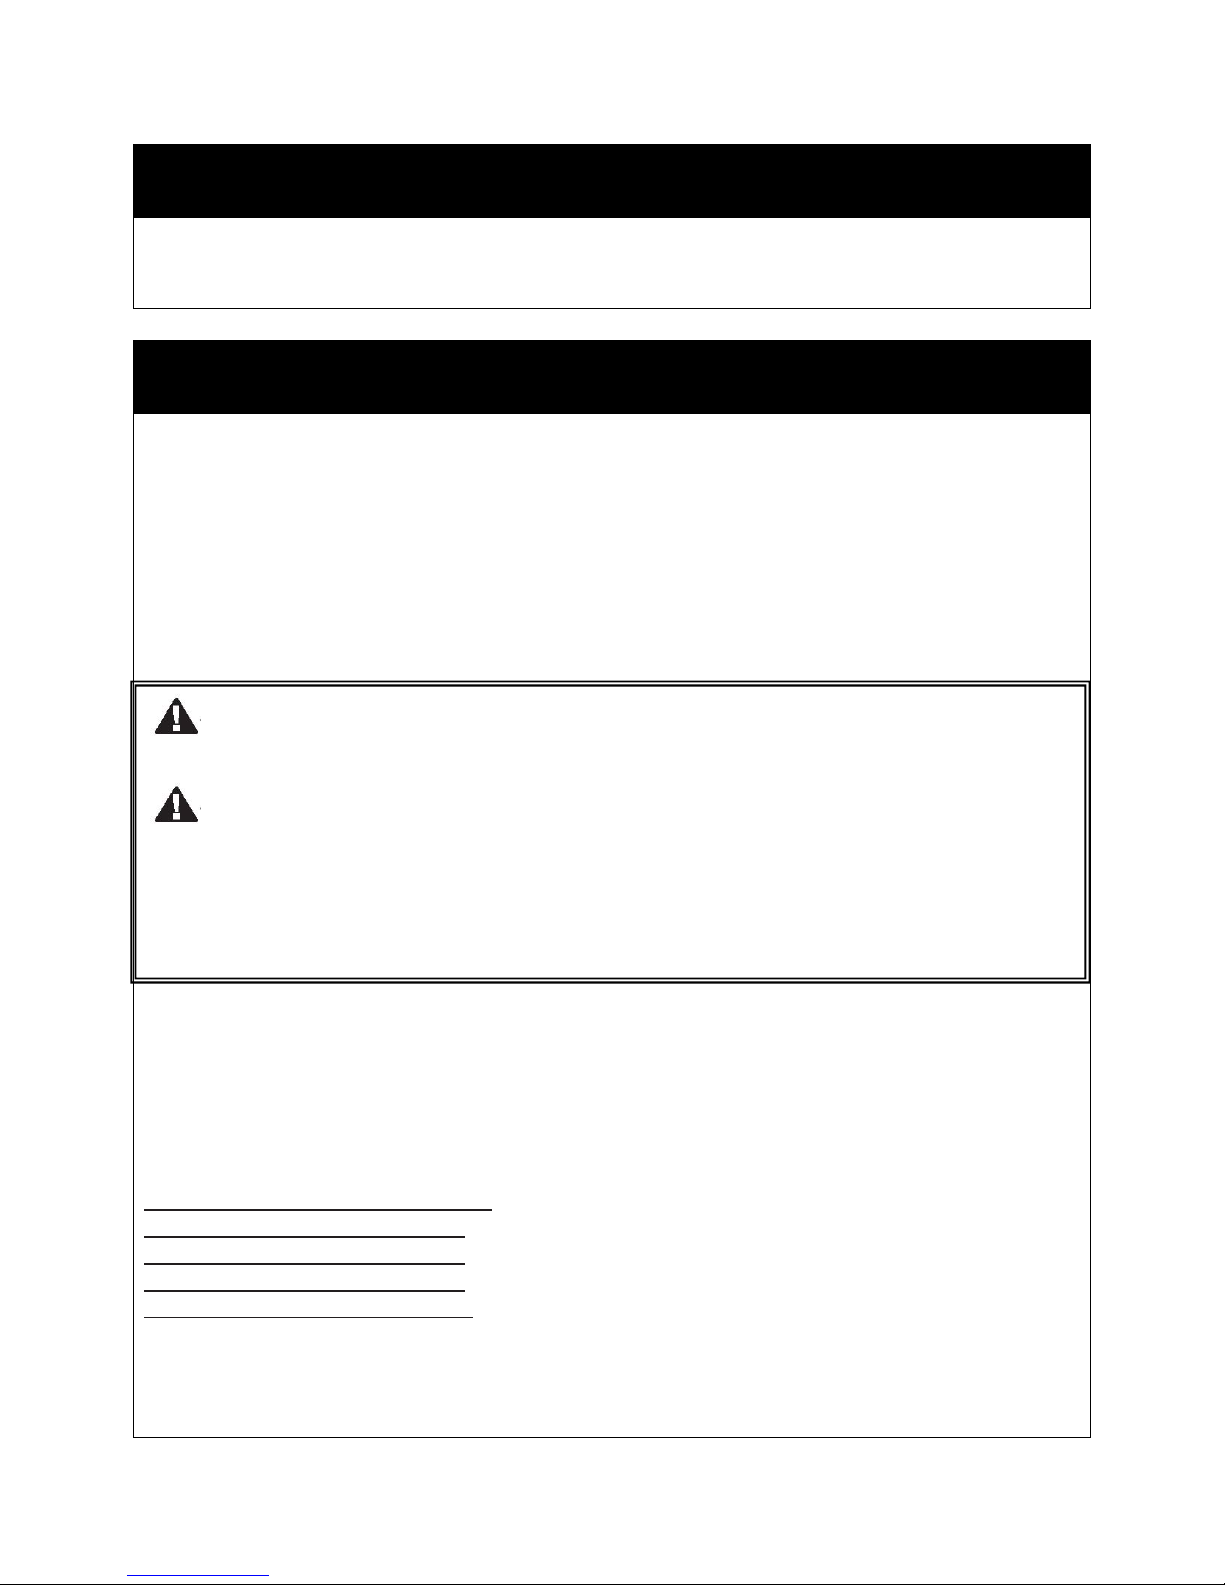
EQUIVALENTVENTLENGTH
Thelongertherunofpipeinyourinstallation,themorerestrictionthereisinthesystem.Therefore
largerdiameterpipeshouldbeusedforlongerruns.
Use76.2mm(3in)pipeifyouhavelessthan4.57m(15ft)ofEquivalentVentLength(EVL).
TocalculateEVL,usethefollowingconversiontable:
Qty TypeofPipeEVL(ft)
190degreeelbowor“T”5
145degreeelbow3
1ftHorizontalpiperun1
1ftVerticalpiperun0.5
Example:(3x1.22m[4ft]ofverticallength=3.66m[12ft]x0.5=6EVL)+(1xelbowor“T”=5EVL)+
(2x0.3m[1ft]ofhorizontallength=2EVL)
TotalEVL=13.So76.2mm(3in)diameterventisallowed.
WARNING
•Donotinstallinabedroom.
CAUTION
•Donotconnectthisunittoachimneyflueservinganotherappliance.
•Donotinstallafluedamperintheventingsystemofthisunit.
•Installventatclearancesspecifiedbytheventmanufacture.
•Thestructuralintegrityofthemanufacturedhomefloor,wall,ceiling,roofmustbemaintained.
8
VENTING
NOTE:ATALTITUDESOFMORETHAN914.4m(3000FT),WESUGGESTTHEUSEOF102mm(4IN)
DIAMETERVENTATANEVLof2.13m(7FT)ORMORE.
INSTALLATIONCONFIGURATION
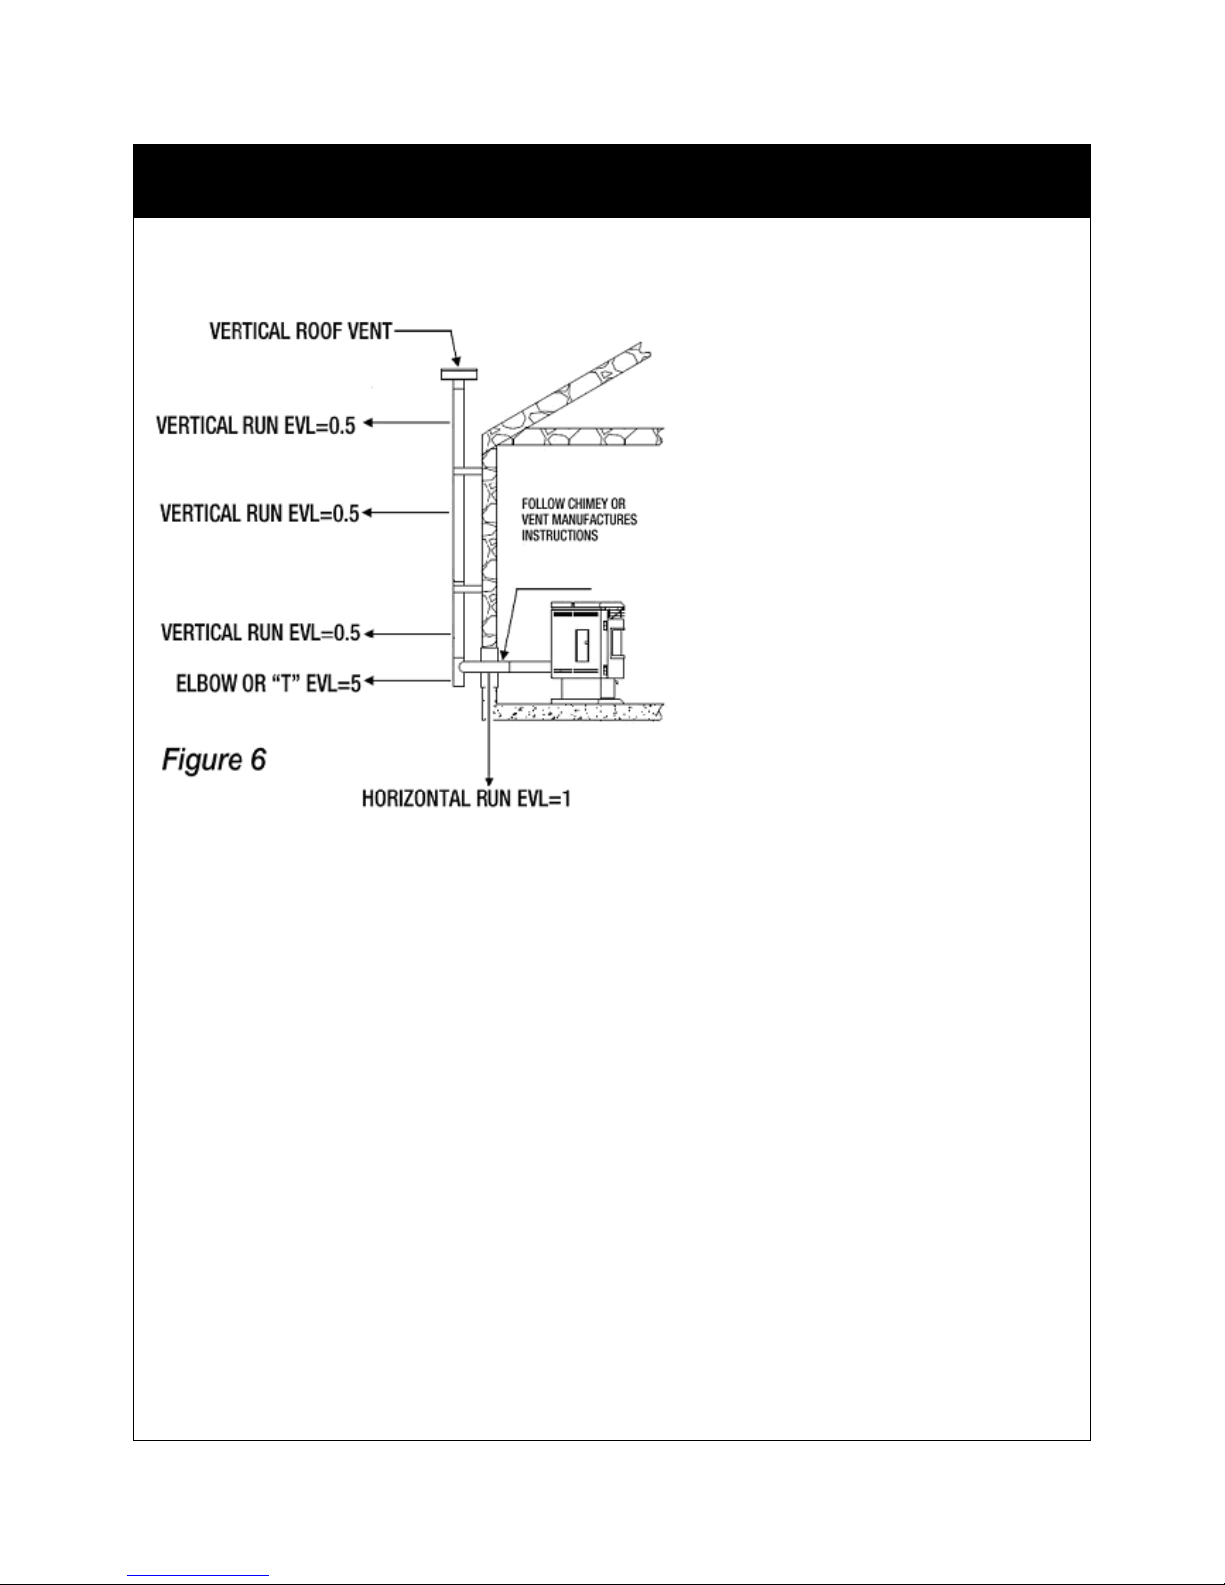
HORIZONTALLYINSTALLTHROUGHWALL
NOTE:FOLLOWL‐VENTCHIMNEYMANUFACTURER’SINSTRUCTIONS.
1.PositionthestoveasFigures1&2andmaintaintheclearancespecifiedinFigure3.
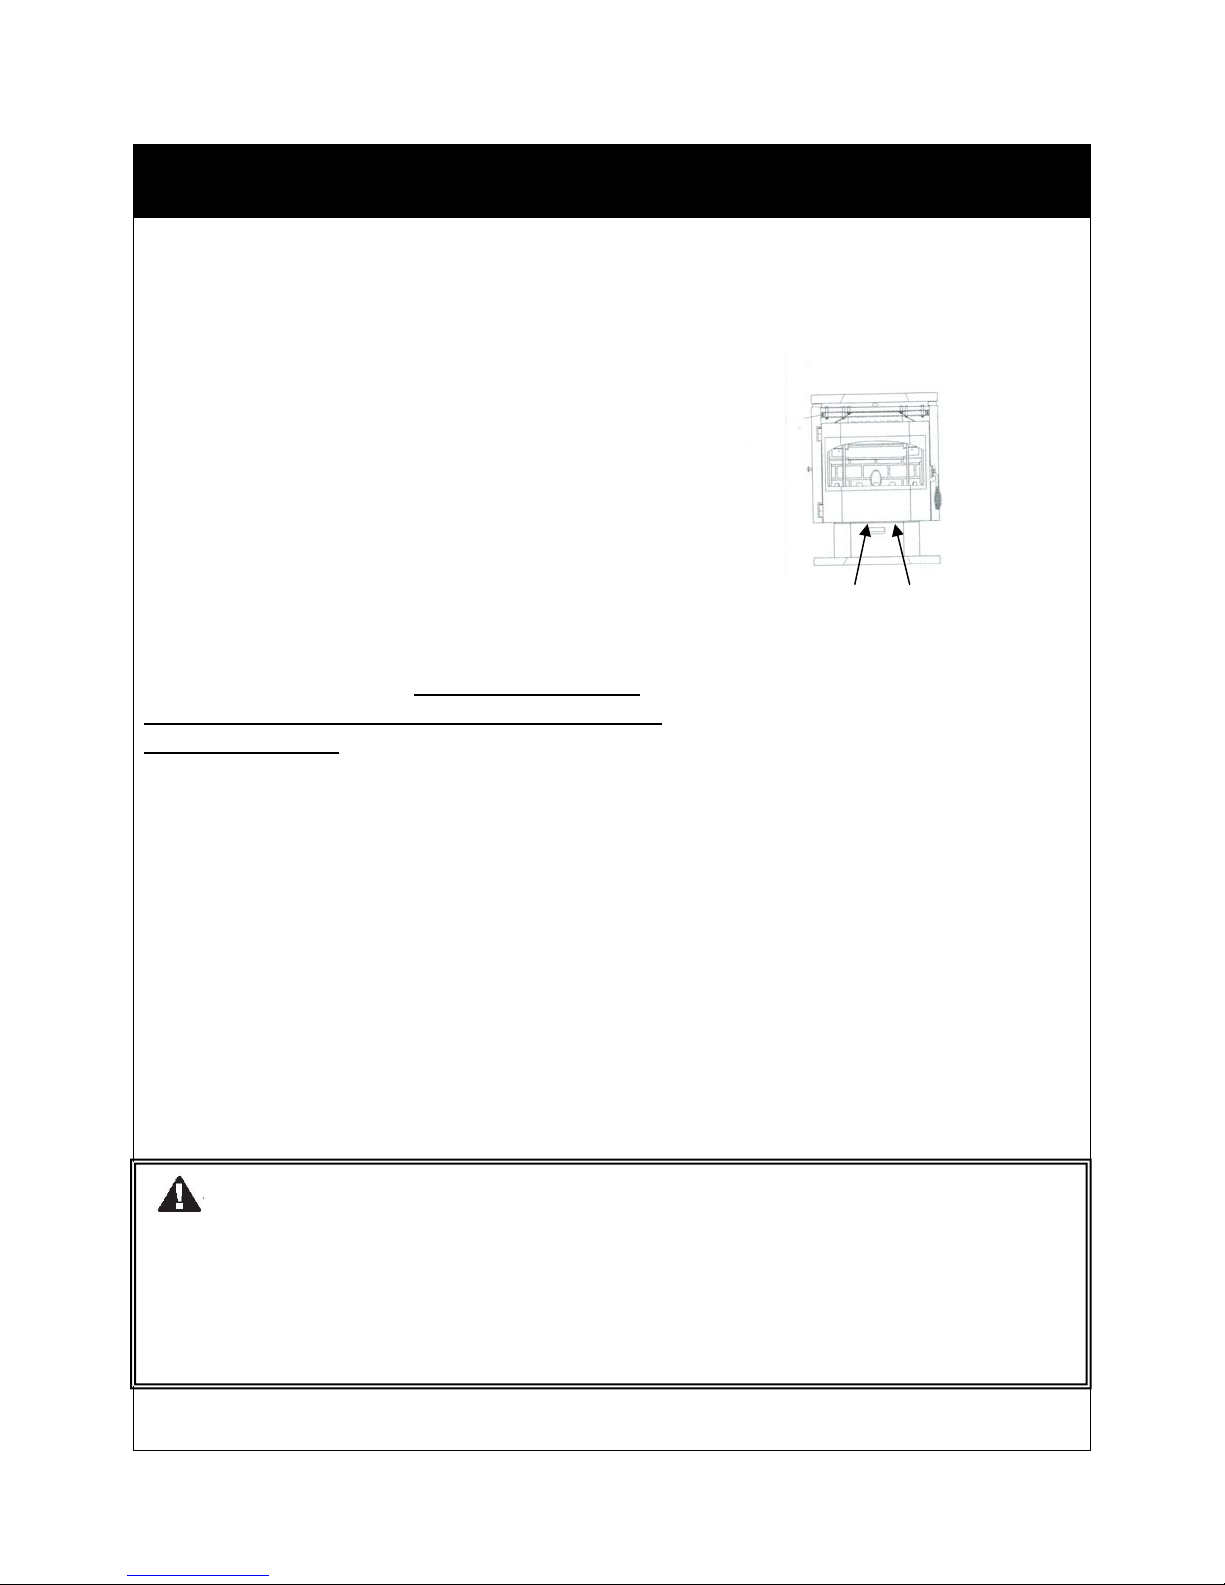
2.Determinethepositionofholeinwallwheredirectlybehindstoveexhaustvent(refertoFigure4).
3.Alwaysmaintain152.4mm(6in)clearancefromcombustiblematerials.
4.RefertoFigure7forinstallation.
5.InstallL‐ventwallthimbleperL‐ventmanufacturer’sinstructions.
6.Attachenoughpipingtogothroughandextendatleast152.4mm(6in)beyondexteriorwall.A
203.2m(8ft)verticalpiperunissuggestedwherepossibletoreducethepossibilityofsmokespillage
causedbynegativepressure.
7.Attachcapandsealoutsidewallthimbleswithnon‐hardeningwater‐roofmastic.
8.Terminationshouldnotbelocatedsothathotexhaustgasescanignitetrees,shrubsorgrassesorbe
ahazardtochildren.Exhaustgasescanreachestemperatureof260˚C(500F)andcauseseriousburns
iftouches.
9
VENTING
9.Locatedterminations:a)notlessthan0.91m(3ft)aboveanyforcedairinletlocatedwithin3.05m
(10ft);b)notlessthan1.22m(4ft)beloworhorizontallyfrom,oronefootabove,anydoor,window
orgravityairinletintoanybuilding;c)notlessthan0.61m(2ft)fromanadjacentbuildingandnot
lessthan2.13m(7ft)abovegradewhenlocatedadjacenttoapublicwalkway.
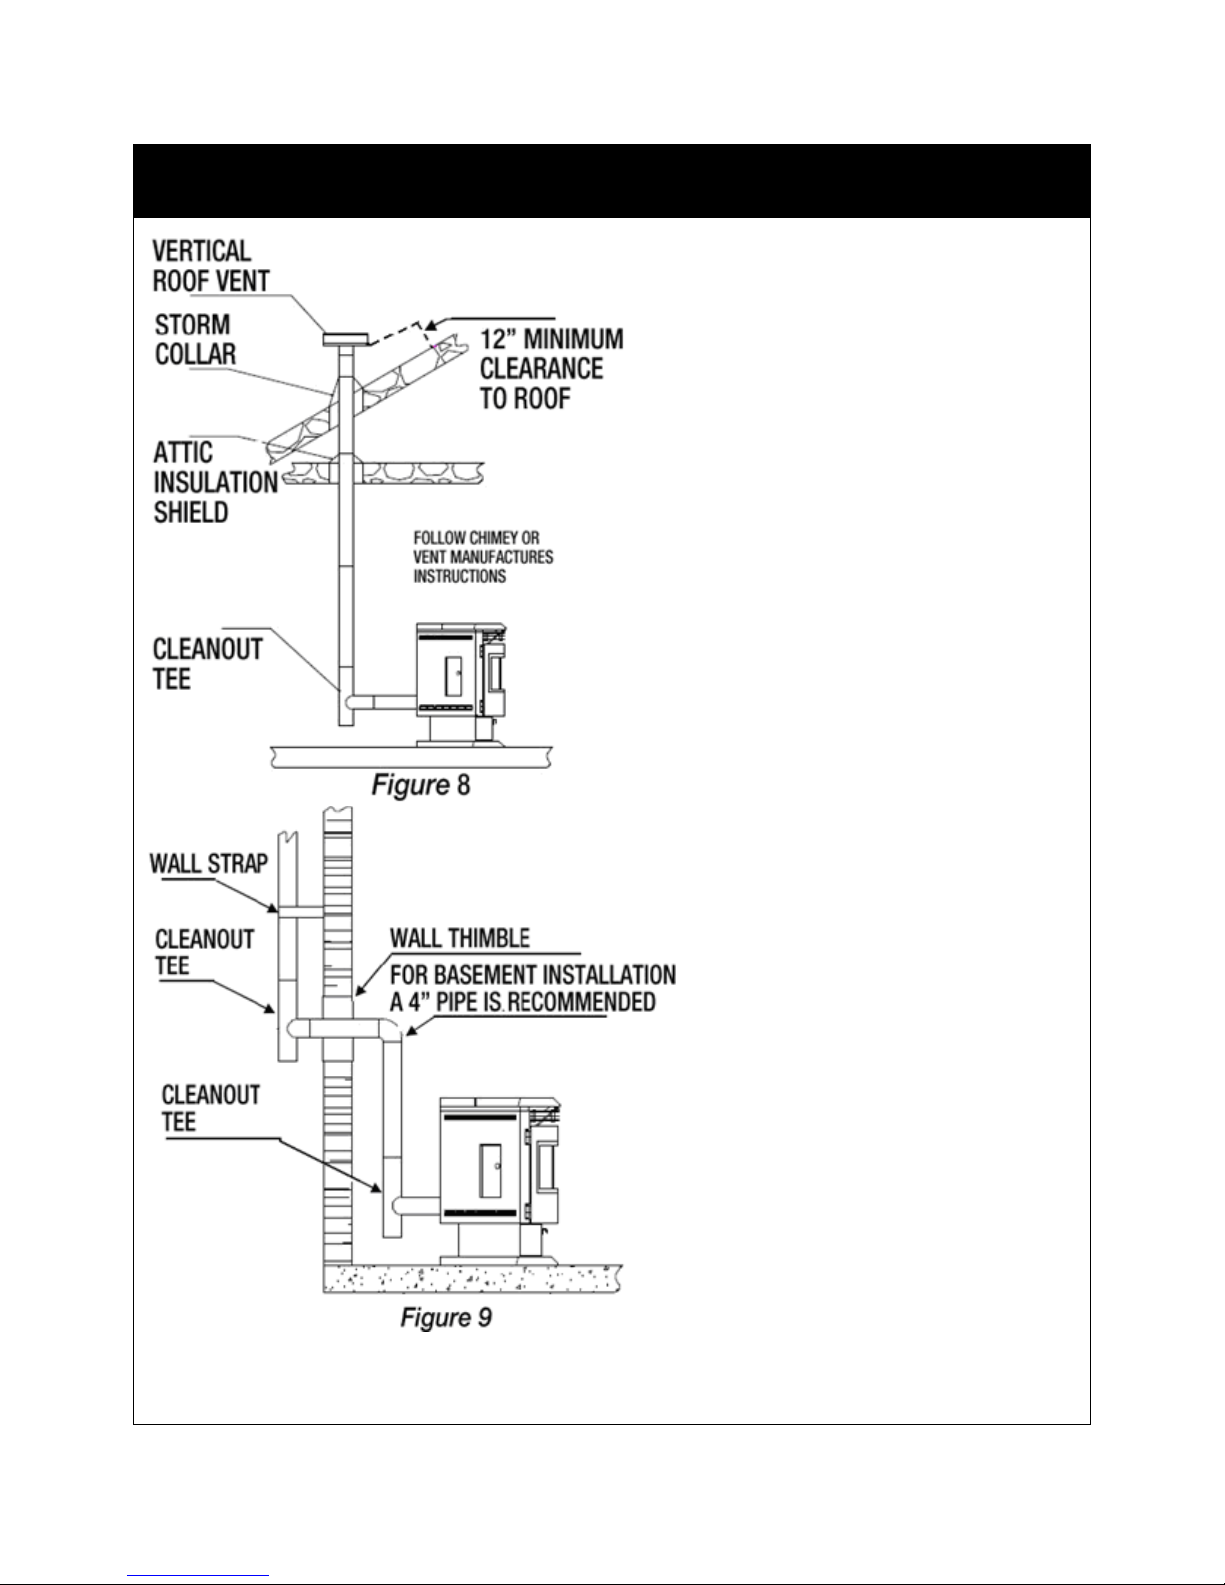
VERTICALLYWITHCHIMNEYSYSTEM
1.FollowL‐Ventchimneymanufacturer’sinstructions.
2.Option–toachieveacenteredverticalinstallation,a45degreeelbowandaclean‐outteecanbe
usedtooffsetthepipefromtheexhaustoutlettotherearcenterofthestove.
3.Option–installL‐ventelbowinplaceofclean‐outtee.Locatestove.Dropplumbbobtocenterof
teeoutlet,markpointonceiling.InstallceilingsupportandL‐ventpipeasperL‐ventmanufacturer’s
instructions.
4.Alwaysmaintain76.2mm(3in)clearancefromcombustiblematerials.Whenpassingthrough
additionalfloorsorceilings,alwaysinstallfire‐stopspacer.
5.Afterlinerisup,cuteitherroundorsquareholeinroof,always76.2mm(3in)largeralltheway
aroundpipe.Installupperedgeandsidesofflashingunderroofingmaterials,nailtotheroofalong
upperedge.Donotnailloweredge.Sealnailheadswithflexiblewaterproofsealant.
6.Applyflexible,waterproofsealantwherethestormcollarmeetsthevent.Slidestormcollardown
untilitsitsontheflashing.Sealandinstallcap.
10
VENTING
11
VENTING
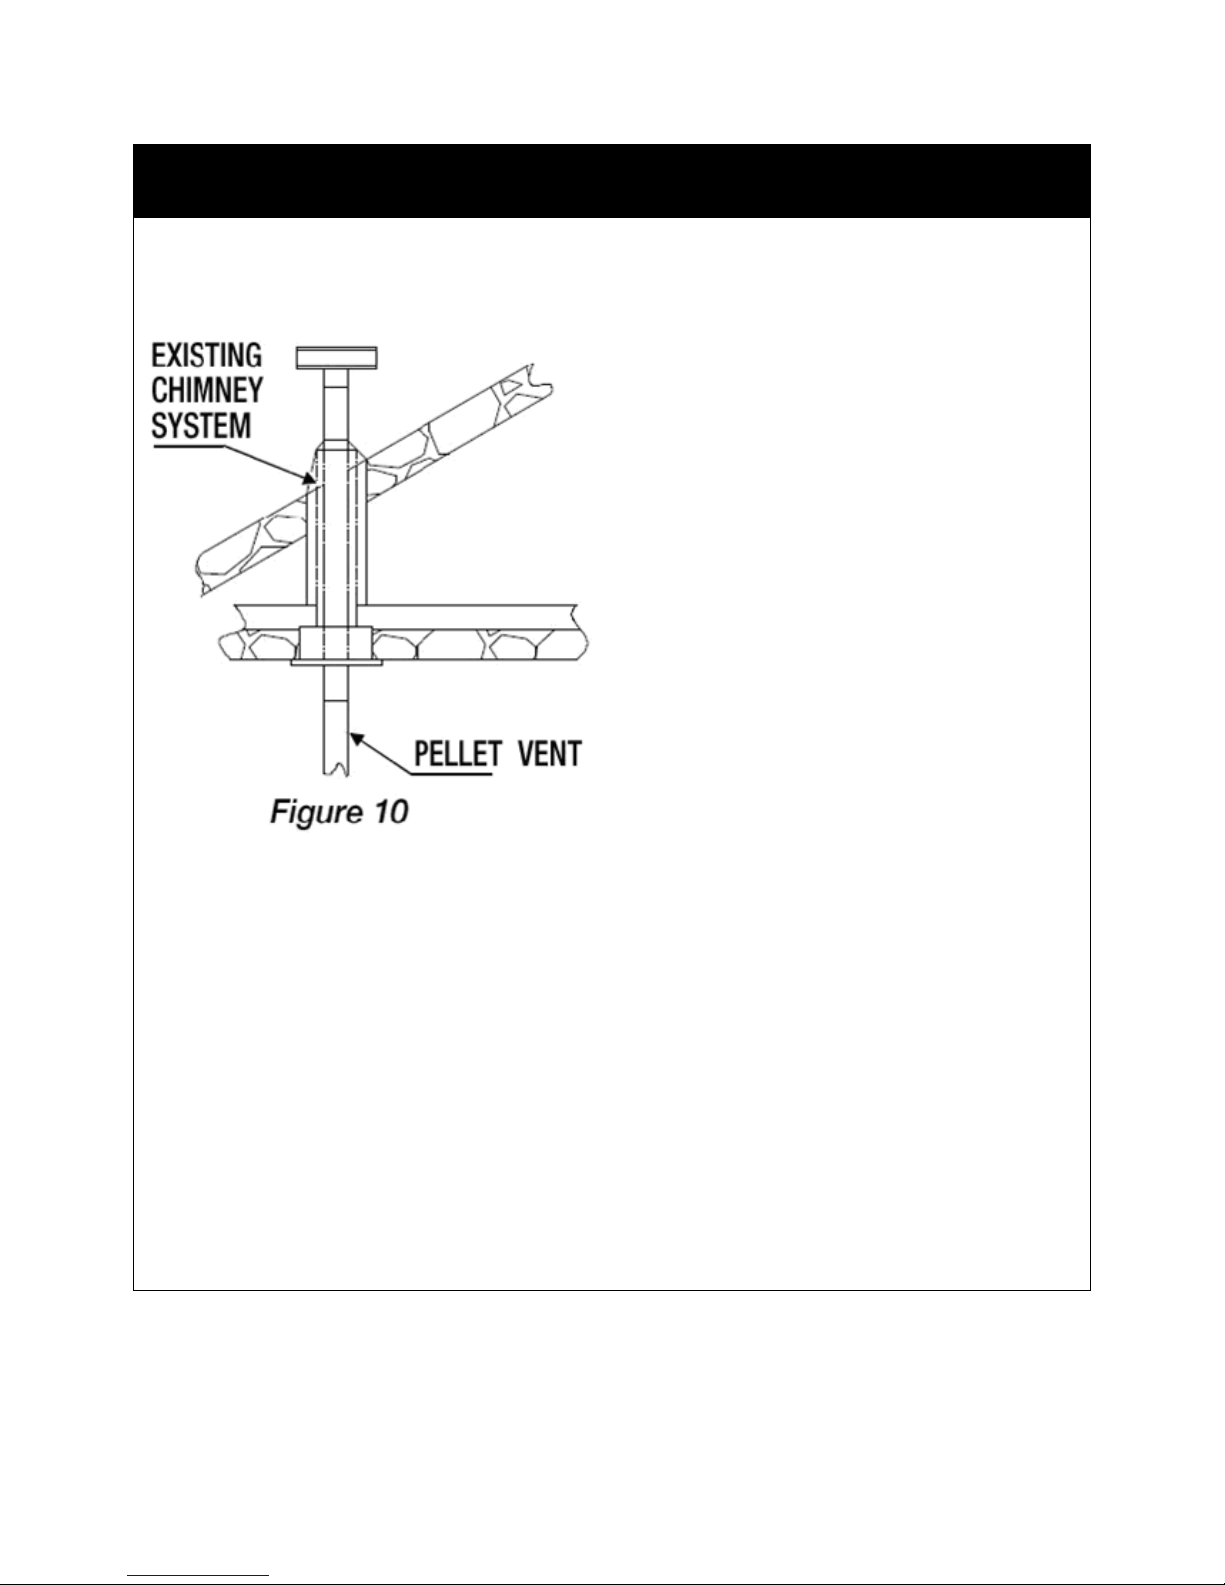
VERTICALLYINTOEXISTINGCHIMNEYSYSTEM
Asanalternate,76.2or101.6mm(3or4in)L‐ventcanberuninsideexistingchimneytotermination
(refertoFigure10).
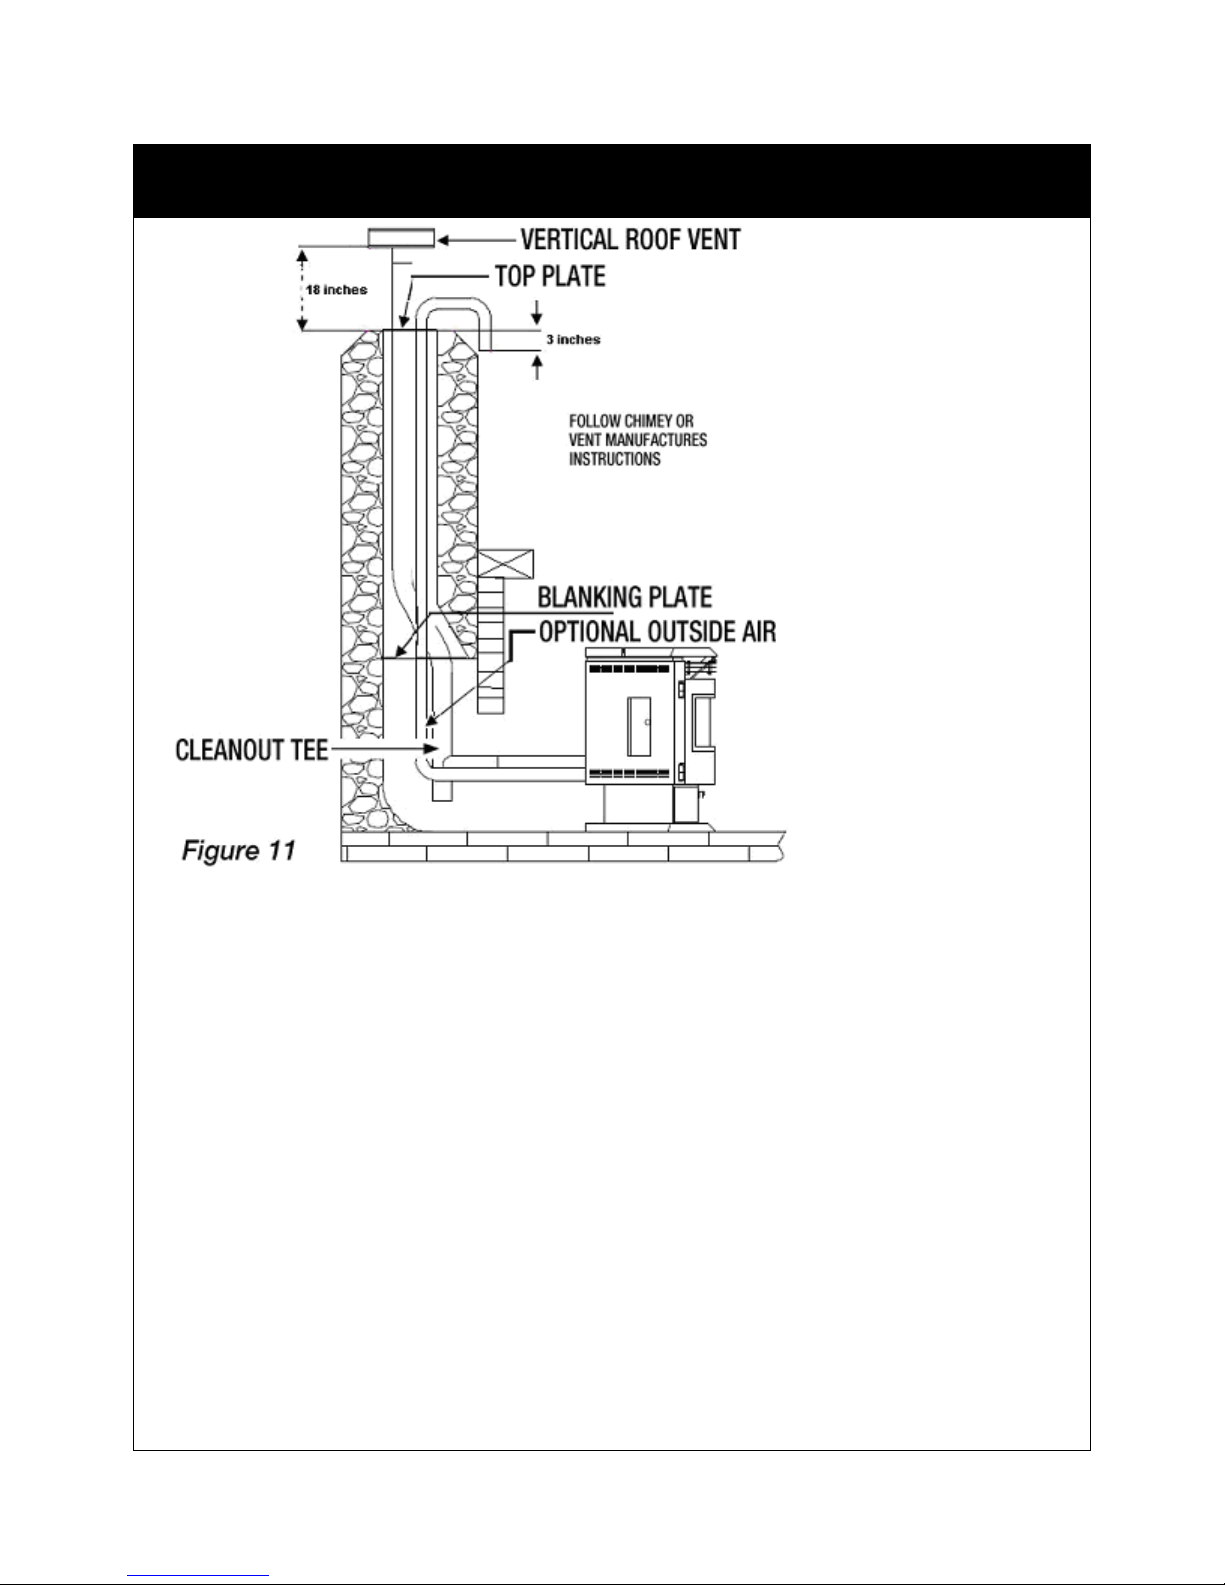
VERTICALLYINTOEXISTINGMASONRYFIREPLACE
1.FollowL‐ventchimneymanufacturer’sinstructions.
2.Havethemasonrychimneyinspectedbyaqualifiedchimneysweeporinstallertodetermineits
structuralintegrity.
3.Runthepipefromthestoveoutletto457.2mm(18in)abovethetopofchimney.
4.Installablanketplateandthechimneypipe,andifusedtheoutsideairpipeasshowninFigure11.
5.AttachtheDuraVentadaptor,asectionofpipeandcleanouttee,makesurethecleanoutteeis
centeredinthechimneyfluearea.UseRTV,metallictapeandaminimumofthreeself‐tapingscrews
atalljointconnectionstoensureatightseal.
6.PositionthestoveadheringtotheclearancespecifiedinFigure1&2.
7.Measureandbuildchimneytopplate.Cutoutholesforchimneypipe,andifusedtheoutsideair
pipe.Installandsealwithflexiblewaterproofsealanttopreventwaterleakage.Installventcap.
12
VENTING
INSTALLATIONTHROUGHSIDEOFMASONRYCHIMNEY
1.FollowL‐ventchimneymanufacturer’sinstructions.
2.Positionthestove,adheringtotheclearanceinFigures1&2.Markthecenteroftheholewherethe
pipeistopiercethemasonrychimney.
3.Itwillbenecessarytocutoutthemasonryaroundthelocationofthepipecentermark.Cuta101.6
mm(4in)diameterholefor76.2mm(3in)pipeand127mm(5in)diameterholefor101.6mm(4in)
pipe.
4.Measureandbuildchimneytopplate.Cutoutholeforchimneypipeandifusedfortheoutsideair
pipe.
5.Installtheteeonthebottomoftheverticalpipesystemandloweritdownthechimneyuntilthe
centerbranchoftheteeislevelwiththecenteroftheholeinmasonryasshowninFigure12.
6.Installandsealthetopplatefromstep3withflexiblewaterproofsealant.Slipthestormcollarover
thepipeandwhileholdingthepipeattheproperelevation,affixthecollarwithaminimumofthree
6.35mm(1/4in)stainlesssteelmetalscrews.Sealalljointsandseamsaroundthecollar.
7.Connectthehorizontalpipebypushingitthroughtheholeinthemasonryandliningitupwiththe
branchinthetee.Pushthepipeintotheteewhiletwistingittolockthetee.
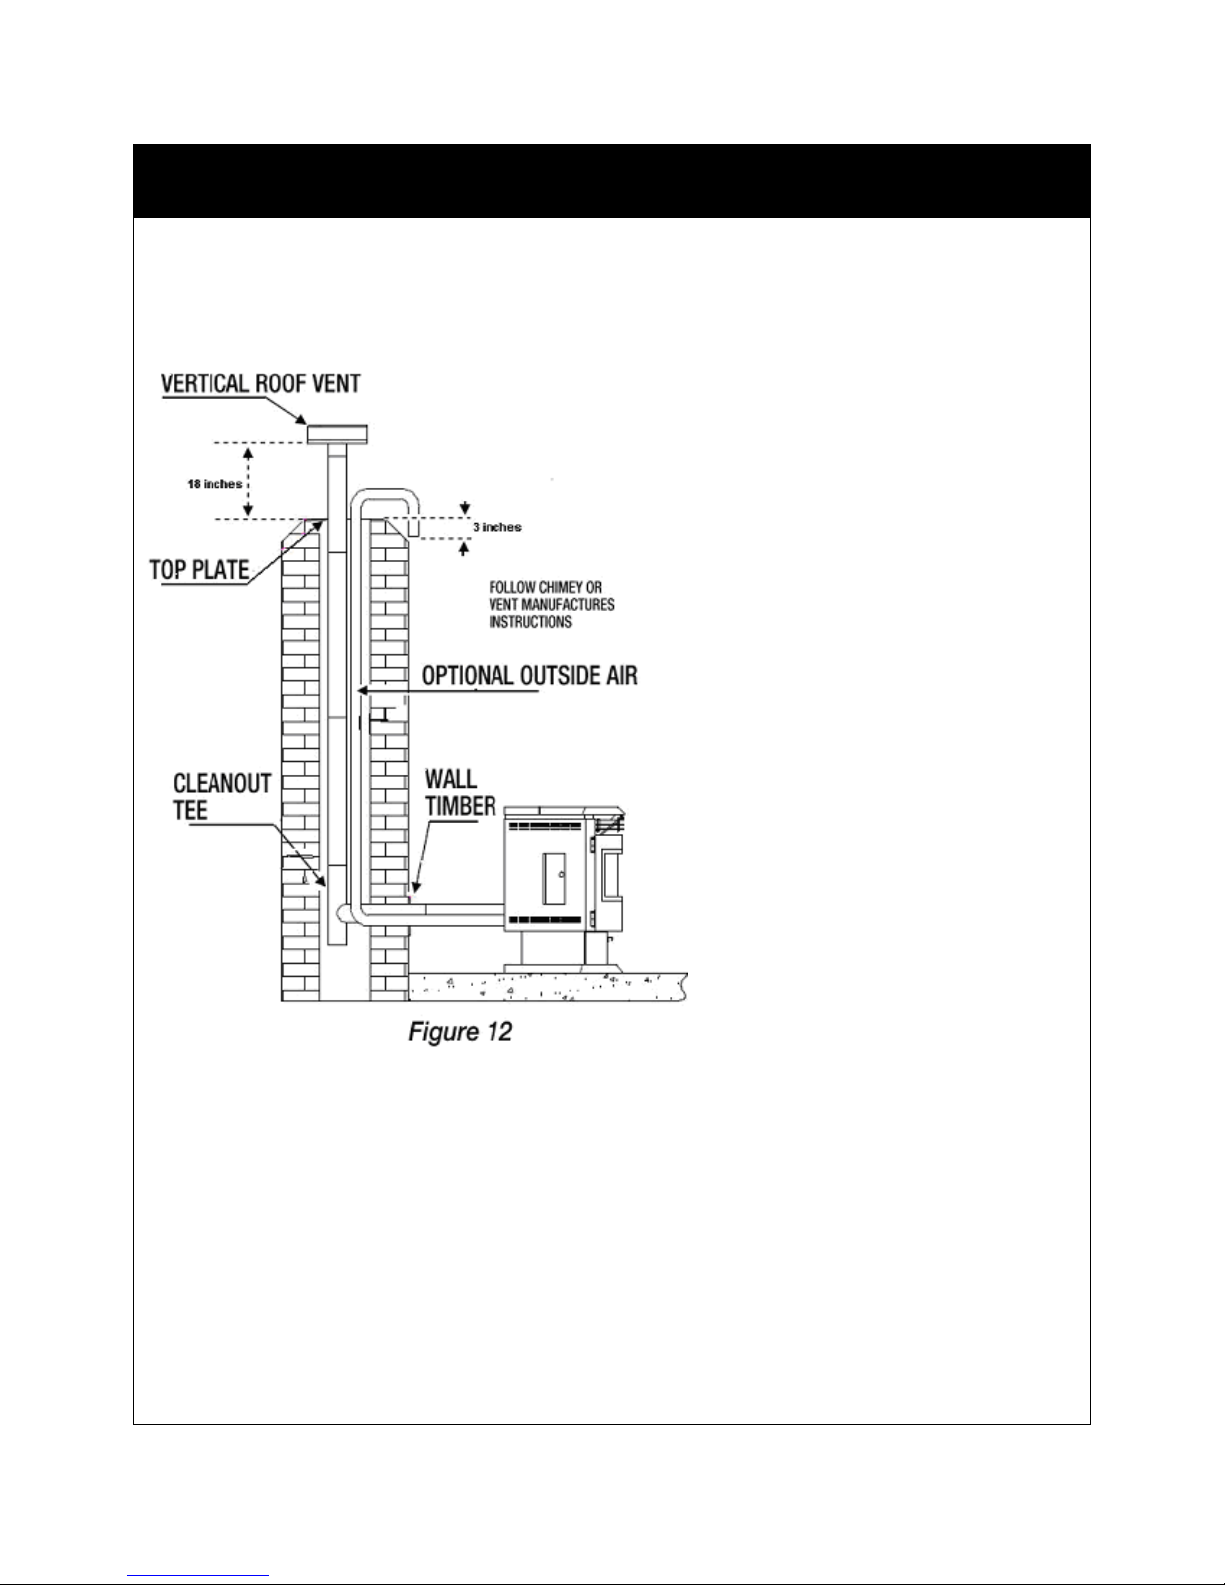
13
VENTING
8.Ifneeded,oncethehorizontalpipeisinplace,thespacebetweenthepipeandmasonrymaybefilled
withhightemperaturegrout.
9.Installthetrimcollar.Anadjustablepipelengthandadaptormaybeneededtoalignandcomplete
theconnectiontothestove.
CONNECTIONOFCOMBUSTIONAIRSUPPLY
STEP1:AttachTrimCollartothewallinsidethehouseandattachwith4screws.
STEP2:AttachRodentGuardCovertothewalloutsidethehouseandattachwith4screws.
STEP3:AttachtheMetalPipetoAirIntakeatthebackofstove(SeeFigure4forlocationofAirIntake)
andattachwithPipeClamp.
STEP4:RoutetheMetalPipeintothewallandfixtheotherendofMetalPipeintoRodentGuard.
STEP5:AttachtheRodentGuardontothecover.
STEP6:AttachExteriorCovertoRodentGuardCoverandattachwith2screws.
14
VENTING
USINGCORRECTFUEL
Thisstoveisdesignatedforburningpelletizedwoodfuelonly.Pelletof6.35mm(1/4in)or21.17mm
(5/6in)indiameterandapproximately25.4mm(1in)longshallbeused.Longerorthickerpellets
sometimebridgetheaugerflights,whichpreventsproperpelletfeed.
Burningwoodinformsotherthanpelletsisnotpermitted.Itwillviolatethebuildingcodesforwhich
thestovehasbeenapprovedandwillvoidallwarranties.
Thisstovefeedpelletsatpresetrates,addingfuelbyhandwillnotincreaseheatoutputbutmay
seriouslyimpairthestoveperformancebygeneratingconsiderablesmoke.
Donotburnwetpellets.
Thestoveperformancedependsheavilyonthequalityofyourpelletfuel.Avoidtheuseofpelletwhich
isexcessfines,withbinderandhighashcontent.
WARNING
•Donotuseanyflammableliquidssuchasgasoline,gasoline‐typelanternfuel,kerosene,charcoal
lighterfluid,orsimilarliquidstostartorfreshen‐upthefire!Keepallsuchliquidswellawayfrom
theheaterwhileitisinuse.
15
OPERATINGINSTRUCTIONS
1. SETTHEAIRINLETDAMPERS
Itisnotpossibleforthemanufacturetofactorysetyour
stovetoworkproperlywithoutsomeadjustments.The
dampershelpcontroltheamountofairflowsupplied
forcombustion.
AdamperPUSHEDINalltheway,maximizesconcentrated
airflowtotheburnpot.Thiswillmaintainarobustfire.
TheAugertimingisdesignedtoberun,inmostconditions,
withthedampersclosed.
Insomeareas/conditions,itmaybebenecessarytoadjust
thedamperopenslightlyinordertoslowdowntheflame
andallowthepelletstokeeppacewiththerateofburn.
Thisshouldbemonitoredcloselytoensureyouhavethe
properfeedrateestablished.Ifdampersareopened
toomuch,therateofburnwillbeveryslowandthe
pelletswillbuildup.
THISSETTINGNEEDSTOBEFINETUNEDTOACCORDING
TOYOURLOCATIONANDELEVATION.ITISRECOMMENDED
THATYOUSTARTWITHTHEDAMPERSPUSHEDINTOSTART.
2. OPENINGANDCLOSINGTHEMAINDOOR
Openthestovedoorbyrotatingthehandlecounterclockwise,towardthetopofthestove.Makesure
thestovedoorispushedfirmlyagainstthestoveandinthelockedpositionbeforestartingstove.
3. FILLTHEHOPPERWITHFUEL
Ensurethehopperiscleanofanydebris,manuals,orotherforeignobjectsthatcouldjamupthefuel
feedauger.Usepelletsmadefromsawdustand/orotherwoodby‐products.Premiumgradepelletswill
producethehighestheatoutput.
4. Connecttheplugintostandard120Vac,60Hzoutlet.PressO/Ioncetostartlighting.
WARNING
•Donotuseanyflammableliquidssuchasgasoline,gasoline‐typelanternfuel,kerosene,charcoal
lighterfluid,orsimilarliquidstostartorfreshen‐upthefire!Keepallsuchliquidswellawayfrom
theheaterwhileitisinuse.
•Makesurehopperlidandfrontdoorofthestovehavebeentightlyclosedbeforestartingstove.
Airinletdampers
16
OPERATINGINSTRUCTIONS
5. Theunithasenteredthestart‐upperiodandpelletisnowfeedingunderthepre‐setrate.
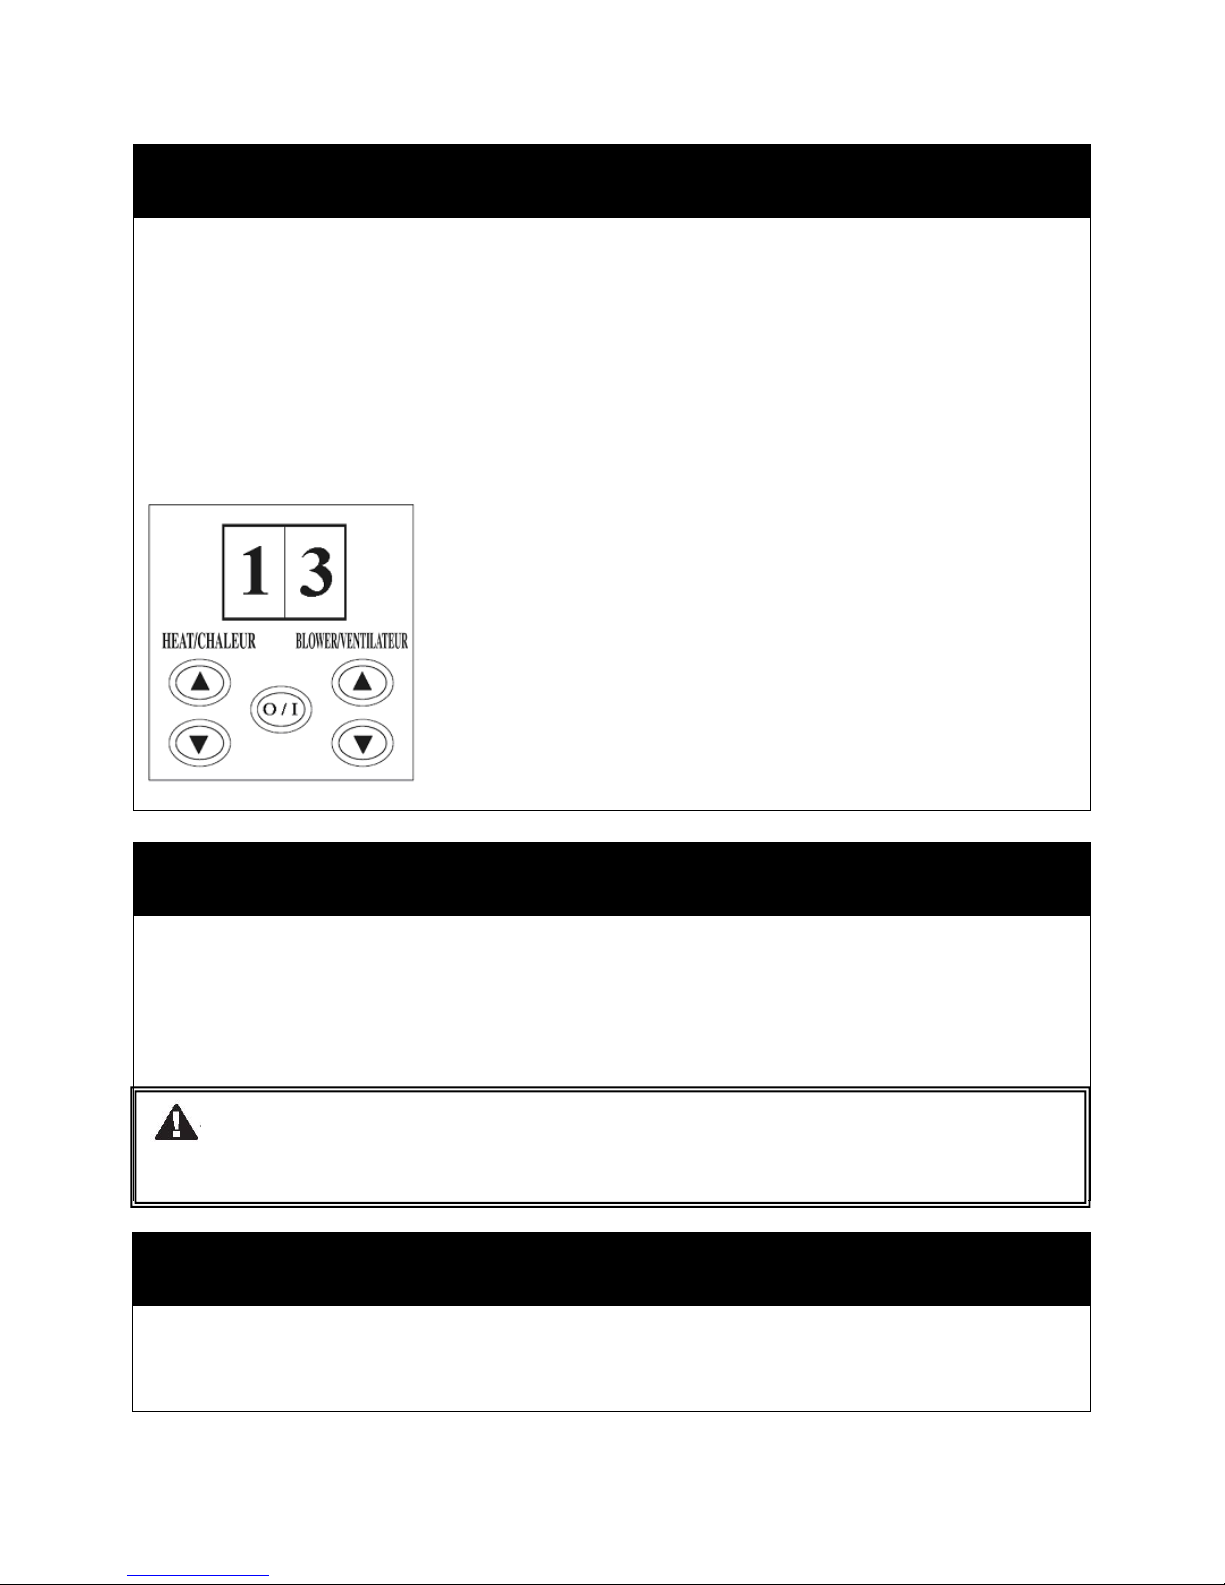
6. After5minutes,thepelletisthenburningnormallyandyoucanselecttheHEATLEVELandBLOWER
airflowasbelow:
ADJUSTHEATRATE–PressUPandDOWNbuttonatleftsideofcontrolpaneltoselectpelletfeed
ratetoadjusttheheatouput.
TheLEDdisplayatleftshallshow1–LOW,2–MEDIUM,3–HIGH.
REFILL
1.PressI/OswitchoncetoturntheunitOFF.
2.Thepelletwillstopfeedingbuttheunitwillrunforafewminutes.
3.Aftertheunitiscooled,openhopperlidandfillpelletsintohopper.
4.RestarttheunitbypressingO/Ionce.
SHUTDOWNPROCEDURE
PressO/IoncetoturntheunitOFF.Theblowerandexhaustfanwillrunforafewminutesuntilthe
pelletsinfireboxarecompletelyburnt.Theunitcanonlyberestartedwhentheinternaltemperature
fallenintopresetlevel.
WARNING
•Keephopperlidandfrontdoorclosedatalltimes.Donotoverfillhopper.
17
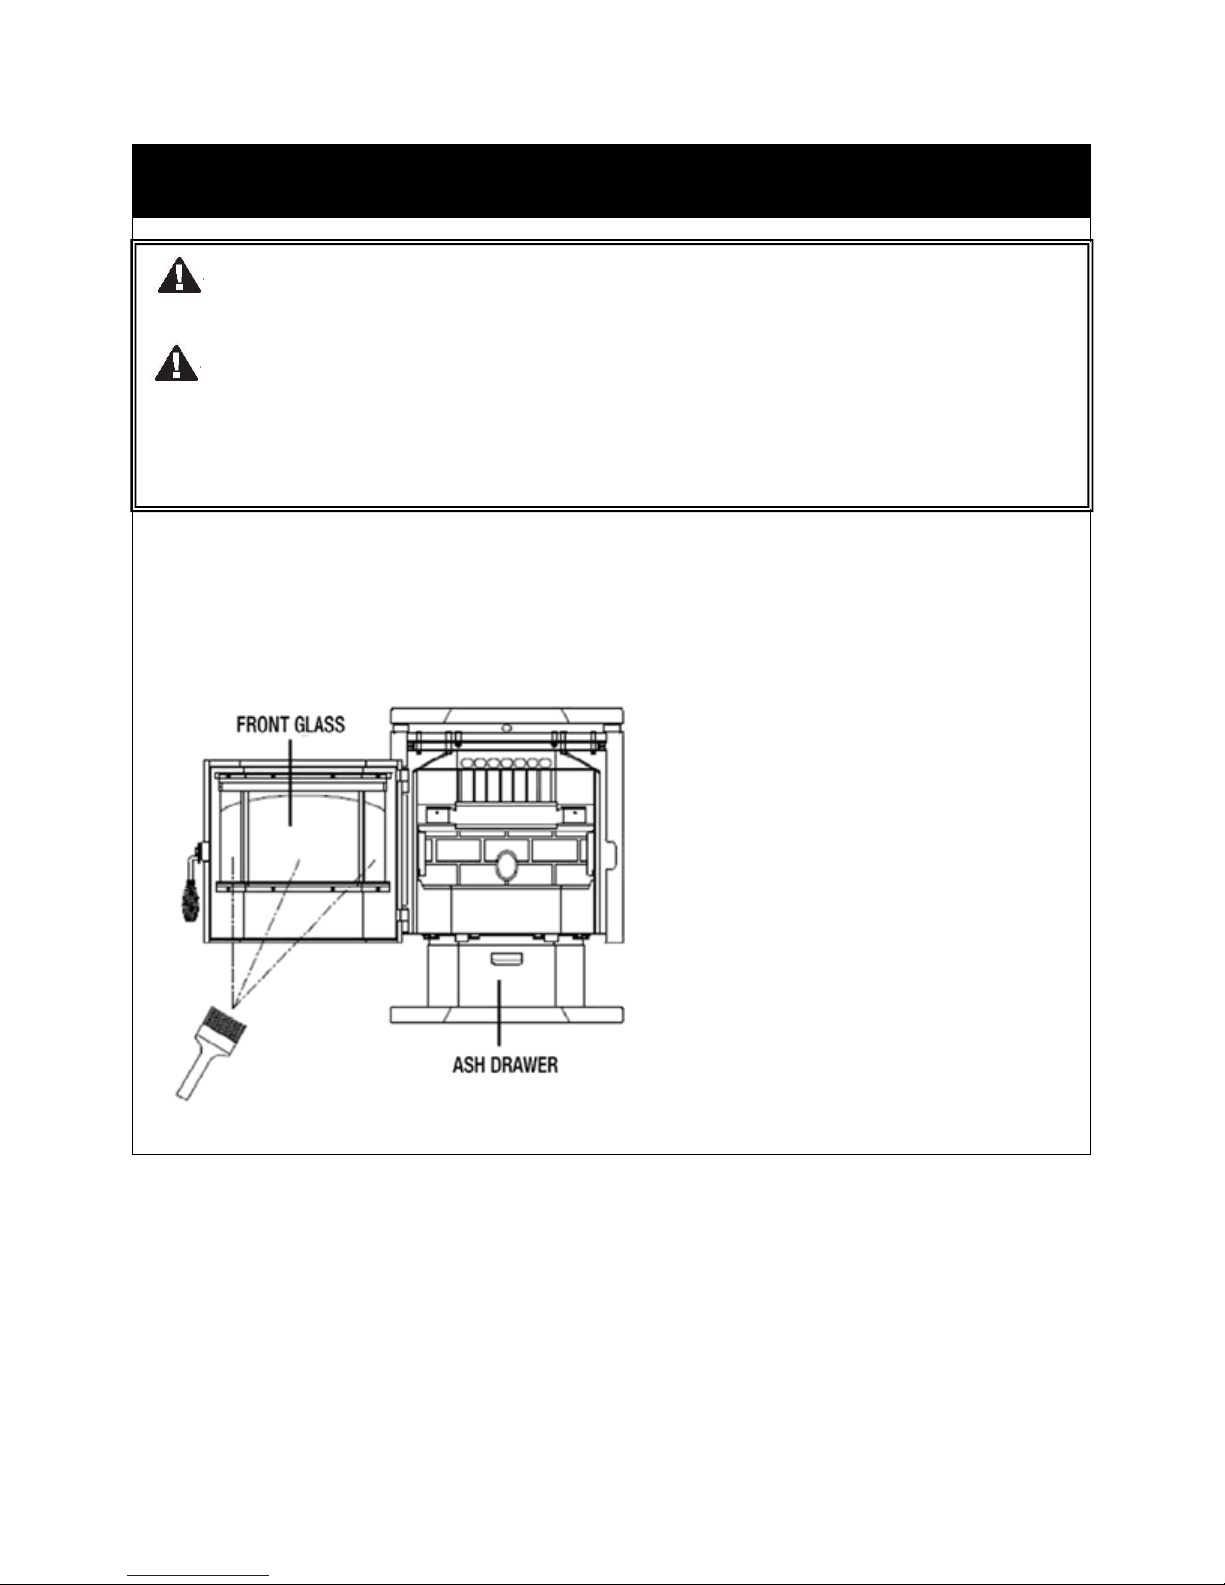
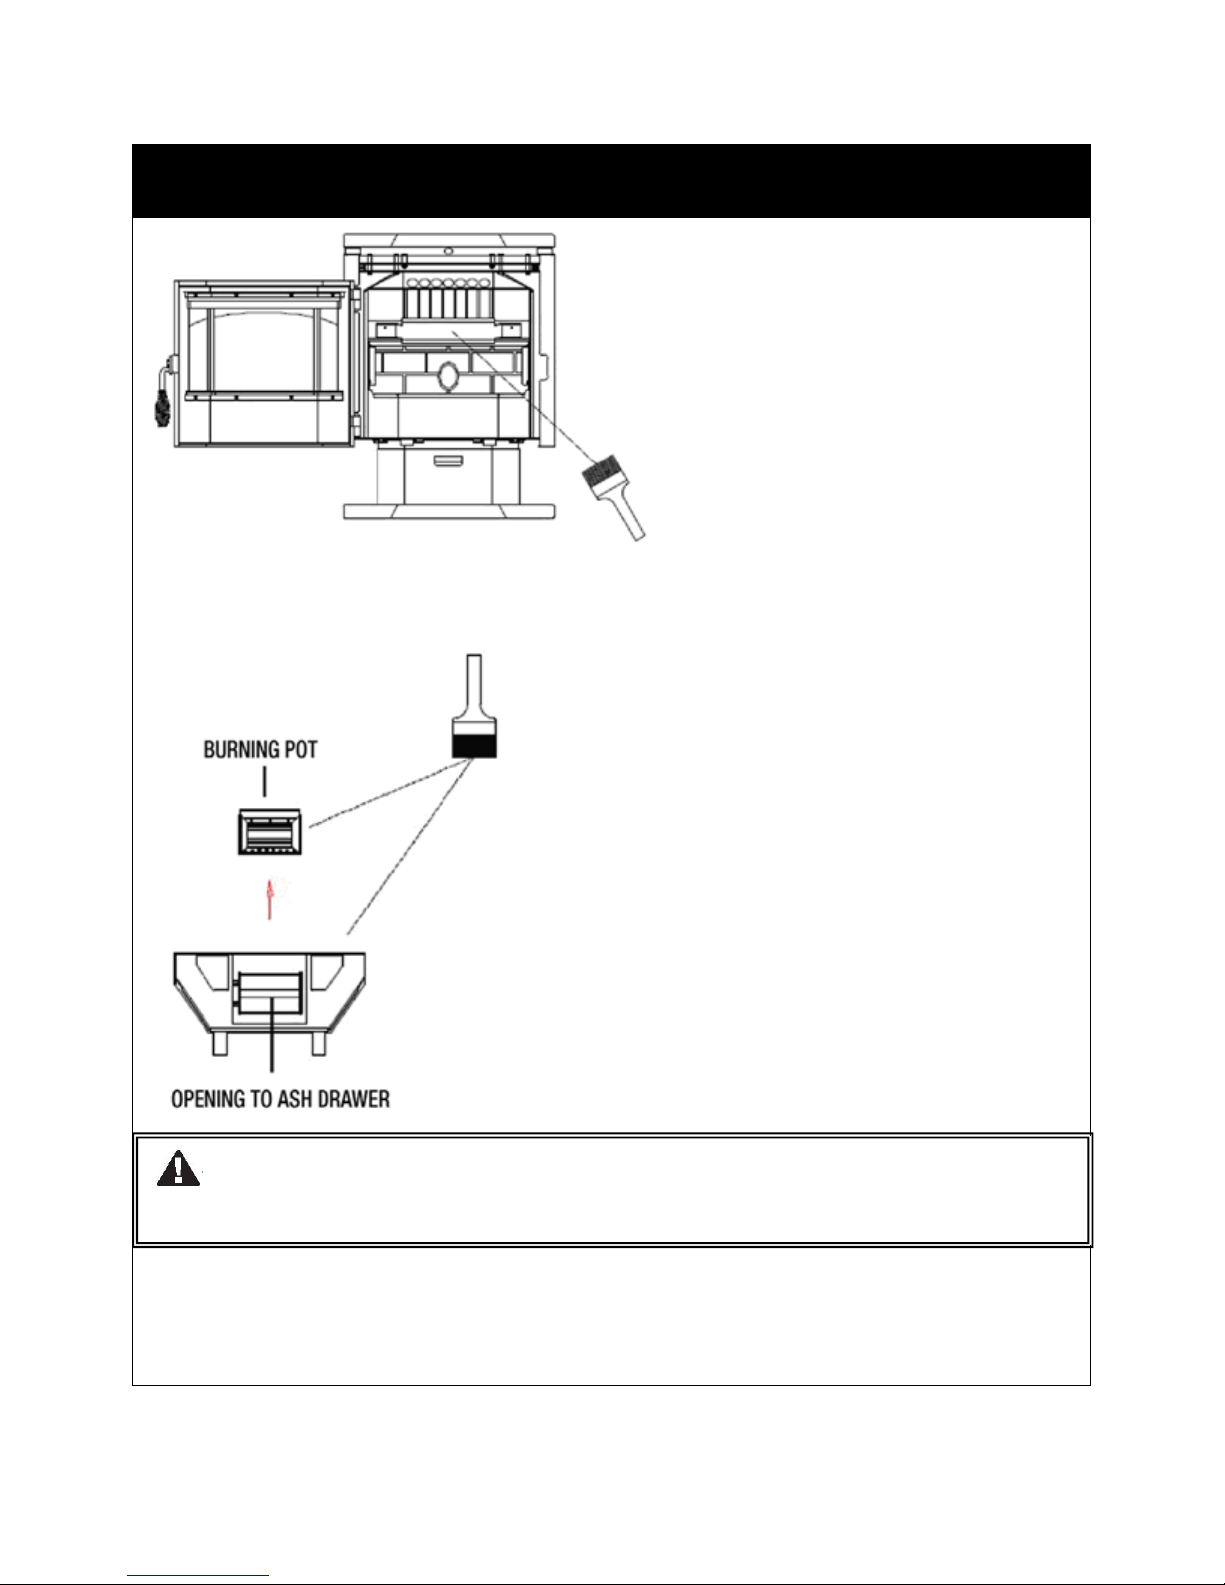
CLEANINGANDMAINTENANCE
1.Disposetheashbypullingouttheashdrawer.Puttheashintoair‐tightmetalcontainerandwaitfor
finaldisposal.Themetalcontainerorashshallbeplacedonanon‐combustiblesurfaceoronthe
groundandwellawayfromallcombustiblematerial.Replacetheashdraweraftercleaning.Make
surethedrawerispushedallthewayinandlevel.
2.Openthedoor.Sweeptheashesonthefrontglassbythebrushprovided.
3.Sweeptheashesoninsidesurfaces.
CAUTION
•Makesuretheunitiscooledandunpluggedbeforeanymaintenanceandcleaning.
WARNING
•Failuretocleanandmaintainthisunitwillresultinpoorperformanceandsafetyhazards.
•Nevercleantheunitwhenhot.
•Makesureashesarecooltothetouchbeforeusingvacuum.
18
CLEANINGANDMAINTENANCE
4.Pullouttheburningpotandsweeptheburningpotbybrush.Alsosweeptheinsidesurfaceoffire
box(aroundtheburningpot)thoughtheopeningintoAshdrawer.Puttheburningpotbackinplace.
Makesureitislevelandallthewayin.
5.Remove4hexscrewsatthebackcoverbyHexscrewdriverprovided.Theexhaustblowerandpellet
feedingassemblyareasshownbelow.Cleantheexhaustblowerandpelletfeedingassemblyby
vacuum.
WARNING
•Makesurethefrontdooriscompletelyclosedbeforeyouoperate.
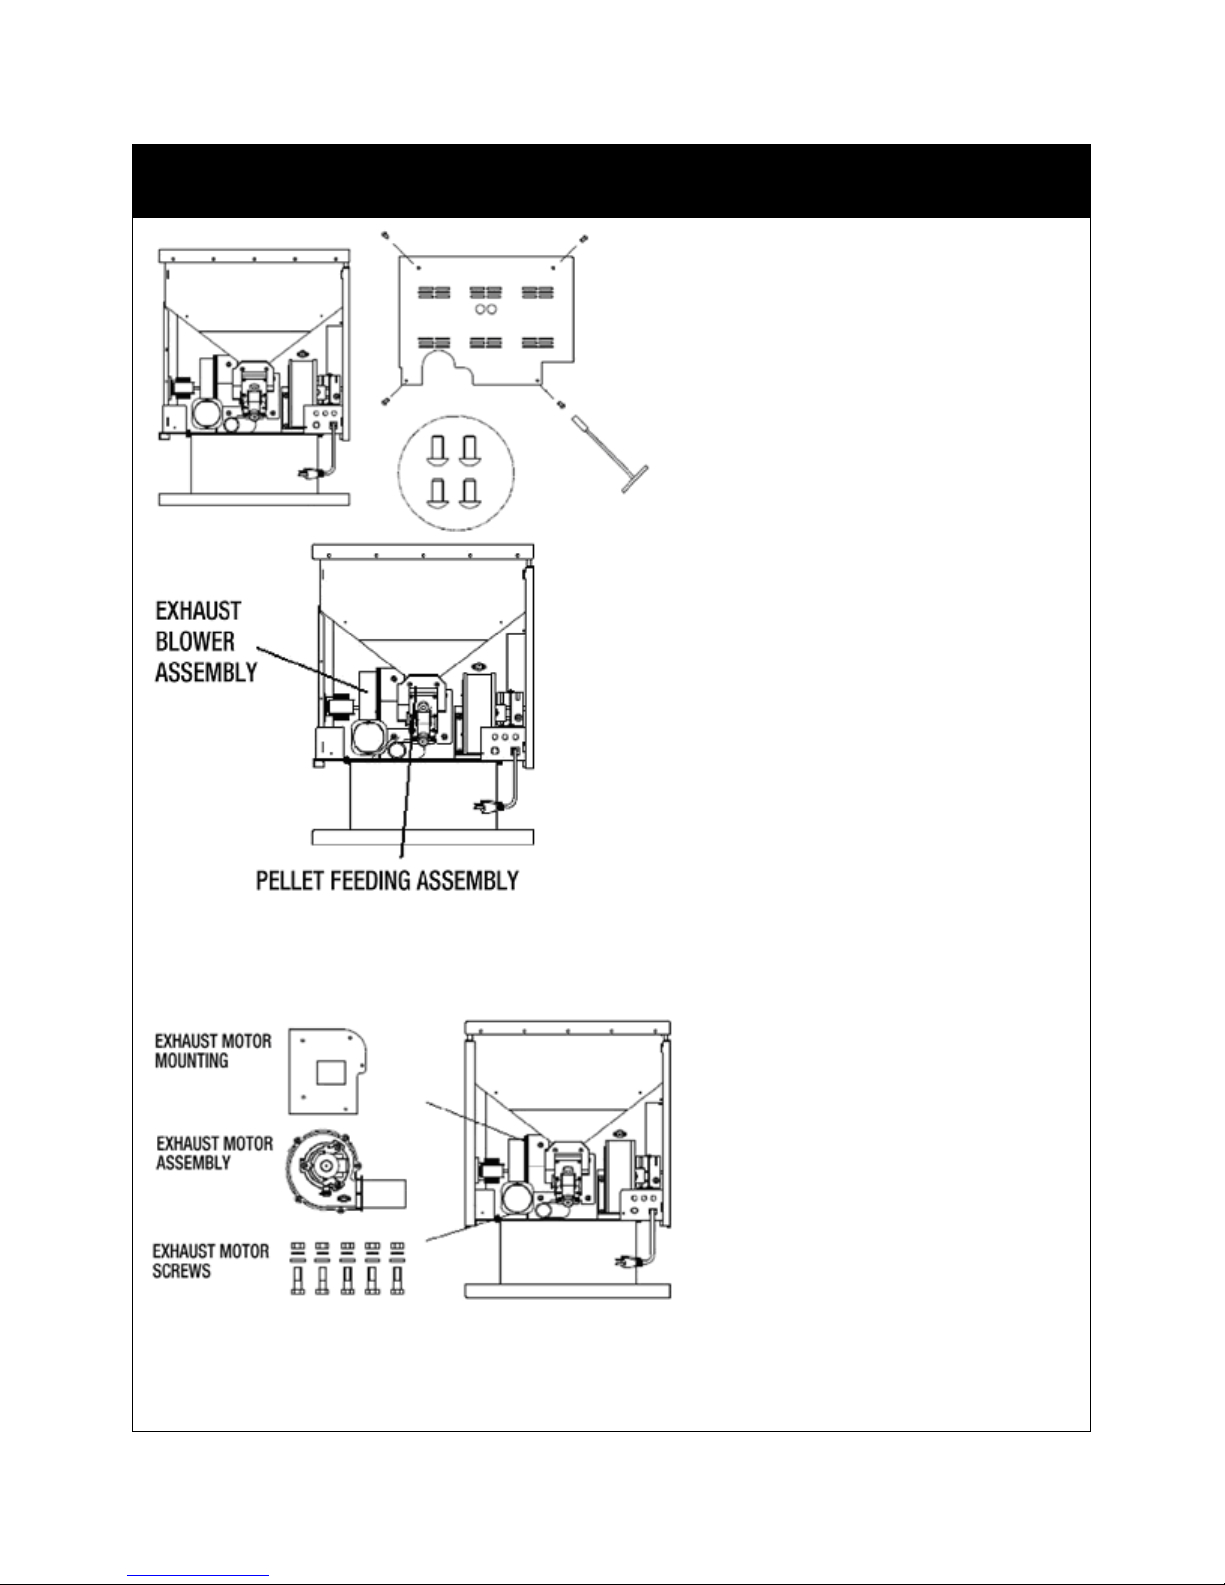
19
CLEANINGANDMAINTENANCE
Note:Donotfurtherdisassembletheinsideparts/component.Iffurtherrepairorreplacementof
partsisneeded,callcustomerservice.
EXHAUSTBLOWERASSEMBLYDIAGRAM
20
CLEANINGANDMAINTENANCE
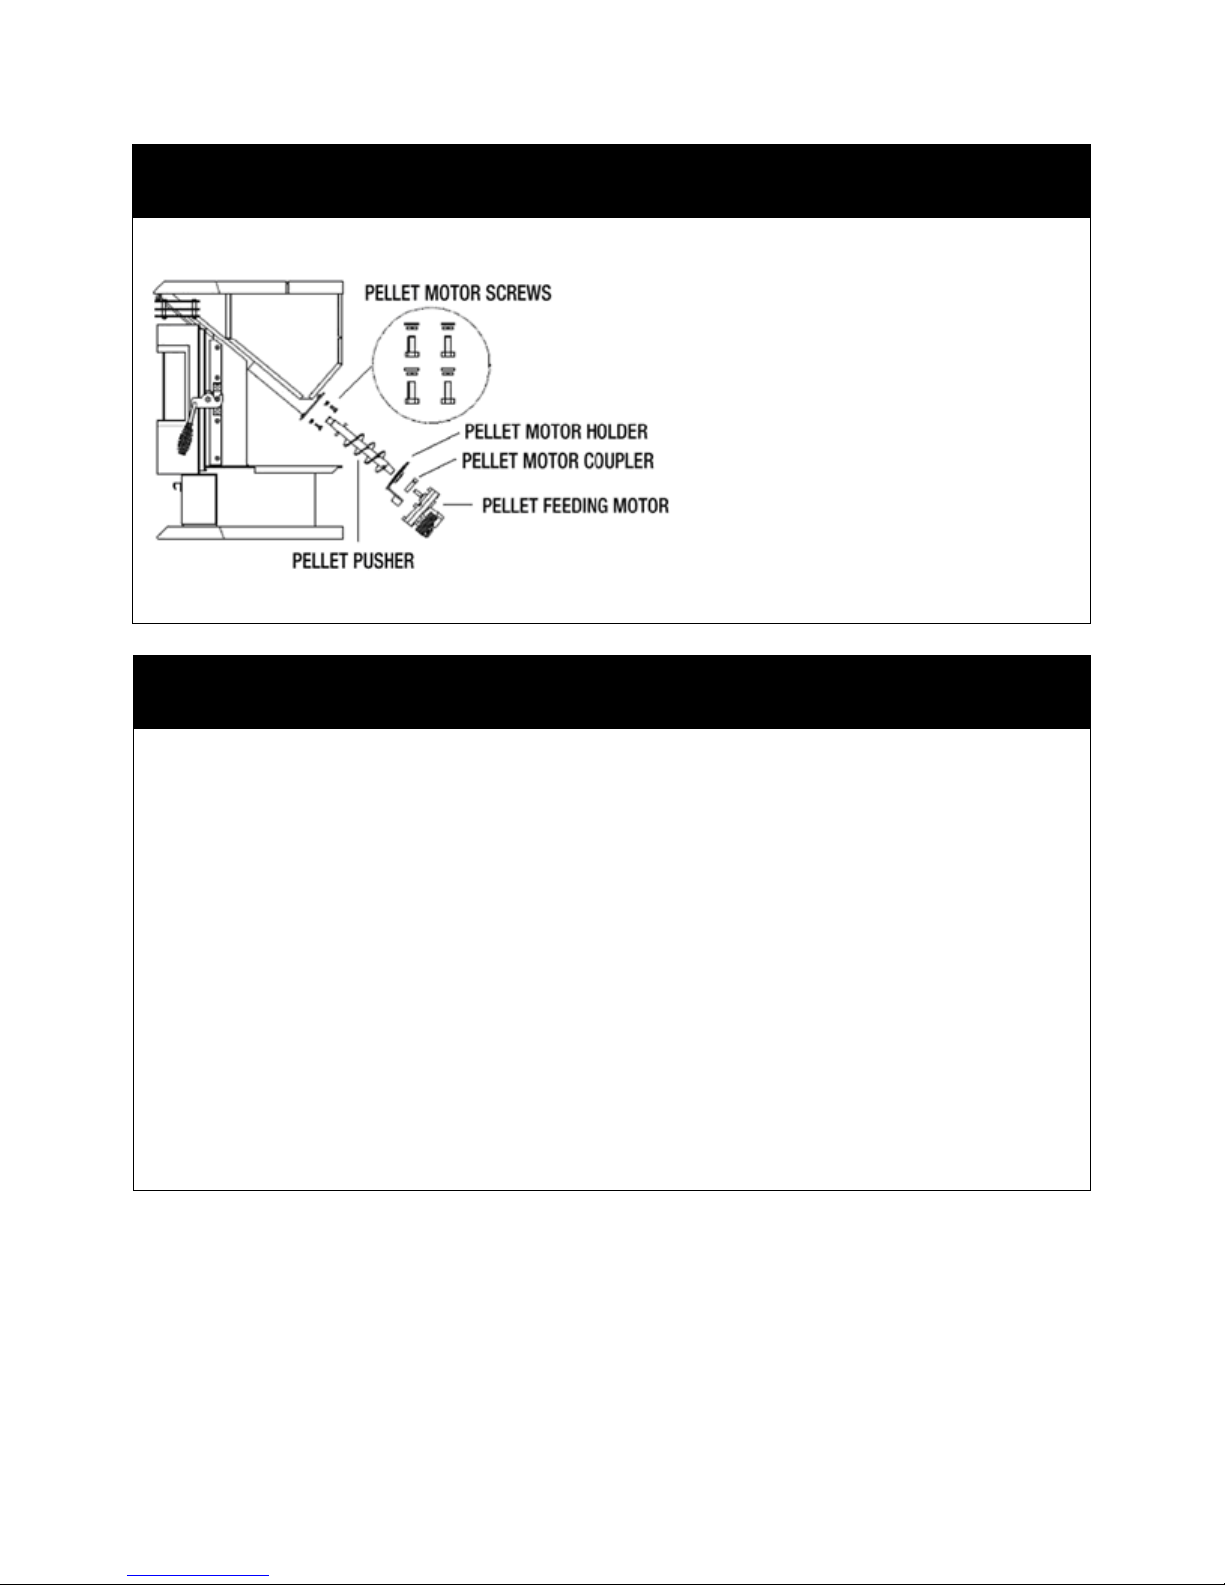
PELLETFEEDINGMOTORASSEMBLYDIAGRAM
SPECIFICATIONS
Model:………………………………………………………………………………….QCPS‐28000
Width:……………………………………………………………………………..55cm(21.6in)
Depth:………………………………………………………………………….52.5cm(20.6in)
Height:…………………………………………………………………………….75cm(29.5in)
Weight:…………………………………………………………………………80kg(176.3lbs)
HopperCapacity:…………………………………………………Upto22kgs(48.5lbs)
(Hoppercapacitymayvaryslightlydependingonpelletsize,length,anddiameter)
BurnRate:………………………………………………………...Maximum2kgs(4.4lbs)
BTURange:……………………………………………………………………………28000BTU
ElectricalRating:…………………………………………………………………120Vac,60Hz
LightCycle:……………………………………………………………………………………..410W
ContinuousCycle:…………………………………………………………………………..110W
Table of contents
Popular Stove manuals by other brands

MCZ
MCZ JAZZ Hydromatic 30 H1 OPERATION AND CLEANING

Monogram
Monogram 30 inch owner's manual

hotho
hotho INSERT Installation and operating instrictions

Heta
Heta Scan-Line 1000 Operating and installation instructions

Westfire
Westfire Uniq 44 Installation manual and operating instructions

Olsberg
Olsberg Pico Compact 23/695 Instruction


