Northwest Machine Works CP65 User manual

CP65
DIAMOND CORE DRILL
OPERATOR/SERVICE MANUAL
2318 Grand Park Drive Grand Junction, CO 81505
Phone: 970-242-1356 Fax: 970-241-1825
sales@northwestmachine.com
Contents
Description –
CP65 Diamond Drill
CP65 Air Rod Puller 2
CP65 Air Rod Puller Specifications 2
Care and Operation 2-3
Lubrication
Recommended Grease
Operation
Gear Changes
Speeds
Maintenance 3-4
Motor
Drill
Rod Puller
Water Circulation
Suggestions for Drilling 5-6
with the CP65
Setting Up
Drilling
Drill Rod Recommendation
Blast Hole and Grout Hole Drilling
Parts Drawings
Recommended Spare Parts 16
Illustrations
CP65 Diamond Core Drill
CP65 Diamond Drill with Blasthole Coupling 1
CP65 Grout Pipe Assembly 1
CP65 Motor – Exploded View 4
CP65 Diamond Core and Blast Hole Drill
(Parts Drawing) 7-8
Standard Equipment 9
Special Equipment 10
CP65 Air Rod Puller (Parts Drawing)
11
CP65 Double Screw Column and Arm
Assembly (Parts Drawing) 12
3 in. Grout Pipe Clamp Assembly 13
1-1/2 in. & 2 in. Grout Pipe Clamp
Assembly 13
CP65 Diamond Drill
The CP65 is a fully enclosed, dust proof, oil tight unit in a
sturdy, rugged steel housing. Ball bearings, used
throughout the drill, and an efficient spur gear drive
running grease, reduce friction losses to a minimum.
A standard rock drill saddle is used to mouth the drill on a
column, arm or crossbar from which it can work in any
position. The complete drill with built-in screw feed
swivel head is 42-1/2 inches long, weighs 200 pounds and
handles with the facility of a drifter.

Principal Features
CP65 Diamond Drill
with Blast Hole Coupling and
High Speed Water Swivel
Coring
1. Capacity – 600 feet with EW rods and EX fittings.
2. Self aligning, two position rod puller is available when
required for deeper drilling.
3. Delicacy of bit control gives low bit cost and high core
recovery.
4. Wide selection of feeds and speed available to cover special
drilling conditions.
Non- Coring
1. The reversible air motor greatly speeds blast hole drilling
by allowing rapid unscrewing of rod joints, after breaking
joint with a wrench, and allowing for rapidly moving the
chuck or blast hole coupling into drilling position.
2. High bit speeds available where drilling conditions admit
their use.
3. Adequate torque to maintain higher bit speeds results in
increased footage.
4. A heavy feed screw, blast hole coupling and high- speed
water swivel available for use when drilling with two foot
rods in front of machine.
Motor
The CP65 motor is a reversible, six blade, 20 HP air motor
which packs plenty of extra power for the most severe operating
conditions. This motor has its highest torque at “stall”, so it will
start heavy loads and run smoothly at any speed. Air
consumption is low, the CP65 motor actually delivering more
horsepower on the same amount of air as motors of lesser
horsepower rating, which means that the use of a compressor for
maximum capacity is not mandatory. The average ait
consumption of the motor is approximately 250 CFM, and
maximum consumption about 400 CFM.
This unusually trouble free motor runs without vibration and has
very few wearing parts.
CP65 Grout Pipe Clamp Assembly with CP65 Diamond Drill
Assembly includes column pipe, saddle clamp, safety collar and
bushing. For use on 1-1/2” or 2” grout pipe.
(Special: may be bored for 3” pipe if needed)
Rated Capacity
The CP65 has a rated capacity of 600 feet with EW rods and EX
core barrel.
General
The CP65 is designed for coring work where a light fast drilling
machine is required. It is also ideal as a blast hole or grout hole
drill because of its compact design, powerful motor, and
reversible features.
Swivel Head
A swivel head with four sets of feed gears is built into the drill
to maintain absolute alignment. Any feed gear may be thrown
into action without stopping the drill. Ball bearings take the
thrust of drilling and the weight of drill rods. Length of feed is
24 in., bit rotation speeds are available as listed in the table of
specifications.
“Safety” Chuck
The chuck is accurately machined to assure perfect alignment.
The jaws are held by two large, Allen set screws with
countersunk heads in chuck body to make it impossible for them
to catch the operator’s clothing while rotating. Successive pairs
of holes in the chuck body may be used as threads become worn
which lengthens the effective life of the chuck.
Blast Hole Coupling
Where it is desired to use 24 in. rods in front of machine, use the
heavy Feed Screw and (EW) Blast Hole Coupling with the High
Speed Water Swivel screwed directly to the back of the feed
screw.

Principal Features, continued
Table of Specifications
CP65 Diamond Drill
Rated Capacity (Feet)
EW-EX
600
AW-AX
500
BW-BX
350
NW-NX
300
Rotary Motor – HP
20 (reversible)
Dimensions (Inches)
Width
15-1/2
Height
12
Length
42-1/2
Net Weight (Lbs.)
Drill with Chuck
200
Drill with Blast Hole Coupling
195
Drill with Rod Puller
290
Bit Rotating Speeds
Standard
0-1500
Optional
0-1000
Optional
0-3000
“Built In” Screw Feed
Length of Feed
24 in.
I.D. of Coring Feed Screw (Inches)*
1-1/2 in.
Feed Gears (4) Revolutions/
Inch Advance
Standard
100, 200,
300, 500
Optional
50, 75, 800,
1100
Special
0, 101, 170
*See page 10 for heavy walled, non-coring blast hole feed screw.
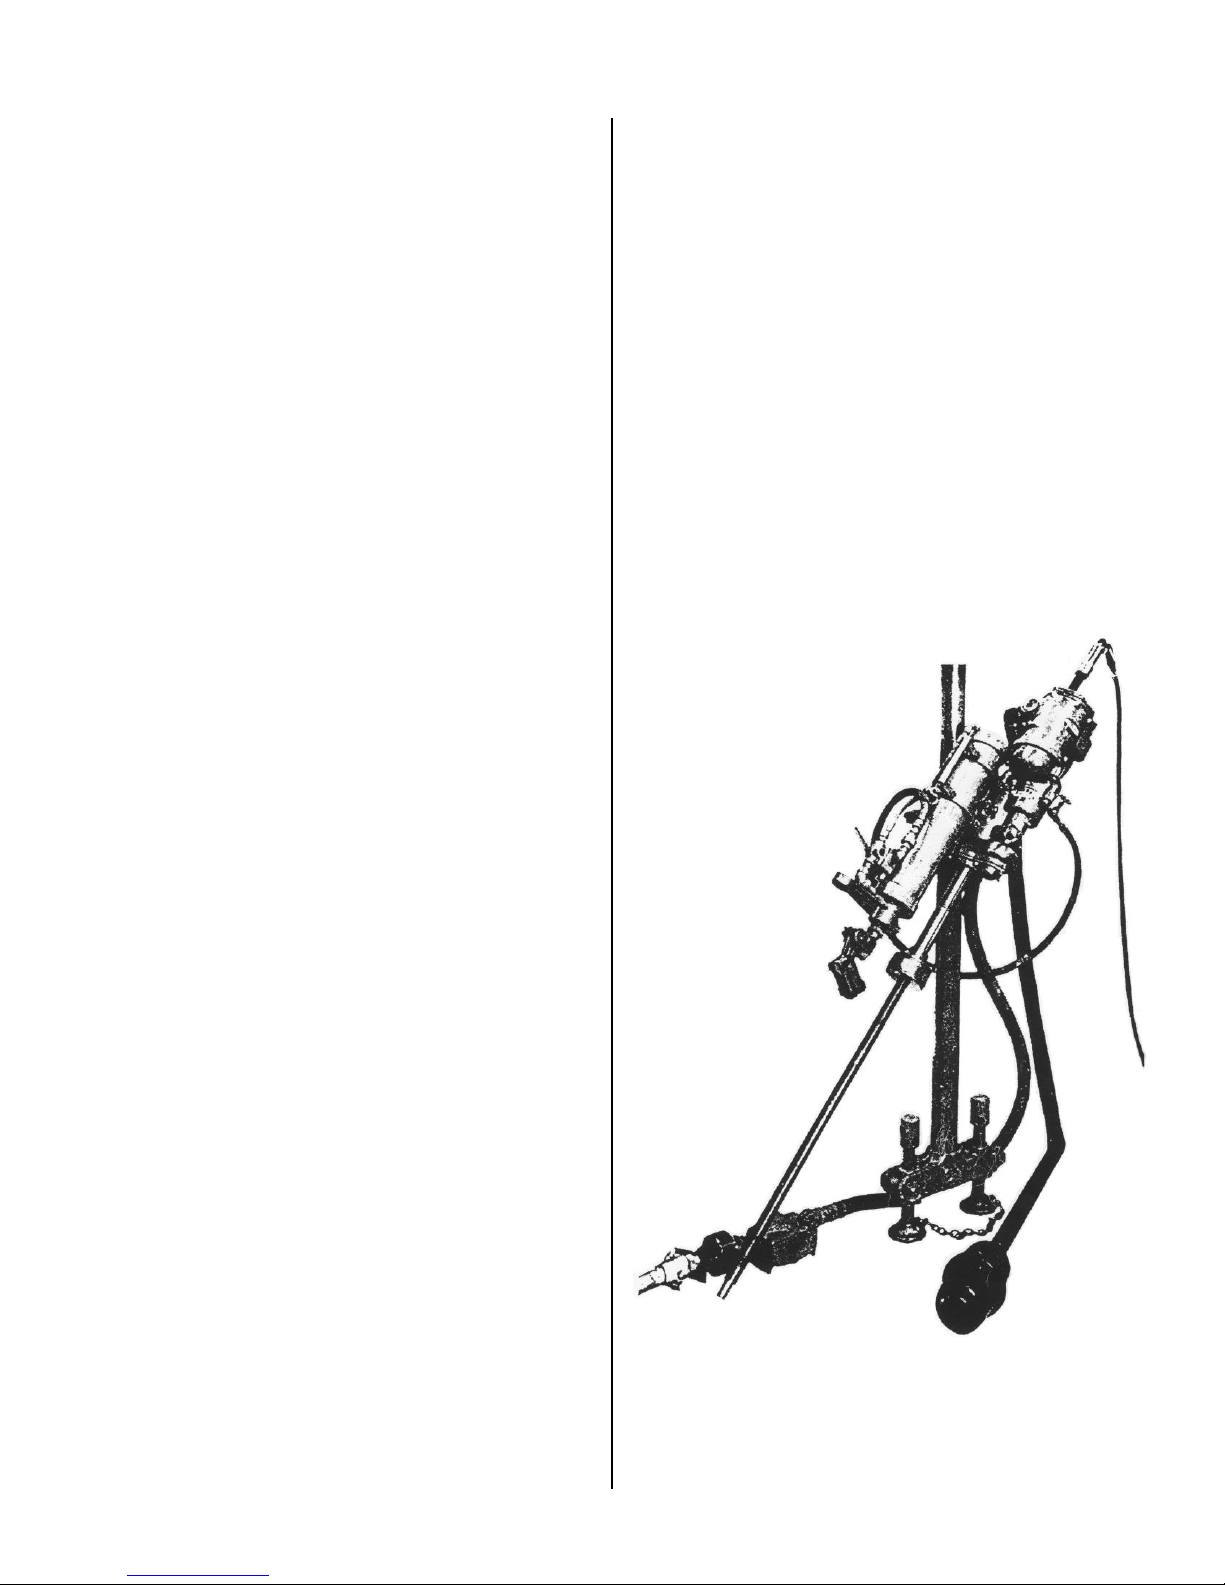
CP65 Rod Puller
The CP65 Rod Puller with a 4-1/2 in. diameter piston and
21 in. of travel has been designed to match the short
overall length of the CP65. Its capacity is from 400 ft. of
EW rods up, depending on the inclination of the drill hole.
Its use is recommended for holes over 60 ft. in depth. Rod
Puller may also be used on AW Rod.
Rod Pullers have a short mounting bracket which bolts to
the drill saddle plate in either of two positions. In the
lower position, this allows for mounting the cylinder
assembly farther back, past the motor when space is at a
minimum. This also eliminates the necessity of removing
the saddle plate from the drill when mounting or removing
the Rod Puller.
Rod Puller Specifications
Capacity – EW Rods, Vertical
400 ft.
Length of Stroke
21 in.
Length Overall, Extended
54-1/2 in.
Cylinder I.D.
4-1/2 in.
Weight (Pounds)
100
Care and Operation
Capacity of the CP65 is 600 feet of EW rod with EX fittings.
The feed screw easily accommodates the EX core barrel for
starting holes. Rods may be pulled by hand to a depth of 60 ft.;
for any depth over this the Rod Puller is recommended since
considerable time is saved which can be used on actual drilling.
Lubrication
The motor is lubricated by a Line Oiler with a short air inlet
hose, which is supplied as standard equipment with each
machine. The Line Oiler must be adjusted according to local
conditions such as the temperature and the grade of oil being
used. With oiler properly adjusted, one filling should be enough
for four hours normal operation.. Use SAE #10 to #30,
depending on temperature and local conditions. Be sure the
motor is getting oil at all times.
For the drill itself, use a lithium base, high viscosity grease as
recommended below. Once each eight hours, inject grease into
the eight grease fittings on the drill, two of which are located on
the housing front cover, four on the housing and two on the rear
cover. Special attention should be given to the upper fitting on
the rear cover. The feed screw is greased by a small hole in the
drive sleeve and cleaned and oiled by the auxiliary exhaust.
The piston rod of the Rod Puller should be oiled occasionally.
No other oiling is necessary as the Line Oiler lubricates the disc
type valve and the two piston cup leathers.
Remove two chuck set screws from chuck occasionally, clean
them and coat with light oil to make adjustment quicker and
easier.
Recommended Grease
A lithium-based grease having high temperature stability
for a wide temperature range is required in the swivel head
of the CP65. The following greases, or their equivalents,
meet the requirements for this application.
Standard Oil Co. of Indiana, Stanolith No. 57
Union Oil Co. of California, Unoba EP No. 1
Shell Oil Keystone Lubricating Co., 84H Medium or Light
Sinclair Oil Co., Litholene
Texas Co., Multi-Fak No. 2
Swan Finch Oil Co., 70-169S
Fisk Bros., Lubriplate No. 630AA
Dow Corning, No. DC-44

Operation
For efficient operation of the CP65 Diamond Core and Blast
Hole Drill, at least 80 psi OPERATING pressure should be
maintained at the drill. Use 1-1/4 in. hose up to 25 feet and 1-
1/2 in. hose for longer lengths.
Blow our air hose before attaching to inlet. Remove and clean
air screen at frequent intervals, being careful not to damage or
distort screen and allow grit or scale to get into motor.
If the motor freezes from excess moisture in the air line, remove
hose from the drill and blow out hose until the line is clear. If
this does not remove water, the use of an air receiver is
recommended. After blowing out line, inspect and clean air
screen, since quantities of water moving through the line
generally carry scale and grit which may plug screen and
seriously impede air flow.
CAUTION: Do not over speed motor on light loads.
This may cause the blades to burn and delaminate.
Gear Changes
There are four feed gear changes on the CP65, the rating figure
representing the number of revolutions of the bit per inch of
advance. The Specification Table lists feeds available, the drill
being supplied with 100, 200, 300 and 500 feed gears unles
otherwise specified.
The drill is assembled with fast feeds toward the front and
slower feeds toward the rear. These may be reversed at
operator’s discretion, since it makes no difference in actual
operation. Gears are engaged by turning the shifter handle until
the longer part of the handle is midway between the letters “N”
stamped on the housing or as far as it will go in either direction.
As assembled, turn the shifter handle CLOCKWISE for a fast
feed or COUNTER-CLOCKWISE for a slow feed. Three
neutral positions, one between each feed, are marked by the
letter “N” on the housing. To return feed screw when run out,
close throttle, move shifter lever to NEUTRAL position, hold
down feed nut stop pin and open throttle slowly. When chuck or
coupling is about one inch from front of housing cover, release
stop pin and close throttle. To re-engage gears, move shifter
handle toward gear to be used, open throttle slightly and the
feed gear key should slip into position. If the gear key does not
immediately slip into slot in gear, do not attempt to force it, but
hold shifter handle against gear until correct position is reached
and key slips into place.
CAUTION: Be careful not to jam chuck against front
housing when returning the feed screw.
If jamming occurs, CLOSE THROTTLE VALVE, leave shifter
handle in NEUTRAL position, hold down feed nut stop pin and
turn chuck or feed screw backward to loosen it.
With shifter handle in neutral, feed screw may be returned
rapidly (taking care not to jam chuck against housing) or may be
run forward into position just as rapidly by reversing motor. If
desired, the screw may be run completely out of the feed nut.
Feed screw may be run normally a full 24” without difficulty.
A full 26” run is obtained without running feed screw down into
feed nut by using the Blasthole Feed Screw and EW Blasthole
Coupling with High Speed Water Swivel attached directly to the
feed screw.
Speeds
As normally assembled, unless another speed range has been
specified, the motor pinion and drive gear set for the CP65 gives
a nominal spindle speed of 1500 RPM with a gear reduction of
two to one. This gives the drill enough torque for holes up to
600 feet deep and plenty of speed for coring.
Other gear combinations are available for the most difficult
conditions, such as deeper NX holes where the 1000 RPM gear
set will give extremely high torque, or for blasthole drilling
where the 3000 RPM set will give a high rotating speed for
drilling up to 24 in. a minute.
Speed of rotation is not to be confused with feed, which is a
definite ratio of revolutions per inch of feed screw advance. For
example, when drilling in the 200 feed gear, the feed screw will
be advancing one inch for every 200 revolutions of the screw.
High rotational speeds will drill faster, but the ratio of
revolutions of the screw to each inch the screw advances
remains constant.
Maintenance
Motor
The motor consists of a cylinder in which a rotor is mounted
eccentrically, six slots in the rotor hold six laminated, phenolic
blades which move in and out against the cylinder wall as the
rotor revolves. These blades and the rotor are the only rotating
parts. Ball bearings, end plates, rotor housing liner and blades
are the only wearing parts. It is recommended that an extra set
be kept on hand. Adequate lubrication is important in
maintaining rotor blades, as running a relatively short time
without lubrication will cause them to wear rapidly and
unevenly, burn or delaminate.
The rotor blades may be removed and the wearing faces dressed
down with sandpaper or a file in case of uneven wear. Care must
be taken to keep the wearing faces square with the sides.
To remove or change blades, remove eight Cap Screws holding
the Rotor Housing Cover to the Rotor Housing and remove
cover. Remove the Rotor Locking Nut and, with two Allen
wrenches tighten the Set Screws to jack the End Plate out of the
housing. The rotor blades may then be removed for inspection
or replacement. Before replacing end plate, retract Set Screws to
avoid interference during assembly.
To remove the Rotor Housing Liner or to change Ball Bearings,
the motor must be removed from drill and, after the Rotor
Housing Cover has been removed, the assembly of rotor, liner
and end plates may be pushed out the rear end of the motor
housing for inspection or replacement.

Maintenance, continued
J-1455 MOTOR
Exploded view showing method of jacking rear end
plate out of motor housing for changing rotor blades
Drill
To disassemble, first move shifter level to neutral, hold down
feed nut stop pin, reverse motor and run screw out of feed nut.
The drill may now be disconnected from the air line and the
motor removed from the drill. Next remove Drive Gear Screw
and remove drive shaft drive gear from Rear Housing Cover,
and remove rear housing cover from Housing. Next, remove
Shifter Sleeve Detent Spring Plug and Detent Spring and
remove Front Housing Cover.
After removing Castle Nut from end of Drive Shaft, drive shaft
with feed gears and feed nut assembly may be pulled out
together. Remove Drive Sleeve.
Do not disassemble drive shaft or feed nut assembly unless
replacement of parts is required. If feed nut is disassembled,
remove Lock Nuts with two spanners, LEFT HAND THREAD!
To reassemble, if feed nut has been disassembled, first drive
Key into slot in nut and place feed gears on feed nut with the
gears in sequence from the lowest to the highest or the reverse,
according to operator’s preference. Place Ball Bearing on gears
and tighten Lock Nuts in place, using two spanners. LEFT
HAND THREAD! After tightening nuts, stake in at least four
places with center punch.
If drive shaft has been disassembled, first place Steel Ball and
Spring in Shifter Rod and tighten Plug in end of rod. Insert rod
in drive shaft and drive Feed Gear Key into rod under steel ball.
Pack feed gears with recommended grease and place on drive
shaft to mate with those on the feed nut. Remember that the two
assemblies are put together from opposite ends and that the
sequence of assembly must be the reverse of that used on the
feed nut in order to pair feed gears on final assembly.
Next, place Thrust Washer and Ball Bearing on drive shaft.
Place one Washer and Shifter Collar in Shifter Sleeve, invert
sleeve, place second Washer on shifter collar and screw Shifter
Collar Nut on shifter collar. Place Pin Retainer on drive shaft,
insert Shifter Pin through hole in shifter rod and place
assembled shifter sleeve on drive shaft, entering pin in slot in
shifter collar nut. Place Pin Retainer in groove in shifter collar
nut.
Before reassembling drill, remove the shifter handle assembly
and the drive Shaft Front Bearing. If two Ball Bearings located
in the drive sleeve chamber of the housing require replacement,
drive the first down tightly against should in housing, add
Spacer and drive second bearing against spacer.
During assembly all parts should be coated liberally with
recommended grease.
Mesh gears of drive shaft and feed nut assemblies and insert in
housing together. Hold Drive Shaft Gear in housing and
assemble with drive shaft using Key. Place Ball Bearing in
housing and tighten Castle Nut on drive shaft against Drive
Shaft Washer. Place Drive Sleeve assembled with one Call
Bearing in housing. Fasten Front Housing Cover assembled with
Grease Seal on housing.
Rotate drive shaft until shifter handle assembly may be inserted
in housing, rotate shifter handle as far as it will go
CLOCKWISE to engage shifter key with last feed gear, remove
assembly and place in its proper position, with handle to left of
‘N’ toward chuck end of housing.
Fasten Rear Housing Cover assembled with Grease Seal and
Roller Bearing to housing, place drive shaft drive gear and two
Keys on drive shaft and tighten Drive Gear Screw into drive
shaft against Washer.
Assemble motor with swivel head, attach air line, thread drive
screw into feed nut, depress stop pin and, with motor on forward
rotation, open throttle and run screw into nut. DO NOT jam
chuck against front housing cover.
Rod Puller
To replace worn piston cup leathers, unscrew back cylinder
head and pull out piston and piston rod.
Water Circulation
Good drilling practice requires a dependable water supply used
at the lowest pressure conducive to good sludge removal, which
results in saving of the pump, power and diamond bits. Local
conditions will dictate the correct pressure and volume required,
for instance, sticky ground will require high pressure and deep
drilling, because of leaky rod joints and the necessity to keep
sludge in suspension for long periods of time will require larger
volumes of water. Large holes drilled with small rods will need
a large volume of water to maintain normal circulation velocity.

Suggestions for Core Drilling
With the CP65
Setting Up
When installing drill on column, column are, or cross bar, be
sure setup is rigid. Misalignment resulting from loose column or
arm may break rods or feed screw. The use of a double screw
column instead of the single screw type is recommended for this
reason. Column should be set up about 42 inches back from
where the hole is to be collared to allow for the full run of the
feed screw and the stroke of the rod puller.
If sludge samples are to be taken, as is done where core
recovery is poor, it is advisable to use a piece of casing in the
collar of the hole. In this case, the column should be set back
sufficiently so that there is still approximately 42 inches
between the column and the end of the casing.
When drilling down holes, where there is danger of muck or
other foreign material falling into the hole, it is advisable to use
casing in the collar of the hole as a safety precaution. In drilling
up holes more than 30 degrees above horizontal, the hole should
be started with a casing bit so that a stuffing box may be used to
prevent water and muck from pouring out of the hole and onto
the drill and operator.
When starting holes in fractured or faulty ground where there is
danger of small pieces of rock caving into the hole, case
sufficiently long to bottom in solid ground should be inserted.
If this is not done, the small pieces of rock, especially if hard,
may materially increase the diamond bit cost per foot of hole
drilled by becoming wedged between the diamonds in the bit
and breaking them when pulling out of the hole. The same holds
true when going to the bottom of the hole, as the pieces may be
forced to the bottom and it will be necessary to run over them
with the probability that some of the diamonds will be broken.
Even if the sharpness of the bit is not materially impaired, each
of the diamonds in the bit represents a portion of its value, and a
correspondingly lower footage and salvage may be had.
Drilling
Diamond bits required for core drilling are the casing bit, double
tube reaming shell and bevel wall coring bit.
In starting to drill (where casing will be used) a five foot rod is
put through the chuck and feed screw, the starting barrel is
tightened to the rod in front of the chuck and the water swivel is
screwed on the back end of the five foot rod. Next, tighten the
casing bit in place, using care not to contact the diamonds with
the wrench.
Move up to rock face and inspect to make sure it is square with
the bit. If it is not, pick or moil the surface until it is square. The
chick screws may now be tightened and adjusted to center the
rod in the chuck. If the ground is soft, the hole mat be started
immediately by holding the starting barrel against the face by
hand. If the ground is hard, a ‘vee’ should be cut in the edge of a
plank or lagging and the plank secured under the starting barrel.
Then, holding the starting barrel down into the ‘vee’ with
another plank or lagging, turn on the water, place drill in lowest
feed gear and open the throttle slowly.
Always start the drill slowly and collar the hole carefully. More
damage may be done to the bit in collaring the hole than in the
next 20 feet of drilling. When a portion of the bit is in the rock,
remove the plank and open the throttle.
Casing should be run into the solid rock far enough so that when
the diamond casing bit is removed and the hole cased,
approximately four inches of casing is outside the collar. The
starting barrel is simply a short piece of casing with a rod-to-
casing bushing and on which a diamond set casing bit may be
used.
If casing is to be fun deeper, longer pieces may be added as
required. After hold is cased to solid bottom, hole should be
washed out, using cross chipping bit on the end of rods to chop
out any small pieces of core that may be left in the hole. This
will ensure a clean hole for the start.
If the casing is only into the rock a couple feet, it will be
necessary to put the double tube core barrel through the feed
screw after removing the Feed Screw Bushing. LEFT HAND
THREAD!
The inner tube of the core barrel is quite thin in section and is
designed to receive the core cut by the bit. Water coming from
the rod into the back end connection of the core barrel flows
between the inner and outer tubes toward the bit. Most of this
water passes out around the bit to keep it cool and carry away
the sludge. A small amount of the water passes back up the
inner tube to float pieces of core back away from the bit and to
keep them from wedging in the tube or bit and causing the bit to
choke or block prematurely and grind up the core; this feature is
the reason that double tube core barrels are usually
recommended instead of single tube barrels. After passing
through the inner tube, the water runs out two small holes in the
side of the back end connection of the core barrel. When starting
a hole with part of the core barrel outside the collar of the hole,
remove bit and push cork, rubber plug or wad of paper to the
back of the core barrel to keep water from spraying on the drill
and operator while drilling. After core barrel is well into hole,
remove the plug the next time the core barrel is emptied.
When the hole has been drilling to approximately five feet, the
core barrel and rods should be kept greased. Different ground
conditions call for different greases, but usually a cup or fibre
grease of No. 3 government specification is suitable. After
greasing, it will be necessary to cut burlap into six or eight inch
squares and use it to grip the rods when pulling them.
The practice of greasing is necessary to cut friction and
vibration to a minimum. Vibration is very hard on diamond bits,
at times shattering the diamonds if allowed to continue for any
length of time. When vibration occurs it may not show on the
surface, but it slows down the drill at once; the best practice is
to shut off the motor completely, and then reopen the throttle
valve slowly, changing speeds until a spot is found where
vibration is not so intense.

When the feed screw has been run down its full length, shut off
the circulating water BEFORE loosening chuck screws. If this is
not done, the water pressure may push the rods and core barrel
off the bottom of the hole and allow some of the core to drop
out of the bit. When drilling with a short string of rods, always
hold them down with a wrench while running the feed screw
back to prevent the string being raised and the core lost if the
chuck jaws should catch on the rods while returning.
If pieces of core should drop out of the bit and lie sideways in
the hole, damage to the diamond bit will result in running over
them.
When the feed screw has been returned, tighten the chuck
screws, turn on the water and wait for it to start running out of
the hole before drilling is resumed.
In normal ground the machine will run smoothly while drilling,
but as soon as the bit is blocked or the core barrel gets full the
motor will act erratically, alternately slowing down, speeding
up, or even stopping momentarily and shutting off the water
when core breaks tightly.
When this happens, core barrel must be pulled and emptied. As
soon as the core barrel is out of the hole, remove the bit and
reaming shell, then remove the back end connection and empty
the inner tube. If some of the core sticks in the inner tube, tap
tube lightly with the flat of a wooden paddle, taking are not to
bend or dent tube.
It is a good plan to have a trough made up that is long enough to
take the core as it is emptied from the tube so that it does not get
mixed up with cores pulled previously. It is important also that
the core be marked as to depth every time the barrel is emptied,
using wooden blocks in boxes made up for preserving the core.
Normally, very little trouble will be encountered in diamond
drilling. Make sure before starting the drill that water circulation
is established. If water shuts off while drilling, stop immediately
until the cause is found. If the bit is blocked or mudded, at
which time the bit will slow down or stop, rods must be pulled
and the core barrel emptied and cleaned. If it is found that rods
turn easily and water is still circulating after chuck screws have
been loosened and still no water shows at the collar, it is
probable that the bit has run into a seam or small cavity which is
taking up the water and drilling may be safely resumed. Since a
new face is then being cut, start drilling for an inch or so. If drill
operates smoothly, it is safe to open the throttle again.
Generally the drill should be run in the fastest feed gear possible
as long as it operates smoothly and without too much effort.
With a sharp bit, after the hole is collared, the drill may be run
in the 100 feed gear. When the motor begins to labor or slow
down, because of a dull bit or harder ground, gear should be
shifted to a slower rate of feed.
Diamond bits should not be run too far for economic reasons. In
very hard ground, bits should be changed as soon as the motor
labors too hard in slowest feed gear. In abrasive formations, or
where the bits have run to the point where metal is worn away
from the diamonds and there is danger of their being torn out,
the bit should be taken out of service because loose stones may
break up the entire bit.
Drill Rod Recommendations
It should be recognized that size of chuck, chuck jaws and drill
rod do not necessarily govern the size of hole what is to be
drilled. For example, the largest size NW casing may be drilled
into the rock using EW drill rod. The EW rod is run through the
chuck jaws and an EW to NW rod-to-casing sub is used to
connect to the NW casing or starting barrel equipped with a
diamond casing bit.
The foregoing is not recommended as a desirable combination
but frequently it is necessary to improvise in order to expedite
the work. Obviously it is impractical to have every desirable
piece of equipment on all jobs, many of which are isolated from
sources of supply.
With the exception of short holes in easy drilling conditions, do
not use EW rods for drilling AX or larger holes EXCEPT
THROUGH FEED SCREW AND CHUCK!
AW rods have the necessary strength for drilling to any depth up
to 3500 feet; however, when drilling with AW rods and BX or
NX core barrels, be sure to insert one or two rods of
complementary size (BW or NW) immediately behind the core
barrel; otherwise, serious rod vibration or wobble may develop.
Blast Hole and Grout Hole Drilling
When drilling blast or grout holes, where recovery of core is
unnecessary, the use of a short, hard metal protected blast hole
barrel, is recommended. The use of a diamond set reaming shell
is dispensed with and the bit screwed directly into the barrel.
The advantage of using these barrels lies in their greater wearing
qualities as compared to the ordinary core barrel.
Where space is at a premium in blast hole drilling, the use of
two foot rods ahead of the drill is recommended. This is the
most rapid method of drilling with the CP65. Using the water
swivel screwed directly to the back end of the blast hole feed
screw, and with blast hole coupling in the front end, drilling is
simply a matter of adding rods instead of chucking and
changing water swivel in the ordinary manner. The reversible
feature of the CP65 motor is a time-saver in this type of drilling
since the rods, after the joint has been broken, may be
unscrewed and screwed up using the motor.
When drilling in soft ground, it is recommended that the spindle
and gear which gives a spindle speed of 3000 RPM be used. In
harder ground the 1500 RPM set may be used to advantage, but
the highest practical spindle speed is recommended to cut
drilling time to the minimum.
The Grout Pipe Clamp setup is indispensable for grout hole
drilling as the drill is always in alignment when moving on and
off grout pipes.


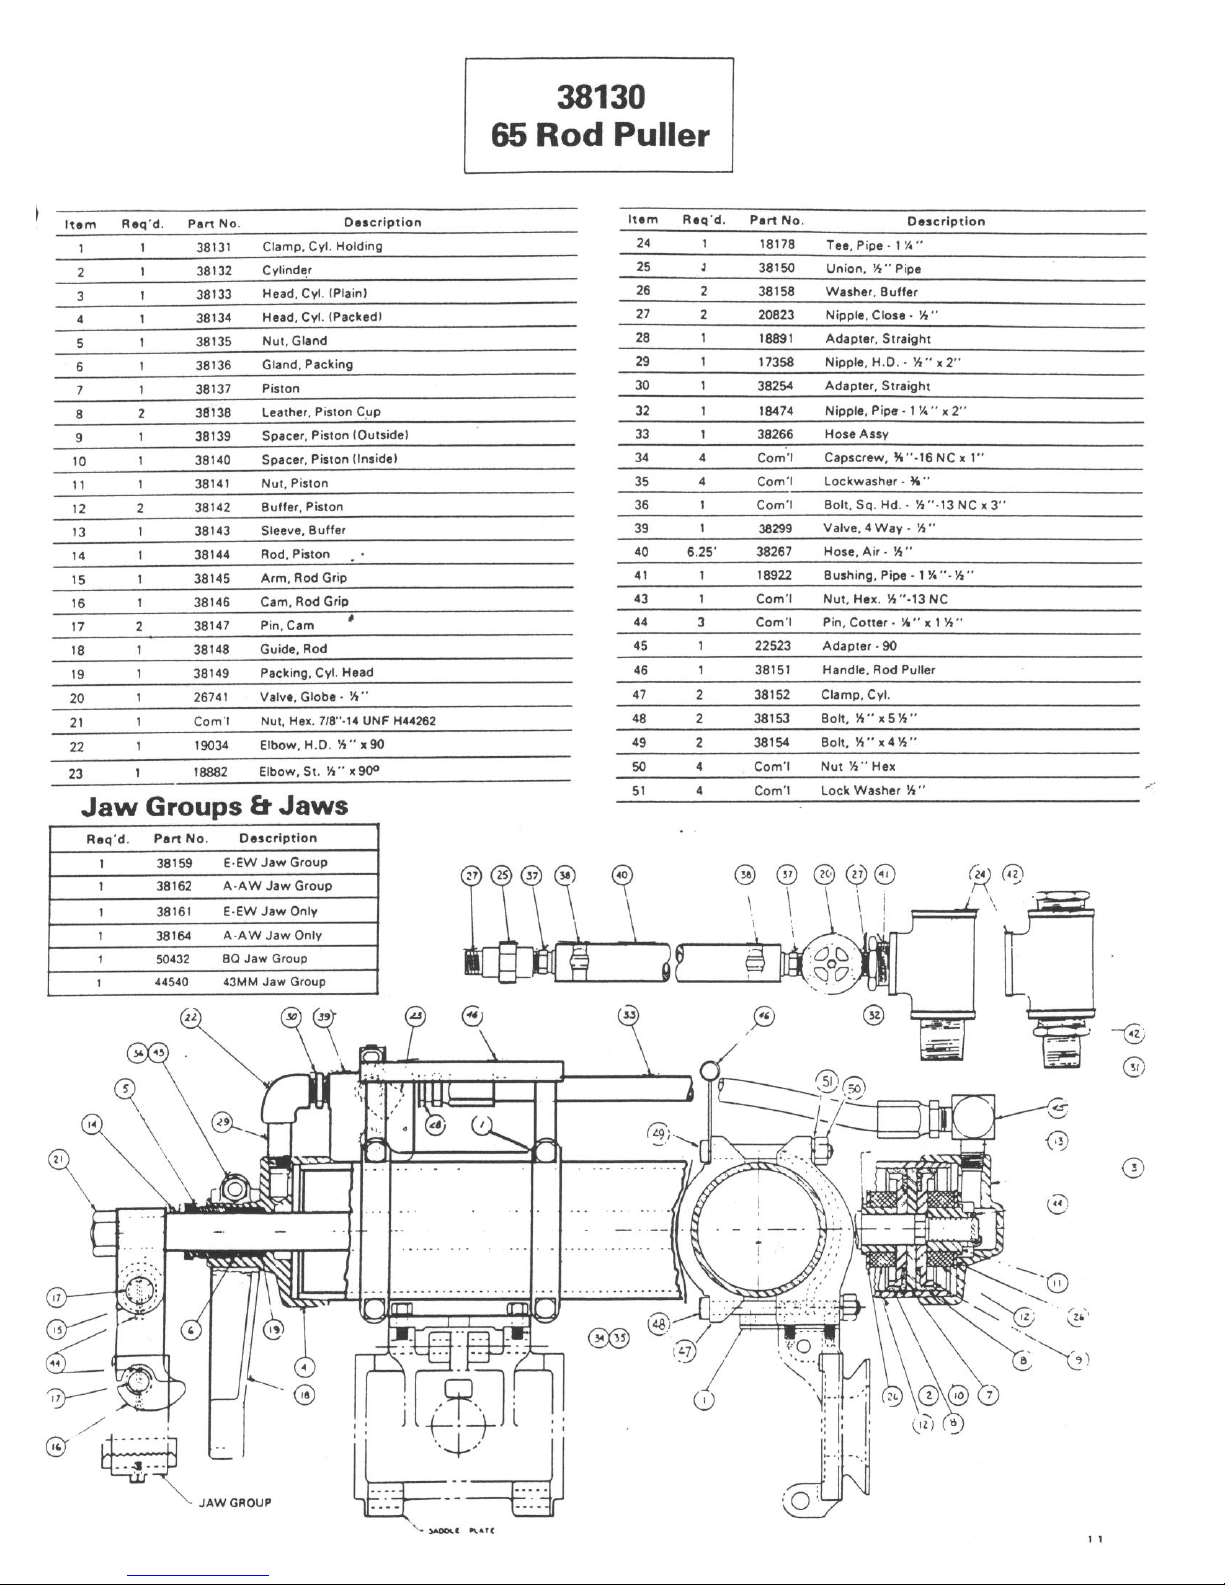


Table of contents
Popular Drill manuals by other brands


Drill Master
Drill Master 67025 Operating insructions

Ferm
Ferm CDM1134 Original instructions

Black & Decker
Black & Decker KD1001 TYPE 2 manual

Lissmac
Lissmac CDR 251 operating manual

DeWalt
DeWalt XR LI-ION DCD980 instruction manual

Hitachi
Hitachi 6.2Amp - D13 1/2" Electric Drill Rev. D-Handle... parts list

Stanley
Stanley SK58 Service manual

Black & Decker
Black & Decker DR350FD instruction manual

Narex
Narex CSV 13-2 Original operating manual

MK Diamond Products
MK Diamond Products MK-Manta III owner's manual

EINHELL
EINHELL TE-ID 1050 CE Original operating instructions

Stomer Professional
Stomer Professional SPD-851x2 user manual