Nostalgia Products Group RCOF120 User manual

All products are trademarks of Nostalgia Products LLC.
Worldwide design & utility patented or patents pending.
© 2018 Nostalgia Products LLC.
www.nostalgiaproducts.com
(rev. 06/27/18 DL)

RCOF120
Retro 12-Cup Coee Maker
Retro Cafetière de 12 tasses
Cafetera para 12 tazas de Retro
Instruction Manual
Manuel d'instruction
Manual de instrucciones


ENGLISH
2
Make every day a party!
Visit www.nostalgiaproducts.com for more fun products.
CONTENTS
SAFETY . . . . . . . . . . . . . . . . . . . . . . . . . . . . . . . . . . . . . . . . . 2
IMPORTANT SAFEGUARDS . . . . . . . . . . . . . . . . . . . . . . . . . . . . . 3
ADDITIONAL IMPORTANT SAFEGUARDS . . . . . . . . . . . . . . . . . . . . 3
INTRODUCTION . . . . . . . . . . . . . . . . . . . . . . . . . . . . . . . . . . . . 4
PARTS & ASSEMBLY . . . . . . . . . . . . . . . . . . . . . . . . . . . . . . . . . . 5
HOW TO OPERATE . . . . . . . . . . . . . . . . . . . . . . . . . . . . . . . . . . 6
HELPFUL TIPS . . . . . . . . . . . . . . . . . . . . . . . . . . . . . . . . . . . . . 7
CLEANING & MAINTENANCE . . . . . . . . . . . . . . . . . . . . . . . . . . . 8
RETURNS & WARRANTY . . . . . . . . . . . . . . . . . . . . . . . . . . . . . . . 9
SAFETY
Appliance Specications:
120 Volts, 60 Hertz
1000 Watts
THIS PRODUCT IS FOR USE IN 120V AC OUTLET ONLY.
Refer to www.nostalgiaproducts.com/user-manuals/ for the most updated manual.
Your safety and the safety of others is very important.
We have provided many important safety messages in this manual and
on your appliance. Always read and obey all safety messages.
This is the safety alert symbol.
This symbol alerts you to potential hazards that can
cause serious injury to you and others.
All safety messages will follow the safety alert symbol.
All safety messages will tell you what the potential hazard is, tell you how to reduce the
chance of injury, and tell you what can happen if the instructions are not followed.
ENGLISH
3
IMPORTANT SAFEGUARDS
A person who has not read and understood all operating and safety instructions
is not qualied to operate this appliance. All users of this appliance must read and
understand this Instruction Manual before operating or cleaning this appliance.
When using electrical appliances, basic safety precautions
should always be followed, including:
1. Read all instructions before operating this appliance.
2. DO NOT TOUCH the hot surfaces. Use handles or knobs. Always
use hot pads or potholders until unit cools.
3. This appliance is NOT A TOY.
4. Unsupervised young children and cognitively challenged
individuals should never operate this appliance.
5. Close supervision is necessary when any appliance is used by or near children.
6. To protect against electrical shock do not immerse cord, plug or
any part of this appliance in water or other liquids.
7. Unplug from outlet when not in use, before removing parts and before cleaning.
Allow to cool before putting on or taking o any parts, and before cleaning.
8. DO NOT operate any appliance with a damaged cord or plug, or after the appliance
malfunctions, or if the appliance has been damaged in any manner. Return the
appliance to the nearest repair shop for examination, repair or adjustment.
9. The manufacturer does not recommend the use of accessory attachments other than
what is provided by the manufacturer. Use of attachments may cause injuries.
10. DO NOT use the appliance for other than its intended use.
11. DO NOT use outdoors. FOR HOUSEHOLD USE ONLY.
12. DO NOT place on or near a hot gas or electric burner, or in a heated oven.
13. DO NOT let cord hang over edge of table or counter, or touch hot surfaces.
14. NEVER leave unit unattended while in use or when plugged into an outlet.
15. Extreme caution must be used when moving an appliance containing hot food.
16. Always attach plug to appliance rst, then plug cord in the wall outlet. To
disconnect, turn any control to "o," then remove plug from wall outlet.
ADDITIONAL IMPORTANT SAFEGUARDS
Operating Safety Precautions
1. Some parts of appliance are hot when in operation. DO NOT
touch with hands. Only use knobs or handles to touch.
2. Never use the appliance if the Carafe shows any signs of cracks or of
having a loose or weakened handle. Only use the Carafe supplied
with this appliance. Use carefully as the Carafe is very fragile.
3. DO NOT set a hot container on a hot or cold surface.
4. DO NOT let the coee maker operate without water.
5. The Carafe is designed for use with this appliance. It must never be used on a range top.

ENGLISH
4
6. DO NOT open the Top Cover while appliance is in use and make sure the
Carafe is placed on the Warming Plate correctly while brewing.
7. Never leave the empty Carafe on the Warming Plate as the Carafe risks cracking.
Instructions for the Electrical Cord and Plug
1. This appliance has a polarized plug (one blade is wider than the other). To reduce the
risk of electrical shock, this plug is intended to t into a polarized outlet only one way.
If the plug does not t fully into the outlet, reverse the plug. If it still does not t,
contact a qualied electrician. Do not attempt to modify the plug in any way.
2. A short power supply cord is provided to reduce the risk resulting
from becoming entangled or tripping over a long cord.
3. If a long detachable power-supply cord or extension cord is used:
• Extension cords can be used if care is exercised in their use.
• The marked electrical rating of the cord or extension cord should
be at least as great as the electrical rating of the appliance.
• When using a longer cord or extension cord, make sure that
the cord does not drape over a countertop or tabletop where
it can be pulled on or tripped over unintentionally.
4. The manufacturer does not recommend using this machine in countries that do not support
120V AC even if a voltage adapter, transformer, or converter is in use.
SAVE THESE INSTRUCTIONS!
INTRODUCTION
Thank you for purchasing the RETRO 12-CUP COFFEE MAKER from Nostalgia™!
While it looks like an appliance straight from the 1950s, this coee maker has plenty
of modern conveniences. A backlit LED display makes using the programmable
functions easy, while the boil-dry protection adds safety. Use the pause-and-serve
function to sneak a cup of coee while the coee maker is still brewing. Between
its distinctive retro style and the convenience of its modern features, the RETRO
12-CUP COFFEE MAKER will love being the centerpiece of your kitchen.
ENGLISH
5
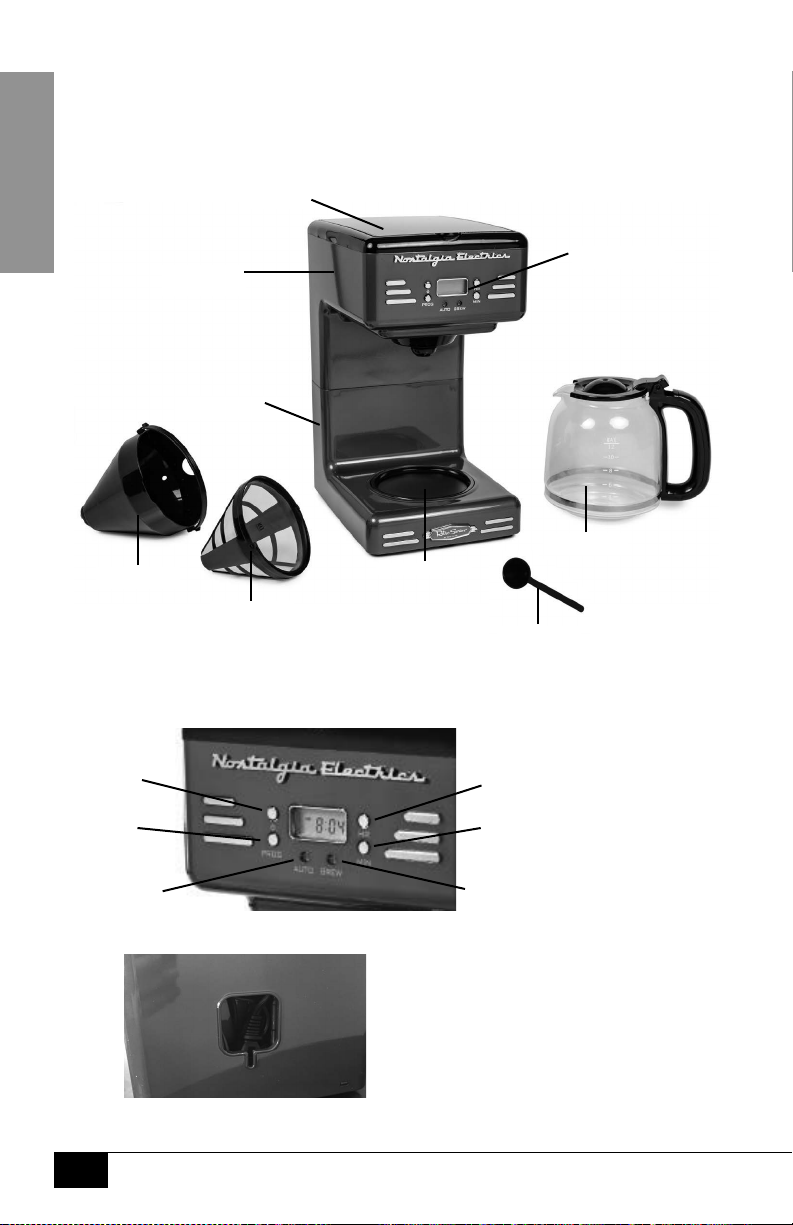
PARTS & ASSEMBLY
PARTS
Control Panel
Cord Storage
ON/OFF
Program
Hour
Minute
BrewDelay
Control Panel
Warming Plate
Top Cover
Water Tank
(interior)
Cord Storage
Reusable
Filter Coee
Scoop
Carafe
Filter Basket

ENGLISH
6
HOW TO OPERATE
Before making the rst pot of coee, wipe down the exterior of your RETRO 12-
CUP COFFEE MAKER with a clean, non-abrasive cloth or sponge. Thoroughly
wash the Filter Basket and Carafe in warm, sudsy water and thoroughly dry.
Next, nd a at surface near an electrical outlet. Make sure your cord is away
from any water source, then plug coee maker into the electrical outlet.
Finally, follow the steps under the Brewing Coee section using only water.
This will remove any dust or residue that remains in the system from the
manufacturing process. Discard the water and repeat if necessary.
Setting the Clock
1. To set the current time, press the Pro button one time so the word
CLOCK is shown in the upper-right hand corner of the display.
2. Press the Hour and Min buttons continuously until the display shows the correct time.
3. Press the Pro button twice more to complete the set up and display the current time.
Brewing Coee
1. Open the Top Cover and ll the Water Tank with cold drinking water. Refer to the Carafe
height markings and ll to the desired amount of cups.
NOTE: Do not ll water past the MAX ll line located inside the Water Tank.
2. Place a coee lter into the Filter Basket, and add coee grounds to the coee lter.
Generally, it is recommended to use 1 tablespoon (1 Scoop) of ground coee per cup, but
the amount used can be adjusted to your personal preference. DO NOT exceed Max Fill line
on Resuable Filter.
NOTE: This coee maker requires the use of #4 size cone-shape coee lters.
3. Place the Carafe onto the warming plate and close the Top Cover.
4. Press the I/O button. The Brew indicator light will illuminate red and begin the brewing cycle.
5. When nished brewing, remove the Carafe to pour and serve coee. Coee will be kept
warm on the Warming Plate for two hours. For your safety, the appliance will automatically
turn o after two hours.
NOTE: The Carafe may be removed during the process of brewing and the appliance will
automatically stop dripping. DO NOT remove Carafe for more than 30 seconds at a time.
CAUTION: Freshly brewed coee will be hot! Use care when pouring and serving coee.
6. Turn o coee maker by pressing the I/O button when nished using. Dispose of
the used coee grounds and coee lter. Filter Basket can be easily removed by
lifting the handle (found folded around the top perimeter of the Filter Basket).
Brewing Delay Function
1. Begin by following steps 1-4 under Brewing Coee.
2. To set time for the brewing delay function, press the Pro button and the
word TIMER will show in the upper-left corner of the display.
3. Set the desired brewing start time by pressing the Hour and Min buttons continuously.
4. Press the I/O button twice and the Delay indicator light will illuminate green, indicating
that the brewing start time is set. After a few moments, the display will return to the current
time. You may check the brewing delay start time again by pressing the Pro button.
5. When the current time reaches your selected brewing start time the Delay indicator light
will turn o, while the Brew indicator light will turn on and the brewing process will begin.

ENGLISH
7
HELPFUL TIPS
BREWING SLOWLY / NOT BREWING
If your RETRO 12-CUP COFFEE MAKER is brewing slowly or not at all,
the coee maker likely needs cleaning. Following the steps under
CLEANING & MAINTENANCE to clean your coee maker.
Check to be sure your coee maker is plugged in and that
the Water Tank has been lled with cold water.
Lastly, to avoid the buildup of mineral deposits that slow the drip of your coee maker, it
is recommened to use distilled water when brewing coee. Over time, minerals,such as
calcium and limestone will leave deposits in your coee maker and aect its performance.
COFFEE TASTES BAD
A clean coee maker is essential for making great-tasting coee. Regularly
clean your coee maker as specied under CLEANING & MAINTENANCE.
For optimum coee taste, buy whole coee beans and nely grind
them just before brewing. Pre-ground coee grounds should
be stored in an airtight container in a cool, dry place.
GROUNDS ARE IN THE COFFEE
Be sure that you are using the correct type of coee lter. This coee
maker requires the use of #4 size cone-shape coee lters.
Check that the coee lter has not collapsed and is properly seated in the Filter
Basket. If coee lter is not properly seated in the Filter Basket, coee grounds
may spill over the lip of the coee lter and into the brewed coee.

ENGLISH
8
CLEANING & MAINTENANCE
Daily Cleaning
1. Make sure appliance is turned o, unplugged and completely cooled before cleaning.
2. Remove the Filter Basket and Carafe, and wash them
warm, sudsy water. Dry parts thoroughly.
3. Using a slightly damp, non-abrasive sponge, towel or cloth, wipe the exterior
surface of the coee maker. Wipe with a non-abrasive towel to dry.
4. Use a damp cloth to gently wipe the surface of the Warming Plate.
Never use abrasive cleaners to clean the Warming Plate.
NOTE: To protect against electrical shock and damaging the
appliance, do not immerse the cord, plug or unit in any liquid. Never
place any parts in the dishwasher. Always wash by hand.
Mineral Deposits / Decalcifying
Minerals found in water, such as calcium and limstone, will leave deposits in your
coee maker and aect its performance. To keep your RETRO 12-CUP COFFEE MAKER
operating eciently, it is recommended that you regularly remove these deposits.
The frequency is dependent upon whether you are using
hard or soft water, and how often you brew.
Suggested Decalcifying Interval
• Soft water.............Every 80 Brew Cycles
• Hard Water...........Every 40 Brew Cycles
1. Using a store-bought coee maker descaler, ll the Water Tank to the MAX level with
a solution of water and descaler in accordance with the descaler instructions.
2. Place a coee lter into the Filter Basket (without coee grounds), close
the Top Cover, and place the Carafe onto the Warming Plate.
3. Press the ON/OFF button. The BREW indicator light will
illuminate and begin the brewing cycle.
4. When nished brewing, turn o the coee maker.
5. Allow the solution to sit for 15 minutes, then discard the
solution. Repeat steps 1-4 one more time.
6. Finally, rinse the coee maker by operating with only water and repeat at least three times.

ENGLISH
9
RETURNS & WARRANTY
SHOULD YOUR UNIT NOT WORK OR IF DAMAGED WHEN YOU FIRST TAKE IT OUT OF
THE BOX, PLEASE RETURN IT TO THE PLACE OF PURCHASE IMMEDIATELY.
RETRO 12-CUP COFFEE MAKER / RCOF120
Should you have any questions, please contact us via email or at the customer service number listed
below between the hours of 8:00 AM and 5:00 PM, Monday through Friday, Central Standard Time.
Distributed by:
Nostalgia Products LLC
1471 Partnership Dr.
Green Bay, WI 54304-5685
Customer Service
Phone: (920) 347-9122
Web: www.nostalgiaproducts.com
Customer Service Inquiry
To submit a Customer Service inquiry, go to www.nostalgiaproducts.com and ll
out the Customer Service Inquiry form and click the Submit button.
A representative will contact you as soon as possible.
Product Warranty Terms
Nostalgia Products LLC (the“Company”) hereby warrants that for a period of one (1) year from the
date of original purchase, this product will be free of defects in material and workmanship under
normal home use, provided that the product is operated and maintained in accordance with the
operating instructions. As the sole and exclusive remedy under this warranty, the Company will
at its discretion either repair or replace the product found to be defective, or issue a refund on the
product during the warranty period. This warranty is only available to the original retail purchaser of
the product from the date of initial retail purchase, and is only valid with the original sales receipt, as
proof of purchase date is required to obtain warranty benets. All warranty claims must be brought
to the attention of the Company within the warranty period and no later than 30 days of the failure
to perform. This warranty does not cover normal wear or damage caused by shipping, mishandling,
misuse, accident, alteration, improper replacement parts, or other than ordinary household use.
You may be required to return the product (with shipping prepaid by you) for inspection and
evaluation. Return shipping costs are not refundable. The Company is not responsible for returns
damaged or lost in transit. Unless otherwise specically permitted by the operating instructions, this
warranty applies to indoor household use only. In order to obtain service under this warranty, please
contact the Company at the telephone number listed above or by lling out the Customer Service
Inquiry Form located at www.nostalgiaproducts.com. Warranty valid only in USA and Canada.
This warranty is in lieu of all other warranties, expressed or implied, including warranties of
merchantability and tness for a particular purpose, which are hereby excluded to the extent
permitted by law. In no event shall the Company be liable for any indirect, incidental, consequential,
or special damages arising out of or in connection with this product or the use thereof. Some
states, provinces or jurisdictions do not permit the exclusion or limitation of incidental or
consequential damages, so the foregoing exclusion or limitation may not apply to you.
This warranty does not apply to re-manufactured merchandise.
Please read the operating instructions carefully. Failure to comply
with the operating instructions will void this warranty.
For more information, visit us online at www.nostalgiaproducts.com.
Like us on Facebook at www.facebook.com/NostalgiaElectrics.
Follow our boards on Pinterest at www.pinterest.com/nostalgiaelctrx.
Tweet along with us on Twitter at www.twitter.com/NostalgiaElctrx.
Table of contents


