Nouveau FS40-07R User manual

Fan Pedestal 40cm with remote control
This manual applies to the following products
SKU: 361424 / Model: FS40-07R

1
Important Safety Instructions
Assembly Instructions
Product Overview
Operations
• ON/Speed
• OFF
• Mode
• Swing
• Timer
• Tilting the Fan Head
Disposal of Appliances and Batteries
Please read this manual carefully before use, and keep for further guidance
Table of Contents

2
Important Safety Instructions
This appliance can be used by children aged from 8 years and above if
they have been given supervision or instruction concerning use of the
appliance in a safe way and if they understand the hazards involved.
Cleaning and user maintenance shall not be made by children unless they
are aged from 8 years and above and supervised. Keep the appliance
and its cord out of reach of children aged less than 8 years.
Appliances can be used by persons with reduced physical, sensory or
mental capabilities or lack of experience and knowledge if they have
been given supervision or instruction concerning use of the appliance in a
safe way and if they understand the hazards involved.
Children shall not play with the appliance.
If the supply cord is damaged, it must be replaced by the manufacturer,
its service agent or similarly qualified persons in order to avoid a hazard.
TO REDUCE THE RISK OF FIRE OR ELECTRICAL SHOCK, DO NOT USE THIS
FAN WITH ANY SOLID-STATE SPEED CONTROL DEVICE.
UNPLUG OR DISCONNECT THIS FAN FROM THE POWER SUPPLY BEFORE
SERVICING.
When using electrical appliances, basic precautions should always be
followed to reduce the risk of fire, electric shock, and injury to persons,
including the following:
The fan is only for intended use as described in this manual. All other uses not
recommended in manual may cause fire, electrical shock or injury to persons.
This fan is intended for household use only.
To protect against electrical shock, do not immerse fan, plug or cord into
water or spray with liquids.
Close supervision is necessary when any appliance is used by or near children.
Always unplug the fan when it is not in use, when moving fan from one
location to another, and before cleaning.
Avoid contacting moving parts. Never insert fingers, pencils or other similar
objects through the guard.
Do not operate in the presence of explosive or flammable fumes.
Do not place fan or parts near an open flame, cooking or other heating
appliances.
1.
2.
3.
4.
5.
6.
7.
8.

3
TO REDUCE THE RISK OF FIRE OR ELECTRICAL SHOCK, DO NOT USE THIS
FAN WITH ANY SOLID-STATE SPEED CONTROL DEVICE.
UNPLUG OR DISCONNECT THIS FAN FROM THE POWER SUPPLY BEFORE
SERVICING.
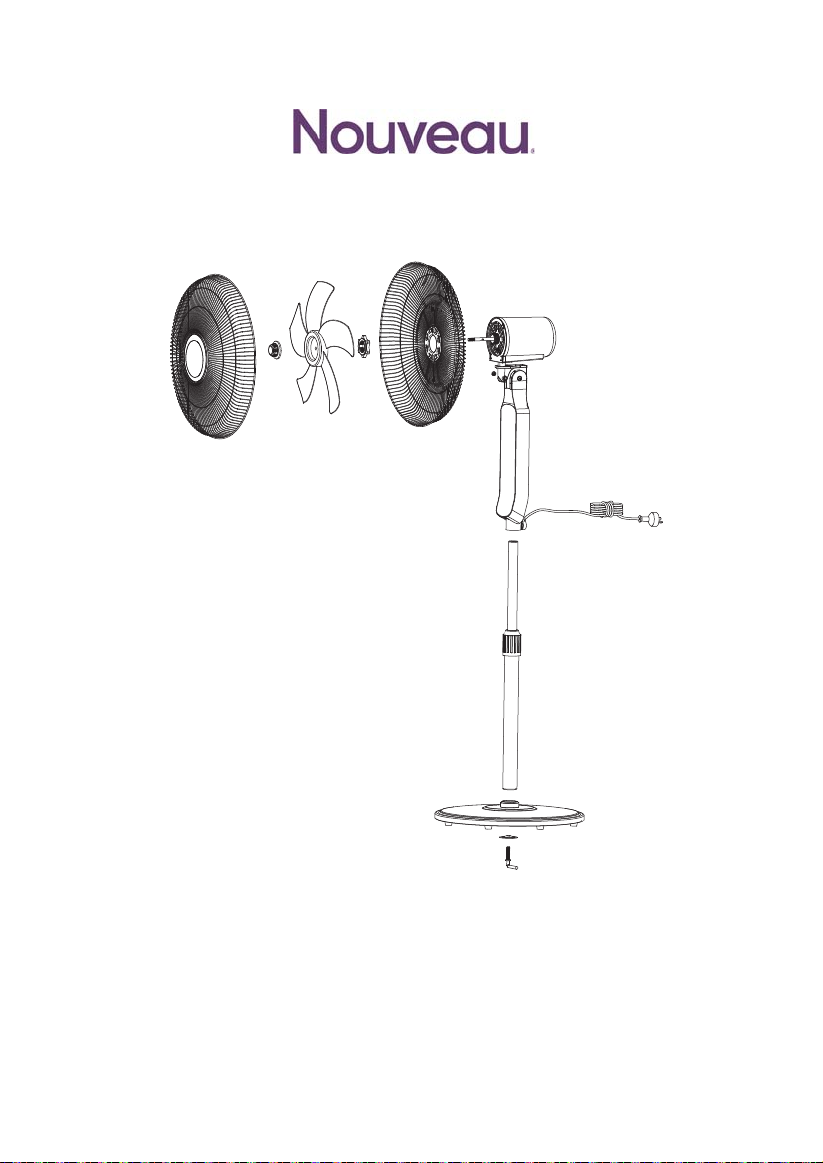
Assembly Instructions:
9.
10.
1 1.
12.
13.
14.
15.
16.
17.
18.
19.
Do not operate fan with a damaged cord, plug or after the fan suered
malfunctions or has been dropped or damaged in any manner.
The use of attachment not recommended by manufacturer may be
hazardous.
Do not use outdoors.
Do not let cord hang over the edge of a table or counter, or let it touch any
hot surfaces.
To disconnect, grip plug and pull from wall outlet, never yank cord.
Do not operate without fan lattice properly in place.
Always use on a dry level surface.
This appliance is not intended for use by children or other persons without
assistance or supervision if their physical, sensory or mental capabilities
prevent them from using it safely.
Children should be supervised to ensure that they do not play with the
appliance.
If the supply cord is damaged, it must be replaced by the manufacturer or
its service agent or similarly qualified person in order to avoid a hazard.
DO NOT attempt to defect this safety feature.
1.
2.
3.
4.
Unscrew the L-shaped screw and remove it and the clamping washer from
the end of the base tube.
Loosen the height adjustment ring at the top of the base tube and pull out
the extension pole to the desired height, or all the way to the top for
maximum height (you may have to push it up from the bottom if it is tight or
stuck). At the desired height, turn the height adjustment ring clockwise to
tighten securely.
Insert the base tube into the hole on the base, turn over the base and ax
the tube using the L-shaped screw and the clamping washer. Tighten the
screw firmly but do not overtighten.
Set the base on a level, dry surface.

3
5.
6.
7.
8.
9.
10.
1 1.
12.
Lightly loosen the set screw, attach the fan body to the top of the
extension pole. Push the body down as far as possible and then tighten
securely with the set screw.
The motor shaft has the blade cap and guard nut attached. Remove the
cap by turning it clockwise and the nut by turning it anticlockwise.
Place the rear guard on the front of the motor housing, Make sure that the
handle is up the top. Push the guard in firmly until the three knobs protrude
through the holes. Secure the rear guard by reattaching the guard nut and
turning it clockwise to tighten.
If the motor shaft is covered with a protected sleeve, remove the sleeve.
Slide the blade onto the motor shaft, making sure to match the protrusions
on the shaft with the slots in the blade. Tighten the blade with the blade
cap, turning it anticlockwise to tighten it securely.
Test the fan by rotating the blade with your hands, making sure that there
is no contact with the nut. The fan blade should rotate freely.
The front and rear guard are held together with clips around the grill gaurd
trim. fix all the clips to make the grill guard well installed.
Your new Pedestal Fan is now fully assembled.
4
Fig 1
NOTE: Refer to the Fig.1 to check the fan assembly illustration.
4
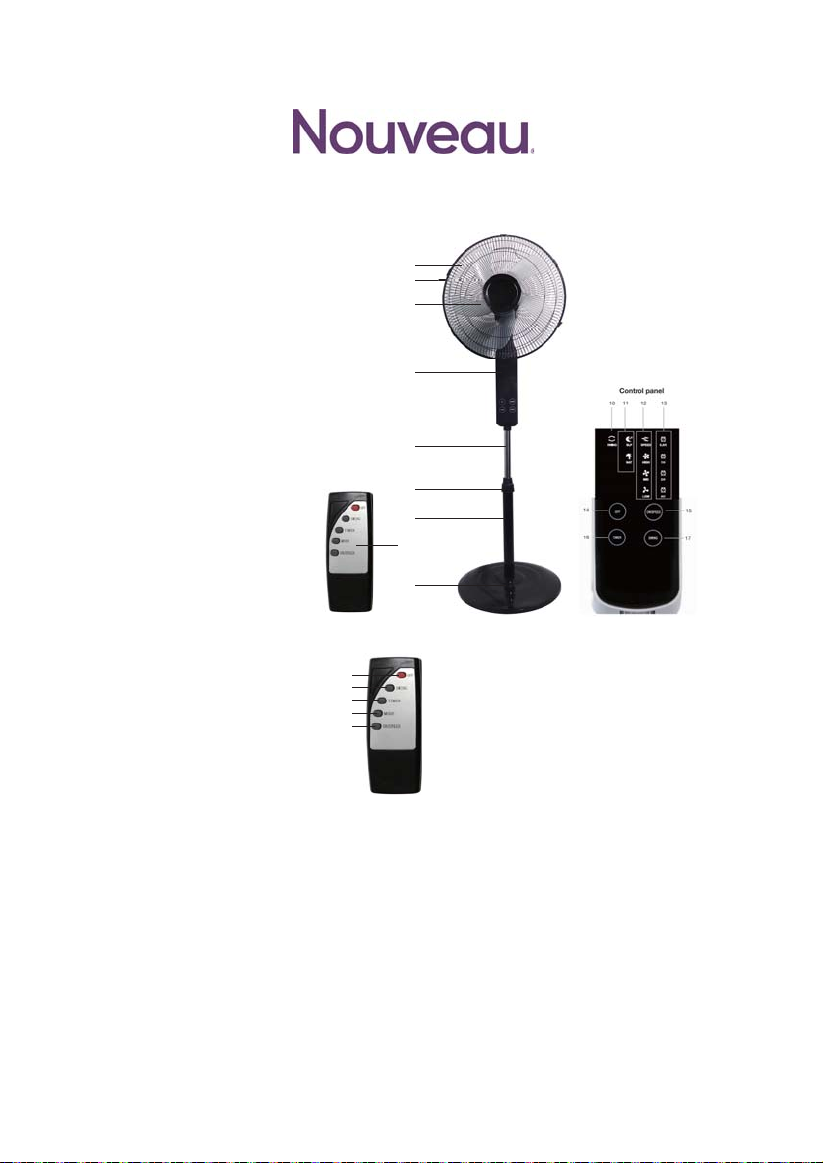
Product Overview
1
2
3
4
5
6
7
8
9
10
1 1
12
13
14
15
16
17
Front and rear grilles
Motor
(at the back, not visible here)
Fan blade
Control panel
Extension pole
Height adjustment ring
Base tube
Remote control
Round Base
Swing indicator
Mode indicators:
Sleep, Nature, Normal
(default, no indicator)
Fan speed indicators:
High, Mid, Low
Timer indicators:
0.5H, 1H, 2H, 4H
OFF button
ON/SPEED button
TIMER button
SWING button
Remote Control Buttons
Operation:
Place the fan on a dry, level surface, plug it into a 220-240V 50Hz electrical
outlet and switch on power to the outlet. All available settings options will
start flashing on the control panel. Ensure the remote controls contains two
AAA size batteries (not supplied).
Remote control operation
This fan is equipped with 3 speeds, 3 breeze modes, a 7.5hr timer and Swing
operation. (You can also use the control panel to switch the fan on and o,
select a speed, set the timer and oscillation.)
18
19
20
21
22
OFF
SWING button
TIMER button
MODE button
ON/SPEED button
18
19
20
21
22
2
1
3
4
5
6
7
9
8

SWING
Press the SWING button (on the remote control or on the control panel) to
activate the oscillation function for widespread breeze distribution.
Press the button again to stop oscillation when the fan head is in the
desired position.
•
•
There are four indicator lights for the timer: 0.5h, 1h, 2h, 4h. For example:
* 0.5h illuminated indicates the timer will shut o after 30 minutes.
* 0.5h and 2h illuminated indicates it will shut o after 2.5 hours.
* 0.5h, 1h, 2h and 4h illuminated indicates it will shut o after 7.5 hours.
TIMER
Press the TIMER button (on the remote control or on the control panel) to
set the timer in increments of 0.5 hour to a maximum of 7.5 hours. After the
timer runs out, the fan will automatically shut o.
•
5
Tilting the fan head
The fan head can be tilted so that the breeze is targeted at an angle.
To tilt the fan head, make sure the fan is disconnected from the power
supply.
Steady the motor housing of the fan with one hand, grip the fan head with
the other and carefully tilt the fan head until it reaches the desired angle.
•
•
OFF
Press the OFF button to switch o the fan.•
MODE
Normal: In this mode the fan operates at a constant speed. The mode
indicator is red.
Nature: In this mode the fan simulates a natural breeze, as in nature. The mode
indicator is green.
Sleep: In this mode the fan simulates a soft, natural breeze suitable for
night-time use. The indicator is o.
Press the MODE button (on the remote control) to change the fan mode
through dierent breeze modes.
•
•
•
Press the ON/SPEED button (on the remote control or on the control
panel) to switch on the fan.
Then press it to select the speeds, the corresponding indicator will be light
on the control panel.
ON/SPEED

MADE IN CHINA
CAUTION:
Do not tilt back the fan head further than it is intended to go.
Doing so will damage the unit.
You can help protect the environment!
Please remember to respect the local regulations: hand in the
non-working electrical equipments to an appropriate waste
disposal centre. The packaging material is recyclable. Dispose of
the packaging in an environmentally friendly manner and make it
available for the recyclable material collection-service.
Environmentally friendly disposal
This manual suits for next models
1
Table of contents
Other Nouveau Fan manuals


Popular Fan manuals by other brands


Thermador
Thermador HMCB42FS/02 installation manual

Monte Carlo Fan Company
Monte Carlo Fan Company 5DCR52EP Owner's guide and installation manual

Hunter
Hunter 90405 owner's manual

Mitsubishi Electric
Mitsubishi Electric EF-35UDT2-GL Installation instructions manual

DELTA BREEZ
DELTA BREEZ AMR1200 manual

Carrier
Carrier HRVXXSVU Product data