manuals.online logo
Brands
  1. Home
  2. •
  3. Brands
  4. •
  5. Armstrong
  6. •
  7. Fan
  8. •
  9. Armstrong 21-AR User manual

Armstrong 21-AR User manual

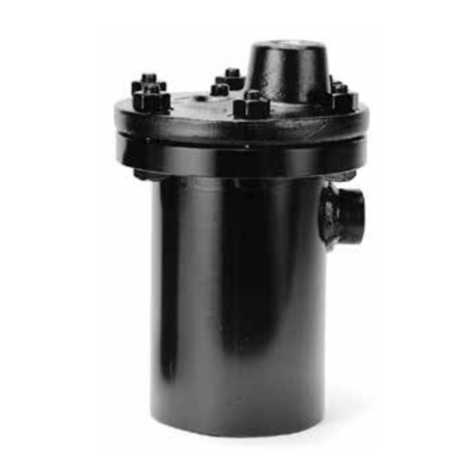
Model 21-AR
Fixed Pivot Air/Gas Vents
Luft/Gas-Entlüfter mit Fixem Hebelmechanismus
Purgeurs d'Air/de Gaz à Axe Fixe
Purgadores de Aire y Gas de Pivote Fijo
Ontluchters - met Vast Draaipunt
Eliminatori d'Aria e Gas da Liquidi in Pressione
These instructions should be used by experienced personnel !
Diese Gebrauchsanweisung ist durch Fachpersonal zu benutzen !
Ces instructions devraient être utilisées par du personnel expérimenté !
¡Estas instrucciones deben ser utilizadas por personal experimentado !
Onderhoud uitsluitend uit te voeren door ervaren personeel !
Queste istruzioni devono essere utilizzate da personale esperto !
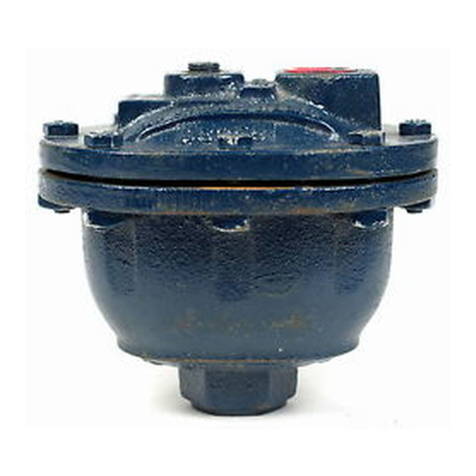
Armstrong Cast Iron Fixed Pivot Air/Gas Vent
Vertical Connection
Armstrong Luft/Gas-Entlüfter aus Grauguß mit Fixem
Hebelmechanismus
Vertikaler Anschluß
Purgeur d'Air/de Gaz en Fonte, à Axe Fixe
Raccordement Vertical
Purgador de Aire y Gas de Pivote Fijo Armstrong en
Fundición
Conexión Vertical
Armstrong Gietijzeren Ontluchter met Vast Draaipunt
Verticale Aansluiting
Eliminatore d'Aria e Gas da Liquidi in Pressione - In Ghisa
Connessioni Verticali
For detailed material specifications, options, approximate dimensions and weights, see Armstrong literature or consult your local Representative.
Für detaillierte Werkstoffangaben, Zubehör, Abmessungen und Gewichte, sehen Sie die Armstrong Datenblätter oder fragen Sie Ihre Armstrong-Vertretung.
Pour toute spécification détaillée des matières, options, dimensions et poids, veuillez vous référer à la littérature Armstrong ou prendre contact avec votre
Représentant local.
Para especificaciones de materiales detalladas, opciones, dimensiones aproximadas y pesos, ver catálogos Armstrong o consultar con su
Representante local.
Voor gedetailleerde materiaal specificaties, afmetingen en gewichten, zie de Armstrong documentatie of neem contact op met uw plaatselijke
Vertegenwoordiger.
Per la specifica dettagliata dei materiali, accessori opzionali, dimensioni e pesi approssimativi, vedere la documentazione appropriata o contattare il
Distributore locale.
PRODUCT DESCRIPTION - PRODUKTBESCHREIBUNG - DESCRIPTION DU PRODUIT
DESCRIPCION DEL PRODUCTO - PRODUKT OMSCHRIJVING - DESCRIZIONE DEL PRODOTTO
Armstrong International S.A., Parc Industriel des Hauts-Sarts, 4040 Herstal - Belgium Ph: +32.4.240.90.90 Fax: +32.4.248.13.61
IOM-1073-A 10/2002 www.armstrong.be Printed in Belgium
I. Entretien des pièces internes :
- Enlever le purgeur de la conduite;
- Dévisser les boulons (9) et les écrous (8) et enlever le couvercle (1) avec
le mécanisme qui y est attaché;
- Dévisser le siège (3) et remplacer la totalité du mécanisme excepté le
flotteur (3, 4, 5);
- Revisser le siège (3) et s'assurer que le levier (5) soit aligné dans l'axe
du couvercle (1). Un espace de 0,1 mm doit être laissé pour que le levier
(5) puisse se mouvoir horizontalement;
- Remplacer le flotteur (6) si nécessaire;
- Remplacer le joint de corps (7);
- Replacer le couvercle (1) sur le corps (2) et revisser les boulons (9) et
les écrous (8).
I. Manutenzione degli organi interni:
- Smontare dalla linea l'intero eliminatore d'aria;
- Svitare i bulloni (9), i dadi (8) e sollevare la testa (1) con il meccanismo
ad essa solidale;
-Svitare la sede (3) e sostituire l'intero meccanismo (3, 4, 5) senza il
galleggiante;
- Riavvitare la sede (3) ed assicurarsi che la leva (5) sia allineata sull'asse
della testa (1). Per permettere alla leva (5) di muoversi orizzontalmente
bisogna lasciare una luce di 0,1 mm;
- Sostituire il galleggiante (6), se necessario;
- Sostituire la guarnizione (7);
- Rimontare la testa (1) sul corpo (2) ed avvitare bulloni (9) e dadi (8).
I. Wartung und Reparatur:
- Komplette Armatur aus der Rohrleitung ausbauen;
-Schrauben (9) und Muttern (8) lösen, Deckel (1) und Mechanismus
abnehmen;
- Sitz (3) abschrauben und gesamten Mechanismus bis auf Schwimmer
austauschen (3, 4, 5);
- Sitz (3) wieder montieren, wobei der Hebel (5) auf die Achse des Deckels
(1) ausgerichtet sein muß. Für die horizontale Bewegung des Hebels (5)
einen Abstand von 0,1 mm lassen;
- Schwimmer (6) bei Bedarf erneuern;
- Gehäusedichtung (7) erneuern;
- Deckel (1) auf das Gehäuse (2) setzen, Schrauben (9) und Muttern (8)
wieder anziehen.
I. Internals Maintenance:
- Remove the complete vent from the line;
- Unscrew bolts (9) and nuts (8) and remove the cap (1) with the operating
mechanism fixed on it;
- Unscrew the seat (3) and replace the complete Mechanism Less Float (3,
4, 5);
- Screw back the seat (3) and make sure that the lever (5) is aligned in the
axis of the cap (1). A clearance of 0,1 mm should be left in order to allow
the lever (5) to move horizontally;
- Replace the float (6) if necessary;
- Replace gasket (7);
- Put the cap (1) back on the body (2) and screw bolts (9) and nuts (8).
I. Binnenwerk vervangen:
- Verwijder de gehele ontluchter uit de leiding;
- Verwijder bouten (9) en moeren (8) en verwijder de kap (1) inclusief het
mechanisme;
- Draai zitting (3) los en vervang het complete mechanisme zonder vlotter
(3, 4, 5);
- Monteer de zitting (3) terug en overtuig Uzelf ervan dat de hefboom (5)
is uitgelijnd in de as van het deksel (1). 0,1 mm vrije ruimte moet aanwezig
om de hefboom (5) horizontaal te laten bewegen;
- Vervang de vlotter (6) indien nodig;
- Vervang pakking (7);
- Plaats het deksel (1) terug op het huis (2) en draai bouten (9) en moeren
(8) weer vast.
I. Mantenimiento de las piezas internas:
- Retire el purgador completo de la línea;
- Afloje los pernos (9) y las tuercas (8) y retire la tapa (1) con el mecanismo
de funcionamiento sujeto a ella;
- Desajuste el asiento (3) y cambie el mecanismo sin boya completo (3, 4,
5);
- Vuelva a ajustar el asiento (3) y asegúrese de que la palanca (5) está
alineada en el eje de la tapa (1). Debe quedar un espacio libre de 0,1 mm
para que la palanca (5) se pueda mover horizontalmente.
- Cambie la boya (6) si es necesario;
- Cambie la junta (7);
- Vuelva a colocar la tapa (1) en el cuerpo (2) y ajuste los pernos (9) y las
tuercas (8).
Not included
Nicht enthalten
Non compris
No incluido
Niet meegeleverd
Non inclusi
Connection
Verbindung
Connexion
Conexion
Aansluiting
Connessioni
INSTALLATION - INSTALLATIONSANWEISUNG - INSTALLATION
INSTALACION - INSTALLATIE - INSTALLAZIONE
START-UP PROCEDURE (Bottom Inlet - Top Outlet) - INBETRIEBNAHME (Einlaß unten - Auslaß oben)
PROCEDURE DE DEMARRAGE (Entrée par le bas - Sortie vers le haut) - PROCEDIMIENTO DE PUESTA
EN MARCHA (Entrada inferior - Salida superior) - OPSTARTPROCEDURE (Bodem inlaat - Top uitlaat)
PROCEDURA D'AVVIAMENTO (Entrata sul fondo - Uscita dall'alto)
SHUT-DOWN PROCEDURE (Bottom Inlet - Top Outlet) - AUßERBETRIEBNAHME (Einlaß unten - Auslaß oben)
PROCEDURE D'ARRET (Entrée par le bas - Sortie vers le haut) - PROCEDIMIENTO DE PARADA (Entrada
inferior - Salida superior) - UIT BEDRIJFNAME (Bodem inlaat - Top uitlaat)
PROCEDURA DI FERMATA (Entrata sul fondo - Uscita dall'alto)
Possible connections: screwed - Mögliche Anschlußarten: Muffengewinde
Raccordement possible: taraudé - Conexiones posibles: roscada
Mogelijke aansluitingen: draad - Connessioni disponibili: filettate
For detailed hookups and adapted start-up and shut-down procedures, see Armstrong literature or consult your local Representative.
Für detaillierte Informationen über Installation, Inbetriebnahme und Außerbetriebnahme sehen Sie die Armstrong Datenblätter oder fragen Sie Ihre
Armstrong-Vertretung.
Pour plus de détails à propos des procédures de démarrage et d'arrêt, ainsi que pour l'installation, veuillez vous référer à la littérature Armstrong
ou prendre contact avec votre Représentant local.
Para posibilidades de conexionado y procedimientos de parada y puesta en marcha, ver catálogos Armstrong o consultar con su Representante
local.
Voor gedetailleerde montage en installatie instructies zie het betreffende Armstrong documentatieblad of neem contact op met uw plaatselijke
Vertegenwoordiger.
Per procedure dettagliate di collegamento, d'avviamento e di fermata, vedere la documentazione Armstrong o consultare il Distributore locale.
MAINTENANCE - WARTUNGSINFORMATIONEN - MAINTENANCE
MANTENIMIENTO - ONDERHOUD - MANUTENZIONE
For troubleshooting, testing methods, frequency of maintenance and detailed spare parts list, see Armstrong literature or consult your local
Representative.
Für detaillierte Informationen über Fehlersuche, Testmethoden, Wartungsintervallen und Ersatzteillisten fragen Sie Ihre Armstrong-Vertretung.
Pour le dépannage, les méthodes de test, la fréquence d'entretien et la liste détaillée des pièces de rechange, veuillez vous référer à la littérature
Armstrong ou prendre contact avec votre Représentant local.
Para detección de posibles averías, métodos de test, frecuencia de mantenimiento y lista detallada de repuestos, ver catálogos Armstrong o
consultar con su Representante local.
Voor het oplossen van problemen, test methodes, onderhoud en gedetailleerde onderdelenlijsten, zie de Armstrong documentatie of neem contact
op met uw plaatselijke Vertegenwoordiger.
Per la soluzione di eventuali problemi, metodi di prova funzionalità, frequenza di manutenzione e dettaglio della lista ricambi, vedere la
documentazione Armstrong o consultare il Distributore locale.
Equipement under pressure - Operating temperature might be > 90°C
Make sure vent is cold before handling !
Armatur steht unter Druck - Arbeitstemperatur kann > 90°C sein
Stellen sie sicher, dass die Armatur kalt und drucklos ist, bevor an dieser gearbeitet wird !
Equipement sous pression - Température en fonctionnement > 90°C
Laisser le purgeur refroidir avant toute manipulation !
Equipo bajo presión - Temperatura posible de trabajo > 90°C
¡Asegúrese de que el purgador esté frío antes de manipularlo !
Toestel onder druk, werktemperatuur > 90ºC
Ontluchter moet afgekoeld zijn alvorens eraan te werken !
Apparecchiatura in pressione - Temperatura operativa potrebbe essere > 90°C
Assicurarsi che l’eliminatore sia freddo prima d’intervenire !
Fixed Pivot Air/Gas Vents
Model 21-AR
These instructions should be used by experienced personnel!
PRODUCT DESCRIPTION
Armstrong Cast Iron Fixed Pivot Air/Gas Vent.
Vertical connection.
For detailed material specifications, options, approximate dimensions and weights,
see Armstrong literature or consult your local Representative.
INSTALLATION
Possible connections: screwed.
START-UP PROCEDURE (Bottom Inlet - Top Outlet)
For detailed hookups and adapted start-up and shut-down procedures, see Armstrong literature or consult your
local Representative.
SHUT-DOWN PROCEDURE (Bottom Inlet - Top Outlet)
®
Vent connectionNot included
I II III
III
t < 40°C
II
I
MAINTENANCE
For troubleshooting, testing methods, frequency of maintenance and detailed spare parts list, see Armstrong
literature or consult your local Representative.
EQUIPMENT UNDER PRESSURE
OPERATING TEMPERATURE > 90°C
MAKE SURE VENT IS COLD BEFORE HANDLING
I. Internals Maintenance:
- Remove the complete vent from the line;
- Unscrew bolts (9) and nuts (8) and remove the cap (1) with the operating mechanism fixed
on it;
- Unscrew the seat (3) and replace the complete Mechanism Less Float (3, 4, 5);
- Screw back the seat (3) and make sure that the lever (5) is aligned in the axis of the cap (1).
A clearance of 0,1 mm should be left in order to allow the lever (5) to move horizontally.
- Replace the float (6) if necessary;
- Replace gasket (7);
- Put the cap (1) back on the body (2) and screw bolts (9) and nuts (8).
Armstrong International, S.A., Parc Industriel des Hauts-Sarts, 4040 Herstal – Belgium Ph: +32.4.240.90.90 Fax: +32.4.248.13.61
IOM-1073-A 05/02 www.armstrong.be Printed in Belgium

Other Armstrong Fan manuals

Armstrong 21AR Instruction Manual

Armstrong

Armstrong 21AR Instruction Manual

Armstrong 21-AR User manual

Armstrong

Armstrong 21-AR User manual

Armstrong AV-11 User manual

Armstrong

Armstrong AV-11 User manual

Armstrong Legacy AG Series User manual

Armstrong

Armstrong Legacy AG Series User manual

Armstrong HLAR Series User manual

Armstrong

Armstrong HLAR Series User manual

Armstrong 11-AV User manual

Armstrong

Armstrong 11-AV User manual

Armstrong TT Series User manual

Armstrong

Armstrong TT Series User manual

Popular Fan manuals by other brands

Tornado HI-FAN-30HVOF-1P instruction manual

Tornado

Tornado HI-FAN-30HVOF-1P instruction manual

Euromatic FF5-Z instruction manual

Euromatic

Euromatic FF5-Z instruction manual

Flexit Vario WiFi User instructions

Flexit

Flexit Vario WiFi User instructions

Tornado HI-FAN-18HVWM- 1P instruction manual

Tornado

Tornado HI-FAN-18HVWM- 1P instruction manual

Emerson PREMIUM SELECT CF4801AB00 owner's manual

Emerson

Emerson PREMIUM SELECT CF4801AB00 owner's manual

Fanimation GLIDEAIRE FPD8520 Series manual

Fanimation

Fanimation GLIDEAIRE FPD8520 Series manual

Anslut 412-019 User instructions

Anslut

Anslut 412-019 User instructions

Clarke air CHV18WF Operation & maintenance instructions

Clarke

Clarke air CHV18WF Operation & maintenance instructions

Global Industrial 292791 user manual

Global Industrial

Global Industrial 292791 user manual

Hunter Augusta Owner's guide and installation manual

Hunter

Hunter Augusta Owner's guide and installation manual

Kichler Lighting 52" Basics Pro instruction manual

Kichler Lighting

Kichler Lighting 52" Basics Pro instruction manual

Vornado 133-AU owner's guide

Vornado

Vornado 133-AU owner's guide

Hinkley HIGHLAND instruction manual

Hinkley

Hinkley HIGHLAND instruction manual

Ross AuraLine Comfort instruction manual

Ross

Ross AuraLine Comfort instruction manual

S&P PCLP50 Instructions for use

S&P

S&P PCLP50 Instructions for use

Bionaire BT14 instruction manual

Bionaire

Bionaire BT14 instruction manual

GE RAK205CW installation instructions

GE

GE RAK205CW installation instructions

Vents-us VK PS 100 installation guide

Vents-us

Vents-us VK PS 100 installation guide

manuals.online logo
manuals.online logoBrands
  • About & Mission
  • Contact us
  • Privacy Policy
  • Terms and Conditions

Copyright 2025 Manuals.Online. All Rights Reserved.