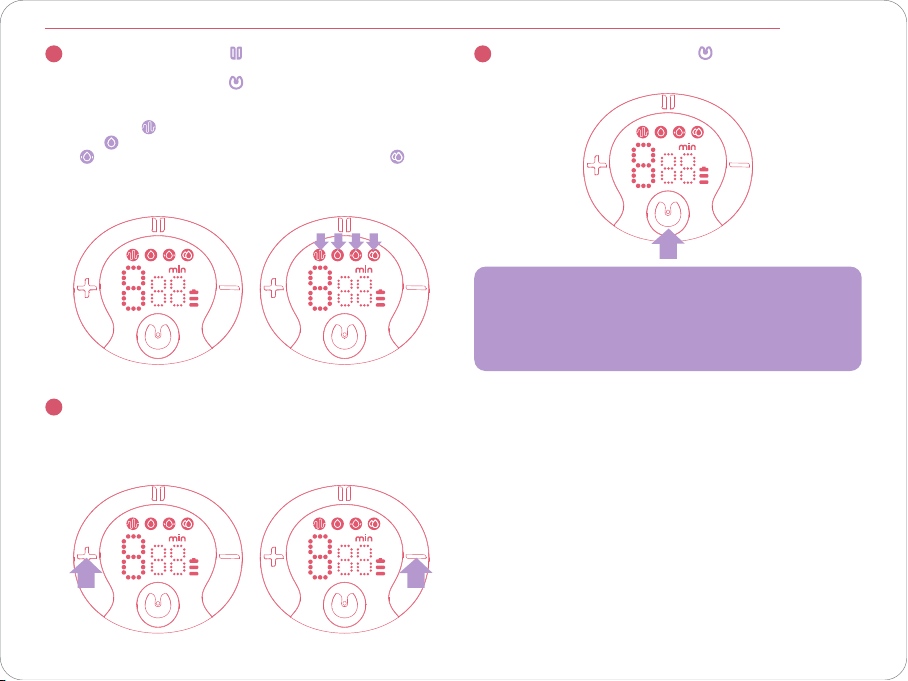
nuliie S32 User manual

WEARABLE
BREAST
PUMP
User Manual
Visit www.nuliie.com for
our 24/7 live chat or email
assistance and inquiries.
S32


English -------------------------------------
Deutsche -------------------------------------
Español -------------------------------------
Français -------------------------------------
Italiano -------------------------------------
04 -13
14 -23
24 -33
34 -43
44 -54
Contents

04
Product Structure Diagram
1 2 3 4 5 6 7
Parts List
1
2
3
4
Flange
Pump Motor
Silicone Diaphragm
USB Charging Cable
Milk Collector
Bra Adjustment Buckle
Valve
5
6
7
Description of LED Display and Button Function
7
1
8
2
9
3
10
4
11
12
5
6
4
1
2
3
5
6
Pause/Start Button
Expression Mode
Stimulation Mode
Level Up Button
Level Display
Power Button/Mode
Selection Button
7
8
9
10
11
12
Massage Mode
Automatic Mode
Time/Minute
Level Down Button
Power Display
Time Display
Notice
This product has a built-in lithium battery. When the power
indicator ashes, it is recommended that you use a certied 5V 1A
power adapter to charge the host as soon as possible.
English

05
LED Power Display
The breast pump display features three power frames for easy monitoring.
Please note that the pump cannot be used while charging. During charging,
the display interface will only show the power level.
Power level shows 1 bar
and ashing: the battery
is running low; charge it as
soon as possible.
Power level shows three bars
and is no longer ashing:the
battery is fully charged.
English
Please disassemble each accessory individually for cleaning and sanitizing before using.
Be cautious when cleaning the valve and silicone diaphragm. To clean the valve and silicone diaphragm, gently rub it between
the thumb and forenger in warm, soapy water. Avoid inserting anything into the valve that could damage it.
Warning
First Time Use After Each Use
Pump Motor Turn on the pump by pressing the power
button.
Wipe with a clean damp cloth with 70% ethyl alcohol or
isopropyl alcohol as needed. Do not immerse the pump
in water.
Flange, Silicone
Diaphragm, Valve, Linker and
Milk Collector
Boil in water for 5 minutes. Do not
microwave the Flange, Silicone Diaphragm,
Valve, Linker and Milk Collector.
Clean with mild dish washing soap or clean water.
The accessories can be sterilized by boiling or soaking
them for 5-8 minutes in boiling water. The sterilization
temperature of accessories should not exceed 100 C.
Cleaning
Cleaning & Maintenance

06
Assembly
To assemble the pump, follow the steps below.
CAUTIONS
Make sure that you clean the pump as instructed in this user manual.
Make sure that you assemble the pump correctly as instructed in this user manual.
To avoid leakage, remove the residue around the rim before assembling.
Wash your hands thoroughly before you assemble cleaned components.
Place the silicone diaphragm inside the milk container
and apply pressure. Get a perfect seal by using your
hands to make the borders fasten tightly.
Install the valve to the bottom of the breast milk collector,
and install it in the correct direction. 2
1
To install the ange on the milk collector, make sure
to align the diversion groove on the ange with the
backow groove on the milk collector, and then press
the edges with both hands to ensure the seal is in place.
3
Install the main body of the breast pump on the milk
collector, align the notch under the main body with the
silicone diaphragm, and assemble it downward to t the
milk collector to ensure a complete seal.
4
English

07
To Start the Pumping Process
To create suction with the breast pump, place the ange
against your breast without any gaps, center your
nipples, and keep them upright. Make sure not to move
the device or your breasts while doing this.
1Long press the power button to start the breast pump.
2
Use a breast pump to assist the mother in getting through the discomfort. To properly stimulate the growth of the
mammary glands before using the breast pump, warm the breasts for ve minutes with a heated towel or a hot and cold
compress.
Starting slowly in rst gear can help mimic a baby's sucking motion and encourage to release milk from the pituitary gland.
To ensure complete opening of the mammary glands, adjust the suction level from small to large.
Eight minutes is advised for each suction; do not go over 20 minutes.
If you are unable to pump milk, avoid pumping for more than ve minutes. Instead, try again later.
If you experience any discomfort or pain while using the breast pump, please stop using it and consult a nursing
professional.
When the milk container holds more than 120ml of milk, the ow of breast milk slows down. Transfer the milk to a storage
bottle to restore the suction speed.
The valve and silicone diaphragm are consumable products with a usable life of 1-2 months and 4-6 months.
Prior to Pumping
1
2
3
4
5
6
7
English

08
You can short press the" " button to control the breast
pump start and pause functions. After starting the
breast pump, press the " " button to switch modes.
You can choose from four modes (stimulation mode,
expression mode, massage mode, and automatic mode).
When the " " is lit, it means the stimulation mode; when
the " " is lit, it means the expression mode; when the
"" is lit, it means the massage mode; when the " " is
lit, it means the automatic mode.
3Long press the power button " " to turn o the breast
pump.
5
Warm Tips
1. This model has a built-in memory function. When you turn on the
device again, it automatically enters and shifts to the working mode
and suction level you used last time.
2. The breast pump will automatically stop after 30 minutes of work.
In each mode, there are 9 levels of suction. You can
adjust the suction to your comfort level by using the "+"
button to increase and the "—" button to decrease.
4
English

09
Step 1
Step 2
Step 3
1
Breastfeeding Sitting
Position
For maximum comfort and eciency,
lean slightly forward and use a
comfortable chair. Use a cushion for
back support. Ensure to keep the
breast cup and pump upright to ensure
proper suction.
How to Adjust Bra Straps
To ensure a comfortable experience, adjust your bra straps
by hanging one end of the adjustment buckle on the bra
cup and the other end of the breastfeeding buckle on the
nursing bra's inner lining. Modify the length of the bra straps
to your comfort level.
Pumping Process Completion
To turn o the breast
pump, long-press the
power button. Afterward,
break the seal between
the breast and the pump
funnel with your nger and
carefully remove the pump
from your breast.
Once you have nished pumping, remove the breast pump
from your breast while keeping it upright. Next, remove the
motor part and hold the milk collector to pour the breast
milk into the bottle. Be sure to align the breast cup's milk
collector gap with the mouth of the bottle to prevent any
spills.
Separate the milk collector from the pump motor ready
for feeding/storage. Clean the other used parts based
on the instructions.
Pour the milk into the storage bottle. Ensure the slot
feature is aligned with the bottle.
2
3
English

10
Proper Storage of Breast Milk
Always use sterilized breast pumps to collect breast milk.
Use sterilized, clean milk storage bags or bottles with a sealing cushion.
Place the milk in the fridge or freezer right after pumping.
1
Breast Milk Cold Storage
Do not freeze breast milk repeatedly.
Do not mix fresh breast milk with frozen breast milk.
Dispose of any remaining breast milk after a feeding.
You can refrigerate the extracted milk for up to 48 hours or freeze it for up to three months. Be sure to label the milk bottle or
storage bag with the date and time it was collected.
2
3
1
2
3
4
How to Safely Unfreeze Breast Milk
To thaw the breast milk, place it in the refrigerator section overnight. For emergency, you can defrost the breast milk quickly
by placing the storage bag or bottle in a dish of hot water.
Once the breast milk has been defrosted, it must be consumed within 24 hours. Do not refreeze breast milk that has already
been thawed.
1
2
Safely Heating Breast Milk
1To heat the breast milk, you can either place the baby bottle in a bowl of hot water or use a baby bottle and food heater for
safe and quick heating.
Always check the temperature of the breast milk before feeding it to your baby to avoid any burns or discomfort.
Do not use a microwave oven to heat breast milk as it can destroy essential nutrients and antibodies. Additionally, uneven
heating may cause partial overheating of the liquid, which can burn baby's mouth.
Avoid immersing the milk storage bottle in boiling water to heat it, as this can cause the bottle to rupture or crack.
2
3
4
English

11
Picking Appropriate Flange
Nipples
Nipples
Areola
Areola
Nipple roots
Measure
Step 1: Using a straightedge or tape measure, calculate the nipple root's diameter in millimeters (mm). While measuring, leave
out the areola section.
Step 2: Using the +4mm principle, select the appropriate shield size based on the measurement results from the chart. If the
diameter is 16 mm, you should buy a 21 mm sucking breast shield because it is 17 mm otherwise.
Nipples
Areola
The ideal size: The breast
shield tube's nipple is situated
in the middle and is freely
movable.
The size is too big: Try using
a smaller-sized breastshield if
a large areola is pulled into the
tunnel.
Nipples
Areola
The size is too small: Try using
a larger breast shield if your
nipples are pressing against
the ducts.
21 24 27 30 36
Max 17 Max 20 Max 23 Max 26 Max 32
Diameter of the nipple as
measured in millimeters
(Unit: mm)
Dimensions of the shield
as measured in millimeters
(Unit: mm)
English

12
Troubleshoot Guide
No. Problem/Issue
Insucient suction
Cause Analysis
Host failure
Solution
Test the suction power:
Separate the main body from the cup, put the main body in the palm of your hand,
and check whether there is suction in the palm of your hand. If there is suction, the
machine is not the problem. Otherwise, the problem lies with the main unit.
Improper
installation
Check for installation issues:
1. To ensure proper assembly and a complete seal, follow the instructions provided to
reassemble the tting correctly.
2. Wash and dry the ange, look for damage, and see if disinfection has altered its
appearance.
3. Verify whether the installation method is incorrect and whether the duckbill valve
is damaged.
Not tightly tted
to the breast To ensure the ange and breast are properly tted together during breastfeeding,
follow the instructions for correct sitting posture provided.
Suction is too small
It's important to note that low suction can result in no milk being expressed during pumping. The
baby's natural sucking pressure typically ranges from 10 to 45 kPa, and the international standard for
breast pumps is a maximum suction pressure of 40 kPa. If this pressure is exceeded, it can damage the
capillaries in a woman's breast. However, with Nuliie's breast pump, the suction pressure falls within the
safe range of 10-45Kpa, which is similar to a baby's natural sucking pressure.
New machine
After ensuring that the new breast pump is functioning correctly, select the
appropriate mode and gear. The atmosphere, your mood, and your physical
condition may aect your milk ow. To increase milk production, consider using a
warm compress with a towel. Generally, it doesn't matter if you utilize breast pumps
from dierent brands.
Suction power
decreases with
prolonged use
The primary causes of issues are deformation from cleaning and improperly installed
accessories. Consumable components include silicone diaphragms and duckbill
valves. It is advisable to change them every three to six months. You might try the
following measures to see if the suction force decreases:
1. Examine the accessories for damage or signicant deformation.
2. Assemble the accessories and ensure they are fully sealed following the provided
instructions.
3. Ensure the silicone diaphragm is fully contracted and adjust to the breast
pumping mode's highest gear.
1
2
English

13
3
4
5
6
7
Can't suck milk
Determine
whether the
breast is
agglomerated
1. Gently massage the breast for ve minutes with a heated towel or a hot and cold
compress.
2. Start using the smallest "breast pumping" setting on the breast pump, gradually
increasing the suction as you work to release any milk blockages.
Determine
whether the
breast has any
milk
If the mammary glands are inactive and not producing milk, nutrition therapy and
training the body may help stimulate milk production.
To promote milk production, consider consuming foods such as old hen soup,
peanuts, trotters, soybeans, astragalus, angelica, soybean sprouts, tofu, enoki
mushrooms, and other lactogenic foods.
Leaking milk
Improper sitting
posture
1. Duckbill valve should be replaced immediately (the service life of the duckbill valve
is about 3-6 months; contact customer service to purchase accessories).
2. Replace the silicone diaphragm immediately (the service life of the silicone
diaphragm is about 3-6 months; contact customer service to purchase accessories).
3. Replace the ange immediately (yellow or deformed, needs to be replaced).
4. Use the designated milk pouring port to pour milk accurately. Avoid removing the
ange while pouring milk, as this can cause milk to leak.
5. After pouring milk, a few drops of milk residue are typically visible on the linker.
Ensure that you are sitting in the correct position for breastfeeding. Lean forward at
a 45-degree angle with your chin tucked into your chest. When using a bottle, hold it
upright during and after the feeding.
Damaged
accessories,
improper
operation
The breast pump
does not respond and
cannot be turned on
The milk goes
into the device
If the accessories (such as the silicone diaphragm) are damaged or if milk is
accidentally poured into the main unit without removing the head, the breast pump
may not function properly.
Note: If any accessories are damaged, replace them promptly and be mindful of how
you pour milk to prevent any issues.
Low battery Please use a certied 5V power adapter to charge the host. Please do not use an
adapter with more than 5V, as it is easy to burn the machine.
Low noise
The breast pump creates suction by inhaling and deating the pump body, resulting in a certain level of
noise. However, this product has been designed to minimize noise, and the decibel level is maintained
within the standard range of approximately 45 to 55 decibels.
Damaged or missing
components Please contact after-sales customer service to purchase accessories.
English

14
Pause/Start-Taste
Ausdrucksmodus
Stimulationsmodus
Level Up-Taste
Level-Anzeige
Power-Taste/Modus
Auswahltaste
Deutsche
Produktstruktur-Diagramm
1 2 3 4 5 6 7
Teileliste
1
2
3
4
Flansch
Pumpe Motor
Silikonmembran
USB-Ladekabel
Milchsammler
BH-Einstellschnalle
Ventil
5
6
7
Beschreibung der LED-Anzeige und Tastenfunktion
7
1
8
2
9
3
10
4
11
12
5
6
4
1
2
3
5
6
7
8
9
10
11
12
Massage-Modus
Automatischer Modus
Zeit/Minute
Level Down Taste
Leistungsanzeige
Zeit-Anzeige
Hinweis
Dieses Produkt hat eine eingebaute Lithium-Batterie. Wenn die
Stromanzeige Anzeige blinkt, wird empfohlen, ein zertiziertes 5V
1A Netzadapter zu verwenden, um den Host so schnell wie möglich
aufzuladen.

15
Erstmalige Verwendung Nach jedem Gebrauch
Pumpenmotor Schalten Sie die Pumpe ein, indem Sie den
Netzschalter drücken.
Mit einem sauberen, feuchten Tuch mit 70 %igem
Ethylalkohol oder Isopropylalkohol nach Bedarf
abwischen. Tauchen Sie die Pumpe nicht in Wasser.
Flansch, Silikonmembran,
Ventil, Verbindungsstück und
Milchsammler
5 Minuten in Wasser kochen.
Den Flansch, die Silikonmembran, das Ventil,
das Verbindungsstück und den Milchsammler
nicht in die Mikrowelle geben.
Mit mildem Spülmittel oder sauberem Wasser reinigen.
Das Zubehör kann durch Auskochen oder Einweichen
für 5-8 Minuten in kochendem Wasser sterilisiert
werden.
Die Sterilisationstemperatur des Zubehörs sollte 100 C
nicht überschreiten.
Reinigung
Reinigung & Wartung
Deutsche
LED-Stromanzeige
Das Display der Milchpumpe verfügt über drei Leistungsrahmen zur
einfachen Überwachung. Bitte beachten Sie, dass die Pumpe während des
Ladevorgangs nicht verwendet werden kann. Während des Ladevorgangs
zeigt die Anzeigeschnittstelle nur den Ladezustand an.
Leistungsstufe zeigt 1 bar
und blinkt: die Batterie ist
fast leer; laden Sie sie so so
schnell wie möglich auf.
Die Leistungsstufe zeigt drei
Balken und blinkt nicht mehr:
Der Akku ist vollständig
geladen.
Verwenden Sie keine Mikrowelle.
Bitte zerlegen Sie jedes Zubehör einzeln, um es vor der Verwendung zu reinigen und zu desinzieren.
Seien Sie vorsichtig beim Reinigen des Ventils und der Silikonmembran. Um das Ventil und die Silikonmembran zu reinigen,
reiben Sie sie vorsichtig zwischen Daumen und Zeigenger in warmem Seifenwasser. Vermeiden Sie es, Gegenstände in das
Ventil einzuführen, die es beschädigen könnten.
Warnung

16
Deutsche
Montage
Gehen Sie wie folgt vor, um die Pumpe zusammenzubauen.
VORSICHTEN
Vergewissern Sie sich, dass Sie die Pumpe gemäß den Anweisungen in diesem Benutzerhandbuch reinigen.
Vergewissern Sie sich, dass Sie die Pumpe gemäß den Anweisungen in dieser Bedienungsanleitung korrekt zusammenbauen.
Um Leckagen zu vermeiden, entfernen Sie vor dem Zusammenbau die Rückstände um den Rand.
Waschen Sie sich gründlich die Hände, bevor Sie die gereinigten Teile zusammenbauen.
Legen Sie die Silikonmembran in den Milchbehälter und
üben Sie Druck aus. Verwenden Sie Ihre Hände, um die
Ränder fest zu verschließen und eine perfekte Abdichtung
zu erreichen.
Installieren Sie das Ventil an der Unterseite des
Muttermilchsammlers und installieren Sie es in der
richtigen Richtung.
2
1
Um den Flansch am Milchsammler zu montieren, achten
Sie darauf, dass die Umleitungsrille am Flansch mit der
Rücklaufrille am Milchsammler übereinstimmt, und
drücken Sie dann mit beiden Händen auf die Kanten, um
sicherzustellen, dass die Dichtung richtig sitzt.
3
Setzen Sie den Hauptkörper der Milchpumpe auf den
Milchbehälter, richten Sie die Kerbe unter dem Hauptkörper
an der Silikonmembran aus und setzen Sie ihn nach unten
in den Milchbehälter ein, um eine vollständige Abdichtung
zu gewährleisten.
4

17
Deutsche
Um den Pumpvorgang zu starten
Um mit der Milchpumpe eine Saugkraft zu erzeugen,
legen Sie den Flansch lückenlos an Ihre Brust, zentrieren
Sie Ihre Brustwarzen und halten Sie sie aufrecht. Achten
Sie darauf, das Gerät oder Ihre Brüste dabei nicht zu
bewegen.
1Drücken Sie lange auf die Einschalttaste, um die
Milchpumpe zu starten.
2
Verwenden Sie eine Milchpumpe, um der Mutter dabei zu helfen, die Beschwerden zu überwinden. Um das Wachstum der
Brustdrüsen richtig zu stimulieren, wärmen Sie die Brüste vor der Verwendung der Milchpumpe fünf Minuten lang mit einem
beheizten Handtuch oder einer heißen und kalten Kompresse.
Wenn Sie langsam im ersten Gang beginnen, kann dies dazu beitragen, die Saugbewegung eines Babys nachzuahmen und
die Freisetzung von Milch aus der Hypophyse zu fördern. Um eine vollständige Önung der Brustdrüsen zu gewährleisten,
stellen Sie die Saugstärke von klein auf groß ein.
Für jeden Saugvorgang werden acht Minuten empfohlen; Gehen Sie nicht länger als 20 Minuten.
Wenn Sie keine Milch abpumpen können, vermeiden Sie es, länger als fünf Minuten abzupumpen. Versuchen Sie es
stattdessen später noch einmal.
Wenn Sie bei der Verwendung der Milchpumpe Beschwerden oder Schmerzen verspüren, beenden Sie bitte die Verwendung
und konsultieren Sie einen Krankenpeger.
Wenn der Milchbehälter mehr als 120 ml Milch fasst, verlangsamt sich der Milchuss. Füllen Sie die Milch in eine
Vorratsasche, um die Sauggeschwindigkeit wiederherzustellen.
Das Ventil und die Silikonmembran sind Verbrauchsprodukte mit einer Nutzungsdauer von 1–2 Monaten bzw. 4–6 Monaten.
Vor dem Abpumpen
1
2
3
4
5
6
7

18
In jedem Modus gibt es 9 Saugstufen. Sie können die
Saugleistung an Ihr Komfortniveau anpassen, indem
Sie die Taste " +" zum Erhöhen und die Taste " —" zum
Verringern verwenden.
Deutsche
Sie können die Taste " " kurz drücken, um die Start- und
Pausefunktionen der Milchpumpe zu steuern. Drücken
Sie nach dem Starten der Milchpumpe die Taste " " , um
den Modus zu wechseln. Sie können aus vier Modi wählen
(Stimulationsmodus, Ausdrucksmodus, Massagemodus
und Automatikmodus). Wenn das " " leuchtet, bedeutet
dies, dass der Stimulationsmodus aktiviert ist. Wenn das
" " leuchtet, bedeutet dies den Ausdrucksmodus; Wenn
das " " leuchtet, bedeutet dies, dass der Massagemodus
aktiviert ist. Wenn das " " leuchtet, bedeutet dies, dass
der Automatikmodus aktiviert ist.
3Drücken Sie lange auf die Einschalttaste " ", um die
Milchpumpe auszuschalten.
5
Warme Tipps
1. Dieses Modell verfügt über eine integrierte Speicherfunktion.
Wenn Sie das Gerät wieder einschalten, wechselt es automatisch
in den Arbeitsmodus und die Saugstufe, die Sie zuletzt verwendet
haben.
2. Die Milchpumpe schaltet sich automatisch nach 30 Minuten
Betrieb ab.
4

19
Deutsche
Stufe 1
Stufe 2
Stufe 3
1
Stillen Sitzende Position
Für maximalen Komfort und Ezienz lehnen
Sie sich leicht nach vorne und nutzen Sie
einen bequemen Stuhl. Verwenden Sie ein
Kissen zur Unterstützung des Rückens.
Stellen Sie sicher, dass der Brustbecher
und die Pumpe aufrecht stehen, um
eine ordnungsgemäße Saugwirkung zu
gewährleisten.
So passen Sie die BH-Träger an
Um ein angenehmes Tragegefühl zu gewährleisten, passen
Sie Ihre BH-Träger an, indem Sie ein Ende der Verstellschnalle
am BH-Körbchen und das andere Ende der Stillschnalle am
Innenfutter des Still-BHs befestigen. Passen Sie die Länge
der BH-Träger an Ihren Komfort an.
Abschluss des Pumpvorgangs
Um die Milchpumpe
auszuschalten, drücken Sie lange
auf den Netzschalter. Brechen Sie
anschließend mit dem Finger die
Versiegelung zwischen Brust und
Pumpentrichter auf und nehmen
Sie die Pumpe vorsichtig von Ihrer
Brust ab.
Wenn Sie mit dem Abpumpen fertig sind, nehmen Sie die
Milchpumpe von Ihrer Brust ab und halten Sie sie dabei aufrecht.
Entfernen Sie anschließend das Motorteil und halten Sie den
Milchauangbehälter fest, um die Muttermilch in die Flasche
zu gießen. Achten Sie darauf, dass der Milchsammelspalt des
Brustbechers mit der Önung der Flasche übereinstimmt, um
zu verhindern, dass etwas verschüttet wird.
Trennen Sie den Milchkollektor vom Pumpenmotor und
bereiten Sie ihn zur Fütterung/Lagerung vor. Reinigen Sie
die anderen gebrauchten Teile gemäß den Anweisungen.
Gießen Sie die Milch in die Vorratsasche. Stellen Sie sicher,
dass die Schlitzfunktion mit der Flasche ausgerichtet ist.
2
3

20
Deutsche
Richtige Lagerung von Muttermilch
Verwenden Sie zum Auangen der Muttermilch immer sterilisierte Milchpumpen.
Verwenden Sie sterilisierte, saubere Milchaufbewahrungsbeutel oder -aschen mit Dichtungskissen.
Stellen Sie die Milch direkt nach dem Abpumpen in den Kühl- oder Gefrierschrank.
1
Muttermilch Kühllager
Frieren Sie Muttermilch nicht wiederholt ein.
Mischen Sie keine frische Muttermilch mit gefrorener Muttermilch.
Entsorgen Sie die restliche Muttermilch nach dem Stillen.
Sie können die extrahierte Milch bis zu 48 Stunden im Kühlschrank aufbewahren oder bis zu drei Monate einfrieren.
Beschriften Sie die Milchasche oder den Aufbewahrungsbeutel unbedingt mit Datum und Uhrzeit der Entnahme.
2
3
1
2
3
4
So tauen Sie Muttermilch sicher auf
Um die Muttermilch aufzutauen, stellen Sie sie über Nacht in den Kühlbereich. Für den Notfall können Sie die Muttermilch
schnell auftauen, indem Sie den Aufbewahrungsbeutel oder die Flasche in eine Schüssel mit heißem Wasser stellen.
Nach dem Auftauen muss die Muttermilch innerhalb von 24 Stunden verzehrt werden. Frieren Sie bereits aufgetaute
Muttermilch nicht wieder ein.
1
2
Muttermilch sicher erhitzen
1Um die Muttermilch zu erhitzen, können Sie entweder die Babyflasche in eine Schüssel mit heißem Wasser stellen oder zum sicheren und
schnellen Erhitzen einen Babyflaschen- und Lebensmittelwärmer verwenden.
Überprüfen Sie immer die Temperatur der Muttermilch, bevor Sie sie Ihrem Baby geben, um Verbrennungen oder Beschwerden zu
vermeiden.
Erhitzen Sie Muttermilch nicht in der Mikrowelle, da diese wichtige Nährstoffe und Antikörper zerstören kann. Darüber hinaus kann eine
ungleichmäßige Erwärmung zu einer teilweisen Überhitzung der Flüssigkeit führen, was zu Verbrennungen im Mund des Babys führen kann.
Tauchen Sie die Milchaufbewahrungsflasche nicht in kochendes Wasser, um sie zu erhitzen, da dies dazu führen kann, dass die Flasche platzt
oder Risse bekommt.
2
3
4
Other manuals for S32
1
Table of contents
Languages:
Other nuliie Breast Pump manuals