Octet Matrix Audio Home Theater Speaker User manual

Home Theater Speaker Placement
Octet Matrix Audio -2010 Page 1
Overview
A properly set up home theater system can provide a surround sound experience better than most
commercial theaters and is a great way to enjoy movies, television programming, sporting events, and
video games with family and friends. The primary concept one must grasp about home theater speaker
setup is that each room, set of speakers, and primary listening position will have its own optimum setup.
The optimum setup can only be determined by experimentation once the initial setup is complete. This
process can be confusing and time consuming, but by following the guidelines outlined in this
document, you will create a great sounding home theater system with a minimum of difficulty.
The diagrams below show the recommended layouts for 5.1 and 7.1 systems. Tables are included in
each of the following sections providing conversions of the angles into easily measurable dimensions
which are referenced from the center of the screen or the primary listening position.
LF - Left Front
C - Center Channel
RF - Right Front
LS - Left Surround
RS - Right Surround
SW - Subwoofer
LR - Left Rear (7.1 only)
RR - Right Rear (7.1 only)

Home Theater Speaker Placement
Octet Matrix Audio -2010 Page 2
Listening Position to
Screen (DF1)
Target Min. Speaker to
Center Distance (DF2)
Target Max. Speaker to
Center Distance (DF2)
6 ft. 2 ft. 5 in. 3 ft. 6 in.
7 ft. 2 ft. 10 in. 4 ft. 0 in.
8 ft. 3 ft. 3 in. 4 ft. 7 in.
9 ft. 3 ft. 8 in. 5 ft. 2 in.
10 ft. 4 ft. 0 in. 5 ft. 9 in.
11 ft. 4 ft. 5 in. 6 ft. 4 in.
12 ft. 4 ft. 10 in. 6 ft. 11 in.
13 ft. 5 ft. 3 in. 7 ft. 6 in.
14 ft. 5 ft. 8 in. 8 ft. 1 in.
15 ft. 6 ft. 1 in. 8 ft. 8 in.
16 ft. 6 ft. 6 in. 9 ft. 3 in.
17 ft. 6 ft. 10 in. 9 ft. 10 in.
18 ft. 7 ft. 3 in. 10 ft. 5 in.
19 ft. 7 ft. 8 in. 11 ft. 0 in.
20 ft. 8 ft. 1 in. 11 ft. 7 in.
Left and Right Front Speakers
The front main speakers, along with the center channel speaker, are used to provide effects across the
front soundstage. Examples include a car moving from one side of the screen to the other, dialog
originating from one of the sides of the screen, or the origin of an overhead effect. The front speaker
output is also coordinated with the surround speaker output to provide a sense of being in a specific
environment such as a large reverberant concert hall, underwater, in a forest, in a large city, or in a
small reverberant chamber like a submarine.
The left and right front speakers should be positioned equivalent distances from the center of the
screen and “toed in” towards the primary listening position. The angle between the plane formed by
the center of the screen and the primary listening position and each speaker should ideally be 22°-30°.
However, in many rooms this is not possible because of windows, doorways, and other obstacles. In
cases such as these, position the main speakers as far apart as possible while maintaining equal
distances from the center of the screen. The chart below identifies the ideal front speaker to screen
center distance ranges. Determine the distance from the primary listening position to the screen and
read across to find the minimum and maximum target distance as measured from the center of the
screen to the center of each speaker.
The design axis of the speakers should be at ear level; typically 38”-40” off of the floor. Most
manufacturers do not specify the design axis, but with systems incorporating vertically aligned drivers,
will be one of two points: the center of the tweeter, or the point halfway between the center of the
tweeter and the center of the midrange or midbass driver. In well designed speakers, any point between
these positions will provide good results. In an MTM system, the design axis is always the tweeter axis.

Home Theater Speaker Placement
Octet Matrix Audio -2010 Page 3
Center Channel
The center channel is used to anchor the dialog to the screen from all off center listening positions, and
to work with the left and right front speakers to reproduce audio effects across the front soundstage.
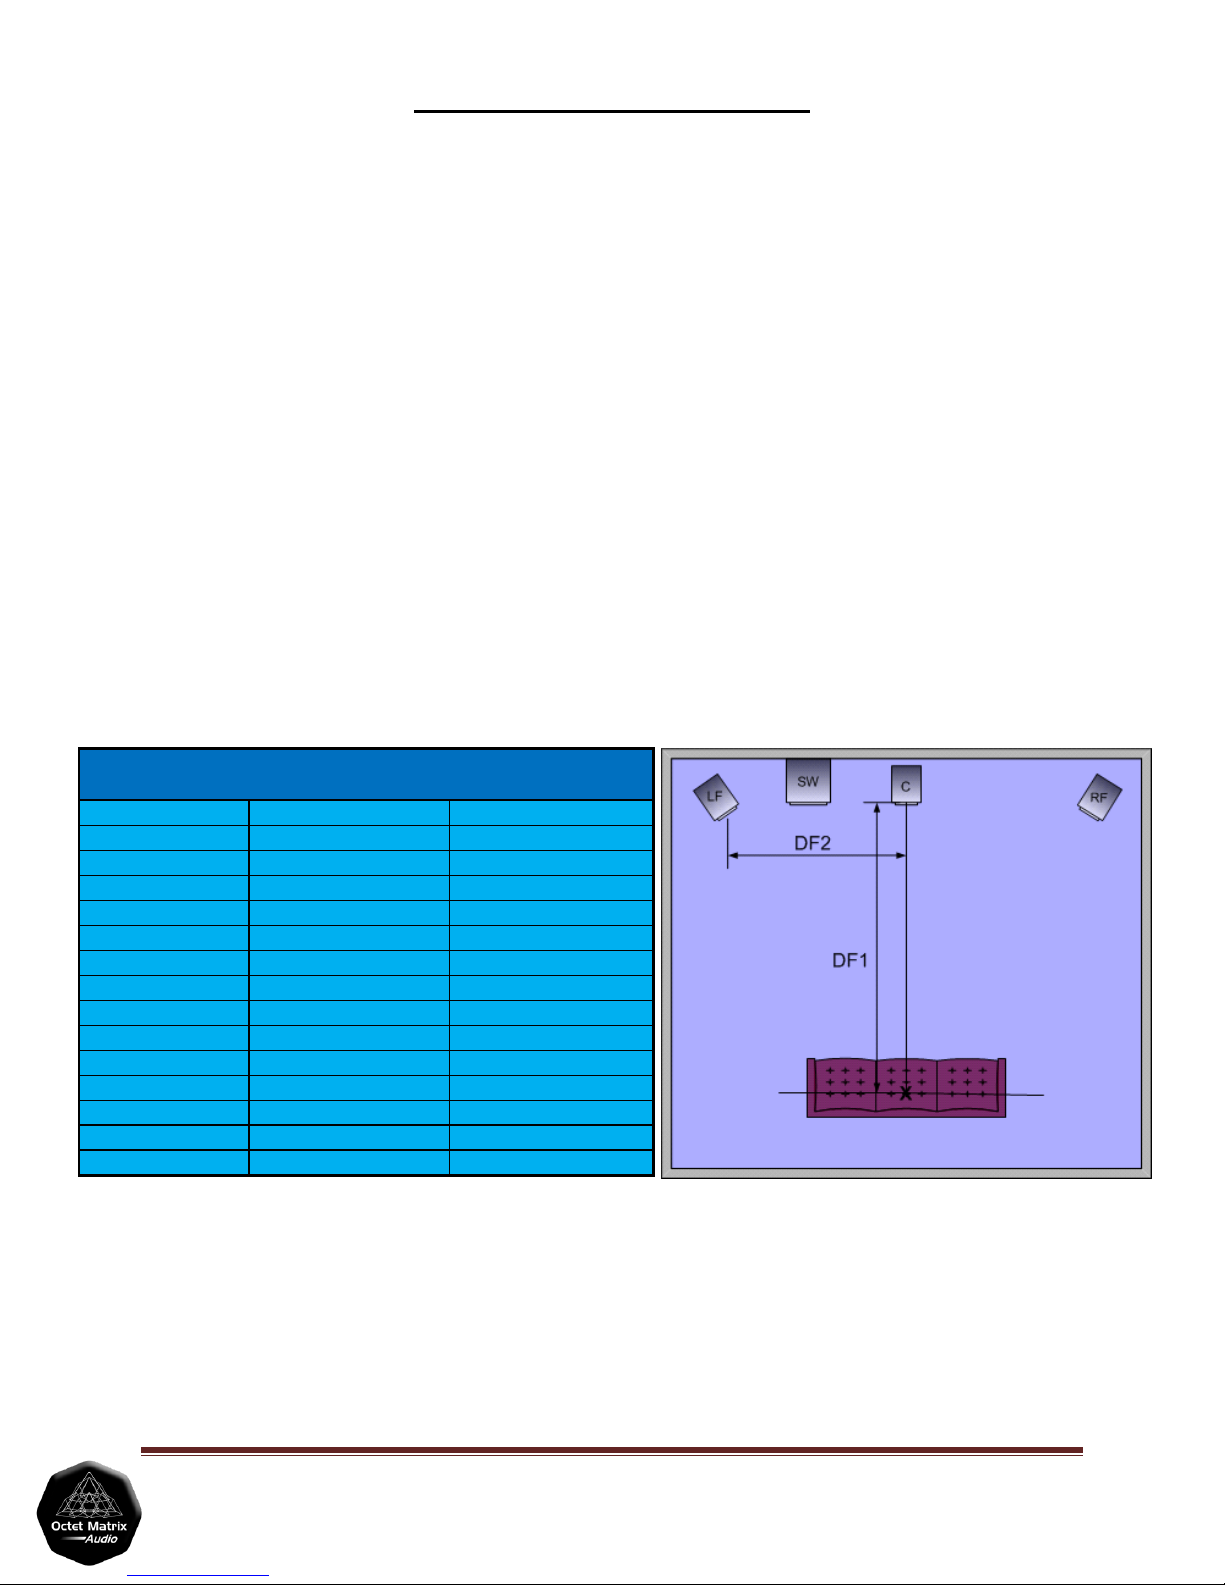
The center channel speaker must be positioned in the center of the screen and as close to the top or
bottom of the screen as possible. Choose the location above or below the screen so that the center
channel design axis is as close to the front speaker design axis as possible (horizontally). Ideally, the
center channel design axis should be positioned at ear level, but this is rarely practical due to typical
screen placement heights. To compensate, tilt the center channel speaker slightly up or down so that
the design axis is pointed to ear level at the primary listening position.
Surround Speakers
The surround speakers provide the movement of images from the front to the rear, from the rear to the
front, and across the rear. Examples include bullets whizzing by and helicopters flying overhead.
Surround speakers are also frequently used to create environmental effects that make you feel like a
part of the activity, or to create a sense of space. Sports telecasts often direct sounds from the crowd to
the surround speakers to make you feel like you’re in the stadium. A very realistic perception of being
somewhere else can be obtained through the use of properly located surround speakers. Sounds like
birds chirping, leaves rustling, traffic, and rain hitting pavement are all effects that moviemakers use to
make us feel like we’re taking part in the story, not sitting in our living rooms.
While one of the primary goals of surround speakers is to realistically reproduce movement, the
implementation is different than with the front speakers. The primary reason for the difference is that in
order to create environmental effects, it is much more realistic if our hearing mechanism can’t locate
the sound source and the sound appears to be coming from multiple directions. In order to accomplish
this, surround speakers are mounted higher than ear level, and we don’t mind if nearfield reflections
occur because they actually contribute to creating a more diffuse sound field. Some home theater
installations actually fire the surround speakers towards the ceiling and rely on the reflected sound to
create the surround field rather than the using the direct sound from the speakers. Other methods used
to create a more diffuse rear sound field include the use of dipole or bipole speakers. Follow instructions
provided with the speakers for placement recommendations.
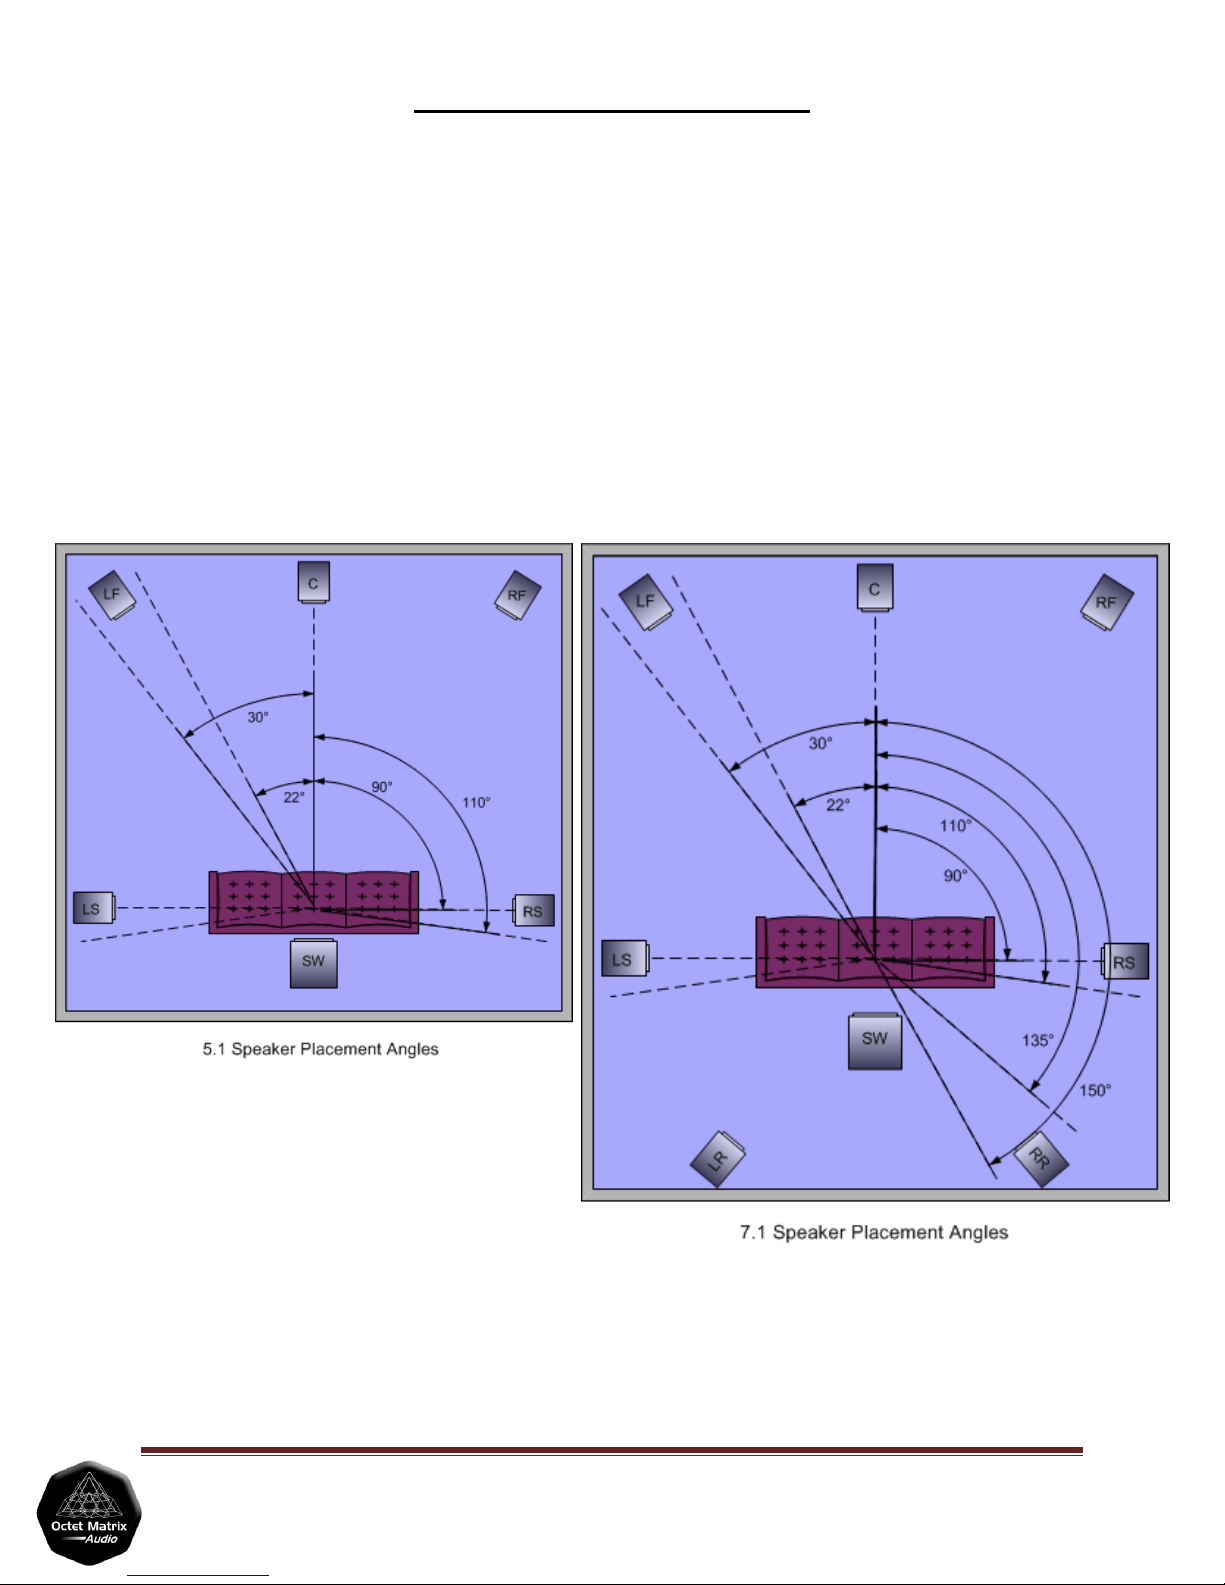
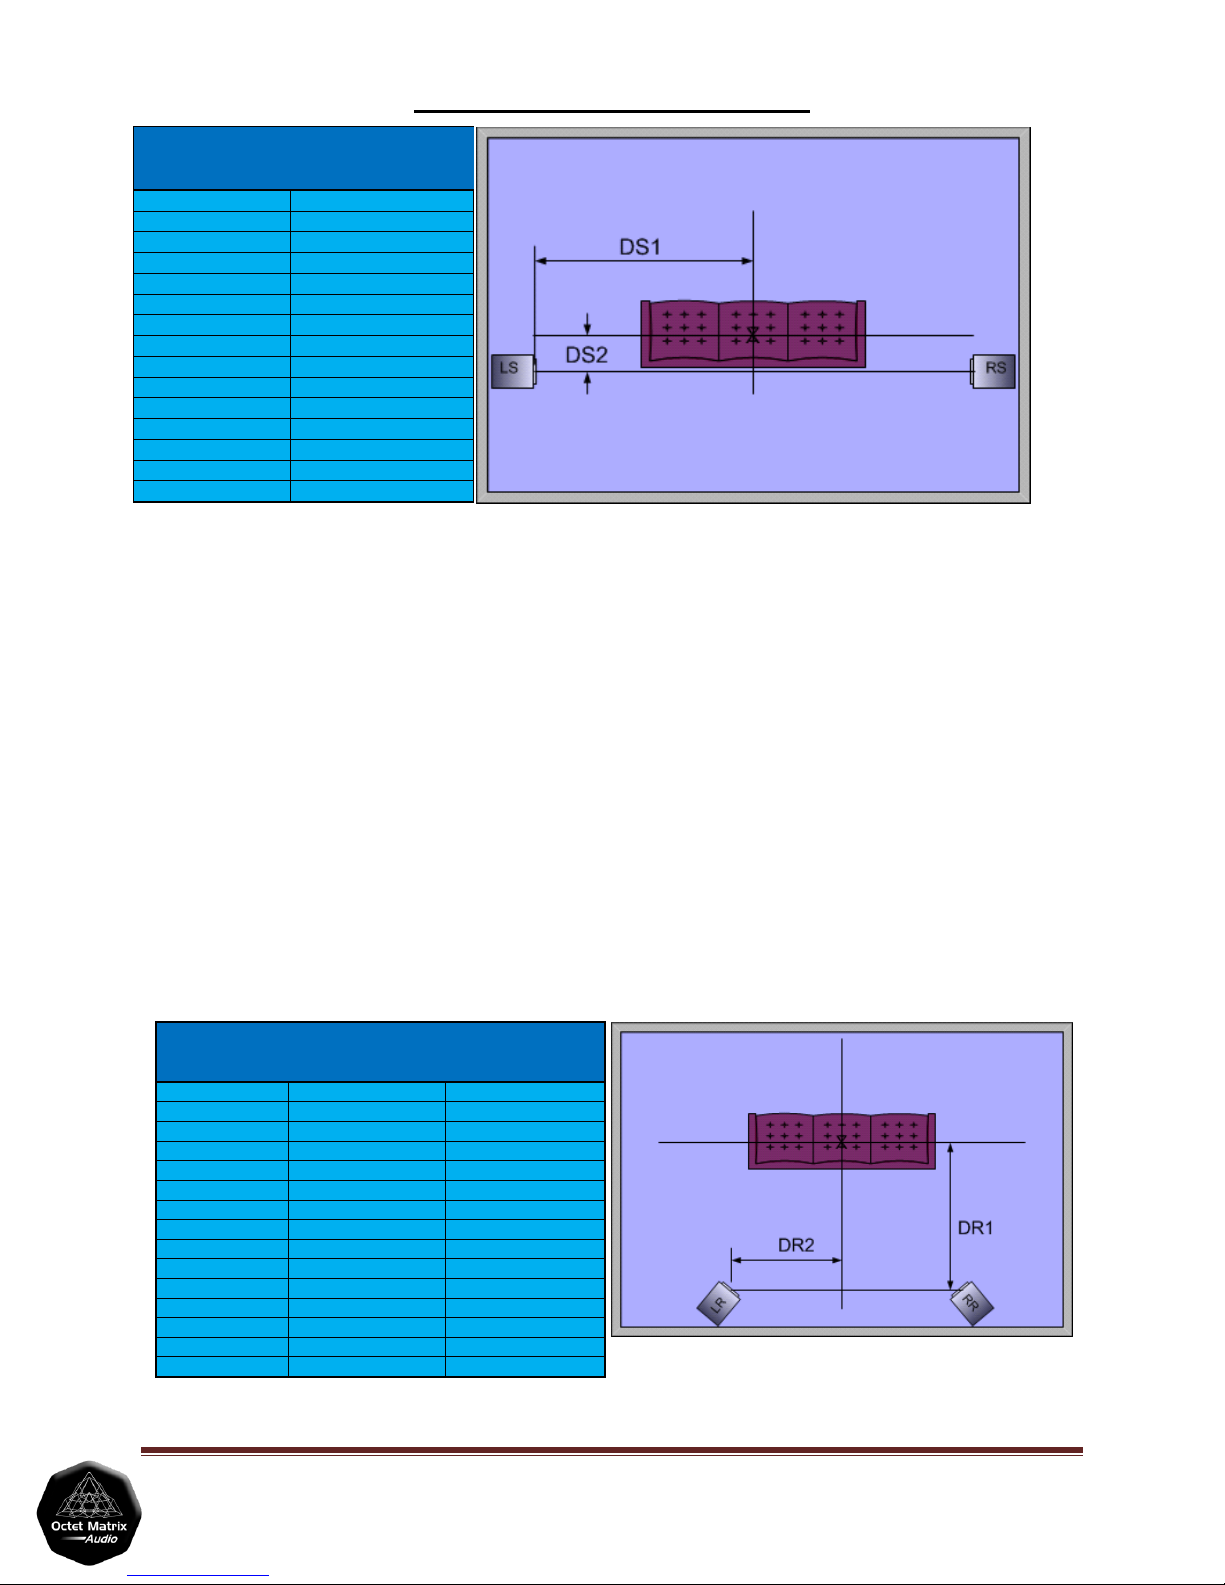
The primary listening position should be centered between the left and right surround speakers, which
should be mounted at least 2 feet above ear level, and preferably 3 feet or slightly more. The surround
speakers should be positioned somewhere between 90° and 110° relative to the plane formed between
the center of the screen and the primary listening position. The table on the following page lists the
distance between the listener’s ears and the plane formed between the centers of the surround
speakers (DS2).

Home Theater Speaker Placement
Octet Matrix Audio -2010 Page 4
Listening Position to
Surround Speaker
(DS1)
Max. Listening Position to
Surround Speaker Distance
(DS2)
6 ft. 2 ft. 2 in.
7 ft. 2 ft. 7 in.
8 ft. 2 ft. 11 in.
9 ft. 3 ft. 3 in.
10 ft. 3 ft. 8 in.
11 ft. 4 ft. 0 in.
12 ft. 4 ft. 4 in.
13 ft. 4 ft. 9 in.
14 ft. 5 ft. 1 in.
15 ft. 5 ft. 6 in.
16 ft. 5 ft. 10 in.
17 ft. 6 ft. 2 in.
18 ft. 6 ft. 7 in.
19 ft. 6 ft. 11 in.
20 ft. 7 ft. 3 in.
The table provides the maximum (110°) dimensions only, since all of the 90° dimensions will have zero
distance offset from the listener’s ears.
Rear Speakers (7.1 channel systems)
The rear channel speakers work with the surround speakers to provide a more uniform and diffuse
surround sound experience. In source material that effectively utilizes the rear channels, movement
effects have a more defined path, particularly with overhead effects. Because the rear speakers spread
the surround soundstage out around the listeners, the addition of rear speakers will create a more
realistic environmental presentation. It should be noted that rear speakers are more effective in larger
spaces where they can be placed 6 or more feet behind the primary listening position.
Rear speakers should be mounted at the same height as the surround speakers, be toed in towards the
primary listening position, and mounted between 135° and 150° relative to the plane formed between
the center of the screen and the primary listening position. The table below lists the distance between
the primary listening position and the center of each rear speaker (DR2).
Listening Position to
Rear Speaker
(DR1)
Min. Listening Position
to Rear Speaker Distance
(DR2)
Max. Listening Position
to Rear Speaker Distance
(DR2)
2 ft. 1 ft. 2 in. 2 ft. 0 in.
3 ft. 1 ft. 9 in. 3 ft. 0 in.
4 ft. 2 ft. 4 in. 4 ft. 0 in.
5 ft. 2 ft. 11 in. 5 ft. 0 in.
6 ft. 3 ft. 6 in. 6 ft. 0 in.
7 ft. 4 ft. 0 in. 7 ft. 0 in.
8 ft. 4 ft. 7 in. 8 ft. 0 in.
9 ft. 5 ft. 2 in. 9 ft. 0 in.
10 ft. 5 ft. 9 in. 10 ft. 0 in.
11 ft. 6 ft. 4 in. 11 ft. 0 in.
12 ft. 6 ft. 11 in. 12 ft. 0 in.
13 ft. 7 ft. 6 in. 13 ft. 0 in.
14 ft. 8 ft. 1 in. 14 ft. 0 in.
15 ft. 8 ft. 8 in. 15 ft. 0 in.
16 ft. 9 ft. 3 in. 16 ft. 0 in.

Home Theater Speaker Placement
Octet Matrix Audio -2010 Page 5
Subwoofer
Unlike the other speakers in a home theater system, subwoofers can be placed in many different
locations. That’s not to say that subwoofer placement is unimportant, but due to limitations in the way
in which humans determine the direction of low frequency sound sources, we do not require a
centered, clear line of sight placement. Acoustic waves lower than about 140 Hz have wavelengths large
enough to “wrap around” most obstacles in a typical home theater setting and will not be reflected the
way higher frequency acoustic waves are. These large wavelengths also make it difficult for humans to
detect phase and level differences between each ear. Phase and level differences are the primary
indicators the human brain uses to determine the direction of sounds.
Low frequencies are “enhanced” when subwoofers are placed near boundaries such as walls or corners.
While this sounds like a good thing, the frequencies that are reinforced are usually at the higher end of
the subwoofer range which will create boominess rather than low frequency extension. Boominess is
excess bass that is not present in the original recording and is often mistaken for low frequency
extension. If not corrected, this will result in dialog articulation problems and allow a subwoofer’s
location to be identified.
While some subwoofers are designed for a specific boundary placement (instructions or specifications
will tell you if they are), most subwoofers perform best on the floor several feet from the nearest
boundary. The intersection of the floor and wall can be a good location, but it may take longer to find a
location with suitable performance. A corner location can work, but the crossover frequency may have
to be adjusted lower to help reduce the tendency of the corner loading to increase the higher frequency
content of the subwoofer.
A well placed and adjusted subwoofer should provide deep bass that appears to originate from the main
speakers, or surround and/or rear speakers if the low frequency effect originates from the rear.
A fairly simple test will let you know if your subwoofer settings or placement will give up its location:
1) Download the Octet Matrix Audio Subwoofer Setup DVD ISO image in the Tech Center. You will
need to burn this image to a DVD using software designed specifically to burn DVD ISO images.
2) Set up all of your speakers with the subwoofer in the location you have chosen. Run the receiver
system optimizer according to the instructions, or set the speaker levels, time delays, etc.
manually before continuing. Confirm that the receiver is in Dolby Digital surround sound mode
with all additional DSP processing turned off.
3) Put the DVD you burned in step 1 into your DVD or Blu-ray player. Select and listen to the Left
and Right Channel Pink Noise Phase Test tone to confirm that the speakers are in phase and the
image is centered between the main speakers and does not shift or warble.

Home Theater Speaker Placement
Octet Matrix Audio -2010 Page 6
4) The Subwoofer Location Test file contains pink noise that is routed to the front left and front
right speakers for the duration of the test. Another signal is fed to the LFE channel that
alternates between off and pink noise in 4 second intervals.
If the front pink noise image shifts at all with the subwoofer on, or if you distinctly “hear” the
subwoofer’s location, you will have to: a) reduce the subwoofer crossover frequency, b) move the
subwoofer, or c) reduce the subwoofer level. Before repeating the listening test, you should rerun your
system setup routine.
Final Thoughts
Problems usually arise when the home theater space forces a violation of the setup recommendations
outlined in this document. We recommend setting up the system and evaluating the setup for several
weeks using suitable source material. During this time, take notes about things that do not sound
natural. Try to confirm the behavior with different source material since the recording itself may be at
fault. Once you have documented and confirmed any system weaknesses, try moving around the room
to different listening positions to determine if the artifact gets better or worse. This may provide clues
as to the source of the problem. Start by making small adjustments to potential offenders. Tilting and
toeing speakers differently can often make a significant difference. See our Troubleshooting Guide for
additional suggestions.
You should re-evaluate the system setup after you have lived with it for a few months. As you gain
experience listening to your new home theater system, you will start to recognize characteristics that
were hidden within the overwhelming details of a new system installation.
Table of contents