Odys High Definition Digital Video Camera User manual

High Denition
Digital Video Camera
User’s Manual

1EN
Contents
Section 1 Getting to Know Your Camera.............................................. 2
Section 2 Getting Started....................................................................... 6
Section 3 Record Mode.......................................................................... 9
Section 4 Playback Mode..................................................................... 38
Section 5 Viewing Movie on PC .......................................................... 48
Section 6 Viewing Pictures and Movies on a TV ............................... 49
Section 7 Video File Converter ........................................................... 51
Section 8 Burning the Recorded Clip into DVD................................. 55
Section 9 Uploading Video Files to YouTube..................................... 57
Section 10 Installing Bundled Software ............................................. 61
Section 11 Specications .................................................................... 62
Section 12 Troubleshooting ................................................................ 64

2EN
Section 1
Getting to Know Your Camera
Overview
The camera with 5 Mega-pixel sensor can take H.264 movies. By the way of using H.264 technology,
more videos can be taken within certain amount of memory. High quality images with up to 8 mega pixels
can also be delivered smoothly. With a color LCD monitor, users can compose images and examine
them easily.
The camera also features movie recording at HD resolution of 1280x720. You can also connect camera
to an HDTV by HDMI cable, and easily playback recorded high-denition videos on the wide screen of
an HDTV.
Exposure and color balance can either be adjusted automatically or allowed to be changed manually.
A 5x optical zoom increases user control over the movies and pictures you take.Built-in memory allows
you to take pictures and movies without memory card. The memory card slot allows users to increase
the storage capacity.
Note
Partial memory of the built-in memory is used for Firmware code.
Check the Components
Unpack the package and make sure all standard accessories listed are included:
• Camera
• USB Cable
• AV Cable
• HDMI Cable
• Lithium-ion Rechargeable Battery
• Quick Start Guide
• CD-ROM(Software, User’s Manual)
• AC Adapter

EN
3EN
Safety Instructions
1. Do not drop, puncture or disassemble the camera; otherwise the warranty will be voided.
2. Avoid all contact with water, and dry hands before using.
3. Do not expose the camera to high temperature or leave it in direct sunlight. Doing so may damge
the camera.
4. Use the camera with care. Avoid pressing hard on the camera body.
5. For your own safety, avoid using the camera when there is a storm or lightning.
6. Do not use batteries of different specications. Doing so may lead to the potential for serious
damage.
7. Remove the battery during long periods between usage, as a deteriorated battery may
affect the functionality of the camera.
8. Remove the battery if it shows signs of leaking or distortion.
9. Use only the accessories supplied by the manufacturer.
10. Keep the camera out of the reach of infants.
11. Risk of explosion if battery is replaced by an incorrect type.
12. Dispose of used batteries according to the instructions.

4EN
Front View
Lens
Rear View
Movie Shutter Button
Direction Button
Record/Play Button
OK/Enter Button
Flash
Tele/Wide Button
Picture Shutter Button
Speaker
Microphone
Self-timer LED

EN
5EN
Side View
LCD Panel
Bottom View
TV Port
HDMI Port
Ports Slide Cover
Mini USB2.0/Battery Charging Port
Power Button
Tripod Socket Battery/ SD Card Cover

6EN
Section 2
Getting Started
Loading the Battery
Before using the camera, users must load Lithium-ion Rechargeable Battery.
Insert the battery according to the correct polarity1.
marks ( + or -).
Close the battery cover rmly.2.
Inserting and Removing an SD Card (Optional)
The camera comes with internal memory which allows you to store pictures and movies. You can expand
the memory capacity by using an optional SD memory card. To insert a memory card, refer to the gure
as below:
Insert the memory card into the right position.1.
To remove an installed card, press the card2.
inwards to release it.
When the card pops out, remove it from its slot.3.
Note
When a memory card is tted, movies and pictures are saved on card rather than on the built-in
memory.

EN
7EN
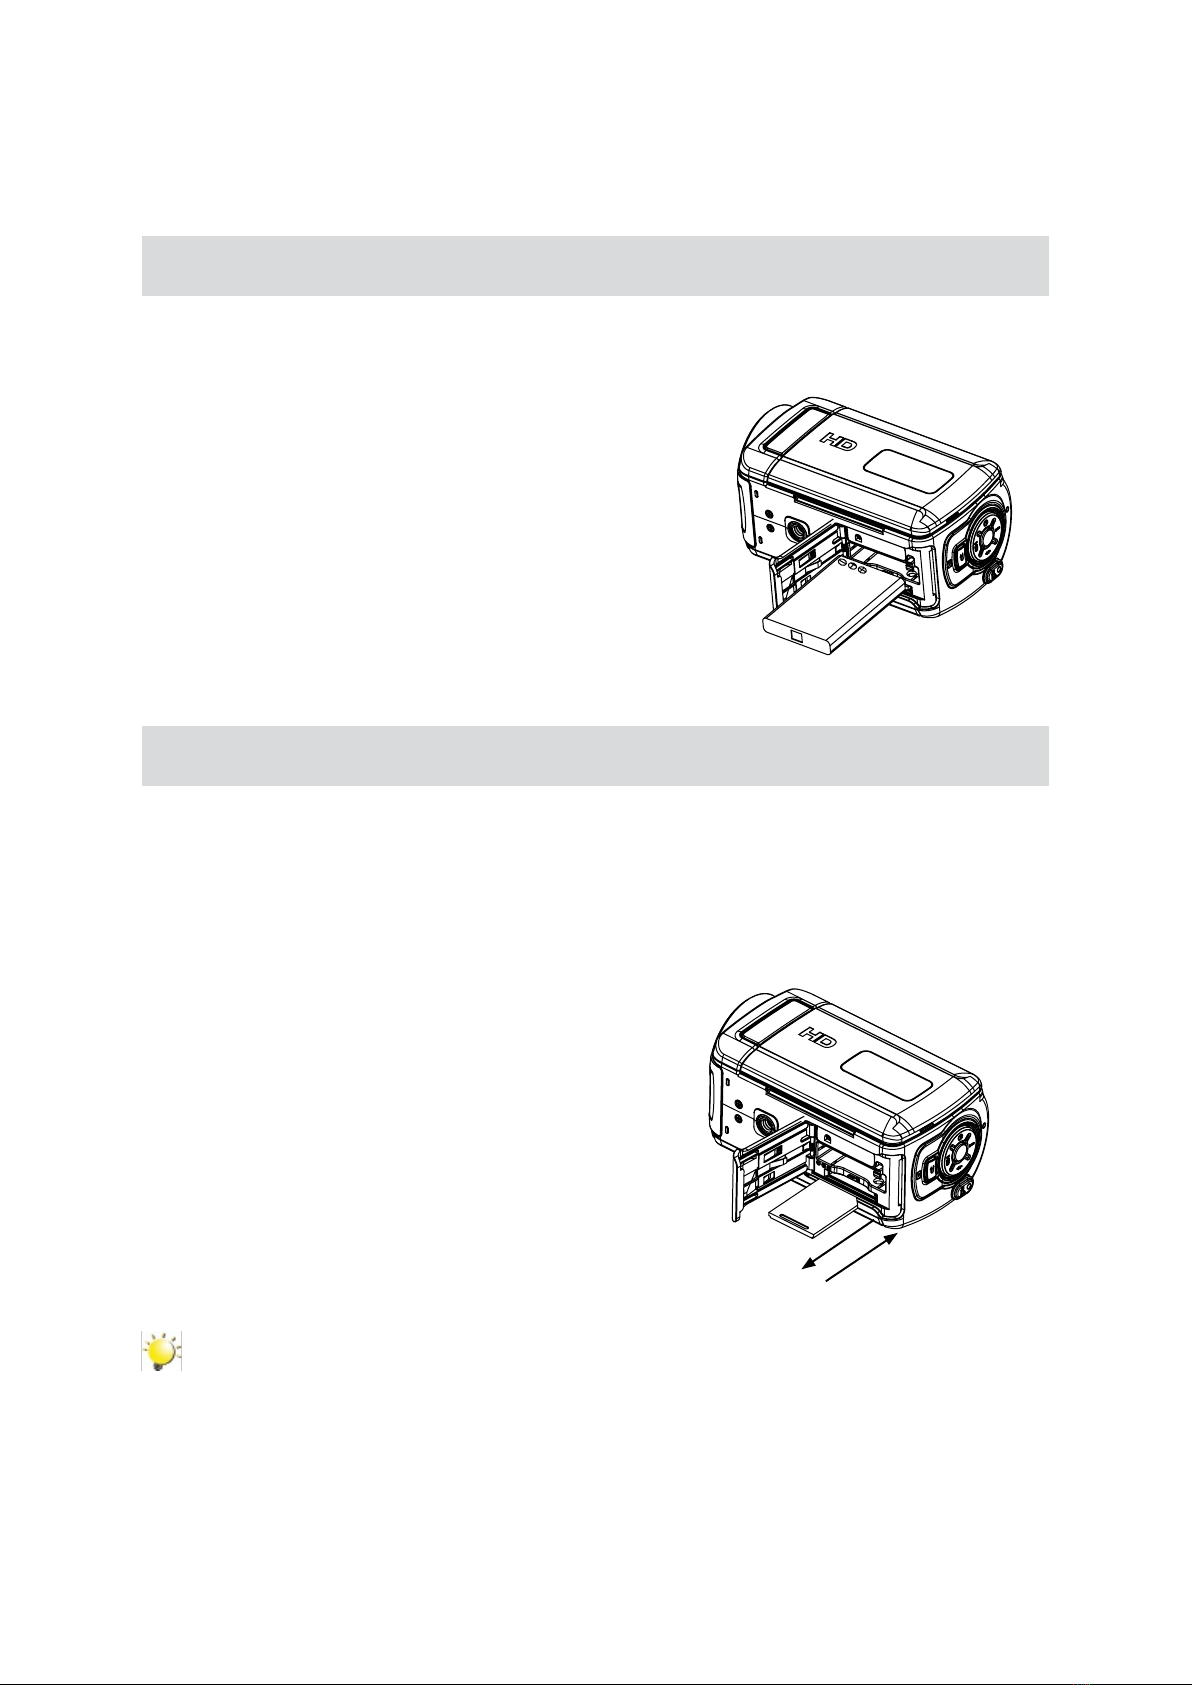
Protecting Data on an SD Card
SD card is read-only by locking the SD card. No pictures and
movies can be recorded when the SD card is locked. Make sure
the lock is on writeable position before recording.
Turning the Camera On and Getting Started
To turn on the camera: Flip out the LCD panel or press Power Button for one second. When the •
camera is turned on, the green LED will light up.
To take a movie, press the Movie Shutter Button ( • ).
To take a picture: P• ress the Picture Shutter Button ( ) halfway down till the focusing frame turns
from white to green. Then, press the Picture Shutter Button fully down to take picture.
Focusing Frame: White Focusing Frame:Green
To take movie at HD resolution, press Down Button to switch to HD mode, then press the Movie•
Shutter Button ( ).
To view stored movies, pictures, press Record/Play Button ( • ) once to switch to Playback Mode.
Press a second time to return to Record Mode.
Turning the Camera Off
To turn off the camera: Return the LCD panel back to its original position or press the Power Button for
one second.
Writeable
position
Write-Protected
Position

8EN
Selecting Interface Language
The Setting submenu contains options for conguring your camera set up.
To change advanced setting:
1. In Movie/Picture Record Mode, press OK Button to switch to record menu screen.
2. Use Right/Left Buttons to move to Setting option, then Setting Submenu will pop out on the screen.
3. Use Up/Down Buttons to select Langauge option and press OK button to switch to Language
Option.
4. Select language for your country and press OK button to validate the setting.
Submenu Display Screen
Language

EN
9EN
Section 3
Record Mode
Button Function
Right Button: Flash Auto/Red Eye Reduction/OFF
Left Button: Self timer ON/OFF
Up Button: Intelligent Lighting ON/OFF
Down Button: HD Mode
OK/Enter Button: Menu ON
Tele Button : Zoom In
Wide Button : Zoom out
Power Button: Press down for one second to turn on or turn
off the camera.
Record/Play Button functions:
Switch between Record and Playback Mode.1.
Exit the Menu.2.
Return to the previous page.3.
Movie Shutter Button:
Start to take movie.1.
To stop recording, press it again.2.
Picture Shutter Button: Start to take picture.

10 EN
LCD Monitor Information
The indicator shows below may display on LCD when movies and pictures are recorded:
(1)
Number of images that can still be taken at current resolution
Recording time of movie that can still be taken at current resolution
(2)
HD
HD
D1
D1
VGA
QVGA
High
Standard
Low
(3)
Auto Flash
Red Eye Reduction
Flash Off
(4) Night Mode
(5) Backlight Mode

EN
11 EN
(6) Multi-snap Mode
(7) Motion Detection
(8) Date/Time: YYYY/MM/DD HH: MM
(9) Self timer enabled
(10) Manual White Balance
(11) Macro Position Focusing
(12) Intelligent Lighting On
(13)
Battery: full power
Battery: medium power
Battery: low power
Battery: power empty
(14) SD Card inserted
(15) 20X zoom(5X optical zoom and 4X digital zoom)
(16) Motion Stabilization
H.264 Movie Recording
Press Movie Shutter button (• ) to start recording. When a movie is recording, a time indicator will
display on LCD monitor. To stop recording, press Movie Shutter Button ( ) again.
Press Record/Play Button to view the recorded movie.•
Four resolution settings are available:•
Video Quality
HD
HD(1280X720)
D1
D1(720X480)
VGA(640X480)
QVGA(320X240)

12 EN
Picture Recording
P• ress the Picture Shutter Button ( ) halfway down till the focusing frame turns from white to
green. Then, press the Picture Shutter Button fully down to take picture.
Press Record/Play Button to view the picture.•
Three resolution settings are available:•
Image Quality
High Quality:11 Mega Pixels
Standard Quality:5 Mega Pixels
Low Quality:2 Mega Pixels
Using Intelligent Lighting Function
The camera has one mode to allow you to extend the brightness of the objects that is dark or in the
shadow.
To use Intelligent Lighting Button:
1. When recording movies or taking pictures, press Intelligent Lighting ( ) Button to extend dynamic
range for backlight and high contrast sense so that the objects will be brighter and clearer.
2. Press Intelligent Lighting ( ) Button again to exit.
Using Zoom Function
The zoom function magnies images, when recording movies or taking pictures.
To zoom in/out, press the Tele/Wide Button.1.
It can be set from 1x to 20x(5x optical zoom and 4X digital zoom).2.

EN
13 EN
Options for Record Menu
Movie Mode Camera Mode Motion Detect Effect Setting
Resolution•
Macro Mode•
Exposure•
Sharpness•
White Balance•
Stabilization•
Night Mode•
Exit•
Resolution•
Macro Mode•
Exposure•
Two in One•
Photo Frame•
Flash•
Selftimer•
Sharpness•
White Balance•
Multi-snap•
Backlight•
Date Printing•
Night Mode•
Exit•
On•
Off•
Normal•
B/W•
Classic•
Negative•
Exit•
Sound•
Time Setting•
Format Memory•
/Format Card
TV System•
Language•
Information•
Default Setting•
Exit•
Operations for Record Mode
Operation Display Screen
Press OK Button when in Movie/Picture Record Mode.1.
Use Right/Left Buttons to move between main menu 2.
options, which are Movie Mode, Camera Mode, Motion
Detect, Effect, and Setting. Submenu will pop out while
move to each main option.
Press OK Button to validate sub option you select.3.
OK Button

14 EN
Default Setting and Validation
The following table indicates the camera’s default setting as well as its validation.
Always:1. The setting always keeps valid.
One Time:2. The setting is only valid either once or till camera power off.
Setting Validation Default Factory Setting
Resolution Always HD for Movie
Standard for Picture
Stabilization Always Off
Flash Always Off
Date Printing Always Off
Night Mode Always Off
Sound Always On
TV System Always Depends on shipping area
Language Always Depends on shipping area
Volume Always Level 8
Macro One Time Normal
Exposure One Time 0EV
Sharpness One Time Level 5
White Balance One Time Auto
Two in One One Time Off
Photo Frame One Time Off
Self timer One Time Off
Multi-snap One Time Off
Backlight Mode One Time Off
Motion Detect One Time Off
Effect One Time Normal
Format Memory / Format Card One Time Off
Information One Time On
Intelligent Lighting One Time Off

EN
15 EN
Movie Mode submenu Settings
Record main menu includes camera setting and other advanced settings. You can use Right/Left Buttons
to move between options and press OK Button to validate the settings.
Movie Resolution
To change Movie Resolution:
In Movie/Picture Record Mode, press OK Button to switch to record menu screen. 1.
Use Right/Left Buttons to select Movie Mode. Submenu of Movie Mode will pop out on the screen.2.
Use Up/Down Buttons to select Resolution then press OK Button to switch to Resolution submenu.3.
Use Up/Down Buttons to move between four settings.4.
Press OK Button to validate the settings and exit.5.
Display Screen Video Resolution Option
OK Button

16 EN
Macro Mode
With Macro Mode set to Macro, you could take closer images of objects in distance of 1cm to 30cm.
To enable Macro Mode:
1. In Movie/Picture Record Mode, press OK Button to switch to record menu screen.
2. Use Right/Left Buttons to select Movie Mode. Submenu of Movie Mode will pop out on the screen.
3. Use Up/Down Buttons to select Macro Mode then press OK Button to switch to Macro Mode
submenu.
4. Use Up/Down Buttons to move between two settings.
5. Press OK Button to validate the setting and exit.
6. To switch back to the default value, select ‘Normal’ in the Macro Mode submenu.
Display Screen Macro Mode Option
OK Button

EN
17 EN
Exposure
The camera adjusts image exposure automatically. In certain circumstances you may wish to adjust the
exposure compensation setting.
To change Exposure setting:
In Movie/Picture Record Mode, press OK Button to switch to record menu screen. 1.
Use Right/Left Buttons to select Movie Mode. Submenu of Movie Mode will pop out on the screen.2.
Use Up/Down Buttons to move to Exposure Option. Press OK Button and then Exposure Submenu 3.
will pop out on the screen.
Use Up/Down Buttons to choose preferred EV value. The change can be previewed immediately.4.
Press OK Button to validate the setting and exit.5.
Display Screen Exposure Option
OK Button

18 EN
Sharpness
You can soften and sharpen images to achieve different effects.
To change Sharpness setting:
In Movie/Picture Record Mode, press OK Button to switch to record menu screen. 1.
Use Right/Left Buttons to select Movie Mode. Submenu of Movie Mode will pop out on the screen.2.
Use Up/Down Buttons to select Sharpness then press OK Button to switch to Sharpness submenu.3.
Use Up/Down Buttons to move between nine levels. The change can be previewed immediately.4.
Press OK Button to validate the setting and exit.5.
Display Screen Sharpness Option
OK Button

EN
19 EN
White Balance
The camera adjusts the color balance of images automatically. Three manual white balance settings are
available:
Auto:• The camera automatically adjusts white balance.
Daylight:• Under outdoors
Fluorescent:• Under uorescent light condition.
Tungsten:• Under tungsten light condition.
To change White Balance Setting:
In Movie/Picture Record Mode, press OK Button to switch to record menu screen. 1.
Use Right/Left Buttons to select Movie Mode. Submenu of Movie Mode will pop out on the screen.2.
Use Up/ Down Buttons to select White Balance, then press OK Button to switch to White Balance 3.
submenu.
Use Up/Down Buttons to move between four settings. The change can be previewed immediately.4.
Press OK Button to validate the setting and exit.5.
Display Screen White Balance Option
OK Button
Table of contents
Other Odys Camcorder manuals