One Button Phone H16 User manual

Manual

Loud-
speaker
Control Button
SIM Card Slot
Pulse Sensor
Magnetic Charging Contacts
Model: One Button Phone H16
System: Android and iOS
Display: 1 inch OLED 128 x 96 px
Battery: Li-Ion 600 mAh
Charging: Magnetic Charging Cable with
USB plug
Seize: 56 x 31 x 14.8 mm
1. Device Description

SIM
Install the SIM card only when the device is
switched off. Use the included screwdriver for
installation.
Use only a nano SIM card
with the PIN deactivated
beforehand (e.g., via your
smartphone). Insert the SIM
card with the chip side
facing the device and the
cut corner to the right.
nano-SIM
The current time is displayed after successful
installation. If not, check the network connection. A
network connection is indicated by bar symbols in
the top left of the display.
2. SIM Card Installation

Switch On: Press and hold the button
SOS Call: Long press the button until
the dialed number on the display
appears.
Pulse and Blood Pressure
Measurement: Press button briefly
until the pulse and blood pressure
measurement icon appears.
Do not move. The measurement
starts automatically. Wait until the
measured values no longer change.
Telephone Book: Press the button briefly
several times until a telephone book entry
(entered via the app) appears. Then long
press the key to dial the selected telephone
book entry.
Switch Off: Press the button briefly several times
until the switch off symbol appears. Then long
press the button.
Charging: Plug the USB end of the charging
cable into a USB charger or into a computer.
Connect the magnetic contact to the
charging contact of the One Button Phone.
3. Operation

Signal strength, steps,
battery status,
time and date
Switch off by long
pressing the button
Pulse and blood
pressure measurement
starts automatically
Pulse,
systolic blood pressure,
diastolic blood pressure
4. Display

After the successful set up of your One Button
Phone, load the One Button Phone App onto your
smartphone and connect your device. You can
find the app in the Google Play Store and also in
the Apple Store under the name One Button Phone.
Start the app and register with your email address.
Assign a password. You can later change your
email address and password in the menu item
Account if necessary.
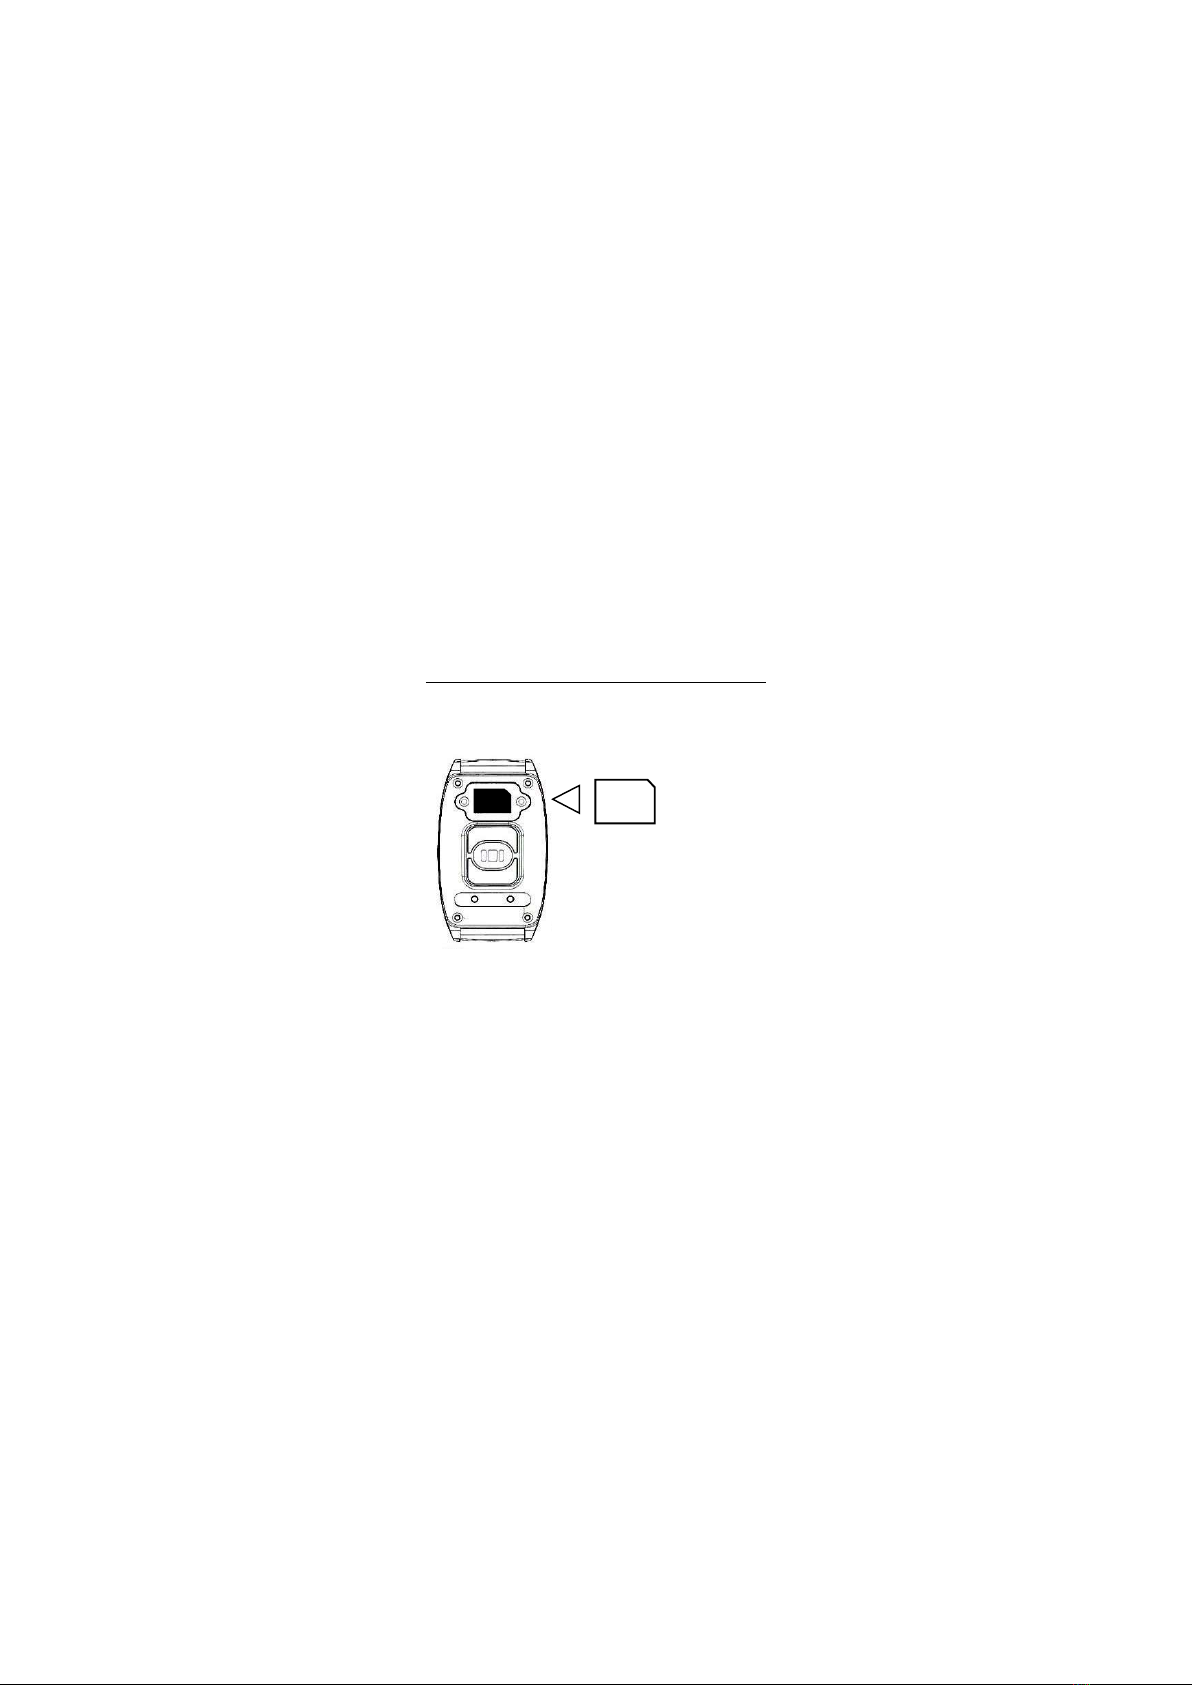
Check the IP connection of your SIM card. If necessary,
send an SMS command via your smartphone to the
number of the inserted SIM card to set the IP. This
should contain:
#APN#=MCC,MNC,apnname,apnurl,user,password#
SMS commands for the main operators in Germany:
Deutsche Telekom:
#apn#=262,01,internet.t-mobile,internet.t-mobile,t-mobile,tm#
Vodafone:
#apn#=262,02,web.vodafone.de,web.vodafone.de,null,null#
O2/Telefonica:
#apn#=262,03,internet.eplus.de,internet.eplus.de,eplus,eplus#
5. One Button Phone App

To connect your One Button Phone, open the top
right menu in the app and select Devices. Then
click on the top right add circle. Then assign a
name to your One Button Phone (e.g. "Mother"),
enter the IMEI number of your device (to be found
on the packaging below the barcode). Also enter
the phone number of the SIM card of your One
Button Phone (please use 00 instead of + for
international dialing codes).
Your One Button Phone will be displayed in the
device list. By pressing the round symbol on the left
of the device tile, you can upload an image or
photo as an avatar. You can change the time zone
under Preferences. Calibration values for blood
pressure can also be entered there.
If the connection is successful, the name of the
device and the message "Online" appear in the top
tile of the main screen.
6. Add Device

Enter your SOS numbers in the menu item SOS
Numbers on the left menu bar (can also be called
up by swiping). You can enter up to 3 numbers that
will be called in sequence if a number does not
answer. For international dialing codes, please
enter 00 instead of +.
To call your active One Button Phone from your
smartphone, simply press and hold the top tile of
the main screen of the app. You will be redirected
to your phone app on your smartphone.
In the menu item SOS History you can see the last
calls from the One Button Phone via the SOS button.
When calling via the SOS button, you will also
receive an SMS with location information.
You can also enter up to 10 contacts in the
Phonebook menu in the left menu bar. The One
Button Phone can then dial a selected number
from the phonebook. By activating the White-List of
the App, the One Button Phone only receives calls
from these contacts. For international dialing codes,
please enter 00 instead of +.
7. Add Numbers

To call up the location of the One Button Phone, press
and hold the map tile or the menu item Show Map in
the left menu of the smartphone app. To keep the
GPS position of the One Button Phone up-to-date,
activate GPS Positioning in the menu.
Attention: The One Button Phone consumes more
power when GPS is activated, and battery life
decreases. The last location of the One Button Phone
is shown on the map. Click to get more information.
With another click you can call the One Button Phone
directly.
The last measurement data of the pulse and blood
pressure measurement of your One Button Phone are
displayed in the tiles on the main screen of the
smartphone app. Under the menu item Pulse/BP-
History you can see the history of the last 10
measurements. You can remotely activate the pulse
and blood pressure measurement of the One Button
Phone in the menu and receive the data on the tiles
on the main screen of the app. Long press the tiles on
the main screen to get more information.
8. Location, Pulse, Blood Pressure

When wearing the One Button Phone, the steps of
the user are automatically counted and shown on
the display. The steps are also displayed in a tile on
the main screen of the smartphone app.
Enter alarms for the One Button Phone in the menu
item Alarms on the left. To do this, press the round
add symbol.
You can switch the notification function for the
status line of your smartphone on or off in the top
right menu under Preferences or Account. In the
smartphone app, you will receive messages about
outgoing calls using the SOS button of the One
Button Phone and also when the charge level of
the One Button Phone is too low.
9. Steps, Alarms, Notifications

Write down this information about your One Button
Phone:
IMEI:
Purchase date:
One Button Phone number:
In the case of quality problems that are not due to
improper handling and operation, we give a one-
year guarantee from the date of purchase. In case
of a return please follow the instructions on our
website onebuttonphone.com.
This product has been quality checked, and the
performance data correspond to the technical
standards.
For more help, visit onebuttonphone.com.
10. Warranty
venyard GmbH
Halskestrasse 17
81379 München
Germany
One Button Phone
… for a worry-free life.

Supported frequency ranges:
GSM850/900, Power Class 4
DCS(1800)/PCS(1900) Power Class 1
These instructions for use are published by venyard GmbH
without any guarantee. Corrections and changes to these
instructions to eliminate typing errors and inaccuracies in
content, if due to improvements in the programs and/or
devices, can be made by venyard GmbH at any time and
without notice. Changes of this kind will be taken into
account in future editions of this manual. All images are for
illustration purposes only and do not always show exact
representations of the device. All product and company
names used in this document are trademarks or registered
trademarks of their respective owners. All rights not expressly
granted in this document are reserved. For more information,
please visit www.onebuttonphone.com.
11. Legal Information
© venyard GmbH, Halskestraße 17, 81379 Munich, Germany.
All rights reserved. Made in China.
Table of contents