OneOdio FM1 User manual

FM1
User Manual

English
German
Japanese
French
Spanish
Italian
1
8
15
22
29
36
Language Guide

Packing list / Verpackungsliste / 梱包内容 /
Contenu du colis / Lista de embalaje / Elenco in confezione
FM1
User Manual

PC
Windows 7/8/10/11
USB 1.1/2.0/3.0
MAC
Mac OS (10.10 or above)
USB 1.1/2.0/3.0
Cellphone
Android 6.0 or above
iOS 9.0 or above
Harmony OS 1.0 or above
Type: Condenser
Polar Pattern: Cardioid
Sampling Rate: (44.1 to 48) kHz / 16 bits
Frequency Response: 20 Hz - 20 kHz
Sensitivity: -38 dB ± 2 dB
Maximum SPL: 110 dB
Signal-to-Noise Ratio: ≥80 dB
Total Harmonic Distortion: ≤0.5 ﹪(1 kHz)
Monitor OutputType: 3.5 mm
Monitor Output Impedance: 32 Ω
Monitor Output Power: 10 mW
Operating Voltage: (5 ± 0.25) V DC
Operating Current: 500 mA
Note: Compatible with WINS, MAC, LINUX, most Android systems, iPhone and iPad
(plug adapter required and not included in the package)
System Requirements
Specifications
•
•
•
•
•
•
•
•
•
•
•
•
•
1
EN

Sampling rate up to 48 kHz/16 bits
Cardioid condenser microphone
Microphone gain control
Operation indicator lamp & microphone mute button
3.5mm headphone monitoring jack
Monitoring on/off switch button
Type-C port
Pop filter
2m USB C-USB A audio cable
①
②
③
④
⑤
⑥
⑦
⑧
⑨
Features
2
7
8
9
5
6
4
2
3

1. Connect USBType C to microphone, and the USB A port (or through an
appropriate adapter) to a computer or mobile terminal. Plug and play. No
extra driver needs to be installed.
Installation Instructions
2. Please ensure that "OneOdio FM1" has been chosen as the default audio
equipment. When microphone is connected and operating normally, the
green indicator light will be on.
3.To optimize recording, please
make sure that the right side of
the microphone faces the
direction where sound is being
produced.
4. By turning the
knobs on both sides
of the microphone,
the microphone
angle can be
adjusted.
3
or
green

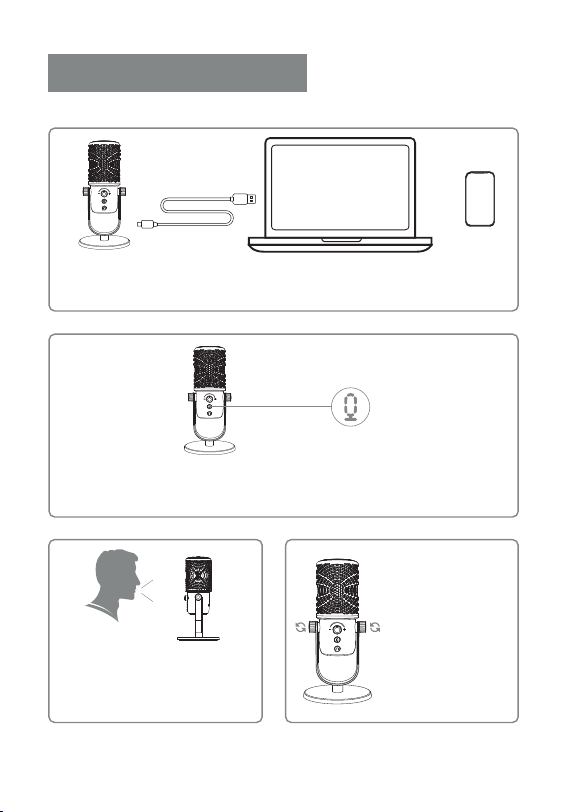
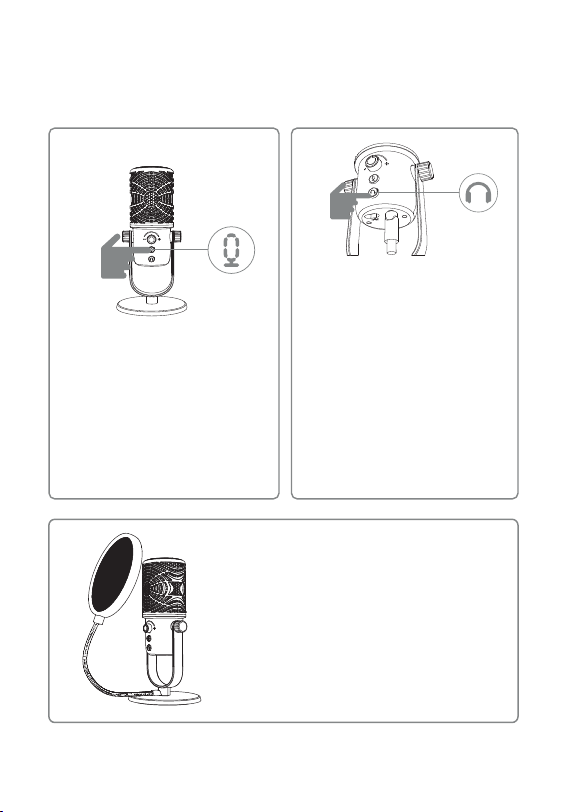
5. Mute. In normal operating
mode, the microphone will enter
mute mode if you gently press the
mute button, and the green
indicator light will turn red. By
pressing the button again, normal
operation will be resumed.
6. Microphone monitor. Insert the
headphone into the 3.5 mm audio
monitor port of the microphone.
To monitor your own voice, you
can gently press the monitor
switch, and the green indicator light
on the monitor will come on. You
can then monitor your voice
immediately. If you press the key
again, the microphone monitor will
be switched off. Regardless of
whether the monitor is switched
on or off, it will neither interfere
with your listening to other people
speaking nor with audio or video
played on the computer.
7. Installation of pop filter. The pop filter is
optional.To install a pop filter, unscrew the
U-shaped bracket and round base. During
installation, the position of the pop filter can be
adjusted so that it is fixed in the best position.
4
red
green

1. Currently, the microphone is compatible with the following mobile phone systems:
Andoid 6.0, Harmony OS 1.0 and iOS 9.0 or above.
2. Android:The microphone can be connected to most smart Android phones via
OTG. Microphone functions (e.g. earphone monitor, sound quality of radio and
recorder) are subject to limitations for certain models and applications. This does
not result from the microphone quality. In this case, please contact the supplier of
your mobile device to confirm if it supports OTG. For instance, for some OPPO
and VIVO cellphones, the microphone can only function if OTG is enabled.
3. iPhone:The microphone is compatible with iPhone 5 and higher-version models.
An original accessory [lightning to USB camera adapter] has to be purchased from
Apple's official website for connecting to our microphone.
Operating Procedure with a Mobile Phone
Correct connection of a mobile phone to the microphone:
①Connect theTYPE-C data cable connector to the microphone;
②Connect one end of the USB-A plug to the phone via an adapter. If the green light
on the microphone is on, this means the phone has been connected to the
microphone.
•
•
•
5
2
1

Setting on computer
Setting microphone level
Windows 8
starts here
Windows 10, 8, 7
6
1X
1
1X
1
1X
2
1X
2X
2
3
4
3
1X 1X
1X
1X
Microphone Properties
Microphone

Setting on Apple Mac
7
1X
1
1X
2
1X
3

PC
Windows 7/8/10/11
USB 1.1/2.0/3.0
MAC
Mac OS (10.10 oder höher)
USB 1.1/2.0/3.0
Handys
Android 6.0 oder höher
iOS 9.0 oder höher
Harmony OS 1.0 oder höher
Typ: kapazitiv
Richtcharakteristik: NierenförmigerTonabnehmer
Abtastrate: (44,1 bis 48) kHz / 16 Bit
Frequenzgang: 20 Hz - 20 kHz
Empfindlichkeit: -38 dB ± 2 dB
Maximaler Schalldruckpegel: 110 dB
Signal-Rausch-Verhältnis: ≥80 dB
Gesamte harmonische Verzerrung: ≤0,5 % (1 kHz)
Kopfhörer-Ausgang: 3,5 mm
Kopfhörer-Ausgangsimpedanz: 32 Ω
Kopfhörer-Ausgangsleistung: 10 mW
Betriebsspannung: (5 ± 0,25) V DC
Betriebsstrom: 500 mA
Hinweis: Kompatibel mit WINS, MAC, LINUX, den meisten Android-Geräten sowie
iPhones, iPads usw. (Umwandlungsstecker erforderlich, nicht im Paket enthalten)
Systemanforderungen
Spezifikationen
•
•
•
•
•
•
•
•
•
•
•
•
•
8
DE

48 kHz/16 Bit Abtastrate
Kondensatormikrofon mit Nierencharakteristik
Mikrofonverstärkungsregler
Betriebsanzeige und Mikrofon-Stummschalttaste
3,5-mm-Kopfhörer-Monitoranschluss
Schaltfunktion für Audioüberwachung
Typ-C Anschluss
Spritzschutzhaube
2 m USB-C - USB-A Audiokabel
①
②
③
④
⑤
⑥
⑦
⑧
⑨
Eigenschaften
9
7
8
9
5
6
4
2
3

1. USBTyp-C Anschluss für das Mikrofon, USB-A (oder über einen
geeigneten Konverter) für den Computer oder das Handy. Plug and Play,
keine zusätzlicheTreiberinstallation erforderlich.
Installationsanleitung
2. Stellen Sie sicher, dass "OneOdio FM1" als Standard-Aufnahmegerät
ausgewählt ist. Wenn das Mikrofon angeschlossen ist und ordnungsgemäß
funktioniert, leuchtet die Mikrofonanzeige grün.
3. Um optimale Aufnahmeergeb-
nisse zu erzielen, achten Sie
darauf, dass die Vorderseite des
Mikrofons auf den Sprechbereich
gerichtet ist.
4. Der Winkel des
Mikrofons kann
durch Drehen der
Knöpfe auf beiden
Seiten des Mikrofons
eingestellt werden.
10
or
green

5. Stummschalten. Drücken Sie im
Normalbetrieb leicht auf die
Mikrofon-Logo-Taste, um das
Mikrofon stumm zu schalten, und
die Anzeigeleuchte wechselt von
hellgrün zu rot. Drücken Sie
erneut, um den normalen Betrieb
wieder aufzunehmen.
6. Mikrofonüberwachung. Stecken
Sie den Kopfhörer in die
3,5-mm-Audiobuchse des Mikrofons.
Wenn Sie Ihre eigene Stimme
abhören, drücken Sie leicht auf die
Abhör-Taste. die Mikrofonüberwa-
chung schaltet sich ein und die
Abhöranzeige leuchtet hellgrün auf.
Sie hören dann Ihre eigene Stimme
ohne Verzögerung. Durch erneutes
Drücken der Abhör-Taste wird die
Mikrofonüberwachung ausgeschaltet.
Unabhängig davon, ob die
Überwachung ein- oder
ausgeschaltet ist, hat sie keinen
Einfluss auf das Hören der Sprache
des Gesprächspartners oder auf die
Audio- und Videowiedergabe auf
dem Computer.
7. Installation einer Spritzschutzhaube. Benutzer
kann wählen, ob er diese installieren will oder
nicht. Zur Installation schrauben Sie den U-Bügel
und den runden Sockel ab und installieren die
Sprühhaube, wobei Sie die Ausrichtung der
Haube rechtzeitig anpassen, um die bestmögli-
che Befestigungsposition zu erreichen.
11
red
green

1. Die folgenden Handysysteme sind derzeit kompatibel:
Android 6.0 oder höher, HarmonyOS 1.0 oder höher, iOS 9.0 oder höher.
2. Android: Unterstützt die meisten Android-Handys mit OTG-Funktion, einige
Handy-Modelle und Anwendungen können die Mikrofonfunktion einschränken
(z. B. Kopfhörerüberwachung, einschließlich der Klangqualität usw.). Dies ist nicht
auf die Qualität des Mikrofons zurückzuführen. Bitte erkundigen Sie sich bei Ihrem
Mobilfunkanbieter, ob Ihr Gerät die OTG-Funktionalität unterstützt.
Bei einigen Handys der Marken OPPO und VIVO muss zum Beispiel die
OTG-Funktion eingeschaltet sein, um das Mikrofon nutzen zu können.
3. iPhone: iPhone 5 und höhere Modelle werden unterstützt. Um unser
Mikrofonanzuschließen, müssen Sie das Originalzubehör [Lightning to USB Camera
Converter] von der offiziellen Website von Apple erwerben.
Bedienung über Handy
Die richtige Art, ein Mikrofon an ein Handy anzuschließen:
①Verwenden Sie dasTYPE-C-Ende des Datenkabelanschlusses, um das Mikrofon
anzuschließen;
②Schließen Sie das Handy über den Adapter am USB-A-Stecker an. Das grüne Licht
am Mikrofongehäuse leuchtet, um die erfolgreiche Verbindung anzuzeigen.
•
•
•
12
2
1

Einstellung auf Ihrem Computer
Einstellung der Mikrofonlautstärke
Windows 8
beginnt hier
Windows 10, 8, 7
13
1X
1
1X
2
1X
1
1X
2
3
1X 1X
1X
1X
4
2X
3
Eigenschaften von Mikrofon
Mikrofon

Einstellung auf einem Apple Mac
14
1X
1
1X
2
1X
3

PC
Windows7/8/10/11
USB1.1/2.0/3.0
MAC
MacOS(10.10以上)
USB1.1/2.0/3.0
携帯電話
Android6.0以上
iOS9.0以上
HarmonyOS1.0以上
タイプ:静電容量式
指向性形状:カーディオイドピックアップ
サンプリングレート(44.1to48)kHz/16bits
周波数応答:20Hz-20kHz
感度:-38dB±2dB
最大音圧レベル:110dB
信号対雑音比:≥80dB
全高調波歪み率:≤0.5%(1kHz)
イヤホンモニター出力端子:3.5mm
イヤホンモニター出力インピーダンス:32Ω
イヤホンモニター出力:10mW
動作電圧:(5±0.25)VDC
動作電流:500mA
注:WINS、MAC、LINUX、ほとんどのAndroidスマートフォン、およびiphone、
ipad等と互換性があります(パッケージには含まれていない、変換プラグが
必要です)
システム要件
技術パラメータ
•
•
•
•
•
•
•
•
•
•
•
•
•
15
JP

48kHz/16bitsサンプリングレート
カーディオイド型静電容量式マイク
マイクのゲインコントロール
動作表示灯&マイクミュートボタン
3.5mmイヤホンモニタリングポート
オーディオモニタリングの オン・オフ 機 能
Type-Cポート
ポップガ ード
2mUSBC-USBAオーディオケーブル
①
②
③
④
⑤
⑥
⑦
⑧
⑨
特徴
16
7
8
9
5
6
4
2
3

1、USBTypeCをマイクに接続し、USBのA側(または適切なコンバーターを使用)をコン
ピューターまたは携帯電話に接続してください。差し込むだけで使用可能となり、ドライ
バーをインストールする必要はありません。
設定ガイド
2.「OneOdioFM1」をデフォルトの録音デバイスとして選択していることを確認してくだ
さい。マイクが接続され、正常に作動しているあいだは、黄緑色のマイク表示灯が点灯
します。
3.最良の録音効果を得るため、マイク
が発声部と正面から向き合うようにし
てください。
4、マイクの両側のつま
みを回してマイクの角
度を調整してください。
17
or
green
Table of contents
Languages: