Open Air Cinema CINEBOX HOME SYSTEM User manual

CINEBOX™ HOME
SYSTEM USER GUIDE
www.openaircinema.us

YOUR NEW CINEBOX™ SYSTEM
Congratulations! You’ve purchased the world’s
nest outdoor movie system.
If you follow the steps for setting up your
outdoor movie system throughout this manual,
setup will be a cinch, and you’ll be watching an
outdoor movie under the stars in no time.
Please make sure to read the entire manual
carefully, as we’ve detailed important
information that will help you make your event a
success and will ensure that your equipment will
last for many years to come.
The rst time you set up your system, it may
take about a half an hour, but once you’ve used
your system once or twice, you’ll be able to set
it up in ten minutes or less.
We’ve given very specic instructions in this
manual for how to setup and use your system,
but if you have any questions, feel free to call us
at 866-802-8202 or send us an email at
Have fun using your new outdoor movie system,
we know that you’ll love it!
The Open Air Cinema Team

System Components
Inatable Screen Setup
Speaker Setup
CineBox™ Home A/V Console Setup
Video Image Alignment
System Takedown
Connecting Other Devices
Care and Maintenance
Troubleshooting
Upgrades + Accessories
Warnings + Warranty
TABLE OF CONTENTS
4
6
9
11
15
16
17
17
18
19
20

4
( 1 ) Open Air Home Inatable Movie Screen
with screen storage bag
( 8 ) Tie down tethers
(attached to screen)
( 4 ) Steel Stakes
(Twist-in stakes for
9’, 12, 16’ screens,
straight for 20’ Screen )
( 1 ) Air Blower
(model may vary
with screen size)
( 2 ) Powered
Speakers
( 2 ) Speaker Stands (16’, 20’
systems only)
( 1 ) Dual Speaker Stand Bag
(16’, 20’ systems only)
( 2 ) Speaker
cables
( 1 ) Mallet
(20’ system only)
(actual products and component models may vary, for illustration purposes only)
SYSTEM COMPONENTS

5
( 1 ) Audio Mixer
( 2 ) Playstation
wireless controllers
(with gaming system)
( 1 ) HDMI Cable (pre-plugged into HD and
gaming consoles, not included in standard def
consoles)
( 1 ) RCA Cable (pre-plugged into standard def
console, loose in gaming and HD console)
( 1 ) Video Projector
( 2 ) 3’ XLR Audio Cables
(pre-plugged into console)
( 2 ) 50’ XLR Audio Cables (9’, 12’, 16’ systems)
( 2 ) 100’ XLR Audio Cables (20’ system)
( 1 ) 3.5mm
(headphone)
cable
( 1 ) Blu-Ray Player, or DVD Player, or Playstation
(Depending on system denition)
( 1 ) Projector power cable
(pre-plugged into
console)
( 1 ) CineBox™ Home Console
with protective carrying case
( 1 ) Flashlight
(actual products and component models may vary, for illustration purposes only)

6
(12’ screen pictured, not all screens are same proportions. For illustration purposes only )
INFLATABLE SCREEN SETUP
STEP 1: UNROLL SCREEN AND UNCOIL TETHERS
Unroll screen on grass or tarp. Unfold the screen so it sits like a
clamshell with the white projection surface on the inside (so it
doesn’t touch the ground). Identify the top and bottom of the
screen. The bottom of the screen has the air intake for the air
blower. Be sure ground is smooth, level and free of glass, rocks or
other debris.
Uncoil white tethers from four corners of screen, top and bottom.
Screen should be at least 10’ away from structures and objects such
as fences, buildings, trees, overhead branches, power lines, electrical
wires, walls, etc. Choose a location where no direct light will hit the
screen.
ATTENTION: Do not drag screen across concrete, pavement or
other rough surfaces.
Properly unfolded screen
Uncoiled white tethers
Rear side of screen
Front side of screen with white
projection surface inside of
clamshell like form
Preview of what screen will
look like when properly inflated.
Notice how there are two tethers
attached to each corner of the
screen, front and back. Do not
inflate yet.

7
(12’ screen pictured, not all screens are same proportions. For illustration purposes only )
STEP 2: SECURE STAKES AND TETHERS
Place stakes in ground roughly 10 feet from the corners of screen at
135 degree angles.
For 9’, 12’, and 16’ screens, clip the tethers from the corners of the
screen to the stakes. For the 20’ screen, tie ends of tethers to stake,
preferrably using a clove hitch knot.
There are eight tethers total, four attached to the top of the screen,
four to the bottom. Make sure bottom tethers are taut when
connected to stakes, but leave about 3 feet of slack in the top
tethers. Tether length can be adjusted using the black sliders on each
tether.
ATTENTION: Be aware of any underground pipes or utilities before
driving stakes into the ground.
Place stakes in ground Attach tethers to stakes with clips
INFLATABLE SCREEN SETUP
Properly attached
stakes and tethers
Front tethers
Rear tethers

8
STEP 3: ATTACH AIR BLOWER TO SCREEN
Attach the air blower to the intake sleeve on the side of the inatable
frame using the cinch cord. Plug in the air blower using an extension
cord (not provided with Home systems).
Be sure the cinch cord is secured tightly around the coupling of the
air blower. Place the air blower in an area where it will not suck in dirt
or leaves. Do not use near water. Do not block vents on blower.
Intake vent (left), and air blower (right) Pull intake vent over blower pipe
INFLATABLE SCREEN SETUP
Tighten cinch cord around blower pipe Properly attached intake vent
(Air blower model will vary with each screen size, for illustration purposes only)

9
SPEAKER SETUP
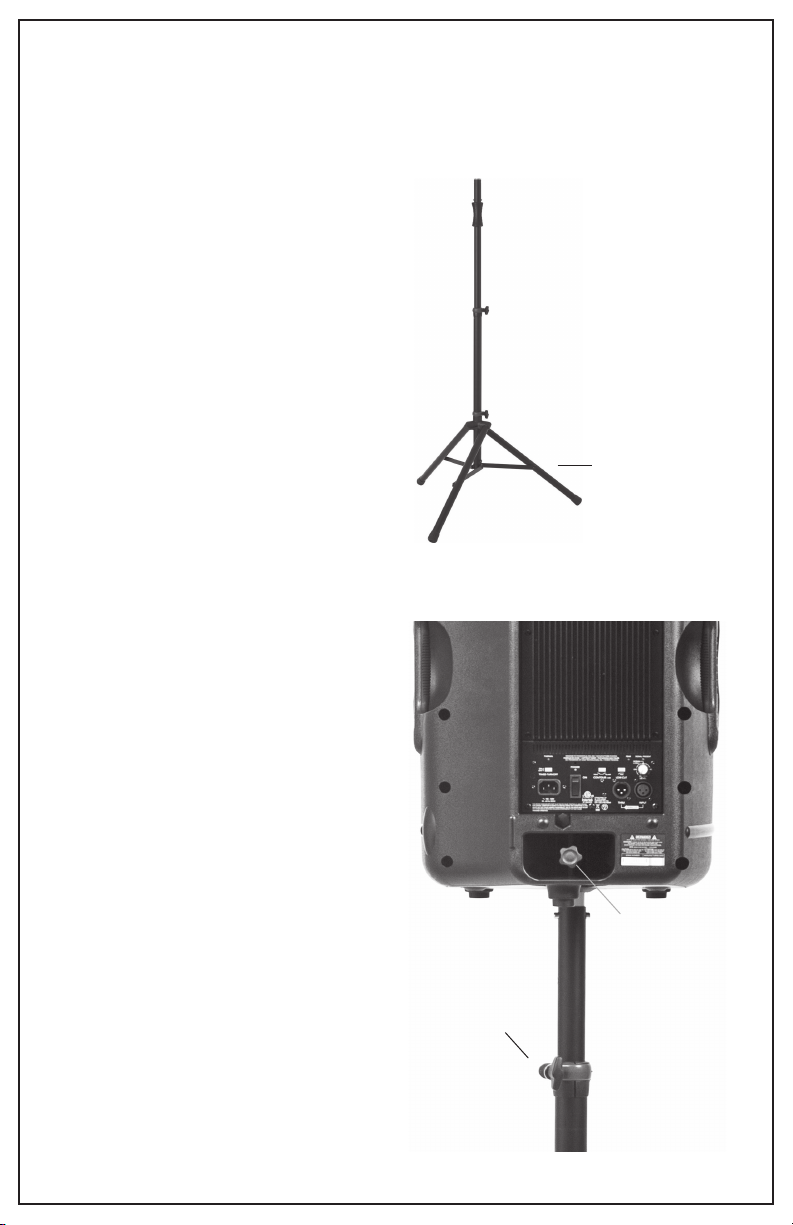
STEP 1: SETUP SPEAKER STANDS
is step is only for 16’ and 20’
systems. 9’ and 12’ systems do not
include speaker stands. So if you have
a 9’ or 12’ system, skip to next step.
Remove speaker stands from
protective bags and pace about
ve feet to each side of the Open
Air Home Screen.
Extend the speaker stand legs so
that the leg supports are parallel
to the ground.
Leg supports
are parallel to
ground
STEP 2: PLACE SPEAKERS
For 9’ and 12’ systems, place
speakers on ground about ve
feet to each side of the Open Air
Home Screen.
For 16’ and 20’ systems, place
speakers on speaker stands.
Secure speaker to stand with
locking knob located on the back
of the speaker, (some speakers
do not have a locking knob).
Raise speaker on speaker stand
to desired height. Secure with
pin then tighten locking knob on
stand so the speaker does not
rotate.
ATTENTION: Do not over tighten
the locking knob. The pin
supports the weight of the
speaker, not the locking knob on
the stand.
Secure speaker
with locking
knob so speaker
doesn’t
rotate
Adjust height
of speaker
stand to
desired
height
(actual speaker not pictured, for illustration purposes only)
(actual speaker stand not pictured, for illustration purposes only)

10
STEP 3: ATTACH POWER AND AUDIO XLR CABLES
Connect speaker power cord to each speaker. Plug in speaker
power cord to an extension cord or power source. Plug in 50’ (or
100’ for 20’ system) XLR audio cables in to the XLR input (middle
jack) on the back of each speaker. Run other end of XLR cables to
the CineBox Pro console, but do not connect yet.
ATTENTION: Make sure speakers are turned off and speaker volume
is all the way down (counterclockwise) before connecting speakers
to power or CineBox console. Do not power on speakers until XLR
cables have been connected to CineBox console. Failure to do so
could result in damage to speakers due to power surge.
Plug this end of 50’
or 100’ XLR cables
into XLR (middle)
input into the back
of each speaker
SPEAKER SETUP
Run this end of 50’ or 100’ XLR cable to the
CineBox Console from each speaker, but don’t
plug into the console yet
Speaker input will look
similar to this (actual XLR cables and inputs not pictured, for illustration purposes only,
CineBox™ console will vary with system definition )

11
CINEBOX™ CONSOLE SETUP
STEP 1: CINEBOX™ AND PROJECTOR PLACEMENT
Center the video projector and CineBox™ Console in front of the
Open Air Home Screen at approximately the distance listed on the
chart below for your specic system size. Place on small table.
The projector’s zoom function will allow for image size adjustment
after the projector has been placed.
DISTANCE TO PLACE CINBOX™ CONSOLE FROM
CENTER OF SCREEN BY SYSTEM SIZE:
9’ Home System
12’ Home System
16’ Home System
20’ Home System
14 feet
18 feet
24 feet
30 feet
Center console to
screen at the distance
specified above
CineBox™ Console
Stakes and
tethers
Speakers
Front of screen
Air blower
(illustration not to exact scale)
Video projector
Overhead View of
system and console
setup

12
STEP 2: OPEN CINEBOX™ CONSOLE
Unzip the front and back covers of the CineBox Console. Loosen the
bundle of cords in the back of the case and identify the main
console power cord, the left and right XLR audio cords, the HDMI
video cord (for HD and gaming systems), the RCA cable
(for standard def systems), and the projector power cord. All cables
are pre-plugged into console
ATTENTION: Be sure all volume knobs are turned all the way down
(counterclockwise) on the audio mixer.
CINEBOX™ CONSOLE SETUP
Main console power cord Left (white), and Right (red) XLR audio cables
HDMI cable
(HD and gaming systems only)
RCA (yellow) video cable
(pre-plugged for standard def systems only,
although included loose in HD and gaming
system consoles)
Projector power cord
Be sure all volume knobs are turned all the
way down (counterclockwise) on audio mixer
(actual cables and knobs not pictured, for illustration purposes only)

13
STEP 3: CONNECT CORDS
Connect the XLR cords running from each speaker to the left (white)
and right (red) audio XLR cables from the CineBox. Plug in the
projector power cord to the back of the projector. Plug in the HDMI
video cord to the back of the projector for HD and gaming systems.
For standard denition systems, plug in the yellow RCA video cable
to the back of the projector. Plug in the main CineBox power cord to
your power source.
CINEBOX™ CONSOLE SETUP
Long XLR audio cables running
from speakers
Short XLR audio cables from back
of CineBox™ Console
Connect the long XLR cable from the
RIGHT speaker to the RED XLR cable
Connect the long XLR cable from the
LEFT speaker to the WHITE XLR cable
For standard
definition
systems,
connect yellow
RCA cable to
“video” port
For HD
systems,
connect
HDMI
cable to
HDMI port
Connect
projector
power
cord to
main
power
port
Back of projector
(actual cables and projector not pictured, for illustration purposes only)

14
STEP 4: POWER ON MEDIA PLAYER
Power on the Blu-ray, DVD, or Playstation gaming system. The
audio mixer should power on automatically when the main power is
plugged in.
ATTENTION: The audio mixer power light will illuminate when
powered on. It is possible for an audio signal to pass through the
mixer when it is off, but the signal will be very weak. Make certain the
audio mixer is powered on for proper audio levels.
CINEBOX™ CONSOLE SETUP
STEP 5: POWER ON SPEAKERS AND AUDIO VOLUME
Return to speakers and turn them on. Next, slowly increase the
speaker level (volume) to 50% so the line on the volume knob is
pointing directly up.
Audio should not be heard at this point. The volume is now
adjustable through the audio mixer in the CineBox console.
STEP 6: PEFORM SOUND CHECK
Slowly increase the volume knob labeled “Level 1” until the volume
from the speakers reaches the desired level. Make sure the
Playstation player is playing content with audio.
You may also use a wired microphone or MP3 player (plugged into
one of the other available audio mixer channels) to test the audio
levels.

15
IMAGE ALIGNMENT
STEP 1: ALIGNING THE IMAGE
When it begins to become dark, turn on the projector (and CineBox
if needed). Use the projectors adjustable feet as well as the zoom,
focus, and keystone features on the projector to ll the projection
surface with the image.
You may need to reposition the CineBox Pro console if the zoom
function is not sufcient to ll the screen. Consult projector manual
on the focus, zoom, and keystone features.
Image needs keystone adjustment Properly adjusted image
STEP 2: WIDESCREEN 16:9 VS FULLSCREEN 4:3 IMAGE
The Open Air Screen has an aspect ratio of 16:9 (widescreen).
Some Blu-Ray and DVD content may be formated in a 4:3
(fullscreen) aspect ratio which will not ll the entire screen and may
leave unused space on the left and right side of the image. Settings
in the media player and the projector can stretch the 4:3 image if
desired to ll the entire screen.
4:3 image does not fill projection
surface, however, it is properly displayed
4:3 image that has been stretched to
fill the 16:9 projection surface (notice
that image gets distorted)

16 WATCH YOUR MOVIE
You’re all ready to watch your movie, so sit back, relax, and enjoy!
For troubleshooting steps, see next page.
SYSTEM TAKEDOWN
Power down projector by pushing power button on top of projector
or by using remote. Make sure projector cools down completely
before unplugging or turning off power source. Failure to do so
could result in projector or bulb damage.
Turn down all audio and other knobs on mixers and speakers.
Power down all electronic components and neatly coil all cables.
Zip up CineBox™ console. Take down speaker stands and return to
speaker stand cases (for 16’ and 20’ systems).
Turn off air blower and guide the screen down so that it folds in half
(top to bottom, as shown on step one of screen setup). Unzip the
air vent and disconnect the intake sleeve from air blower. Unclip or
untie tethers from stakes. Remove stakes from ground and clean off
any debris or dirt.
Fold the screen from back to front a few times until it is in a long
strip about two feet wide. Roll tightly and place in protective travel
bag.
ATTENTION: Prevent the projection surface from touching the
ground. Do not pack the screen if it is wet. Hang the screen
indoors if necessary to dry before storage.

17
CONNECTING OTHER DEVICES
CONNECTING COMPUTERS
To send the video image from a laptop computer to the projector
connect the “monitor out” of the laptop to the appropriate
“computer in” of the projector. Connect the audio out (or head-
phone jack) from the computer to the “IN 4” channel on the front of
the audio mixer or one of the available input channels on the back
of the audio mixer. Change the input on the projector to the
computer Input.Consult projector manual to change input.
CONNECTING VIDEO GAME SYSTEMS
For video game systems connect the yellow RCA video cable or
HDMI video cable to the projector’s video in. Connect the red and
white RCA audio cords from the game system to one of the avail-
able input channels on the back of the CineBox™ audio mixer.
CONNECTING iPODS AND MP3 PLAYERS
Use the supplied 3.5mm (headphone) cable to connect other audio
players to the CineBox console. To play sound and video from an
iPod you will need a special iPod audio video cable made for the
iPod. Audio connections from the iPod will plug into the audio
mixer and the video cords will plug in to the projector.
CARE AND MAINTENANCE
Spot clean any soiled areas of screen with a mild detergent and
water. Do not use bleach. Rinse any soap thoroughly but avoid
soaking more area than necessary. Air dry.
ATTENTION: Do not machine wash or dry. Do not use bleach or
strong detergent. Do not allow black frame material to fold or rest
on the white surface material when drying. Do not store wet. Color
bleeding can occur if screen is not open fully when drying.
WASHING INSTRUCTIONS FOR SCREEN

18 CARE AND MAINTENANCE
If the inatable frame develops a hole, repair is possible with a
special nylon tape available from Open Air Cinema. Clean and dry
the area before application.
When possible it is best to patch from the inside and outside of the
tube.
SCREEN REPAIR
TROUBLESHOOTING
Verify power cord is connected properly. Verify the power source
has power or is turned on.
AIR BLOWER DOES NOT TURN ON
Make sure all air vents are zipped closed. Make sure inatable tubes
are not twisted.
SCREEN DOES NOT INFLATE
Starting at the audio source make sure: 1) All components are
connected to the correct audio input and output. 2) The audio
source, audio mixer and speakers are properly plugged in and
turned on. 3) The volume is turned up on the audio source, audio
mixer and speakers.
NO SOUND
Starting at the image source make sure all components are
connected to the correct input and output. Make sure the correct
projector input is selected. Make sure the image source (Blu-Ray,
DVD Player, Playstation, etc.) and projector are turned on.
NO IMAGE

19
UGRADES AND ACCESSORIES
FOR YOUR CINEBOX™ HOME SYSTEM
Honda Generators
FM Transmitters for Drive-In Style Events
Subwoofers and Additional Speakers
Microphones: Wired or Wireless
3D Projectors and Video Kits
Brighter Projectors
Projector case: Foam encased, water resistant, air tight.
Projector Replacement Lamps
Short Throw or Long Throw Projector Lenses
(compatible with upgraded projector)
Backup DVD/BluRay Player, Extra Cables, Extension Cords
Custom Cables, Adaptor Kits, Extra Tarps, Stakes, Tables
to order any of the above items today!
Alternatively, you can visit our website at www.openaircinema.us to
view product pages for many of the above items.

20 WARNINGS AND WARRANTY
WARNING!
Read and follow all instructions carefully to avoid injury or damage
to equipment.
• Do not expose the electronic components or cords to moisture, extreme heat or cold.
• Make certain all cords are connected properly when in use to prevent re or electric shock.
• Do not obstruct the air blower’s intake vents when in use.
• Do not attempt to use system in winds above 20 mph.
• Secure inatable screen properly to ground to prevent it from falling or shifting.
• Level speaker stand to prevent tipping.
• Wait at least 2 minutes after turning off projector before unplugging power cord.
• Never expose the inatable screen to sharp or abrasive objects or moisture.
• Turn speaker & audio mixer volume all the way down before connecting or powering on.
• Do not leave CineBox, air blower, speakers or screen out in the rain or elements when not in use.
WARRANTY
Open Air Home Screens come with a 90 day limited manufacturer’s warranty. Warranty covers manufacturer’s
defects only when product has been used properly according to the instructions provided. Proper use includes
tying all ropes or tethers to properly secured stakes or weight appropriate anchoring at the proper distances and
angles from the screen. See quick setup guide for proper screen anchoring. Open Air Cinema is not responsible
for damage arising from failure to follow instructions relating to the product’s use. Warranty does not cover
damage to screen caused by winds over 20 mph, use of screen in close proximity to trees, buildings, poles, wires,
cars, water and other potentially damaging objects. Further, warranty does not cover damage from materials
becoming wet, storage of product after it has become wet, mold, mildew, improper folding and storage, dragging
the screen along hard surfaces or acts of God. Customer must submit photos (if damage is visible) and written
explanation of defective product to Open Air Cinema before replacement can take place. 90-day warranty ap-
plies to screen, tethers, clips, stakes, storage bag and air blower.
CineBox Home console, as well as all other electronics included in the console are covered in the United States
with a one year limited warranty. Warranty covers manufacturer’s defects. Warranty does not cover damage
due to customer negligence or misuse of equipment.
Customer must submit photos and written explanation of defective product to Open Air Cinema before replace-
ment can take place.
Products Covered by Other Manufacturer’s Warranties:
Optoma projectors are covered with a limited manufacturer’s warranty.
Contact Optoma directly at (888) 289-6786 for all warranty issues.
Behringer speakers are covered with a one year limited manufacturer’s warranty.
Contact Behringer (Music Group Services) directly at (425) 672-0816 for all warranty issues.
Ultimate speaker stands are covered with a limited manufacturer’s warranty.
Contact Ultimate directly at 800-525-5628 for all warranty issues.
B-Air blowers are covered with a one year limited manufacturer’s warranty.
Contact B-Air directly at 877-800-2247 for all warranty issues.
Consult individual component manuals for more manufacturer warranty information
CAUTION!
• The complete CineBox Home System can use a full 15 amp circuit.
• Do not use other electronics on the same circuit as the CineBox Home System.
• Use only GFCI protected receptacles.
Table of contents
Other Open Air Cinema Home Theater System manuals