Opticstar PL-131 COOLAIR User manual

Opticstar PL-131 / AG-131 COOLAIR
OPTICSTAR
Microsoft Windows
(64-bit & 32-bit)
7/8/10/11
Setup Guide

Opticstar PL-131 series. © Opticstar Ltd, 2021.
1
Updated: 12/10/2021
1. Please read and follow the installation instructions on the following
pages for a trouble-free installation!
2. Do not drop your camera as this can result in serious damage.
3. Only use the supplied power supply unit if your camera comes with one.
4. Do not point the camera to a bright light source like the Sun without the
appropriate filters as this will damage the sensor.
5. Disconnect the camera from the computer when not in use.
6. Treat the camera glass window with the same care as you would of a
photographic lens.
CAUTION
!
Manufacturer’s Warranty
This product has a 12 month back to base warranty. For after
sales support, please contact Opticstar at: info@opticstar.com

Opticstar PL-131 series. © Opticstar Ltd, 2021.
2
Updated: 12/10/2021
Introduction....................................................................................................................................................................... 3
Software Support ......................................................................................................................................................... 3
Package Contents ........................................................................................................................................................ 3
Camera Installation........................................................................................................................................................... 4
Installing Software for Windows DirectShow ............................................................................................................ 5
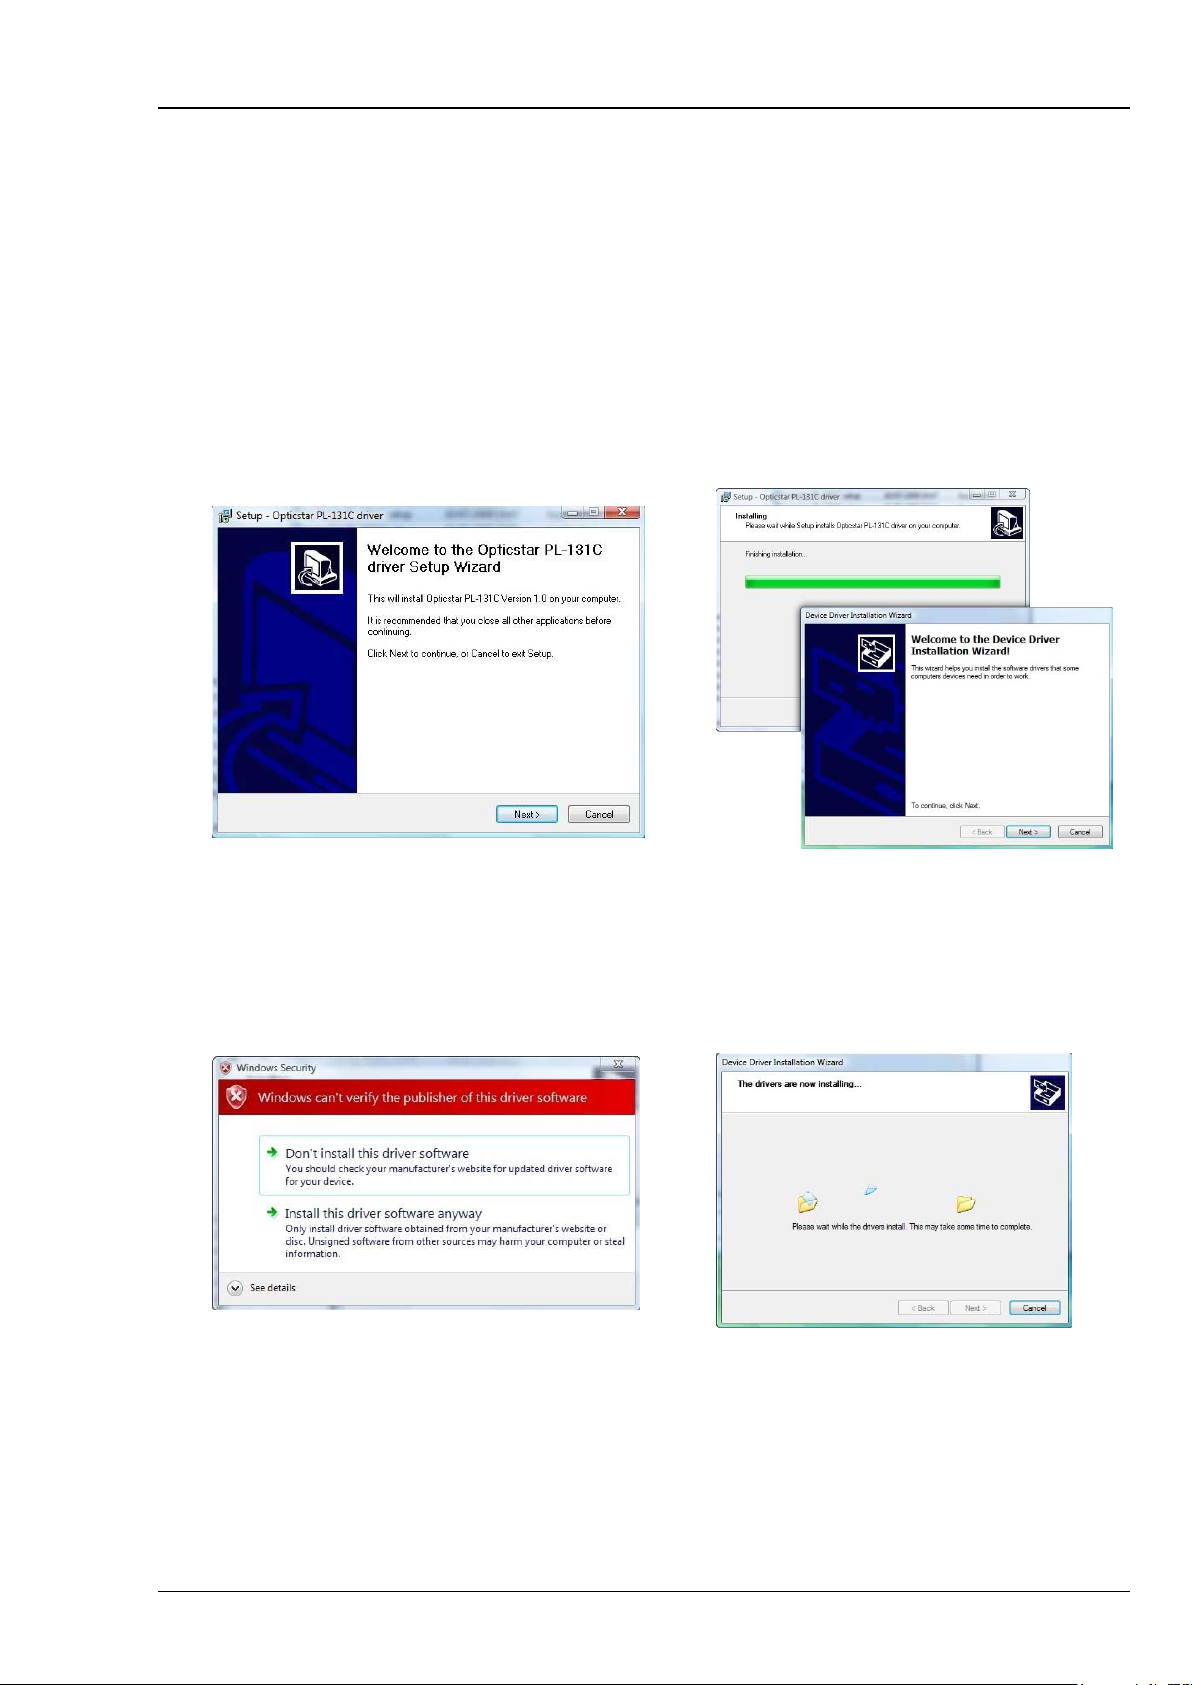
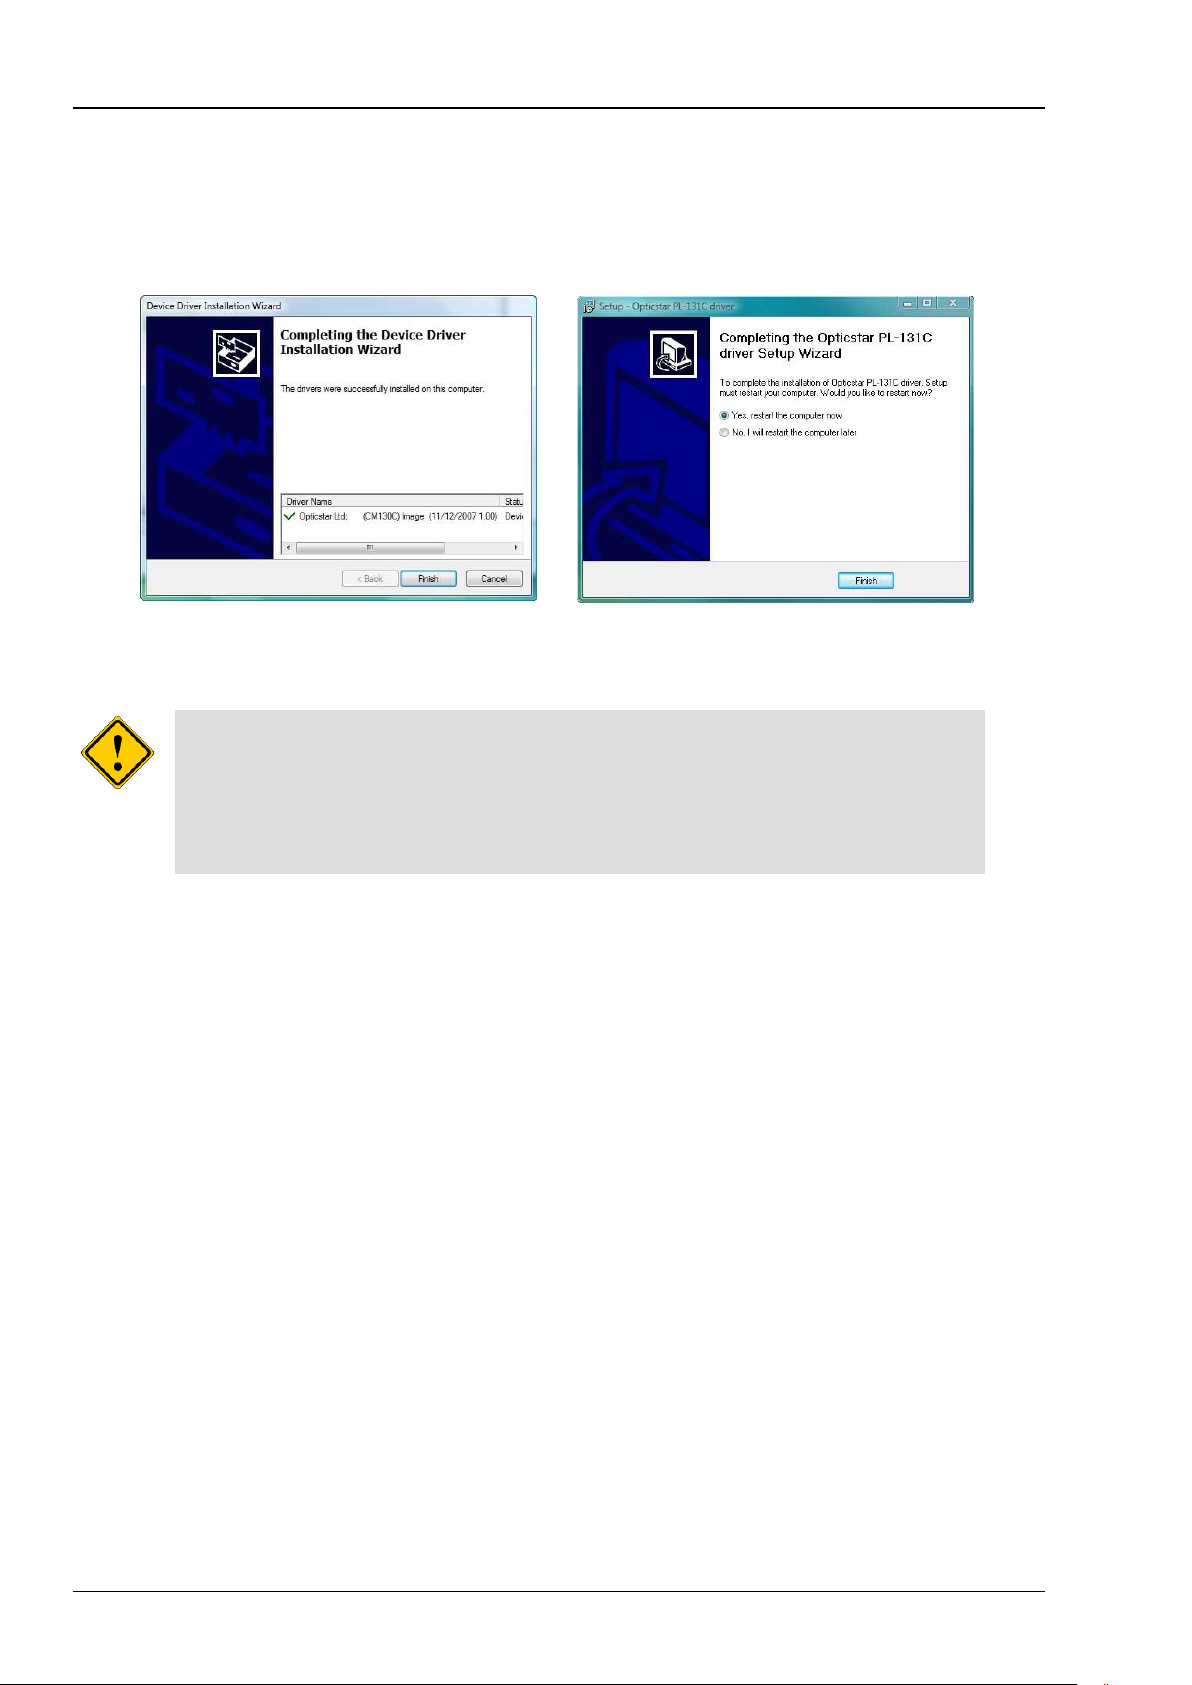
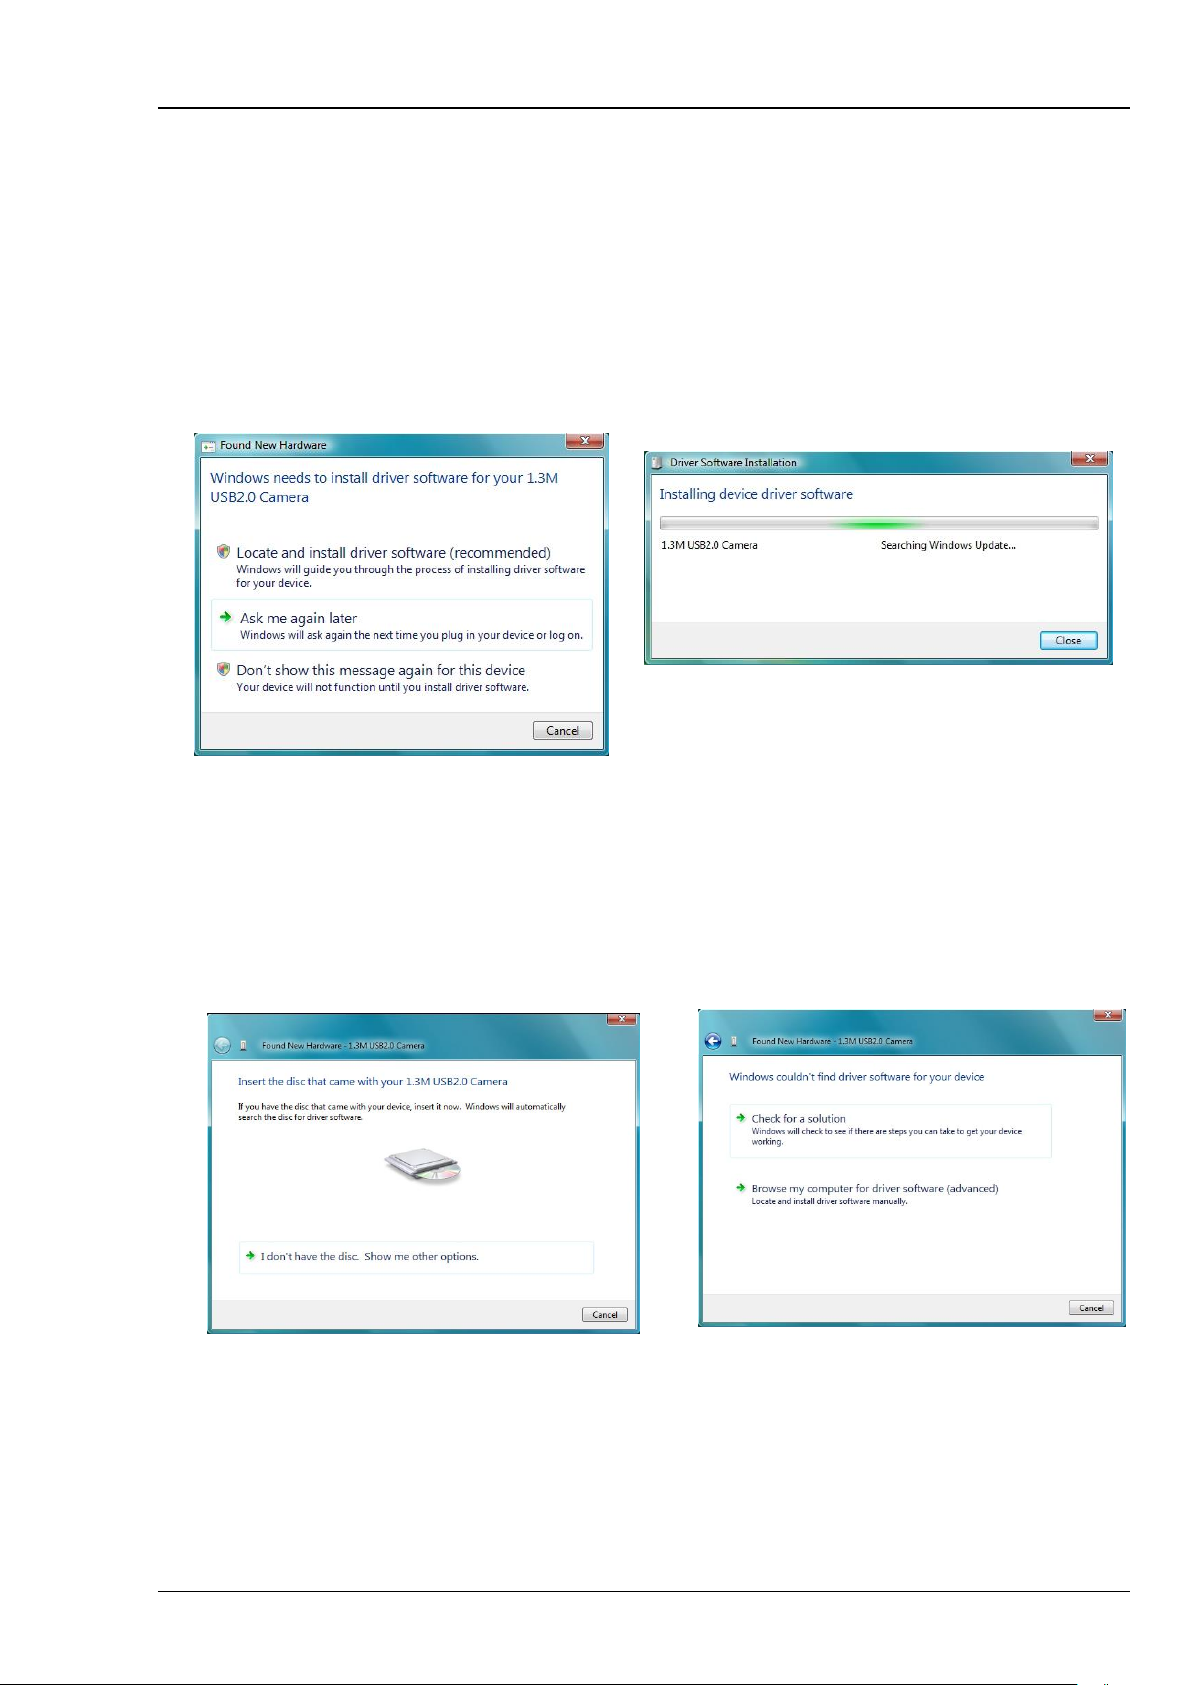
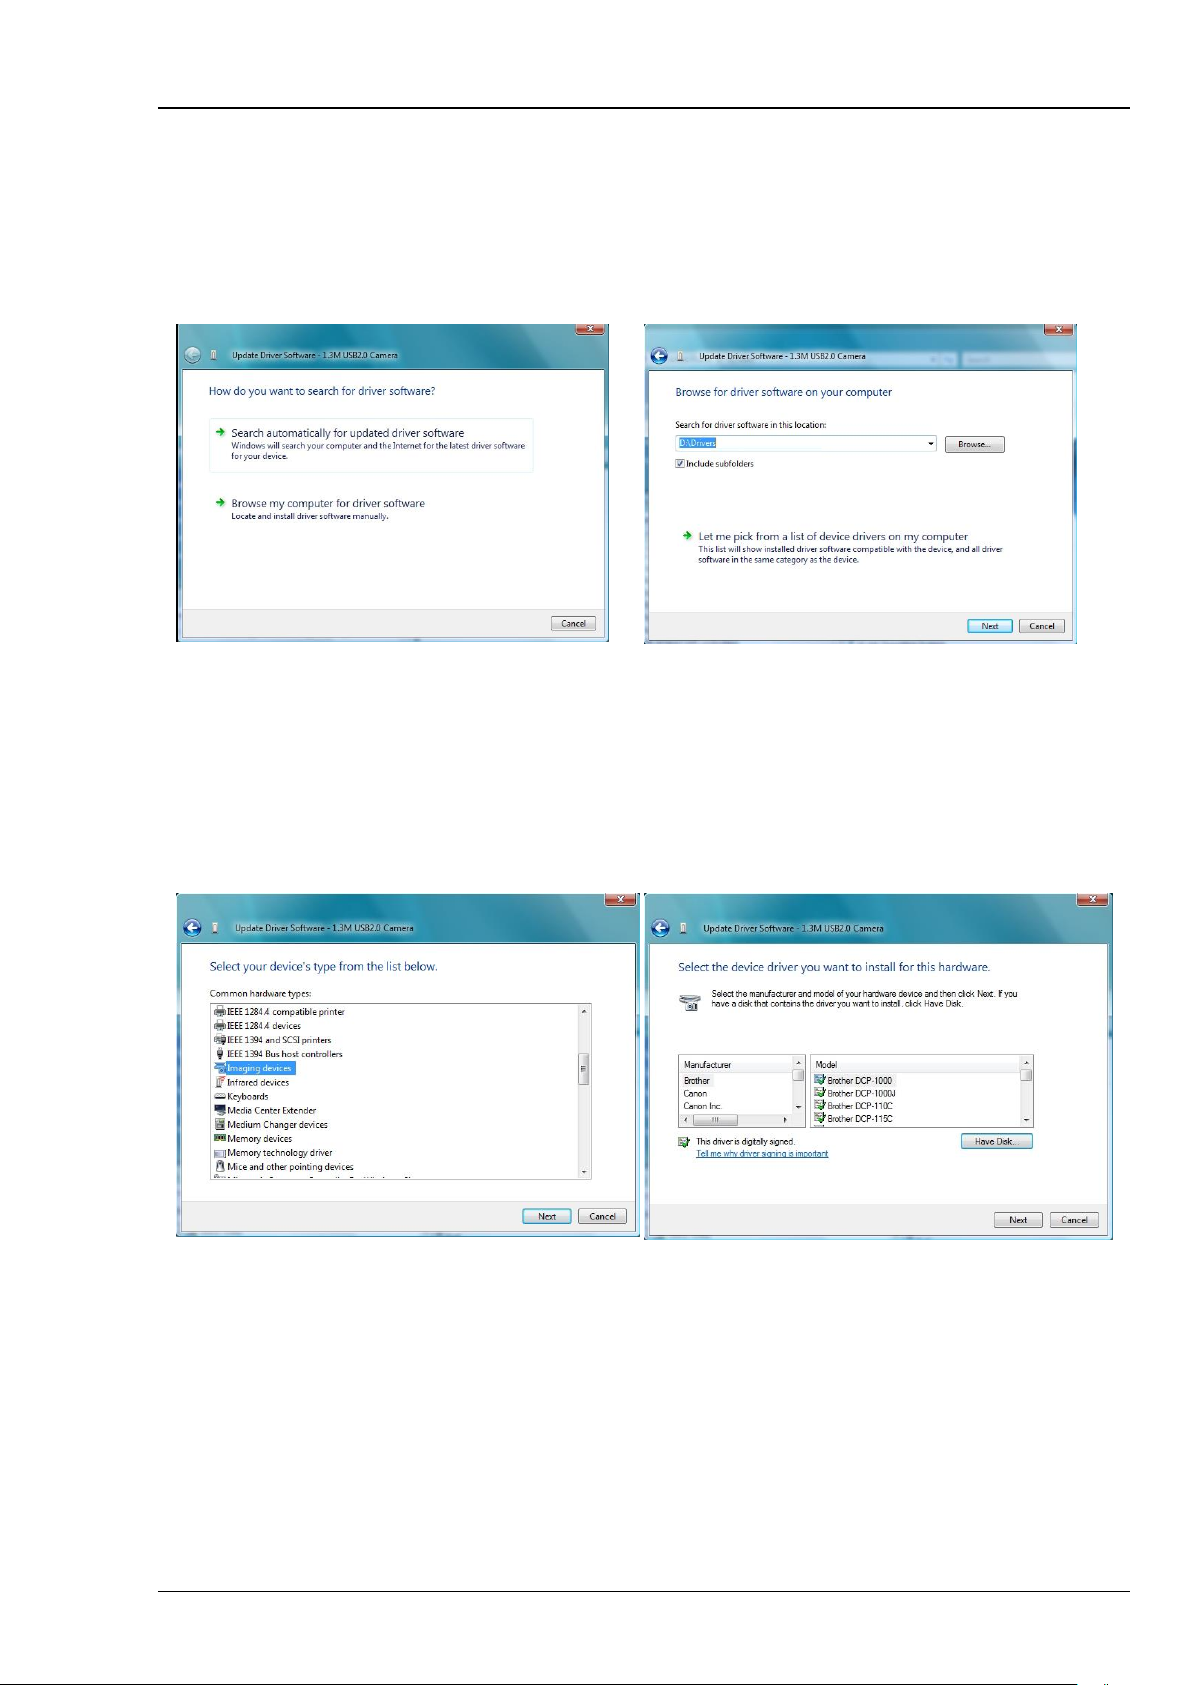
Installing the PL-131 Driver Software (32-bit or 64-bit)............................................................................................. 7
Installing etAMCAP......................................................................................................................................................... 11
Video Capture with etAMCAP ................................................................................................................................... 11
Exposure Time ........................................................................................................................................................... 12
Manual Exposure Time.............................................................................................................................................. 12
Timing Units and Exposure Time ............................................................................................................................. 12
Region of Interest....................................................................................................................................................... 13
Colour Synthesis for the PL-131C (colour model) .................................................................................................. 13
Gamma, Contrast and Saturation (colour model) ................................................................................................... 14
Video Capture........................................................................................................................... 14
Post Processing ......................................................................................................................................................... 14
Installing Opticstar View ................................................................................................................................................ 15
Camera Control .......................................................................................................................................................... 16
Frame Rate.................................................................................................................................................................. 16
Camera Configuration................................................................................................................................................ 16
Colour Adjustment Tab.............................................................................................................................................. 17
Exposure Tab ............................................................................................................................................................. 17
Other Tab .................................................................................................................................................................... 17
Image Capture........................................................................................................................... 18
Image Processing` ..................................................................................................................................................... 19
Installing Nebulosity....................................................................................................................................................... 20
Opticstar PL-131 Plug-in for Nebulosity................................................................................................................... 20
Opticstar PL-131 Plug-in for AstroArt ...................................................................................................................... 21
Binning and ROI Modes........................................................................................................... 21
Gain and StarView.................................................................................................................... 21
Opticstar PL-131 Plug-in for MaxIm DL.................................................................................................................... 22
Binning and ROI Modes........................................................................................................... 22
Gain and StarView.................................................................................................................... 22
Telescope Control and Auto-Guiding with the AG-131 ............................................................................................... 23
System Requirements................................................................................................................................................ 23
ASCOM Software........................................................................................................................................................ 23
PHD Guiding ............................................................................................................................................................... 23
Installing the PL-131 Plug-in for PHD Guiding....................................................................... 23
Selecting the Camera in PHD Guiding..................................................................................... 24
Shoestring GPUSB..................................................................................................................................................... 24
Assembling your Auto-Guiding Hardware............................................................................................................... 25
Auto-Guiding................................................................................................................................................................... 26
Imaging and Auto-guiding With Two Scopes .......................................................................................................... 26
Imaging and Auto-guiding With a Single Scope...................................................................................................... 27
Troubleshooting.............................................................................................................................................................. 28
USB Requirements..................................................................................................................................................... 28
Express Card .............................................................................................................................................................. 28
Re-Installing the Software Drivers............................................................................................................................ 28
Support ............................................................................................................................................................................ 29
Other Software ................................................................................................................................................................ 29
Microscope Attachments ............................................................................................................................................... 29
Camera Specification................................................................................................................................................. 30

Opticstar PL-131 series. © Opticstar Ltd, 2021.
3
Updated: 12/10/2021
Introduction
The PL-131 series of video cameras include the PL-131C COOLAIR (colour model) and the PL-
131M COOLAIR (monochrome model). The PL-131 is the successor to the popular PL-130 but
includes a number of significant enhancements such as:
•Twice the speed and the frame rate.
•Higher light sensitivity.
•Improved dynamic range and image quality.
•Region of Interest (ROI) in hardware. User definable.
The PL-131 achieves frame rates of up to 22 frames per second (FPS) at full resolution: 1280x1024
pixels, or up to 80 FPS at 640x480 pixels or up to 220 FPS at 320x240 pixels.
The PL-131 is suitable for imaging the planets, the Moon and the Sun. The camera is also suitable
for microscopy when fitted with an appropriate attachment.
Software Support
The maximum frame rates are possible in conjunction with the etAMACAP and Opticstar View
software applications that are included on the bundled CD. Alternatively, if the emphasis is to
process individual frames rather than a video stream, then the PL-131 can be used with the
following software applications:
•Nebulosity for image processing (Nebulosity Lite included on the CD).
•PHD Guiding for auto-guiding (included on the CD).
•AstroArt for advanced image capture, image processing and auto-guiding.
•MaxIm DL for advanced image capture, image processing and auto-guiding.
Package Contents
This Setup Guide includes instructions for the Opticstar PL-131 and Opticstar AG-131. The AG-
131 includes the PL-131 camera plus the Shoestring GPUSB interface for telescope control. Prior
to the installation, please ensure that the following items are included in the box.
Opticstar PL-131 contents:
•Opticstar PL-131 video camera.
•CS to 1.25” telescope adapter.
•USB cable.
•Software CD.
Additionally, the AG-131 includes the following items:
•Shoestring GPUSB interface box for telescope control via the Guide Port (ST4).
•Coiled cable to connect the GPUSB to the Guide port on the telescope mount.
Please note that for solar photography, the camera should be
used only with an appropriate solar telescope and/or solar
filters.

Opticstar PL-131 series. © Opticstar Ltd, 2021.
4
Updated: 12/10/2021
Camera Installation
The minimum computer system requirements are the following:
•Windows (32-bit or 64-bit) 7/8/10/11 with the latest update.
•USB 2.0 port for the camera.
There are several pieces of software to install in order to add support for the PL-131 camera to
Windows. It is not necessary to install all the supplied software but the Windows drivers and
Windows DirectShow support (steps 1 & 2) should be installed as a minimum. The remaining
software may be installed as needed depending on the user’s specific application.
1. Windows DirectShow software for the PL-131.
2. Windows software drivers for the PL-131.
3. EtAMCAP application software for camera control and video capture.
4. Opticstar View application software with more advanced functions and usability.
5. Nebulosity Lite for single shot image capture and processing.
6. PHD Guiding for telescope auto-guiding.
7. Plug-in for AstroArt support (you must already have AstroArt to use this).
8. Plug-in for MaxIm DL support (you must already have MaxIm DL to use this).
Anti-virus software may attempt to block the software
installation. In such cases the anti-virus software should be
temporarily disabled. Otherwise, when prompted, add the
installation files to the trusted list.
The installation of the software should be carried out by a user
with Windows administrator permissions. Otherwise, the
installation may fail.
Please ensure that the camera is not connected to the computer
yet.
The camera does not incorporate any optics and therefore it
cannot reach focus by itself. A C/CS mounted lens must be used
with the camera or it must be attached to a telescope with the
nosepiece adapter that is included with the camera. To attach it
to a microscope, please use an appropriate attachment.

Opticstar PL-131 series. © Opticstar Ltd, 2021.
5
Updated: 12/10/2021
Installing Software for Windows DirectShow
The first step is to install software that makes the PL-131 compatible with Microsoft’s Windows
DirectShow model. Such compliance allows the PL-131 to be used with etAMCAP.
1. Navigate to the DirectShow folder on the CD and open the appropriate program for your
camera. There are two options:
•PL-131C-setup.exe for the colour camera.
•PL-131M-setup.exe for the monochrome camera.
2. A message will appear “Welcome to the Device Driver Installation Wizard”. Click on the
Next button to continue.
Step 1: Open the appropriate installation program. Step 2: Click Next to start software installation.
3. Windows may display a warning message such as Windows can’t verify the publisher of this
driver software. Select “Install this driver anyway” to continue.
4. The next message will confirm that “The drivers are now installing…”.
Step 3: Ignore the Windows warning. Step 4: Installation in progress.

Opticstar PL-131 series. © Opticstar Ltd, 2021.
6
Updated: 12/10/2021
5. Windows should confirm that the “Drivers were successfully installed on your computer”.
Click Finish to continue.
6. Finally, if Windows asks to restart the computer, select “Yes”.
Step 6: Drivers installed successfully. Step 7: Restart the computer.
DirectShow support can be removed from the Windows Control
Panel independently of the camera’s Windows software drivers.
Click the Programs and Features or Apps & Features, and
remove the entry headed “PL-131…”.

Opticstar PL-131 series. © Opticstar Ltd, 2021.
7
Updated: 12/10/2021
Installing the PL-131 Driver Software (32-bit or 64-bit)
Please follow the instructions below in order to install the Windows drivers for the camera.
1. Insert the CD in the drive.
2. Connect the camera to a USB 2.0 port on your computer.
3. A window will appear with the heading Found New Hardware, giving three options.
Select “Locate and Install Driver Software”. Windows will search for the camera drivers.
Step 3: Searching for driver software.
Step3: Install driver software.
4. Windows will ask for the CD that came with camera (insert the CD if not present).
5. The drivers should now be installed and you can proceed on page 11. Otherwise, if
Windows fails to find the drivers, it will display that Windows failed to find the driver
software and prompt for action. Select, Browse my computer for driver software.
Step 5: Windows failed to find driver software. Step 5: Browse computer for drivers.

Opticstar PL-131 series. © Opticstar Ltd, 2021.
8
Updated: 12/10/2021
6. The drivers are located in the Drivers\PL-131C (colour camera) and Drivers\PL-131M
(monochrome camera) folders on the CD. Each folder contains a 32-bit and a 64-bitsub-
folder. Direct Windows to the appropriate folder. Windows will now install the driver
software.
7. Sometimes, Windows will fail to identify the drivers. If this is the case, a message box will
appear saying that “Windows was unable to install your 1.3M USB2.0 Camera”.
Step 6: Direct Windows to the Drivers folder. Step 7: Unable to install the camera.
8. In this case, the driver software should be installed manually. Click on the Start button on the
Windows desktop and from Settings > Control Panel, select Device Manager. The camera
should appear in the list with an explanation mark next to it, indicating that the drivers have not
been installed yet.
9. Right-click on the camera description and from the pop-up menu select Update Driver
Software.
Step 8: Open Device Manager to locate the camera. Step 9: Update the driver software.

Opticstar PL-131 series. © Opticstar Ltd, 2021.
9
Updated: 12/10/2021
10. Windows will ask “How do you want to search for driver software?”. Select “Browse
my computer for driver software”to continue.
11. On the next dialog box select “Let me pick from a list of device drivers on my
computer”.
Step 10: Browse for driver software. Step 11: Pick from a list of device drivers.
12. Windows will ask to Select your device’s type from the list below. Select “Imaging
devices” and click on the Next button.
13. On the next message box Windows will display: Select the device driver you want to
install this hardware. Click the Have disk button.
Step 12: Select device type. Step 13: Have a disk.

Opticstar PL-131 series. © Opticstar Ltd, 2021.
10
Updated: 12/10/2021
14. The next message box with the title Install
from disk will appear. Navigate to the
Drivers folder on the CD and click the OK
button.
15. The camera will be identified as “PL-131
HighSpeed”. Click the Next button to
continue.
Step 14: Drivers folder on the CD.
16. Windows may issue an Update Driver Warning. Click the Yes button to continue the
installation.
Step 16: Continue the installation.
Step 15: Select the camera from the list.
17. The following warning message may be displayed: Windows can’t verify the
publisher of this driver software. Ignore the message and select “Install this driver
software anyway”.
18. Finally, Windows will confirm the end of the installation with the following message:
Windows has successfully updated your driver software.
Step 17: Select the camera from the list.
Step 18: Finished driver installation.

Opticstar PL-131 series. © Opticstar Ltd, 2021.
11
Updated: 12/10/2021
Installing etAMCAP
You can test that the camera has been installed successfully by running the etAMCAP
program.
The etAMCAP.EXE can be found on the
accompanying CD inside the etAMCAP
folder. Copy this to your computer’s
desktop by dragging it from the CD folder.
Double-click the etAMCAP icon on the
Windows desktop to run the program.
The camera will be identified as PL-131C
for the colour model or PL-131M for the
monochrome model. Select the camera
from the Devices menu. EtMAMCAP can
be used as a general-purpose program to
capture video in AVI format.
Video Capture with etAMCAP
ROI (region of interest) modes increase the rate at
which the camera sends the data to the computer
while preserving the full image quality of the
selected region.
The camera mode can be selected from the menu
by selecting Options > Video Capture Pin.
The maximum frame rate that the camera operates
at depends on the mode selected.
Mode
Frame Rate (max)
1280 x 1024
22 frames per second
640 x 512
70 frames per second
640 x 480 ROI
80 frames per second
320 x 240 ROI
220 frames per second
EtAMCAP can be used to capture video in AVI format. It cannot
capture single frames. In order to capture single frames as well
as video please use Opticstar View.
Selecting the camera mode and resolution.

Opticstar PL-131 series. © Opticstar Ltd, 2021.
12
Updated: 12/10/2021
Exposure Time
The exposure time can be set by selecting Options
> Video Capture Filter under the Exposure tab.
The camera can operate using automatic exposure
or manual exposure. When using automatic
exposure, the only exposure related parameter that
the user can control is Target. The target slider
gives a delta value, up or down, to the automatic
exposure used by the camera. Effectively, the user
can affect the automatic exposure time by setting
the Target value. The target value can be set
between 50 and 200. The default value is 100
which leaves the default exposure time unchanged.
A Target value above 100 will increase the exposure time. A value below 100 will decrease it. The
Gain value cannot be set by the user when the camera operates in automatic exposure mode.
Manual Exposure Time
The exposure time can also be set manually by un-ticking the Auto Exposure option. When the
camera operates in manual exposure mode, the Target value cannot be set since it has no
meaningful purpose in this context. The Gain value however can be set between 1 and 40. High
Gain values increase the camera’s light sensitivity.
Timing Units and Exposure Time
The region of interest (ROI) modes, increase the frame rate dramatically. At 1280x1024 the frame
rate is 22 frames per second (FPS). When in 640x480 ROI mode the maximum frame rate increases
to 80FPS. An increase of 3.6 times (80 / 22 = 3.6). The exposure time per frame decreases
accordingly. Therefore, in 640x480 ROI the maximum exposure time of the camera is 3.6 times
less. Effectively, it is a trade-off between speed and exposure time (and hence sensitivity).
Similarly, at 320x240 ROI the frame rate increases to 220 FPS. Therefore, because the frame rate
increases by ten times, the exposure time per frame is reduced by 10 times (220 / 22 = 10).
The exposure control slide bar always displays the exposure time units between 0 and 3000. These
units relate to the camera's internal clock rather than actual milliseconds. The range of 3000 units
specifies different a exposure time depending on the camera mode. When the camera runs in high-
speed mode (the default mode), the maximum frame rates and the exposure times are outlined in
the table below.
Mode
Frame Rate (FPS)
Exposure Time (max)
Timing Units
1280 x 1024
22
500ms
3000
640 x 480 ROI
80
138ms
3000
320 x 240 ROI
220
50ms
3000

Opticstar PL-131 series. © Opticstar Ltd, 2021.
13
Updated: 12/10/2021
The camera can also operate in standard speed at half the frame rate but double the maximum
exposure time. In software applications such as Nebulosity, PHD Guiding, AstroArt and MaxIm
DL the camera operates at standard speed.
Region of Interest
When the camera operates in ROI modes, the
user can specify the region of data that will be
downloaded to the computer by selecting
Options > Video Capture Filter under the
Misc tab.
The four arrow keys in the ROI group can be
used to scroll over the sensor’s active imaging
area. The selected area is always in full resolution
but the camera operates at a higher frame rate.
Colour Synthesis for the PL-131C (colour model)
Colour synthesis is the process of creating a colour image from raw data. Scientific colour cameras
use a Bayer matrix on the CMOS/CCD sensor. A Bayer matrix is a series of micro-filters that are
placed on top of the sensor’s cells (pixels) in order to give it the colour information.
Dedicated astronomy cameras do not incorporate an
infra-red blocking filter (IR filter) and therefore
images tend to have a red bias. By capturing light in
the IR region, the camera can capture data that
normally would not be visible to the human eye. The
PL-131C does not incorporate an IR filter for this
reason.
On the PL-131C, colour synthesis can be adjusted
manually or automatically. Under the White
Balance tab, there are three slide bars that can be
used to adjust the relative strength each colour
channel: Red, Green and Blue (RGB). It is also
possible to let the camera perform the colour
balancing by clicking on the One Push WB button.
When the camera is set to operate at standard speed (by
Nebulosity, PHD Guiding, AstroArt and MaxIm DL) it will
remain at standard speed until the user restarts Windows. Even
etEMACAP and View will operate at standard speed until
Windows is restarted.

Opticstar PL-131 series. © Opticstar Ltd, 2021.
14
Updated: 12/10/2021
If the user adjusts any of the RGB slide bars, the camera will enter manual white balance mode. To
revert back to automatic white balance, the One Push WB button must be pressed.
Gamma, Contrast and Saturation (colour model)
Other image properties such as the gamma, contrast
and saturation of the image can be adjusted by
selecting Options > Video Capture Filter under
the Colour Adjust tab.
These values can be set manually by using the
appropriate slide bars or automatically by ticking
the Colour Enhancement Enable option.
Video Capture
The camera can capture video and store it to disk as an AVI file. The folder and location of the file
can be selected from the File > Set Capture File menu. In order to start video capture, select
Capture > Start Capture. Timing during capture can be selected from Capture > Set Frame
Rate and Capture > Set Time Limit.
Post Processing
There is some freely available third-party software that may be of interest to some users. Please
note that Opticstar cannot guarantee the suitability the software.
•Deep Sky Stacker. (http://deepskystacker.free.fr).
•RegiStax. (http://www.astronomie.be/registax/)
These programs can be used to post-process video files captured in EtAMCAP and View. They
can stack, align and enhance multiple AVI frames into a single high quality “master” image.

Opticstar PL-131 series. © Opticstar Ltd, 2021.
15
Updated: 12/10/2021
Installing Opticstar View
Opticstar View is a more
advanced software
application that can be
used to control the camera,
capture single frames or video,
perform image processing and image
measurements.
View can be used for a wide range of
applications outside astronomy
including microscopy.
1. To install View, navigate to the View folder on the CD and open the View_setup.exe file.
2. Windows will display “Welcome to the Opticstar View Setup Wizard”. Click the Next
button to continue.
Installing Opticstar View. Running Opticstar View.
After the installation has finished, View can be run by clicking on the Windows Start button and
selecting Opticstar View from the programs list.

Opticstar PL-131 series. © Opticstar Ltd, 2021.
16
Updated: 12/10/2021
Camera Control
Run View with the camera connected to the computer.
On the right-hand side panel of the application, under
the Capture tab, the camera will be identified as
“Opticstar PL-131C”or “Opticstar PL-131M”.
By default, the camera will be running as soon as
View opens. In order to change the image resolution,
the preview must be stopped by clicking the Stop
Preview button. This button toggles between Start
Preview and Stop Preview modes.
The Default button resets the camera settings to the
default values.
Frame Rate
When lower resolution modes are combined with
manual exposure times, they can increase the frame
rate (frames per second) at which the camera operates.
Camera Configuration
The exposure time as well all other camera
parameters can be configured by clicking the
Advanced button. This button is situated below the
Start Preview / Stop Preview button.
A window will appear with three tabs:
•Color Adjust
•Explosure
•Other
The options under each tab are outlined in the
following sections.
Resolution
Frame Rate (max)
1280 x 1024
22 frames per second
640 x 512
70 frames per second
640 x 480 ROI
80 frames per second
320 x 240 ROI
220 frames per second

Opticstar PL-131 series. © Opticstar Ltd, 2021.
17
Updated: 12/10/2021
Colour Adjustment Tab
The first three slider bars labelled: R Gain, G Gain and B Gain, can be used to manually adjust
the red, green and blue colour reproduction of the camera. Alternatively, the camera can
automatically set these values by pressing the White Balance button. Automatic values may not be
appropriate in certain circumstances depending on the light conditions, luminosity of the target, etc.
Other values that are user selectable include Gamma and Contrast.
User defined settings can be stored for future use. There are four sets of parameters that can be
stored for future use. They are labelled A, B, Cand D. Simply select one of them and click the
Save button.
Exposure Tab
When auto-exposure is used, the user cannot specify
the exposure time. However, it is still possible to add
a “bias” by increasing or decreasing the Target value.
Likewise, the Gain value is not user definable in
auto-exposure mode.
To set the exposure time manually, simply un-tick the
Auto Exposure option. In this mode, the time can be
set in milliseconds and the Gain value can be set
manually. The Target value cannot be set in manual
exposure mode.
Other Tab
All other configuration settings are situated under the
Other tab. The camera’s frame speed can be set to
Normal (better image quality) or High (higher frame
rate).
The way that the camera reads the pixel data from the
sensor can be set by selecting the Sub Resolution
option. This has effect only in binning modes. Bin
Pixels combines the pixel data but Pick Pixels skips
some of the data on the sensor.
The orientation of the captured images can be
inverted or reflected by the H Flip and V Flip
options. The Mono option produces monochrome
images rather than colour.

Opticstar PL-131 series. © Opticstar Ltd, 2021.
18
Updated: 12/10/2021
Image Capture
There is a second group of user controls on the right-hand
side panel, headed Camera Capture Config. The Capture
button can be used to capture a single frame or a series of
frames in BMP format. The location of the captured files
and the number of frames can be specified by clicking the
Config button.
By adjusting these options, it is possible to specify how
many frames to capture and a time lapse between the
frames. The captured frames are also displayed as
thumbnails on the bottom right hand side corner.
Video can be captured in AVI format by clicking the Start
Video button. This button toggles between Start Video and
Stop Video. Once the Start Video button has been pressed,
the camera will capture and store the data on the hard disk
until Stop Video is clicked by the user.
The location of the stored file(s) can be specified by
clicking the Config button. By default, video data is stored
uncompressed in order to preserve high image quality.
Optionally, it is possible to compress the AVI files by
clicking the Video Compress button.
Captured images can be processed in View by clicking the Open And Edit button underneath the
captured image.
The image to be processed should be present in the folder in which the image was stored. This
folder can be specified by pressing the Config button.

Opticstar PL-131 series. © Opticstar Ltd, 2021.
19
Updated: 12/10/2021
Image Processing`
View can be used to perform measurements on the captured image(s). It is also possible to apply
various filters and perform image processing operations.
A brief outline of View’s image processing functions is listed below:
•Basic operations including Crop, Mirror, Flip, Invert, Rotate, Bright, etc.
•Copy and paste user defined regions.
•Distances can be measured between user defined points, circles, etc.
•Angles can be calculated by defining three points on the image.
•Operations can be performed on any user defined region.
•Colour operations can be performed on individual R, G, B channels.
•Data combine of two images.
•Data calibration.
•Image-zoom as a per cent of the original image.
•Linear filters to soften, sharpen, emboss, blur and Gaussian.
•Non-linear filters for median, erode, dilate, contour, edge and jitter.
•Transform filters for pinch, punch, twirl and cylinder.
•Fluorescence filters for gamma, colorize, mix and combine.
This manual suits for next models
3
Table of contents
Other Opticstar Digital Camera manuals