Opticstar DS-616C XL+ User manual

OPTICSTAR
Microsoft Windows
(64-bit & 32-bit)
XP/Vista/7/8/10

DS-616C XL Setup Guide
24/10/2017
© Opticstar Ltd
1
1. The DS camera is sealed to protect the sensor and electronics, do not
open your camera, this will make the camera susceptible to moisture
and dust.
2. Do not drop your camera as this can result in serious damage.
3. Only use the supplied power supply unit (12VDC 2A regulated).
4. Do not point the camera to a bright light source like the Sun without the
appropriate filters.
5. Do not over-tighten adaptors attached to the camera.
6. Treat the camera glass window with the same care as you would of a
photographic lens.
CAUTION
!
Manufacturer’s Warranty
This product has a 1 year back to base warranty. For after sales

DS-616C XL Setup Guide
24/10/2017
© Opticstar Ltd
2
Contents
CONTENTS..........................................................................................................................................................................2
INTRODUCTION ................................................................................................................................................................4
PACKAGE CONTENTS .....................................................................................................................................................4
SYSTEM REQUIREMENTS..............................................................................................................................................4
CONNECTING THE DS-616C XL+ TO THE COMPUTER..........................................................................................5
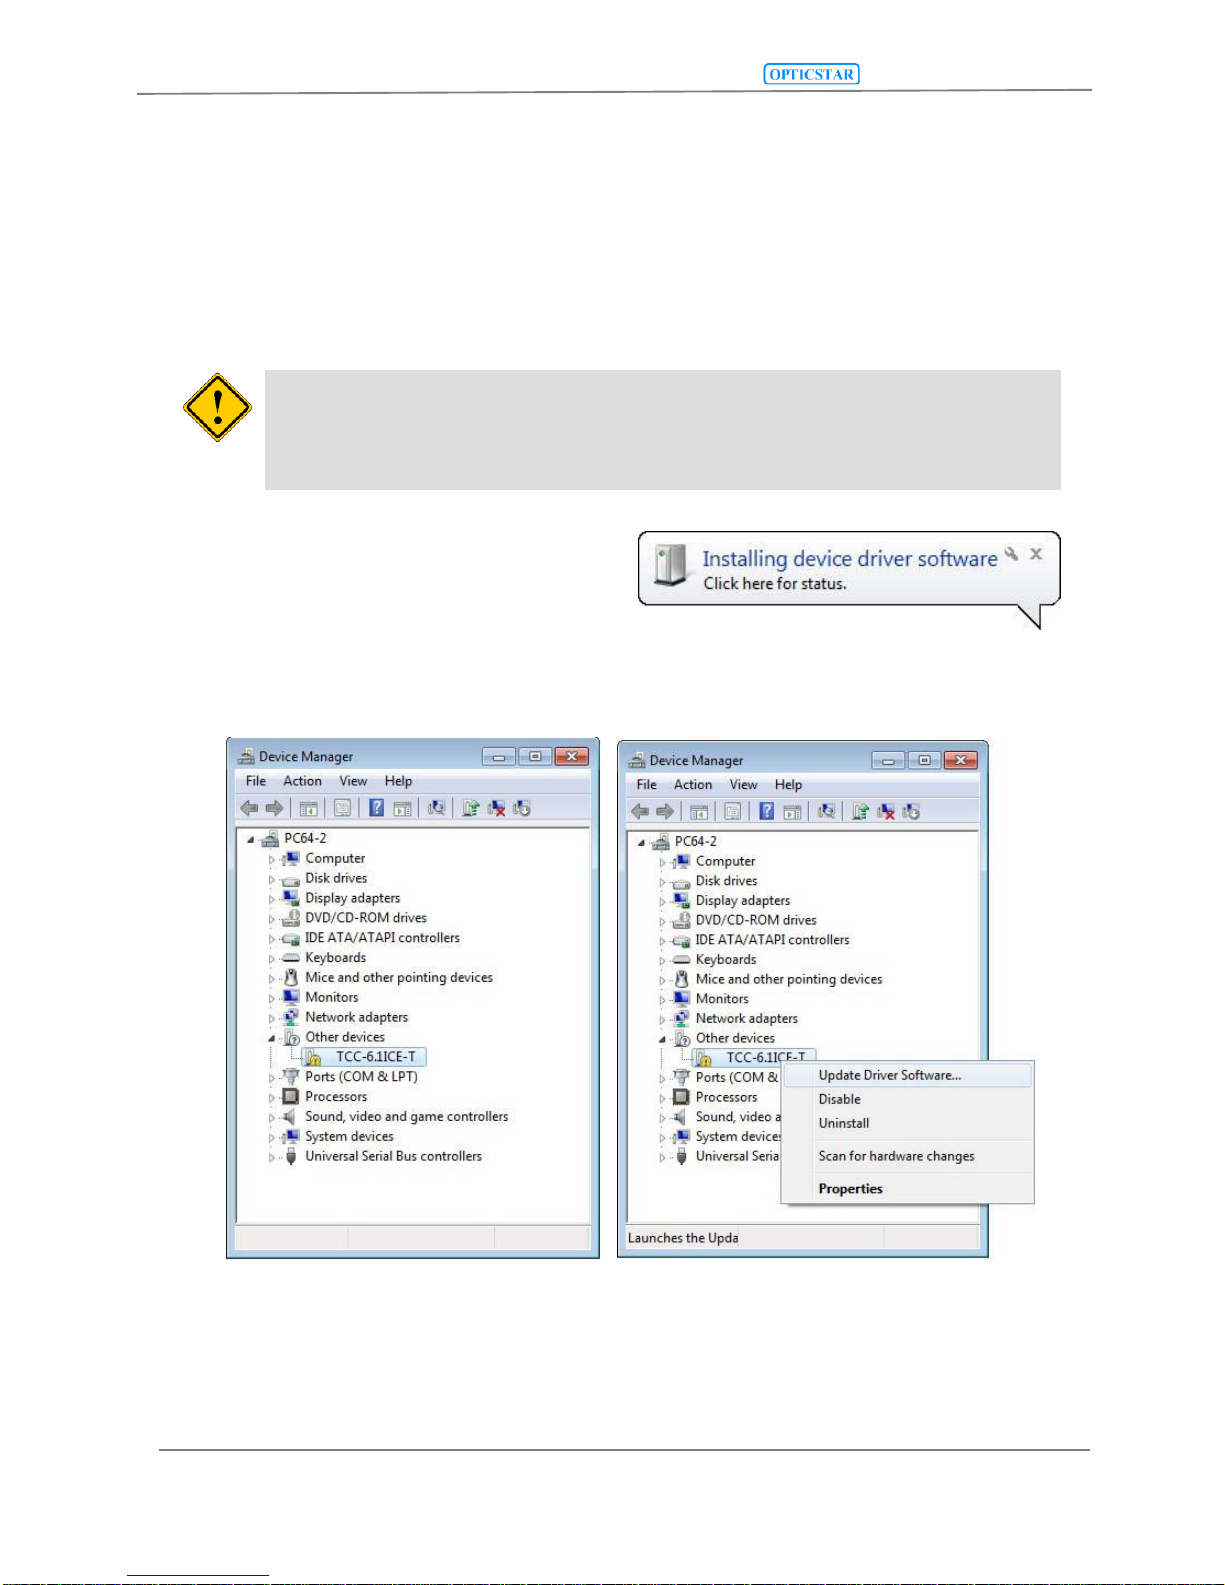
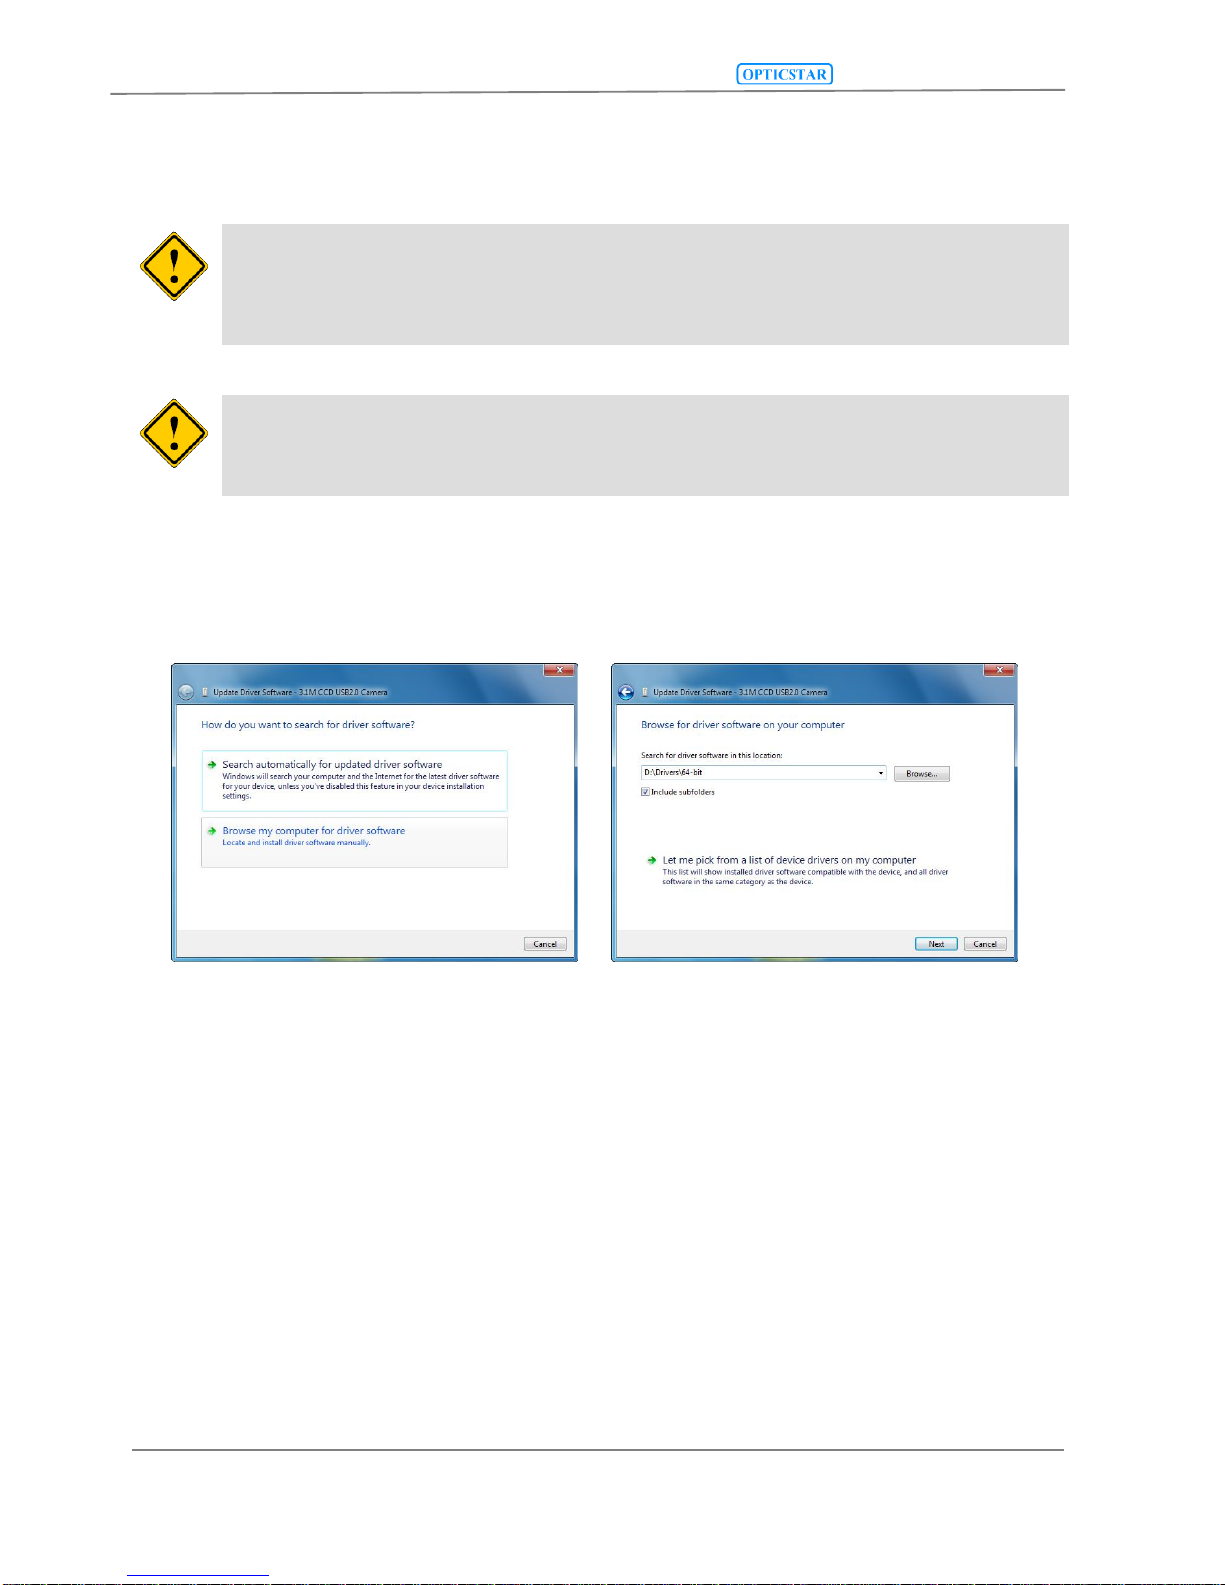
INSTALLING THE SOFTWARE DRIVERS...................................................................................................................6
SOFTWARE APPLICATIONS..........................................................................................................................................9
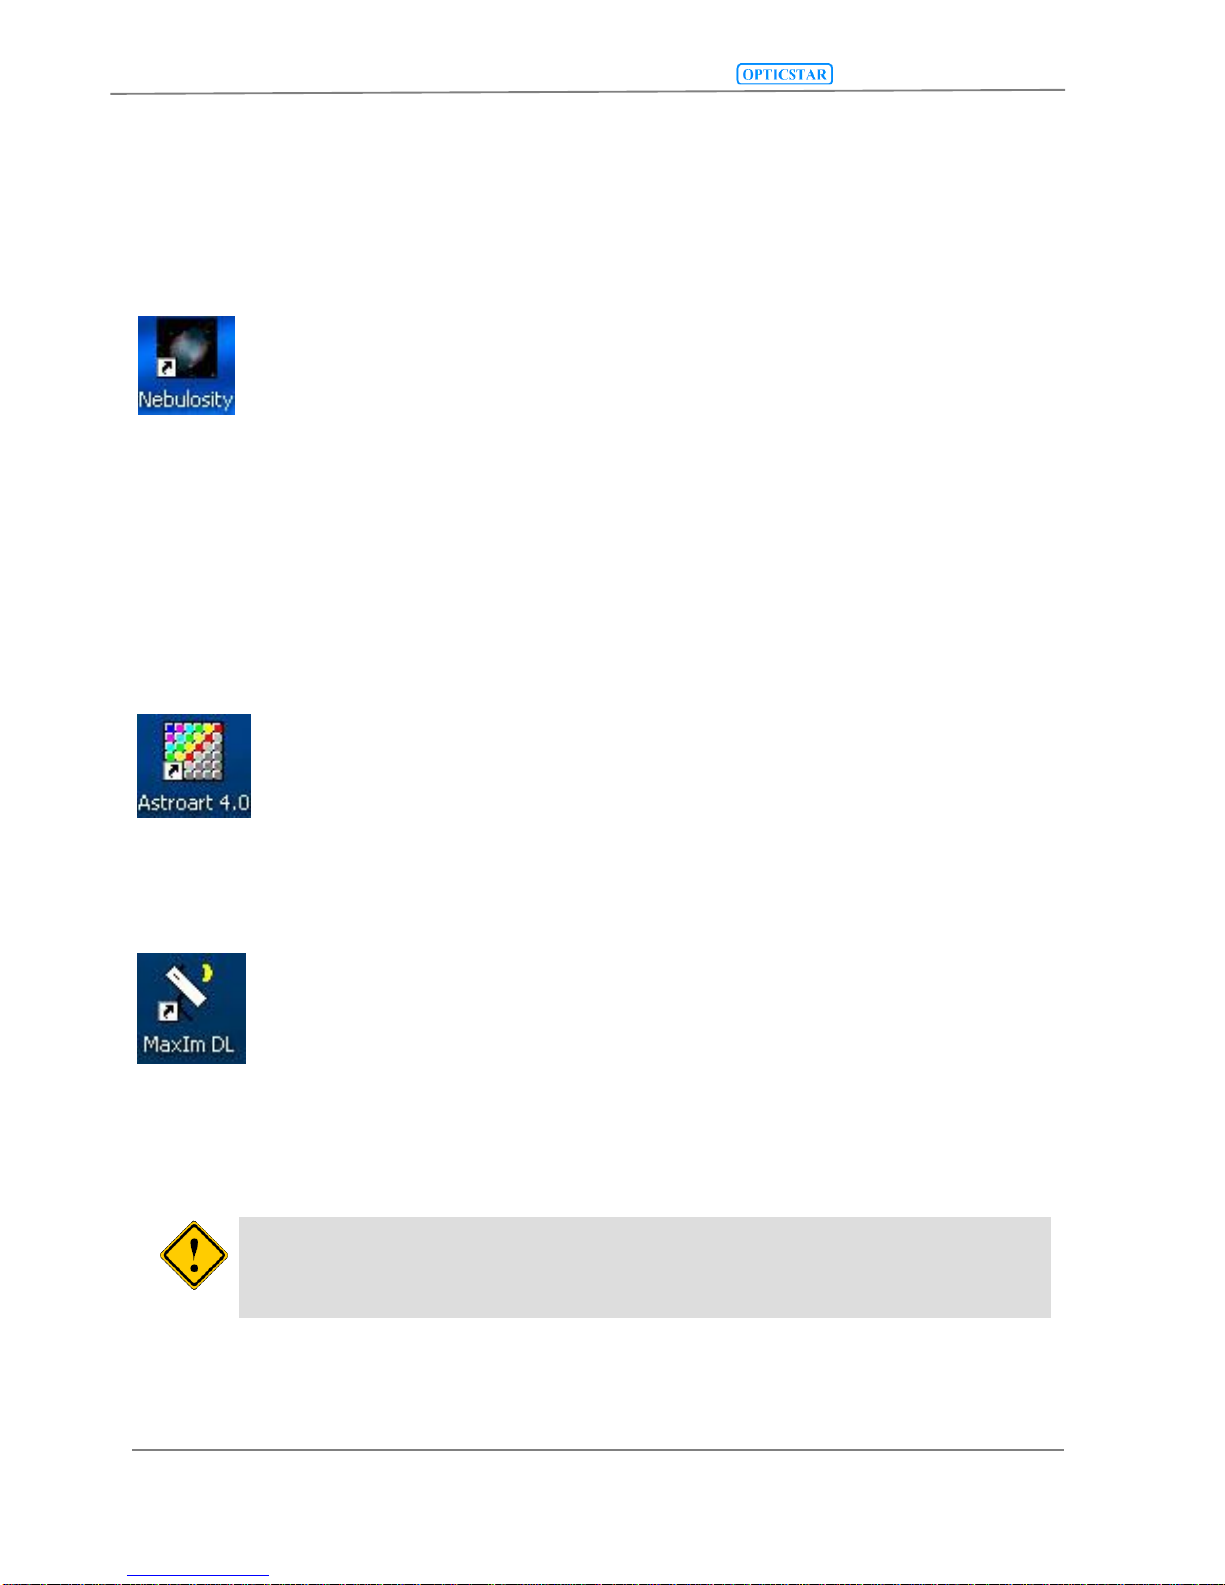
NEBULOSITY.......................................................................................................................................................................9
ASTROART .........................................................................................................................................................................9
MAXIM DL.........................................................................................................................................................................9
INSTALLING NEBULOSITY V2 AND THE DS-616C XL PLUGIN..........................................................................10
RUNNING NEBULOSITY V2................................................................................................................................................10
MAIN PANEL.....................................................................................................................................................................11
Advanced Sub Panel....................................................................................................................................................11
VIDEO MODE....................................................................................................................................................................12
SUPPORT...........................................................................................................................................................................12
INSTALLING THE DS-616C XL PLUGIN FOR ASTROART....................................................................................13
BINNING MODES...............................................................................................................................................................14
HIGHER IMAGE QUALITY..................................................................................................................................................14
HIGHER SPEED..................................................................................................................................................................14
STARVIEW........................................................................................................................................................................15
CAPTURE SETTINGS..........................................................................................................................................................15
COLOUR SYNTHESIS .........................................................................................................................................................16
SUPPORT...........................................................................................................................................................................16
INSTALLING THE DS-616C XL PLUGIN FOR MAXIM DL V4/V5.........................................................................17
BINNING MODES...............................................................................................................................................................18
HIGHER IMAGE QUALITY..................................................................................................................................................18
HIGHER SPEED..................................................................................................................................................................18
STARVIEW........................................................................................................................................................................19
CAPTURE SETTINGS..........................................................................................................................................................19
COLOUR SYNTHESIS .........................................................................................................................................................20
SUPPORT...........................................................................................................................................................................20
TROUBLESHOOTING.....................................................................................................................................................21
SYSTEM REQUIREMENTS ..................................................................................................................................................21
INSTALLATION ISSUES ......................................................................................................................................................21
Windows does not Recognise the Camera...................................................................................................................21
Camera Driver Check .................................................................................................................................................22
Camera Driver Removal.............................................................................................................................................22
Re-installing the Camera and Drivers ........................................................................................................................23
CAMERA PERFORMANCE ..................................................................................................................................................23
USB BUS SPEED...............................................................................................................................................................23
USB EXTENSIONS.............................................................................................................................................................24
USB PORT ISSUES ............................................................................................................................................................24
COMPUTER LATENCY ..................................................................................................................................................25
GOOD PRACTICES..........................................................................................................................................................25
CAMERA CLEANING .........................................................................................................................................................25
CAMERA POWER REQUIREMENTS.....................................................................................................................................25
OVEREXPOSING THE CAMERA TO STRONG LIGHT.............................................................................................................25
SUPPORT ...........................................................................................................................................................................25

DS-616C XL Setup Guide
24/10/2017
© Opticstar Ltd
3
OTHER SOFTWARE .......................................................................................................................................................25
CAMERA SPECIFICATION...........................................................................................................................................26
If you have any queries regarding the camera or you require after
include your camera’s serial number as displayed on the camera’s
case.
The camera does not incorporate any optics and therefore it cannot
reach focus by itself. A T-threaded (M42 x 0.75) mounted lens
must be used with the camera or it must be attached to a telescope
with the nosepiece adapter that is included with the camera.
The camera requires a computer running Microsoft Windows
XP/Vista/7/8/10 with a fully specified USB 2.0 port. If your
computer’s USB 2.0 ports do not meet the full specification of the
USB 2.0 standard, you may need to use a USB 2.0 Repeater cable
between the computer and the camera. Please refer to the
Troubleshooting section of this guide under USB Extensions for
more details.

DS-616C XL Setup Guide
24/10/2017
© Opticstar Ltd
4
Introduction
Your Opticstar DS-616C XL+ single shot camera will enable you to capture
images of deep sky objects, the planets and their satellites as well as images of
the Moon and Sun with the use of an appropriate filter. The camera incorporates
thermo-electric cooling (TEC) reducing the levels of noise dramatically during
longer exposures.
The DS-616C XL+ is the latest in the XL range of high performance scientific
CCD cameras with the following features:
•Sony 1.8” colour CCD with 6.1-megapixel resolution.
•Higher frame rate for focus and preview modes.
•High light sensitivity due to Gain function in hardware.
•Colour binning modes at 1x1, 2x2 and 4x4.
Package Contents
Please insure that you check that no parts are missing. In the event of a part
missing please inform your local supplier immediately. Your camera should
include the following:
1. Camera.
2. USB cable.
3. USB 2.0 repeater cable (may be required for some computers).
4. T-mount to 2” Nosepiece (for 2” telescope drawtubes).
5. Printed setup guide (this document).
6. CD with software, drivers and Nebulosity user manual.
7. Mains Power Supply Unit for powering the camera.
System Requirements
You will first need to install the camera and drivers before installing the
Nebulosity software. Please follow the instructions closely for a successful
installation. You will require a PC running Microsoft Windows (64-bit or 32-bit)
XP/Vista/7/8/10 with a free USB 2.0 port.
If you experience any difficulty during or following installation please refer to the
Troubleshooting section in this guide.
If you have installed the camera drivers in the past and you wish to replace the
drivers to a different version you must first remove the original drivers. Please
refer to the Troubleshooting section on how to remove the currently installed
drivers.
The 2” nosepiece can be secured on the camera using a screw
driver. Remove the cap from the camera, screw the nosepiece in its
place and secure it by tightening the three screws on the side of
the camera’s optical window.

DS-616C XL Setup Guide
24/10/2017
© Opticstar Ltd
5
Connecting the DS-616C XL+ to the Computer
Before installing the software drivers and applications, follow the instructions
below to connect the DS-616C XL+ to your computer.
1. Remove the protective cap at the front of the camera exposing the camera’s
female T-tread. Screw the 2” Nosepiece in its place which is bundled with the
camera. This will enable the camera to be attached to a telescope with a 2”
draw tube.
2. Connect the power supply unit to the mains.
3. Insert the power lead into the camera’s 12VDC socket.
4. Plug the mains power supply to a mains socket.
5. Attach one end of the USB cable to the side of the camera. Additionally, you
may have to attach the USB 2.0 Repeater cable too on some computers.
6. Attach the other end of the USB cable to your computer. Windows will
identify the camera as a new device. Please, follow the instructions in the
next section to install the software.

DS-616C XL Setup Guide
24/10/2017
© Opticstar Ltd
6
Installing the Software Drivers
Follow the instructions below closely ensuring that you make the right
selections.
1. Un-install any previous versions of the software.
2. Insert the supplied CD in the CD/DVD drive.
3. Plug the camera to a USB2.0 port
(ideally to one attached directly
on the motherboard of your
computer).
4. The Windows Device Manager will list the camera as TCC-6.1ICE-T as
shown below.
Once connected to the computer, the
Device Manager will show the camera.
During installation do not allow Windows to automatically select the
best drivers. If you allow Windows to automatically select the
drivers, installation will fail.
The software drivers can also be installed
by the user from the Device Manager.

DS-616C XL Setup Guide
24/10/2017
© Opticstar Ltd
7
5. The Windows Found New Hardware Wizard will come into view. If the
wizard does not appear, you can install the drivers by right-clicking on the
camera entry in Device Manager and select Update Driver Software.
6. Do not allow Windows to search automatically for the driver software.
Instead, select the Browse my computer for driver software option.
7. The drivers are situated on the CD inside the Drivers folder. These
software drivers will operate on 64-bit and 32-bit Microsoft Windows
XP\Vista\7\8\10 operating systems. The 64-bit drivers are situated in the
\Drivers\64-bit folder and the 32-bit drivers are situated inside the
\Drivers\32-bit folder.
Anti-virus software may attempt to block the installation. In such cases
the anti-virus software should be temporarily disabled. Alternatively,
when prompted, add the installation files to the trusted list.
Select the software drivers manually.
The software drivers are situated on the
CD inside the Drivers folder.
Windows may demand the user to have Administrator access rights in
order to install the software. Otherwise the installation will be
terminated by Windows.

DS-616C XL Setup Guide
24/10/2017
© Opticstar Ltd
8
8. Windows may display a warning prior to installing the driver software.
Ignore the message and select Install the driver software anyway.
9. Once the drivers have been installed, Windows will identify the camera as
Opticstar DS-616C XL.
10. If Windows asks you to restart the computer before proceeding, please do
so.
11. Your camera and drivers are now installed. Please refer to the
Troubleshooting section in this guide if the camera and driver installation
failed to complete successfully.
Ignore the Windows warning.
The drivers installed successfully.
Note that if later you remove the camera from your computer and
re-connect it to a different USB 2.0 port Windows may ask for the
drivers again. Repeat the above procedure to re-install the drivers
for the newly selected USB 2.0 port.

DS-616C XL Setup Guide
24/10/2017
© Opticstar Ltd
9
Software Applications
The Opticstar DS-616C XL+ camera can be controlled by Nebulosity 2,
AstroArt and MaxIm DL.
Nebulosity
The DS-616C XL+ is bundled with a copy of Nebulosity v2 as
standard. Nebulosity is a fully featured application that provides
camera control and image processing. Nebulosity needs to be installed
as a first step but it will not provide DS-616C XL+ camera support by
default. The DS-616C XL+ software plugin for Nebulosity must be copied into
the folder where Nebulosity has been installed.
Nebulosity is ideal for astronomy. It supports long exposures, single or multiple
frame capture, and semi-video modes for real time visual observation of deep
sky objects.
AstroArt
Users of AstroArt v4 or later will be interested in the DS-616C XL
plugin for AstroArt. This plugin adds camera support with 6 binning
modes including 1x1, 2x2, and 4x4 all in colour. Fast focus and
preview modes are also supported. Please refer to the following
pages for detailed instructions.
MaxIm DL
Users of MaxIm DL v4 or later will need to install the DS-616C XL
plugin for MaxIm DL. The plugin enables MaxIm DL full camera
control with many binning modes including: 1x1, 2x2 and 4x4
binning all in colour. There is also support for fast readout speeds in
most modes. Please refer to the following pages for detailed
instructions.
Please note that the AstroArt and MaxIm DL software applications
are not bundled with the Opticstar DS-616C XL+ camera but may be
purchased separately.

DS-616C XL Setup Guide
24/10/2017
© Opticstar Ltd
10
Installing Nebulosity v2 and the DS-616C XL Plugin
Nebulosity v2 is a fully featured image processing software especially
designed for amateur astronomers. Follow the instructions below to
install the Nebulosity software.
1. Insert the supplied CD in the CD/DVD drive.
2. Navigate to the Nebulosity2 folder on the CD.
3. Double-click (LMB) on the setup_Nebulosity2.exe icon.
4. Follow the on-screen instructions to install Nebulosity.
To add support for the DS-616C XL+ camera to Nebulosity v2 please carry out
the following steps.
5. Navigate to the \Plugins\Nebulosity2 folder on the CD.
6. Copy all the files present inside that folder into the folder where
Nebulosity has been installed on the hard disk e.g. C:\Program Files
(x86)\Nebulosity2.
7. To run Nebulosity double-click (LMB) on the icon.
Please refer to the Nebulosity user manual found on the supplied CD in the
Nebulosity2 folder for full instructions. The Serial Number can be found on
the inside front cover of the camera Setup Guide (this guide).
Running Nebulosity v2
In Nebulosity, the DS-616C XL+
can be used in real time mode or
in long exposure mode. In real
time mode, the camera can
display colour images of deep sky
objects directly to the computer
as they are captured.
Nebulosity must first be
configured appropriately by the
user depending on the task in
hand.
The first step is to select the
camera model and get familiar
with Nebulosity’s right-hand panel settings.

DS-616C XL Setup Guide
24/10/2017
© Opticstar Ltd
11
Main Panel
The camera model must be selected from the pull-down
menu in the Capture Control section. The camera will be
identified as “Opticstar DS-616C XL”. Clicking on the
Advanced button opens a small window for image capture
options. Typically, these options are used when capturing
data as single frames or as a series of single frames. They
are not used for streaming real time video images.
Advanced Sub Panel
The Use Rolling Shutter option keeps
the camera in continuous capture (video
like behaviour) more. As soon as one
frame has been captured, another one
starts automatically. This ensures that
there is no pause between frames. When
the High Speed read option is selected
the camera outputs 8-bit data to the
computer at high speed. Otherwise the
data is output in 16-bit format at
standard speed.
The binning modes can be 1x1, 2x2 and 4x4. The 2x2 mode reduces the image
resolution to one quarter (1516x1007) of the original but it quadruples the
camera’s light sensitivity. Similarly, the 4x4 mode reduces the image resolution
to one sixteenth (758x503) of the original but the light sensitivity increases by
16 times. Unlike other colour cameras, the DS-616C XL+ can perform binning in
colour.
The exposure time can be entered in seconds and milliseconds. Longer exposure
times increase light gathering and sensitivity but reduce the camera’s frame
rate. The Gain value can be used to increase the sensitivity of the camera by up
to 100%. This signal amplification takes place in the camera and it is combined
with noise reduction electronics.
The StarView window runs semi
independently of Nebulosity itself and it
can be used as a very high sensitivity
mini video window. It has its own
controls for exposure time, gain and
brightness. It displays colour video at
36 times higher sensitivity than normal.
It can be used to assist in quick
focusing and previews. The StarView
window cannot be in use when
Nebulosity itself reads data from the
camera.

DS-616C XL Setup Guide
24/10/2017
© Opticstar Ltd
12
The Offset value controls the camera’s Black Level. Typically, high data values
contain more noise (bad data) than signal (useful data). The user can adjust this
setting to modify at runtime the cut-off point between signal and noise. The
most appropriate Offset value depends on many factors including the exposure
time, gain value, the target, the binning mode, etc.
Video Mode
The camera can be set to video mode from
the Preferences panel. On Nebulosity’s main
menu at the top select Edit > Preferences.
For colour video, in Acquisition Mode select
Recon (RGB/square): Quality. For lower
quality but faster video select Recon
(RGB/square): Speed. By default these
video modes work in 2x2 binning (1516 x
1010 pixels).
The light sensitivity of the video can be
increased by reducing the size of the video
image by ticking the Use max binning in
Frame Focus option. This option uses 4x4
binning (758 x 505 pixels).
Close the Preferences panel by clicking the
Done / Save button. From now on, the
camera can be run in video mode by clicking
the Frame and Focus button on
Nebulosity’s main right hand panel.
The camera will display video till the Abort button is clicked. The video mode in
Nebulosity is intended to be used for real time visual observation of deep sky
objects as well as planets.
For more information regarding Nebulosity please refer to the user manual on
the CD.
Support
There is an active community of Nebulosity users at the following Yahoo Group:
http://tech.groups.yahoo.com/group/stark-labs-astronomy-software/. Joining
this group may be beneficial by sharing the experiences with other Nebulosity
users.
For support related to the camera or the software drivers, or the Nebulosity

DS-616C XL Setup Guide
24/10/2017
© Opticstar Ltd
13
Installing the DS-616C XL Plugin for AstroArt
AstroArt is powerful image processing software especially designed
for amateur astronomers. Before installing the plugin, please ensure
that the camera’s software drivers and AstroArt have already been
installed on the computer. Follow the instructions below to add
support for the DS-616C XL+ camera to AstroArt.
1. Insert the supplied CD in the CD/DVD drive.
2. Navigate to the \Plugins\AstroArt folder.
3. Copy all the files from that folder on the CD into the folder where AstroArt
has been installed on the hard disk e.g. C:\Program Files
(x86)\AstroArt.
4. Run AstroArt.
5. From the Plug-in menu select CCD Camera.
6. Select the appropriate camera model identified as OS-616C and click on
the Check CCD button.
7. The camera will be initialized and the StarView window will appear. The
StarView window offers real-time video for focusing and previews. This is
an additional focus mode to the standard modes offered by AstroArt. A
second additional window will also appear titled Capture settings –
Opticstar 616C.

DS-616C XL Setup Guide
24/10/2017
© Opticstar Ltd
14
Binning Modes
There is support for 6 binning imaging
modes. These modes have been included
in order to maximize the performance of
the camera in specific areas including:
resolution, sensitivity and focusing. All
binning modes produce colour data.
Higher Image Quality
The 16-bit modes offer the highest quality data but at a lower speed. The first
three modes (1 –3) offer colour binning in 16-bits per pixel. They offer the
highest quality colour data.
Higher Speed
The 8-bit modes are (4 –6) used for higher frame rates and data readout
speeds. These modes are appropriate for focusing and fast previews (not for
data analysis). Typically, when operating in these modes, the camera is in
continuous video mode and it does not set/reset itself for every individual frame
captures. It continuously sends to the computer the data for every frame it
captures rather than waiting for the user to request the data. This ensures the
highest camera speed and image acquisition.
The continuous data capture option is selected by default whether the camera
operates in 8-bit or 16-bit mode. The user has the option to deselect it. Please
refer to the Capture Settings section below for more details.
When the camera is used at very short exposure times e.g. a few seconds or
less (focusing, previewing, etc) it should always be used in continuous capture
mode.
Mode
Binning
Bit Depth
Mono
Colour
Resolution
FPS
(max)
Sensitivity
1
1x1
16-bit
yes
yes
3032x2014
0.5
X1
2
2x2
16-bit
yes
yes
1516x1007
0.5
x4
3
4x4
16-bit
yes
yes
758x503
0.5
X16
4
1x1
8-bit
yes
yes
3032x2014
1.0
X1
5
2x2
8-bit
yes
yes
1516x1007
1.0
x4
6
4x4
8-bit
yes
yes
758x503
1.0
X16

DS-616C XL Setup Guide
24/10/2017
© Opticstar Ltd
15
StarView
The StarView window
cannot be in use
simultaneously with
AstroArt’s capture and focus
modes. StarView provides a
high sensitivity preview
mode (6x6 binning) in
colour. The exposure time
can be set between 100
milliseconds and 10
seconds.
The hardware Gain function
can be set using the vertical
slide bar on the StarView
window.
Raising the Gain, greatly increases the light sensitivity of the camera. This Gain
setting only affects the StarView window. Similarly, the black level value for the
StarView window can be selected on the B Level slide bar. This value sets the
range of data captured by the camera. The Brightness slide bar can be used to
adjust the brightness of the StarView image.
It is also possible to invert of reflect the image displayed on the StarView
window by ticking the Inv and Ref options in the bottom right hand corner of
the StarView window.
Capture Settings
The Capture Settings window includes
two slide bars that control two of the
camera’s most important hardware
functions. The Gain settings increases
the light sensitivity of the camera
dramatically when AstroArt captures
image data (excludes StarView). The
maximum Gain value can double the
sensitivity of the camera but it will also
introduce some noise. Setting the Gain
at 50% will give a significant boost in sensitivity while keeping noise levels low.
The Black Level function sets the lowest value of image data captured by the
camera that is considered useful (e.g. signal rather than noise). Any data
captured below this level is considered noise and it is discarded. This enables
the camera to maximize its dynamic range with useful data.

DS-616C XL Setup Guide
24/10/2017
© Opticstar Ltd
16
The 8-bit and 16-bit optimization modes eliminate pauses between successive
exposures as long as the exposure time remains constant and the binning mode
does not change. In most cases it is preferable to set the camera in continuous
capture mode for 8-bit and 16-bit binning modes.
Colour Synthesis
By default all images captured in AstroArt (but
not in StarView) are displayed in raw format.
Raw data broadly resembles a monochrome
image but in reality, it is not. The raw data
includes the colour information that can be
used to produce a colour image.
The process of converting raw data into a
colour image is called Colour Synthesis. This
option can be selected from AstroArt’s main
menu under Color > CCD Color Synthesis.
In order to reproduce the colour information
correctly, the RGB layout (RGB Matrix) must
be configured in AstroArt. The Xand Y Offset
values must be set at 1and 1respectively as
shown on the right hand side.
If a small region of data has been captured
rather than the full CCD image area, then it is
likely that the offset values may have to be set
at different values. This is also the case for
some of the colour binning modes. Please refer
to the AstroArt documentation for more
information.
Support
There is an active community of AstroArt users at the following Yahoo Group:
http://tech.groups.yahoo.com/group/AstroArt/. Joining this group may be
beneficial by sharing the experiences with other AstroArt users.
For support related to the camera or the software drivers, or the AstroArt

DS-616C XL Setup Guide
24/10/2017
© Opticstar Ltd
17
Installing the DS-616C XL Plugin for Maxim DL v4/v5
MaxIm DL is a powerful image capture and processing software
especially designed for amateur astronomers. Before installing the
plugin, please ensure that the camera’s software drivers and MaxIm DL
have already been installed on the computer. Follow the instructions
below to add support for the DS-616C XL+ camera to MaxIm DL.
1. Insert the supplied CD in the CD/DVD drive.
2. Navigate to the \Plugins\MaxImDL folder.
3. Copy all the files from that folder into the folder where MaxIm DL has
been installed on the hard disk e.g.
C:\Program Files (x86)\Diffraction Limited\MaxIm DL V5.
4. Run MaxIm DL.
5. Click the Toggle CCD Control icon and select the DS-616C
camera identified as Opticstar 616C.
6. The camera will be initialized and the StarView window will appear. The
StarView window offers real-time video for focusing and previews. This is
an additional focus mode to the standard modes offered by MaxIm DL. A
second additional window will also appear titled Capture settings –
Opticstar 616C.

DS-616C XL Setup Guide
24/10/2017
© Opticstar Ltd
18
Binning Modes
There is support for 6 binning imaging
modes. These modes have been
included in order to maximize the
performance of the camera in specific
areas including: resolution,
colour/monochrome, sensitivity and
focusing.
Higher Image Quality
The 16-bit modes offer the highest quality data but at a lower speed. The first
three modes (1 –3) offer colour binning in 16-bits per pixel. They offer the
highest quality colour data.
Higher Speed
The 8-bit modes are (4 –6) used for higher frame rates and data readout
speeds. These modes are appropriate for focusing and fast previews (not for
data analysis). Typically, when operating in these modes, the camera is in
continuous video mode and it does not set/reset itself for every individual frame
captures. It continuously sends to the computer the data for every frame it
captures rather than waiting for the user to request the data. This ensures the
highest camera speed and image acquisition.
The continuous data capture option is selected by default whether the camera
operates in 8-bit or 16-bit mode. The user has the option to deselect it. Please
refer to the Capture Settings section below for more details.
When the camera is used at very short exposure times e.g. a few seconds or
less (focusing, previewing, etc) it should always be used in continuous capture
mode.
Mode
Binning
Bit Depth
Mono
Colour
Resolution
FPS
(max)
Sensitivity
1
1x1
16-bit
yes
yes
3032x2014
0.5
X1
2
2x2
16-bit
yes
yes
1516x1007
0.5
x4
3
4x4
16-bit
yes
yes
758x503
0.5
X16
4
1x1
8-bit
yes
Yes
3032x2014
1
X1
5
2x2
8-bit
yes
Yes
1516x1007
1
x4
6
4x4
8-bit
yes
Yes
758x503
1
X16

DS-616C XL Setup Guide
24/10/2017
© Opticstar Ltd
19
StarView
The StarView window
cannot be in use simulta-
neously with MaxIm DL’s
capture and focus modes.
StarView provides a high
sensitivity preview mode
(6x6 binning) in colour. The
exposure time can be set
between 100 milliseconds
and 10 seconds.
The hardware Gain function
can be set using the vertical
slide bar on the StarView
window.
Raising the Gain, greatly increases the light sensitivity of the camera. This Gain
setting only affects the StarView window. Similarly, the black level value for the
StarView window can be selected on the B Level slide bar. This value sets the
range of data captured by the camera. The Brightness slide bar can be used to
adjust the brightness of the StarView image.
It is also possible to invert of reflect the image displayed on the StarView
window by ticking the Inv and Ref options in the bottom right hand corner of
the StarView window.
Capture Settings
The Capture Settings window includes
two slide bars that control two of the
camera’s most important hardware
functions. The Gain settings increases the
light sensitivity of the camera dramatically
when MaxIm DL captures image data
(excludes StarView). The maximum Gain
values can double the sensitivity of the
camera but it will also introduce some
noise. Setting the Gain at 50% will give a significant boost in sensitivity while
keeping noise levels low.
The Black Level function sets the lowest value of image data captured by the
camera that is considered useful (e.g. signal rather than noise). Any data
captured below this level is considered noise and it is discarded. This enables
the camera to maximize its dynamic range with useful data.
Table of contents
Other Opticstar Digital Camera manuals