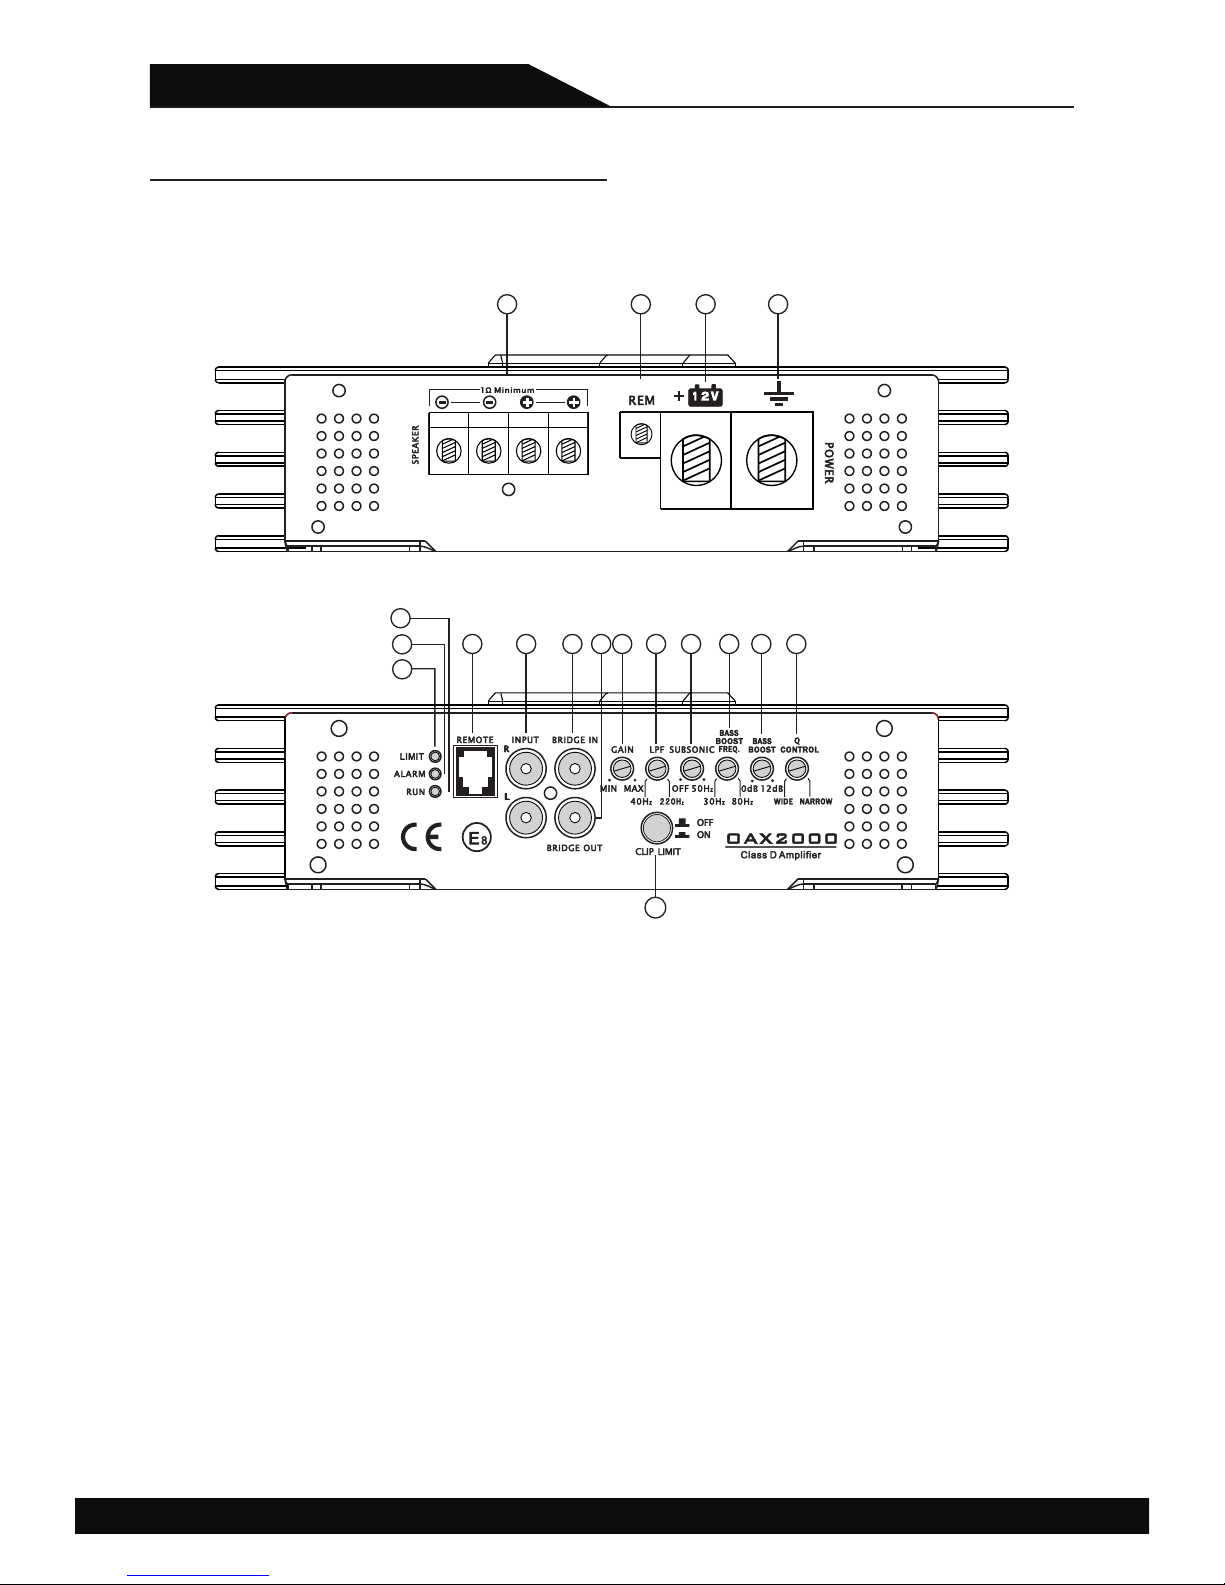
Option Audio OAX2000 User manual

OWNERS MANUAL
OAX2000
PRO-Series
Mono Bass
Car Amplifier PRO-Series Mono Bass Car Amplifier

DESIGN FEATURES
Double side FR-4 PCB, high quality SMD components
Compact size & Light weight
Full circuit designMOSFET
24dB Low pass filter and subsonic filter adjustable
Passed RoHS, E-mark certification
Overload, thermal, low/high power voltage protection
Easy bridging, optional remote gain control
Bassbosst frequency, level and Q factor adjustable
12
Advanced power management function
Clip limit function
The Ultimate Sound Experience
Congratulations on purchasing an Option Audio !
At Option Audio, we like our music LOUD! Manufactured using the
latest in cutting edge technology and high quality components,
you can trust your Option Audio amplifier will sustain optimum
sound, while not compromising quality.
We manufacture a large range of In-Car Audio Visual products,
Speakers, Subwoofers, Amplifiers, GPS and Reverse Camera
Systems. To view our product range, please visit our website
www.optionaudio.com.
Please retain this manual and your sales receipt for future
reference.
We appreciate all feedback you may have. Please address this to:
Option Audio
Unit 5, 3-19 University Drive,
Meadowbrook, Qld, 4131
Info@optionaudio.com
Ph: 07 3805 5112
Serial# ___________________________
Dealer's Name______________________
Date of Purchase____________________
Installation Shop____________________
Installation Date ____________________
amplifier
AUSSIE OWNED AND
ENGINEERED
OPTION AUDIO

AMPLIFIER FUNCTIONS
1 Speaker connection
2 +12V Battery Terminal
3 REM
4 GND
5
Gain
6 RCA audio-input
Filter out high frequency from 40Hz to 220 Hz that the woofer can`t play. Adjust this
knob to match the woofer`s frequency response.
The +12 Volt power cable must be connected with a fuse in line near the battery+
terminal. Please see table 1 in page 7 to select cable and fuse.
Connect your speakers correctly which means plus to plus and minus to minus. Never
connect speaker cables with chassis ground directly. It may destroy your amplifier. We
recommend AWG 8-10# speaker cable. The two plus units and two minus units are
connected inside amplifier. The detailed connection method is shown in page 7~8.
Chassis ground terminal. The chassis ground cable must be connected very tight on a
nearby massive and electric conductive place. Please connect chassis ground near
amplifier with same gauge as power cable.
These RCA audio-inputs connect with your source unit RCA outputs. Please use car audio
RCA cables, otherwise it may be disturbed. Keep these cables as short as possible. To
avoid disturbances from your car electronics, please don`t close the existing car cables
when you install the RCA cables. If your source unit has only speaker outputs, you should
use a HIGH-LOW level adaptor.
7 Remote Volume Control ( Optional )
8 LPF( Low Pass Filter)
9 SUBSONIC
34
OAX2000
12
34
When using the remote volume control you can adjust volume in the driver seat
conveniently.
It is the opposite of the LPF. It can filter out unwanted low frequency from 10Hz (OFF) to
50Hz. This function will increase the power handling of your woofers.
Remote terminal. The remote cable must be connected with source unit remote terminal
then amplifier will switch on and off automatically with source unit. If there are two or
more amplifiers connected to this terminal it might be necessary to add an additional
relay.
Gain control regulates the sensitivity of amplifier to match the signal output voltage of your
source unit. The gain control is not a volume adjustment. Use high quality CD music and
increase the volume of your source unit to 75%. Position the gain at the minimum and then
increase gain slowly (clockwise) .Stop at the first sign of distortion, then lower the gain a
little (counter clockwise) to achieve clear undistorted music at the maximum level.
10 BASSBOOST FREQ
11 BASSBOOST
This knob controls the boosted center frequency. The frequency can be adjusted from
30Hz to 80Hz according the specification of your car audio system. (Eg. When you adjust
this knob to 50Hz, amplifier can boost the frequency around 50Hz.) This function should
be adjusted along with bassboost level and Q control.
This knob adjust the boost level of the bassboost center frequency. It can be adjusted
from 0 to 12dB. Combining with bassboost frequency and Q control, you can accurately
match the amplifier to subwoofer’s response.
5
6
714
13
12
9
17
16
15 810 11
18
OPTION AUDIO

15 BRIDGE OUT
5 6
This RCA output send out bridge signal to another same X-series amplifier in bridging
configuration. All the functions will be adjusted by the master amplifier. Please see the
drawing of bridging in page 12.
This blue LED will light up when amplifier work properly. It will flash or shut down once
amplifier in self-testing or malfunction.
16 Run Indicator
17 Alarm Indicator
This red LED will light if amplifier has detected a fault or has shut down to protect
itself from permanent damage. This may caused by one of the following: excessive
heat, short circuit, low voltage, high voltage or overload. If this happens please shut
down the amplifier and check the problem.
Don't expose any cables out of car.Please take care insulated cables to avoid be
damanged when cables pass through metal, rubber and plastic etc. Don't install all
cables too tight.
Please use car audio RCA cables, otherwise it may be disturbed. Keep these cables as
short as possible. To avoid disturbances from your car electronics, please don`t close the
existing car cables when you install the RCA cables.
Table 1
The ground wire should be connected directly with the chassis of your vehicle which
should be metal to metal ground point connection.
The amplifier must be mounted securely at a solid, dry and low vibration surface in the
trunk or passenger area. Fix the amplifier in an open air area to insure proper heat
dissipation. Fix the amplifier in a place where can access easily to set input
controllers.
INPUT WIRING CONFIGURATION
Optional Remote Bass Level Control
OAX2000
5V Max Signal Input Source Unit
14 BRIDGE IN
This RCA jack receives signal from the master amplifier when this amplifier is bridged as
slave. DO NOT use input jacks when the amplifier is working as slave. All the functions
will be adjusted by the master amplifier. Please see the drawing of bridging in page 12.
Model Fuse Cable
OAX2000 150AMP AWG 0-2#
12 Q-Control
18 Limit Indicator
This yellow LED will light if amplifier is driven to it’s power limit. This may occur when
amplifier output clipping, overload or overheat. When limit indicator light up, the
amplifier will reduce or hold output power to protect subwoofer and amplifier. Please
turn down volume or cool down the amplifier when this indicator light up continually.
This knob adjust the curve shape of bassboost. Turn it to narrow side will make the
boosted frequency narrow and sharp, turn it to wide side will extend the boosted
frequency range. Combining with bassboost frequency and bassboost level adjusting,
youcan achieve a perfect bass response matching your system.
Please prepare sufficiently to layout your car space before installation. We
recommend to have the installation done by an Autho rized Dealer.OPTION AUDIO
PRE INSTALLATION
Use good insulated power cable to endure up to 80A current draw. The +12 Volt power
cable must be connected with a fuse in line near 20cm of battery+ terminal. Required
current, power cable and proper external fuse listed as following.
OPTION AUDIO

10
OUTPUT WIRING CONFIGURATION
One Subwoofer Wiring
FUSE
1 ohm Minimum
-
+
OAX2000
Two Subwoofers Wiring
OAX2000
2 ohm Minimum
2 ohm Minimum
+
+
-
-
BRIDGING
OAX2000
Amp # 2
SLAVE
Amp # 2
SLAVE
Amp # 1
MASTER
Amp # 1
MASTER
+
-
5 V Signal Inpput
Source Unit
2 ohm Minimum
Optional
Remote Control
7 8
FUSE
FUS E
FUS E
OPTION AUDIO

TROUBLE SHOOTING
If your amplifier is still malfunction after checking through the troubleshooting section,
please contact our authorized dealer.OPTION AUDIO
9
IMPORTANT
When bridging two amplifiers you should use same model amplifiers.
Please make sure the negative speaker terminal of two amplifiers are connected by
the same gauge cables as the positive terminal being used. Also make this cable as
short as possible.
DO NOT connect any signal cables to the input RCA jacks when bridged as slave unit.
All the functions will be disabled on slave amplifier when bridged. It will be adjusted
by the master amplifier.
MALFUNCTION SOLUTION
Power LED off
Check volume control on the source unit
No Output
(Power LED on)
Check GAIN regulator on amplifier
Check RCA cables and connections
Check speaker cable and connections
Bad speaker connections
Bass is weak Bass control on source unit is set on low
Subwoofers connected out of phase
Dual voice coils on subwoofer wired out of phase
Check connections both at amplifier and at other ends
Check plus and minus battery cables
Check all fuse on amplifier
Check remote voltage
No Output
(Alarm LED on)
Subwoofer is short circuit or damage
Amplifier is over temperature
Amplifier overloaded
+12V voltage is too low or too high
Distorted Output
Source unit gain set too high
Amplifier gain set too high
Speaker(s) blown
Amplifier switches
on and off
Check chasis ground connection with amplifier
Check cable terminals and battery terminals
Low voltage from battery
Check remote wire connect right
10
SPECIFICATION
OAX2000
MODEL
RMS Power @ 2OHM
RMS Power @ 1OHM
Input Sensitivity
Frequency Response
LPF
Subsonic Filter
BassBoost Frequency
BassBoost Level
THD at 4Ohm load 30% Rated Power
S/N Ratio
Efficiency @ 4Ohm load, rated power
Minimum load
Optional remote control
Bridging
Over load system
Overheat temperature protection
Components & PCB
Transparent Isolation Connector
DIMENSIONS(HXWXL) MM
0.2~5V
SMT& Double side board
YES
40~220Hz
10~50Hz
30~80Hz
0~12dB
<0.2%
>70dB
>85%
10~180Hz
1Ω
YES
YES
YES
90C/194F
53 228 396× ×
800W
1300W
2000W
RMS Power @ 4 OHM
BassBoost Q control
Yes
OPTION AUDIO

WEBSITE : WWW.OPTION AUDIO.COM
PRO-Series
Mono Bass
Car Amplifier
Table of contents
Popular Car Amplifier manuals by other brands

Kicker
Kicker KX550.3 manual

Rockford Fosgate
Rockford Fosgate 550X Installation and operation

Zeuz Audio
Zeuz Audio SPL-P2100 instruction manual

Pioneer
Pioneer PRS-D2000SPL - Premier Amplifier owner's manual

Boss Audio Systems
Boss Audio Systems CHAOS CH1000 user manual

MAC Audio
MAC Audio FEARLESS 1000 owner's manual

SoundMax
SoundMax SM-SA604 instruction manual

Rockford Fosgate
Rockford Fosgate Power Elite T20001bd Installation and operation

Sundown Audio
Sundown Audio SAZ-1000D owner's manual

Pyle
Pyle PLMRA620 user manual

Sony
Sony XM-504Z - Stereo Power Amplifier operating instructions

Ground Zero
Ground Zero GZNA 4350XII user manual