ORANGE Option GlobeTrotter User manual

Business Everywhere
Option GlobeTrotter 3G/EDGE data card Version 7.2

2
welcome
Congratulations on the purchase of your new Business Everywhere.
You are now just a few steps away from experiencing the advantages of
Business Everywhere; simplicity of use, predictable costs and value added services.
You will find the following items within your box. Please make sure that you configure
and use them only in the order shown in the next few pages.
■Business Everywhere software CD
■Option GlobeTrotter 3G/EDGE data card
■External antenna
If any of the above items are missing, please return to the supplier you bought your
Business Everywhere from and ask for the missing component.
NAVIGATION TIPS
■Click on the titles shown on the contents page to be taken directly to the
section of your choice. Click in the bottom right corner of the page to get
back to the contents.
■Click on URL’s e.g. http://www.orange.sk to be taken via your internet browser
directly to this internet page.
■Use the Bookmarks and Pages tab in Adobe Acrobat Reader to navigate easily
through the user guide.
■Use the orange underlined text in this interactive guide to navigate around
the pages and move directly to the section of your choice.
WARNING
Please do NOT connect the device before you install the software as damage may
occur to your computer. Orange assumes no responsibility for any damage or loss
caused by connecting the device before the software has been properly installed,
including any malfunction or damage to your computer or device, dead battery,
lost data or required repairs. Be sure to make backup copies of all important data
on other media to protect against data loss before commencing
the installation process.
Business Everywhere | welcome

3
contents
getting started 4
system requirements 5
insert your SIM card 5
install the software 6
attach your external antenna 7
user guide 8
01 launch Business Everywhere 9
02 your Business Everywhere dashboard 9
03 applications 10
04 signal & connections 10
05 using the network button 12
06 how to connect 12
07 internet 13
08 text messaging 13
08.1 new messages 14
08.2 send a text message 14
08.3 save and edit contacts 15
08.4 synchronisation 16
08.5 text messaging options 17
09 internet email 17
10 VPN 18
10.1 VPN buttons 18
10.2 configure your VPN settings 18
11 help 19
12 settings & reporting 19
12.1 settings 20
12.2 startup preferences 21
12.3 PIN Code 21
12.4 usage 22
13 advanced settings 23
13.1 web browser 23
13.2 email client 24
13.3 VPN client 24
13.4 add a device 25
13.5 button rules 25
13.6 HSDPA/3G/EDGE/GRPS access 27
13.7 add/remove a connection 28
14 using your Business Everywhere abroad 28
15 troubleshooting 29
frequently asked questions 30
FAQs - general questions 31
FAQs - general technical questions 33
FAQs - text messaging 34
Business Everywhere | contents

4
getting started
Business Everywhere | getting started
5
In order to run the device, your computer will need to meet the following
requirements:
■Operating Systems
■Microsoft Windows®XP
■Microsoft Windows®XP Service Pack 1 and 2
■Microsoft Windows®2000
■Microsoft Windows®2000 Service Pack 1, 2, 3 and 4
■Microsoft Windows®XP Tablet Edition
■Microsoft Windows®XP Tablet Edition Service Pack 1 and 2
■Microsoft Internet Explorer Version 5.5 or later
■Pentium II processor or equivalent
■128 MB RAM internal memory
■Minimum disk space 24 MB (The maximum application size is 105 MB)
■Type II PCMCIA card slot with cardbus interface
system requirements
WARNING
Please do NOT connect the device before you install the software as damage may
occur to your computer.
Business Everywhere | getting started
DO NOT connect your data card to your computer until prompted to do so during
the install process.
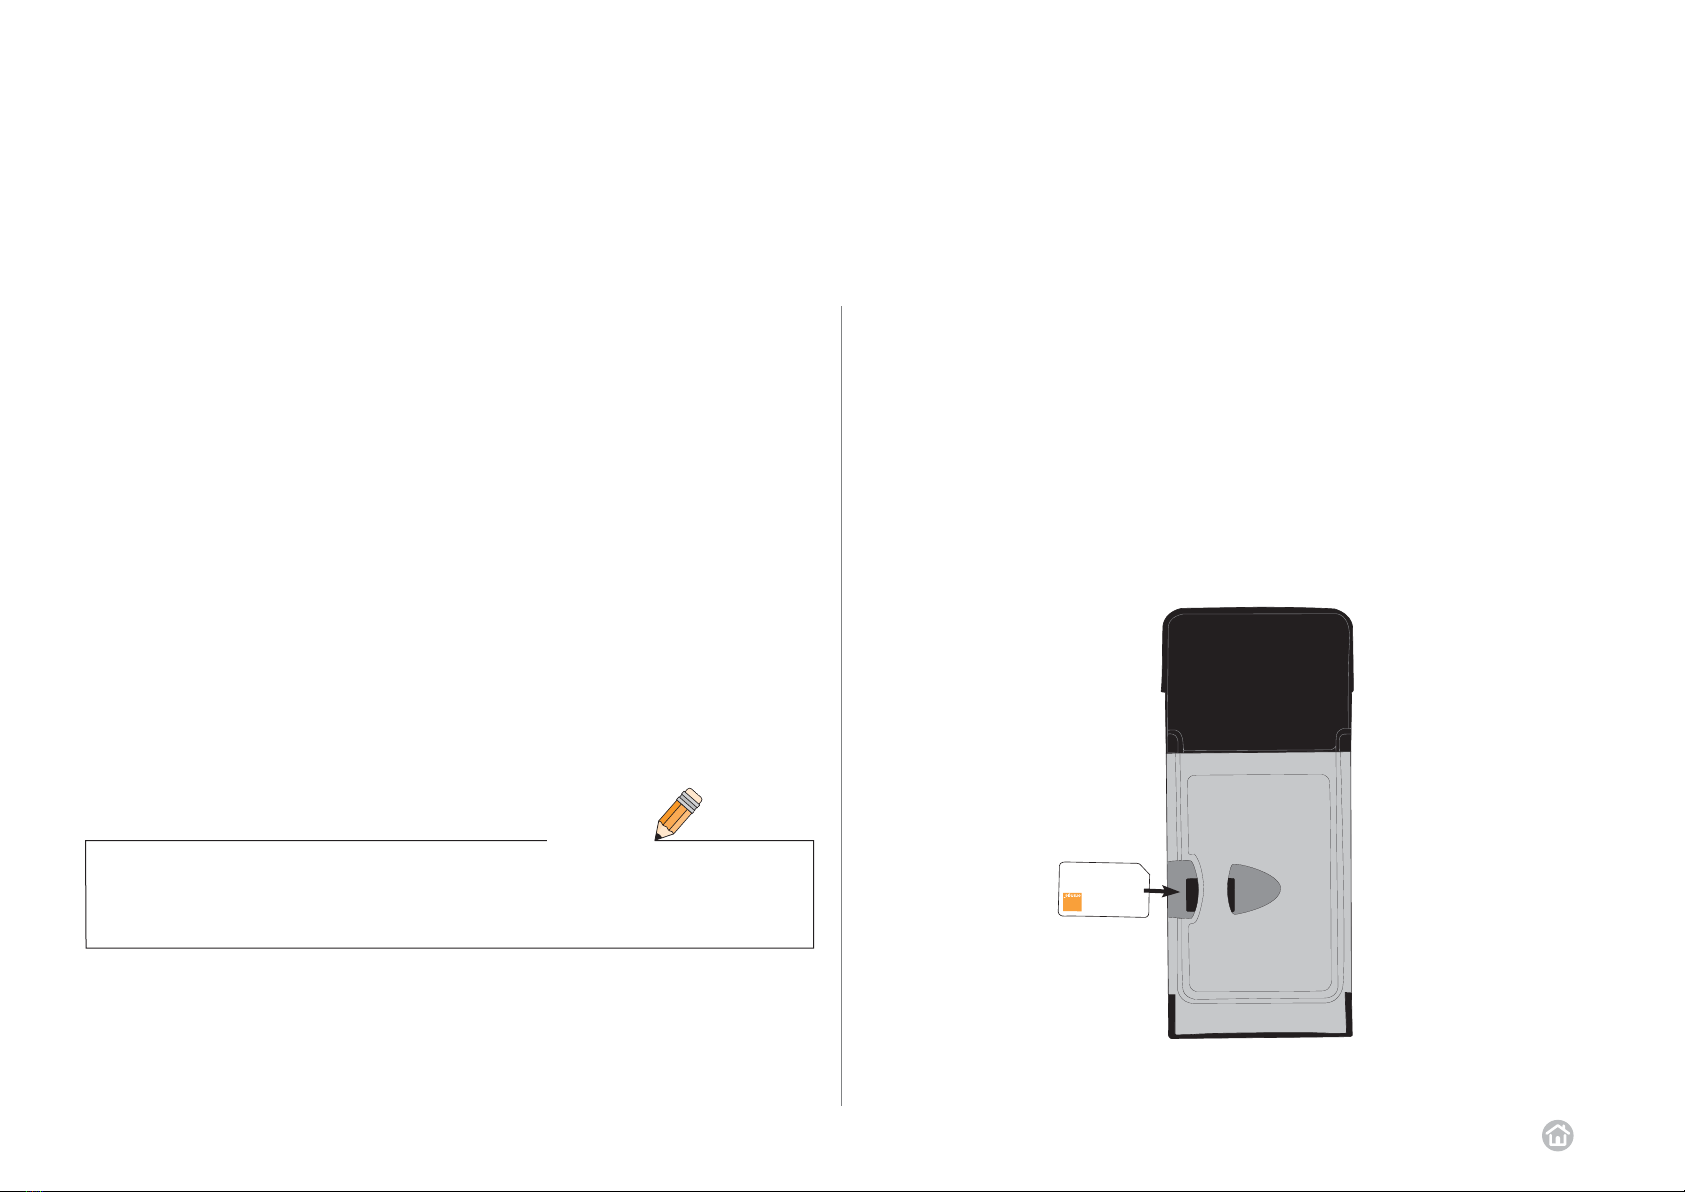
To insert your SIM card:
1Remove the SIM card from its plastic surround without touching the gold contacts.
2Insert your SIM card into the device as shown below.
insert your SIM card

6
Business Everywhere | getting started
To install the Business Everywhere software:
1If you already have existing Business Everywhere software installed on
your computer uninstall it by clicking Start > Programs > Orange Applications
> Uninstall. Close down your computer and restart without any network
connections.
2Insert the Business Everywhere CD into your laptop’s CD drive.
If the CD does not automatically start type X:\setup.exe in the Run dialog box,
where X is the letter denoting your CD drive.
3Please read the End User Software Licence Agreement with this product before
using the Business Everywhere. If you agree to these Terms and Conditions,
please click the box next to “I declare that I have read and understood this
license agreement, and I accept its terms”. Then click Next step.
4Click Install to begin the installation. Allow yourself approximately 15 minutes
to configure the Business Everywhere application.
5A bar will appear at the bottom right-hand corner of your screen showing the
progress of the installation. Insert the Option GlobeTrotter 3G/EDGE data card
into the card slot of your computer when prompted so that the end of
the antenna remains outside your laptop as shown on page 7.
6If the installation is successful the message “The Business Everywhere
software installation was successful” will appear. Click Next step to complete
the configuration.
7 Your Business Everywhere application will now launch for the first time.
You may be asked to reboot your computer.
8 The Business Everywhere software will be installed to Start > Programs >
Orange Applications. A shortcut will appear on your desktop and in your system
tray.
install the software

7
Business Everywhere | getting started
Your device comes supplied with an external antenna to enhance the signal reception.
This can be particularly beneficial when you are using the Business Everywhere on the
move. Simply follow the diagrams below to set up your antenna.
attach your external antenna
2
Insert the antenna lead into the metal hole
on the outside of your device.
1
Clip the
antenna to
the top of
your laptop
to keep it in
place while
you work.

Business Everywhere | user guide 8
user guide

Business Everywhere | user guide 9
Insert your device into your laptop. You can now launch the Business Everywhere
in two ways:
■Double-click the Business Everywhere icon on your desktop.
■Select Start > Programs > Orange Applications > Business Everywhere.
The Business Everywhere dashboard will open, with the network name and
signal strength appearing after a few moments. You will be able to use text
messaging, help and settings & reporting when you are offline. Connect by clicking
the internet, internet email or VPN button.
Note: You can set your Business Everywhere to open automatically when you
start your laptop using the settings & reporting menu.
See 12.2 startup preferences on page 21 for more information.
To close the Business Everywhere data card application:
1Click the disconnect button if you have an active connection, and then close
down any browser windows that may have opened.
2Click the Xicon in the top right of the Business Everywhere dashboard.
01 launch Business Everywhere
01-02
02 your Business Everywhere dashboard
WARNING
DO NOT remove your device from your laptop without first clicking on the relevant
system tray icon and safely stopping your device. Failure to follow this advice
could damage your laptop.
networks details
Displays the
network that you
are using.
HSDPA/3G/EDGE/
GPRS indicator
Indicates that a HSDPA/
3G or EDGE/GRPS
connection is avalaible.
details bar
Displays the status
and type of connection
you are currently
using, the duration of
your connection and
the amount of data
transferred during
the current session.
signal strength
The more bars
showing the
stronger the signal.
applications buttons
Click a button to access
that application. See
page 10 for an overview
of each application.
disconnect button
Press to end
your current
connection.
network button
Click the network button to
switch between HSDPA/3G/
EDGE/GPRS and Dial-up.
You will only be able to use
the network button when in
Manual connection mode
and disconnected.

Business Everywhere | user guide 10
03 applications
Your Business Everywhere dashboard gives you access to the following
applications. Click on an application button to launch the application.
Open your laptop’s default
internet browser. This will take
you to your internet homepage,
which is preset to
www.orange.sk
Send, view and organise
text messages, and store
a list of important contacts.
Access your internet based
email account. You will need
to select the account that you
wish to use when you open this
application for the first time.
Open an offline version of your
user guide in Adobe
Acrobat Reader.
Customise connection and
application settings.
Do not launch this application
without first consulting your IT
administrator or 12 settings &
reporting on page 19.
Click the network button for a list
of available networks. Note: this
button is only available when you
are in Manual connection mode
and disconnected (see 12.1
settings on page 20 for
more information).
Click the disconnect button to
close your connection.
Please note that this will not close
any applications launched during
the connection.
Connect to your business
network to access VPN based
applications. The VPN settings
will need to be configured
before you can use the
VPN button.
03-04
When you launch your Business Everywhere application it will automatically look for a
network. When a network is found, the network name and signal strength will be shown.
For example:
Your signal strength is shown by the number of bars visible, with 5 bars being the
strongest signal. Dial-up connections do not show signal strength.
If there are no networks available this will be shown as a signal strength X. If in
manual mode the last network chosen will be shown.
To see the networks available to you, click the Network button when you are
disconnected and in Manual mode. To establish a connection through Dial-up you’ll
need to select your preferred network and click the internet, internet email, or VPN
button to connect.
04 signal & connections
Business Everywhere | user guide 11
04
Your Business Everywhere application supports two different types of network connections. The table below explains what they are and in which way they can appear in
your network connection list:
ACCESS TYPE CONNECTION NAME DEFAULT DESCRIPTION
HSDPA/3G/EDGE/GPRS access
internet
corporate
intranet
HSDPA/3G/EDGE/GPRS allow you to keep a constant mobile network connection
while only paying for the data that you send and receive. For example, you will only
be charged for the amount of data that you download when opening a new web
page, and not for the time you spend viewing it
Dial-up access GSM
In some destinations worldwide Orange may not have roaming agreements with
HSDPA/3G/EDGE/GPRS. In some cases it might be possible to use a Dial-up
(PSTN) service instead. You will need a cable modem compatible with your laptop.
To use Dial-up you will also need to register for the service. Please contact your
Orange Account Manager for further details.
✓

Business Everywhere | user guide 12
Your Business Everywhere data card supports two main connection modes,
Automatic and Manual.
In Automatic connection mode your Business Everywhere data card will
automatically search for the most appropriate network. Depending on what is
installed or configured, your data card will look for HSDPA/3G/EDGE/GPRS access.
In Manual connection mode, you can choose from a list of available networks.
To switch between connection modes, you will first need to change your connection
mode in your settings menu. Go to 12.1 settings on page 20 to find out how to
change this setting.
Once you are in Manual connection mode, clicking the network button will open a list
of all available networks. Click on a network to use it.
05 using the network button
05-06
06 how to connect
Click on the internet, internet email or VPN buttons to make a connection and use
those applications. You do not need to be connected to use the text messaging,
help or settings & reporting applications.
Your connection details will be shown underneath the signal bar. When you are
connected you will see the text Connected, the duration of the connection and the
volume of data you have transferred at each session. Between brackets you will see
which type of connection you are using (for example HSDPA/3G/EDGE/GPRS or
HSDPA/3G only).
To close the connection, click the disconnect button. Please note that closing your
internet browser, email application or VPN software will not end your connection,
and you will continue to be charged for data services until you click
the disconnect button.
To conserve your laptop’s battery power you can stop your data card from looking
for a HSDPA/3G/EDGE/GRPS connection using the settings & reporting button.
See 12.1 settings on page 20 for details.
Business Everywhere | user guide 13
To start an internet connection:
1Open the Business Everywhere dashboard by double-clicking the icon on
your desktop.
2Click the internet button.
3A connection will be made and your laptop’s default internet browser application,
for example Microsoft Internet Explorer, will launch. You will be taken to the
Orange homepage.
4Click disconnect to stop your connection.
You can change the program that you use to browse the internet by using your
settings & reporting menu. Go to 13.1 web browser on page 23 for instructions.
07 internet
07-08
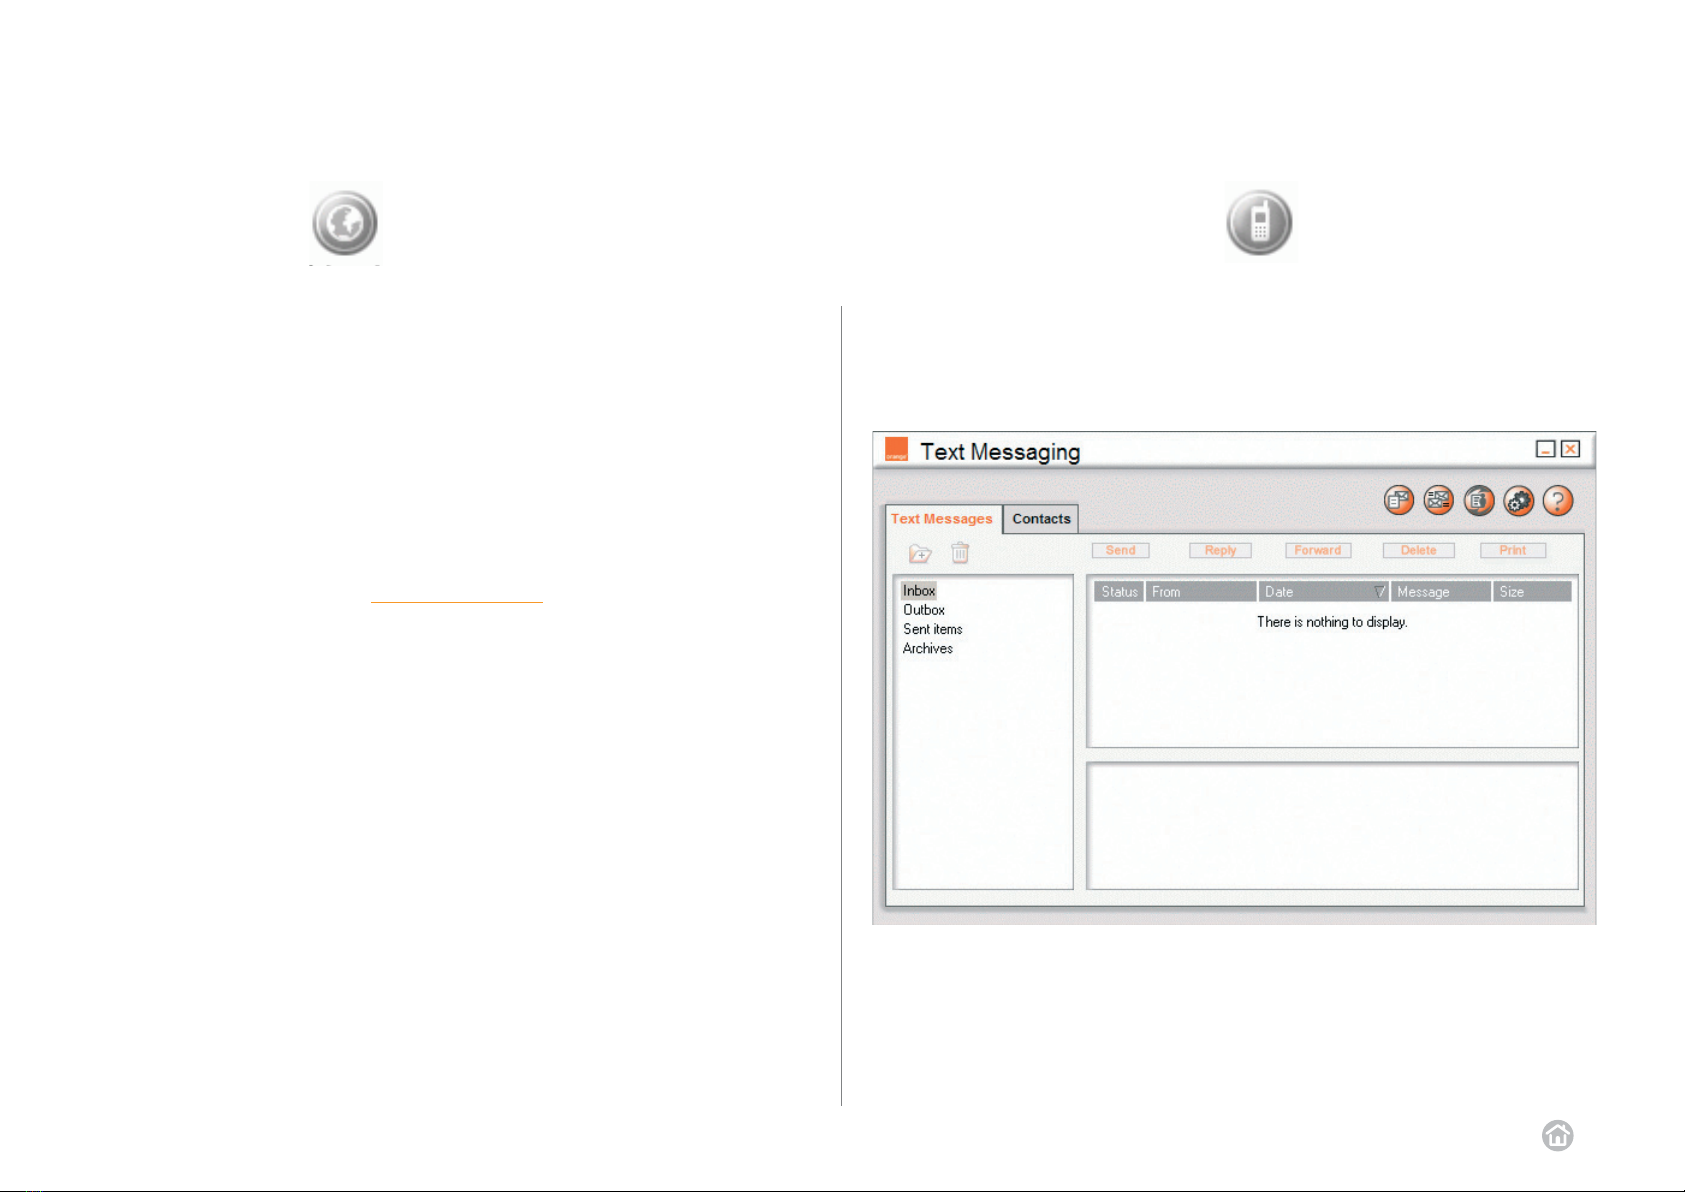
08 text messaging
You can use Business Everywhere to send, view and save text messages.
Click the text messaging button and the following screen will appear:
Your Business Everywhere data card automatically checks for new messages,
but you can also check manually.

Business Everywhere | user guide 14
To check for new messages:
1Click , any newly received messages will be displayed in your Inbox.
You will also be asked if you would like to send any messages you have stored
in your Outbox.
2Highlighting a message will display the text message in the box below.
3To delete a message highlight it in your Inbox and click Delete.
4You can also reply to, forward and print messages by clicking the relevant buttons.
To help keep organized you can store messages in separate Archives folders:
1Click Archives and then add folders and subfolders using . Highlight the folder
and click to rename it.
2To store a message in one of your Archives simply highlight the message in your
Inbox then use your mouse to drag it to the folder where you would like to store it.
08.1-08.2
To send a text message:
1Click , the following screen will appear:
2If you want to send the message to one of your saved contacts, check Contact and
then select the relevant contact and telephone number from the drop-down menus.
3If you want to send the message to a new number, check Telephone number(s)
and then enter the number. To send the message to more than one number insert
a semi-colon then space between the numbers, for example ...789; 0905....
You can also add saved contacts to your recipients by clicking Add a contact and
08.1 new messages 08.2 send a text message

Business Everywhere | user guide 15
08.2-08.3
To save a new contact:
1Click the text messaging button on your Business Everywhere dashboard.
2Select the Contacts folder and then click .
3Enter the relevant information about your contact in each of the tabs. Once you
have finished click OK to save the contact.
You can also save a contact from a text message that you have received by
right-clicking on the message and selecting Create a new contact.
To edit a saved contact:
1Click the Contacts tab and then click on the contact that you would like to edit.
2Click Edit and then change the information in the same way as when you first
saved the contact. Click OK to save the changes.
Note: Use to delete a contact.
You can also send a text message directly from your contacts list:
1Click the Contacts tab and then click on the contact that you would like to send a
message to.
2Click Send and then write and send your message in the usual way.
selecting the relevant contacts and then clicking OK.
4Enter your message in the lower box. A single text message can be up to
160 characters long. A message longer than 160 characters will be sent as
separate messages and you will be charged accordingly. You will also be charged
separately for each person the message is sent to.
5Click Send. The message will be stored in the Outbox folder whilst it is being sent.
6Once the message has been sent it will be saved in the Sent Items folder.
Note: If you click Save instead of Send the message will be stored in the Outbox,
from where it can be edited and sent at a later date.
08.3 save and edit contacts

Business Everywhere | user guide 16
You can synchronize contacts saved on your PC with contacts saved on your
SIM card:
From the dashboard click on . Then select . Choose to copy contacts from
your Mobile (SIM card) to your PC or from your PC to your Mobile.
If you chose Mobile to PC the following screen will appear:
Each line corresponds to a telephone number to synchronize.
The first column is the name of the contact from the SIM card memory you wish
to copy from. A suffix will be added depending upon the type of number you have
stored – for example / W will be added for work contacts.
The second column shows either the name and number of a contact if it is already
saved in the PC memory, or Creating: if the contact does not yet exist in the PC memory.
The fourth column shows whether you will be adding a new contact, or modifying or
deleting an existing one. Check each contact’s box in the fifth column if you would
like to go ahead with the synchronisation.
If you chose PC to Mobile the following screen will appear:
Each line corresponds to a telephone number to synchronize.
The first column shows the contact as it appears in the PC memory.
The second column shows the contact as it appears in your SIM card memory.
The third column shows whether you will be adding, modifying or deleting the
08.4 synchronisation
08.4

Business Everywhere | user guide 17
08.5-09
Your internet email button will to take you to a list of popular email providers.
Click the applicable link.
You can then choose to download a cookie, which will remind your laptop of your
internet email settings, and redirect you to your email account each time you click
the internet email button.
Alternatively, you can select an email application pre-installed on your laptop to
open when you click on the internet email button. The email clients supported are
Internet Mail & News 3, Outlook Express 4, 5, 5.5 & 6, Outlook 2000, 2002 & 2003,
Netscape Mail 3 & 4, and Eudora Light 3. Lotus Notes is not supported.
It is possible to switch between an email provider and your pre-installed email
program. For more information see 13.2 email client on page 24.
contact. Check the box next to each contract and click OK to synchronize.
Note: You can change the address book that your Business Everywhere data
card uses in your text messaging Options menu.
Clicking the will open your text messaging Options menu. The Options menu is
split into three tabs:
■Contacts Management
This tab allows you to choose the Address book of your PC, for example Outlook
Express, which is used by Business Everywhere. You can also choose whether
to view contacts from your SIM card memory or device memory. These contacts
can then be saved to your PC using the final option in this tab.
■Text Message Management
Choose to read messages from your SIM card memory, device memory or both.
You can then delete these messages from your SIM card or device once they
have been downloaded to your text messaging application. The Text Message
Management tab also contains options for sending messages; check the box to
automatically delete messages from memory after retrieving or to save copies of
sent messages in memory.
■Information
This tab displays information on the SIM card and device that you are using with
your Business Everywhere data card, including available space for new text
messages and network strength.
09 internet email08.5 text messaging options

Business Everywhere | user guide 18
10-10.1-10.2
10 VPN
When you click the VPN button for the first time you will be taken to a web page
explaining your connection options to your business network. Your IT administrator
should be able to help you with this.
10.1 VPN buttons
Once configured, the VPN button will connect you to your business network so
you will always have access to the files, emails and intranet that you need to keep
working efficiently whilst away from your desk.
Note: The VPN button can work in conjunction with VPN (Virtual Private Network)
software already installed on your laptop. You will need to ask your IT
administrator to install and configure your VPN software before you can use
your Business Everywhere data card to access your business network.
Before you can access your business network you will need to configure your VPN
settings. Contact your IT administrator, who will work through the instructions in
10.2 configure your VPN settings on page 18.
To access your business network (once configured):
1Ask your IT administrator to configure your VPN settings as described in
10.2 configure your VPN settings on page 18.
2Click the VPN application button.
If you want to use a VPN client to connect to your business network:
1Click settings & reporting > Advanced settings > VPN Client.
2Click Browse to find the VPN client that you would like to use. You may also need
to enter your proxy settings.
■LAN in the proxy type indicates that the Windows proxy must be used.
■None in the proxy type indicates that no proxy is used for the connection
■Other in the proxy type indicates the specified address and port settings that
are used whilst connecting. The Windows proxy settings are restored
after disconnection.
If you want to use Business LAN to connect to your business network:
1Click settings & reporting > Advanced settings > Add/Remove a connection.
2Click Add a connection, and select Corporate or Intranet from the list. Click OK.
3Click Advanced settings > HSDPA/3G/EDGE/GPRS access, and select
Corporate or Intranet (as previously added in 2).
4Enter the name of your corporate APN (case sensitive) and your username and
password if required. You may also need to enter your proxy settings (as before).
5Click Button rules, then VPN button and check the Use this order instead of
global search order box. Select Add, then choose Corporate or Intranet and click
OK.
It is also possible to configure GSM connections to your business network using a
Remote Access Server (RAS).
10.2 configure your VPN settings

Business Everywhere | user guide 19
11-12
Your settings & reporting button will allow you to customise network, connection
and functional settings, which will affect the way that your Business Everywhere
works.
Clicking your settings & reporting button will open the following screen:
The left hand side of your settings menu contains the following options:
Settings (see 12.1 settings on page 20).
Startup preferences (see 12.2 startup preferences on page 21).
PIN code (see 12.3 PIN code on page 21).
Advanced settings (see 13 advanced settings on page 23).
Usage (see 12.4 usage on page 22).
12 settings & reporting11 help
Clicking on the help button opens up the user guide in Adobe Acrobat Reader.
You can also access the user guide by going to Start > Programs >
Orange Applications > Business Everywhere Userguide.

Business Everywhere | user guide 20
12.1
12.1 settings
The Settings option within your settings & reporting menu allows you to set your
general preferences for your Business Everywhere application.
You can choose to switch between manual and automatic connection modes,
using the Select network preference rule drop-down menu.
Note: This option is only available when you are not connected.
By default your Business Everywhere application is set to Automatic connection
mode, meaning it will search and use the most suitable connection automatically.
Selecting Manual connection mode will enable you to click the network button in the
main dashboard window to select from a list of networks.
Go to 05 using the network button on page 12 for more details on Manual
connection mode.
Sections of this screen allow you to choose the device that you are using.
Devices can be added or removed using advanced settings.
If you are in an area of variable HSDPA/3G coverage (or moving in and out of
HSDPA/3G coverage whilst travelling) your Business Everywhere performance
can be reduced whilst your working session moves between HSDPA/3G and
EDGE/GPRS.
In this situation you can choose to use HSDPA/3G only or EDGE/GPRS only to
eliminate time taken to move between HSDPA/3G and EDGE/GPRS. This will
improve the performance and/or allow you to select the faster HSDPA/3G only
option.
Note: On trains it can be useful to select EDGE/GRPS only to minimise
session interuptions.
Use the Connection via HSDPA/3G/EDGE/GPRS drop down menu to choose
from:
■HSDPA/3G/EDGE/GPRS
Your data card will continue to switch between HSDPA/3G and EDGE/GPRS.
■HSDPA/3G
Your data card will only work when HSDPA/3G is available.
When you move out of a HSDPA/3G area you will lose your connection.
■EDGE/GPRS
Your data card will only work when EDGE/GPRS is available. It will not try to hand
over to HSDPA/3G, even if it is available.
The box next to Switch off radio when closing application will conserve your
battery power by stopping your data card from searching for a network when the
application is closed.
The Change operator button will allow you to switch between network operators
when Roaming abroad.
Standby and Hibernation mode management provides controls to try to maintain
a connection, close a connection or prevent standby and hibernation to maintain
a connection.
Table of contents


