Orbitor OR 1208SS User manual

orbitor
OR 1208SS
Astronomical and
Terrestrial Telescope
Instruction Manual

2
A. Finder Scope
B. Telescope Tube
C. Dew Shield
D. Eyepiece
E. Diagonal Mirror
F. Focuser
G. Altitude Lock Bolt
H. Azimuth Lock Screw
I. Tripod Height Adjusters
J. Tripod Legs
K. Universal Accessory
Bracket
Here are the Main Parts of Your
orbitor 1208SS
WARNING!
Do not aim your telescope at the sun, or anywhere near
the sun! Instant and irreversible damage can occur,
including blindness!
Do not let children use any telescope without adult
supervision at any time the sun is above the horizon.
A
B
C
D
F E
G
H
I
I
J
J
J
K

3
Introduction
Congratulations on purchasing your new tele-
scope. We hope it will give you many years
of enjoyment as it opens your eyes to some
of Nature’s most wondrous sights.
Please read this manual carefully and com-
pletely. It contains the information you need
to know to obtain the best results from your
telescope.
If you quickly passed over the sun warning on
the previous page, please go back and read it
now.
Good Luck with your new hobby, and may all
your skies be clear!
NOTE: Your telescope is equipped with
our exciting new Star Searcher. This
accessory will greatly add to the enjoy-
ment of your new telescope. Please read
the appropriate section describing the
Star Searcher.
CONTENTS
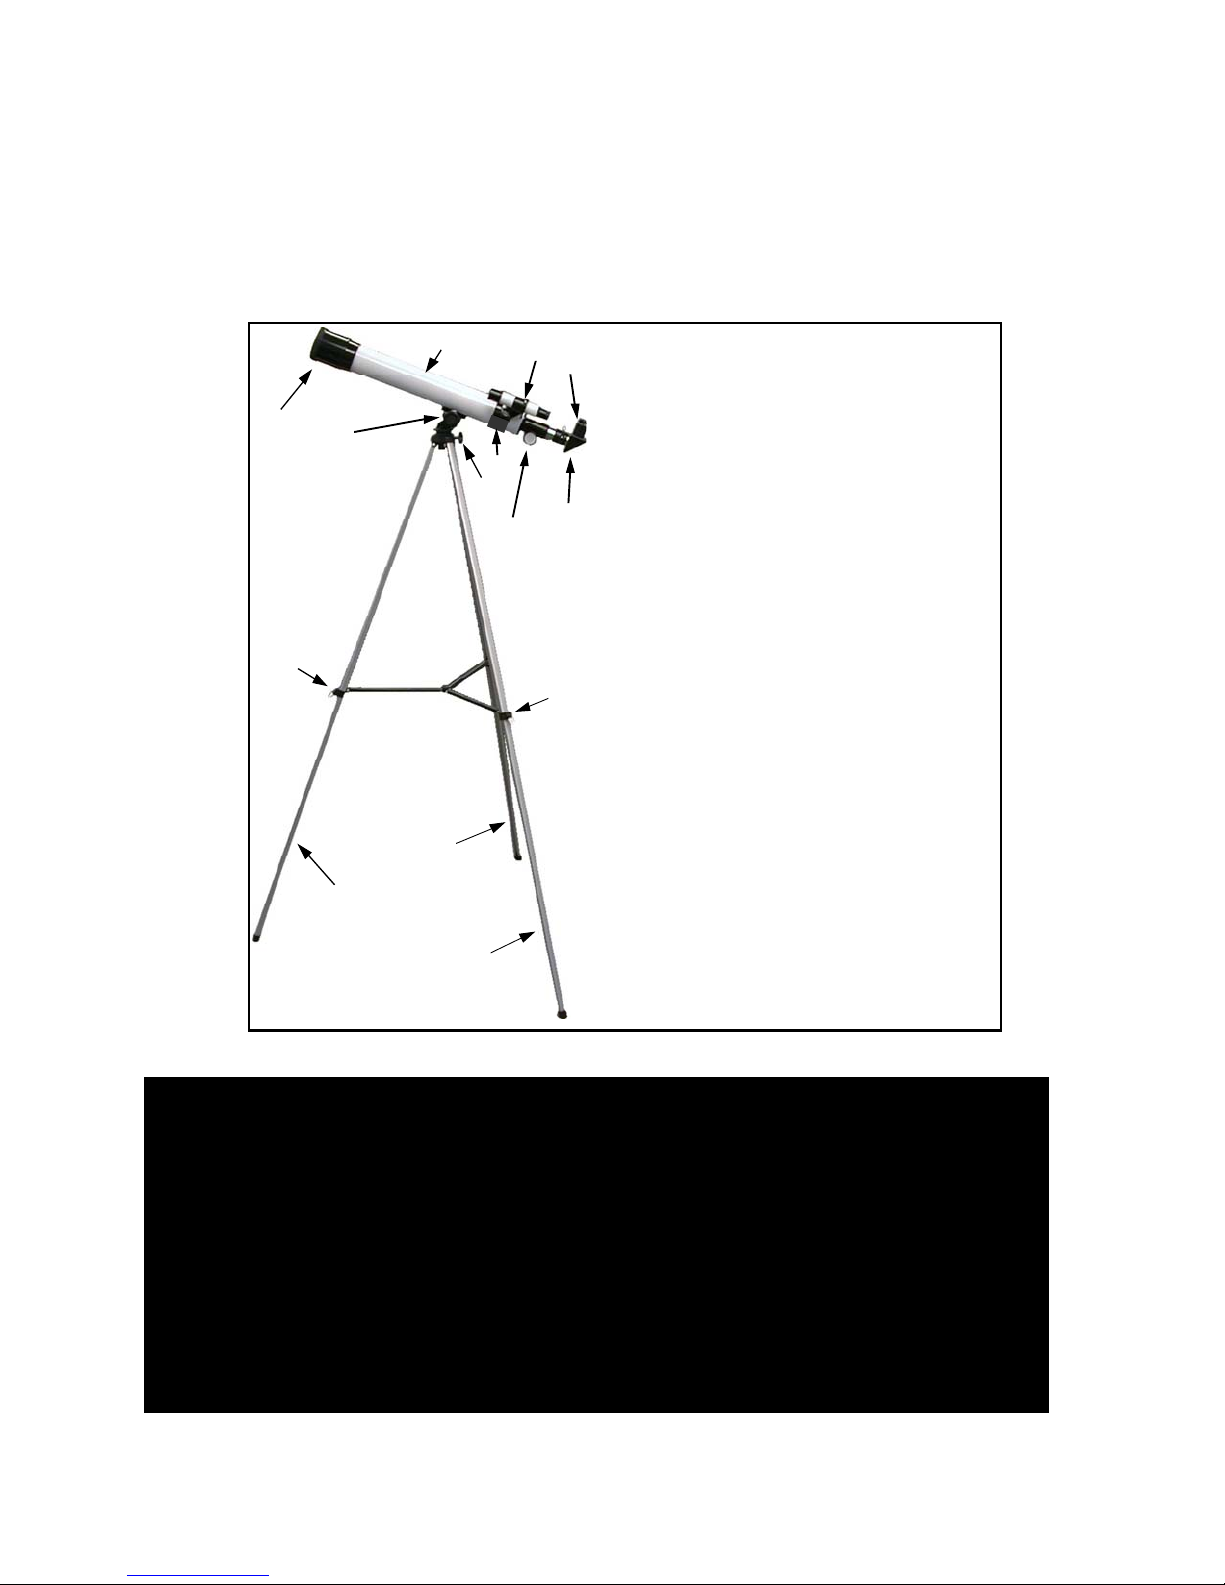
Telescope Parts . . . . . . . . 2
Sun Warning . . . . . . . . . . . 2
Introduction . . . . . . . . . . . . 3
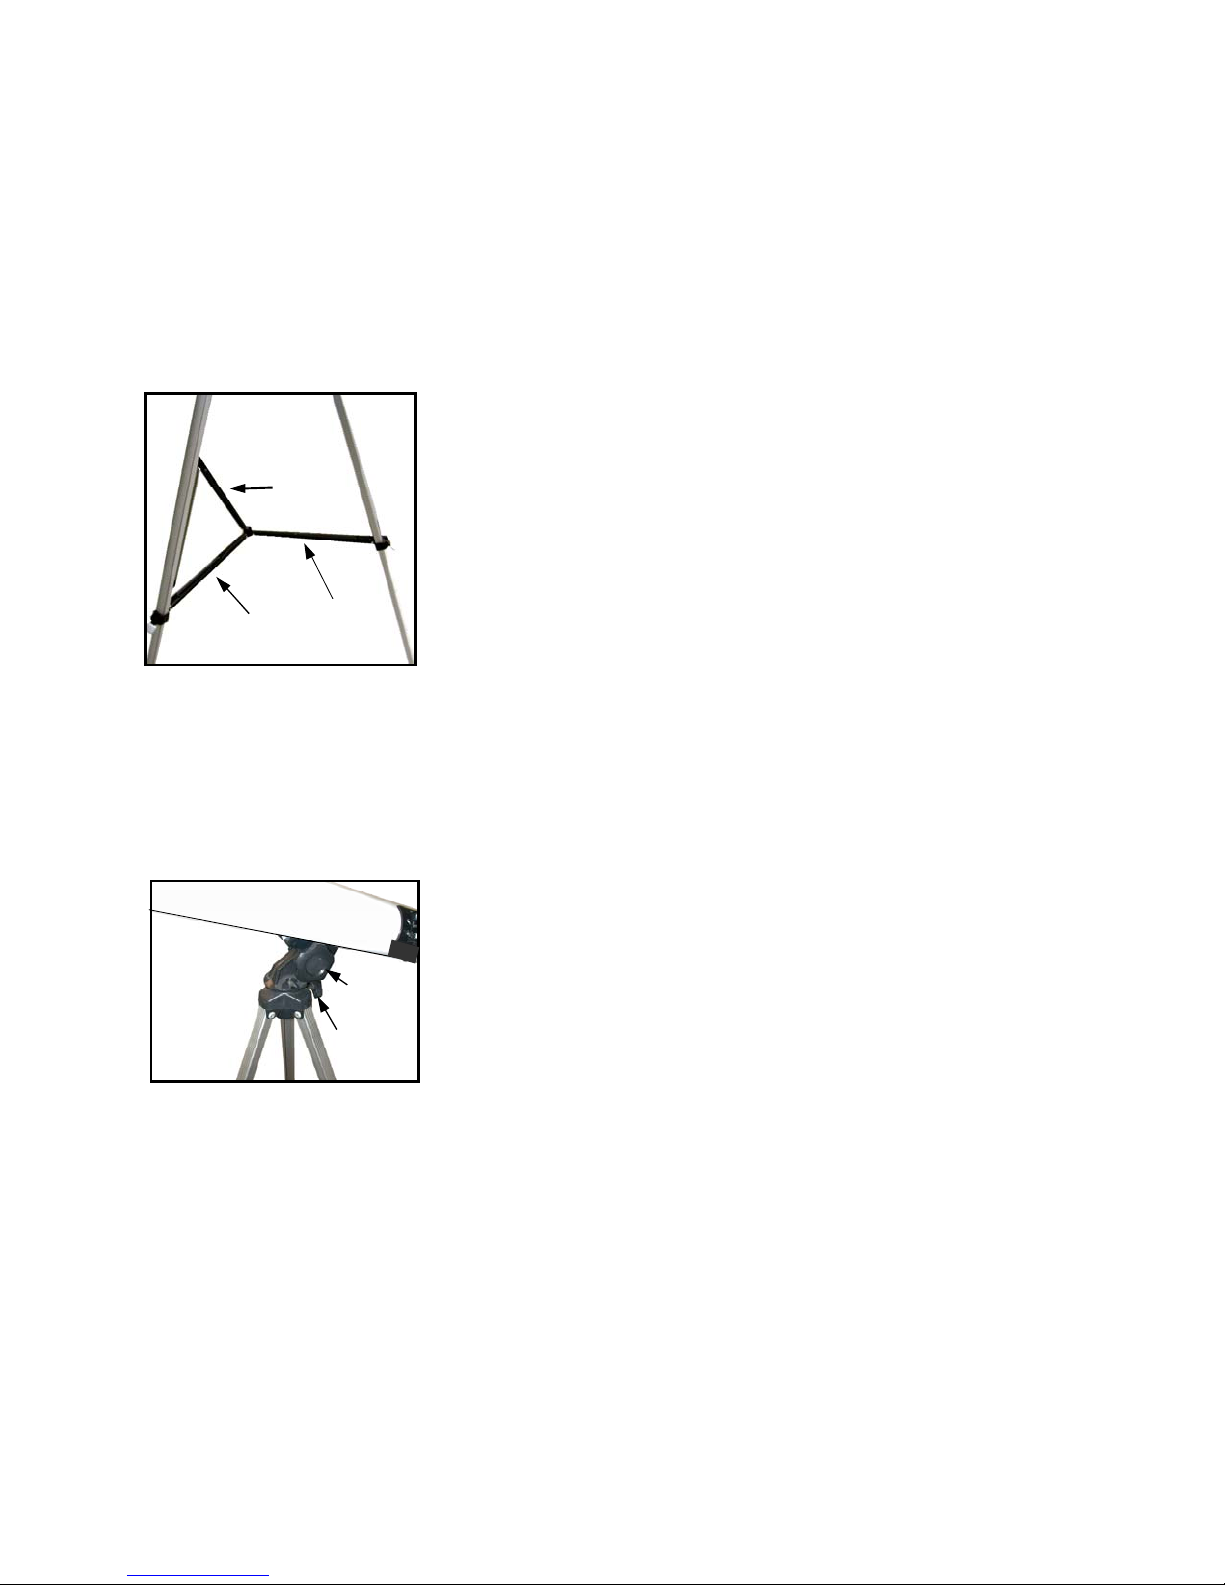
Assembly . . . . . . . . . . . . . .4
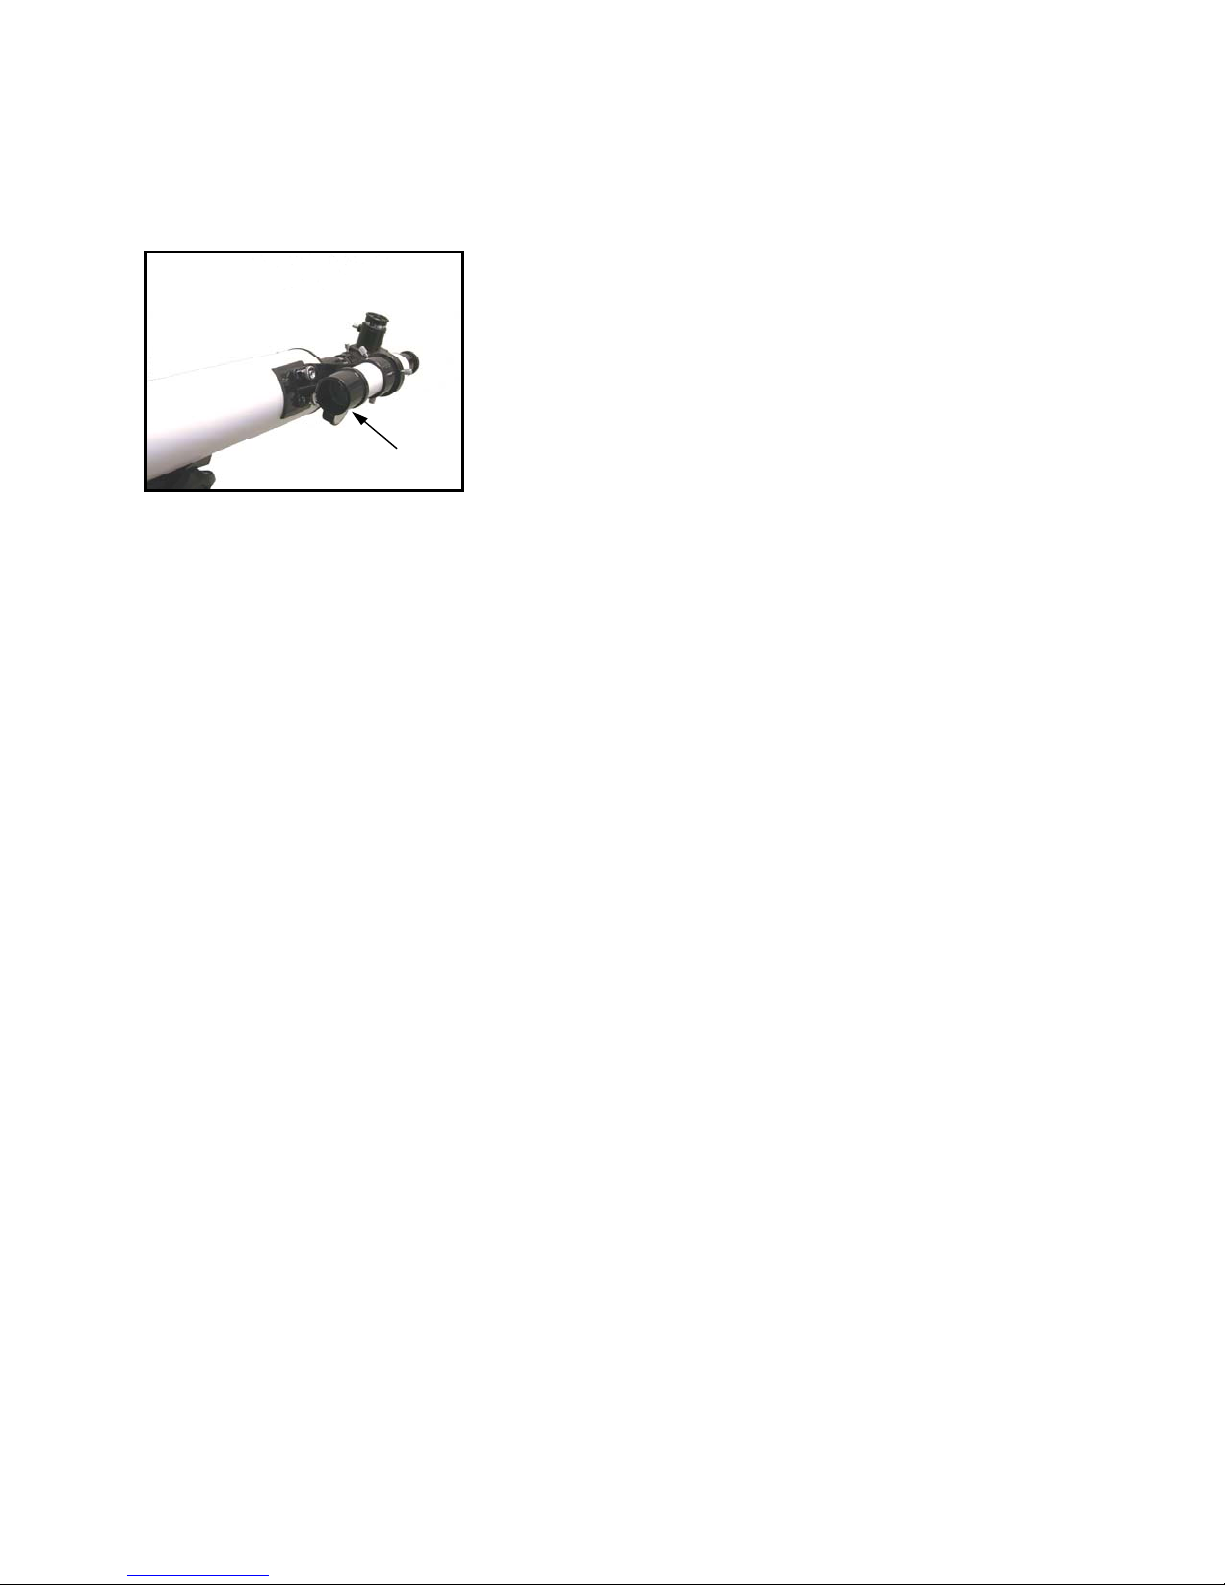
The Finder Scope. . . . . . . . 5
Finder Scope Alignment . . 6
Using Your Telescope . . . . 7
Astronomical Use . . . . . . . .7
Terrestrial Use . . . . . . . . . . .8
About Magnification . . . . . .8
The Star Searcher . . . . . . . .9
Care & Cleaning of Optics .11
What to Look For . . . . . . . .12
This unit uses 2 AA batteries. Always
use fresh batteries. If the unit will not be
used for an extended term remove the
batteries. Do not try and recharge a non-
rechargeable battery. Do not take a bat-
tery apart. Do not short circuit the termi-
nals. Do not dispose of a battery in fire.
It may explode.
Please Note:
We constantly improve and update our products.
Sometimes, as a result of these improvements,
what is seen on the package or in the instructions
may differ somewhat in color and content from the
product inside the package.
WARNING! CHOKING
HAZARD – Small parts.
Not suitable for children
under 3 years.
!

4
Assembly:
Remove all of the pieces from the box and lay them
out so you can clearly see them. Check that you
have all parts. Keep the box for storage, or if you
ever need to return the telescope for service.
1) Gently pull the aluminum tripod legs (J) apart
as far as they will go until the center leg
braces sit flat, in a horizontal position (Fig.1).
2) Locate the altitude lock bolt (G) and the
altitude lock nut.
3) The underside of the telescope tube (B) has
two prongs with a hole in each. Place these
prongs over the tang found on the tripod
mount and line up the holes.
4) One of the mount prongs has a cutout that is
the exact size and shape as the altitude lock
nut. Place the nut in this cutout. Then, while
holding this nut in place insert the altitude
lock bolt (G) from the other side. Turn the
bolt clockwise to tighten it. Be careful not to
over tighten.
5) The altitude lock bolt (G) is correctly tight-
ened when you can move the telescope tube
up or down and it will stay pointed at the
angle you want. (Figure 2)
6) Find the azimuth lock screw (H) and
tighten it, if necessary by turning it clockwise.
This screw, when fully tightened will lock
your telescope’s horizontal movement.
7) Insert the diagonal mirror (E) into the focus-
ing tube. Secure by tightening the two small
chromed tightening screws.
8) Insert the 20mm eyepiece into the diagonal
mirror (E). Tighten the small chromed screw.
LEG BR ACE
LEG BRACE
L E G B R AC E
ALTITUDE
LOCK BOLT
G
Figure 1
Figure 2
AZIMUTH
LOCK SCREW
H

5
The Finder Scope:
The Finder scope (A) is a small telescope that sits
on your telescope tube. It magnifies objects 5 times
and has a light collecting lens that is 24mm. in
diameter.
When you look through the Finder Scope you will
see an upside down image. This is normal and you
will quickly get used to it.
The viewing field of the finder scope is much wider
than that of your telescope and if you properly align
the Finder Scope it will make it easier for you to
precisely aim your telescope where you want.
Installing Your Finder Scope:
1) Your Finder Scope (A) comes already
installed in its mounting bracket. This bracket
attaches to your telescope at the end where
the focuser (F) is located. If the Finder Scope
tube is wrapped in plastic, loosen the three
positioning screws (Fig. 3) on the bracket un
til you can slide the Finder Scope out.
Remove the plastic and reinsert the Finder
Scope in the same direction that it was posi
tioned in before. Tighten the three positioning
screws.
2) You will see two chromed bolts sticking out
from the tube (Fig 3). Each one has two nuts.
Remove only the top nut from each bolt and
carefully set the two nuts aside.
3) Position the Finder Scope and bracket so that
the two holes in the bracket slip over the two
upright bolts and the larger lens of the Finder
Scope faces in the direction of the large lens
at the front of your telescope. Then thread
the two nuts you previously removed over the
two bolts. Tighten them firmly, but do not
overtighten, as you may crack the bracket.
CHROMED BOLT
POSITIONING SCREWS
POSITIONING SCREW
CHROMED BOLT
Figure 3

6
Aligning Your Finder Scope:
1) To work effectively your Finder Scope needs
to be aligned with your telescope. This is
most easily done during the daytime.
2) Locate the telescope diagonal (E) and the
eyepiece marked “20mm.”). Insert the
diagonal into the eyepiece holder, or focuser
(F), of your telescope. To do this you will
have to loosen two small set screws on the
outside of the eyepiece holder. When the di
agonal is inserted tighten these two set
screws. The diagonal has a small set screw
on its side. Loosen this screw just enough so
that you can insert the eyepiece (D) as far as
it will go. Then gently tighten the set screw to
keep the eyepiece from falling out.
3) Remove the black plastic lens cap from the
large lens at the front of your telescope and
look through your telescope to locate an
object as far away as you can. Use the focus-
ing knobs to make the image sharp. Adjust
the telescope tube until this object is in the
centre of the viewing field.
4) Tighten the altitude lock bolt (G) and the azi-
muth lock screw (H). Check the position of
your chosen object and re-adjust the tube po-
sition, if needed, to ensure that the object is
in the centre of the viewing field.
5) Slightly loosen the three positioning screws
on the Finder Scope. Look through the finder
and turn the tube until the crosshairs are
facing vertically and horizontally.
6) While looking through the Finder Scope,
carefully adjust the positioning screws until
your object is centred in the crosshairs.
Occasionally check the view through the tele
scope to make sure it hasn’t moved. When
the object is centred in both, and the position
ing screws are firmly holding the Finder
Scope, it is aligned.
Viewfinder

7
Using Your Telescope
1) Take your telescope outside. Do not try and
use it by aiming through a window. If the win-
dow is closed the window glass will introduce
reflections and distortions. If the window is
open the moving air currents of different tem-
peratures will cause distortions.
2) Let your telescope adjust to the outside tem-
perature. Your telescope will perform much
better if the lenses and the air inside the tube
are all the same temperature as the outside
air. This process may take up to 1/2 hour if
the temperature difference between inside
and outside is extreme.
3) Try to find a location that is away from glar-
ing lights. If you are in a large town or city
you may want to try and find a location in the
country. Using a telescope in the skyglow of
a town or city can cut its ability by half.
Astronomical Use:
1) From aligning the Finder Scope you know
how to change eyepieces. Always start view
ing with your 20mm. eyepiece. This is your
low-power eyepiece and its wide viewing field
will make it easier to locate objects. By the
way, you will notice that stars, when seen
through your telescope, still look like points of
light. This is because they are so far away.
Even the largest telescopes show stars only
as bright points.
2) Once you have located an object and the
view is clear you may wish to change to the
4mm. eyepiece. This is a much higher pow-
ered eyepiece. You will notice that your ob-
ject looks bigger, but not as bright as seen
with the 20mm. eyepiece. This is normal. If
the viewing conditions are not good the 4mm.
image may not appear sharp or stable. If this
happens, switch back to the 20mm. eyepiece
and try the 4mm. eyepiece another night.
EYEPIECE
DIAGONAL
MIRROR
FOCUSING KNOB
Figure 4

8
Terrestrial Use:
Your telescope is a dual purpose model. It can be
used for astronomy, as well as for viewing objects
on land. When viewing terrestrial objects you will
want objects to appear both right-side up, and cor-
rectly oriented left to right, just as you see them with
your eyes.
To achieve correct orientation you will use the Im-
age Erector that is supplied with your telescope.
1) Remove the diagonal from your telescope.
(Fig. 5)
2) Insert the Image Erector into the focuser.
Then insert the 20mm. eyepiece. When you
look through the telescope you will find that
the image you see is right-side up and prop-
erly oriented.
3) For more magnification remove the 20mm.
eyepiece and replace it with the 4mm one.
About Magnification (Power):
1) You have seen that as you change eye
pieces objects appear closer or further away.
You are seeing the effect of changing magni-
fication, or power.
2) To determine the astronomical magnification
of your telescope, divide the telescope’s
600mm. focal length by the focal length of
the eyepiece in use. Using this formula you
will see that the 20mm. eyepiece gives 30
magnifications (written 30X) and the 4mm.
eyepiece gives 150 magnifications (150X).
3) During terrestrial use the Image Erector mul-
tiplies eyepiece magnification by a factor of
1.5X. Therefore the 20mm. eyepiece gives
45X and the 4mm. eyepiece gives 225X.
EYEPIECE
IMAGE ERECTOR
Figure 5

9
THE OR7042 STAR SEARCHER
Introduction:
The IOR742 Star Searcher provides an easy and fun way to learn the positions in the sky
of the better known constellations that are seen from the Northern Hemisphere. It will also
show you the locations of some famous galaxies, star clusters and nebulae.
Parts of Your Star Searcher:
A. Adjustable mounting shoe
B. Illuminated card holder
C. Battery compartment
D. Battery compartment lid
E. On/Off switch
F. Constellation card storage compartment
G. Sample constellation card
H. Constellation map
I. Visible months chart
J. Mounting adapter
Getting Started
1) First, turn the battery compartment lid counterclockwise to remove it.
2) Then insert 2 “AA” alkaline batteries into the battery holder. Place the positive (+)
ends of the batteries in first, as is shown by the diagram printed on the outside of
the battery compartment.
3) Replace the battery compartment lid by turning it clockwise. Do not over-tighten.
Installation:
1) The Star Searcher will mount directly onto the telescope’s Universal Accessory
Bracket. Simply slide the Star Searcher’s adjustable mounting shoe onto the Uni-
versal Accessory Bracket.
2) Insert the illuminated card holder into the adjustable mounting shoe as shown in
picture.
3) The white face of the card holder should face the direction of the eyepiece.
B
F
G
H
I
D
E
C
A
J

10
4) Choose a constellation card. You will see a small chart with a jumble of letters. These
are the initials of the months of the year that this constellation is visible. For example, if
the constellation is visible in January, February, March and April the card will show
“JFMA”. If it is visible from June to October the chart would show. “JJASO”. Because
Ursa Major (the constellation that contains the Big Dipper) is seen all year in the North-
ern Hemisphere its chart looks like this; “JFMAMJJASOND”!
5) Place the chosen card in the card holder. Turn on the light and the card will be backlit
with a soft red light.
6) Each card has a letter ‘N’ with an arrow. This indicates how the constellation is posi-
tioned in the sky. With a compass, or by using the position of Polaris, the North Star,
determine which direction is North. Then turn your telescope until the N and arrow are
pointing in this direction.
7) Now all you need do is scan the sky in the general area your telescope is pointing until
you see a pattern of stars matching the pattern shown on your card. The card will give
the names of prominent stars and will also show any visible galaxies, star clusters or
nebulae in the area of the constellation
Once you have learned to recognize the main constellations and prominent stars you
will be able to locate planets, meteor showers and comets when they are described as
being in the region of a certain star or constellation. Note: To avoid unnecessary wear
and scratching please hold the constellation cards by their edges.

11
Care and Cleaning of Optics
Warning: Improper cleaning of optical components may void the warranty.
Optical components of a telescope will over time get dirty. The amount of dirt and or
dust collected onto a lens or mirror should only be removed with the utmost care and
this is at times best left to people with experience in this procedure. A considerable
amount of dirt or dust must be present on the optical surface before one will notice the
effect visually.
1. Keeping the dust caps on during storage of the telescope will reduce the
amount of dust collected.
2 After using the telescope there might be dew condensation, on the optical
surfaces. When the telescope is brought inside remove the dust caps and
allow the moisture to evaporate naturally. Point the telescope downwards so
as to minimize the collection of airborne dust.
3. Once the moisture is gone then replace the dust caps.
4. If you wish to remove dust from the lenses or mirrors you first should try using a
can of filtered compressed air. Remove the dust cap and the dew shield in the
case of the refractor style of telescope, or take the mirror cell out of the reflecting
type. Once you are able to freely blow across the surface of the optics then begin
by first pointing the can away from the piece and gently expel some air. This will
remove any condensate in the air can lines and clear off dust that may have
accumulated on the discharge tube. Next using short quick bursts of air carefully
remove the dust particles. DO NOT HOLD THE TRIGGER OF THE
COMPRESSED AIR FOR TOO LONG AS CONDENSATE MIGHT BE BLOWN
OUT ACROSS THE OPTICAL SURFACE. If particles still remain after several
attempts at removal than the telescope should probably be taken back to the
dealer for cleaning.
The optics of your telescope should last a long time before they generally
require major cleaning. By keeping the dust caps on and avoiding the temptation
to handle the lenses you will find that very little is needed in the way of optical
maintenance.

12
What to Look For in the Sky
WARNING: DO NOT AIM YOUR TELESCOPE AT THE SUN OR ANYWHERE NEAR
THE SUN! INSTANT AND IRREVERSIBLE DAMAGE CAN OCCUR, INCLUDING
BLINDNESS!
DO NOT LET CHILDREN USE ANY TELESCOPE WITHOUT ADULT
SUPERVISION AT ANY TIME THE SUN IS ABOVE THE HORIZON.
There is a whole universe of objects to be seen in the night sky so where does one
start? Well let’s examine the most visible objects first.
The Moon.
The moon is the easiest target to find in the night. When it is in the full position, when
the entire face is lit, then it bathes the night with a silvery light washing out the rest of
the sky from all but the brightest objects. The best time to view the moon is actually not
when it is full but rather anytime up to the first quarter, this is when the face appears to
be half lit up. The terminator on the moon, the dividing line between dark and light,
shows the best features such as craters and mountains.
The Planets
The planets are our solar system companions. These range in size from moon size
rocky bodies to giant gas balls which could hold 1000 Earths. To find the planets
requires some information as to when they are visible. An astronomy magazine such as
SkyNews or Sky and Telescope, will give you the locations of the planets from month to
month. Most people who have looked up at night have probably seen some planets but
did not realize it. A planet, when it is well clear of the horizon will not twinkle as do the
stars. They are resolved by the eye as tiny balls as opposed to the stars which are
infinitely small points of light. The easiest planets to view, when they are visible, are
Venus, Mars, Jupiter and Saturn, Uranus and Neptune. Mercury is an object to look for
but it is usually below the horizon and often is a challenge to find. Pluto is too small for
most telescopes below 10" so do not worry about finding it at this time.
Each of the planets has its own interesting views. Venus is covered with clouds so all
we see is an extremely bright light, the brightest next to the moon, however it like our
moon goes through phases. In other words the planet surface will, as it travels around
the sun, appear to have different amounts of it lit up. This gives the planet varying
crescent shapes, as if a bite were taken out of it. Mars is the red planet. It is very
noticeably red when rising above the horizon and stands out like a beacon in the night
sky. The apparent brightness of Mars varies as the planet orbits around the sun so
throughout its time being visible to us it will brighten and dim depending on how our two
planets are aligned relative to each other.

13
Jupiter is the largest planet in our solar system. It is the second brightest planet next
to Venus. Jupiter also has moons of which 4 are easily visible through a telescope.
In fact as you watch them throughout the evening you will see that they change their
positions relative to each other and to Jupiter. It is possible with careful planning to
actually see one of the moons disappear either in front of, or behind Jupiter as they
travel around their planet. Another great feature of Jupiter is the cloud belt pattern.
Jupiter is alive with weather activity and the planet’s clouds have formed in time into
belts which are visible to telescopes, when our skies allow it.
Saturn, the second largest planet, is not as bright as Jupiter and its moons are not
as visible through small telescopes. However it has very large rings that encircle the
planet which are spectacular. The planet appears as a pale yellow, as do the rings
but one can spend hours looking at these. The major division in the rings, the Cas-
sini division, is possible to see in a small telescope if the viewing is steady.
Uranus and Neptune are the last of the solar system gas giants. They do not yield
up spectacular sights like Jupiter or Saturn, however they are part of our family and
are rewarding to see as they can be a challenge to find.
Beyond our solar system there lies a multitude of objects to be found. Galaxies,
nebulae and star clusters abound.
BATTERY INFORMATION:
This unit uses two AA batteries. Always use fresh batteries. If the unit will not be used for an
extended term remove the batteries. Do not try and recharge non-rechargeable batteries.
Do not take batteries apart. Do not short circuit the terminals. Do not dispose of batteries in
fire. They may explode.
WARNING! CHOKING HAZARD – Small parts. Not suitable for children
under 3 years.
Made in China
!
Part # 260029

14
Table of contents
Other Orbitor Telescope manuals
Popular Telescope manuals by other brands

Bresser
Bresser National Geographic 91-06000 operating instructions

ATN
ATN Night Trek user guide

Cosmo Brands
Cosmo Brands CASSINI CQR-120 manual

Educational Insights
Educational Insights GeoSafari My First Telescope manual

Zhumell
Zhumell 60MM AZ owner's manual

Explore Scientific
Explore Scientific FirstLight series instruction manual