Osaki CPW110 User manual

E C LOW VOLTAGE DI ECTIVE 73/23/EEC
E C ELECT OMAGNETIC COMPATIBILITY DI ECTIVE 89/336/EEC
E C MACHINE Y DI ECTIVE 89/392/EEC
We hereby certify that OSAKI CPW110 Cold Water Pressure Washer complies with all
the relevant provisions of the EC Directives 73/23/EEC, 89/336/EEC, 89/392/EEC
Harmonised Standards Applied: E 60335-1: 2002+A1+A11+A12+A2+A13+A14, E 60335-2-79:2009, E 62233: 2008.
© The Kennedy Group Ltd. 05/13
OSAKI POWER TOOLS carry one years manufacturers warranty.
OSAKI POWER TOOLS are designed & produced to the highest standards & specifications
OSAKI POWER TOOLS are fully guaranteed against faulty materials & workmanship
Should they be found to be defective, they will either be repaired or replaced free of charge
(fair wear and tear and/or misuse excepted).
Please retain supplier invoice as proof of purchase.
AVAILABLE F OM YOU DIST IBUTO
OTHE OSAKI P ODUCTS
EC DECLA ATION OF CONFO MITY
QUALITY GUA ANTEE & WA ANTY
OPE ATO S MANUAL
COLD WATE P ESSU E WASHE
CPW110
O DE CODE
OSA-279-6110K
For easy cleaning of vehicles, patios
and other light duty applications
Compact and portable design
110 bar pressure
In built detergent bottle
Heavy duty induction motor
Automatic on/off
Adjustable lance nozzle for fan or
open jet wash pattern
High and low pressure
adjustment
5m length, high pressure hose and
trigger gun
5.3m length power cord
Official Agent
KENNEDY TOOLS
Wigston Works, Leicester, England LE18 2FS.
Supplied by an ISO9001 approved company
Name: Keith Read
Position: Director, The Kennedy Group Ltd.
Date: 15th May 2013
Signed:
2
SAFETY INST UCTIONS
SE VICE & EPAI
Osaki Power Tools are committed to the Production of Quality Power Tools
that are designed for high performance and long service life.
If safety and maintenance procedures are observed they will last for many years.
Man, Earth and the Universe
are forces that create an
immovable centre of balance . . . the
balance of power
“
”
GENE AL SAFETY
•
To reduce the risk of injury, close supervision is
necessary when a product is used near children. Do
not allow the pressure washer to be used by children
or people who are not familiar with it.
•
Know how to stop the product and bleed the pressure
quickly by pressing the trigger (See the ‘Operation’
section on page 5). Be thoroughly familiar with the
controls.
•
Stay alert and watch what you are doing.
•
Do not operate the product when tired or under the
influence of alcohol or drugs.
•
Keep operating area clear of all people and clutter.
•
Do not over reach or stand on an unstable support.
Keep a good footing and balance at all times.
•
This product must be grounded. The plug must be
plugged into an appropriate outlet that is properly
installed and grounded in accordance with all local
codes and ordinances. Check with a qualified
electrician if you are in doubt as to whether the outlet
is properly grounded.
•
When working outdoors only use suitably approved
extension cables with a minimum conductor cross
section of 1.5mm2. The plug connectors must have
earthing contacts and be waterproof. Always
disconnect the extension from the mains electricity
supply, before disconnecting the pressure washer
from the extension cord.
•
Do not start and run the machine in the rain or stormy
conditions. Keep all connections dry and off the
ground. Do not touch the plug or sockets with wet
hands. It is very important not to let water leak into
the machine.
•
The machine should be switched off if it is not used
for periods longer than 3 minutes.
•
Maintain a constant water supply when the machine
is running. Without water circulation damage will be
caused to the sealing rings of the machine.
•
It is necessary to turn on the spray lance within one
or two minutes after the machine has been started.
Otherwise, the temperature of the circulating water
within the machine will soon rise to a critical point,
which will cause damage to the sealing rings inside
the machine.
•
Do not start and run the pressure washer in a place
which is excessively cold.
•
This machine has been designed for only using
cleaning water. Do not use corrosive chemicals.
•
This machine must be connected to a cold water
source.
•
Hold the spray lance firmly when in use as there is a
chance it might swing back with the force that is
inside it.
•
Do not use the appliance within the range of persons
unless they are wearing protective clothing.
•
Do not wash any objects which are a health hazard
e.g. asbestos.
•
High pressure jets can be dangerous if subject to
misuse. The jet must not be directed at persons, live
electrical equipment or the appliance itself. Pressure
washers should not be pointed less than 30cm away
from tyre walls or tyre valves, as it may be possible to
damage them.
•
Do not direct the jet against yourself or others in order
to clean clothes or footwear.
•
Disconnect from the electrical power supply before
carrying out user maintenance.
•
To ensure the appliance safety, please use only
original spare parts from Osaki. Do not use the
machine before you have changed them if they are
damaged.
•
Store the pressure washer in a dry, secure place,
away from children.
•
If the supply cord is damaged, it must be replaced
immediately.
•
ever try to move the appliance by pulling it with the
mains lead. Do not allow the mains lead to be pulled
around corners or sharp edges. Do not run the
pressure washer over the lead.
Repair work on the Osaki Power Washer can
only be carried out by a trained service engineer.
A comprehensive in house repair and service
facility is available through your local agent.
ACCESSO IES
7
T OUBLE SHOOTING
FAULT
When switched on,
the machine will not
start working.
Fluctuating pressure.
Water is leaking
from the pump.
The motor stops
suddenly.
The pump does not
reach the necessary
pressure.
LIKELY CAUSE
Plug is not well connected or electric socket is faulty.
The mains voltage is insufficient.
The pump is stuck.
Thermal safety switch has tripped.
The pump is sucking air.
The valves are dirty, worn out or stuck.
The pump seals are worn out.
The seals are worn out.
The thermal safety switch has tripped due to overheating.
The water inlet filter is clogged.
The pump is sucking air from connections or hoses.
The suction/delivery valves are clogged or worn out.
The unloaded valve is stuck.
The lance nozzle is incorrect or worn out.
SOLUTION
Check plug socket.
Check that the mains voltage is adequate.
Refer to after storage instructions.
Switch off the machine and let the motor cool for a few minutes.
Leave the lance open.
Check that hoses and connections are airtight.
Clean and replace, or refer to your dealer.
Check and replace, or refer to your dealer.
Check that the main voltage, corresponds to the specifications.
Switch off the unit and let it cool for a few minutes.
Clean the water inlet filter.
Check that all supply connections are tight.
Check that the water feeding hose is not leaking.
Clear or replace the valves.
Loosen and retighten regulation screw.
Check and/or replace.
The following accessories are available through your local Osaki distributor:
Gun and lance with adjustable spray pattern Order Code: OSA-280-1701W (As supplied with Model CPW090)
Gun and lance with adjustable pressure and spray pattern Order Code: OSA-280-1710W (As supplied with Model CPW110)
5m high pressure hose Order Code: OSA-280-1711W (Suitable for Model CPW110)
Osaki pressure washer accessory kit Order Code: OSA-280-1705W
Kit Contents: 1 x Large round head brush attachment with rotating centre.
1 x Large tapered head brush attachment (Wash brush).
1 x Snap action tap connector.
1 x Female hose fitting (HPC connector).
1 x Sander blast kit (includes hose & sand probe).
1 x Turbo lance.
1 x Flexible snake hose.
1 x 6m water hose.
63
LONG TE M STO AGE
SPECIFICATIONS
Model Number CPW110
Order Code OSA-279-6110K
Nominal Voltage 230v
~
50 Hz
Power Con umption 1900W
Working Pre ure 110bar (1595PSI)
Maximum Permi ible Pump Pre ure 200bar (2900PSI)
Working Flow Rate 6.2bar (90PSI) 6 1/min
Maximum Water Supply Pre ure 4bar
Motor Rotation Speed 2800rpm
Maximum Water Temperature 50°C
Noi e Level <90db(A)
Water Inlet Size 3/4”
Vibration Level 1m/s2
Water Protection IPx5
Ho e Length 5m
Power Cord Length 5.3m
A embled Dimen ion W45 x D45 x H105cm
Net Weight 16kg
COMMON EFE ENCE POINTS
BOX CONTENTS
GUN
Frost can destroy an incompletely emptied unit. The pressure washer must be stored in a
frost-free environment, ensuring that the hose is coiled without any kinks in it.
After long term storage without operation, it is possible that scales have formed inside the
machine, making it difficult to start. In such conditions it is recommended to turn off and
disconnect the power supply and rotate the motor by hand. This is achieved by putting a
screwdriver through the ventilation grill at the back of the pressure washer and turning the
motor several times (See fig 21). This will help to avoid excessive current draw on the
motor and the power supply.
Fig. 21
MAINTENANCE
OPE ATION continued
The Osaki Pressure Washer is maintenance-free. However regular inspection of the water
inlet filter on the side will prevent any blockage restricting the water supply to the pump
(see fig 20). .B. Assembly tools and mains water connector are not provided with this product.
Main body
Fig. 20
DETE GENT CONTAINE
ON/OFF SWITCH
WATE INLET
CABLE HOLDE
HIGH P ESSU E OUTLET
HEAVY DUTY INDUCTION MOTO
ADJUSTABLE
PRESSURE
First turn off the spray lance and then
slide the nozzle towards yourself for high
pressure or away for low pressure. (See
fig. 17 and 18).
INTEGRATED
DETERGENT TANK
When using your pressure washer for cleaning, there are specially formulated
detergents that can be used, depending on what job you are doing. For example, if
you are cleaning your car, use a detergent with wax for extra shine.
1. Put detergent into the tank.
2. Adjust the lance to the low pressure position.
3. Squeeze the trigger, the gun will spray liquid detergent mixed with water.
4. To avoid blockages, flush the detergent bottle with clean water after use.
GUN SAFETY LOCK
When you stop the machine, it is necessary to use the safety lock in order to avoid
accidental activation of the pressure washer (See fig. 19).
Fig. 19
Fig. 17 Fig. 18
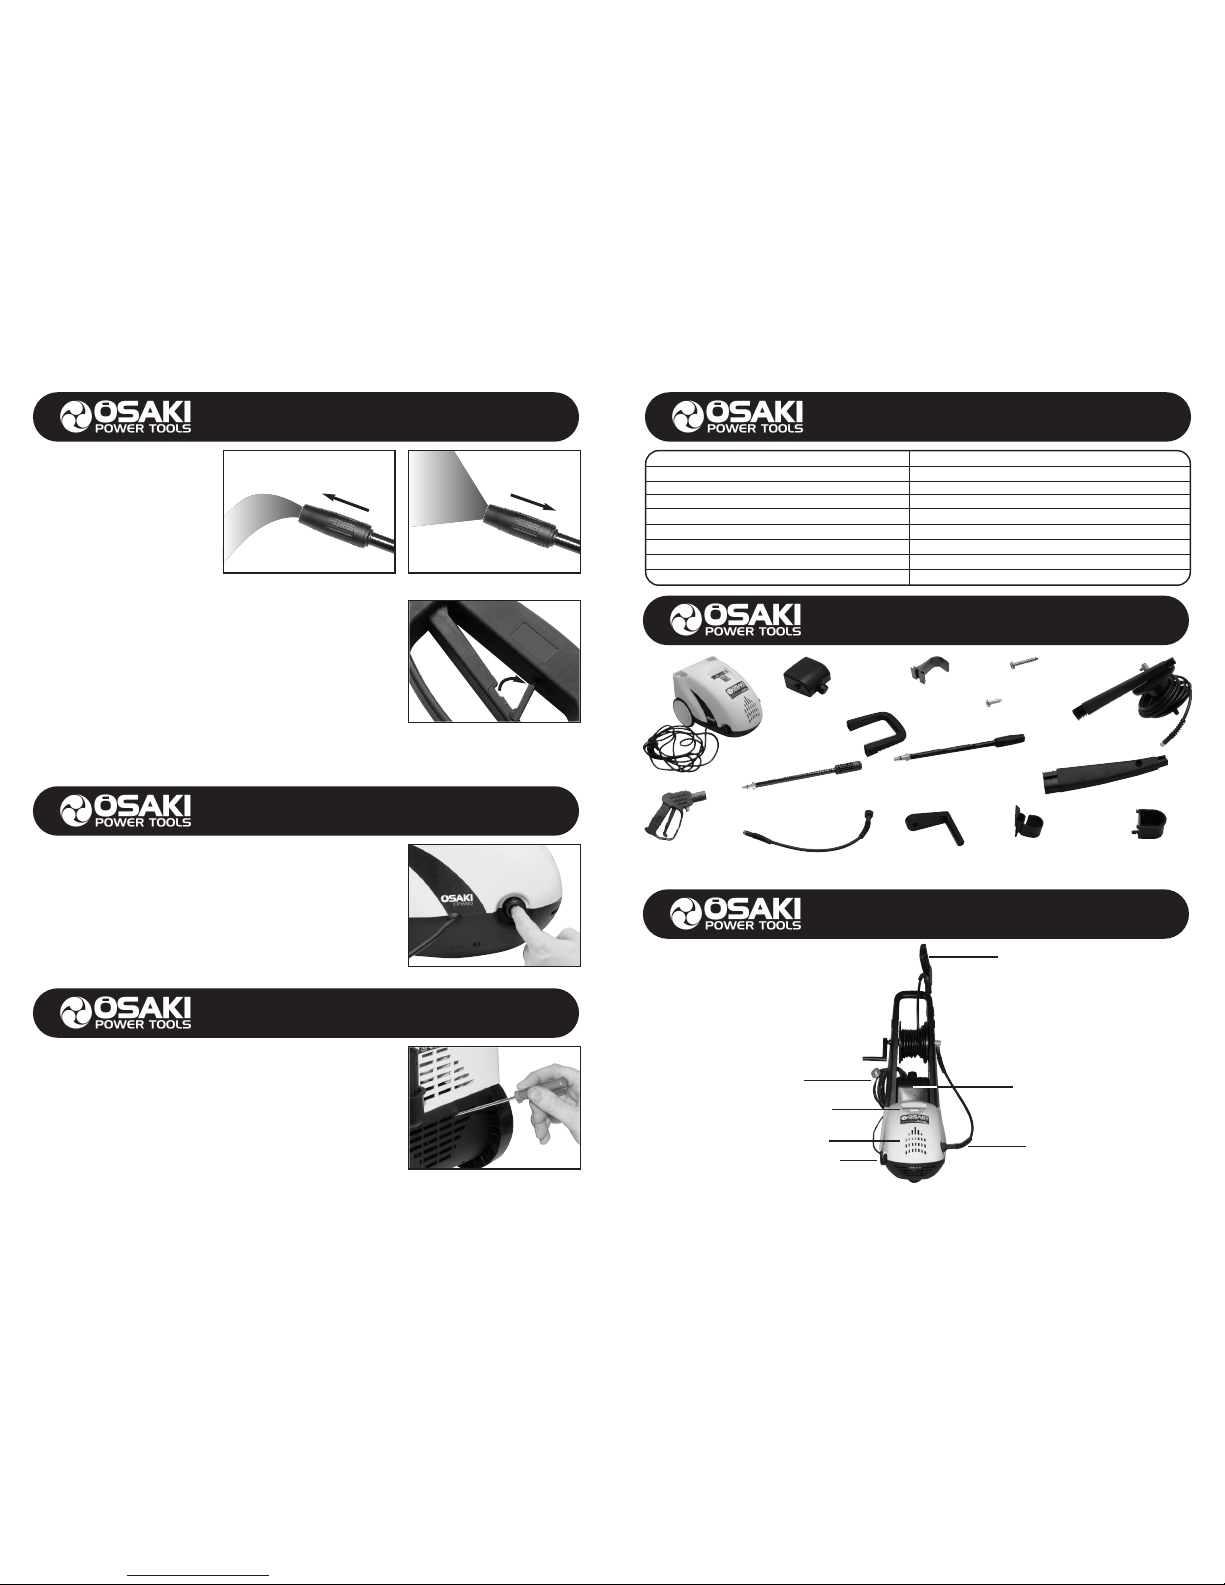
Curved handle
Detergent
container
Upright pole with high
pressure hose assembly
Upright pole
Gunstock holder
Gunstock hook
Crank handle
Power cord hook
Long screw x 7
Short screw x 2
High pressure
connecting hose
Gun
Lance extension
Adjustable spray lance
Low press re High press re
Lock
on

4
OPE ATION
ASSEMBLY continued
5
THIS ACHINE UST BE CONNECTED TO A COLD WATER SOURCE ONLY.
THE OTOR OF THIS PRESSURE WASHER WILL NOT RUN CONTINUOUSLY. IT WILL ONLY
OPERATE WHEN THE TRIGGER OF THE SPRAY GUN IS SQUEEZED.
IT IS VERY I PORTANT TO BLEED THE PRESSURE WASHER BEFORE USING IT (Stages 2-7 below).
Use a 3/
4” HPC connector (not included) to connect the water supply hose to the pressure washer (see fig. 13).
RE OVE THE RUBBER BUNGS FRO THE WATER INLET AND
THE HIGH PRESSURE OUTLET BEFORE ASSE BLING.
ASSEMBLY
Fig. 16
1. Assemble the left pole with the right
pole (See fig. 1). Put the detergent
container in the middle of the left and
right pole. Then push the two side
poles together with your hands at the
same time to make the upright
section.
2. Insert the bottoms of assembled left
and right poles into the holes at the
back of the machine shell at the same
time (See fig. 2).
3. Install the curved handle on top of the
left and right poles (See fig. 3).
4. Insert and tighten one long screw for
each side of the right and left poles
which meet the curved handle (See
fig.4).
5. Similarly insert and tighten two long
screws for each side at the
connections of the right and left poles
and the machine body (See fig. 5).
6. Install the crank handle onto the right
pole and insert a long screw and
tighten (See fig. 6).
7. Fix the hook on the left rear of the
curved handle and insert two small
screws and tighten (see fig. 7).
8. Attach the gunstock holder onto the
rear of the machine body on the left
hand side by locating the top two lugs
first and then pushing in the bottom
lug (see fig. 8).
9. With the power cord hook in an
upright position, slide it onto the right
hand upright (see fig 9).
10. The mains power cord can now be
hung over the hook (see fig. 10).
11. Hand tighten the high pressure
connecting hose to the high pressure
outlet on the main body.
12. Use a 17mm spanner to attach the
other end of the high pressure
connecting hose to the brass
connector (see fig 11). Do not
overtighten.
13. Connect the gun extension to the
gun and the adjustable spray nozzle
to the gun extension by pushing the
brass connector into the hole and
turning (see fig 11).
14. Use the spanner to connect the gun
to the high pressure hose. Do not
overtighten.
Tools required:
Fig. 5
Fig. 3
Fig. 1
Fig. 6
Fig. 4
Fig. 2
Fig. 14
Fig. 11
Fig. 8
Fig. 10
Fig. 12
Fig. 9
Fig. 13
Fig. 7 Fig. 15
17mm spanner
Medium size
crosspoint screwdriver
1. Check the water inlet gauze for any
blockages (See fig. 20).
2. Connect the water supply hose.
3. Check that the hose has no kinks in it.
4. Turn on the water and check for any
leaks.
5. Depress the trigger to allow air to be
expelled through the pump and the
hose. Lock the trigger.
6. Plug in the pressure washer and
switch on the power (See fig. 14).
7. Unlock the trigger and use the
pressure washer (See fig. 19)
ADJUSTABLE SPRAY
Turn off the spray lance first and then
adjust the nozzle. Water may be sprayed
out from the spray nozzle either linearly
or in a fan shape (See fig. 15 and 16). Narrow jet Wide jet
Steps 1-10 are assembled with the
pressure washer facing away from you.
Other Osaki Pressure Washer manuals


