OSO 21" User manual

21” Commercial Walk-Behind Lawn Mower
Operator’s
Manual

21” COMMERCIAL WALK-BEHIND LAWN MOWER
Operator’s Manual
Oso Electric Equipment, LLC
8480 Esters Blvd Ste 100
Irving, TX 75063
844-676-0123 • suppor[email protected]

Table of Contents
Introduction................................................................................ 1
Overview ................................................................................... 2
Specifications ............................................................................ 3
Understanding the Warning Stickers......................................... 4
Setup Guide .............................................................................. 5
Getting Started................................................................................ 5
General Safety Guidelines ........................................................ 7
Basic Operation......................................................................... 8
Tips for a Better Mowing Experience ...................................... 12
Understanding the Indicator Lights.......................................... 13
Proper Care and Maintenance ................................................ 14
Troubleshooting....................................................................... 16
Disclaimers.............................................................................. 17

OPERATOR’S MANUAL
1
Introduction
The Oso 21" Commercial Walk-Behind Lawn Mower is an electric walk-
behind lawn mower that is powered using a Lithium Iron Phosphate or
LiFePo4 battery.
Batteries are charged using the supplied Oso Charging Station from a
standard 110V plug.
Battery power is used to turn the cutting blade and rear self-drive
wheels to move the mower forward.
Please make sure you fully ready and understand this operator’s
manual before using the Oso 21” Commercial Walk-Behind Lawn
Mower.
OPERATOR’S MANUAL
2
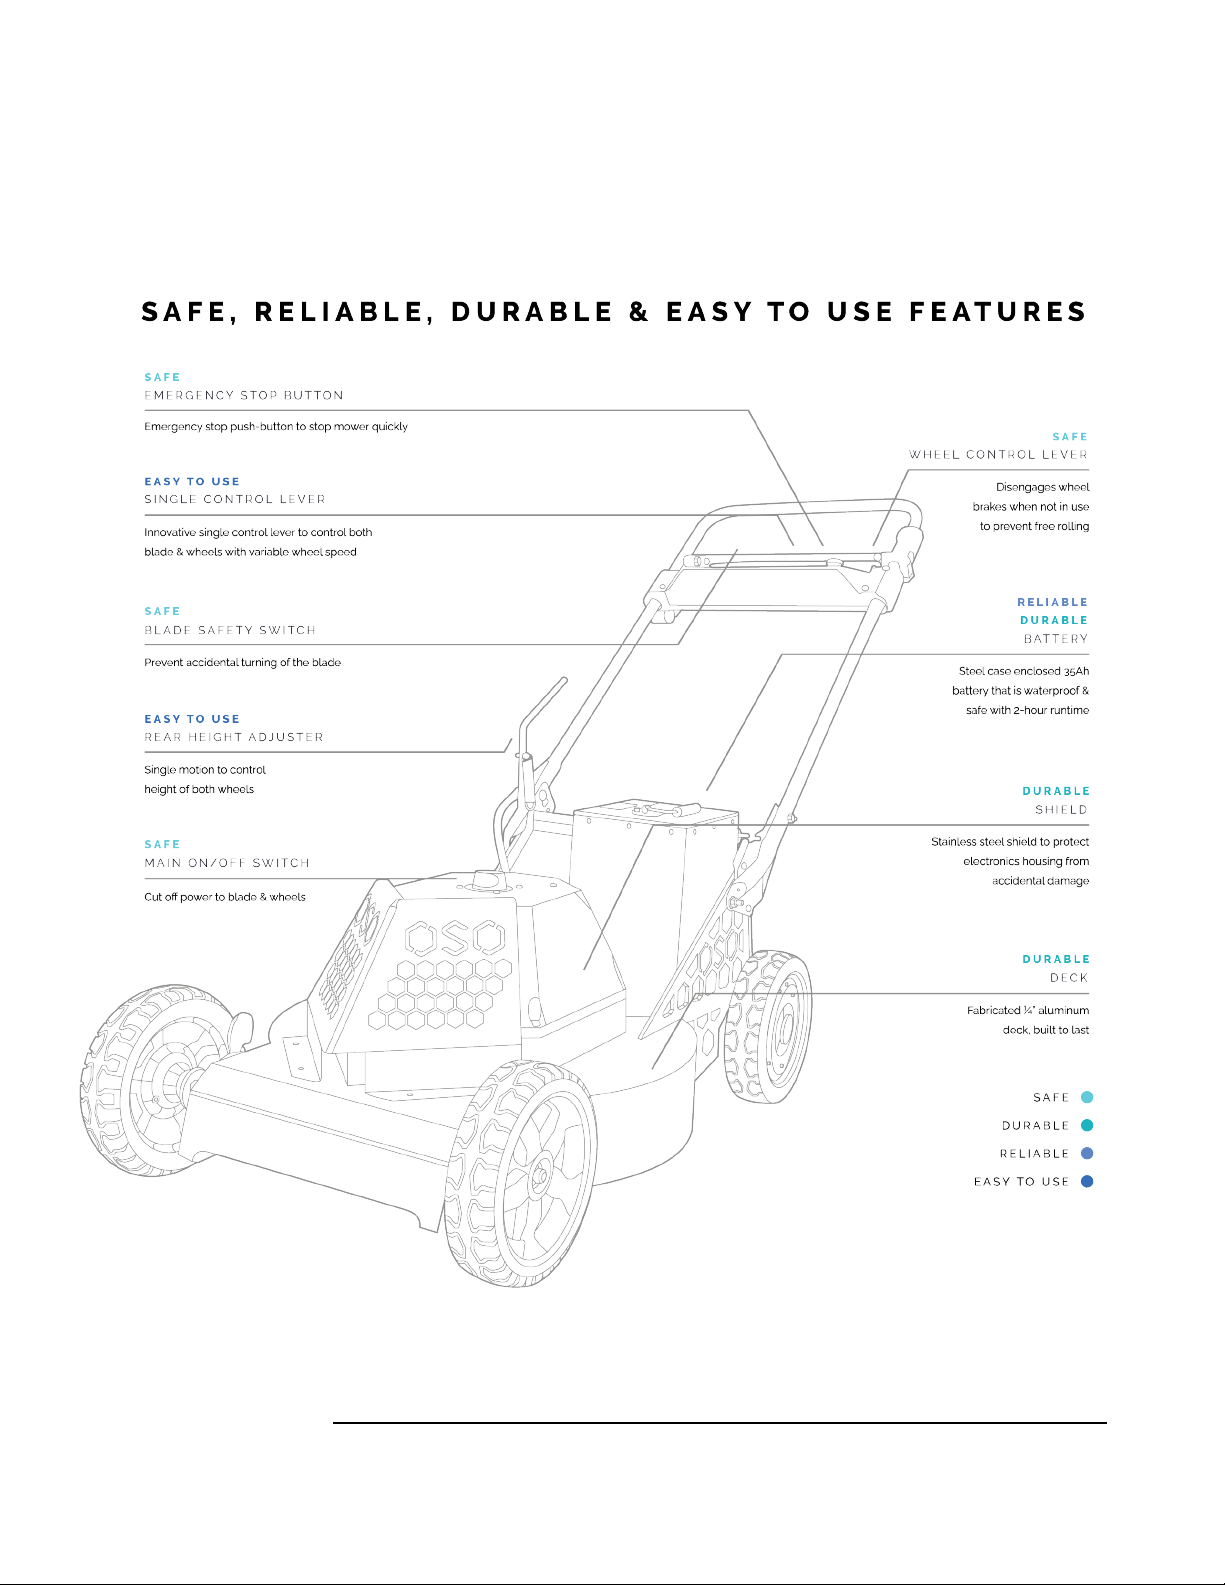
Overview

OPERATOR’S MANUAL
3
Specifications
•Mower Specifications
o21” commercial, self-propelled drive system with mulching
and bagging support
oBlade – 21" Toro compatible blade
oFront Wheels – Toro compatible 9” front wheels
oRear Wheels – 9"/10” wheels with built in self-propel
motors
•Technical Specifications
oMower
Battery – 48V, 38Ah, LifePO4
Motor – 60V, 1800W, Brushless DC
Hub wheels – 48V, 350W
Runtime – 2-3 hours
oCharger
Voltage – 110V 15A/20A AC
Charge time – Overnight, 6 batteries with 15A or 10
batteries with 20A
Cost/battery - 2KWh @ local electricity cost/KWh
•Safety Features
oBlade brake to quickly stop the blade in less than 2
seconds after blade cutoff
oEmergency Stop button in control panel to shut off blade
oBlade start safety switch to prevent accidental blade start
OPERATOR’S MANUAL
4
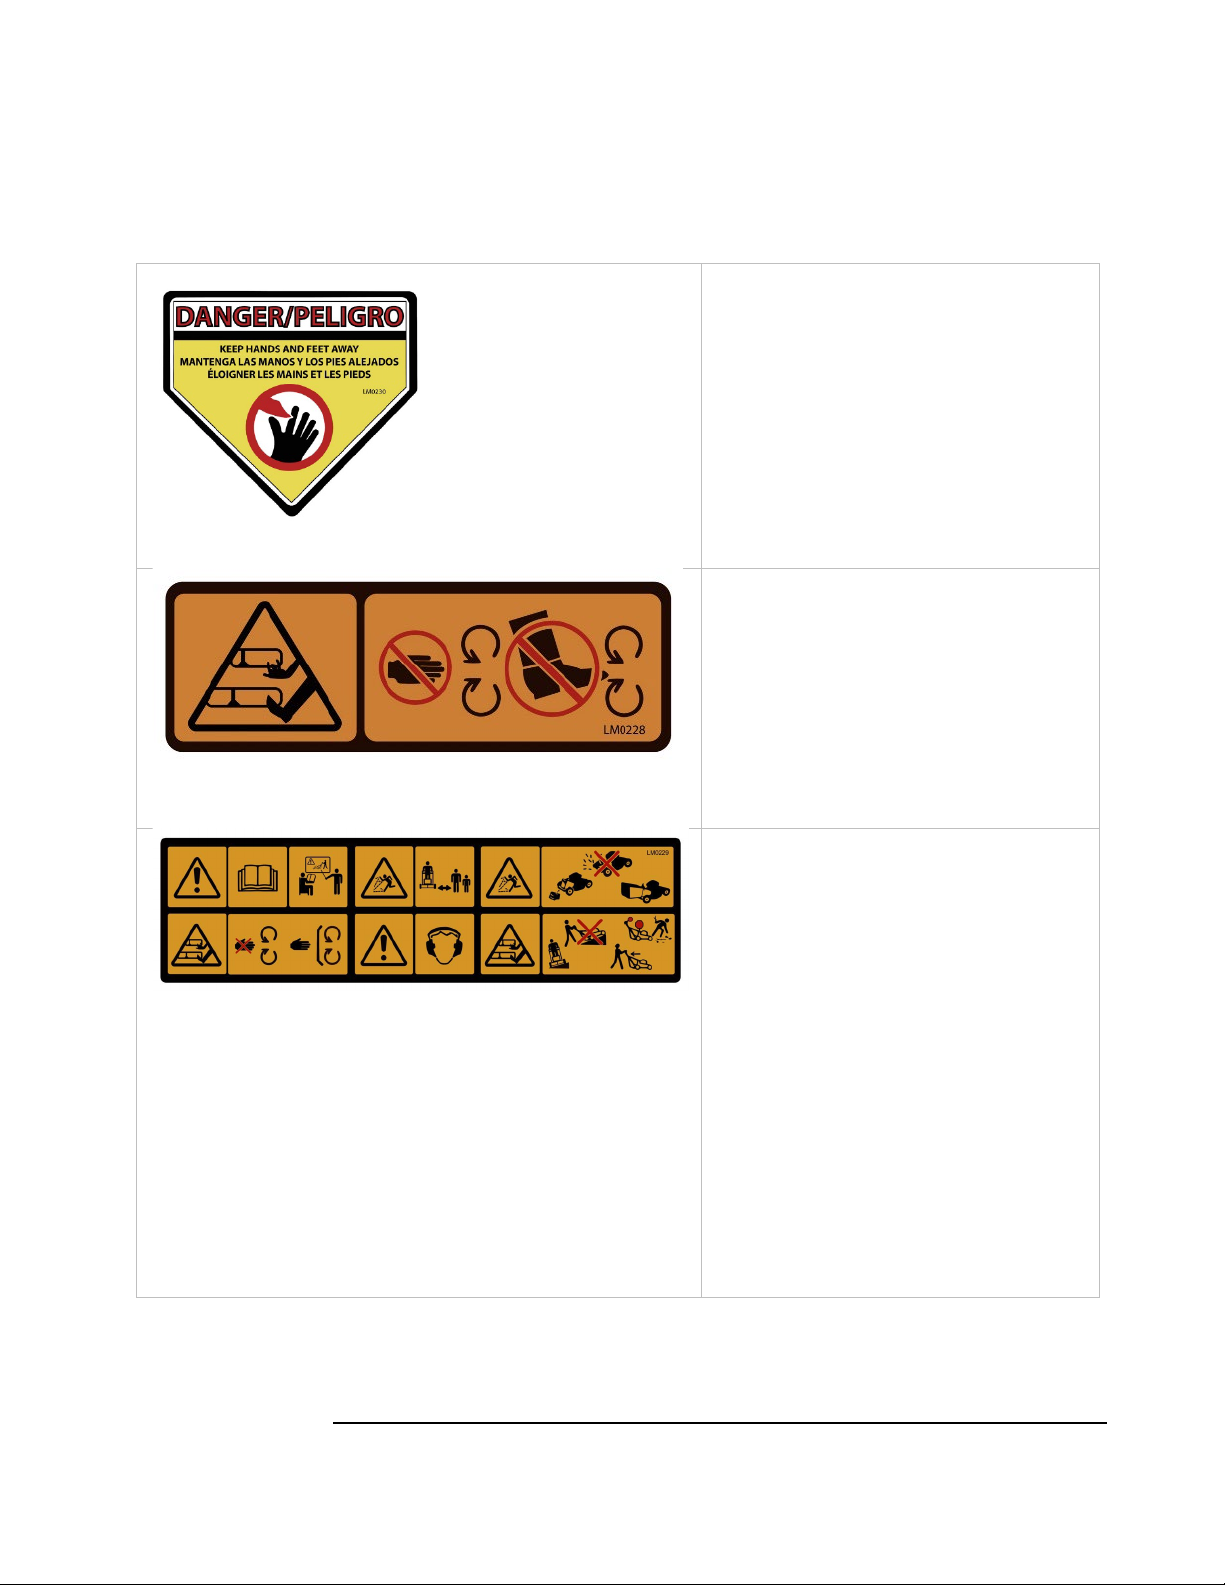
Understanding the Warning Stickers
•Risk of dismemberment. Keep hands
and feet away from any moving parts,
such as the lawn mower blade.
•Never put your hands or feet near or
under the mower.
•Never clean the mower or replace the
blade without first disconnecting and
removing the battery.
•Indicates that there are blades that
move. Risk of dismemberment. Keep
hands and feet away from any
moving parts,
•Never put your hands or feet near or
under the mower.
•Never clean the mower or replace the
blade without first disconnecting and
removing the battery.
•Read the Operator’s Manual before
using the mower.
•Receive proper training and
instruction before using the mower.
•The lawn mower can throw objects.
Keep people 50 feet away when
operating the mower.
•Only use the lawn mower with the
grass bag or mulching plug properly
installed.
•Keep hands and feet away from
moving parts, especially the blade.
•Dangerous noise levels. Wear
hearing protection when operating the
mower.
•Keep hands and feet away from the
sides and bottom of the mower.
•When operating the mower on an
incline, mow parallel to the incline. Do
not mow directly up and down the
incline.

OPERATOR’S MANUAL
5
Setup Guide
Getting Started
1. Unpack all the contents and make sure they match the items
included in your order.
2. Inspect all parts for any visible transportation damage.
3. Batteries are delivered between 80% to 100% charged.
4. To charge a battery, place it in one of the battery charger bays.
Connect the battery plug to the correspondent bay charger plug.
Close the charger door and confirm the charging status light is
Red.
a. A Red light means the battery is being charged.
b. A Green light means the battery has been fully
charged.
5. Once the battery shows 100%, place it in the Battery Holder Bay
on the Lawn Mower. Ensure the battery is placed in the proper
orientation and that it fits in the holder. Connect the battery plug
to the mower connector. Ensure you hear an audible click.
6. To turn On the Mower:
a. Turn the Main Switch to the “ON” position
i. The Cooling Fan will start running immediately
after the battery is plugged in and the Main
Switch is turned ON. If you don’t hear the
Cooling Fan, please call Oso Customer Support
or your Sales Representative.
Warning - Using the mower without the Cooling
Fan running can cause the mower to overheat
under some conditions. This could result in
permanent damage to the electrical and
electronic components. This will void the
warranty.
b. Disengage the Emergency Stop by twisting the control
panel red button. The button will slightly pop up. Press
it down again to engage the Stop.

OPERATOR’S MANUAL
6
c. The Mower Status Lights should turn Green, Blue or
Purple in less than 15 seconds. If the Status Lights do
not turn On, please contact Oso Customer Support or
your Sales Representative.
d. When finished, please engage the Emergency Stop
button by pressing it down, then turn the Main Switch
back to the OFF position.

OPERATOR’S MANUAL
7
General Safety Guidelines
•This is a professional product capable of amputating hands and
feet If improperly used or if the user fails to follow the instructions.
Pay attention to the mower, its surroundings, and any debris on
the ground. Objects on the ground other than grass can be
thrown out from under the cutting area at high speed. Follow all
safety instructions to avoid serious injury or death.
•Read and follow the instructions and warnings in this Operator’s
Manual before using the mower.
•Do not put your hands or feet near moving parts or under the
mower. Do not operate the machine without all systems and
components in place and functioning properly on the machine.
•Do not put the mower on its side with the battery plugged in and
installed on the mower.
•Keep bystanders and children out of the operating area. Do not
allow children to operate the machine.
•Allow only people to operate the machine that meet the following:
oUnderstand the Operating Instructions
oFully trained and physically capable
oFamiliar with higher-power commercial lawn mowing
•Do not operate the mower on an incline that is greater than 30
degrees.
•If the control lever for the blade or wheel is damaged and does
not move up or down freely or spring gets back to its normal
position, do not use the mower.
•To stop both the self-drive and cutting blade at any time, engage
the Emergency Stop button by pressing it down.
•For servicing, engage the Emergency Stop button by pressing it
down and turn the main power switch to the OFF position. Ensure
that all moving parts have stopped moving.

OPERATOR’S MANUAL
8
Basic Operation
1. Mower
a. Make sure mower is on grass, that there are no obstacles
in front of the mower or debris on the ground.
b. Adjust the cutting height to the desired level prior to
connecting the battery and powering ON the mower, by
utilizing the height adjuster handle on the back for the rear
wheels and the levers at the each of the front wheels.
i. Warning - Adjusting the height-of-cut could bring
your hands into contact with a moving blade and
result in serious injury. Shut off the mower, unplug
and remove the battery and wait for all moving parts
to stop before adjusting the cutting height. Do not
put your fingers under the cutting deck when
adjusting the cutting height.
c. Next, place the battery in the mower battery bay and plug
it in to the mower, toggle the main switch to the ON
position and disengage the Emergency Stop button by
slightly rotating it clockwise. Wait for about 15 seconds
while the mower fully powers on. The LED lights on the
main mower housing will light up when the mower is ready
to use.
i. Note: The blade will not start until the mower has
fully booted up, but the self-propel system is
available.
d. With the mower LED lights on and Emergency Stop
disengaged, the mower is now ready to be used.
e. Self-Propel System
i. To activate the self-propel system, gently pull up
the control lever until the mower starts to move
forward. The more the control bar is pulled, the
faster the mower will travel.
Warning - If you are new user, please first
familiarize yourself with this mower’s drive
control. Practice on an open grassy area by
slowly pulling the control bar and understanding

OPERATOR’S MANUAL
9
the mower speed output. Do not pull the control
bar all the way up on a flat area if you are not
familiar with its drive system.
ii. To de-activate the self-propel system, release the
control lever just far enough until the mower stops
moving. Letting go of the control lever completely
(no hands on the controls) will also make the
mower de-activate the self-drive, and it will also
shut off the blade.
f. To activate the blade rotation, gently pull the control lever
slightly with one hand and with the other hand press the
Blade Start Button. Notice that to be able to start the
blade, you must pull the control lever just slightly.
However, if you keep pulling the control level, you will
engage the self-propel system, so it is important that you
familiarize yourself with this process.
The mower blade rotation can be started with
and without the self-propel system engaged, by
properly controlling the control bar with one
hand and pushing the start bar with the other
Similarly, the self-propel system can be used
without the blade being on, which can be useful
when transporting the mower.
g. To stop the blade rotation, fully let go of the control lever.
You can disengage the self-propel system while keeping
the blade on by releasing the control lever just enough to
slow the self-propel system to a stop, but not so far as to
fully disengage the blade.
Notice that when slowing down the self-propel
speed, if the control level is released too far, the
blade will also stop as well. If this is not the
user’s intention, please practice stopping the
self-propel system while leaving the blade on by
familiarizing yourself with the different
positions of the control lever.
h. If you must use the grass bag for collection, please first
turn off the mower and wait for all moving parts to stop.
Remove the grass plug, lift the grass door, and hang the
bag from the tabs on the mower.

OPERATOR’S MANUAL
10
i. Warning – Removing or installing the glass plug
insert could bring your hands into contact with a
moving blade and result in serious injury. Shut off
the motor, remove the battery, and wait for all
moving parts to stop before installing or removing
any component related to the grass bag. Do not put
your fingers under the housing when installing or
removing the grass plug or bag.
i. If mulching is desired, make sure the grass plug is inserted
in the grass chute after the grass bag is removed.
j. If you see the mower Status Light (first light on the left)
turn red at any time, please contact Oso Customer
Support or your Sales Representative.
2. Charger
a. Ensure the charger box is placed indoors, in a dry, flat area
and connected to a 120V grounded outlet with at least a 15A
breaker.
a. Warning – Do not charge the batteries inside living or
working areas. Recommended areas include any
covered area such as a garage or dedicated shop. We
do not recommend charging the batteries outdoors. Do
not charge the battery if there is any visible damage to
the battery casing or the batter appears to be visibly
swollen. Do not attempt to charge the batteries using
any method other than the Oso Charging Station.
b. The charger box contains an internal GFCI (Ground-Fault
Circuit Interrupter). If the battery charger lights do not come
on once it is connected to the wall plug, make sure there is no
visible water present in or around the charger. The GFCI will
reset automatically once there is no current leakage.
a. This is an electric charger, and as such, please follow
all basic safety precautions when dealing with
electricity. There is a risk of electric shock or death.
Make sure all components are dry and all wires do not
have any signs of fraying or other damage.

OPERATOR’S MANUAL
11
c. To charge the batteries, insert them in any of the empty
charger bays and connect each battery's plug to the
connector from the charger. Close the lid to start charging.
Tip – You can use the charger without having a battery
in every charger bay.
d. The charging status light for each bay will turn Red when
charging and Green when charging has been completed.
e. Charging time varies based on the battery charge state when
plugged in as well as other safety factor. To extend the usable
life of the battery, plan each charging to take up to 1o hours.

OPERATOR’S MANUAL
12
Tips for a Better Mowing Experience
•Unlike gas mowers, the Oso mower self-drive is not connected to
the blade motor and is independent. For a better experience,
slow down the wheels when you hear your blade slowing down.
•When the battery light turns red, you have about 10-15 minutes
left before the battery runs out completely.
oTip - Please ensure you have a spare battery ready. It is
possible for wheels to still turn even if the battery charge is
too low to turn the blade
•The Oso mower wheel speed is variable. Please pay attention to
grass cut quality to maintain optimal wheel speed.
•Do not overload the grass bag for better performance. Empty the
grass bag frequently
•Always place the battery in the charger at the end of the day and
ensure the charger is connected to 120V plug and the status light
is either red or green. Red indicates battery is charging.
•Charger is designed to be weather resistant, but please charge
the batteries under a covered roof to avoid electrical hazards.
•Do not charge batteries inside a residence, office, or any
enclosed space where people could be living or working.
•The Battery is heavy and weighs over 30 lbs. Use caution when
lifting and transporting. Do not attempt to lift the battery if you
have any condition that would prevent you from lifting heavy
weights.

OPERATOR’S MANUAL
13
Understanding the Indicator Lights
The Oso Mower comes equipped with 3 status lights. These lights are
important to understand the operation of the mower.
•Status Light – (Farthest light to the left from the user position)
oGreen – Indicates everything is normal and mower is
ready to be used.
oRed – Mower is indicating an error condition. There are
many reasons for this light to be red. Please disconnect
and re-connect the battery and wait at least 15 seconds. If
the error light remains, please contact Oso Customer
Support immediately
Warning – When the mower status light is red, and
the blade does not start after battery connect and
disconnect, please do not attempt starting the blade
more than once without calling Oso customer
support
•Network Light – (Middle light)
oBlue – Mower is connected to a 4G LTE network
oPurple – Mower is connected to a WiFi network
Tip - None of the Network Lights affect the performance of
the Mower.
•Battery Light (Farthest light to the right)
oGreen – Battery has greater than 15 minutes of runtime
oRed – Battery has less than 15 minutes left at the current
usage rate. Please continue to use the mower if you are
satisfied with cut quality. Eventually your blade will stop
turning. Under most conditions the self-propel system will
continue to work at very low battery levels.

OPERATOR’S MANUAL
14
Proper Care and Maintenance
•Cleaning
oClean the mower after each use. Before performing any
cleaning, make sure the battery is disconnected and all
moving parts have stop rotating.
oEnsure there is no debris, grass, sediments stuck under
the cutting area.
Warning – The mower blade is sharp. Use caution
when cleaning around the blade.
oBlow air on the cooling vents so any stuck debris on the
filters blow out to the outside.
oWipe clean the area with LED lights to ensure status
visibility.
oRemove sediment from tires until the rubber treads are
visible.
oAlthough the mower is weather resistant, we do not
recommend that you directly hose down the main housing
and control panel with high pressure water. Metal parts,
the blade, and all wheels can be hosed down using a
typical home garden hose with no more than 50 psi.
Ensure the mower is dried to prevent corrosion.
•Storage
oStore the mower, batteries and charger in a dry, ventilated
and flat indoors space. This is a heavy commercial piece
of equipment that can roll down incline surfaces. Make
sure it is properly secured.
•Maintenance
oOur mower was design for minimal maintenance.
oFollow cleaning steps detailed on the Proper Care and
Maintenance section of this manual
oBefore operating the mower, ensure the control lever
moves freely by pulling it up and let go. The control lever
should immediately come down to its resting position. If

OPERATOR’S MANUAL
15
the control lever is stuck or if it moves down slowly,
inspect the spring that pulls it down and check that there is
no debris stuck in between the spring and other parts.
Inspect that there is no debris or sediments around the
pivoting points of the control lever and that it moves freely.
oBefore operating the mower, and with no battery
connected, ensure the blade is properly attached and that
it rotates freely. If the blade is tilted, not centered, or
broken, discard immediately.
oOnce a week, lubricate the handle bar rotating pivot points
with a silicone based lubricant. Ensure control lever moves
freely and that it returns to its resting position.
oOnce a week inspect there are no missing, broken, or bent
parts.
oOnce a week inspect that all buttons on the control panel
are functional free moving
oOnce a week, leave the mower with the battery connected
overnight. This will ensure the mower gets the latest
software updates available.
oA sharpened blade should last a season of cutting. If there
is a need to change the blade, please contact Oso
Customer Support to go over the proper steps.

OPERATOR’S MANUAL
16
Troubleshooting
Problem Observed
Possible Reason
Recommended Solution
Light Status
Self-propel system and/or
blade do not work
Battery not plugged in
1. Ensure the battery is placed in the
mower and properly plugged in.
2. Unplug and plug battery. Wait 15
seconds.
All lights are Off
Main Switch in Wrong Position
Ensure the Main Switch is turned into
the ON position
All lights are Off
Emergency Stop Button is
Engaged
Ensure the Emergency Stop button is
not engaged. Slightly rotate clockwise
and confirm it pops-up.
All lights are On
LED lights do not turn on
Battery is Depleted or Not
Connected Property
Ensure the battery is in the mower
properly and plugged in with a secure
connection. Unplug and plug battery.
Wait 15 seconds. Ensure battery is
fully charged.
All lights are Off
Self-propel system stops
working during use
High Load Drive Protection may
have been triggered
1. Let go of the control lever
completely until it returns to its
resting place. This will reset the self-
propel system from a high load
safety stop
2. Unplug and plug the battery, wait for
at least 15 seconds.
Not Applicable
Blade stops working
Blade Physically Stuck
Unplug and remove the battery from
the mower. Inspect for debris stuck
under the cutting area. Ensure blade
moved freely
Status Light (farthest to the
left) is Red
Safety Reset – The blade was
Momentarily Under High Load
1. Let go of the control lever
completely until it returns to its
resting place. This will reset the
blade from a high load safety stop.
2. Unplug and plug the battery, wait for
at least 15 seconds.
Status Light (farthest to the
left) is Red
Blade stops while pivoting
around
Control Lever Released Too
Far / Training / Practice
When pivoting around, when slowing
self-propel system, ensure the control
bar is not fully released to its resting
place. There is a control lever position
where the blade stays on but the self-
propel system is not engaged. This
could take practice to maintain the
blade during pivoting.
All lights working
Blade slows down /
performance decrease
Battery needs to be replaced
Follow the instructions to replace the
battery
Battery Light (farthest to
the right) is Red

OPERATOR’S MANUAL
17
Disclaimers
•If the tamper proof seals on handle control panel, head assembly
and charger panels are tampered all warranties will be voided
•If the mower blade hits something hard moving and if you
continue to use the mower all warranties will be voided
•If you use the mower on an incline more than 45 degrees, all
warranties and injury claims will be voided
•If you don't use appropriate caution before accessing grass chute
or under the mower all warranties and injury claims will be voided
•If you don't read this manual prior to operating the mower all
warranties will be voided
•California Proposition 65 Warning
oThe power cord on this product contains lead, a chemical
known to the State of California to cause birth defects or
other reproductive harm. Wash hands after handling.
oUse of this product may cause exposure to chemicals
known to the State of California to cause cancer, birth
defects, or other reproductive harm.
Table of contents


