Otic Webbook User manual

1
Contents
1Welcome .................................................................................4
2. SystemOverview .................................................................................4
3. SystemSpecification ..4
4Mininotebook Description.........................................................................5
4.1 HardwareDescription .............................................................5
4.2 OperatingSystem Description........................................................6
5. ConnectingtoyourdesktopPC .. 7
6.BatteryManagement...............................................................................12
7. BasicOperation ...............................................................................13
7.1 Power OnandOff.........................................................................13
7.2 UsingApplications........................................................................13
7.3 KeyboardIntroduction..................................................................14
7.4 MousePad ..................................................................................15
7.5 HowtouseSDCards....................................................................16
7.6 ConnectingUSB Devices................................................................17
7.7 CommunicationwithEthernetLAN..................................................18
7.8 WiFiConnectionSetting................................................................19
8.Applications...........................................................................................22
8.1InternetExplorer .........................................................................22
8.2 MobileHotmail ...............................23
8.3 Core Player-YouTube ..............................24
8.4 WordProcessing-WordPad ..............................25
8.5 PDFViewer –Foxit Reader Pro.......................................................25
8.6 Spreadsheet-SpreadCE ..........................................26
8.7 nPOPuk –EmailClient ..........................................27
8.8 InternetMessenger-MSN...............................................................28
8.9 Multimedia..................................................................................29
8.10FileCompression –PocketRAR......................................................29
8.11Games........................................................................................29
9.SystemSettings......................................................................................30
9.1 Certificates..................................................................................30
9.2 TimeSettings..............................................................................30
9.3 Keyboard....................................................................................30
9.4 Display .......................................................................................31
9.5 InternetOptions..........................................................................31
9.6 Mouse........................................................................................32
9.7 Network Connections ....................................32
9.8 Owner Properties.........................................................................32
9.9 PasswordSettings........................................................................33
9.10Power Management......................................................................33
9.11System.......................................................................................33
9.12Memory Management...................................................................34
9.13RegionalSettings.........................................................................34
9.14Installing/RemovingPrograms.....................................................35
9.15Storage......................................................................................36
9.16VolumeandSound.......................................................................36
9.17SystemReset..............................................................................36
10. Troubleshooting ..37
11. Warranty&Support .38

2
1.Welcome
CongratulationsonpurchasingthisMininotebook SeriesWebbookmobiledevicepoweredbythe
Microsoft®WindowsCE®5.0 OperatingSystem.Thesize oftheMinibook allowsyoutocarryitaround
withyouandit’scapabilitiesallowyoukeepanyimportant informationcloseathand.If youarefamiliar
withMicrosoftWindowsproducts,youwillnoticethatyourMininotebookhasalot ofthesame
functionalityyouare usedto,makingiteasy foryoutobeproductivequickly.
2.SystemOverview
TheMini notebook,ishighly portable&compactinitsdesign,withgoodperformance,adaptability and
robustness.TheMininoteBooks optimisedWindowsCEbasedoperatingsystemgivesauserfriendly
interfaceandensuresoptimumperformancewiththeminimum ofsystemresources.
3.SystemSpecification
OperatingSystem:WinCE5.0
CPU:ARM920266MHzMultimediaProcessor
Display: ColourLCD 7”WVGA(800x480)digitalTFTLCM
Memory: SDRAM:128MB at133MHz
NAND FlashStorage: 4GB
Ports:3 XUSB Port,withUSB1.1 specificationatspeedupto12Mbps.
Note:TheseUSB PortssupportKeyboardsandMiceetc. but don’tsupportUSB
MemorySticks,HardDrives, Optical DrivesorPrinters.
1 XEthernetLANPort(RJ-45)
1 xSDCardsupport
WIFIHighspeedforLANwirelessconnection
IEEE802.11b/gupto54Mbpsdatarate
SupportWPA(WIFIProtectedAccess),AES /CCMP &WEPwithTKIPsecurity
Miscellaneous: MicrophoneJack forvoicerecording
EarphoneJackandinternalSpeaker
UserInterface: 80 keykeyboard
Touchpad
VideoFormatsupport: AVI,MP4,3GP(MPEG4profile),ASF(MPEG4 profile)
Musicformatsupport: MP3,WMA,AAC, AAC+, CAT,maxupto48KHzat320kbps
ApplicationSoftware: Core Player
EmailClient
FoxitPDFReader
InternetExplorer
MSNMessenger
SpreadCEExcelViewer andEditor
WinRAR
WordPad ViewerandEditor
Battery: Built-in2100mA/HLi-ionand9Vadapter

3
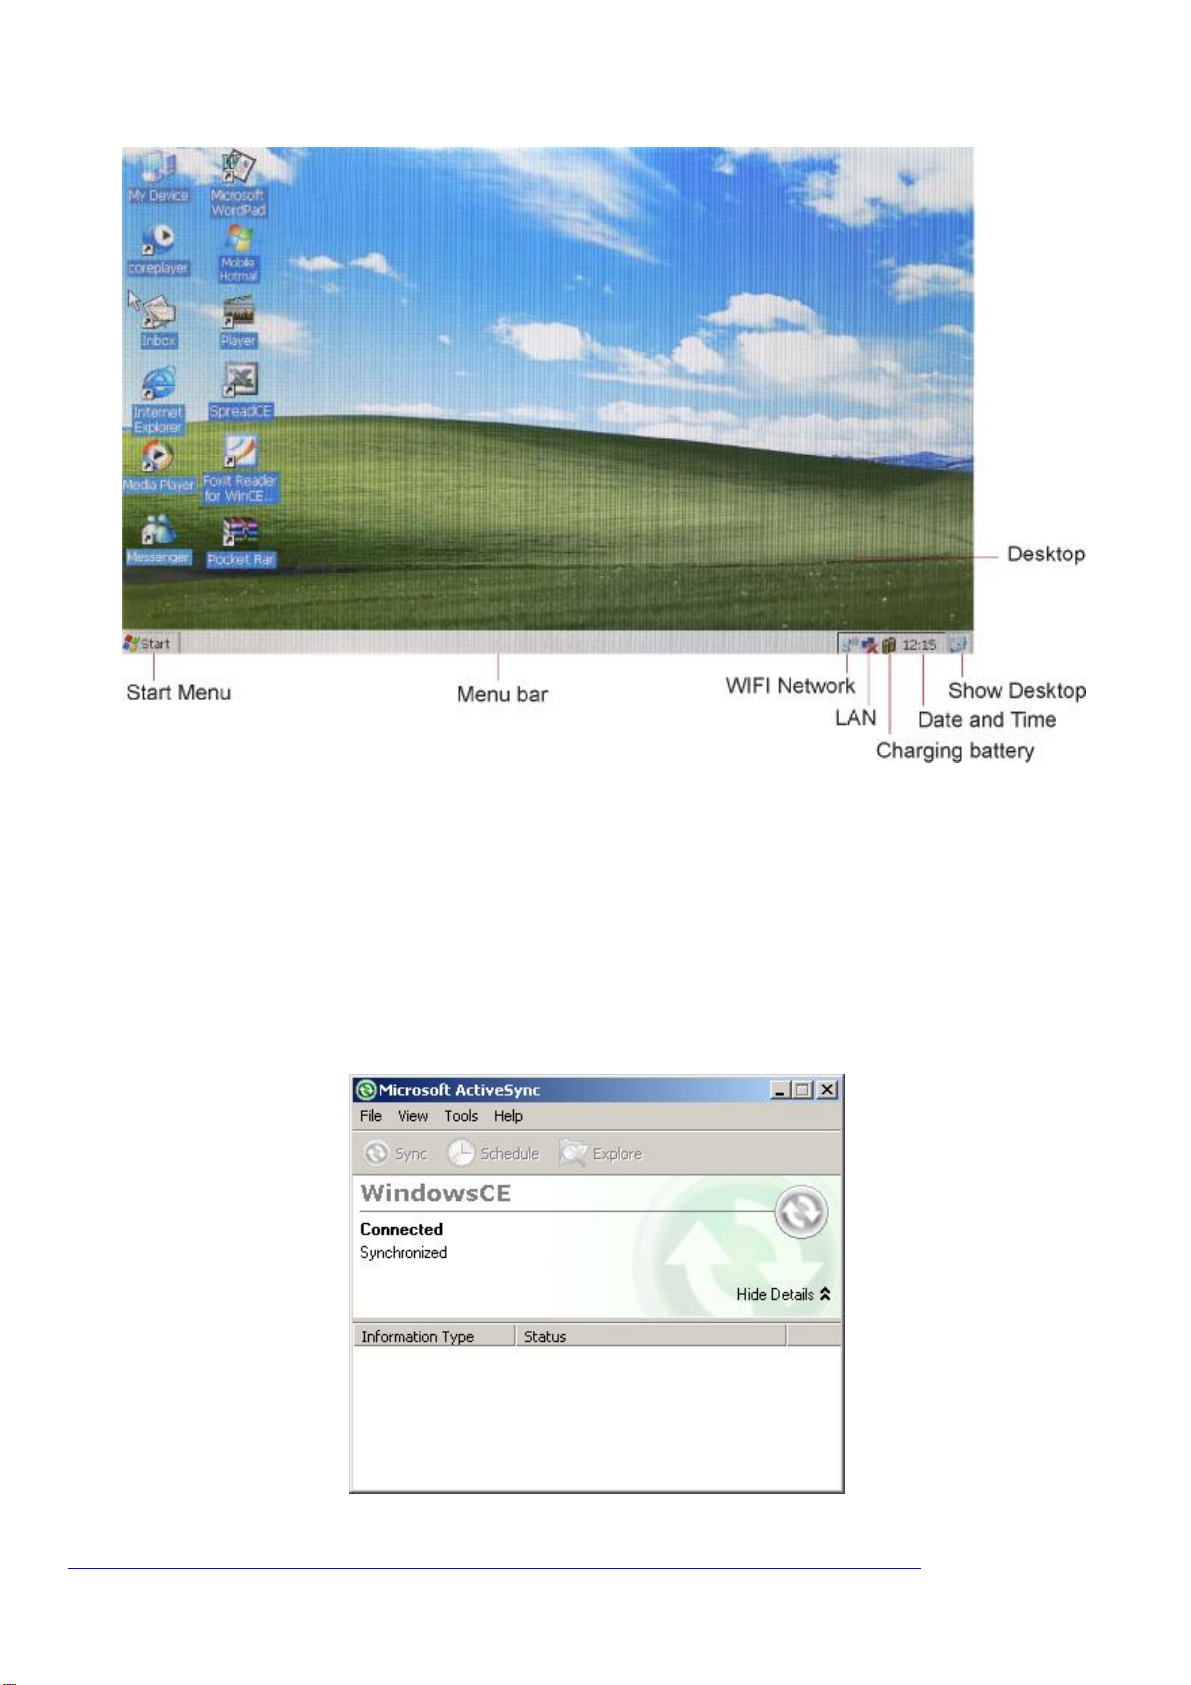
4.MininotebookDescription
1.HardwareDescription
Open FrontView
LEDstatusindicatorsfromLefttoRight:
①BatteryChargestatus
②No LED
③Power on/off
④Num Lockstatus
⑤CapsLock status
⑥WIFIconnectionstatus
BackView
Leftside View Right sideView
4
2.OperatingSystem Description
MicrosoftWindowsCEisascaled-downversionof theWindowsOperatingSystem whichhasbeen
designedspecificallyforlowpoweredportabledevicesliketheMininotebook.Withauserinterfacethat
anyonewhohasusedWindowsbefore willrecognizestraightaway,WindowsCEallowsyoutobeupand
runningwiththeMini notebook inashortperiodof time.
TheMini notebook supportsconnectingtoaPC viaActiveSyncwhenrunningonWindows2000/XPor
WindowsMobileDeviceCenter whenrunningonVista. Thisallowsfilestobetransferred,emailto be
synchronisedandnewapplicationstobeinstalled.Becauseof thisWindowsCEenhancestheMini
notebooksfunctionality andusability.
Note: ActiveSyncisnot suppliedinthebox,butcanbedownloadeddirectfrom Microsoftat:
http://www.microsoft.com/windowsmobile/en-us/downloads/microsoft/default.mspx
5
5.Connectingtoyour desktopPC
YourMininotebookWebbook worksperfectlyasastandalonecomputer.But togetthemostoutit,you
willwant toconnecttoyourdesktopornotebook PC. Thischapter describeshowtoestablisha
connectionbetweenyourMininotebook andadesktopPCrunningActiveSyncorWindowsMobileDevice
Center.
Connecting forthe firsttime
YoucanconnectyourMininotebooktoadesktopPC usingaUSB cable(whichisincluded).Before you
connect,youmustinstalltherequiredMicrosoftsoftware:
Windows2000/XP –ActiveSync4.5
WindowsVista-WindowsMobileDeviceCenter
OncethissoftwareisinstalledonthedesktopPC, youcanconnectyourMininotebook andestablisha
partnership.
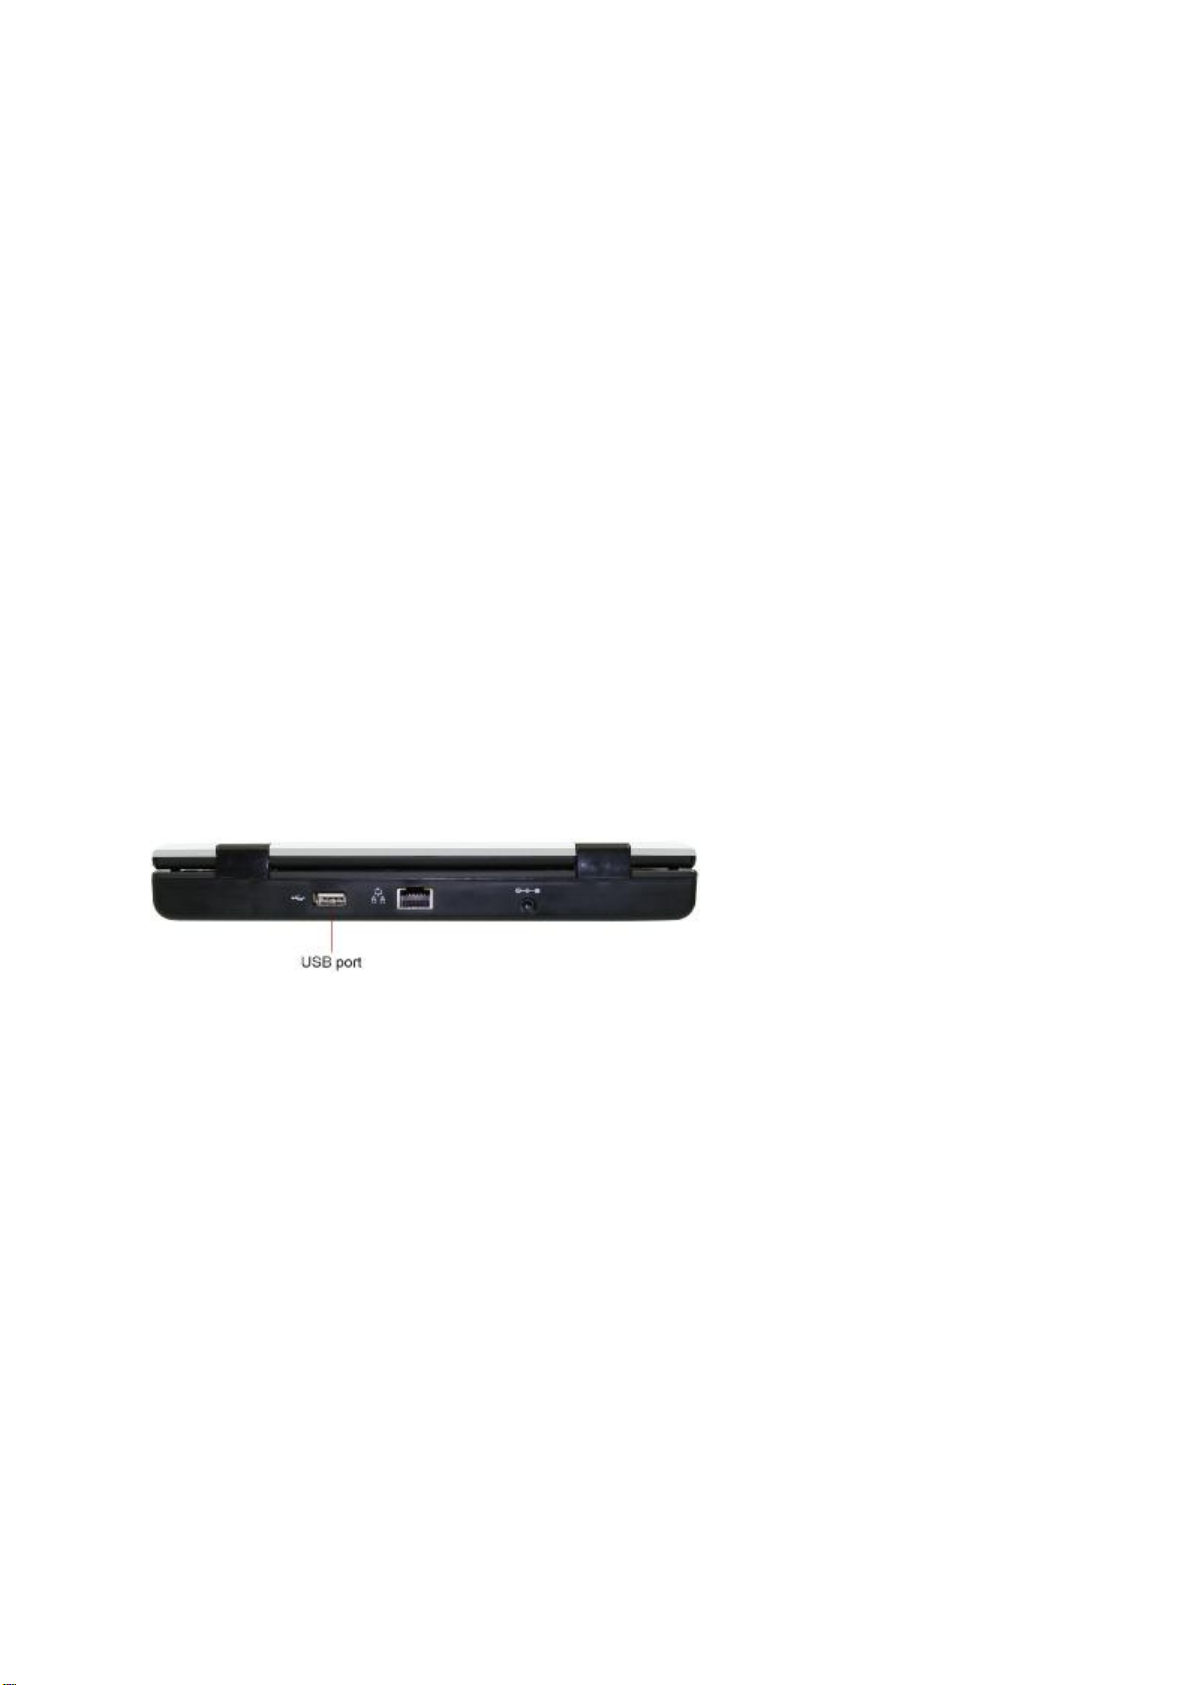
Connecting by USBport
1.ConnecttheflatUSB "A"connectortoanavailableUSBportonyourdesktopPC.
2.ConnecttheflatUSB "A"connectortotherearportonyourMininotebook.
YourMininotebookshouldestablishaconnectiontothedesktopcomputer
RearActiveSyncUSBPort
Setting up MicrosoftActiveSyncand establishing apartnership on Windows2000 /XP
MicrosoftActiveSyncenablesyoutosynchronizetheinformationonyourdesktopPC withtheinformation
onyourMininotebook.SynchronizationcomparesthedataonyourdevicewithyourdesktopPCand
updatesbothcomputerswiththemostrecentinformationincludingWord,ExcelandPDFdocuments.
WithMicrosoftActiveSync,youcanalso:
Back upandrestore yourMininotebookdata.
Add andremoveprogramsonyourMininotebook.
Moveandcopy files,instead ofsynchronizingthem.
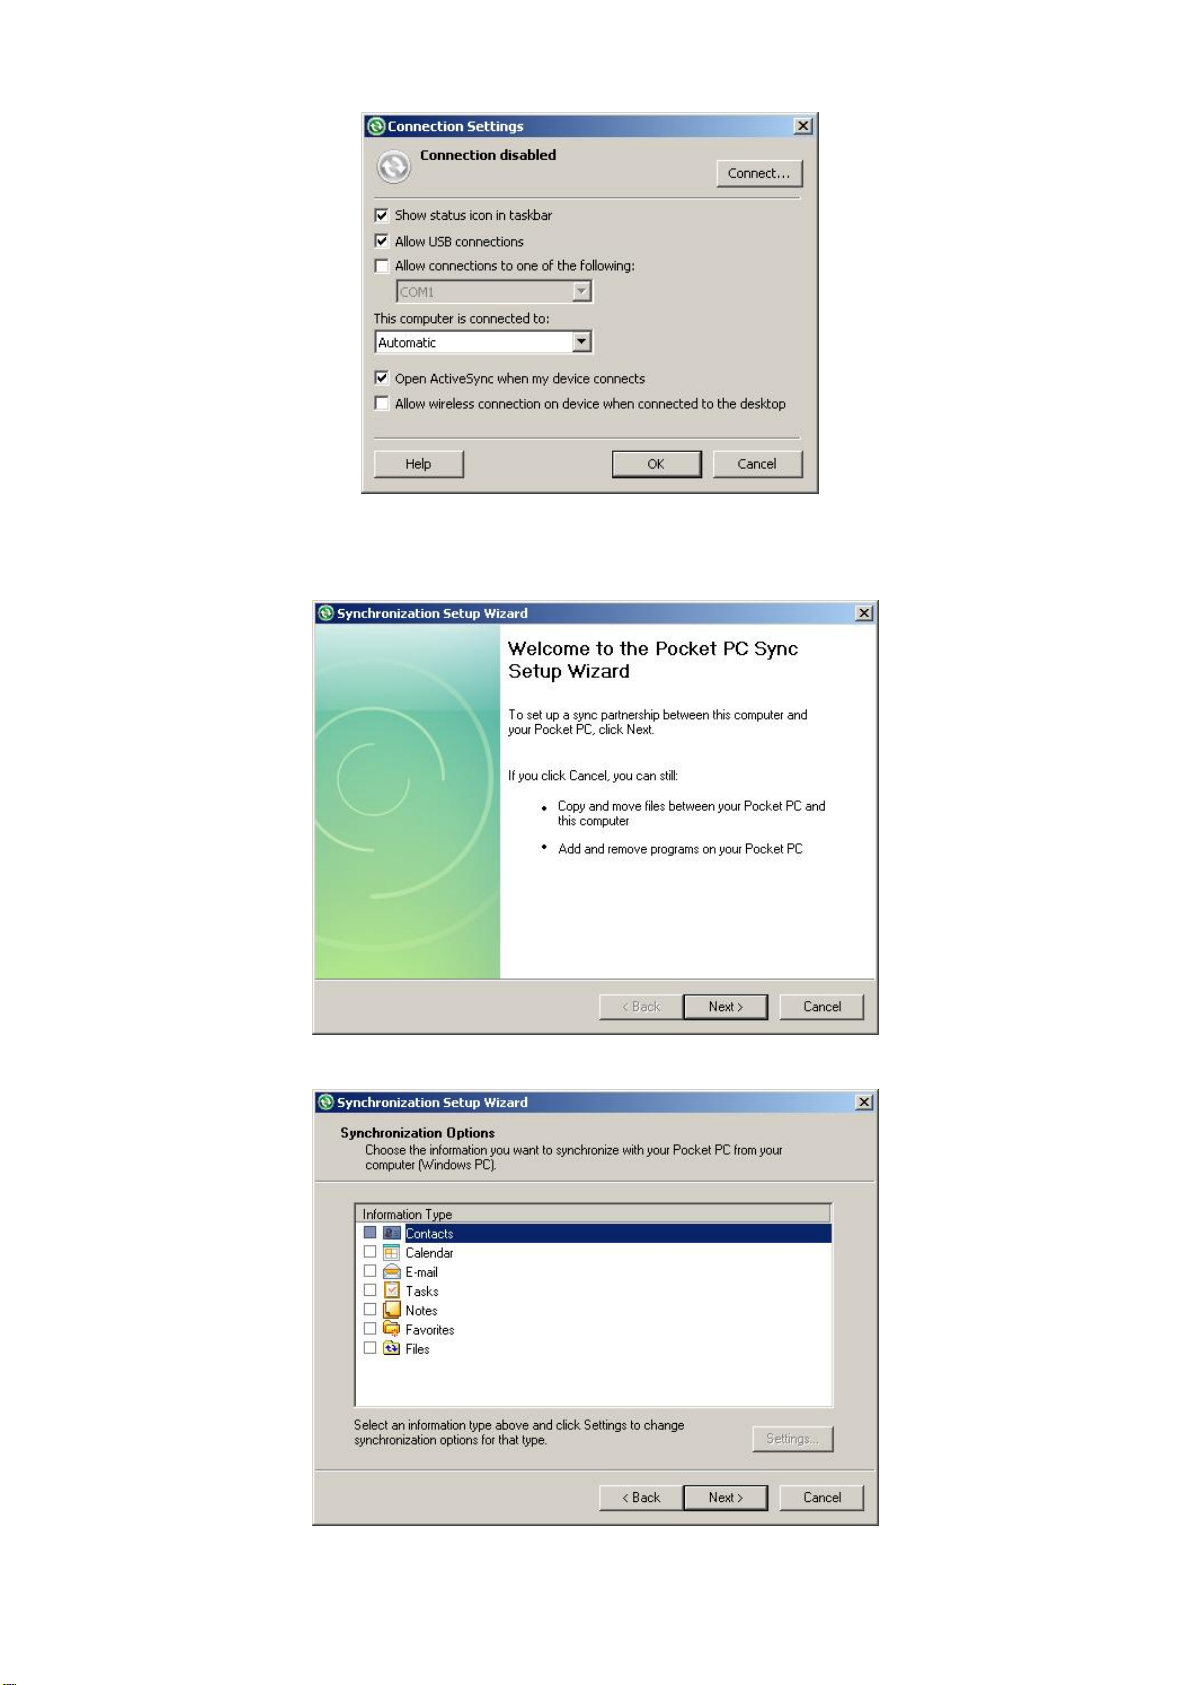
Before connectingtoyourMininotebookforthefirsttimeusingActiveSyncyouwillneedtoconfigure it
toallowconnectionsviaUSBconnections.
Clickthe “File”menu optionandselect “ConnectionSettings ”,thiswillopentheConnectionSettings
window. ClickintheAllowUSBconnectionscheck box andthenclick the “OK”buttonasshownbelow:
6
OnceConnectionSettingshavebeenchangedActiveSyncwillautomaticallyconnecttotheMininotebook
andstarttheSynchronizationSetupWizard.
Click Next
SelecttheInformationTypesyouwishtosynchronize,initially wesuggestjustselectingFiles.Thenclick
Next,FinishandNexttofinishtheconfigurationprocess.

7
TheMini notebook willnowbeconnectedtoyourPC andwillsynchronizeany ofthefiletypesyouhave
selected.
TheMini notebook willshowupasaMobileDevicein “MyComputer”or “WindowsExplorer”andfilescan
becopiedtoitdirectly fromhere:

8
Setting up WindowsMobileDeviceCenterand establishing apartnership onWindowsVista
WindowsMobileDeviceCenter replacesActiveSynconWindowsVistaandenablesyoutosynchronizethe
informationonyourdesktopPC withtheinformationonyourMininotebookinaverysimilarway.
Before connectingtoyourMininotebookforthefirsttimeusingMobileDeviceCenter youwillneedto
download thelatestversionfrom http://www.microsoft.com/windowsmobile/en-us/help/synchronize/
device-center-download.mspx.Or youcanconnecttheMininotebook andperform anonlineupdate,
whichwillallowMicrosoftUSBSynctobeadded.Onceinstalledyoumayhavetorestartyoursystem.
Note: Thelatestversionofthissoftware isrequiredsothattheMininotebookisdetectedcorrectly.
Now youwillneedtoconfigureWindowsMobileDeviceCenterittoallowconnectionsviaUSB
connections.Clickthe “MobileDeviceSettings”link andselect “ConnectionSettings”.
ThiswillopentheConnectionSettingswindow. ClickintheAllowUSBconnectionscheckbox andthen
click the “OK”buttonasshownoverleaf:

9
Tocopy filestothedeviceclickthe “FileManagement”Linkandselect “Browsethecontentsofyour
device”.ThiswillshowthestorageontheMininotebook andallowyoutonavigatethroughany folders
onthedevice
Tosynchronize fileswithincertainfoldersonyourPC, clickthe “MobileDeviceSettings”link andselect
“Changecontentsyncsettings”,thenadd anyfoldersyouwouldliketosynchronizebyclickingthe
“Add“buttonandselectingthefolders.
Formore informationonActiveSyncorWindowsMobileDeviceCenter pleaserefer tothiswebsite:
http://www.microsoft.com/windowsmobile/en-us/help/synchronize/default.mspx
10
6.BatteryManagement
TheMini notebook usesaninternalLi-IonBattery,toensurethebestperformancefromthisbattery
pleaseusethefollowingproceduretoconditionthebattery.BeforeturningontheMininotebookforthe
firsttimeplugthechargerinandchargethebatteryuntilfullycharged(thecharginglighthasgoneout).
Duringusewesuggestchargingthebattery wheneverthebatterypower islowandallowthebatteryto
fullychargebefore disconnectingthecharger.
HowtoChargethe Battery
1.PluginthePoweradaptertoPoweradaptorportofMininotebook,theBatterychargeLEDwilllightup.
ChargingwillbecompletedoncetheLEDhasturnedoff.
2.Tosee thechargingstatus,turnontheMininotebook by pressingandholdingthePower on/off button.
Oncethesystem hasbootedtotheWindowsCEdesktop,theChargingstatuswillbedisplayedonthe
righthandsideoftheMenubarasindicatedbelow.
3.DuringBatteryChargingtheMininotebook canbeusedasnormal,(Pleasebenotethatthecharging
timewillbelonger whenthesystemisinuse).
4.ChargingtheBatterynormally requiresaround3 hoursfromlowbattery chargetofully charged.
DuringChargingthemachinewillbecomewarm,butthisisnormal.
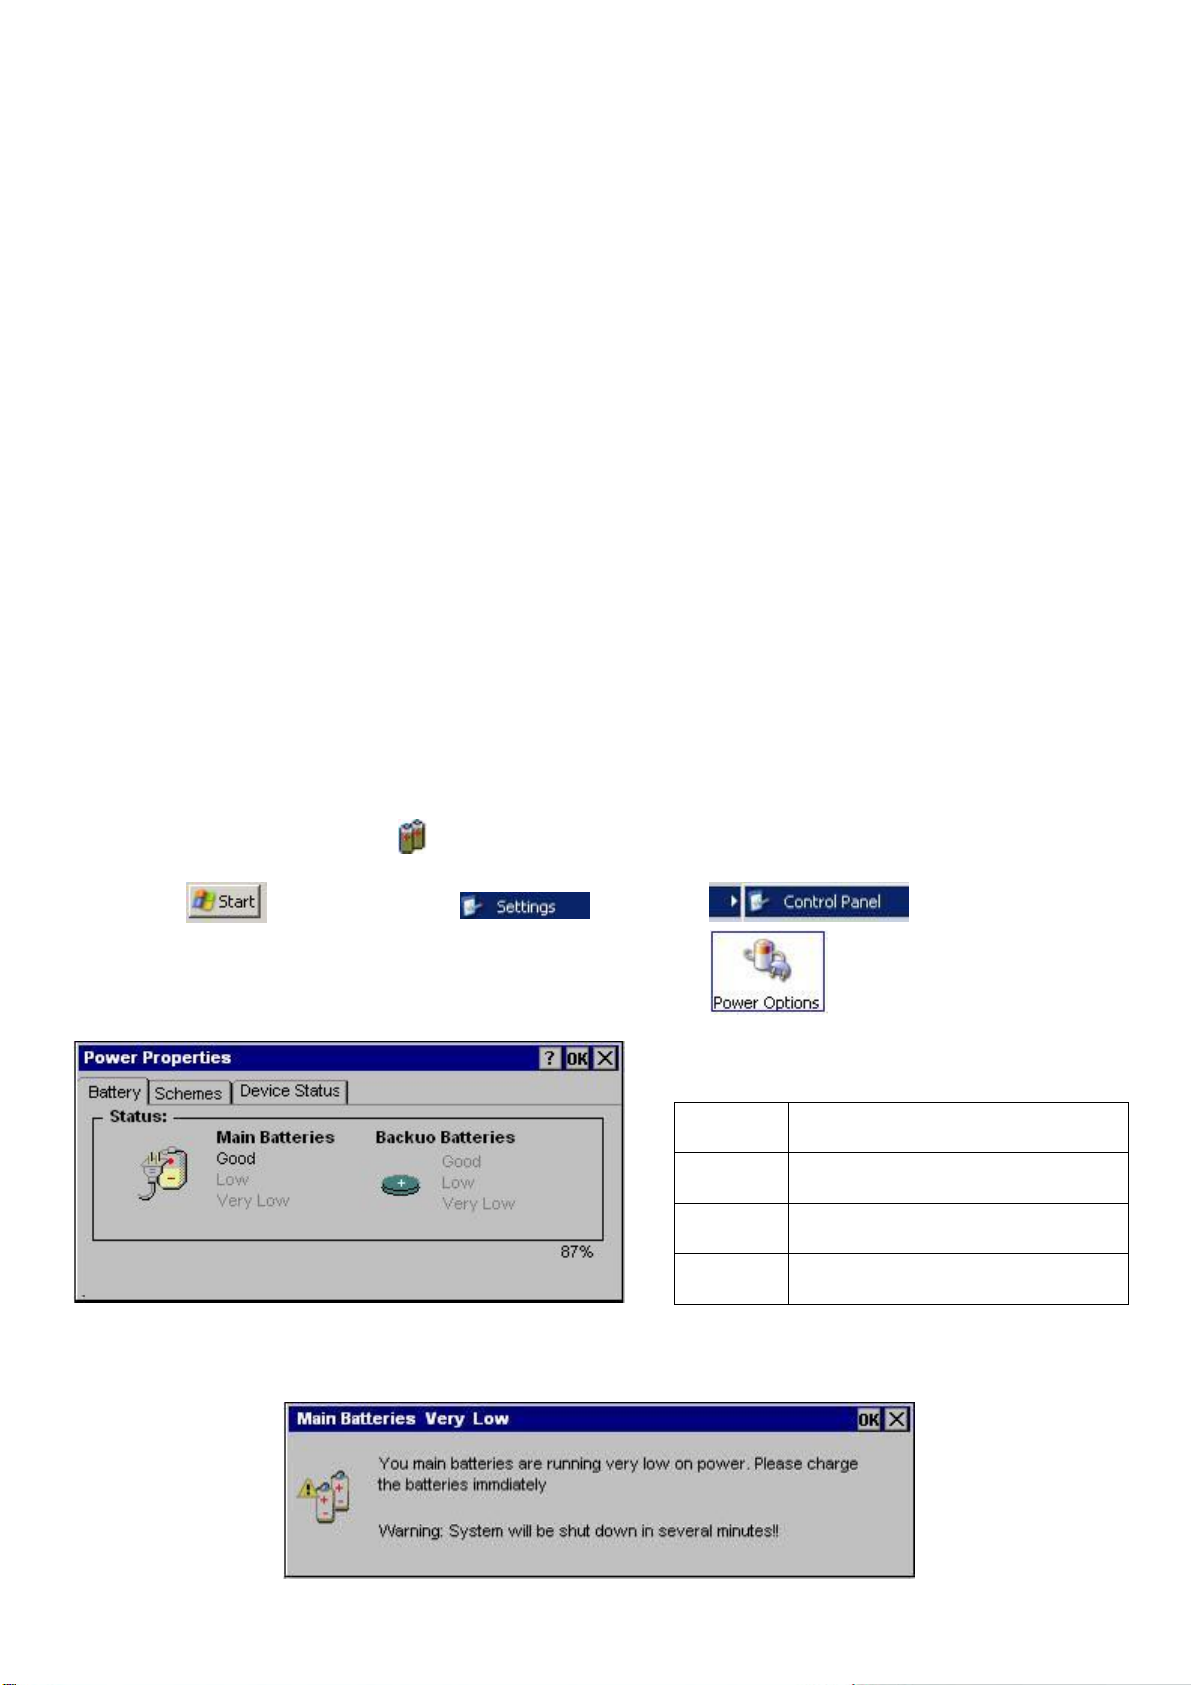
Checking the Battery Level
Doubleclickingthebatteryiconwillshowthepercentageofbatterypower remaining.Thisiconcan
alsobedoubleclickedtoshowthePower Propertieswindow. Thiswindowcanalsobeshownbyclicking
the “Start”button,selectingandthen
WhentheControlPanelisshown,clickthePowerOptionsicontoshowPower Properties.
Whenthebatteryisalmostempty,the “MainBatteriesverylow”popupwillappearasshownbelow, the
Mininotebook willbeautomatically poweroffafter thispopuphasbeendisplayedforashorttime.
Status Description
Good Good Battery Level
Low Low Battery Level, should be charged
Very Low Low Battery Level, mustbe charged
11
7.BasicOperation
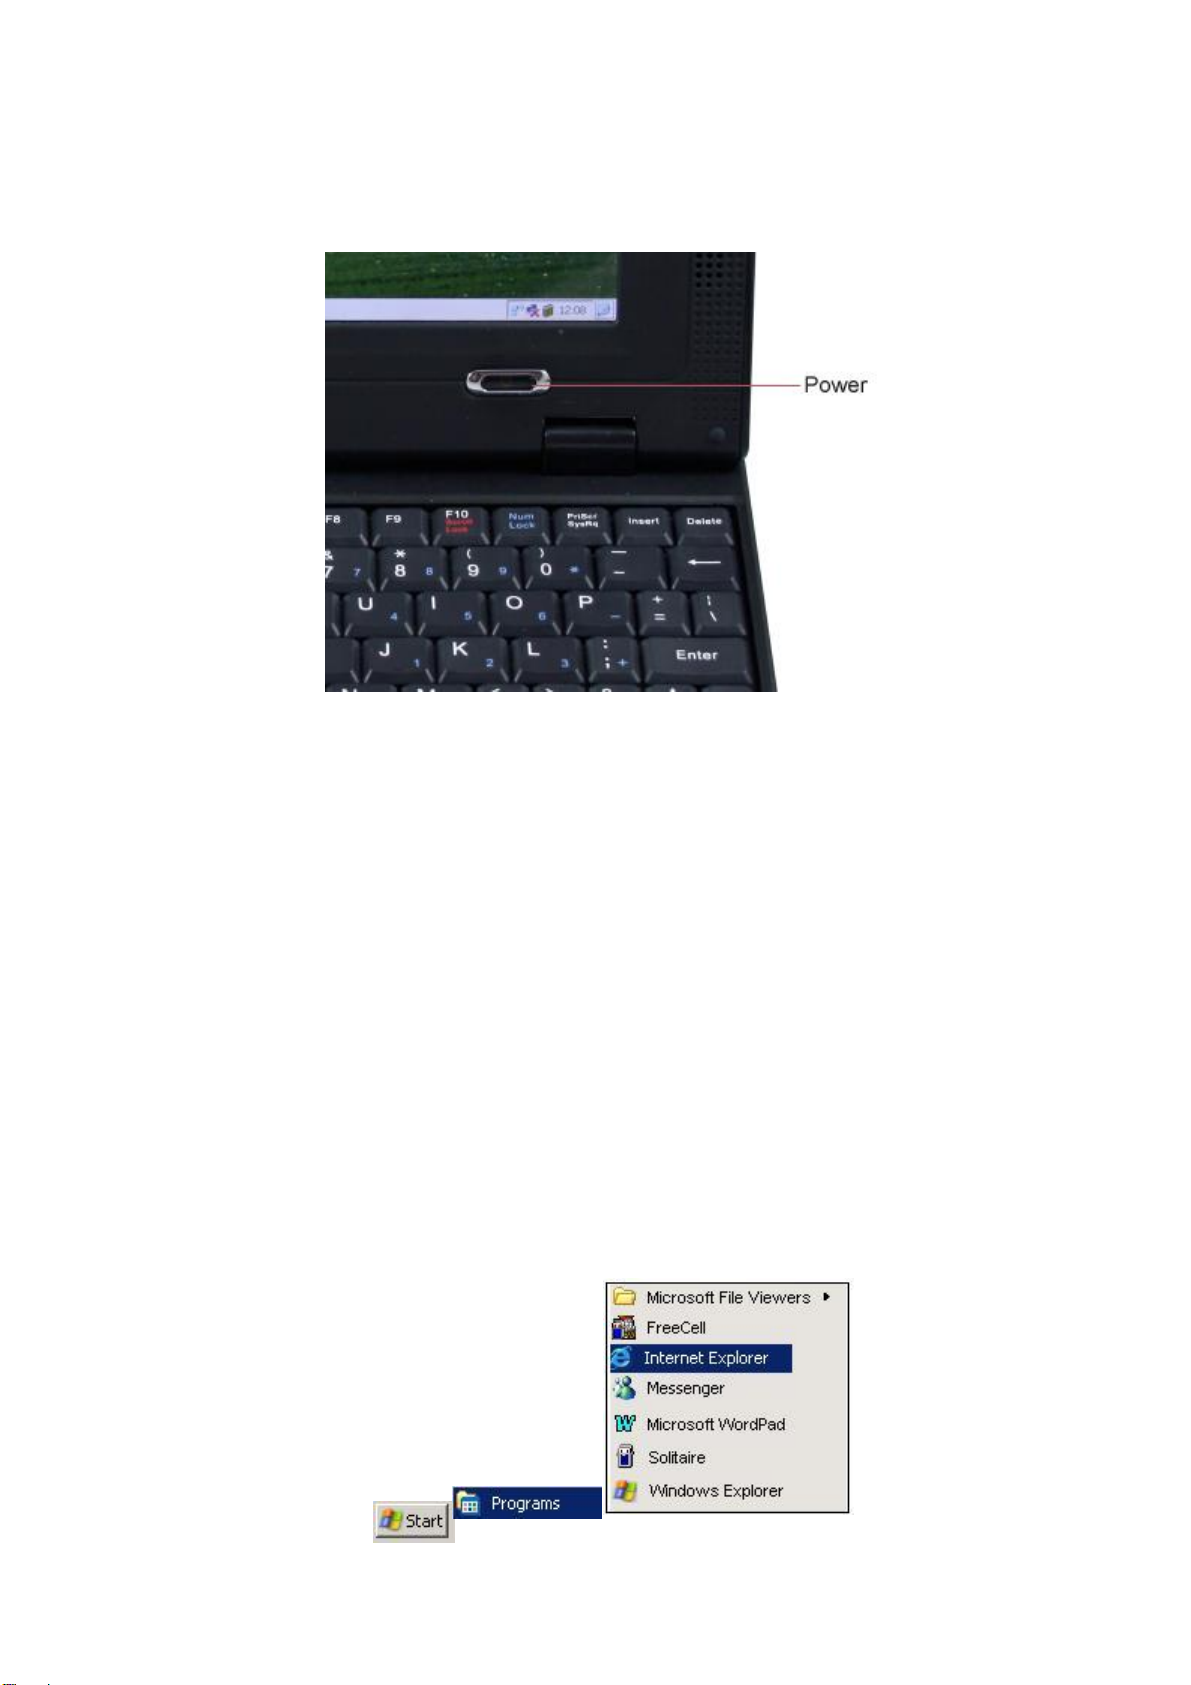
1.Powering Onand Off
1.Power On:Press andholdthepowerbuttonuntiltheWindowsCEOperatingSystem startstoboot.
2.Power Off:There aretwoways toturnofftheMininoteBook:
①Pressthepower buttonuntiltheOSshowsthatitisshuttingdown.
②Power offthrough “Start”Menuselection.
2.Using Applications
Systemapplicationscanbestartedeitherbyclickingontheiconoftherelativeapplicationonthe
Desktop,orby clickingtheStartbuttonandselectingtherequiredprogramfromtheProgramsMenu.
1.Openthrough “Start”Menu,Click Start”
12
DoubleclicktherequiredProgram(suchasInternetExplorer asshownbelow)
2.OpentheProgramdirectlybydoubleclickingthedesktopicon.
Pleasenote,onceseveralprograms havebeenstarted,theiconcanbeusedtominimizeallthe
openprogram windows,thiscanbeusedtoun-clutter thescreen.
Inorder tousetheMininotebookinmostefficientway,it issuggestednot tostarttoo many programs
atthesametime,orhavetoo manyInternetExplorer windowsopentogether.Otherwisethesystem
may starttoslowdown.
3.Keyboard Introduction
TheMini notebook usesan80key standardUKkeyboardlayout.

13
TheNumber Keypad (BlueSymbolsontheKeyboard)becomesactivewhentheNumLock key
hasbeenpressed(theNUMLock statusLEDwill light).PressingtheNum Lock again will disablethis
function.
Therearealsoanumber ofFunctionKeys whichcanbeused
4.Mouse Pad
TheMousepad isapointerdevicewhichcanwork asanormalmouse.Thesurfaceofthemousepad can
sensefinger movementinorder tocontrolthepointersmovementonthescreen.Thetwobuttonsonthe
leftandrightsideofthepad operateinexactlythesameway asthebuttonsonanormalmouse.
DocumentPage(scrollup)
Beginningof Line
DocumentPage(scrolldown)
Endof Line
14
TheMousePad canalsohavethesamefunctionality aspressingtheleftmousebuttonasdescribed:
FastSingleTapof Pad :Normalselectionfunction
FastDoubleTap ofPad :Startuptheapplication
MovinganObject:
1.Movepointer totheobjectwhichyouwant tomove,pressandholdLeftbuttonofthePAD,thenmove
thepointertothelocationrequired.
2.Releasethebuttonandfingeronthepad
Please note:
Pleasedon’tputobjectsonthemousepadssurfacewhichcouldscratchorcompress thepadbecause
thiscouldcausepermanentdamage.
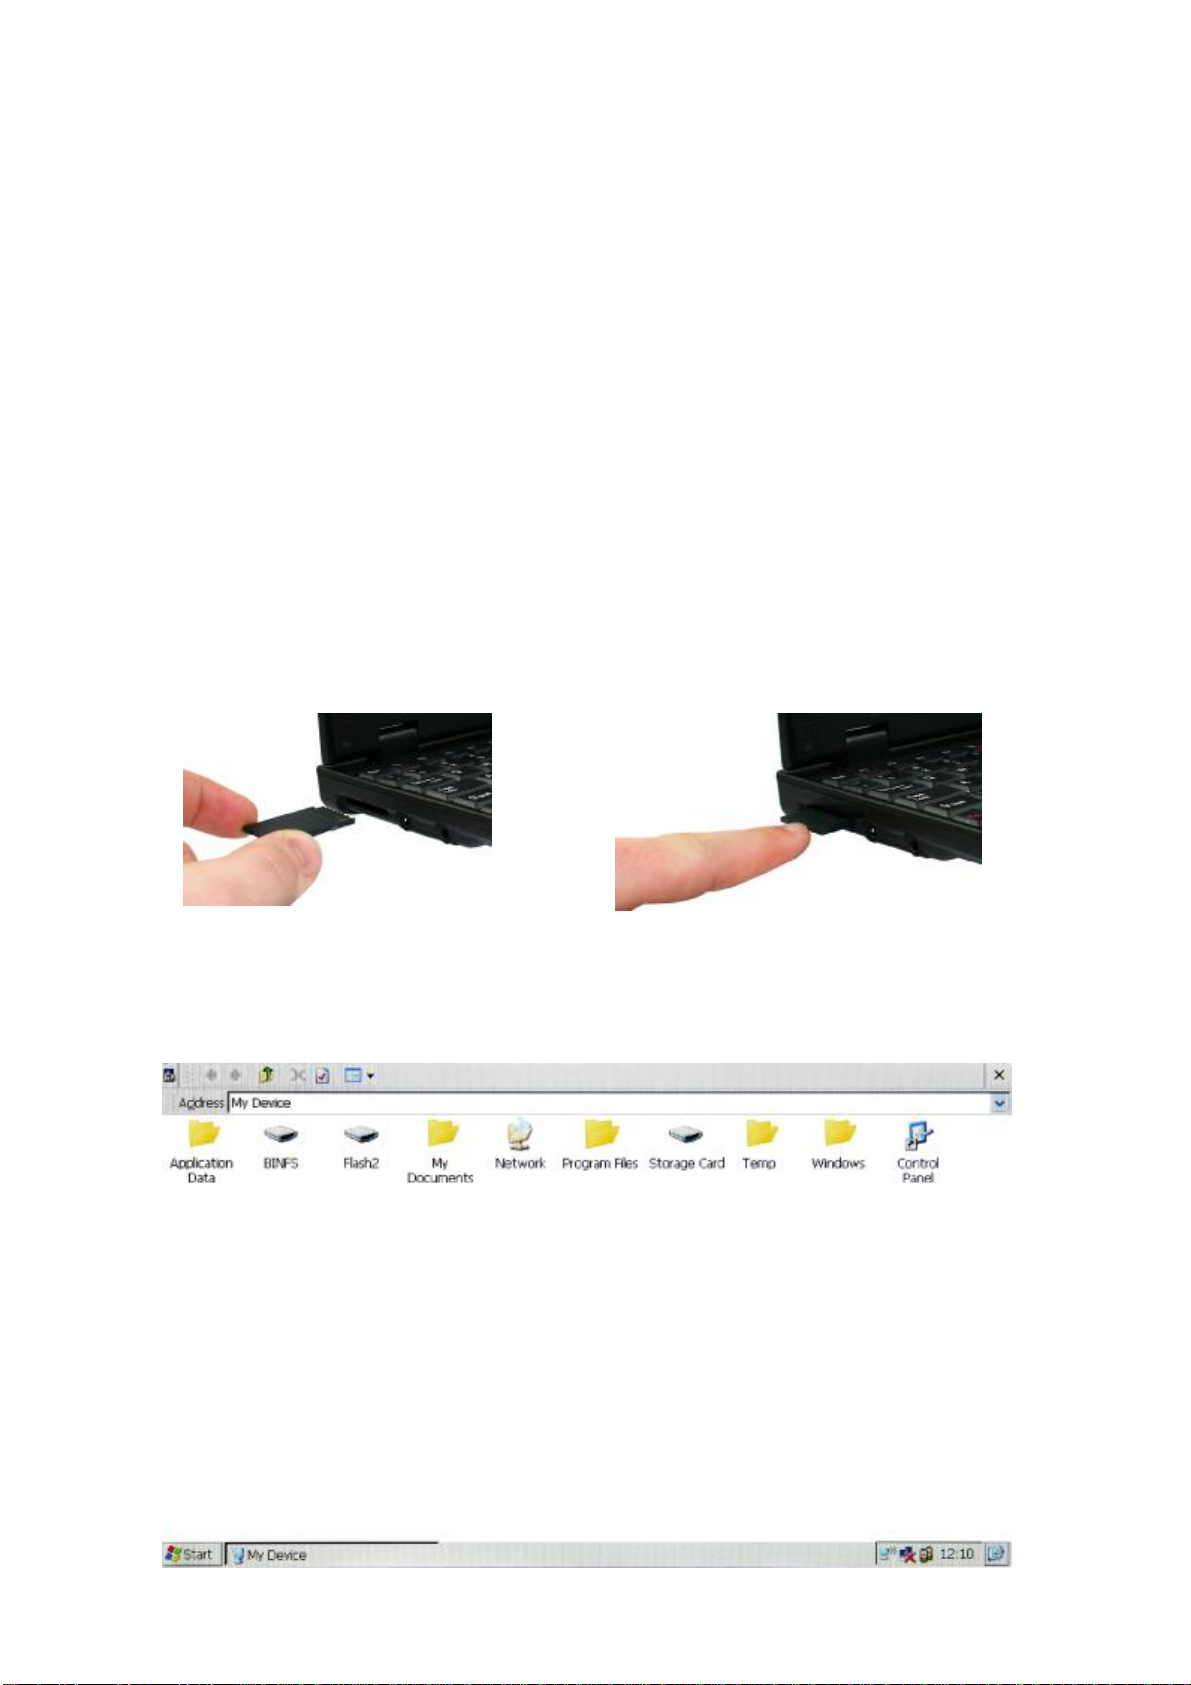
5.HowtouseSD Cards
UsingtheSDCard:
1.PleaseinserttheSDCard(Brandnamesidefacedown)intotheCardslotasshownbelow.
PushtheSDCardintotheslot untilit “clicks”intoplacetoconfirmthecardisincorrectlyandlockedinto
position.ToviewdocumentsontheSDCard:
1. DoubleClick “My Computer”ondesktop,andthefollowingscreenbelowwillbedisplayed.

15
2. DoubleclicktheiconastoviewthefilesstoredontheSDCard.
3. FilesorapplicationsstoredontheSDCardcanbeopenedorrundirectly fromtheCardorcopied
tothemainsystemdrive.
ToremovetheSDcard:
1. Closeany applicationsordocumentswhichhavebeenopenedfrom theSDCard.
2. Lightly press thecard,itwillpartejectautomatically,removethecardfromtheslot.
Note:
1.Pleaseinsertthecardtherightway roundanddon’ttrytoforceacardintotheslot.
2.IfanSDCardhasbeenlocked,theMininotebook cannotformatorcopy datatothecard.
3.Pleasedonotrepeatedlyinsertandremovethecard,thismaycausedamagetothecard.
4.WesuggestusingMininoteorother majorbrandsofSDcardtoavoidanyincompatibility.
6.Connecting USBDevices
TheMini notebook has3USBdeviceports,whichcanbeusedtoconnecttoUSB devicessuchas
KeyboardsandMouseetc.BecauseoftheMininotebooks supportforconnectingtoaPC viaActiveSync
orWindowsMobileDeviceCenter,thereisnosupportforUSB MemorySticks orStoragedeviceslikeMP3
Players,Cameras,ExternalHardDrives,ExternalOpticalDrivesandUSB Printers.
TherearUSB portistheonlyportthatsupportsActiveSync,sopleaseusethisportwhenconnectingthe
MininotebooktoaPC.
RearActiveSyncUSBPort
ThesideUSBportsshouldbeusedforplugginginperipheralssuchasUSBKeyboardsorMice.
SideUSBPorts
Formore informationonActiveSyncorWindowsMobileDeviceCenter pleaserefer tothiswebsite:
http://www.microsoft.com/windowsmobile/en-us/help/synchronize/default.mspx

16
7.CommunicationwithEthernetLAN
TheMini notebook hasa10/100EthernetPortthatcanbeusedtoconnecttoaLAN(LocalArea
Network).
Onceanetwork hasbeenconnected,thenetwork iconwillchangefromtointheStartbar,atthe
bottomrighthandsideofthedisplay.
1.Clickthe “Start”icon.
2.Select “Network Connections”andthefollowingwillbedisplayed:
3.Selectanddoubleclickit,theEthernetDriver Settingsscreenwillappear.
17
4.Movethepointer to ”ObtainanIPaddressviaDHCP”toallowtheMini notebook toautomaticallybe
assignedit’snetworkingsettingsfromaRouterasshownbelow:
5.Click “OK”toconfirmthesetting.
6.Networksettingscanalsobemanuallyentered,if “Specify anIPaddress”isselectedinstead.
Note: PleaseunplugalltheconnectionsbeforemovingtheMininotebook,asdamagemayoccurifany
forceisappliedtotheseconnectors.
8.WiFi ConnectionSetting
Before usingtheWiFiConnection,pleasemakesureyouknowtheSSID(nameofthenetworkto which
youaregoingtoconnect)andsecurity key (suchasWEP, WPA)assumingthenetworkissecure.
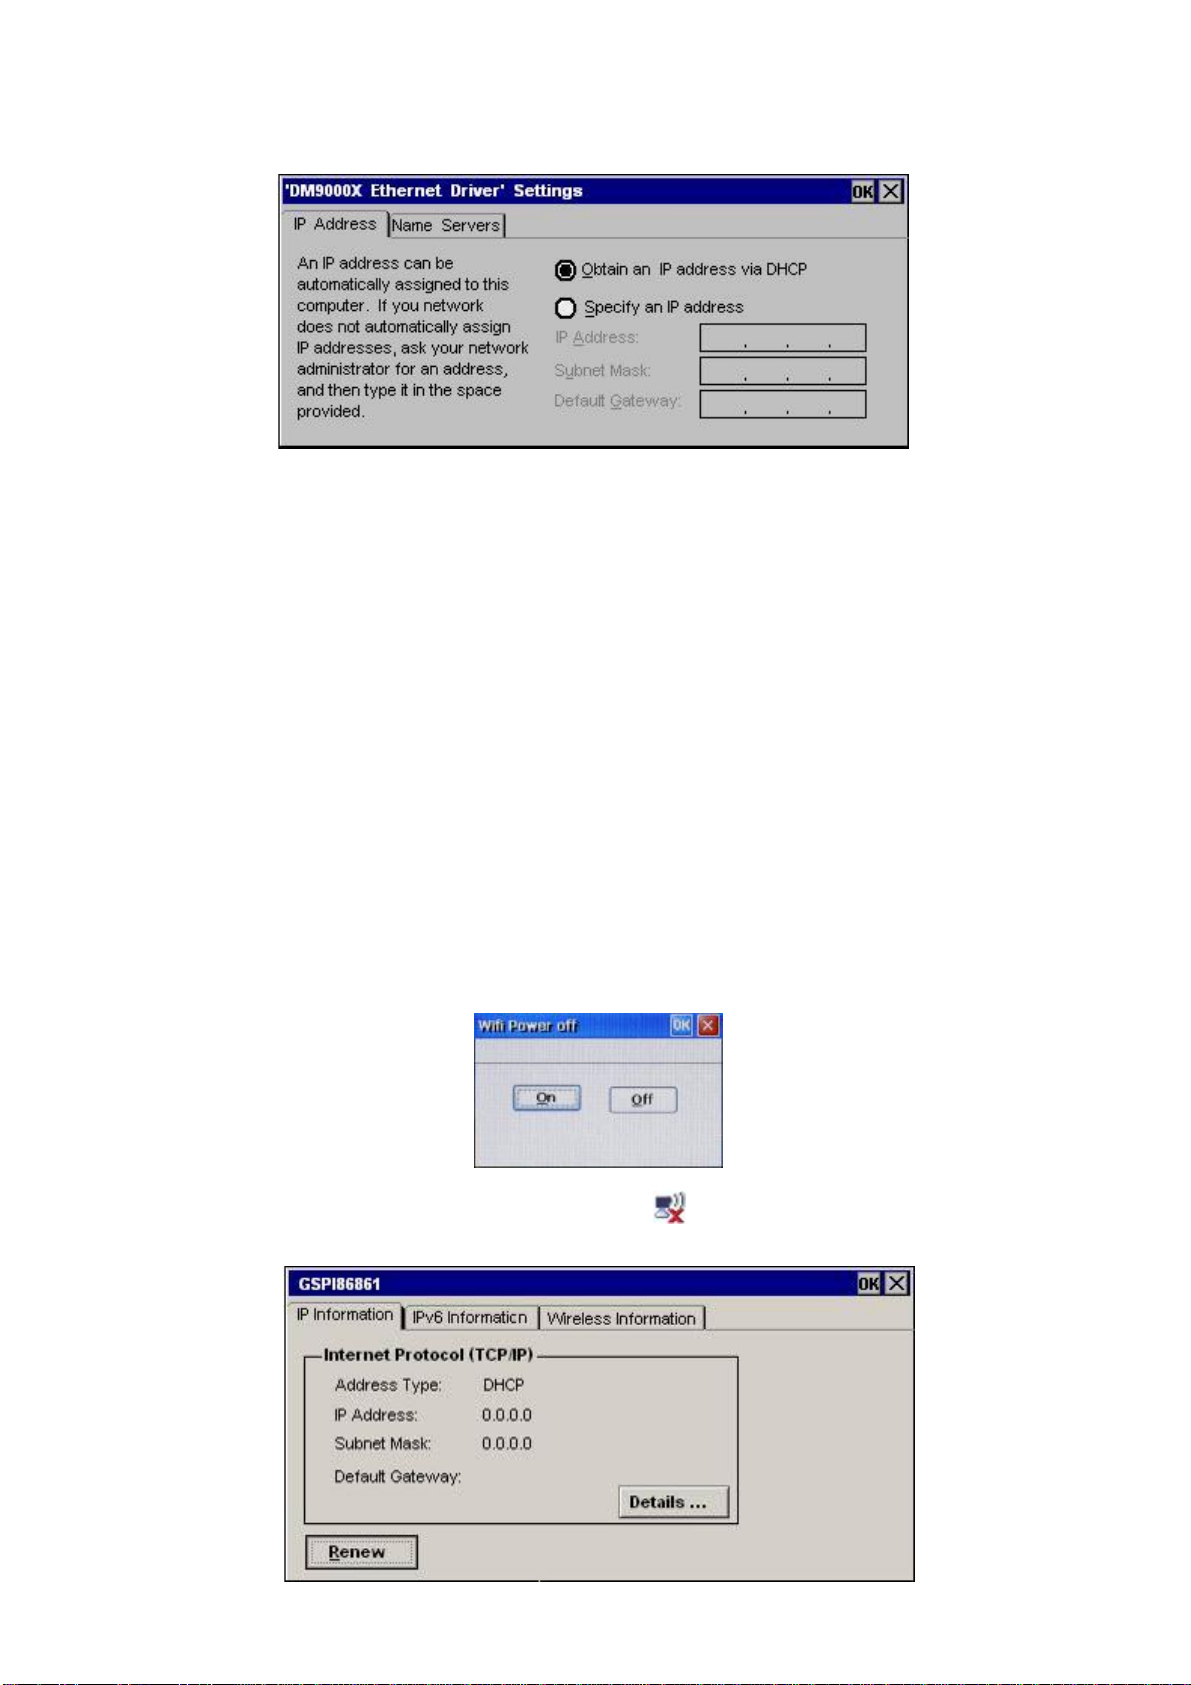
SwitchOn/OffWiFifunction
TheMini notebook containsaninternalWiFidevice,thatisswitchedonby default.ToturnthedeviceOff
orOn,clicktheStartbutton,click “Settings”andthenclick “Control Panel”,finallyselect “WiFi
Configuration”.TheWiFiPowerOffwindowwillappearasshownbelow,select “On”or “Off”asnecessary:
TofindoutthestatusoftheWiFiDevice,doubleclicktheicononthemenubar,thefollowing
windowwillpopup.

18
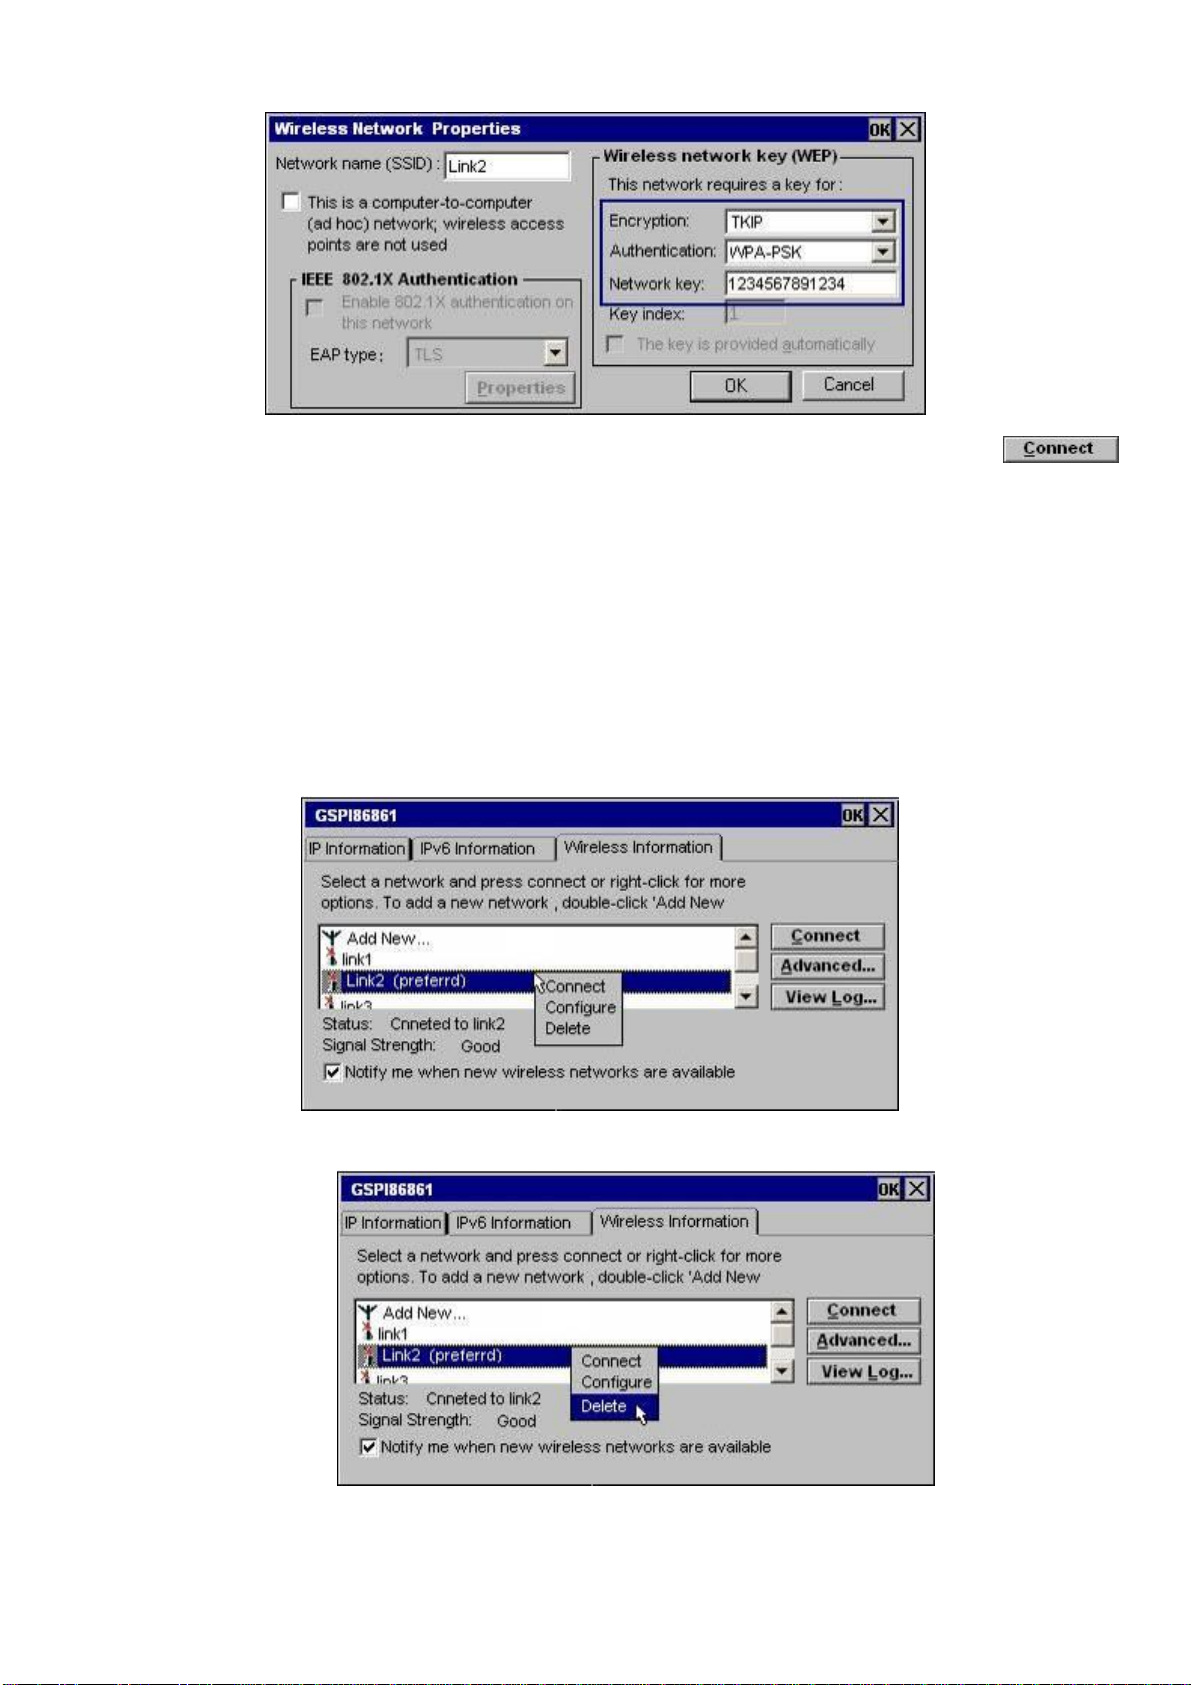
Select “WirelessInformation”,thenthefollowingscreenwill appear:
Allthewireless routerswithinrangewillautomatically bedetectedasshownabove.Selectyourrouter
by clickingtherouternameinthelist,suchas “link2”shownabove.
Ifnetwork doesn’thavepassword,youcanclicktostarttheconnection,ifsuccessful,the
Dialogbox ”WirelessInformation”willshowtherelatedinformationsuchasconnectionstatus,signal
strength asshownbelow:
Iftheconnectionissuccessful,themenubariconwillchangefromtothisiconwillflashduring
datatransfer.IfsecurityEncryptionisenabledontheWireless Networkyouareconnectingto,the
Wireless NetworkPropertiesscreenwillbeshown.Thiswillrequire theEncryptiontypetobechosen,two
Securitytypesare supported,WEP(16 bitand32 bit),andWPA-PSK.
Note: TheSecurity Key may beprintedonasticker ontheWirelessRouter,oritmayhavebeensupplied
withthedocumentationyoureceivedwiththeequipment.Ifnot pleasecontactyourserviceprovideror
whoever setuptheRoutertoobtain thecorrectinformationforyourwirelessnetwork.
19
PleaseenterthePasswordinthe “Network Key”box asbelow:
After confirmingthesettingsby clicking “OK”,it willgobackto “GSPI86861”interface.Click
tomaketheconnection.Iftheconnectionfails,thismaybebecausethewrongpasswordhasbeen
entered.
Youcanalsotrydeletingallthedetectedrouter names(byrightclick andselecting “delete”),thenswitch
theWiFioffandonagain,thenenteringrelateddataforyourwireless network andrepeattheprocedure
foryourwireless networknameagainasdescribedbefore.
Todeleteadetectedwirelessnetwork,inthewindow “GSPI86861”,presstherightbuttononcethe
correctwireless networkhasbeenselectedasshown:
Selectthe “Delete”option
Note: ItisrecommendedswitchingoffWiFiwhennotinuse,thiswill savepower consumptionandallow
thebatterytolastlonger.
20
8.Applications
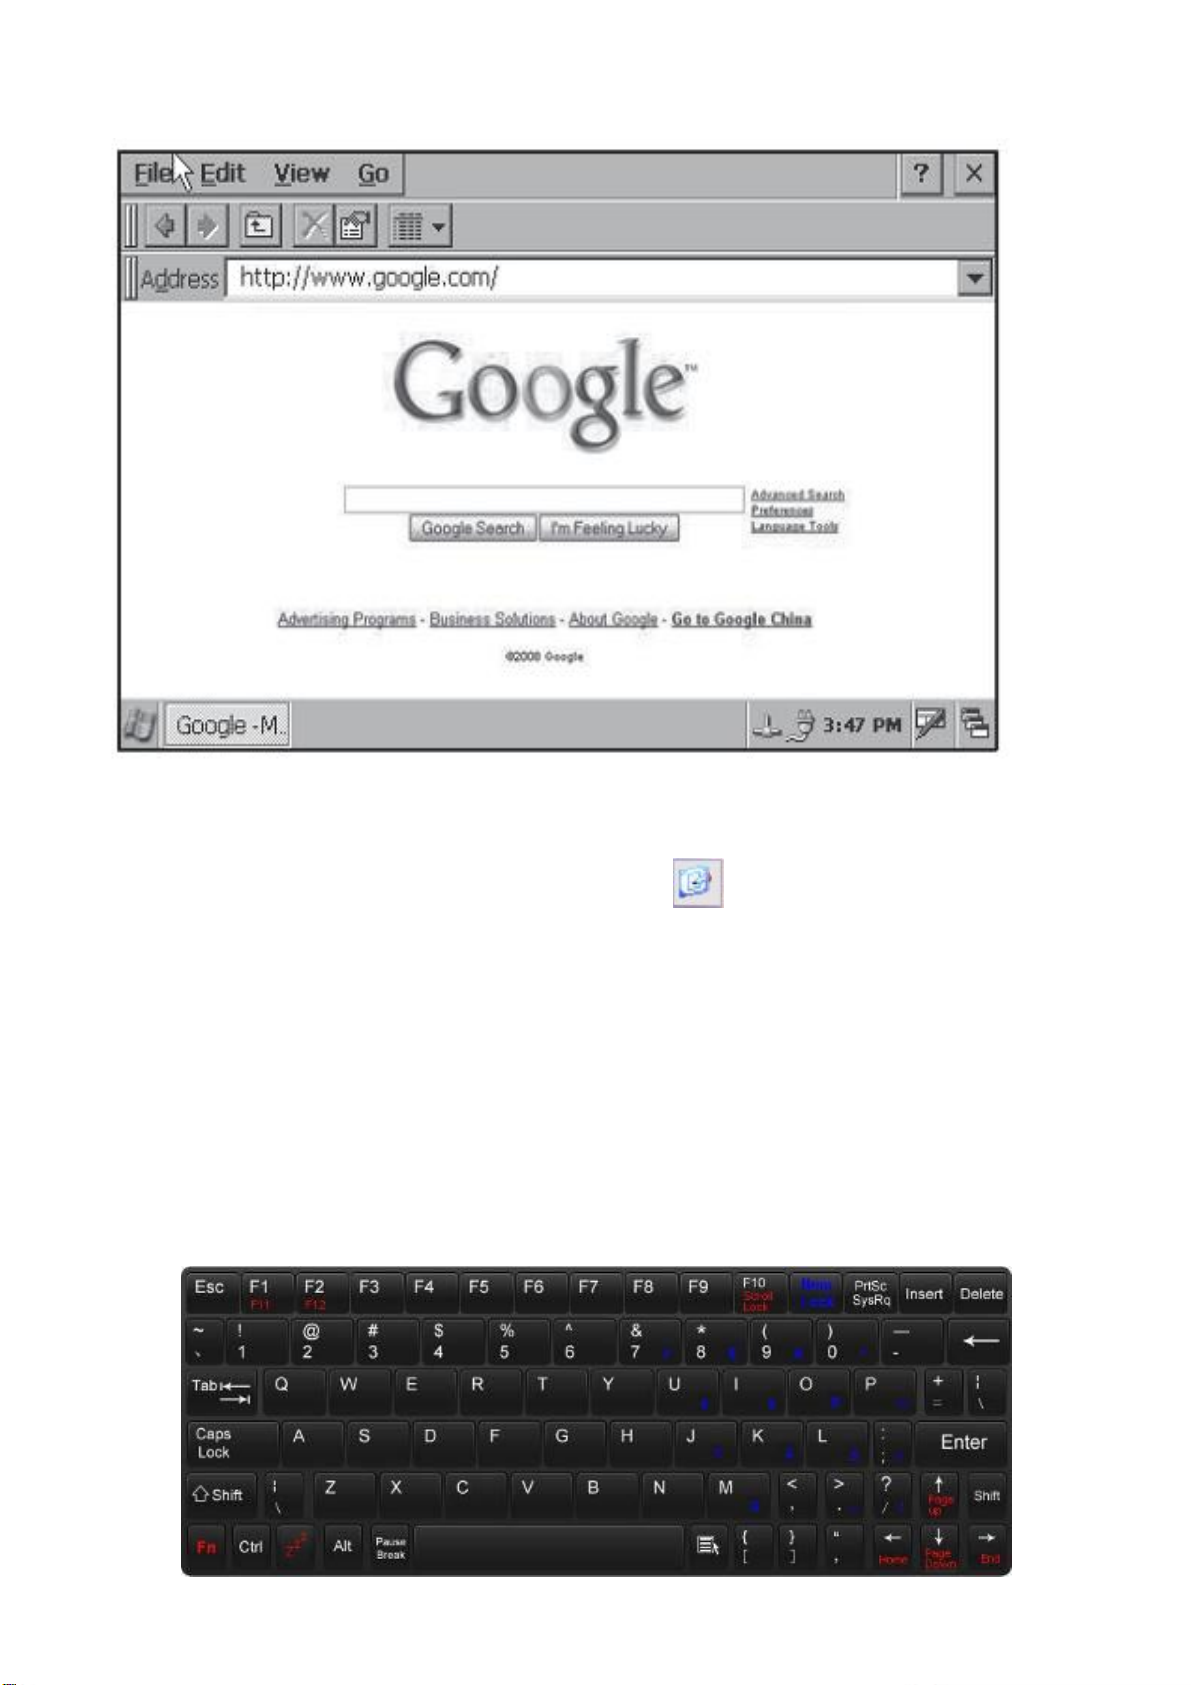
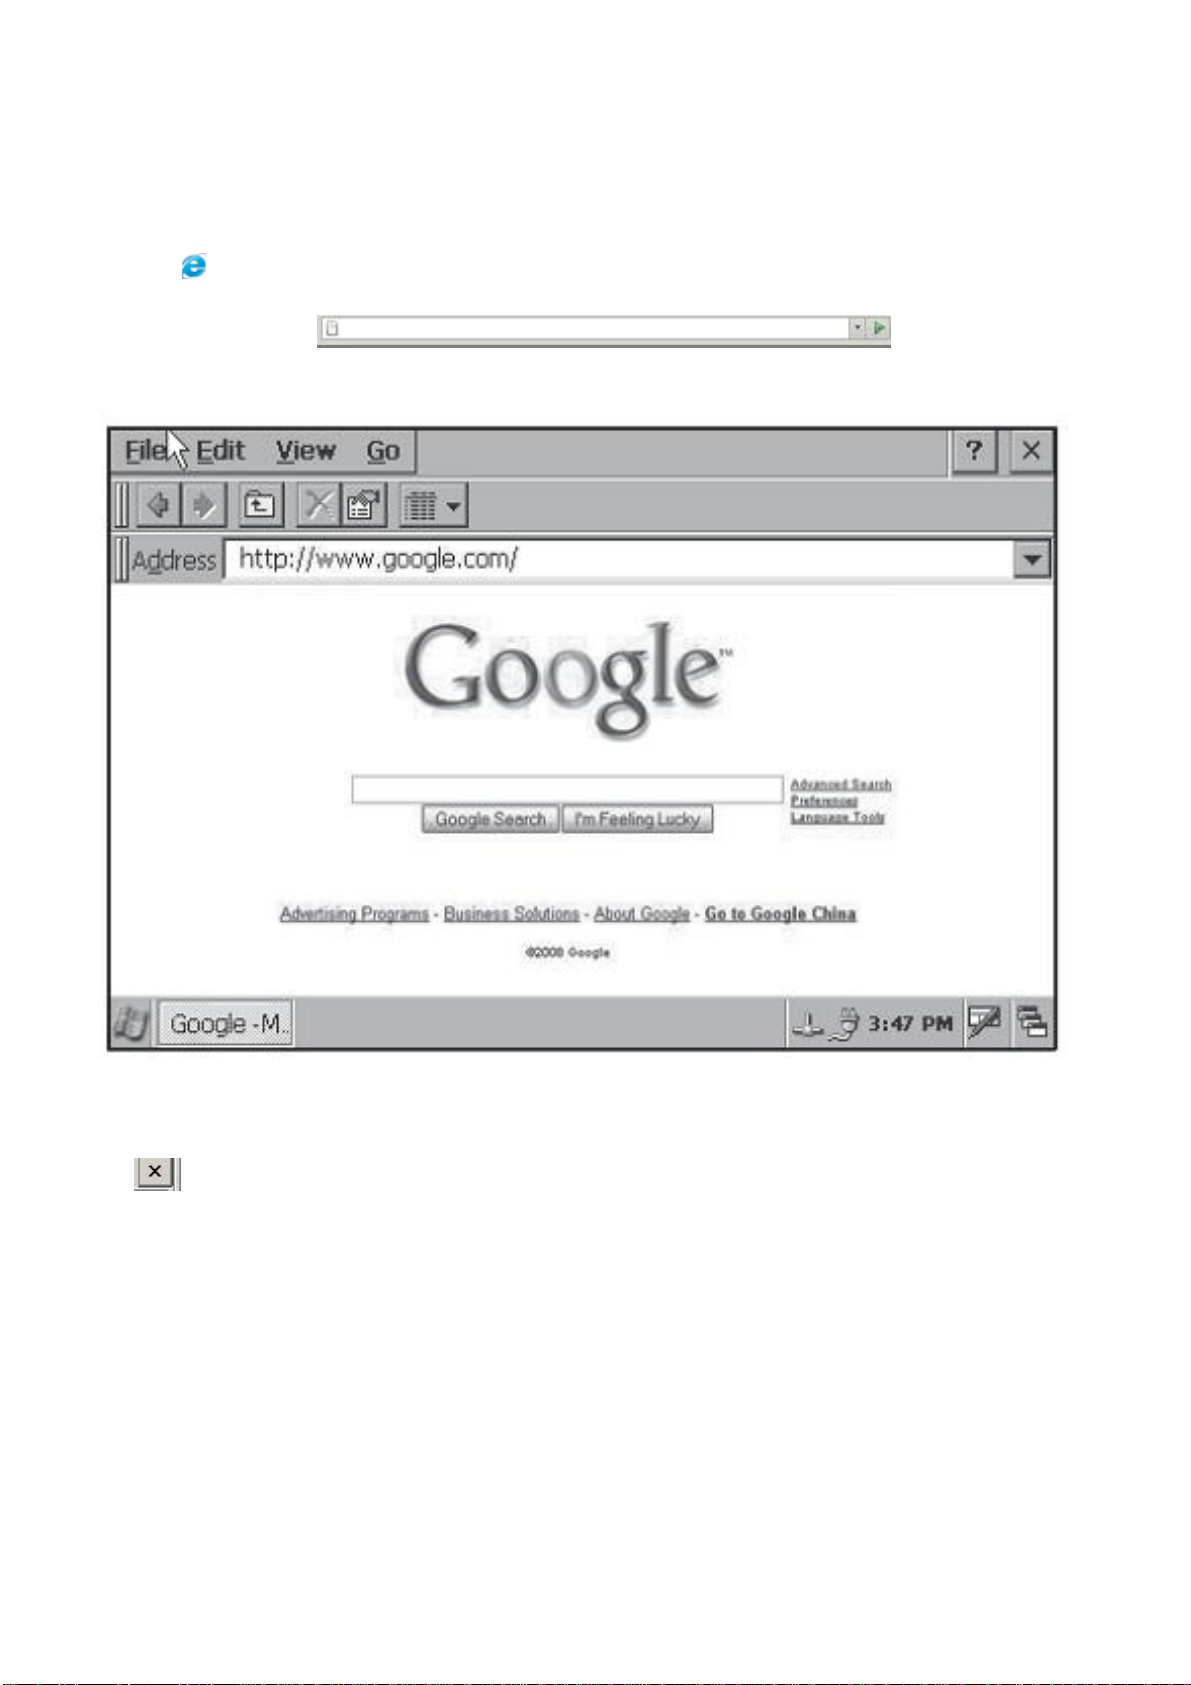
1.InternetExplorer
YoucanmakeuseofIEtoobtaininformationfrom internetweb,musicdownload, etc
1)Click ondesktoptoopenWebBrowser.
2)Enterwebaddress forthewebsiteyou
wishtobrowse.
3)TocloseInternetExplorerselecttheFilemenuandchoosetheCloseoption,orpress(Alt+F4),or
click
4)Tosavethecurrent WebSitepagetodisk selecttheFilemenuandchoosetheSavepageoption.
By defaultthefileswillbesavedtoNAND Flashdirectory.
Please Note: ThisversionofInternetExplorer haslimited supportfor JavaScriptand supports
AdobeFlash Movies up toversion7.
Table of contents
Popular Laptop manuals by other brands


Toshiba
Toshiba A205-S7468 - Satellite - Core 2 Duo 1.5 GHz Specifications

Compaq
Compaq presario V6000 Maintenance and service guide

Packard Bell
Packard Bell EasyNote ME69BMP quick start guide

Lenovo
Lenovo THINKPAD R60 Service und fehlerbehebung

Fujitsu
Fujitsu P1610 - LifeBook - Core Solo 1.2 GHz Technical Procedure

Panasonic
Panasonic Toughbook CF-30C3DAZBM operating instructions


