Otic SB-7724 User manual

SB-7724
32" Stereo Soundbar System
USER MANUAL


1
1. Remote Sensor 8. HDMI ARC in Jack
2. Mode Indicating Lamp Set 9. USB Port
3. (Power On/Off) Button 10. OPTICAL in Jack
4. VOL- Button 11. AUX in Jack
5. VOL+ Button 12. RCA L/R Jacks
6. (Play/Pause) Button 13. DC IN Jack
7. MODE Button
PRODUCT OVERVIEW
MAIN UNIT
Front view
Back view
8 9 10 12 13
2
1
Side view
5
6
4
7
3
11
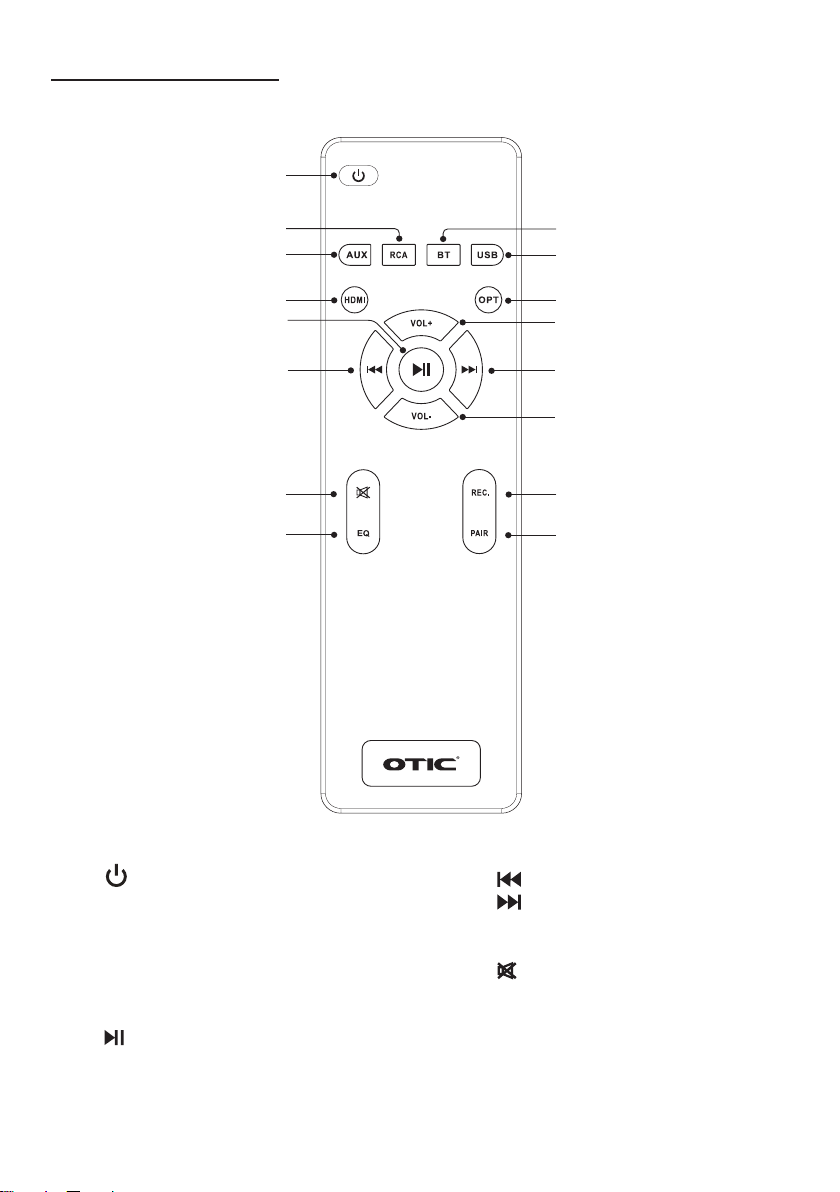
2
R1. (Power On/Off) Button
R2. RCA Button
R3. AUX Button (for 3.5mm cable in)
R4. HDMI Button
R5. BT (Bluetooth) Button
R6. USB Button
R7. OPT (Optical in) Button
R8. (Play/Pause) Button
R9. (Previous) Button
R10. (Next) Button
R11. VOL+ Button
R12. VOL- Button
R13. (Mute) Button
R14. EQ (Equalizer) Button
R15. REC. (Recording) Button
R16. PAIR Button (for bluetooth pairing)
REMOTE CONTROL
R1
R3
R2
R4
R9
R13
R14
R6
R5
R7
R10
R15
R16
R12
R8 R11

3
IMPORTANT SAFETY INSTRUCTIONS
CAUTION: TO REDUCE THE RISK OF ELECTRIC SHOCK, DO NOT REMOVE COV-
ER (OR BACK). NO USER SERVICEABLE PARTS INSIDE. REFER SERVICING TO
QUALIFIED SERVICE PERSONNEL.
DANGEROUS VOLTAGE: The lightning ash with arrowhead symbol within
an equilateral triangle is intended to alert the user to the presence of uninsu-
lated dangerous voltage within the product`s enclosure that may be of suf-
cient magnitude to constitute a risk of electric shock to persons.
ATTENTION: The exclamation point within an equilateral triangle is intend-
ed to alert the user to the presence of important operating and maintenance
(servicing) instructions in the literature accompanying the appliance.
WARNING: USE UNDER SUPERVISION OF AN ADULT DUE TO LONG CORD.
This unit has a long cord that can be easily tripped on or pulled on, causing injury.
Please make sure it is arranged so that it will not drape over a tabletop, etc. Where it
can be pulled on by children or tripped over accidentally.
Note:
The mains plug is used as the disconnect device. The socket-outlet shall be installed
near the equipment and shall be easily accessible.
1. Read Instructions: All the safety and operating instructions should be read before
the appliance is operated.
2. Retain Instructions: The safety and operating instructions should be well kept for
future reference.
3. Heed Warnings: All warnings on the appliance and in the operating instructions
should be adhered to.
4. Follow Instructions: All operating and use instructions should be followed.
5. Power Sources: The appliance should be connected to a power supply only of the
type described in the operating instructions or as marked on the appliance.
6. Power-Cord Protection: Power supply cords should be routed so that they are not
likely to be walked on or pinched by items placed upon or against them, paying
particular attention to cords at plugs, convenience receptacles, and the point at
which they exit from the appliance.
7. Overloading: Do not overload wall outlets and extension cords as this can result in
a risk of re or electric shock.

4
8. Grounding or Polarization: Precaution should be taken to insure that the grounding
or polarization means of an appliance is not defeated.
9. Severe weather: In extreme weather such as lightning storm, hurricane, unplug it
from the wall outlet and disconnect the antenna or cable system. This will prevent
damage to the appliance due to unexpected power surges.
10. Water and Moisture: The appliance should not be used near water-for example,
near a bathtub, washbowl, kitchen sink, laundry tub, swimming pool, or a wet
basement.
11. Heat: The appliance should be situated away from heat sources such as radiators,
heat registers, stoves, or other appliances (including ampliers) that produce heat.
12. Object/Liquid Entry: Care should be taken so that no object/liquid enter into the
enclosure through openings.
13. Ventilation: The appliance should not be situated so that its location (on a bed,
sofa, rug, or similar surface) or position (such as a bookcase or cabinet) interferes
with its proper ventilation.
14. Mounting: The appliance should be mounted only as recommended by the
manufacturer.
15. Cleaning: Only use a soft dry cloth to clean the appliance.
16. Servicing: The user should not attempt to service the appliance beyond that
described in the user’s operating instructions. All other servicing should be
referred to qualied personnel.
17. Replacement Parts: When replacement parts are required, be sure the
service technician has used replacement parts specified by the manufacturer.
Unauthorized substitutions may result in re, electric shock or other hazards.
18. Damage Requiring Service: The appliance should be serviced by qualied service
personnel when:
• The power-supply cord or plug has been damaged.
• Objects have fallen into, or liquid has been spilled into the appliance
enclosure.
• The appliance has been exposed to rain.
• The appliance has been dropped, or the enclosure damaged.
• The appliance does not appear to operate normally or exhibits a marked
change in performance.
19. Carts and Stands: An appliance and cart combination should
be moved with care. Quick stops, excessive force, and
uneven surfaces cause the appliance and cart combination to
overturn.
20. Non-use Periods: The power cord of the appliance should be unplugged from the
outlet/The batteries should be removed when the appliance is to be left unused for
a long period of time.
Portable Cart Warning

5
Battery precautions:
Replacement of a battery with an incorrect type that can defeat a safeguard; Disposal
of a battery into re or a hot oven, or mechanically crushing or cutting of a battery, that
can result in an explosion;
Leaving a battery in an extremely high temperature surrounding environment that can
result in an explosion or the leakage of ammable liquid or gas
A battery subjected to extremely low air pressure that may result in an explosion or the
leakage of ammable liquid or gas.
1. Use only the size and type of battery specied.
2. Be sure to follow the correct polarity when installing the battery as indicated in the
battery compartment, a reserved battery may cause damage to the device.
3. Do not mix different types of batteries together (e.g., Alkaline and Carbon-zinc) or
old batteries with fresh ones.
4. If the batteries in the device are consumed or the device is not to be used for a long
period of time, remove the batteries to prevent damage or injury from possible leak-
age.
5. Do not try to recharge the battery as it is not intended to be recharged; it can over-
heat and rupture (Follow the battery manufacturer’s instructions).
6. The batteries shall not be exposed to excessive heat such as sunshine or re.
7. Clean the battery contacts and also those of the device prior to battery installation.
Before throwing any batteries away, consult your distributor who may be able
to take them back for specic recycling.
6
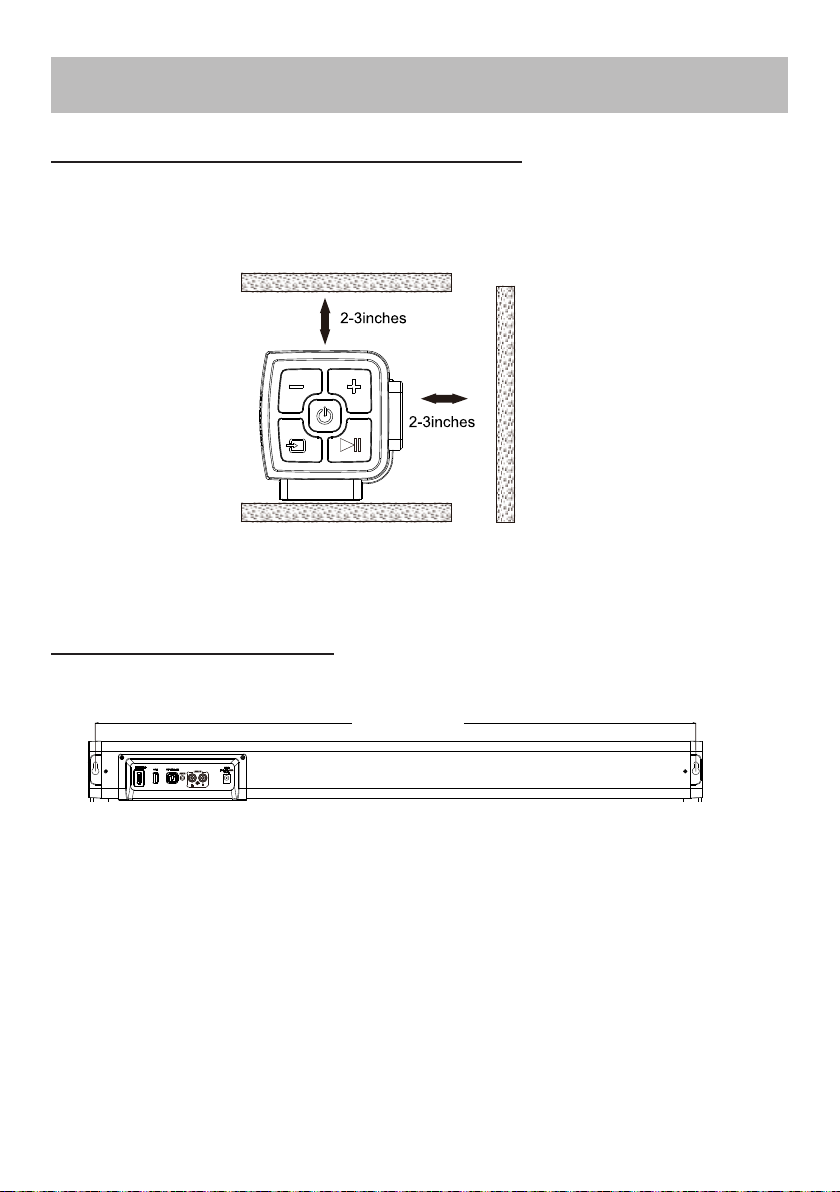
PLACEMENT AND MOUNTING
Placing the device on a table - Ventilation
When placing the soundbar and subwoofer on an entertainment center, bookshelf,
or any type of enclosed space, be sure to allow at least 5-8 cm (2-3 inches) of space
around them for ventilation. If they are enclosed in a tight space, without ventilation,
heat generated from them could produce a potential heat hazard.
The Installation Distance
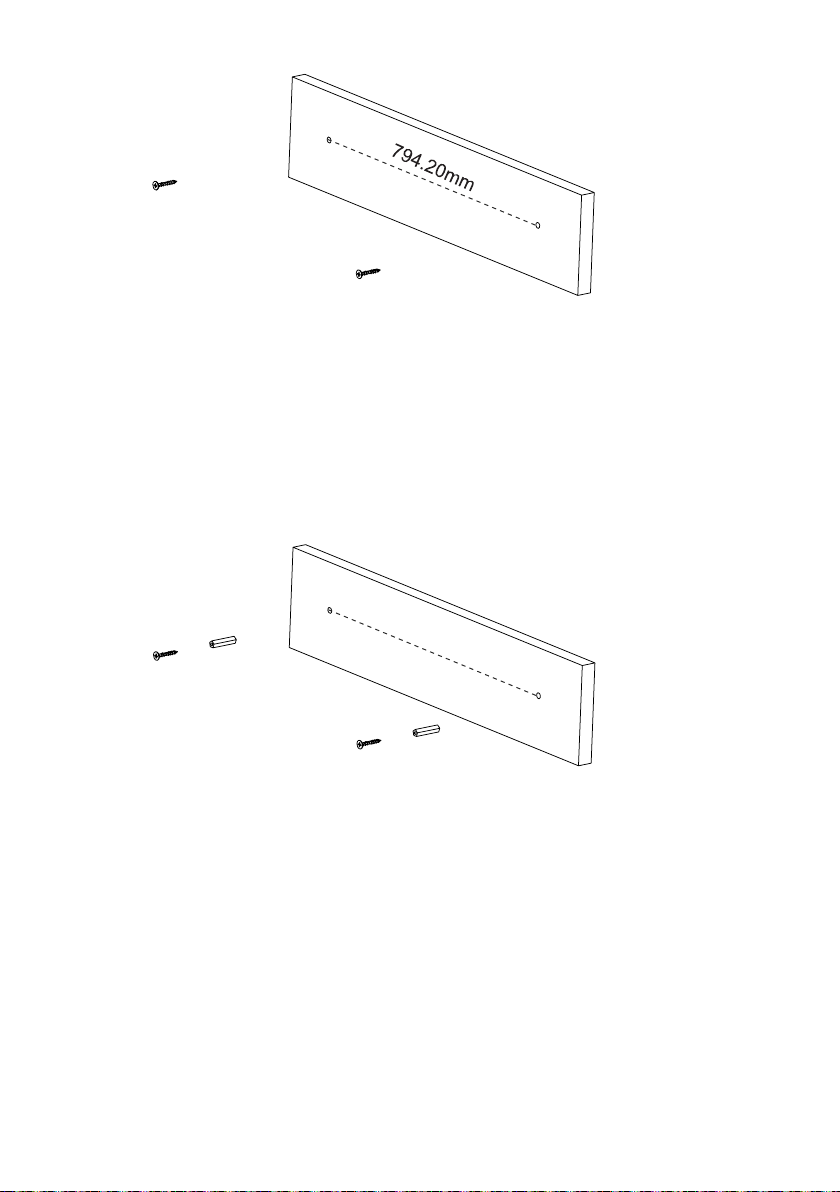
Mounting to a wooden wall
1. Mark the position of the mounting screws on the wall using a pencil.
2. Drill the screws directly into the marks that you have made on the wall and leave
approx. 0.3 inches length to hook the soundbar.
3. Put the soundbar onto the mounting screws. Make sure they are rm and stable.
7 94 . 20 m m
7
Mounting to a brick wall
1. Mark the position of the mounting screws on the wall using a pencil.
2. Drill 2 holes on wall with a powerful electric drill.
3. Insert the plastic insert and hammer it into the hole.
4. Secure the screws into the plastic insert and leave approx. 0.3 inches length to
hook the soundbar.
5. Put the soundbar onto the mounting screws. Make sure they are rm and stable.
794.20mm

8
GENERAL OPERATIONS
1. Connect the AC/DC adapter to the unit and wall outlet.
2. Press the button (3/R1) to power on the unit. The MODE indicating lamp (2) will
light up.
3. Press the MODE button (7) repeatedly, or press the RCA (R2), AUX (R3),
HDMI (R4), BT (R5), USB (R6) or OPT (R7) button switch to the desired mode di-
rectly. The corresponding lamp in MODE indicating lamp set (2) will light:
BT (Blue)...................................................................................Bluetooth Mode
AUX IN (Green).....................................................................................AUX IN Mode
LINE IN (Green)....................................................................................LINE IN Mode
OPTICAL (Green)............................................................................OPTICAL Mode
USB (White).........................................................................................USB Mode
HDMI (Green).....................................................................................HDMI Mode
NOTE:
Only when a USB ash drive is inserted into the USB slot (8), can the MODE indicating
lamp (2) answer the command from your pressing on USB button (R6) or MODE button
(7) at the USB mode.
4. During playback:
• Press the VOL+ button (5/R11) or VOL- button (4/R12) repeatedly to adjust vol-
ume.
• Press the button (R13) to mute; press it again to resume.
• Press the button (6/R8) to pause; press again to resume the playback.
• Press the button (R9) or button (R10) to play the previous or next audio
track.
• Press the EQ button (R14) to set to desired EQ mode (MUSIC (default), TALK,
MOVIE, STANDARD).
5. Press the button (3/R1) again to power off the unit.
NOTE:
For energy saving, this product will be powered off automatically if no audio signal is in-
put for 15 minutes.
BATTERY OPERATION (REMOTE CONTROL)
1. Remove the battery compartment door by applying thumb pressure to area indicat-
ed on battery door and then lift the door out and off the cabinet
2. Before inserting the batteries, observe the polarities (+ and -) of the battery, then
relate the polarities to the engraved diagram inside the battery compartment, insert
2x1.5V, AAA/R03/UM-4 batteries into the compartment.
3. Replace the compartment door.
CAUTION:
Danger of explosion if battery is incorrectly replaced. Replace only with the same or
equivalent type.

9
BLUETOOTH OPERATION
1. Power on the unit as previously explained.
2. Press the MODE button (7) repeatedly, or press the BT button (R5) directly on re-
mote control to switch to the Bluetooth mode, the BT/USB lamp in MODE in-
dicating lamp set (2) will start to blink in Blue.
3. Power on the external Bluetooth enabled device and enter Bluetooth mode to
search the pairing name of the unit.
4. When SB-7724 appears, select it to make the connection.
5. After successfully paired, the BT/USB lamp will turn solid Blue.
6. Press the PAIR button (R16) to disconnect current connection and enter the
searching condition again. You can pair to new devices with this soundbar.
NOTE:
The unit will be automatically connected with the last connected Bluetooth device if their
Bluetooth function are both activated and they are in working range.
AUX IN OPERATION
Through the unit you can listen the sound from a connected external audio player (such
as MP3 player, tablet, cell phone, laptop).
1. Plug one end of the 3.5 mm Stereo Headphone Cable into the AUX in jack (11).
2. Plug the other end of the 3.5 mm Stereo Headphone Cable into the headphone
jack or Aux Out jack on the external audio player.
3. Power on the unit as previously explained.
4. Press the MODE button (7) repeatedly, or press the AUX button (R3) on remote
control directly to switch to the AUX IN mode, the AUX IN lamp in MODE indicating
lamp set (2) will turn to Green.
5. Power on the connected external player and start playback as usual.
AUDIO SOURCE SWITCHING
10
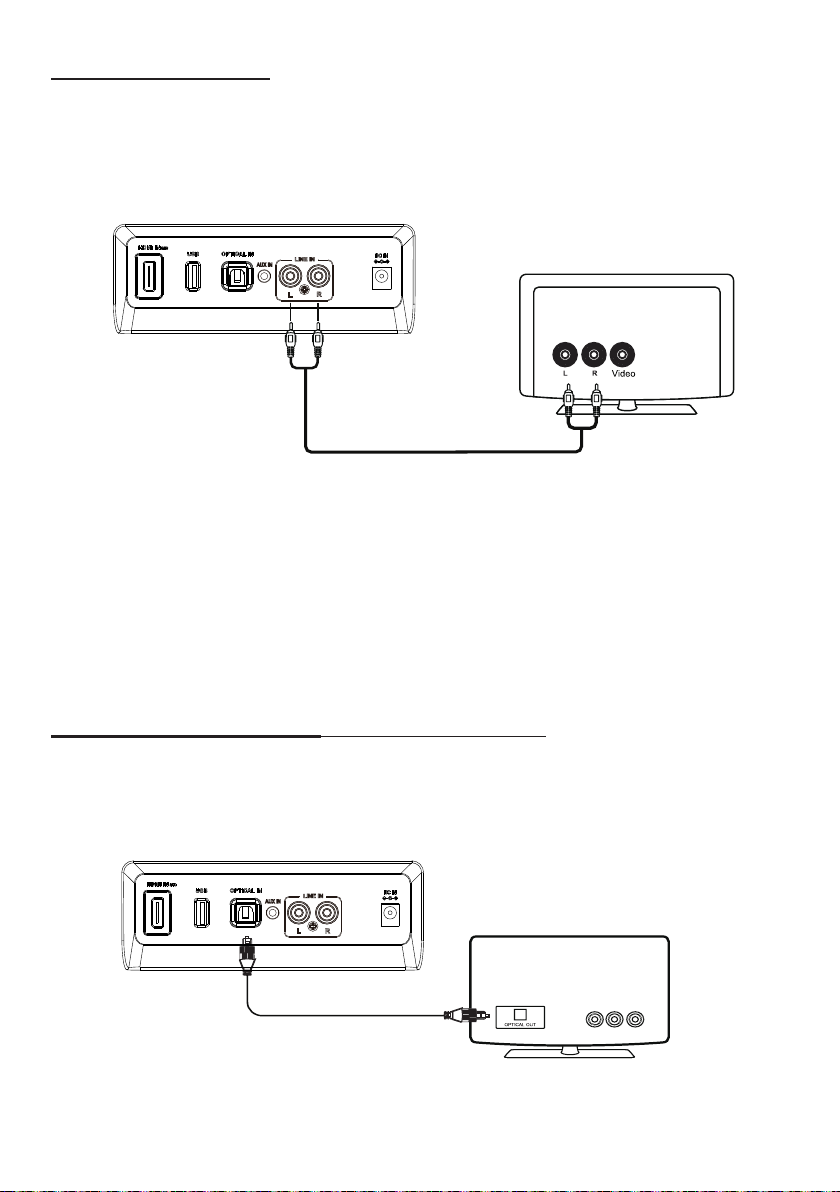
RCA IN OPERATION
Through the unit you can listen the sound from a connected external audio/video device
(such as TV, CD/DVD player).
1. Plug one end of the RCA Cable into the RCA in jack (12).
2. Plug the other end of the RCA Cable into the RCA Out jack (L&R) on the external
device.
3. Power on the unit as previously explained.
4. Press the MODE button (7) repeatedly, or press the RCA button (R2) directly to
switch to the RCA IN mode, the LINE IN lamp in MODE indicating lamp (2) set will
turn to Green.
5. Power on the connected external device and start playback as usual.
NOTE:
Special attention should be paid to matching the color (red to red, white to white) when
inserting the plugs of the RCA cable into the corresponding jacks on the unit and
external A/V device.
OPTICAL IN OPERATION (for PCM format only)
1. Plug one end of an Optical Cable (user supply) into the OPTICAL in jack (9).
2. Plug the other end of the Optical Cable into the Optical Out jack on the external
device (such as TV, DVD player).
3. Power on the unit as previously explained.
4. Press the MODE button (7) repeatedly, or press the OPT button (R7) on the remote
control directly to switch to the OPTICAL IN mode, the OPTICAL lamp in MODE

11
indicating lamp set (2) will turn to Green.
5. Power on the connected external player and start playback as usual. OPEN its
"SETUP" window and set Digital Audio Output to PCM (Pulse Code Modulation)
type similar to the below gure:
HDMI IN OPERATION
The TV with HDMI ARC port can be connected to this unit, and you can listen to the
sound from it though the unit's speakers.
1. Plug one end of an HDMI Cable (user supply) into the HDMI ARC in jack (8).
2. Plug the other end of the HDMI Cable into the HDMI ARC jack on TV.
3. Power on the unit as previously explained.
4. Press the MODE button (7) repeatedly, or press the HDMI button (R4) on remote
control directly to switch to the HDMI IN mode, the HDMI IN lamp in MODE
indicating lamp set (2) will turn to Green.
5. Power on the connected TV and start playback as usual.
NOTE:
This audio input mode only works for TV with HDMI ARC feature and it needs turn on
this feature from your TV.
HDMI
HDMI
HDM I
12
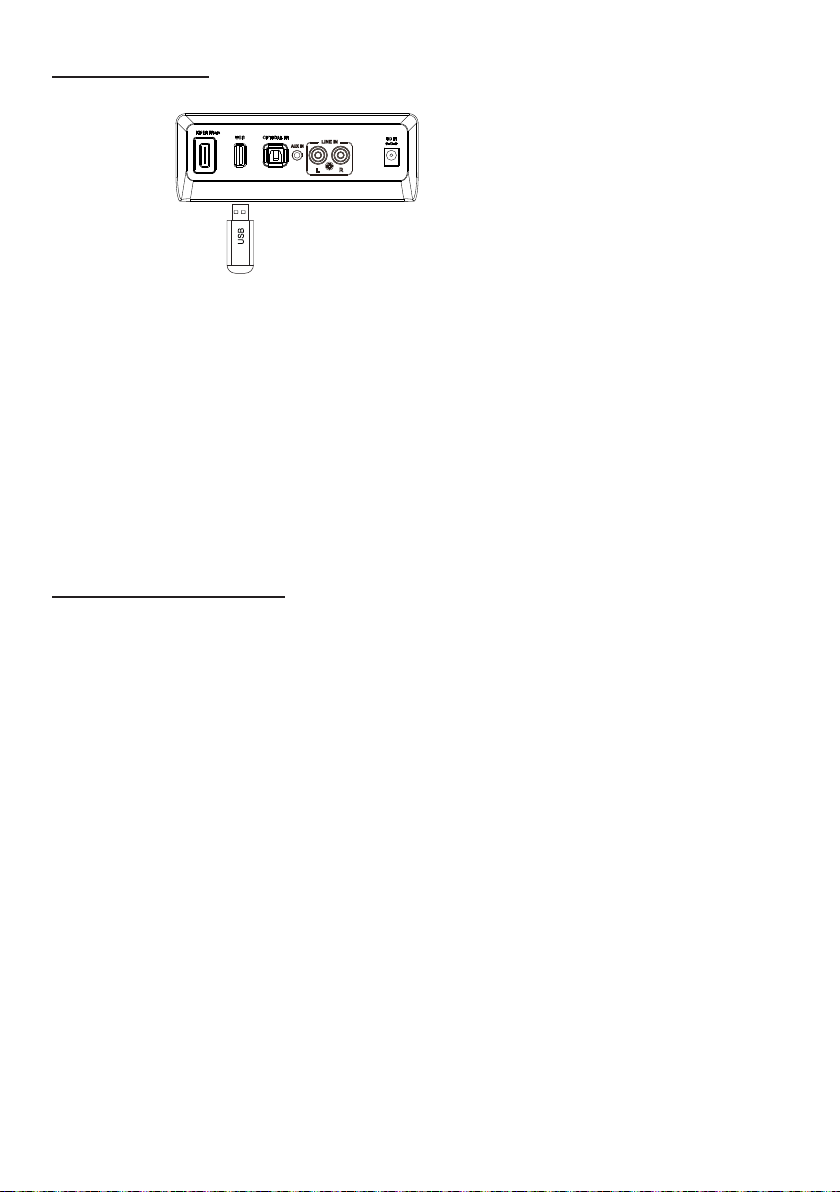
USB OPERATION
1. Insert a USB device to the USB port (9).
2. Power on the unit as previously explained.
3. Press the MODE button (7) repeatedly, or press the USB button (R6) on remote
control directly to switch to the USB mode. The BT/USB lamp in MODE indicating
lamp set (2) will turn to White.
Then the audio tracks stored in the inserted USB device will be played automatically.
NOTE:
• When a USB ash drive is inserted, the unit will automatically switch to USB mode
from the other audio input mode.
• The USB port (9) cannot be used for charging.
RECORDING OPERATION
1. Power on the unit as previously explained. Insert a U ash drive to the USB port (9).
2. Switch the audio input mode to Bluetooth, AUX IN or RCA IN mode as explained
above, and start playback on the connected device.
3. Press the REC. button (R15) or press and hold the MODE button (7) to start
recording. One beep tone will be heard when the recording begins.
4. Press the REC. button (R15) or press and hold the MODE button (7) to stop
recording. Two beep tone will be heard when the recording ends.
NOTE:
• The recording function only works in Bluetooth, AUX and RCA in mode.
• The recorded tracks will be stored in USB device automatically and will be played
in priority in USB mode.
5. If you press USB button (R6) during the recording process, the unit will turn to USB
mode and the recorded audio track will be played automatically.

13
TROUBLESHOOTING
SYMPTO
M
POSSIBLECAUSE
POSSIBLE SOLUTION
No power The adapter is not
connected
Connect the adapter to the unit
and wall
outlet.
The unit is in power o
mode
Press the buon (3/R1) to
power on
the unit.
No sound or
sound
weak
Volume level in
minimum
posion
Raise the volume level by
pressing the
VOL+ buon (5/R11).
The connected device
is not
in playback.
Play a track in the connected
device and
make sure its volume
is in high level.
Input source incorrect Press the MODE buon (7) on
the unit
repeatedly or use the
corresponding
buon on remote
control to switch to the
correct
mode.
Sound
distoron/
rale
Volume level too high Reduce the volume level by
pressing the
VOL- buon (4/R12).
Reduce the volume level of the
connected
device.
Remote Control
not funconing
Out of range Point the remote control to the
remote
sensor on the unit within
7 m, +/-30
degrees
The baery in the
remote s
weak
Replace with new baery.
Bluetooth
recepon failure
The external device is
too far
from the unit
Put the external BT device close
to the
unit.
Not paired Pair the unit with the BT Device
as stated
in this manual.
HDMI IN (ARC) not
working
The HDMI port is not
connected
Be sure the TV supports HDMI
ARC
funcon and insert an HDMI
cable to its
HDMI ARC port.
The ARC control is o Please go to the TV setup menu
and turn
on the ARC funcon.

14
SPECIFICATIONS
Power Input: AC 110-240V, 50/60 Hz
Power Output: DC16V 2.25A,
Audio Output: Mid-range speaker ×2 (12.5 W)
Woofer × 1 (25 W)
Bluetooth: V5.0
Remote Working range: 7 m (on the line of sight), horizontal: +/- 30 degrees,
vertical: +/- 15 degrees.
ACCESSORIES
Remote Control x 1
Power Adapter x 1
RCA Connection Cable x 1
3.5 mm Stereo Headphone Cable x 1
User Guide x 1
Metallic screw x 2 (for mounting)
Plastic insert x 2 (for mounting)
Specications and Accessories Subject to
Change
Without Notice

15
The appliance is in compliance with the essential requirements and other
relevant provisions of the following EC directives: 2014/35/EU Low voltage
directive, 2014/53/EU Radio Equipment Directive and 2014/30/EU EMC
directive.
RECYCLING
This product bears the selective sorting symbol for Waste electrical and
elec-
tronic equipment (WEEE). This means that this product must be
handled
pursuant to European directive 2012/19/EU in order to be
recycled or
dismantled to minimize its impact on the environment.
User has the choice to
give his product to a competent recycling
organization or to the retailer when
he buys a new electrical or
electronic equipment.
The symbol indicates class II equipment
The symbol indicates DC voltage
The symbol indicates AC voltage
For indoor use only
Caution
Please refer for further information to the user manual. Use only power
supplies listed in the user instructions.
The symbol indicates energy efciency marking
The symbol indicates polarity of d.c. power connector
The Bluetooth®word mark and logos are registered trademarks owned by Bluetooth
SIG, Inc. and any use of such marks by New One S.A.S is under license. Other
trademarks and trade names are those of their respective owners.

16
FCC Statement
Changes or modifications not expressly approved by the party responsible for
compliance could void the user's authority to operate the equipment.
This equipment has been tested and found to comply with the limits for a Class
B digital device, pursuant to Part 15 of the FCC Rules. These limits are
designed to provide reasonable protection against harmful interference in a
residential installation. This equipment generates uses and can radiate radio
frequency energy and, if not installed and used in accordance with the
instructions, may cause harmful interference to radio communications. However,
there is no guarantee that interference will not occur in a particular installation. If
this equipment does cause harmful interference to radio or television reception,
which can be determined by turning the equipment off and on, the user is
encouraged to try to correct the interference by one or more of the following
measures:
-- Reorient or relocate the receiving antenna.
-- Increase the separation between the equipment and receiver.
-- Connect the equipment into an outlet on a circuit different from that to which
the receiver is connected.
-- Consult the dealer or an experienced radio/TV technician for help
This device complies with part 15 of the FCC rules. Operation is subject to the
following two conditions (1)this device may not cause harmful interference, and
(2) this device must accept any interference received, including interference that
may cause undesired operation.
This equipment complies with FCC radiation exposure limits set forth for an
uncontrolled environment. This equipment should be installed and operated with
minimum distance 20cm between the radiator & your body

17
Warranty
Thank you for purchasing this product. You have received a 1-year warranty
provided by OTIC since the day of purchase.
The warranty does not cover normal aging changes, use not following the
printed instructions, or any damage caused by moisture, drop, power surge, or
such factors.
For faster service, locate the model and type on your appliance. Purchase
receipt is also required to obtain the maintenance service.
If you have any enquiries, please contact us by email or visit our website.

Vendor: Shenzhen Junlan Electronic Ltd.
Add: No.277 PingKui Road, Pingshan District, Shenzhen, CHINA
After Service: https://otic.afterservice.vip
Email: otic@afterservice.vip
Table of contents


