Outback EDX-VD6 User manual

1
February 2012 876-0183-000 Rev. A Rel. 1
Automated Steering Kit
Installation Guide
Kit: EDX-VD6, P/N 911-2039-000
Fits Versatile Tractor Models:
Read and Follow Safety Messages
• In these instructions, you will see the heading WARNING and the safety alert symbol . They indicate a hazardous
situation that, if not avoided, could result in death or serious injury. The safety messages provide information to identify a
hazard associated with potential injury.
• Before installing, operating, or performing maintenance or service on any part of the system:
– Read and understand this installation guide and all of the safety information.
– Read and understand the Automated Steering System User Guide.
• Do not allow anyone to operate without instruction.
• Keep these instructions and all related safety information with the manual for your machine and other implements.
If you have any questions or need assistance, contact your local dealer or distributor.
Overview
A series of equipment specific kits has been developed to work in conjunction with your automated steering system. For the
machine models listed above, these kits contain the components for:
• the steering hydraulics
• the wheel angle sensor (WAS)
• the steering wheel switch (SWS - for steering override)
• the electronic control unit (ECU)
The items in each kit are detailed in the tables that follow the safety warnings beginning below. After the kit tables, there are
four step-by-step installation sections, one for each of the kits.
Please read this manual thoroughly before beginning the installation.
To avoid serious injury or death during machine operation, install the appropriate kits for your machine make and model.
836 936
846 946
856 956
876 976

22
2
Machine Preparation
Inspect the machine and perform any needed maintenance (for example, contaminated hydraulic fluid) before installing the
automated steering kit. This kit cannot perform as intended on a machine that is not maintained properly. Errors in
performance increase the risk of operator and bystander injury or death.
Failure to maintain clean hydraulic fluid and operational hydraulic components can cause loss of directional control resulting
in serious injury or death.
To avoid serious injury, wear hand and eye protection and use wood or cardboard when checking for leaks.
Turn off the machine and power off the automated steering controller when installing or performing maintenance.
Before attempting to install any of the components, park the machine on a clean level floor with adequate clearance to work all
around.
Before you perform any drilling, cutting or fastening, ensure that no other machine components, such as hydraulic hoses or
electrical wiring, will be damaged. Failure to follow this warning may cause physical injury and/or damage to the machine.
To prevent hydraulic system contamination, it is essential to thoroughly clean hydraulic system fittings and hose connections
prior to disconnecting or removing. Use a degreasing solvent spray cleaner such as a brake cleaner to prevent hydraulic system
contamination. Note that o-rings used on ORB and ORFF type fittings, referred to in the Kit Contents section, may be
damaged by degreasing solvent cleaners. If a fitting is to be cleaned internally, you should first remove and clean the o-ring
with a fiberless cloth.
Kit Contents - Steering Hydraulics
Unpack the hydraulics installation kit and identify the required parts as shown. Kit items are A, B, C etc. with an H
(Hydraulic) prefix.
REF PART NUMBER QTY DESCRIPTION PHOTOGRAPH
HA 760-0021-000 1 Assembly, hyd valve block - 35L\proportional
(Hydraulic steering block)
Bag H1 of 6 contains HB, HC and HD
HB 760-2079-000 2 Adapter, hyd - #8maleJIC x #8maleORB
(P [pressure] and T [tank] ports on hydraulic
steering block)
HC 760-2060-000 2 Adapter, hyd - #6maleJIC x #8maleORB
(A and B steering ports on hydraulic steering
block)
HD 760-2058 1 Adapter, hyd 90 elbow - #6maleJIC x
#6maleORB
(LS port on hydraulic steering block)

3
Kit Contents - Steering Hydraulics (continued)
REF PART NUMBER QTY DESCRIPTION PHOTOGRAPH
HE 640-0011 1 Hydraulic steering block mounting bracket
Bag H2 of 6 contains HF
HF 675-2006-000
678-1054-000
676-1035-000
2
2
2
Bolt - 3/8NC x 3-3/4" Gr5, ZP
Washer, flat - 3/8 ZP
Nut, nylock - 3/8NC ZP
(Mount HA on HE)
Bag H3 of 6 contains HG
HG 675-2007
676-1035
2
2
Bolt, 3/8NC x 3/4" Gr5 ZP
Nut, nylock - 3/8NC ZP
(Mount HE on machine)
HH 640-0063-000 1 Steering controller mounting bracket
HI 750-5003-000 1 Steering controller
Bag H4 of 6 contains HJ
HJ 675-2002
678-1053
676-1034
2
2
2
Bolt, 1/4NC x 2-1/2" Gr5 ZP
Washer, flat - 1/4" ZP
Nut, lock - 1/4NC ZP
(Mount HI on bracket HH)

44
4
Kit Contents - Steering Hydraulics (continued)
REF PART NUMBER QTY DESCRIPTION PHOTOGRAPH
Bag H5 of 6 contains HK, HL, HM, HN and HO
HK 760-2016 1 Adapter, hyd run-tee - #12JIC
(Pressure line)
HL 760-2027 1 Adapter, hyd run-tee - #16JIC
(Tank line)
HM 760-2012 1 Adapter, hyd - #12femJIC x 8maleJIC
(Pressure line - use with HK)
HN 760-2026 1 Adapter, hyd - #16femJIC x 8maleJIC
(Tank line - use with HL)
HO 760-2077 2 Adapter, hyd run-tee - #8JIC
(Steering lines)
Bag H6 of 6 contains HP, HQ, HR, HS and HT
HP 760-0002 1 Assembly, hyd static load sense valve
HQ 760-2041 1 Adapter, hyd - #6maleORB x 6femJIC
(Function port of HP - with HR)
HR 760-2029 1 Adapter, hyd - #4femJIC x 6maleJIC
(Function port of HP with HQ - connect to valve
stack)
HS 760-2037 1 Adapter, hyd 90 elbow - #4maleJIC x 6maleORB
(Source port of HP - connect machine’s LS line)
HT 760-2058 1 Adapter, hyd 90 elbow - #6maleJIC x 6maleORB
(To hydraulic steering block - connect HW)

5
Kit Contents - Steering Hydraulics (continued)
Kit Contents - Wheel Angle Sensor
Unpack the wheel angle sensor kit and identify the required parts as shown. Kit items are A, B, C etc. with a W (Wheel) prefix.
REF PART NUMBER QTY DESCRIPTION PHOTOGRAPH
HU 760-1122 2 Hose, hyd - 3/8" x 45", #8femJIC swivel x
#8femJIC 90 swivel
(Pressure and tank hoses)
HV 760-1115 1 Hose, hyd - 3/8" x 57", #6femJIC swivel x
#8femJIC 90 swivel
(Steering hose - to head end of steering cylinder)
HW 760-1117 1 Hose, hyd - 3/8" x 44", #6femJIC swivel x
#8femJIC 90 swivel
(Steering hose - to rod end of steering cylinder)
HX 760-1012 1 Hose, hyd - 1/4" x 48", #6femJIC swivel both
ends
(Load sense hose)
HY 677-2001 20 Tie strap, 11" heavy duty
REF PART NUMBER QTY DESCRIPTION PHOTOGRAPH
Bag 710-0099-000 (W1 of 3) contains WA to WF
WA 720-0045-000# 1 WAS assembly
WB 750-5002-000 1 Sensor, dual output, BEI
WC 602-1087-000 1 Connector arm, steering

66
6
Kit Contents - Wheel Angle Sensor (continued)
WD 675-1191-000 2 Screw, mach, 8-32 x 3", PPH ZP
WE 676-1054-000 3 Nut, nylock 8-32NC, ZP
WF 675-1150-000 1 Screw, 8-32 x 1", Allen socket cap, ZP
WG 675-2031-000 1 Threaded rod, 5/16-24 x 12"
Bag W2 of 3 contains WH, WI and WJ
WH 676-1053-000 4 Nut, 5/16-24 standard ZP
WI 760-0018-000 2 Rod end swivel with stud, 5/16-24
WJ 675-2010 2 Bolt, 5/16NC x 3/4" Gr5 ZP
(Attach WAS assembly to WK)
WK 640-0147-000 1 WAS assembly mounting bracket
WL 640-0076-000 1 WAS link rod bracket
Bag W3 of 3 contains WM and WN
WM 675-2066-000 1 Bolt, 16-2.0 x 50mm, Gr8.8, ZP
(Attach WK - with machine’s nut)
WN 675-2065-000
678-1081-000
676-1079-000
2
2
2
Bolt, 7/16" x 1-1/2", Gr5, ZP
Washer, flat - 7/16" ZP
Nut, 7/16" - 14, Gr5, ZP
(Attach WL)

7
Kit Contents - Steering Wheel Switch
Unpack the steering wheel switch kit and identify the required parts as shown. Kit items are A, B, C etc. with an S (Switch)
prefix.
REF PART NUMBER QTY DESCRIPTION PHOTOGRAPH
SA 478-0008 2 Magnet, flex -1/2" W x 1" L x 1/8" thk, plain 1
SB 675-0077 1 Epoxy, Hardman 04001 - single double bub
SC 602-1062 1 Bracket, steering wheel switch mounting
SD 726-1054 1 Assembly, steering wheel switch/cable
SE 677-2002 4 Tie strap, 7" releasable

88
8
Kit Contents - Electronic Control Unit
Unpack the electronic control unit kit and identify the required parts as shown. Kit items are A, B, C etc. with an E (Electronic)
prefix.
REF PART NUMBER QTY DESCRIPTION PHOTOGRAPH
EA 051-0226-000# 1 Main cable
EB 054-0115-000# 1 Extension cable
EC 051-0228-000# 1 Steering controller main cable
ED 051-0231-000# 1 Valve cable
EE 051-0230-000# 1 WAS cable
EF 051-0229-000# 1 SWS cable

9
Kit Contents - Electronic Control Unit (continued)
REF PART NUMBER QTY DESCRIPTION PHOTOGRAPH
EG 054-0117-000# 1 Power switch
EH 051-0166-000# 1 CAN-PWR cable
EI 806-1031-000# 1 Controller (ECU)
EJ 640-0091-000 1 ECU (EI) mounting bracket
EK 726-1093-000 1 Switch bracket
Bag E1 of 1 contains EL and EM
EL 675-1197-000# 4 Screw, self-drilling, # 10-16 x 2½", Hex, ZP
EM 675-1188-000 4 Screw, mach, M6 x 12mm, PPH, ZP
1010
10
Installation - Automated Hydraulic Steering Kit
Before installing, disconnecting or repairing the hydraulic hoses and components, turn off the machine and relieve all pres-
sure from the hydraulic system by turning the steering wheel left and right. Failure to remove the pressure can result in seri-
ous injury or death from unexpected machine movement.
To avoid burn injury when installing, disconnecting or repairing the hydraulic hoses and components, turn off the machine and
allow the system to cool down prior to touching the parts of the machine that are heated.
See Appendix B for a schematic of the hydraulic circuits.
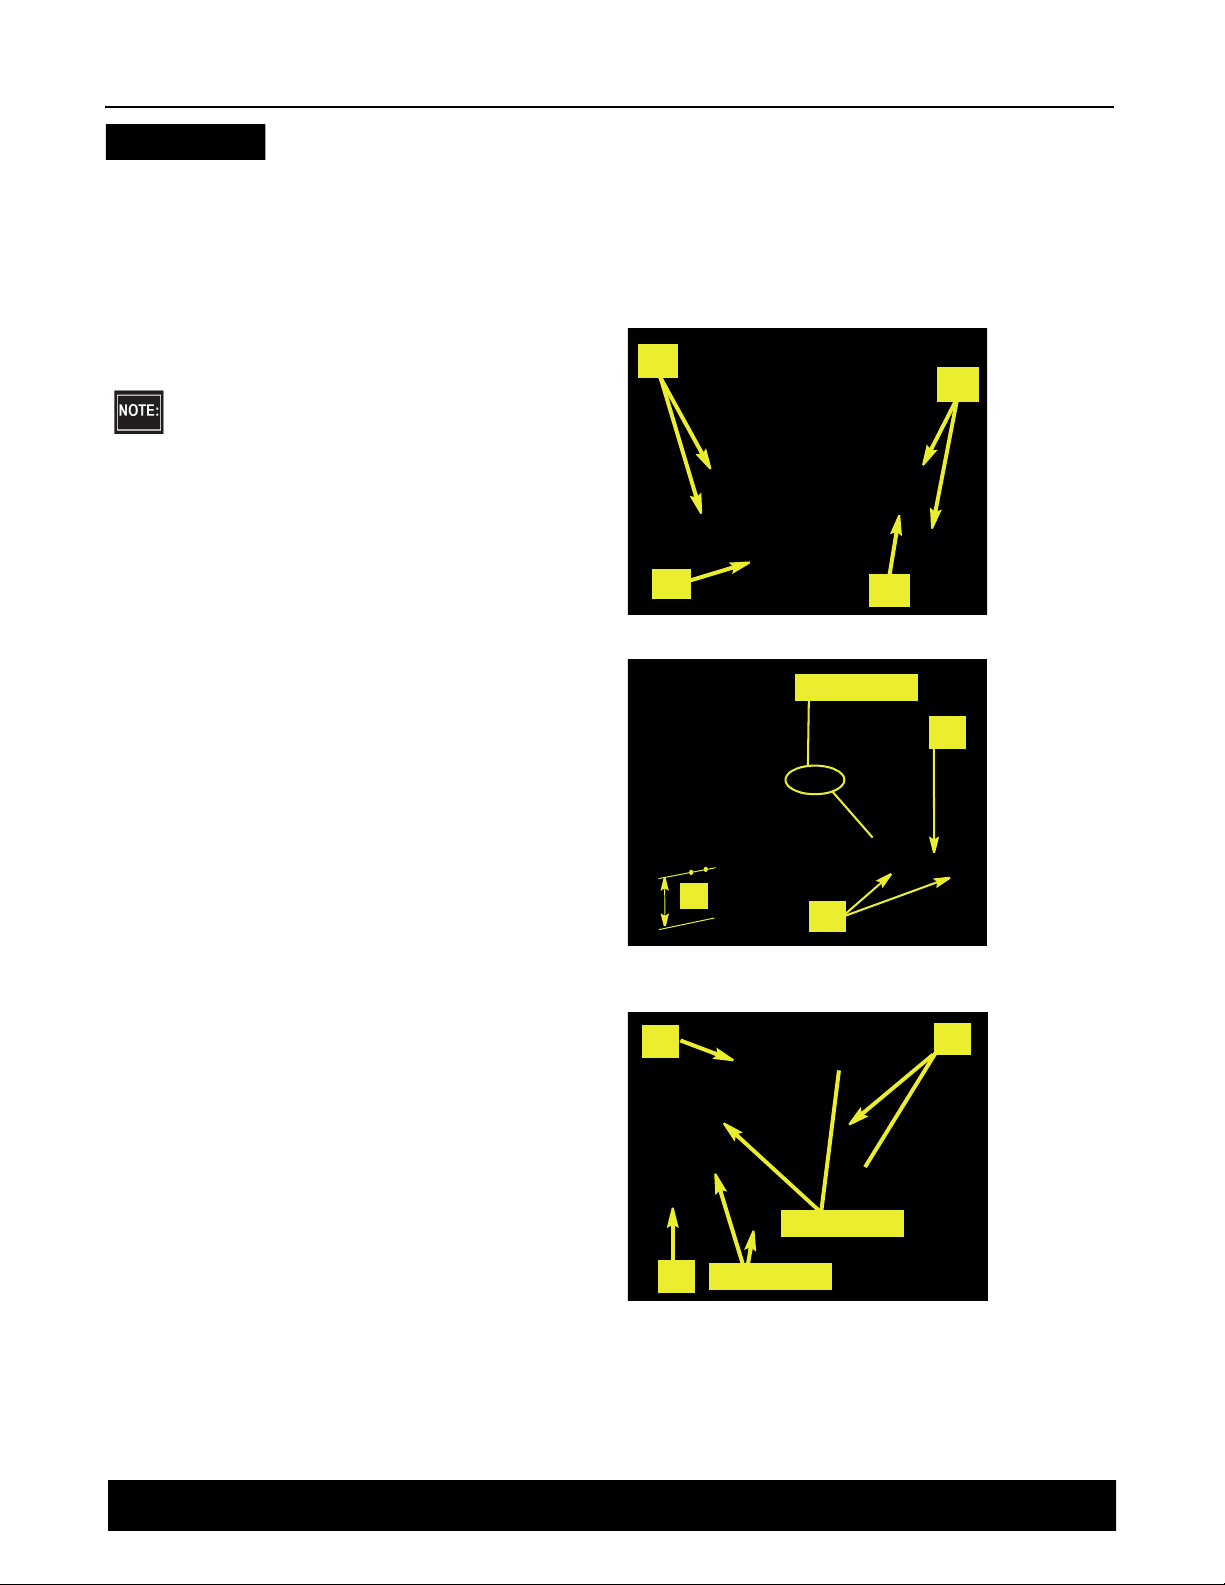
1. Prepare the hydraulic steering block.
Make sure the hydraulic steering block HA is clean
and dust free.
Remove the plastic plugs from hydraulic steering
block HA and install adapter fittings as follows
(Figure 1):
• HB in the P and T ports
• HC in the A and B ports
• HD in the LS port
2. Install the steering block mounting bracket.
Using hydraulic steering block bracket HE as a
template mark the inner face of the left rear fender
(Figure 2) 8”from the bottom of the fender (Figure
2 left inset - outer face view) and just back from the
fender’s front edge. Drill two 7/16”holes and,
using hardware HG, attach bracket HE (Figure 2,
right inset).
3. Install the hydraulic steering block and steering
controller mounting bracket.
Using hardware HF, attach hydraulic steering block
HA and steering controller bracket HH to bracket
HE (Figure 3):
• Mount HH against HE with its short side
upward and outward (from mounting)
• Mount HA with its L/R solenoids upward (so
with the Pand Tports rearward)
Figure 1: Prepared hydraulic block
Figure 2 with insets: Steering block mounting
bracket location and installation
Figure 3: Steering block and steering controller
mounting bracket installed
HB
HD
HC
HA
Install HE here
HE
8”HG
HH
HE
HF
L/R solenoids
P and T ports

11
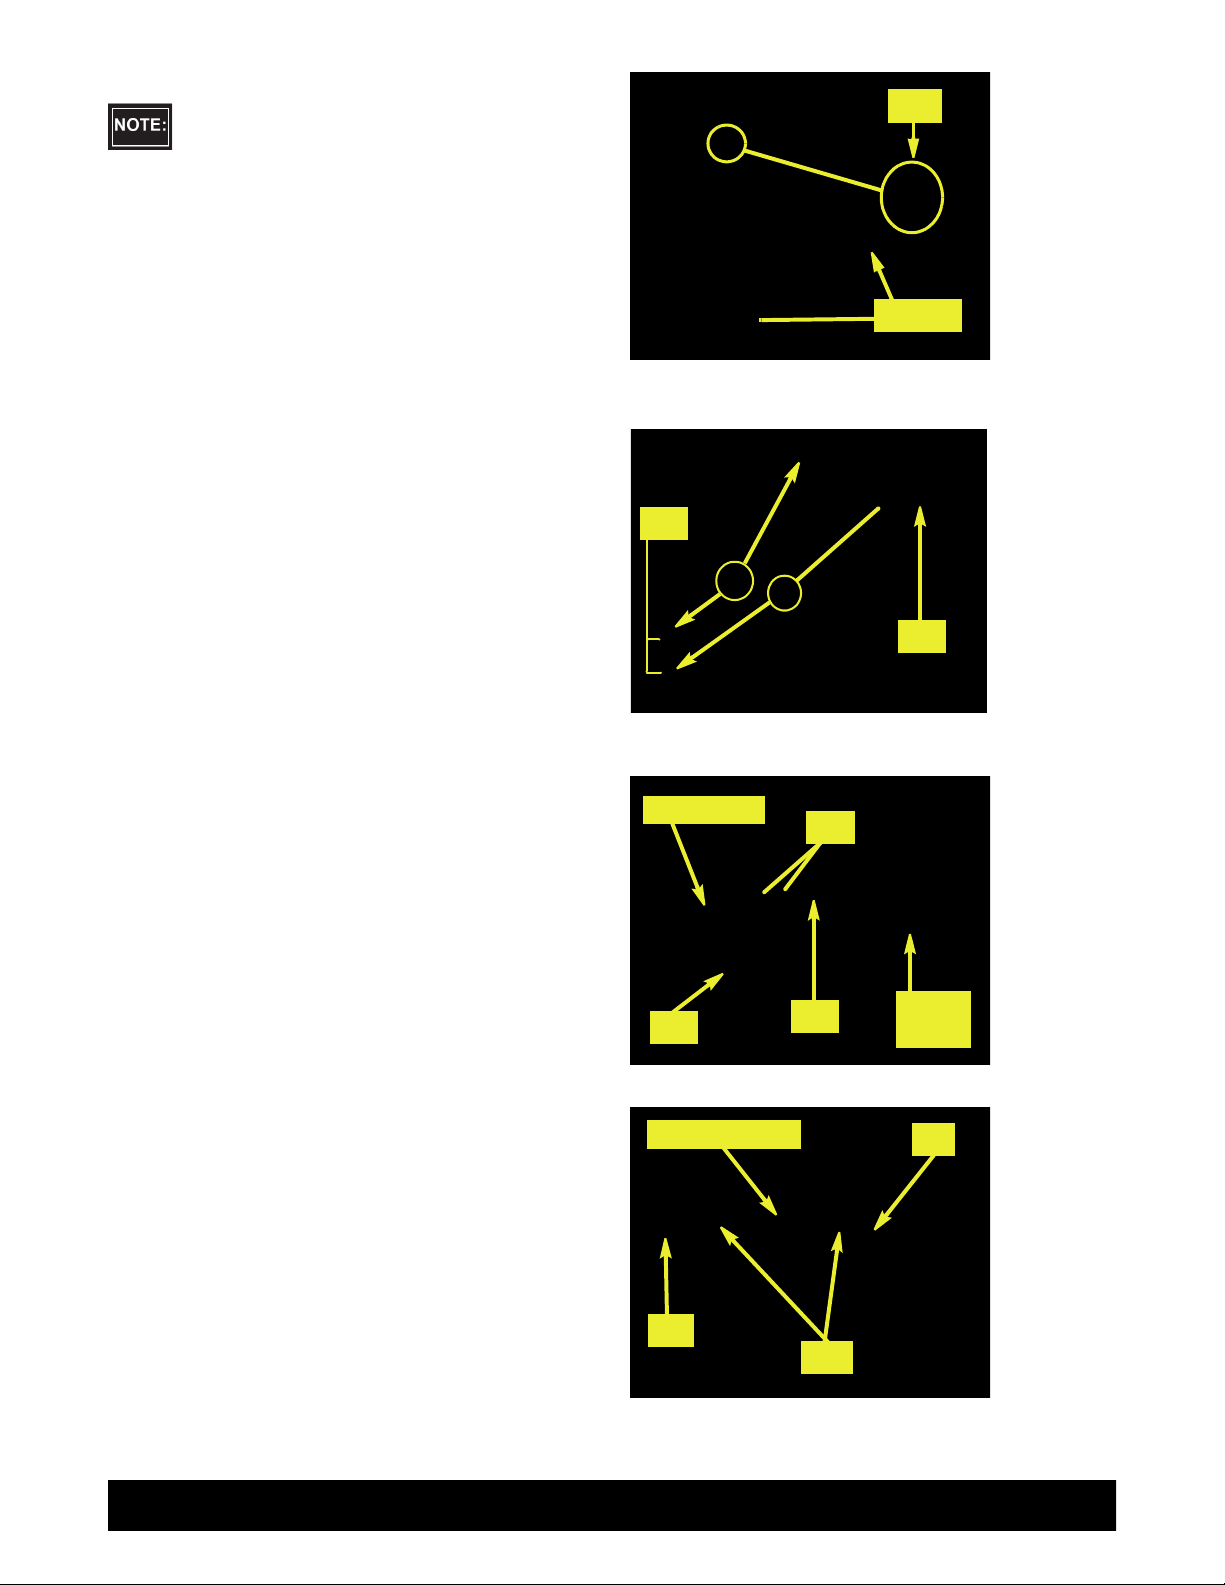
4. Install the pressure, tank and load sense fittings.
Plastic caps placed on the open ends of the fittings
will prevent excessive leakage prior to hose
installation. Leave run-tees loose to allow for
alignment when attaching hoses.
a. Prepare the load sense valve HP as follows:
• Adapter HQ in the function port, then adapter
HR in adapter HQ
• Adapter HS in source port
• Adapter HT in the load sense port
b. Locate the pressure, tank and load sense connec-
tions on the bottom of the hydraulic valve stack
located under the tractor on the left side near the
rear axle (Figure 4b with inset).
c. Disconnect the load sense line then connect the
assembled load sense valve HP to the valve stack
using fitting HR (Figure 4c inset). Connect the
machine’s load sense hose to the load sense valve at
fitting HS (Figure 4c).
d. Disconnect the pressure and tank hoses and install
run-tees HK and HL to the pressure and tank ports
on the valve stack respectively. The tank port is the
larger of the two (#16). Reconnect the machine’s
pressure and tank hose to the open ‘T’ ends of the
two run-tees (Figure 4c with inset).
5. Install the pressure, tank and load sense hoses.
Route all hoses with other machine plumbing free
from entanglement and secured with heavy tie
straps HY.
a. Using reducer fittings HM and HN on the stems of
run-tees HK (P) and HL (T) respectively (Figure
5a-i inset), install pressure and tank hoses HU
between their respective run-tees (Figure 5a-i) and
fittings HB in the Pand Tports of the hydraulic
steering block (Figure 5a-ii).
Install load sense hose HX between fitting HS in
the load sense valve and fitting HD in the LS port
of the steering block (Figures 5a-i and 5a-ii).
Figure 5a-i: Pressure, tank and load sense
hoses connected at valve stack
b. Securely tighten all hose fittings and connections.
Figure 4a: Prepared load sense valve
Figure 4b with inset: Pressure, tank and load
sense connections at valve stack
Figure 4c: Load sense valve and run-tees in-
stalled, machine’s hoses reconnected
Figure 5a-ii: Pressure, tank and load sense
hoses installed at steering block
HN on HL
HM on HK
HU
HX HS
HQ
HS
HP
HT HR
Pressure
Tank
LS
HR
HS
HK
HL
HL
Machine’s T, LS & P hoses
HU (to HB) HX
HD

1212
12
6. Install the steering output fittings.
Plastic caps placed on the open ends of the fittings
will prevent excessive leakage prior to hose
installation.
Locate the steering lines at the head and rod ends of
the left steering cylinder at the center of the
machine (Figure 6, top). Disconnect the machine’s
steering hoses and install run-tees HO. Reconnect
the machine’s steering hoses to the open ‘T’ end of
each run-tee (Figure 6, bottom).
7. Install the steering output hoses.
a. Connect steering hoses HV (the longer) and HW to
the stem of the run-tees at the head and rod ends of
the steering cylinder respectively (Figure 7a).
Route the hoses, with other plumbing and clear of
moving parts back and up to the hydraulic steering
block. Use ties HY as necessary.
b. Connect the hoses HV and HW to adapter fittings
HC in the A and B ports of the hydraulic steering
block (Figure 7b).
8. Install the steering controller.
Using hardware HJ, install steering controller HI
on its mounting bracket HH. Mount HI with its
connector sockets inward and the pressure wash
warning on top (Figure 8).
9. Verify operation.
During tests of the hydraulic system, the
machine may move unexpectedly. Be
prepared for machine movement to avoid
injury.
Keep others away and stay clear of
mechanical steering linkages to prevent
serious injury or death from pinch point
hazards while manually operating the
hydraulic steering circuit.
a. Tighten all connections and clean up the installation
area around the machine and make certain that it is
safe to operate.
b. Start the machine and check hydraulic connections
for any leaks.
c. Rotate the steering wheel from one extreme to the
other and back.
Figure 6: Steering hoses (top), run-tees installed
and machine’s hoses reconnected (bottom)
Figure 7a: Steering hoses connected at steer-
ing cylinders
Figure 7b: Steering hoses connected to steer-
ing block
Figure 8: Steering controller attached to steer-
ing block
HO
Machine’s steering lines
HV HW
HC
HV/HW
HH
HJ
HI

13
Installation - Wheel Angle Sensor
Switch off the machine’s engine while installing or adjusting the WAS. Keep others away and stay clear of mechanical steering
linkages to prevent serious injury or death from pinch point hazards while manually operating the hydraulic steering circuit.
1. Prepare the wheel angle sensor.
a. Using the provided hardware WE (nuts) and WD
(bolts), attach the WAS wire connector WB to the
WAS housing WA. Install the bolts up through the
bottom of the housing. Mount WB with its right
edge in line with the right front corner of WA
(Figure 1a).
b. Cut four holes off WAS arm WC at the opposite
end from the WAS shaft mounting hole (Figure 1b).
c. Using hardware WF (screw) and WE (nut), attach
the WAS arm WC to the WAS assembly. Mount the
arm in the same direction as the WAS wire connec-
tor WB (Figure 1c with inset).
Before you cut the rod at step d, screw the provided
nuts WH onto the threaded rod WG so that they
are inside the cut you will make. After you have cut
the rod, the nuts can help clean the threads.
d. Cut threaded rod WG to 6½”long (Figure 1d-i)
then screw swivel rod ends WI onto the cut rod to
achieve a center-to-center stud measurement of
7¾”(Figure 1d-ii). Leave WH loose until you
complete linkage adjustment at step 2f.
Figure 1d-i: Threaded link rod preparation
Figure 1a: Prepared WAS housing\connector
Figure 1b: WAS arm preparation
Figure 1c with inset: WAS arm installed
Figure 1d-ii: Assembled threaded link rod
WG
WH WH
6½”
WB
WA
WE
WD
WC
Cut
WAS shaft mounting hole
WC
WB
WF WE
WH
7¾”
WI
WG
1414
14
2. Mount the wheel angle sensor.
Figures in this section show a prototype WAS
assembly mounting bracket. Install your supplied
bracket (WK) as described.
a. Locate and remove the fuel tank’s top mounting
bolt on the right side of the rear of the front section
of the machine (Figure 2a, top inset). Retain the
nut. Using hardware WM with the machine’s nut,
install WAS bracket WK (Figure 2a, bottom inset)
with its long arm inward and parallel to the ground
(Figure 2a).
b. Locate the two outer (leftmost) holes in the bottom
of the articulation coupling (Figure 2b) and, using
hardware WN (Figure 2b, bottom left inset), install
link rod bracket WL, its long arm pointing inward
(Figure 2b, top right inset).
c. Using hardware WJ (not visible), mount the WAS
assembly from step 1 on the rear face of bracket
WK. Mount the WAS assembly with its arm WC
on top and, like wire connector WB, pointing out-
ward (Figure 2c).
d. Using hardware WH, install the link rod assembly
from step 1 between the last hole in WAS arm WC
and bracket WL. Set the swivel stud downward into
WC and upward into WL (Figure 2d - leave swivel
nuts WH loose until you complete linkage adjust-
ment at step 2f.).
Figure 2a with insets: Installed WAS mount-
ing bracket (prototype bracket shown installed)
Figure 2b with insets: WAS link rod bracket in-
stalled
Figure 2c: Installed WAS assembly
Figure 2d: Installed WAS link rod assembly
Use WK
WM
WN
WL
WAS assembly (WJ)
WB WC (Your)
WK
WH
Link rod assembly WC
WL

15
2. Mount the wheel angle sensor (continued).
e. With all hardware WH loose, slowly turn the
machine full left lock then full right lock. Check
that the linkage moves freely without binding and
adjust the linkage as necessary (Figures 2e-i and
2e-ii. Note, you will connect the wheel angle sensor
cable later.)
Figure 2e-i: Full left lock
f. When the linkage does move freely and without
binding, tighten hardware WH on the rod and the
swivels (Figure 2e-ii).
Figure 2e-ii: Full right lock
WH

1616
16
Installation - Steering Wheel Switch
1. Prepare the switch/sensor bracket.
Drill a 7/16”hole in switch bracket SC ½”from
the opposite end to the pre-drilled switch hole. Put a
90° bend in the bracket 1¼”from the newly-drilled
end. Put a 45° (approx) bend in the opposite direc-
tion to the first bend, 1”from the pre-drilled end
(Figure 1 with inset - not to scale).
2. Access the steering shaft.
Access the steering shaft in the control and cabling
compartment inside the firewall by removing the
top section of the steering console (release the hook
and loop fixing on the left side - Figure 2 with
inset).
3. Install the switch bracket, magnets and switch.
a. Using the forward bolt of the brace bracket to the
right of the steering shaft universal joint, mount
prepared switch bracket SC (Figure 3a and right
inset).
Clean two magnet-sized areas on the steering shaft
below the lower universal yoke, 180° apart and in
line with the bracket’s switch/sensor hole.
Using the two-part epoxy SB, attach magnets SA
180° apart on the steering shaft. Set a short edge of
each magnet against the shaft yoke (Figure 3a, left
inset - you will install the switch/sensor at the next
step).
b. Install switch/sensor SD in bracket SC and adjust
the bends in SC to align SD with the magnets.
Adjust the sensor face to 1/8”to 1/4”away from
the magnets.
c. Route SD’s cable down and out through the clutch
pedal aperture. You will connect the cable later.
Figure 1 with inset: Drilled/bent switch bracket
Figure 2 with inset: Steering shaft inside con-
trol/cabling compartment
Figure 3a with insets: Installed switch bracket
and magnets (install switch/sensor at next step)
Figure 3b: Installed switch/sensor
1¼”
½”
7/16”
45° bend (up)
90° bend (down)
1”
SC
Steering shaft
Top cover
Magnet(s) at 180° SC
SD SC

17
Installation - Electronic Control Unit (ECU)
See Appendix A for a schematic of the cable connections.
1. Install the ECU.
a. Identify the ECU mounting location on the cab
floor to the right of the driver’s seat.
Facing the one inch tabs of bracket EJ toward the
driver’s seat, align the bracket parallel to the seat
mounting box and with (Figure 1a):
• The front edge of the bracket in line with the
front face of the seat mounting box.
• The outer edge of the one inch tabs ½”from the
right face of the seat mounting box.
Using hardware EL, fasten the bracket to the cab
floor (Figure 1a). Use a small level (not shown) to
check the level of the bracket. Adjust accordingly.
Do not overtighten the self drilling screws. Over-
tightening could cause the fastener to fail.
b. Using hardware EM (not visible) attach the ECU
EI to bracket EJ. Have the power and communica-
tions indicators at the top (Figure 1b left) and the
wire connections toward the rear of the machine
(Figure 1b right).
2. Assemble and install the cables.
On a clean surface, lay out all the cables and
become familiar with the connections and where
they are to be placed. See Appendix A.
Route all cables with other machine cabling,
plumbing or fixtures free from entanglement and
secured with heavy tie straps HY.
a. Connect cable EA to the ECU EI using an Allen
wrench to secure the cable to the ECU. The EA
connector will only fit the ECU socket that is in line
with the power and communications indicators at
the opposite end of the ECU - so the top socket in
this installation (Figure 2a).
b. Connect steering controller cable EC’s two 12-pin
connectors (black and gray) to their respective
sockets on the steering controller HI (Figure 2b).
c. Connect EC’s connector labeled ‘VALVE’ to valve
cable ED. Connect ED’s three 2-pin connectors
(labeled ‘LEFT’, ‘RIGHT’ and ‘ENABLE’) to the
enable valve and two solenoid valves on the
hydraulic steering block (Figure 2b).
Figure 1a: ECU mounting bracket installed
Figure 1b: ECU installed
Figure 2a: ECU main cable installed (in top
socket)
Figure 2b: Steering controller main cable and
‘VALVE’ cable installed
1/2”
EL (4) EJ
(EM - 4)
Indicators
EI
EA
ED (L, R &
ENABLE
solenoids)
EC
HI

1818
18
2. Assemble and install the cables (continued).
d. Connect EC’s connector labeled ‘WAS’ to WAS
cable EE (Figure 2c). Route EE to the WAS assem-
bly in the articulation space. Connect EE to wire
connector WB (Figure 2d with inset).
e. Install SWS cable EF between EC’s connector
labeled ‘SWS’ (Figure 2c) and, in the cab, SD’s
cable (Figure 2e with inset). Route EF in/out of the
cab through the access hole in the right rear of the
cab (Figure 2f with inset).
f. Install extension cable EB between EC’s connector
labeled ‘ECU’ (Figure 2c) and, in the cab, the ECU
main cable EA’s connector labeled ‘STEERING
CONTROLLER’. Route EB in/out of the cab
through the access hole in the right rear of the cab
(Figure 2f with inset).
g. Attach power switch EG to cable EA’s connector
labeled ‘SWITCH’. Some machines are equipped
with pop out tabs that you can remove and replace
with switch EG. If no tab is available, you can use
bracket EK mounting it in the cab at the operator’s
preferred location.
Set the switch to OFF before connecting EA to the
battery at step i.
h. Connect CAN-PWR cable EH to EA’s open con-
nection labeled ‘TERMINAL/RECEIVER’. Route
the cable in the cab so that it is clear of any machine
operation controls. Connect the opposite end of
cable EH to the guidance terminal.
i. Route the power cable part of cable EA, through the
cab access hole with EF and EB (Figure 2f with
inset) to the machine’s 12V battery and connect it.
© Hemisphere GPS (2012). All rights reserved.
Figure 2c: Steering controller main cable con-
nections to function cables
Figure 2d with inset: WAS cable from steer-
ing controller to WAS assembly
Figure 2e with inset: SWS cable routed to/from
switch/sensor cable in the cab
Figure 2f with inset: Cabling out from the cab
for routing to, and connecting at, steering controller
SC’s ‘SWS’ to EF,
‘ECU’ to EB
SC’s ‘VALVE’ to ED,
‘WAS’ to EE
EE
WB
EF
SD
EF (fromSD)
EB (from ECU)

19
Appendix A - ECU Cables and Connections
ECU CABLES AND CONNECTIONS
SWS
WAS
VALVE
SWITCH
EF
TERMINAL/RECEIVER
STEERING CONTROLLER
USB
EB
ED
EC
054-0115-000#
051-0229-000#
051-0230-000#
051-0231-000#
054-0117-000#
051-0226-000#
BATTERY
SERIAL
EE
051-0228-000#
STEERING
CONTROLLER
ECU
SWS
WAS
VALVE
ECU
EA
BA
AB
EG

2020
20
Appendix B - Hydraulic Circuits
Legend
Static Load
Pressure
Tank Load Sense
B - Steering Line
A - Steering Line
Sense Shuttle
SS
Without AutoSteer With AutoSteer
Steering Cylinder
LS T
EF
CF
L
Machine
Operations
P
R
LS
P
Priority
Divider
Pump
Orbital
Steering Cylinder
LS T
EF
CF
L
Hydraulic Steering
Block
LS
P
PT
R
BA
LS
P
A
BPilot
Priority
Divider
Pump Machine
Operations
Orbital
SS
Table of contents
Popular Utility Vehicle manuals by other brands


MULTIQUIP
MULTIQUIP Whiteman series Operation and parts manual

SnowEx
SnowEx V-Maxx G2 VX-2200 Installation instructions manual

Massimo
Massimo MSU 1100 owner's manual

Columbia
Columbia Summit Owner's and operator's manual

TrailMax
TrailMax T-10-UR instruction manual

Sodikart
Sodikart Sodi Racing Furia 950 User maintenance guide