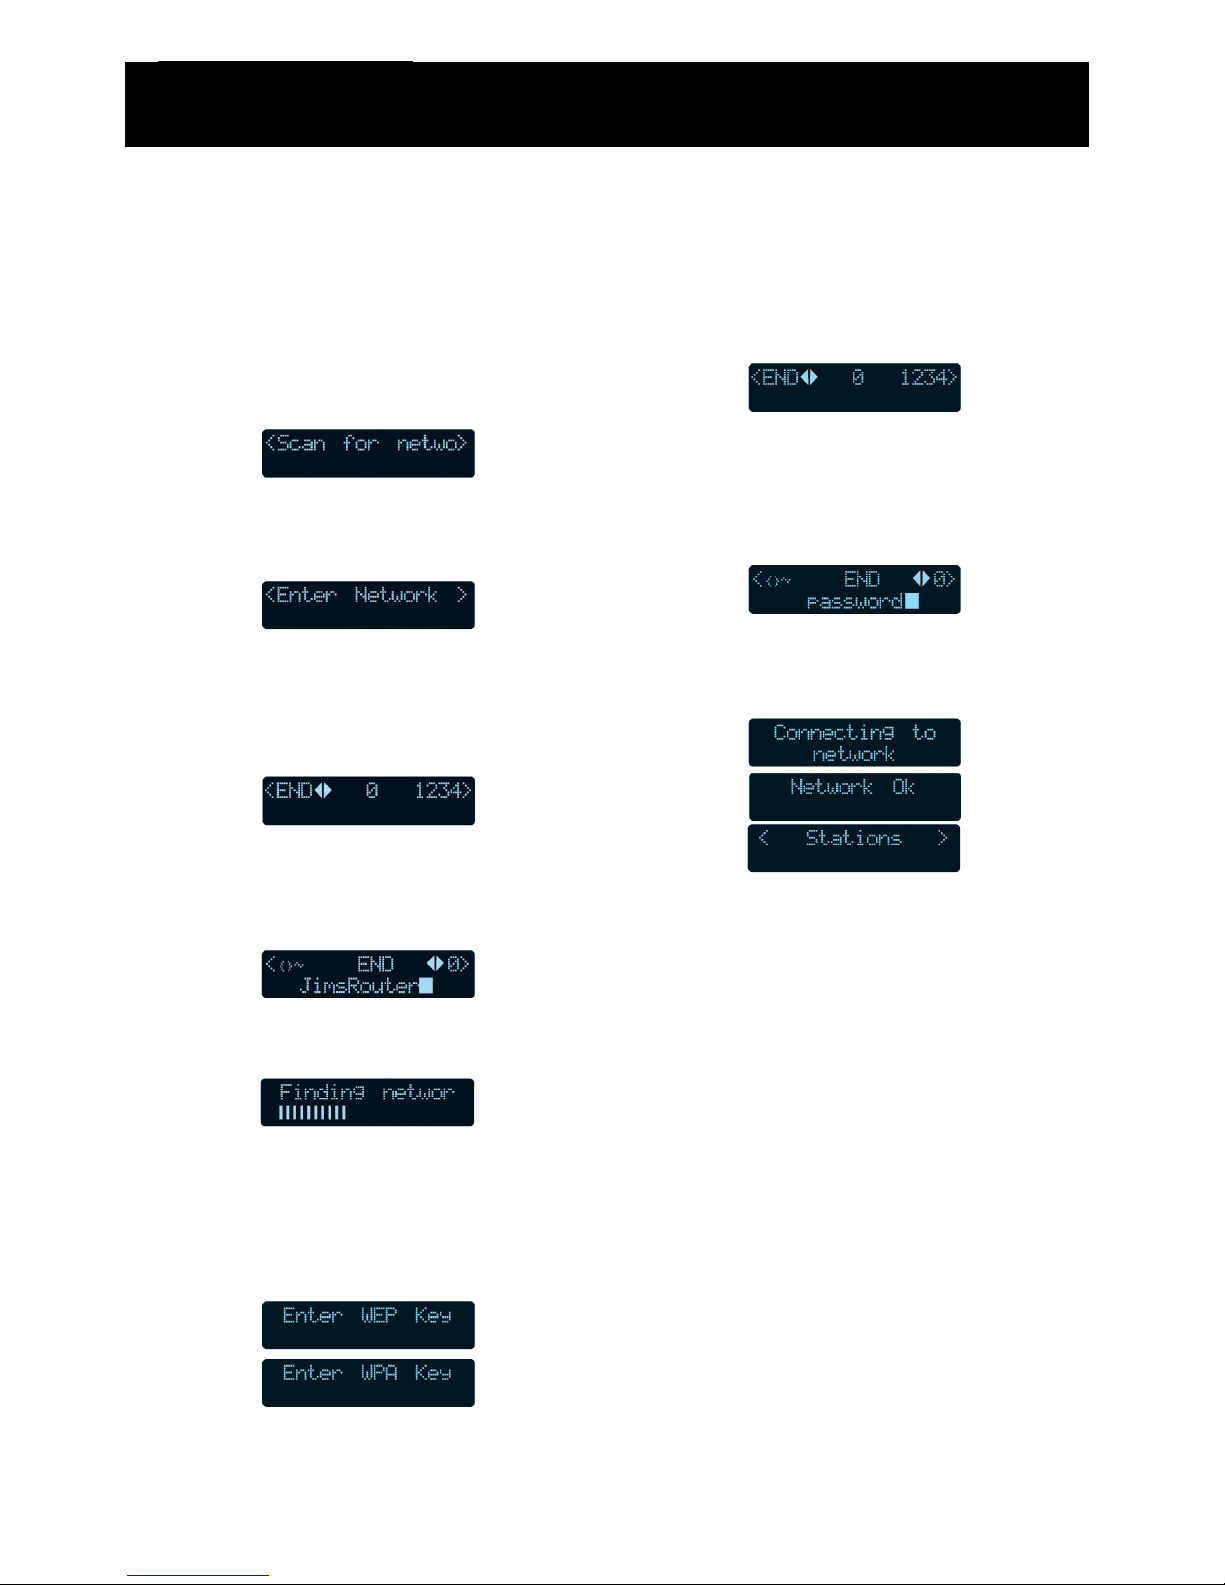
OXX Digital oxx540008 - Tube 2.1 WiFi Internet Radio User manual

6
User Guide
Tube Internet Radio

2

3
Before you are able to use your internet
radio, you will need the following items:
• A broadband internet
connection
• A wired/wireless access point,
or router connected to your
broadband internet connection.
If your wireless network is
configured to use Wired Equivalent
Privacy (WEP) or WIFI Protected
Access (WPA) data encryption, you
will need to know the WEP or WPA
code so that you can setup your
internet radio to communicate with
your wireless network. Consult
your network administrator for your
WEP or WPA codes.
• Before continuing, make sure
that your wired/wireless access
point or router is powered on,
and connected to your
broadband internet connection.
Consult the manufacturer’s
guide supplied with your
wired/wireless access point or
router if you are unsure how to
do this.
Before Starting

4
Before Starting 3
Contents 4
Safety Information 5
Power Source 5
General 5
Cleaning 5
Ventilation 5
Servicing 5
Sound Levels 6
Parts Identification 7
Front view 7
Rear view 7
Getting Started 8
Switching on 8
Connecting to a wireless network 8
Connection to a wireless network
when the SSID is not broadcasted 9
Connecting to a wired network 10
The menu structure 11
Using the WI-FI Radio 12
Connecting to a station 12
Changing the volume 12
Exiting a station 12
Connecting to an on demand
radio station 13
On demand features 13
Saving a station to a preset memory 13
Using the Media Player 14
Supported file types 14
Setting up your PC 14
Connecting the WI-FI radio to your
PCs shared folder 15
Connecting the WI-FI radio to your
PC using UPnP mode 15
Playing your media files 16
Media player controls 16
Removing tracks from the queue 17
Playing tracks in a random order 17
Repeating all tracks 17
Clock Functions 18
Setting the clock 18
Setting the alarm 18
Setting the sleep timer 19
Configuration Settings 20
Network Config 20
Version 20
Upgrade firmware 20
Language 20
Factory Reset 20
Register 20
Clock 20
Sleep timer 20
Equalisation 20
Help and Advice 21
Error Messages 22
Windows 2000 Users 23
Technical Specification 24
Guarantee and support 25
Disposal 25
Contents

5
Power Source
This product requires a 230-240 v AC, 50Hz
mains supply. Do not use any other supply.
General
Position the mains cable so that it cannot
be walked on or pinched by other items
placed on or against them.
Do not use this product in humid or damp
conditions.
Do not allow this product to get wet.
Do not expose this product to dripping or
splashing.
Do not place water filled objects such as
vases on top of this product.
Do not place naked flame sources, such
as candles on top of this product.
Cleaning
Always unplug this product from the
mains supply before you clean it.
Do not use liquid or aerosol cleaners.
This product should be cleaned with a
soft, barely damp cloth.
Ventilation
The slots and openings on this product
are for ventilation purposes. Do no cover
or block them as this could cause
overheating.
Never let children push anything into the
slots or openings in the case.
Servicing
There are no user-serviceable parts in
this product.
If servicing is required, always refer to
qualified service personnel.
Always consult the helpline (stated on the
warranty card) if you are ever in doubt
about the installation, operation or safety
of this product.
Safety Information

6
Sound Levels
Your hearing is very important to you and to us, so please take care when using this product. It is
strongly recommended that you follow the listed guidelines in order to prevent possible damage or
loss of hearing.
Establish a safe sound level
1. Over time your hearing will adapt to continuous loud sounds and will give the impression that
the volume has in fact been reduced. What seems normal to you may in fact be harmful. To
guard against this before your hearing adapts, set the volume to a low level.
2. Slowly increase the level until you can hear comfortably and clearly and without distortion.
3. Damage to your hearing is accumulative and is irreversible. Any ringing or discomfort in the
ears indicates that the volume it too loud.
4. Once you have established a comfortable listening level, do not increase the sound level.
The examples below may help you in recognising just how loud you have set the volume.
30dB Quiet library, soft whisper.
40dB Living room, fridge freezer, bedroom away from traffic.
50dB Normal conversation, quiet office, light traffic.
60dB Electric sewing machine.
70dB Vacuum cleaner, hair dryer, noisy restaurant.
THE FOLLOWING NOICE CAN BE HARMFUL UNDER CONSTANT EXPOSURE
80dB Average city traffic, alarm clock buzzer at 2 feet, food mixer.
90dB Motorcycly, heavy goods vehicle, petrol lawn mower.
100dB Pneumatic drill, chain saw, refuse vehicle, disco/night club.
120dB Rock bank concert, thunderclap.
PERMANENT LOSS OF HEARING – THRESHOLD OF PAIN
140dB Gunshot at 2 feet away.
180dB Rocket launching pad.
Safety Information

7
Front view
1 Left speaker. 9 Select button.
2 3.5mm Headphone socket. 10 Back button.
3 Preset 1/6. stop button. 11 Shift button.
4 Preset 2/7. play/Pause button. 12 Reply button.
5 Preset 3/8. skip back button. 13 Standby button.
6 Preset 4/9. skip forwards button. 14 Right speaker.
7 Preset 5/10. browse button. 15 Remote control sensor.
8 Multifunction and volume control. 16 Information display.
Rear view
17 DC In. 19 Right audio out (red).
18 Left audio out (white) 20 Ethernet (wired network) connection.
Parts Identification

8
Switching on
1. Using the power adapter supplied,
connect to the socket on the rear of the
product labelled ‘7.5V DC’, and switch
on at the mains supply.
2. After a brief pause the information
display will light up as displayed below.
Connecting to a wireless network
When switched on for the fist time, you will
need to enter your wireless network details.
To setup your wireless network complete the
following procedure:
1. Press the ‘STANDBY’ button and wait
until the following is displayed.
2. Press the ‘SELECT’ button.
3. When scanning is complete, the name
of a wireless network will be shown.
If your wireless network is not
found, check that your wireless
access point or router is switched
on and connected to your
broadband internet connection.
If the SSID (name of your wireless access
point) is not displayed, turn the
multifunction control to the right until the
correct one is shown.
4. When the correct wireless network is
shown, press the ‘SELECT’ button.
If your wireless network uses WEP
or WPA encryption, one of the
following screens will display.
If your wireless network does not
use WEP or WPA go to step
number 7 below.
5. When the following screen is displayed,
turn the multifunction control to enter
your WEP/WPA key. Use the ‘SELECT’
button to confirm the digit chosen.
6. When the WEP/WPA key has been
entered, turn the multifunction control
so that ‘END’ is selected. Press the
‘SELECT’ button to confirm.
7. The WI-FI radio will now connect to your
wireless network.
8. To listen to a station see “Connecting to
a station” on page 12.
Getting Started

9
Connecting to a wireless network
when the SSID is not broadcasted
To setup your wireless network when your
router does not broadcast the SSID (network
name), complete the following procedure:
1. Press the ‘STANDBY’ button and wait
until the following is displayed.
2. Turn the multifunction control until the
following screen is displayed. Press the
‘SELECT’ button to confirm.
3. When the following screen is displayed,
turn the multifunction control to enter
your SSID (network name). Use the
‘SELECT’ button to confirm the digit
chosen.
4. When the SSID has been entered, turn
the multifunction control so that ‘END’ is
selected. Press the ‘SELECT’ button to
confirm.
5. Your WI-FI radio will now search the
network.
If your wireless network uses WEP
or WPA encryption, one of the
following screens will display.
Press the ‘SELECT’ button to confirm.
If your wireless network does not
use WEP or WPA go to number 9.
6. When the following screen is displayed,
turn the multifunction control to enter
your WEP/WPA key. Use the ‘SELECT’
button to confirm the digit chosen.
7. When the WEP/WPA key has been
entered, turn the multifunction control
so that ‘END’ is selected. Press the
‘SELECT’ button to confirm the digit
chosen.
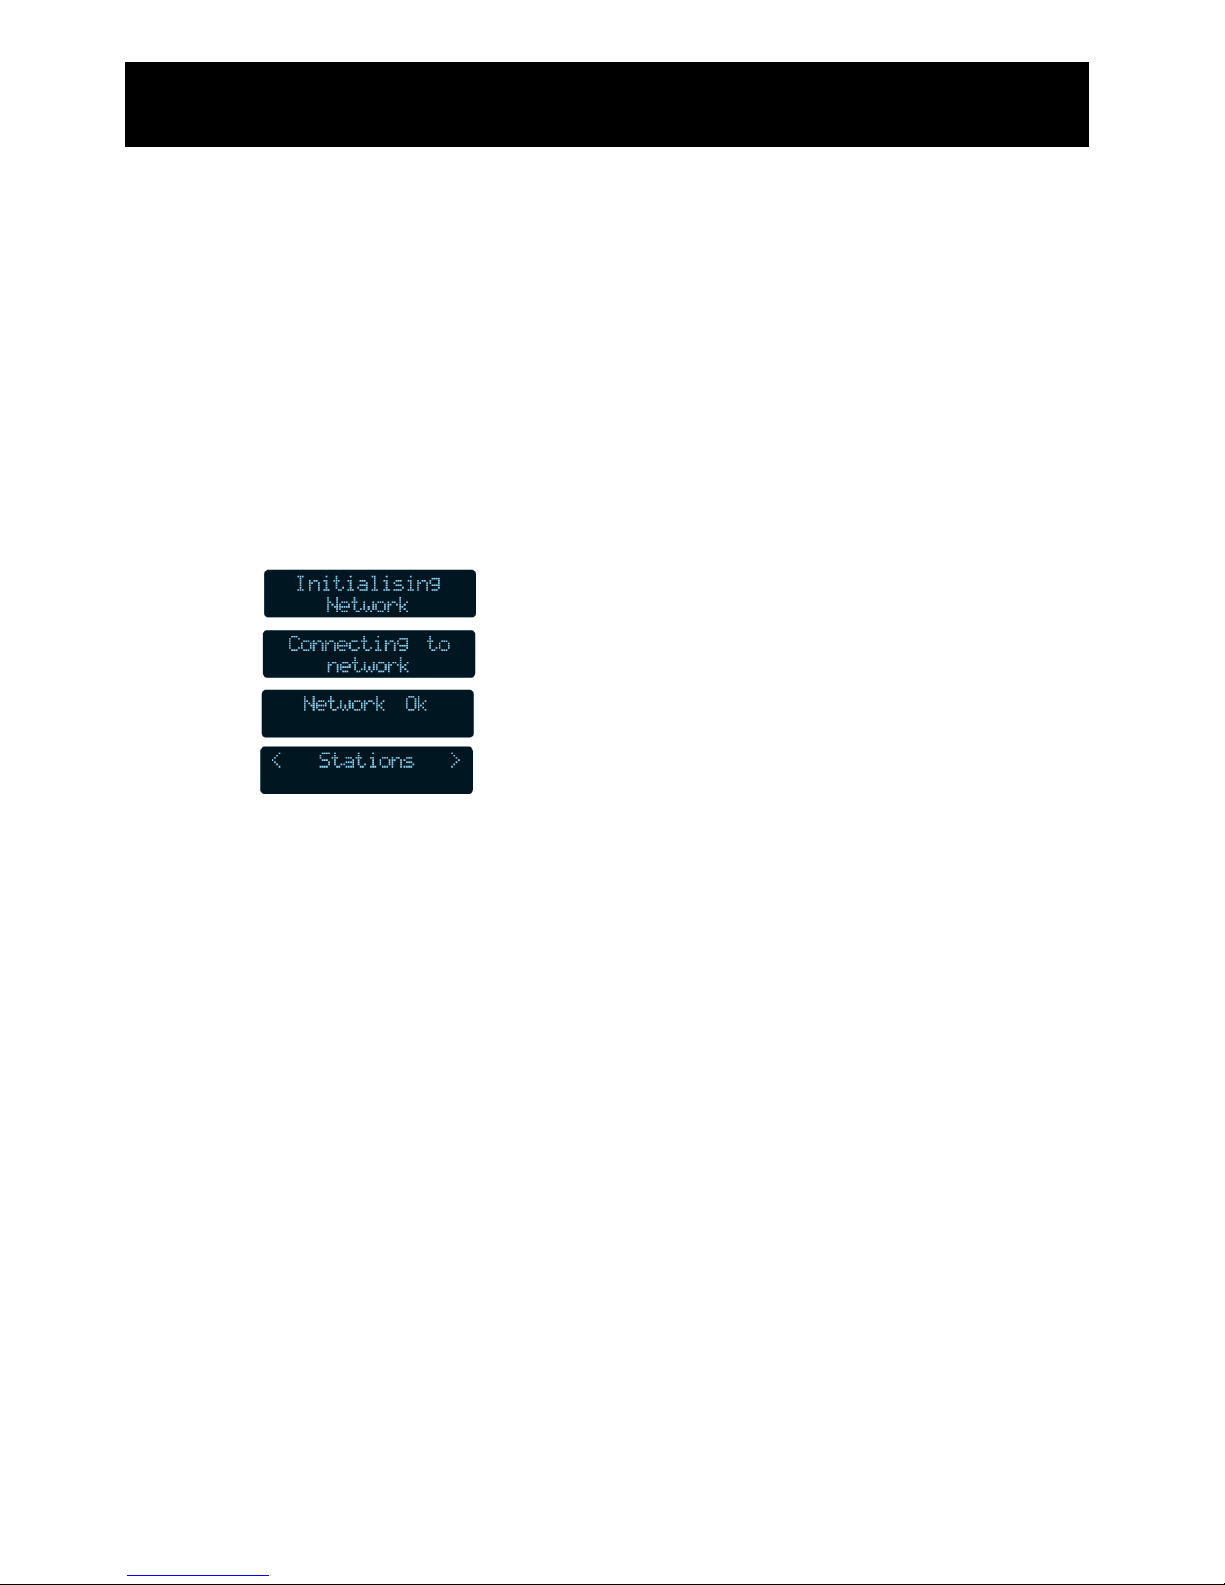
8. The WI-FI radio will now connect to your
wireless network. The following screens
will display on the WI-FI radio.
9. To listen to a station see “Connecting to
a station” on page 12.
Should you need to enter a new network in
the future, these options can be edited in the
‘Edit Config’ sub menu. Please refer to the
menu structure diagram on the next page.
Getting Started

10
Connecting to a wired network
Use the following procedure to connect the
WI-FI radio to a wired router:
1. Connect an ethernet cable (not
supplied) between the ethernet port on
the rear of the WI-FI radio and a wired
router.
2. Power On the WI-FI radio.
3. The connection between the WI-FI radio
and the router will be setup
automatically. The following screens will
display on the WI-FI radio.
4. To listen to a station see “Connecting to
a station on page 12”.
Getting Started

11
The menu structure
Navigate through the options using the
multifunction control, confirming each step
using the ‘SELECT’ button.
Getting Started

12
Connecting to a station
1. Turn the multifunction control until the
following screen is displayed. Press the
‘SELECT’ button to confirm.
2. You can choose to select a station by
either location or genre. Use the
multifunction control to choose, then
press ‘SELECT’ to confirm.
Navigate through the options using
the multifunction control,
confirming each step using the
‘SELECT’ button. The following
example connects to a station
using the Genre method.
3. Select a Genre type. Press the
‘SELECT’ button to confirm.
4. Select the desired station. Press the
‘SELECT’ button to confirm.
5. When you connect to an internet radio
station, the blue menu control indicator
will flash and a connecting screen will
display.
6. Before the station begins to play, the
wireless radio will start to buffer the
signal so that playback is not
interrupted when other devices are
using the wireless network.
However, please not that there may be
cases when playback is interrupted when
the router is being used by other devices.
This does not indicate a fault with the
Internet radio.
7. When the station starts to play the blue
volume control indicator will flash and a
connecting screen will display.
The bit rates are set by the radios stations
and will vary between stations. The higher
the bit rate, the better the sound quality.
Changing the volume
When a station is playing, you can use the
multifunction control to change the volume.
To turn the volume down, turn the
control anticlockwise.
To turn the volume up, turn the
control clockwise.
The display will show the volume level as it is
changed.
Exiting a station
To exit a station, press the ‘BACK’ button.
You can now use the multifunction control to
select a new station.
Using the WI-FI Radio

13
Connecting to an on demand radio
station
Some radio stations offer on demand
services, which can feature highlights,
previous shows or special events.
When you connect to a station that
offers an on demand facility you will
have two options.
Navigate through the options using
the multifunction control, confirming
each step using the ‘SELECT’ button.
The following example connects to
‘The best of Chris Moyles’ on Radio
1.
1. Turn the multifunction control until the
following screen is displayed.
2. Select the desired station.
3. Select ‘On Demand’.
4. Select the desired on demand program.
5. Select the day.
This may not be an option depending
on the on demand service that you
have chosen.
6. Choose the start time. If you want to
play from the beginning, press the
‘SELECT’ button to listen from that
point.
On demand features
When listening to an on demand service, you
can use the following features.
Saving a station to a preset memory
Your WI-FI radio can store a maximum of 10
stations. To store a station follow the
procedure below:
1. To store presets 1-5, listen to the
station that you wish to store, then hold
the relevant preset number button to
store the station. When the station is
stored successfully the following screen
will display.
2. To store presets 1-5, listen to the
station that you wish to store, then
press and release ‘SHIFT’ and then
hold the relevant preset number button
to store the station. When the station is
stored successfully the following screen
will display.
Using the WI-FI Radio

14
Supported file types
The media player allows you to play audio
files that are stored on a networked PC, using
Windows 2000 or Win XP.
The following file formats are supported:
.MP3
.WMA
.RM
.OGG
.AAC
.M3U
DRM encrypted files cannot be played
back using the built-in media player. If you
try to play an encrypted file ‘Protected’
will be displayed. Most tracks purchased
from online music stores are encrypted
and therefore cannot be played using your
WI-FI Radio.
Setting up your PC
Windows XP Pro users should select the
simple file sharing option from Windows
Explorer (for further information refer to
the help system supplied with Windows
XP Pro). If your PC is not configured to
use simple file sharing or you are using
Windows 2000, please refer to “Windows
2000 Users” on page 23.
To enable your WI-FI radio to playback your
audio files, you need to share the folder in
which they are stored.
To setup your shared folders complete the
following procedure on your computer:
1. Open ‘My Computer’ from the ‘Start’
menu.
2. Browse to the folder where your audio
files are stored.
3. Using the mouse, right click on the
folder and select ‘Sharing and
Security’.
4. In the ‘Network sharing and security’
section, select the ‘Share this folder on
the network’ button and enter a share
name. An example is shown below
using Win XP.
‘Allow network users to change my
files’ must also be selected.
5. Click the ‘Apply’ button.
6. Click the ‘OK’ button to close the
window.
7. The folder icon will change, to visually
show you that the folder is shared.
Using the Media Player

15
Connecting the WI-FI radio to your
PCs shared folder
1. Log-on to your PC, using the user
account where the media files are
stored.
2. Turn the multifunction control until the
following screen is displayed. Press the
‘SELECT’ button to confirm.
3. Select the option for ‘Windows
Shares’. Press the ‘SELECT’ button to
confirm.
4. Select the option for ‘Scan for PCs’.
Press the ‘SELECT’ button to confirm.
5. Your WI-FI radio will now search your
wireless network for PC’s that are
sharing music files.
6. The name of the PC will be shown in
the display. If there is more than one
PC found, use the multifunction control
to select the required PC. Press the
‘SELECT’ button to confirm.
7. Your WI-FI radio will now search for
shared folders on the specified PC.
8. The shared folder name will be
displayed. If there is more than one
shared folder, use the multifunction
control to select the required folder.
Press the ‘SELECT’ button to confirm.
9. Your WI-FI radio will now scan the
folder for available files.
10. To play your files, see “Playing your
media files” on page 16.
Connecting the WI-FI radio to your PC
using UPnP mode
To use Universal Plug and Play(UPnP)
mode, you will need to have previously
setup the following:
Make sure that your router is UPnP
compatible and that UPnP mode has
been enabled.
You have installed on your PC
Microsoft Media Player 11, Microsoft
Media Connect (for PCs with
Microsoft Windows Media Player 10
or earlier) or a third party UPnP client
on the PC that hosts your media
library.
You may need to consult the
manufacturer’s user guide that was
supplied with your router or UPnP client
software f you are not sure how to enable
these features.
1. Make sure that the PC where the media
files are stored is switched on, and the
above requirements have been installed
and enabled.
2. Turn the multifunction control until the
following screen is displayed. Press the
‘SELECT’ button to confirm.
3. Select the option for ‘UPNP Servers’.
Press the ‘SELECT’ button to confirm.
Using the Media Player

16
4. Your WI-FI radio will now search your
wireless network for UPnP servers/
clients that are sharing music files.
5. Select the UPnP server that you want to
connect to. Press the ‘SELECT’ button
to confirm.
6. Your WI-FI radio will now search for
shared media on the UPnP server.
7. You can select either to play the files by
music category or by using a predefined
playlist. Use the multifunction control to
select the required option. Press the
‘SELECT’ button to confirm.
8. To play your files, see “Playing your
media files” on page 16.
Playing your media files
DRM encrypted files cannot be played
back using the built-in media player. If you
try to play an encrypted file *Protected’
will be displayed.
After you have scanned your shared
folder, or connected to a UPnP
server you can play your media files.
If you have not yet scanned your
folder, or connected to a UPnP
server refer to the procedures on the
previous pages.
1. You can choose to playback your files
by using one of the following options;
Album Artists
Albums
All Artists
All Music
Composers
Contributing Artists
Folders
Genre
Music Playlists
Rating
2. Select the relevant option from the list
above, then press the ‘SELECT’ button
to confirm.
3. Choose the relevant sub category using
the multifunction control, then press the
‘SELECT’ button to confirm.
4. Your selection will now be added to the
queue, and the first track will begin to
play.
Media player controls
When listening to your media files, you can
use the following features.
Using the Media Player

17
Removing tracks from the queue
1. Press the ‘BROWSE’ button.
2. Turn the multifunction control to select
the track that you want to remove.
3. Press and hold the ‘STOP’ button for 2
seconds.
4. Turn the multifunction control so that
‘YES’ is highlighted then press the
‘SELECT’ button to confirm.
5. Turn the multifunction control so that
‘YES’ is highlighted then press the
Playing tracks in a random order
1. Press back repeatedly until the main
menu is reached. Turn the multifunction
control until the following screen is
displayed. Press the ‘SELECT’ button
to confirm.
2. Select the option for ‘Playback Mode’
using the multifunction control. Press
the ‘SELECT’ button to confirm.
3. Turn the multifunction control until
‘Shuffle’ is displayed. Press the
‘SELECT’ button to confirm.
4. Turn the multifunction control so that
‘YES’ is highlighted then press the
‘SELECT’ button to confirm.
5. Your tracks will now be played back in a
random order.
To remove random playback, follow the
same procedure, but select ‘YES’ when
the display shows ‘Disable’.
Repeating all tracks
1. Press back repeatedly until the main
menu is reached. Turn the multifunction
control until the following screen is
displayed. Press the ‘SELECT’ button
to confirm.
2. Select the option for ‘Playback Mode’
using the multifunction control. Press
the ‘SELECT’ button to confirm.
3. Turn the multifunction control until
‘Repeat’ is displayed. Press the
‘SELECT’ button to confirm.
4. Turn the multifunction control so that
‘YES’ is highlighted then press the
‘SELECT’ button to confirm.
5. All tracks will now be played repeatedly
until the function is turned off.
To remove repeated playback, follow the
same procedure, but select ‘YES’ when
the display shows ‘Disable’.
Using the Media Player

18
Setting the clock
The clock on the WI-FI radio will set
automatically once connected to the internet,
however, should you need to adjust this
setting, proceed as follows;
1. Select ‘Configure’ from the main menu,
and press ‘SELECT’ to confirm.
2. Turn the multifunction control until
‘Clock’ is displayed. Press ‘SELECT’ to
confirm.
3. Turn the multifunction control until ‘Set
time’ is displayed. Press ‘SELECT’ to
confirm.
4. Turn the multifunction control to set the
hour. Press ‘SELECT’ to confirm.
5. Turn the multifunction control to set the
minutes. Press ‘SELECT’ to confirm.
6. The set time will be displayed.
Setting the alarm
Before setting the alarm, make sure that the
clock is correct.
To set the alarm, proceed as follows;
1. Select ‘Configure’ from the main menu,
and press ‘SELECT’ to confirm.
2. Turn the multifunction control until ‘Set
Alarm’ is displayed. Press ‘SELECT’ to
confirm.
3. Ensure that ‘YES’ is highlighted, then
press ‘SELECT’ to confirm.
4. Turn the multifunction control to set the
hour. Press ‘SELECT’ to confirm.
5. Turn the multifunction control to set the
minutes. Press ‘SELECT’ to confirm.
6. The alarm time will be displayed.
7. Press the ‘ON/OFF’ button. The display
will show two times.
8. The time on the left is the current time
and the time on the right is the alarm
time. When the time on the right is
reached, your WI-FI radio will turn on
and play the station or track that you
were last listening to.
Clock Functions

19
Setting the sleep timer
The sleep timer is used to turn off the WI-FI
radio after a specified amount of time.
To set the sleep timer, proceed as follows;
1. Select ‘Configure’ from the main menu,
and press ‘SELECT’ to confirm.
2. Turn the multifunction control until
‘Sleep Timer’ is displayed. Press
‘SELECT’ to confirm.
3. Turn the multifunction control to set the
amount of time before your WI-FI radio
will turn off. Press ‘SELECT’ to confirm.
4. ‘Alarm Set’ will be displayed to confirm
that the timer has been set. In the
example above the WI-FI radio will turn
off after 2 hours and 45 minutes.
Clock Functions

20
The following settings can all be accessed
from the configuration menu. Use the
multifunction control to navigate through the
menu system, and change settings. Press the
‘SELECT’ button to confirm.
Network Config
This menu enables you to setup and view
your network configuration settings. These
settings are used when setting up your
network and are explained in “Switching on”
on page 8.
Version
This menu shows you the version numbers of
the built-in firmware in your WI-FI radio.
These version numbers are helpful when
calling the customer helpline.
Upgrade firmware
This menu enables you to upgrade the
firmware in your WI-FI radio. When you press
the ‘SELECT’ button your WI-FI radio will
search for available upgrades.
Language
This menu enables you to change the menu
language used in your WI-FI radio.
Factory Reset
This menu enables you to reset your WI-FI
radio. When your WI-FI radio is reset you will
lose your stored radio stations, clock settings
and network settings.
Refer to “Switching on” on page 8 for help
with re-setting up your WI-FI radio.
Register
The 7 digit key is device specific and is
required when you subscribe to premium
content services.
Clock
See “Setting the clock” on page 18.
Sleep Timer
See “Setting the sleep timer” on page 19.
Equalisation
The equalisation menu enables you to
change the Bass and Treble settings.
Configuration Settings
This manual suits for next models
1
Table of contents
Other OXX Digital Radio manuals