OZtrail 10000428 User manual

www.oztrail.com
OWNERS MANUAL
Fast Frame Ensuite Single
10000428

FEATURES
Products & parts................ . . .3
Assembly Instructions ........... . . .4
Disassembly Instructions
& Folding Instructions ........... . . .7
Warranty ...................... . . .8
Prolonging The Life Of
Your Tent/ Shelter .............. . . .9
Important Safety &
Care Information .............. . . .10
Replacing the Shock-Cord
in Tent Poles .................. . . .12
Understanding
Waterproofness ............... . . .14
Zips .......................... . . .15
HELPFUL HINT
OZtrail advises you to read this
use to ensure all parts are present
and to become familiar with the
operation of your tent.
2
CONTENTS
Fast Frame Ensuite Single
• Fast Frame system provides quick set up,
greater strength and improved water shedding
• Heavy duty polyester fabric with silver coated
inner walls for total privacy
• Vented roof for ventilation and removable
fly panel
• Removable floor with mesh drains for ease
and versatility
• Adjustable multi-position toilet paper holder
• Internal multi-pocket toiletry organiser
• Adjustable towel rail can be used inside or
outside the ensuite
• Reinforced central hanging hook supports
heavy showers
• Internal access ports for shower hoses or
power cords
Product Height
213cm
SIZE
Packaging L/H/D
110x16.5x16.5cm
SIZE
Product Weight
5.78kg
WEIGHT
Fast Frame
Ensuite Single
A fast pitching and stable ensuite tent

Thank you for purchasing a quality
OZtrail product. Please keep this
Owner’s Manual in a safe and dry
place,it contains important and
helpful information.
The following parts are included for
Product Code:
PLEASE NOTE
Due to our policy of continual product
features of the product may vary from
details within this Owners Manual.
HELPFUL HINT
We recommend that you set up this
product before you leave for your trip.
Check that all parts are present and that
you familiarise yourself with the
assembly and disassembly of the
OZtrail dealer will be happy to help you.
PART DESCRIPTION
3
PRODUCTS & PARTS
MPE-FFS-D
1x Inner tent complete with main frame
4x Guy ropes
8x Pegs
1x Peg bag
1x Tent carry bag

4
ASSEMBLY INSTRUCTIONS
Select a sheltered camp site protected from
the wind that will not allow water to pond
under the Ensuite floor. Clear a level area of
all stones, twigs, etc.
Unpack the contents of your Ensuite. Release
and remove the ties around the packed
Ensuite. Carefully unfold and lay out your
Ensuite ensuring that you have the door facing
in the direction you require.
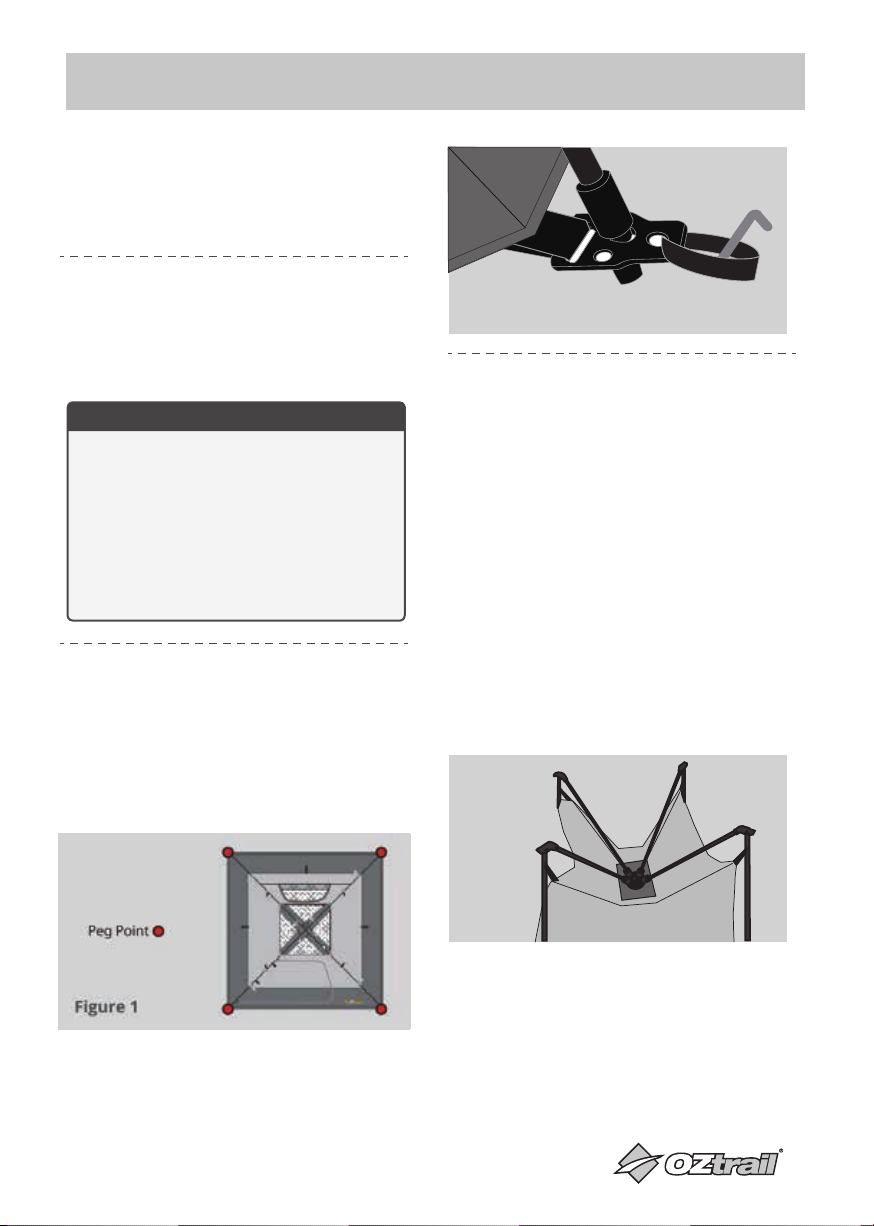
Peg out the Ensuite at the four corner peg
points. These peg points are indicated in
Figure 1. Anchor the Ensuite to the ground
by inserting the pegs through the loops at
the base corners of the Ensuite at an angle
of 45 degrees as indicated in Figure 2. Firm
but not tight.
STEP 2: LAY OUT THE ENSUITE
STEP 3: PEG DOWN THE ENSUITE
Before extending the corner wall poles to
their full height, ensure the corner wall
poles are facing upward and the central roof
hub is resting towards the ground in the
middle of the floor, as indicated in Figure 3.
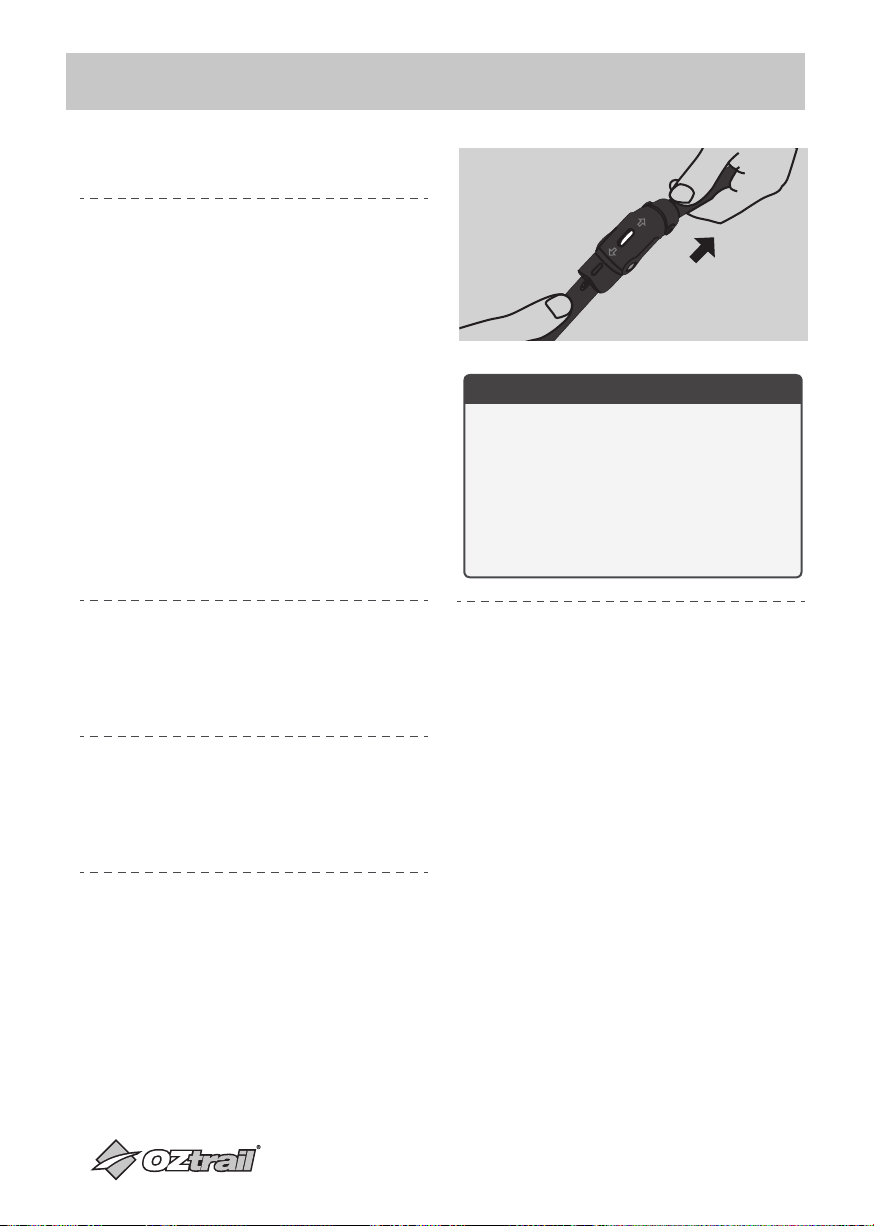
Next pull vertically up on the central roof
hub with moderate force to lock the central
roof hub into its final position, now apply a
small compression force on the wall to roof
frame elbow to lock hub into place, as
indicated in figure 4. Beginning at one
corner pole now extend the pole to its full
telescopic height until the locking pin locks
into place, repeat this process for the other
three corner poles as you walk around the
tent, the tent will stand up during this step
as indicated in Figure 5.
STEP 4: EXTENDING THE ENSUITE
FRAME AND STANDING UP THE ENSUITE
STEP 1: CHOOSING THE SITE
HELPFUL HINT
Be careful not to twist or force the frame
assembly when unfolding the Ensuite.
Until you are locking the central roof hub
into its final position in Step 4, it is not
necessary at any stage of Ensuite
assembly to apply more than a small force
on the frame. If a small force is not
sufficient to carry out each described step,
then realign the frame and try again.
Peg Point
Figure 1
Figure 2
Figure 3

5
ASSEMBLY INSTRUCTIONS CONT.
STEP 5: INSTALL THE RAIN FLY
IMPORTANT
In severe conditions the shelter should be
dismantled
WARNING
At no stage is it necessary to apply any
excessive force to achieve any of the
above steps. The frame is tensioned and
if the correct action is applied the Ensuite
will erect with little or no force required.
Excessive force will result in damage to
the frame or skin and this is not covered
by warranty.
Peg out the guy ropes, make a loop (about 30
to 50 cm long) with the slider on the end of the
rope and peg out as far as possible from
shelter, as indicated in Figure 6. Ensure all peg
down points are utilised and all guy ropes are
attached firmly and remain firm, as indicated
in Figure 7.
Locate the rain fly and carefully draw over the
top of your ensuite. Hook rain fly to each
corner of the ensuite frame.
STEP 6: GUY ROPES
Figure 6
Figure 5
Lock
Unlock
Figure 4 Figure 7

6
ASSEMBLY INSTRUCTIONS CONT.

7
DISASSEMBLY INSTRUCTION
Release guy ropes.
STEP 1:
Remove pegs with a claw hammer or peg
puller. Do not remove pegs from the ground by
pulling on Ensuite base as this may cause
damage to the Ensuite.
STEP 3:
Collect and gather the Ensuite and frame into a
compact cylindrical bundle with only ever using
a small force at any time. Ensure all loose fabric
is folded within the edges of the Ensuite frame.
STEP 4:
Once the Ensuite bundle is rolled up, place the
provided tie straps around it and secure firmly
but not tight and place into the tent carry bag
with peg bag, instruction booklet and other
miscellaneous parts. If the Ensuite will not fit
into carry bag, unroll and roll again paying
more attention to folding the fabric more
carefully and ensuring air has escaped
successfully during collapsing the Ensuite.
STEP 5:
To collapse the ensuite, ensure windows and
doors are open to allow air to escape from
inside the Ensuite. Beginning at one corner
pole of the Ensuite frame, release the locking
pin holding the telescopic pole in it extended
position, the pole will retract to approximately
half height, repeat this process for the other
three corner poles of the Ensuite frame as you
walk around the Ensuite. The Ensuite will
collapse during this step and the tension will be
removed from the central roof hub and the
wall/roof frame elbow. To unlock and release
the wall to roof frame elbow hub apply a small
expanding force to the poles on either side of
the elbow, as indicated in Figure 8. Now reach
over a place a small force downwards onto the
central roof hub to collapse the hub towards
ground level, as indicated in figure 3.
STEP 2:
WARNING
At no stage is it necessary to apply any
excessive force to achieve any of the
above steps. The frame is tensioned, but
if the correct action is applied the Ensuite
will pack up with little or no force
required. Excessive force will result in
damage to the frame and this is not
covered by warranty.
Lock
Unlock
Figure 8

OZtrail warrants this product against
defects for a period of one year from the
date of purchase. OZtrail will repair or
should a warrantable defect arise within
will be substituted at our discretion. This
caused by improper use and abuse; fair
wear and tear; or failure to follow
instructions regarding care and
maintenance. Products used for a
commercial nature are not covered by
this warranty against defects. A warranty
may be claimed by returning the product
proof-of- purchase clearly showing the
date and detail of the purchase. You may
are in addition to other rights and
remedies under law in relation to goods.
Our goods come with guarantees that
Consumer Law. You are entitled to a
and for compensation for any other
reasonably foreseeable loss or damage.
You are also entitled to have the goods
repaired or replaced if the goods fail to be
For more detailed information and an
PLEASE NOTE
Accessories shown may be for display
purposes only and not included with the
product. Due to our policy of continual
features of this product may vary from
what is stated.
AVOIDING MOULD AND MILDEW
You should always pack your products
both clean and completely dry. In
many climates there is a risk of mould
or mildew damage to materials that are
condition is not covered by the
clean you products with warm soapy
water and allow them to dry completely
after rinsing them with fresh water.
CARING FOR YOUR SHOCK CORD
Shock cord is designed to help you
keep your tent poles organised and to
stretching the cord or dropping the
poles will cause shock cord failure and
this condition is not covered by the
warranty.
INSURANCE, YOUR PROTECTION
AGAINST THE UNEXPECTED
Most people have product problems
Insurance policy. Most good Insurers
will cover the storm damage to your
tent or other products that falls outside
of the warranty.
8
WARRANTY STATEMENT

light will reduce the life of the fabric.
Fading of colour is an early warning
sign. OZtrail products are not designed
as permanent dwellings or structures.
avoid water ponding.
tent/shelter; as mildew and corrosion
can form. Always allow the tent to dry
completely before packing and stowing.
brush or sponge with mild detergent to
with silicon spray.
is provided for easy assembly of the
for any structural reason. The poles
and tent perform perfectly well without
and mishandling may cause failure.
Shock cord is not covered by warranty.
on page 12.
or does not close. This could be due to
wear or metal fatigue. The problem can
page 15.
and ash burns. This not only blocks the
emergency pole repairs and many
other uses around the camp site.
webbing or corner of the tent as your
remover or the claw of a hammer
hooked under the peg to remove them.
CONDITIONING YOUR NEW TENT
important to condition the tent. Simply
pitch your tent and wet it down with
your garden hose until the fabric and all
seams are saturated. Pay particular
attention to the seams - the thread
swells when wet and blocks the needle
holes. The needle holes also shrink
around the thread. The fabric also
swells into the weave and the
waterproof treatment settles within the
fabric. Let the tent dry completely before
repeating this wetting and drying
process until there is no leakage during
hosing. Always pack your tent away dry.
HELPFUL HINT
MATERIALS:
Pole: Fibreglass and steel
CARE INSTRUCTIONS:
Wipe down all metal surfaces with fresh
soft brush or sponge with fresh water and
mild detergent only and rinse with fresh
clean water. Allow to dry thoroughly.
with silicon spray.
9
PROLONGING THE LIFE OF YOUR TENT

CAMP SAFE - SAFETY HABITS
Fabrics used in the construction of
retardant properties. This treatment
reduces the rate at which the fabric will
burn if it comes into direct contact with a
The application of any foreign substance
to the fabric such as some water
The following pages cover several safety
tips that will help you avoid some of the
camping trip.
TO PREVENT INJURY CAUSED BY
FIRE
appliances)
repellent compounds on the
insecticides
TO PREVENT INJURY CAUSED BY
ELECTRICITY
electricity and electric lighting in and
near tents/shelters. Only use 12 volt
lighting.
tent/shelter could result in
even death.
A well ventilated tent not only maintains
condensation build up inside the tent.
consuming devices inside the tent. This
appliances.
inside the tent/shelter.
Please read before setting up your tent/shelter
TO PREVENT INJURY CAUSED BY GAS
POISONING OR SUFFOCATION
10
IMPORTANT SAFETY &
CARE INFORMATION

collapse or rock fall
winds - collapse the tent onto the ground and seek
refuge in your vehicle
branches or under trees known to drop branches
To prevent injury caused by your camping environment
IMPORTANT SAFETY &
CARE INFORMATION CONT.
11

Tent Poles and Shock Cord are similar to
maintenance and replacement from time
most common causes of shock cord
assembly or during periods of high
winds is the most common causes of
pole failure. By maintaining both the
Poles and Shock Cord you will be
ensuring that you get the best
performance and life out of your OZtrail
Tent.
REPLACING SHOCK-CORD
See Figure 10
Step One: Measure and Cut
Measure the length of the Tent Pole.
You should use a length of Shock Cord
roughly two-thirds the length of the Tent
Pole. This will ensure that the Shock
Cord has the appropriate amount of
elasticity.
Step Two: Threading the Pole
Sections
Tie a large knot in the end of the Shock
Cord length. This knot needs to be large
enough to stop it passing through the
tubular hole in the pole sections whilst
you are threading it. Thread the Shock
Cord through the tubular hole in each
pole section.
never drop the tents poles during
transporting. When packing poles into
their carry bag be careful not to settle
them by tapping them vertically on a
hard surface.
HELPFUL HINT
Figure 10
TENT POLE &
SHOCK CORD REPLACEMENT
12

Once all of the Pole Sections have been
large to stop it pulling through the hole.
Cord at each end.
Replacing Tent Pole Sections
Pole Section is an annoyance that can be
Cut the Shock Cord to enable you to remove
the broken Pole Section. This is also a good
time to replace the Shock Cord as well.
Measure both the diameter and overall
length of the Pole Section. Once you have
organise a Pole Replacement kit from your
to cut the replacement pole to length. This
sand the cut edge to remove any sharp
edges.
Towards the end of the Pole Length it
Sections as the Shock Cord is stretching.
sections you have already threaded on
through them until you have much more
than what you need for the rest of the
sections to thread. Place your foot on
the Shock Cord at the end of the last
Pole Section you have threaded. This
will maintain the stretch and give you
plenty of Shock Cord to work with.
HELPFUL HINT
sections that match the diameter of your
tent poles as well as some lengths of
replacement shock cord. These items
are available at all good Camping
retailers.
HELPFUL HINT
Once your new pole is cut to length you can
to get your Pole Length complete.
TENT POLE &
SHOCK CORD REPLACEMENT
13

Know your tent
OZtrail tents are manufactured from
waterproof and water repellent fabrics.
and other desirable features a recreational
or other solid structures.
water can enter a tent: -
CONDENSATION
forms an impermeable layer between the
inside and outside conditions. The moisture
inside the tent/shelter condenses on the
fabric. Sometimes in cold conditions it
appears that the fabric is leaking when in
fact the cause is condensation.
Condensation can be reduced if the
tent/shelter is well ventilated.
ZIPS
At times wind driven rain could force water
FLOOR
If the ground is very wet or water pools
make sure water drains away from the tent.
STRUCTURAL INTEGRITY
A well pitched tent on level ground is
structurally strong and most waterproof.
During prolonged periods of rain and
wind it may be necessary to tighten guy
lines and reset the tent pegs and attend
to drainage around the tent. Sagging and
incorrect pitching weakens the tent
structure and could allow water to pool
causing leaking and breakages.
14
UNDERSTANDING WATERPROOFNESS

REDUCING THE RISK OF
JAMMING FABRIC IN THE ZIP
with your thumb facing you.
slider underneath with your remaining 3
Use this action for opening or closing.
WHAT TO DO IF THE ZIPPER
GETS CAUGHT
Do not try and pull all the fabric in one
go. Do not force the slider or the fabric.
IF THE SLIDER DOES NOT CLOSE
THE ZIPPER PROPERLY
open ever so slightly. When this occurs
teeth or coil together tightly enough and
the slider together. Try top to bottom
CRIMPING A ZIP-SLIDER
the coil tightly enough. Wear and tear may
cause the gap marked A to open up.
See Figure 11.
By simply ‘crimping” the slider together at
solves the problem most of the time.
Crimping in other planes is worth a try if B
& C does not work. This is to be done
See Figure 11.
A
B
C
Figure 11
15
ZIPS

Designed & Imported by:
Adventure Trading Australia Pty Ltd
71 Charles Ulm Place,
Eagle Farm, QLD 4009
AUSTRALIA
P: 1300 362 921
www.oztrail.com.au
facebook.com\OZtrailAustralia
Table of contents
Other OZtrail Camping Equipment manuals