Pacific GSM Electronic Micro Alarm User manual

>>>
1 2
3 4 5
>>> >>>
>>> >>>
>>>>>>
>>>>>>
>>>>>>
>>>
>>>
myema.co.nz
ELECTRONIC MICRO ALARM
USER MANUAL
DEAR CUSTOMER,
Thank you for your purchasing EMA – a revolutionary GSM security system for
cars, which has been developed by the Czech company FLAJZAR. EMA is a
miniature GSM alarm intended for any car type; you do not need to assemble
anything and you can move it simply from car to car. The simplest GSM alarm
ever. EMA´s aim is not to substitute expensive built-in GSM alarms and satellite
systems. It is, however, a option to increase the security of your car when parking
anywhere on workdays – in front of shopping malls, in the town streets, when
angling or spending a weekend in the nature.
A brief summary of the most signicant properties and functions:
EMA is a unique GSM security device
no assembly necessary
suitable for any car type*
sensors integrated inside the alarm device
connection of other external sensors possible
in case of an alarm, it sends SMS messages and calls up to 6
phone numbers
easy to control by your mobile phone
possible to monitor the position of your car
a stand-by Li-Ion battery integrated in the miniature body
easy conguration by PC or a SMS
Please check if the voltage of your 12V power supply
connectordropsaftertheignitionis switchedo.This
principleis usedto detectand startthe countdown.If
it is not the case and the voltage persists in the
connector, use the option C.
First putting into operation:
Control – option A:
Automatic activation and deactivation of the alarm Automatic activation and manual deactivation of the alarm Manual activation and deactivation of the alarm
VERSION: 210212
Control – option B: Control – Option C:
* precondition – a common 12V dashboard socket, so-called cigarette lighter
connector, with the inside diameter between 20,5 to 21,5 mm.
This device includes an integrated LI-Ion battery that can run down
after a long inactivity. Let us recommend you to charge EMA before its rst use!
Plug EMA into the 12V on-board connector and let it plugged until the green
LED (BATT) goes on. This LED indicates the battery has been charged.
Since this moment, EMA starts working in the basic mode set up by the
producer with possible manual activation and deactivation (see the control
optionC). However,if youwishto usethe EMA´sintegratedfunctions infull,
to change the parameters, to add other phone numbers or to use the
comfortable automatic mode of activation and deactivation, just install a
simple conguration program EMA cong into your PC. (how to download
and install it – see on the other side of the sheet).
This option is the most comfortable one and recommended for
common use. After you switch o the ignition and you leave your car,
EMA automatically counts down the time until the activation (leave
time). After the countdown and activation, EMA gives you a short ring
to conrm the activation. Since this moment, EMA protects your car.
Afteryourreturntothecarandtheshockdetection, Emawilldetectyouand
will start count down of the arrival time. Until this point in time, you must
switchon theignition. Afterthe ignition is switched on,EMA isdeactivated,
awaiting next activation.
The leave and arrival times can be set up by the program Ema cong – see
the second page of the Instructions).
Similarly to Option A, EMA automatically counts down the set-up time until
the activation (leave time) after you have switched o the ignition and left
the car. After the countdown and activation, EMA gives you a short ring to
conrm the activation. Since this moment, EMA protects your car.
Before you enter your car, deactivate EMA by giving a free-of-charge ring
from your mobile phone (your mobile phone number must be saved on the
EMA phone book).
In this mode, the activation and deactivation is controlled by the user – by
giving a free-of-charge ring or a SMS message – therefore, it is not as
comfortable asthe optionsA or B are.Themode issuitable tosecure e.g.the
vans if it is not possible to set up a xed time for automatic activation
because of frequent loading and unloading.
After you enter the car, the sensors are activated immediately; EMA is
sending the alarm SMS messages and calling. Therefore, it is necessary to
deactivate EMA by giving it a ring from your mobile phone before you enter
your car (your mobile phone number must be saved on the EMA phone
book).
Insert a SIM card of your mobile phone operator with a
switched-o PIN code! As soon as you insert it in the EMA´s slot, all
the LEDs go on – the device has been started. After some minutes, the LEDs
go out and the blue LED begins to ash – GSM –EMA has been netted and
it is ready for use.
Give EMA a ring from your mobile phone. The device automatically
savesthephonenumber bywhichyouareauthorizedto controlEMAand to
which EMA will call you or send SMS messages in case of an alarm. This
process will be conrmed by a SMS message sent to your mobile phone.
Please check if the voltage of your 12V power supply
connectordropsafter theignition isswitchedo.This
principleis usedto detectand startthe countdown.If
it is not the case and the voltage persists in the
connector, use the option C.
The above mode is suitable for the cars in which the
voltage in the 12V connector persists.
Before putting the EMA alarm into operation, please read the
Enclosure 1 carefully (technical and service information)!
Giving a ring – more information:
What we understand under giving EMA a ring: dial the SIM card number inserted in EMA alarm and let it ring until you can hear more than
two ringing tones in the earphone.Warning – EMA may not register a very short ringing! On the other hand, more ringing tones can be
assessed as calling and used e.g. for tapping (in case of its activation). Please keep the ordinary ringing times to activate and deactivate EMA!

TECHNICAL SUPPORT:
1
1
2
2
33
4
4
5
5
6
6
12
12
13
13
14
15
16
17
18
19
20
21
7
8
9
10
11
7
8
9
10
11
22 23 24 25
1
2
3
A
B
C
4
5
6
11
12
13
13
14
15
16
17
18
19
20
7
8
9
10
1
2
3
4
5
6
11
12
7
8
9
10
21
22
23
24
25
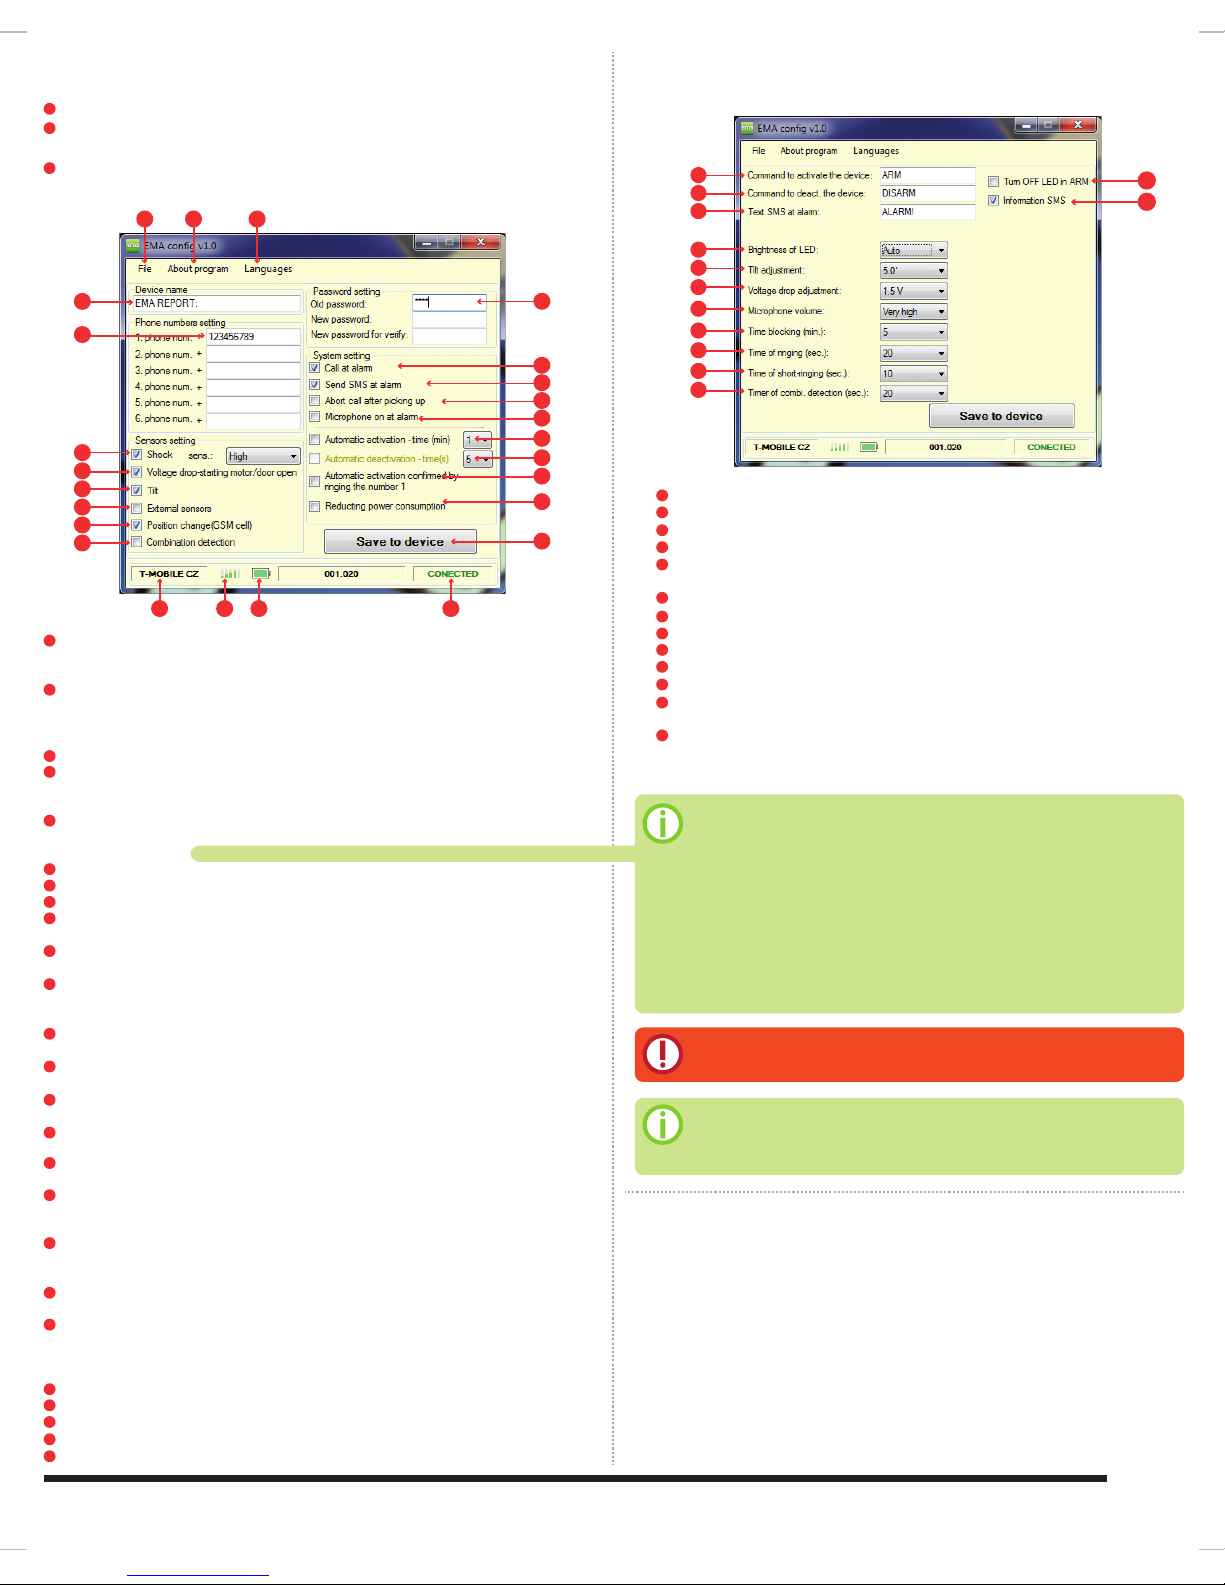
File – it allows storing and opening the complete set-up from the le. For example, you can create dierent proles for
dierent cars, which you can store on the disc and load them to the program EMA cong. Furthermore, it allows switching over
the program to the extended set-up. Here you can nd some set-ups recommended by the producer.
About the programs > help - it displays the operation instruction for the EMA alarm device
About the program > version - it displays the actual version of the program and the links to technical support.
About the program > path to actualization – it allows to enter the le name with actualization.
About the program > actualize the rmware – it opens the window to actualize the rmware
Languages – language selection for EMA cong interface
Device name – it serves for naming the alarm. This name will be displayed at the beginning of each SMS which EMA will send
to you – e.g. “EMA IS REPORTING: UNAUTHORIZED STARTING UP!! The naming is suitable to distinguish the devices if you use
more alarms.
Phone numbers set-up - EMA allows the communication and control with up to six mobile phones whose phone numbers
you can enter into the corresponding elds (let us recommend you to use max. 2 numbers in practise).The rst phone number is
the so-called“Master Position”– see information box.
Shocks – alarm activation in case some shocks are registered; the sensitivity to shocks can be adjusted in ve stages.
Engine start-up detection – activation of the function when EMA informs you about an unauthorized start-up of your car.
Tilting detection (towage) – this function assesses the tilting of your car, e.g. in case of a towage or wheels theft.
External sensors – it activates the function of external sensors which can be connected to the alarm device, by an USB
connector optionally.
Motion detection (GSM cell change) – EMA allows to detect the change in its position for which it uses the GSM cells in its
environs. In case it registers a transition to another cell, it sends a warning SMS.
Combined detection – if an alarm shall be raised by the combined detection, both shocks must be detected, and the motion
sensor must be activated within a set-up time interval.The time interval can be set-up as an extended adjustment. In this way,
high resistance to false alarms can be achieved.
Password set-up – here you can assign a password to give the SMS instructions and open the EMA cong program. Initial
password: 1234..
To call in case of an alarm – if you permit this option, EMA will call the set-up phone numbers in case of a registered alarm.
This function can be combined with the next option (14).
To send a SMS in case of an alarm - if you permit this option, EMA will send you a SMS in case of a registered alarm.This
function can be combined with the previous option (13).
To interrupt the phone call after reply – in case of an alarm call, if the function is permitted and some of the set-up phone
numbers will reply to the phone call, EMA will not continue calling the other phone numbers on the list.
Tapping - if the function is permitted and the EMA phone number calls an authorized phone number, the call will be replied
after the approx. third ringing and it will be possible to tap the protected space.
Automatic activation – this function is interesting if there is a power supply connector in your car, which is supplied only
upon ignition switching on. If you leave your car and EMA detects that the power supply does not function, it starts counting
down the pre-set time automatically and after it elapses, EMA changes over to the protection mode automatically.
Automatic deactivation – it serves for alarm deactivation in case the 12V voltage appears on the power supply connector. If
you come to your car and switch on the ignition within the set-up time, EMA automatically switches over from the active to the
inactive condition. If the voltage does not appear on the connector within the set-up time interval, the alarm will be raised.
To conrm the automatic activation by giving a ring to the number 1 – if this option and the automatic activation are
permitted, a ring will be given to the rst number on the list (Master Position) as the conrmation.
Decrease in consumption with disconnected power supply – if this function is permitted and there is no voltage on the
power supply connector, EMA changes automatically over to the“decrease-in-consumption”mode, whereby the internal battery
eective time is extended signicantly. All permitted sensors (except for the detection of GSM cell change) are active in this
mode. Upon an alarm, EMA switches back to the operational mode, calling a set-up phone number or sending a SMS message.
Push-button“store into device” – it stores all adjustments into the EMA micro alarm.
Operator’s symbol – it displays the name of the applied SIM card’s operator in the alarm device.
Signal intensity indicator - it indicates the actual GSM signal intensity.
Battery condition indicator
– it indicates the actual condition of the alarm internal battery.
Device condition
– it indicates the information on EMA connection/disconnection to PC.
Command to activate the device–itallows changingtheSMStext for thedeviceremoteactivation(CAUTION–nogaps).
Command to deactivate the device–itallows changingtheSMStext for thedevicedeactivation(CAUTION–nogaps).
SMS text for alarm–this text willbedisplayedinalarmSMS messages,e.g.“ALARMINTHECAR”.
LED brightness –it allowschangingtheLEDs brightness.Letusrecommendyoutoapplythe AUTOmode.
To switch o LED in ARM (masking function) –ifthisfunctionis permitted,all LEDs willbeswitchedo uponactivation;the
alarmwill be lessnoticeable.
Information SMS–itsends a SMSaboutthechangeovertostand-bymode.
Inclination adjustment –adjustmentofinclination sensorsensitivity –5levels.
Decrease in power supply with start-up –adjustment ofstart-up detection sensitivity.
Microphone volume –adjustmentoftapping volume.
Time of blocking (min.) –adjustmentof thetimeduring which another alarmwillbe blocked.
Time of ringing (sec.) –adjustmentof the timeduringwhich EMA shallringwhen informing aboutanalarm.
Time of giving a ring (sec.)– thetime during whichEMAshall call incaseit is conrmingtheactivationbygivinga ring,or by
automaticactivation.
Combined detection timer (sec.) –thetime betweendetectionbyboth sensors.Ife.g.shocks aredetected,fora set-up periodthe
detectionofperson’s motionbya connected externalsensoris expected.Thedetection bythesetwosensors withinaset-upintervalwill
raisethe alarm.
Installation of the program EMA cong and conguration of the device:
Extended set-up of EMA cong program:
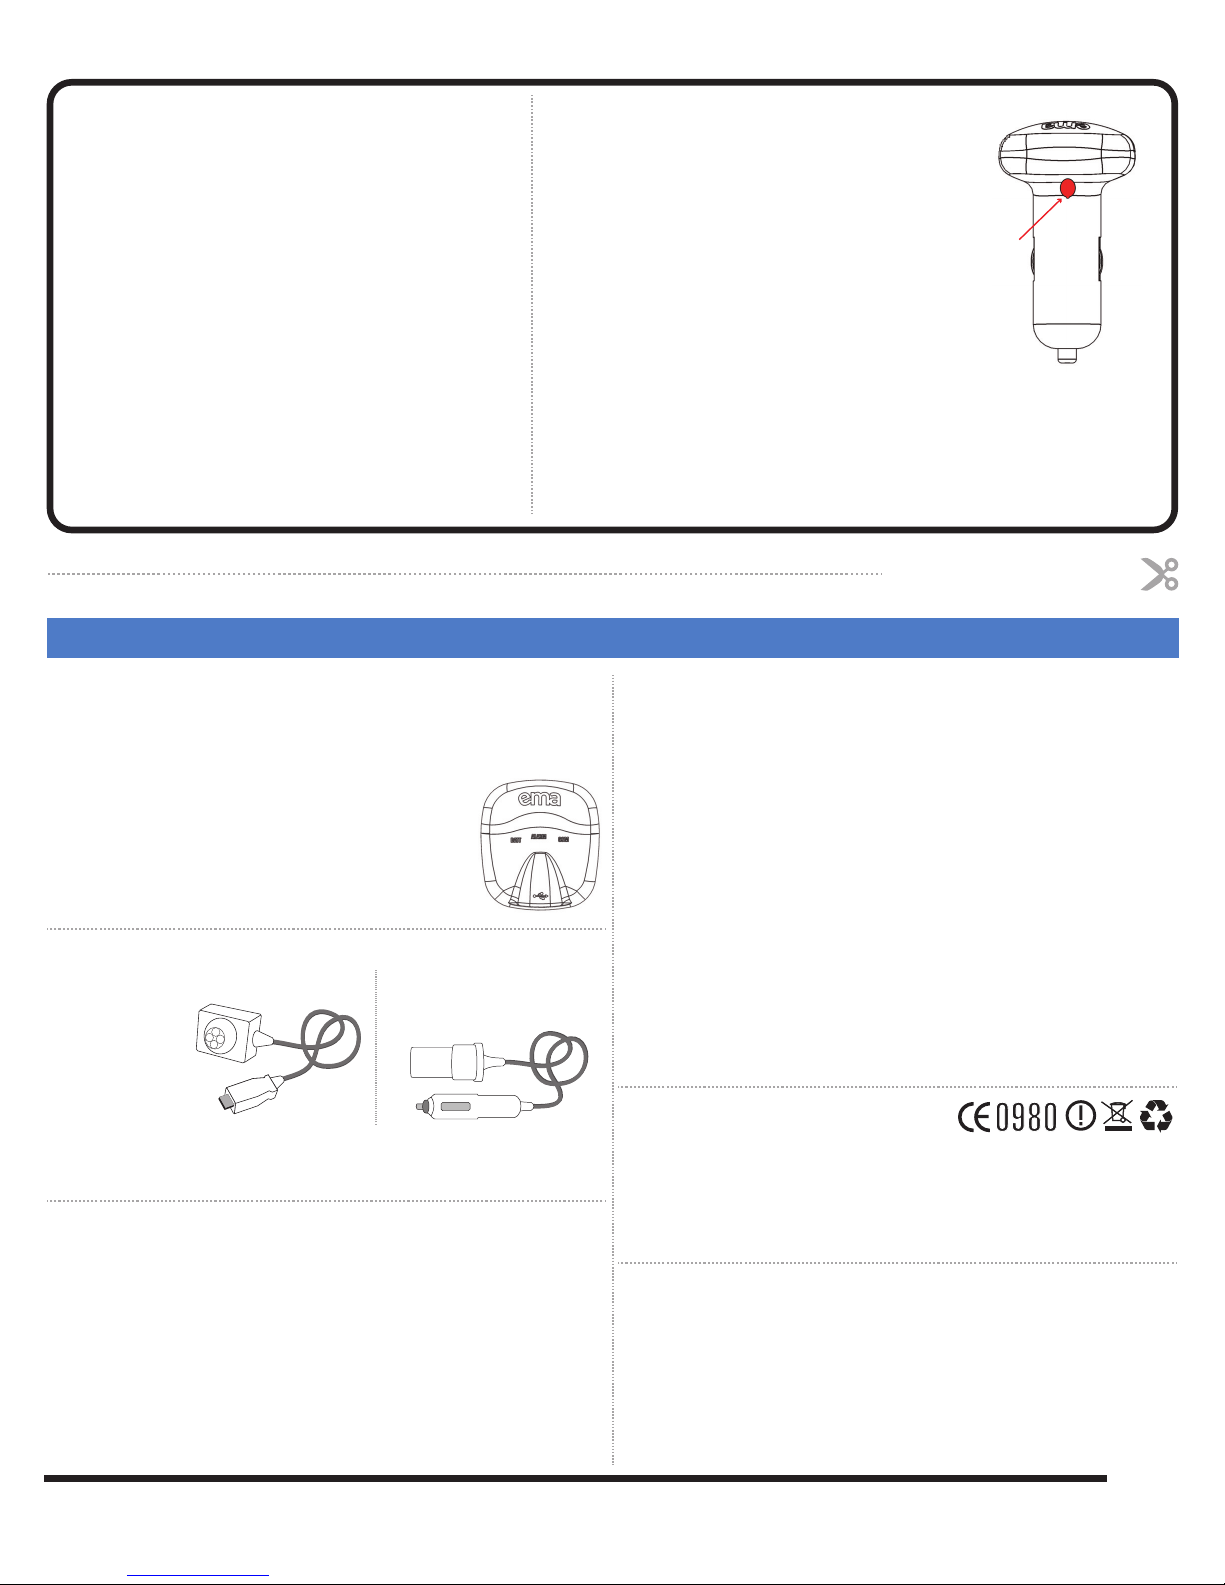
Description of signalling LEDs
Download the conguration program EMA cong on the website www.myema.co.nz
Start the program installation and follow the instructions of the installation program. The installation requires
EMA to be connected to your PC by an USB cable (included in package)
After the successful installation, an icon appears - EMA cong on the desktop area, by which you can start the
conguration program.
After you switch on or reset the device, all the LEDs are on. If the masking function“To switch o LED in case of ARM”is permitted,
the LEDs in protective mode do not emit light and the device does not point out its presence.
BATT (green / yellow LED):
GREEN: occurrence of 12V power supply and charged battery for more than 85 %
YELLOW: occurrence of 12V power supply and charged battery between 25 - 84 %
YELLOW BLINKING 1 SEC: discharged battery below 25 %
YELLOW - FLASHES 4 SEC: stand-by mode (GSM part o )
GSM (blue LED):
PERMANENTLIGHT: netting processorGSMsignal drop-out
(no signal in place)
SHORT FLASHES 4 SEC: good signal
QUICK FLASHES 1 SEC: bad signal
ALARM (red LED):
OFF: EMA is not protecting (DISARM)
FLASHES EVERY 2 SEC: EMA is protecting (ARM)
PERMANENT LIGHT: alarm call or SMS sending
TRIPLE SHORT FLASHES EVERY 1 SEC: EMA is protecting
but the time of blocking is counted down upon alarm (see
EMA cong > Extended adjustment > paragraph 10)
1st phone number = Master Position
MasterPositionis the name of the phone number that has been stored on the rst position of the internal phone
book. It has several advantages as compared with the other numbers.
The phone number on this position is informed by a ring about the automatic activation (if this function is set
up). If an alarm is raised, EMA calls the phone numbers following their positions on the list, i.e. the Master
Position number is called as the rst one. If any phone number on positions 2 – 6 gives a ring to EMA,
implementing activation, it is moved automatically to the Master Position (i.e. the phone number positions are
changed).Then, this phone number can use the Master Position advantages.
Moving the phone numbers to the Master Position is suitable if EMA is controlled by more users (e.g. by more
family members – when you activate EMA by giving a ring, you move the user’s number to the Master Position
and then you can control EMA).
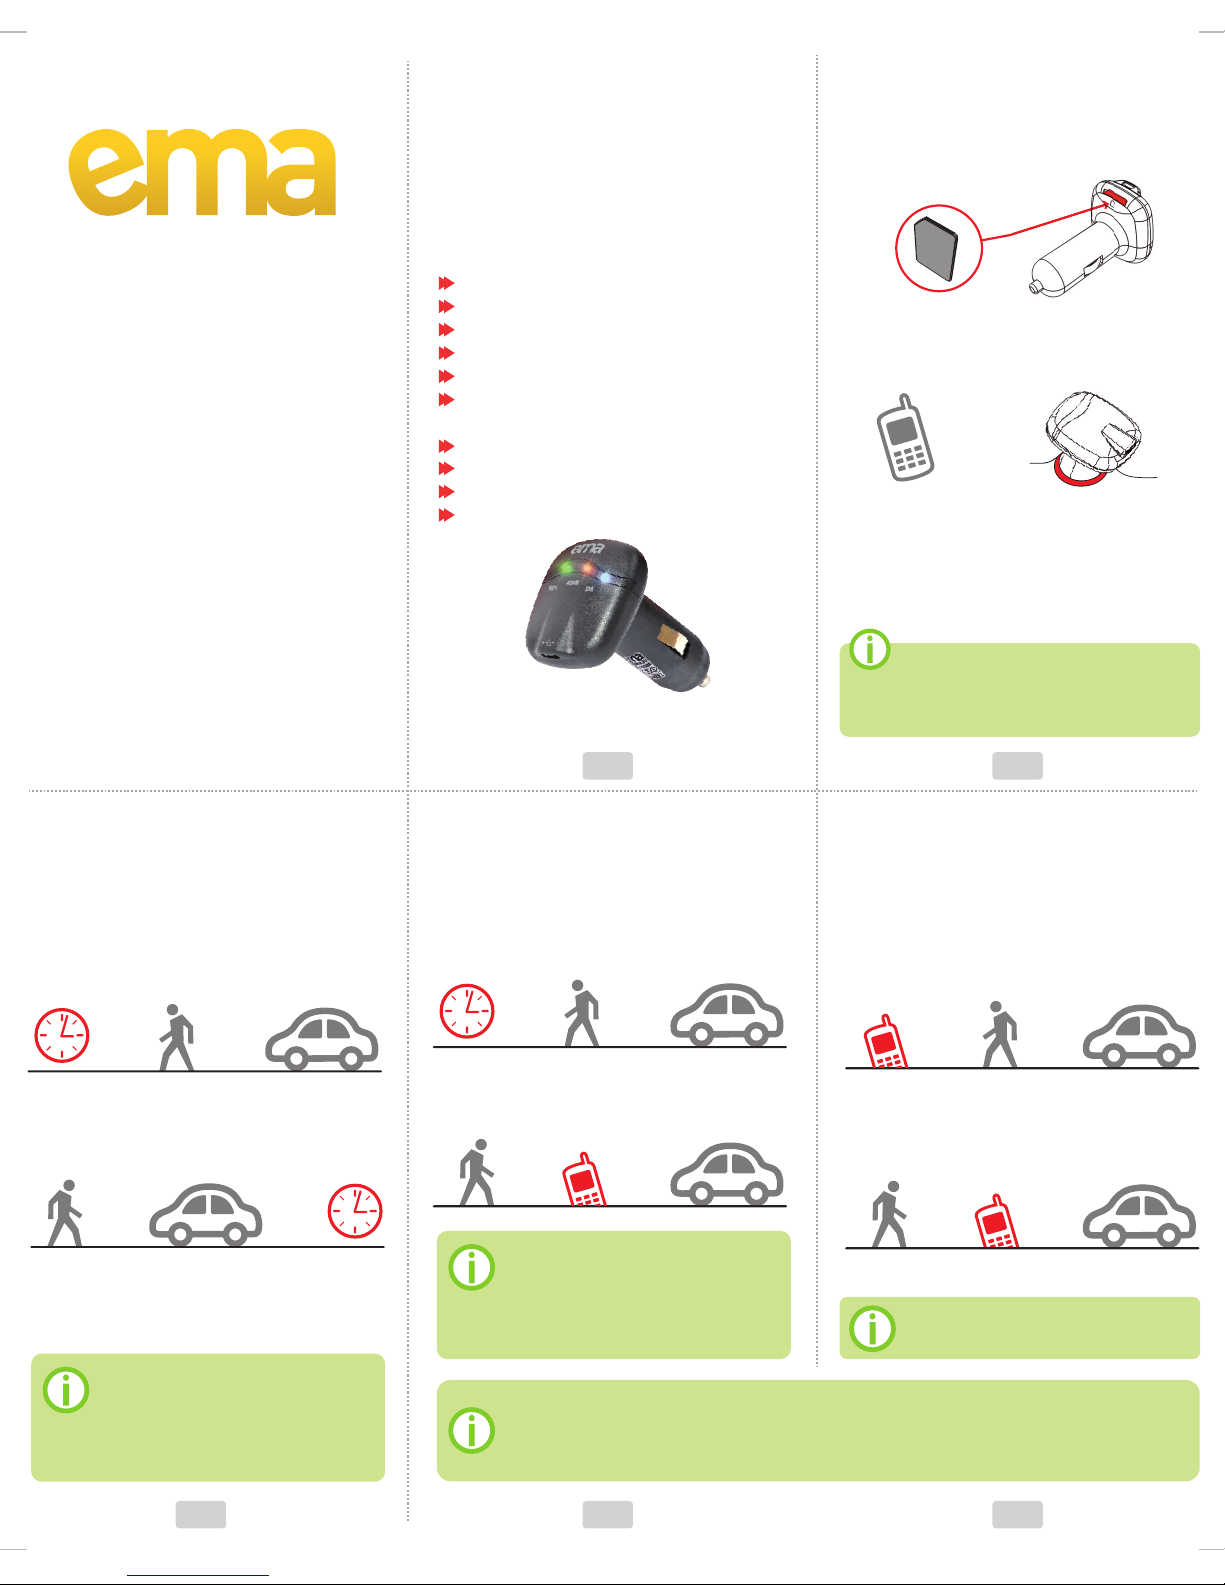
Before conguration of the alarm by the EMA cong program, EMA must be
switched on! You switch on the device by inserting the SIM card.
ARM and DISARM
The terms are commonly used in security technologies.The ARM command activates the alarm,
while the DISARM command switches o the protective mode and the alarm is not more active.
VERSION: 210212
Pacic GSM limited Auckland New Zealand | +64 9 9484762 | ema@pacicgsm.com | www.myema.co.nz

STATUS? Question about the device condition (condition, operator, signal battery, car battery voltage, BTS, number of events).
LOCATION? Question about the actual position (BTS).
HISTORY? It writes the list of alarms since the last activation.
WATCH It switches on the function of position monitoring (BTS).
ROUTE Information about the route (list of the latest BTS´s – after the commandWATCH).
DELETE ROUTE It deletes the route (list of the latest BTS.)
SLEEP It activates the function“Reduction in consumption with disconnected power supply”.
WAKE It deactivates the function“Reduction in consumption with disconnected power supply”.
LED ON LEDs are on in the active mode.
LED OFF LEDs are o in the active mode.
NUMBER1 +420123456789 It saves the phone number to Position 1.
DELETE NUMBER1 It deletes the phone number on Position 1.
NEW PASSWORD It changes the access password.
SHOCK ON It switches on the shock sensor.
SHOCK OFF It switches o the shock sensor.
SHOCK VH Shock sensor sensitivity.Very high.
SHOCK H Shock sensor sensitivity. High.
SHOCK M Shock sensor sensitivity. Medium.
SHOCK L Shock sensor sensitivity. Low.
SHOCK VL Shock sensor sensitivity.Very low.
TILT ON It switches on the inclination sensor.
TILT OFF It switches o the inclination sensor.
TILT 2.5 It sets up the inclination sensor sensitivity to 2,5°.
TILT 5 It sets up the inclination sensor sensitivity to 5°.
TILT 7.5 It sets up the inclination sensor sensitivity to 7,5°.
TILT 10 It sets up the inclination sensor sensitivity to 10°.
TILT 12.5 It sets up the inclination sensor sensitivity to 12,5°.
TILT 15 It sets up the inclination sensor sensitivity to 15°.
MICROPHONE ON It permits the tapping function.
MICROPHONE OFF It forbids the tapping function.
MICROPHONE VH Tapping volume.Very high.
MICROPHONE H Tapping volume. High.
MICROPHONE M Tapping volume. Medium.
MICROPHONE L Tapping volume. Low.
MICROPHONE VL Tapping volume. Very low.
EXT ON It permits the external sensors.
EXT OFF It forbids the external sensors.
LOCATION ON It switches on the motion monitoring. (BTS change).
LOCATION OFF It switches o the motion monitoring.(BTS change).
START ON It switches on the start-up detection. (except for the automatic activation mode).
START OFF It switches o the start-up detection.
START 0.5 It sets up the start-up sensitivity (voltage drop) to: 0.5V.
START 1.0 It sets up the start-up sensitivity (voltage drop) to: 1V.
START 1.5 It sets up the start-up sensitivity (voltage drop) to: 1.5V.
START 2.0 It sets up the start-up sensitivity (voltage drop) to: 2V.
START 2.5 It sets up the start-up sensitivity (voltage drop) to: 2.5V.
START 3.0 It sets up the start-up sensitivity (voltage drop) to: 3V.
START 3.5 It sets up the start-up sensitivity (voltage drop) to: 3.5V.
START 4.0 It sets up the start-up sensitivity (voltage drop) to: 4V.
DELETE ALL NUMBERS It deletes all set-up phone numbers
DEFAULT SETTING It renews the production set-up (incl. phone numbers and password)
012345678912345 Device IMEI code to renew the default password 1234 (within 20s upon sending this SMS, it is necessary to restart by
removing the SIM card). IMEI command to be sent without password!
ARM It activates the device (the command can be changed by PC and SW).
DISARM It deactivates the device (the command can be changed by PC and SW)
SMS commands
If you wish to change the alarm set-up and the EMA cong program is not available for you, you
can do the basic conguration using the following SMS commands:
Attention:
Before you insert your SIM card and start using the alarm device, read the enclosed
documentation carefully!
The security PIN code of the SIM card must be o.
If all LEDs do not go on after inserting the SIM card, the battery is probably discharged.
Please charge the battery using the on-board power supply connector.
To congure by PC (USB port), please insert the SIM card and charge the internal Li-Ion
battery.
Let us recommend you not to have any other phone numbers stored on the SIM card
(except for those stored by the operator).This measure allows you to accelerate the
device start-up and to shorten the time for sending an alarm message after the device
wakes-up from the stand-by mode.
After inserting the SIM card, the LEDs should go out within max. 30 seconds and the
device should be registered in the GSM network (blue GSM LED ashing). If it is not the
case, make sure whether the SIM card is inserted correctly and the corresponding GSM
signal is available on site.
When placing the EMA alarm in the car, do not expose it to the sun. If you use the
extension cable, do not place the alarm e.g. under the rear window or the windscreen.
To avoid nding the alarm device by a thief, place EMA into a drawer at the rear of the
car (if available).
If you remove the SIM card, the device switches o. In case of longer storing or
non-using, remove the SIM card.
The eective time of the internal Li-Ion battery depends on the way of its use and the
range of ambient temperature. Its eective time and number of cycles are limited. In
case you want to replace the battery or do any other repairs, please contact the
authorized service or the producer.
If you have connected the external sensor EMA-PIR (see on the other side of the sheet),
do not place it in the sun or near transmitting devices (GSM phones, radio stations). It
could cause false alarms. Recommended locations: between the front seats, under the
dashboard, under the seat.
EMA does not require any changes in the car therefore do not interfere in electrical
installation!
Lead the cable of external sensor so that you do not disturb trac security, getting on
and o and motion of persons in the car, load handling. Be sure that moving seats or
persons cannot damage the sensor cables or pull out the EMA connector.
Do not dismantle or modify the EMA alarm device and its accessories.
When in stand-by mode, the GSM module is o and EMA cannot receive any SMS
messages or reply to giving rings. It is woken-up from the stand-by mode by a raised
alarm, 12V connection (ignition switching-on) or connection to PC.
EMA changes over to the stand-by mode even if this function is not permitted. It
happens when the battery voltage drops.Thanks to the stand-by mode, the battery
eective time is extended in case of external supply disconnection..
1
2
3
4
5
6
11
12
13
14
15
16
7
8
9
10
You have to enter the password prior to the SMS command (initial password is 1234). There is a gap between
the password and the command - e.g. send the SMS message 1234 STATUS? to nd out the device status.
WARRANTY CARD
Production number:
Type of device: EMA alarm
To cut o here in case of a complaint
First name, surname (company name, registration number, business address),
permanent address of the seller:
Record on the 1st warranty repair:
Record on the 2nd warranty repair:
Record on the 3rd warranty repair:
Date of sale:
TECHNICAL SUPPORT:
VERSION: 210212
Pacic GSM limited Auckland New Zealand | +64 9 9484762 | ema@pacicgsm.com | www.myema.co.nz

Stand-by time:
Option – extension by the EMA-PIR external sensor:
Declaration of Conformity:
Service and technical support:
When using the mode “Reduction in consumption with disconnected power supply” (see EMA
cong), the battery charge can keep alive even some days in the protection mode.Without using the
mode“Reductionin consumptionwithdisconnectedpowersupply”itkeepsaliveup totwodaysafter
the last full charging, whereas it remains in the full mode for the rst approx. 12 hours, then it
changes over to the stand-by mode switching o the GSM module.The above period is not xed, it
results from the charging condition, battery condition and signal intensity on site.
The operation time depends on the battery condition, its age, and especially actual operational
temperature. In summer, the battery keeps alive for longer time, while in winter with low tempera-
tures (below zero) its eective time can be limited for some hours only. Let us recommend using the
option“Reduction in consumption with disconnected power supply”in case of long parking and in
winter – see EMA cong.
After you start-up your car (12V connection), EMA wakes-up from the stand-by mode. The set-up
sensors remain active for the entire period, even in the stand-by mode. After sensor activation, EMA
wakes up switching the GSM module on and sending a SMS message or giving an alarm ring.
Because of the battery eective time, we recommend to save one max. two phone numbers on the
list. The option to use up to six phone numbers is recommended solely for exceptional cases if the
permanent charging by 12V voltage is available.
Because the nature of the integrated shock sensor and accelerometer cannot 100 % exclude false
alarms, especially in rush streets of big cities or on crowded parking lots at shopping malls, we oer
the possibility to connect an external sensor - motion detector PIR which replies only to the motion
of persons.
It is activated only if a person enters the car.This detector can be connected to the EMA alarm device
by a USB connector, being permitted in the set-up 9 (external sensors) or in the combined detection
set-up 11 (conditioned upon shocks + a person entering the car).
The EMA-PIR sensor is a miniature device with the dimensions 25x20x20 mm. It can be fastened
anywhere in the car – we recommend to place it in the front part of the car, e.g. between the front
seats, under the dashboard etc. see www.myema.co.nz.
The FLAJZAR, s.r.o. company declares herewith that the EMA GSM alarm device complies with the
requirements of the following standards and regulations for the corresponding type of equipment:
ČSN EN 55022 - class B, ČSN EN 55024, ČSN EN 50130-4*, ČSN EN 61000-4-2 criterion A, ČSN EN
61000-4-3 criterion A, EN 301 489-1V1.8.1, EN 301 489-7 V1.3.1, EN 301 511V9.0.2, ČSN EN 60950-1,
Council Rec. 99/519/EC, ČSN EN 50131-2-2, ČSN EN 50130-5, ČSN EN 50136-1-1.
Service for the equipment is provided either by the manufacturer or by the authorized service shops.
Please ask for information at your seller or send the device with enclosed defect description and the
payment document to the following address:
Pacic GSM limited Auckland New Zealand, +64 9 9484762, ema@pacicgsm.com,
www.myema.co.nz
If you do not know how to set up the device or in case of another technical problem, do not hesitate to
contact us under ema@pacicgsm.com. Our technicians will try to help you as soon as possible.
Master device:
Most common accessories for the EMA alarm device:
Motion sensor EMA-PIR: Extension cable 12V:
GSM frequency: Quad-band 850/900/1800/1900MHz
GSM transmitting capacity: Class 1 (1W), Class 4 (2W)
Charging: 7 – 16V (on-board network 12V)/max 150mA only during recharging
Power Supply: internal Li-Ion 3,7V, capacity 320mAh
Operational temperature: -20°C to +70°C
Operational relative humidity: 35% to 85%
Storage temperature: -20°C to +80°C
USB – IN – connection to PC: 5V
USB – OUT – external sensors power supply: 3,5 – 4V / max. 5mA
Dimensions: 38x42x69mm
Detection range: 2 meters
Detection angle: 90°
Power supply: 3,5 - 4V
Current consumption: 1mA
Dimension: 25x20x20mm
Cable length: 2 meters
The EMA-PIR sensor and the extension cable 12V are intended to be connected and used solely alongside
the EMA alarm. If connected to another device, the sensor or device can be damaged. Neither the sensor
nor the extension cable 12V are a part of the delivery; they can be purchased separately.
Operational voltage: 12V
Cable length: 2m
Warranty conditions
To cut o here in case of a complaint
ThisWarranty Card is a written warranty pursuant the Consumer Guarantees Act 1993. The
warranty period starts on the day on which the customer takes over the product, on the
purchase date, which has to be mentioned as an integral part of this Warranty Card.The
device guarantee is provided within the standard legal period of 24 months.The
guarantee is provided for the product as a unit, i.e. there is no separate guarantee for any
part of the product. The guarantee is governed by valid legal rules and does not exceed
the Consumer Guarantees Act 1993.
The details concerning complaints are mentioned in the purchaser’s complaint rules. In case of damage, please lodge
a complaint about the device with your purchaser or dispatch the product to the producer’s address mentioned in the
User Manual.The up-to-date list of service shops please nd under www.myema.co.nz. When lodging a complaint,
please enclose the description of the defect, the purchase document, and the warranty card. If your device does not
work properly, please visit the website www.myema.co.nz rst, on which you can nd the up-to-date list of the most
frequent troubles and their shooting.
The guarantee cannot be acknowledged in case of:
- a damage caused by the application which is in contradiction to the operation instruction
- mechanical damage of the product
- after direct penetration of liquids and foreign agents into the device
- present acids or solvents
- negligent handling
- unsuitable storage
- operation in rash environment
- use of other accessories than those allowed by the producer
- connection to an electrical circuit with improper parameters (voltage)
- penetration of foreign objects into the device
- damage by natural elements
- malfunction of mobile operators´ network
- a failure caused by bad installation of the product
The guarantee expires in case of:
- unauthorized changes of the data in theWarranty Card
- unprofessional handling with the device including the change/modication of its software
- unprofessional repair of the device
- security seal damage
The Warranty Card must include:
- production number of the product
- type of the product
- sale conrmation (date of the sale, seal, signature and address of the seller)
Enclosure 1: EMA1 – technical and service information:
Recommended
working position
TECHNICAL SUPPORT:
VERSION: 210212
Pacic GSM limited Auckland New Zealand | +64 9 9484762 | ema@pacicgsm.com | www.myema.co.nz
ruc
c
c
c
c
c
c
c
c
c
c
c
c
c
c
c
c
c
c
c
c
c
c
c
c
c
tio
ti
i
t
t
t
t
i
ti
t
t
t
t
t
t
t
t
t
t
t
t
t
n
Security seal!
When damaged,
the guarantee expires!
Table of contents
Popular Car Alarm manuals by other brands

Audiovox
Audiovox Prestige 128-8601 owner's manual

Audiovox
Audiovox Pursuit PRO-9900 owner's manual

Fortin
Fortin EVO ONE THAR-ONE-TOY3 Electrical Wiring Manual

Crime Guard
Crime Guard 750i6 quick start guide

CLIFFORD MATRIX
CLIFFORD MATRIX 70.5X installation guide

Audiovox
Audiovox Prestige Platinum 128-4629B owner's manual

Clifford
Clifford SuperNova Auto Security SuperNova owner's manual

Avital
Avital G5103 owner's guide

Prestige
Prestige Prestige Platinum APS 600 installation manual

teko
teko Astra-Z-3245 Operation manual

Directed Electronics
Directed Electronics AM1 installation guide

Clifford
Clifford ACE 2000 installation manual