Palsonic TFTV580 User manual

PALSONIC CORPORATION PTY LTD
1 JOYNTON AVENUE
WATERLOO NSW 2017 AUSTRALIA
TEL: (02) 9313 7111
FAX: (02) 9313 7555
www.palsonic.com.au
PALSONIC CUSTOMER SERVICE
TELEPHONE
AUSTRALIA: 1300 657 888
58CM CORDLESS REMOTE LCD TELEVISION & MONITOR
MODEL: TFTV580
OWNER'S MANUAL
N111

Contents
Important Safety Precautions ..........................................................................................................
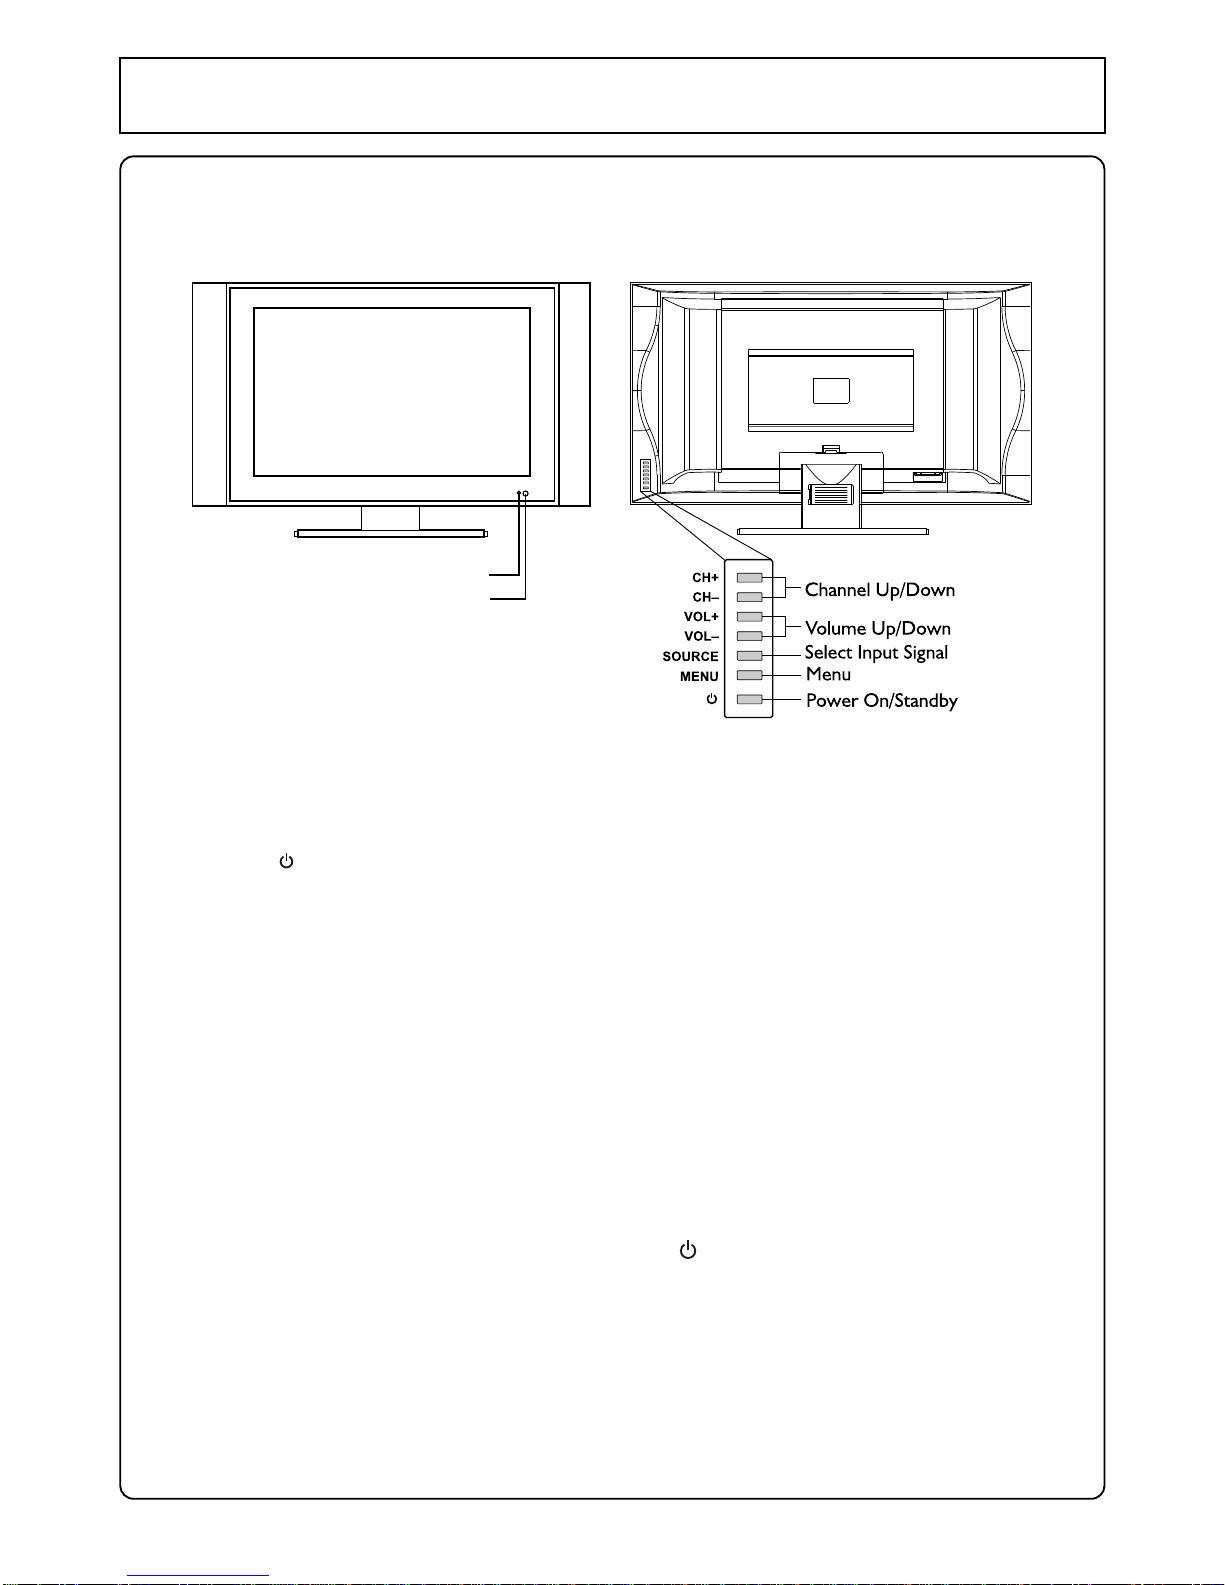
Control Panel and Back Terminals ..................................................................................................
Control Panel .........................................................................................................................
Back Terminals ......................................................................................................................
Remote Control Unit ........................................................................................................................
Installation .......................................................................................................................................
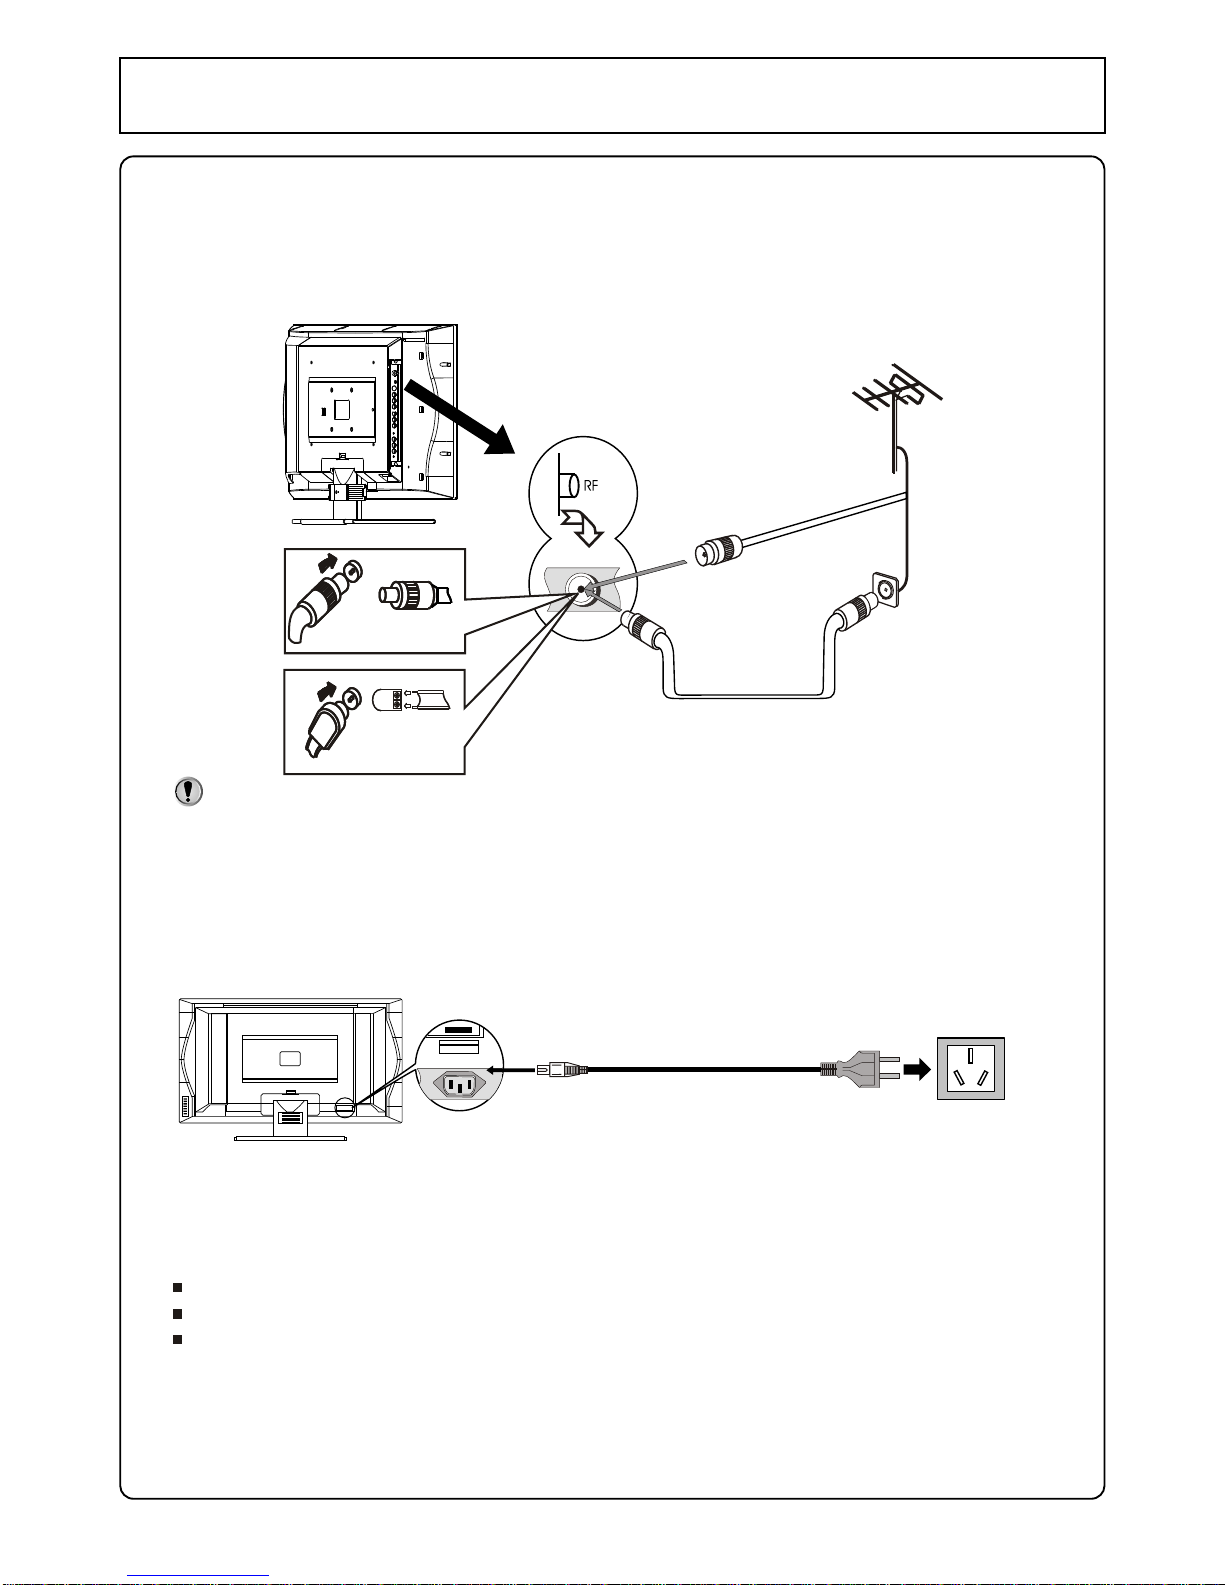
Antenna Connection ..............................................................................................................
Power Connection .................................................................................................................
Connecting External Device ..................................................................................................
Basic Operations .............................................................................................................................
Turning On .............................................................................................................................
Turning Off .............................................................................................................................
Selecting Input Signal ............................................................................................................
Menu Operations ...................................................................................................................
Setting OSD (On-Screen Display) .........................................................................................
Channel Setting ...............................................................................................................................
Auto Search ................................................................................................................................
Manual Search ......................................................................................................................
Fine Tuning ...........................................................................................................................
To Skip Unnecessary Channel ..............................................................................................
Channel Selection ...........................................................................................................................
Using Keypad Buttons ...........................................................................................................
Using CH+/- Buttons ..............................................................................................................
Using Previous Channel Button ............................................................................................
Channel Edit ..........................................................................................................................
Adjusting Picture and Sound ...........................................................................................................
Picture Adjustment ................................................................................................................
Picture Mode .........................................................................................................................
Adjusting Volume ...................................................................................................................
Muting the Sound ..................................................................................................................
Sound Mode ................................................................................................................................
Setting Sound Output ............................................................................................................
Adjusting Bass or Treble .......................................................................................................
Adjusting Balance ..................................................................................................................
Stereo/Bilingual Selection ......................................................................................................
System Setting ................................................................................................................................
Setting Blue Screen ...............................................................................................................
Setting Colour System ...........................................................................................................
Setting Sound System ...........................................................................................................
Setting scaler Mode ...............................................................................................................
Setting Sleep Timer ...............................................................................................................
Operations In RGB/YPbPr Mode ....................................................................................................
Select RGB/YPbPr Mode ......................................................................................................
PC Signal Format ..................................................................................................................
Auto Adjusting .......................................................................................................................
Adjusting Brightness/Contrast ...............................................................................................
Setting Colour Temperature ..................................................................................................
Adjusting Phase/Frequency ..................................................................................................
Adjusting Picture Position ......................................................................................................
Troubleshooting ...............................................................................................................................
Specification ....................................................................................................................................
1
4
4
5
6
8
8
8
9
13
13
13
13
13
13
14
14
14
14
14
15
15
15
15
15
16
16
16
16
16
16
17
17
17
17
18
18
18
18
18
18
19
19
19
19
19
19
20
20
21
22

Important Safety Precautions
1
Electrical energy can perform many useful functions, but it can also cause personal injuries
and property damage if improperly handled. This product has been engineered and manufactured with
the highest priority on safety. But IMPROPER USE CAN RESULT IN POTENTIAL ELECTRICAL
SHOCK OR FIRE HAZARD. In order to prevent potential danger, please observe the following
instructions when installing, operating and cleaning the product. To ensure your safety and
prolong the service life of your LCD TV product, please read the following precautions carefully
before using the product.
1. Read these instructions --- All operating instructions must be read and understood before
the product is operated.
2. Keep these instructions ---These safety and operating instructions must be kept in a safe place
for future reference.
3. Head all warnings --- All warnings on the product and in the instructions must be observed
closely.
4. Follow all instructions --- All operating instructions must be followed.
5. Do not use this apparatus near water --- for example, near a
bathtub, washbowl, kitchen sink, or laundry tub, in a wet
basement, or near a swimming pool, and the like.
Do not use immediately after moving from a low temperature
to high temperature environment, as this causes condensation,
which may result in fire, electric shock, or other hazards.
6. Clean only with dry cloth --- Unplug this product from the wall
outlet before cleaning. Do not use liquid cleaners or aerosol
cleaners. Use a damp cloth for cleaning.
7. Ventilation --- Do not block any ventilation openings. Install
in accordance with the manufacturer instructions. The vents
and other openings in the cabinet are designed for ventilation.
Do not cover or block these vents and openings since
insufficient ventilation can cause overheating and/or shorten
the life of the product. Do not place the product on a bed, sofa,
rug or other similar surface, since they can block ventilation
openings. This product is not designed for built-in installation;
do not place the product in an enclosed place such as a
bookcase or rack, unless proper ventilation is provided or the
manufacturer's instructions are followed.
8. Heat sources --- Do not install near any heat sources such as
radiators, heat registers, stoves, or other apparatus
(including amplifiers) that produce heat.
9. Grounding or Polarisation --- Do not defeat the safety purpose of the polarised or grounding-type
plug. A polarised plug has two blades with one wider than the other. A grounding type plug has two
blades and a third grounding prong. The wide blade or the third prong are provided for your safety.
If the provided plug does not fit into your outlet, consult an electrician for replacement of the
obsolete outlet. (America only)
10. Power cord protection --- Protect the power cord from being walked on or pinched particularly at
plugs, convenience receptacles, and the point where they exit from the apparatus.
11. Attachments --- Only use attachments/accessories specified by the manufacturer. Do not use
attachments not recommended by the manufacturer. Use of improper attachments can result in
accidents,

Important Safety Precautions
2
12. Stand --- Use only with the cart, stand, tripod, bracket, or table
specified by the manufacturer, or sold with the apparatus. Do not place
the product on an unstable trolley, stand, tripod or table. Placing the
product on an unstable base can cause the product to fall, resulting
in serious personal injuries as well as damage to the product. When
mounting the product on a wall, be sure to follow the manufacturer's
instructions. Use only the mounting hardware recommended by the
manufacturer.
13. Careful move --- When a cart is used, use caution when moving the
cart/apparatus combination to avoid injury from tip-over. Sudden
stops, excessive force and uneven floor surfaces can cause the
product to fall from the trolley.
14. Lightning --- Unplug this apparatus during lightning storms or when
unused for long periods of time.
For added protection for this television equipment during a lightning
storm, or when it is left unattended and unused for long periods of time,
unplug it from the wall outlet and disconnect the antenna. This will
prevent damage to the equipment due to lightning and power-line
surges.
15. Servicing --- Refer all servicing to qualified service personnel. Servicing is required when the
apparatus has been damaged in anyway, such as power-supply cord or plug is damaged, liquid has
been spilled or objects have fallen into the apparatus, the apparatus has been exposed to rain or
moisture, does not operate normally, or has been dropped.
16. Replacement parts --- In case the product needs replacement parts, make sure that the service
person uses replacement parts specified by the manufacturer, or those with the same
characteristics and performance as the original parts. Use of unauthorised parts can result in fire,
electric shock and/or other danger.
17. Overloading --- Do not overload wall outlets, extension cords, or convenience receptacles on
other equipment as this can result in a risk of fire or electric shock.
18. Entering of objects and liquids --- Never insert an object into the product through vents or
openings. High voltage flows in the product, and inserting an object can cause electric shock and/or
short internal parts. For the same reason, do not spill water or liquid on the product.
19. Damage requiring service --- If any of the following conditions occurs, unplug the power cord
from the AC outlet, and request a qualified service person to perform repairs.
a. When the power cord or plug is damaged.
b. When a liquid is spilled on the product or when objects have fallen into the product.
c. When the product has been exposed to rain or water.
d. When the product does not operate properly as described in the operating instructions.
Do not touch the controls other than those described in the operating instructions. Improper
adjustment of controls not described in the instructions can cause damage, which often requires
extensive adjustment work by a qualified technician.
e. If the product has been dropped or the cabinet has been damaged in anyway.
f. When the product displays an abnormal condition or exhibits a distinct change in performance.
Any noticeable abnormality in the product indicates that the product needs servicing.
20. Safety checks --- Upon completion of service or repair work, request the service technician to
perform safety checks to ensure that the product is in proper operating condition.
21. Wall or ceiling mounting --- When mounting the product on a wall or ceiling, be sure to install the
product according to the method recommended by the manufacturer. This is a safety feature.

Important Safety Precautions
3
22. Power source --- This product is intended to be supplied by a listed power supply indicated on the
marking label. If you are not sure of the type of power supply to your home, consult your product dealer
or local power company. For added protection for this product during a lightning storm, or when it is left
unattended and unused for long periods of time, unplug it from the wall outlet and disconnect the cable
system. This will prevent damage to the product due to lightning and power line surges. When the unit
has to be used with another power supply voltage, the power cable must be changed. Consult your
product dealer. The socket outlet should be installed near the equipment and easily accessible. Use
only the power cord designated by our dealer to ensure safety and EMC. When connecting other
products such as VCRs and personal computers, you should turn off the power of the unit for protection
against electric shock.
23. Panel protection --- The LCD panel used in this product is made of
glass. Therefore, it can break when the product is dropped or impacted
upon by other objects. Be careful not to be injured by broken glass pieces
in case the LCD panel breaks.
24. Pixel defect --- The LCD panel is a very high technology product, giving you finely detailed pictures.
Occasionally, a few non-active pixels may appear on the screen as a fixed point of blue, green or red.
Please note that this does not affect the performance of your product.
If an outside antenna is connected to the television equipment, be
sure the antenna system is grounded so as to provide some
protection against voltage surges and built-up static charges.
An outside antenna system should not be located in the vicinity of
overhead power lines or other electric light or power circuits, or
where it can collide with such power lines or circuits. When
installing an outside antenna system, extreme care should be
taken to keep from touching such power lines or circuits, as
contact with them might be fatal.

Control Panel and Back Terminals
4
Power Indicator
Remote Sensor
A blue indicator lights when the power is
on and a red indicator lights when in the
standby mode.
Control Panel
1. POWER
Press this button to turn the unit ON from STANDBY mode. Press it again to turn the set
back to STANDBY
2. MENU
Press this button to access the Menu main page
3. SOURCE
To access signal source select menu
4. VOL+/-
Press the VOL+ or VOL- button to directly increase or decrease the sound volume level;
In OSD Menu, press these buttons to adjust the value or setting of each item
5. CH+/-
Press these two buttons to directly change the TV channel;
In OSD Menu, press these buttons to choose the OSD items
Note:
Functions of VOL+/-, CH+/-, MENU, SOURCE and POWER are also provided to the remote control.
This operation manual provides a description based on operating functions with the remote control.

Control Panel and Back Terminals
5
Back Terminals
1. Antenna input
Allows you to connect cable or outdoor antenna
2. Headphone jack
3. AVI inputs (Video, Audio L, R) / S-Video input
Receive video/audio signals from external sources such as VCR or DVD player.
Receive a S-Video signal from external source such as VCR or DVD player.
4. AV2 inputs (Video, Audio L, R)
Receive video/audio signals from external sources such as VCR or DVD player.
5. AV outputs (Video, Audio L, R)
Connect to the VCR input jacks to record programs.
6. VGA input/Audio line in
Connect to the VGA/Audio output jacks on your PC equipment
7. COMPONENT inputs (Y, Pb, Pr, Audio L, R)
Connect to the audio and component output jacks of a DVD player or Set-Top Box.
AUDIO
Y
PB
PR
COMPONENT
IN
VGA
LINE
VGA IN

Remote Control Unit
6
Mute
Direct channel
selector
Channel up/down
selector
Stereo mode select
Auto correct
picture in VGA
LEFT/RIGHT button:
In the menu operation,
adjust the selected item
Access the menu
Select the input
signal source
Previous channel
Volume up/down selector
Sound mode select
Picture mode select
Display the current state
UP/DOWN button:
In menu operations,
used to select item.
Setting sleep timer
Power on/standby

Remote Control Unit
7
Batteries for the Remote Control
If the remote control fails to operate the LCD TV functions, replace the batteries in the remote control.
Open the battery cover.
Insert two size-AAA batteries.
(Place the batteries with their terminals
corresponding to the (+) and (-) indications in
the battery compartment.)
Replace the cover.
Effective range of the remote control
Notes:
1.
2.
3.
4.
5.
6.
7.
8.
When the remote control will not be used for a long
period of time or when the batteries are worn out,
remove the batteries.
Do not drop or dampen the remote control.
Do not disassemble the remote control.
There should be no obstacle between the TV and the
transmitter.
Use the remote control within the effective range
as shown in the figure on the left.
If the remote control does not work, please check
whether the batteries are exhausted or if they have
been installed properly.
When direct sunlight, and incandescent lighting,
fluorescent lamp or any other strong light shines on
the remote sensor of the TV, the remote operation
can be come erratic.
Do not mix different types of batteries in the remote.
1
2
3

Installation
8
Antenna Connection
Optimum reception of colour requires a good signal and will generally mean that an outdoor aerial
must be used. The exact type and position of the aerial will depend upon your particular area.
Note:
It is recommended that the 75-ohm coaxial cable be used to eliminate interference and
noise which may occur due to radio wave conditions.
The aerial cable should not be bundled with the power cord and the like.
Power connection
1. Connecting the female plug to the AC socket on the unit.
2. Connecting the male plug to the wall outlet as illustrated.
Note:
This illustration is for reference only. The AC plug may be different on different models.
This product should be operated only from the type of power source indicated on the marking label.
Always unplug the AC cord from power outlet when not not using for a long period of time.
AC-INPUT
AC cord Plug into AC outlet
Household
power outlet
bottom view

Installation
9
Connecting External Device
Notes about connection
1. Carefully check the terminals for position and type before making any connections.
2. Loose connectors will result in image or colour problems. Make sure that all connectors are
securely inserted into their terminals.
3. When connecting an external device, turn off the power of the main unit first to prevent any possible
damage.
4. Please refer to the instruction manual of the equipment to be connected as well.
Composite Video signal connection
Connect the composite video signal terminal on the TV to the output of AV equipment through
composite cable.
If you select the video signal, please set the input signal source of LCD-TV to AV1/AV2 mode.
Note:
Composite video signal is the most common signal, but the picture quality is not very good.
S-VIDEO Signal Connection
Connect the S-video terminal on the TV to the output of AV equipment through S-video cable.
If you select S-video signal, please set the input signal source of LCD-TV to SVIDEO mode.
To audio outputs
Note:
S-Video is a signal format which transfers the colour and bright of the picture respectively. The
picture quality is better than composite signal.
To video input
To audio outputs
To S-VIDEO output
VCR, DVD etc.
Yellow (video)
White (audio, L)
Red (audio, R)
W
Y
R
VCR, DVD etc.
W
Y
R
W
Y
R
W
Y
R
AUDIO
To audio inputs
To video output
To video input
To audio inputs
W
R
W
R
To audio inputs
To S-VIDEO input
White (audio, L)
Red (audio, R)
W
R

Installation
10
The PC input signal connection
Connect the VGA (D-Sub) signal terminal on the TV to the output of PC equipment through Min D-sub
15 pin cable as illustrated. Connect a cable, which matches the audio output terminal on the computer.
If you select PC signal, please set the input signal source of LCD-TV to RGB mode.
1. The native display resolution is 1280 768. If the signal resolution exceed the native
resolution, it may not be possible to show fine detail with sufficient clarity.
2. We strongly recommend that you set the vertical scanning frequency for PC signals
to 60Hz. If you set it above 60Hz the unit may not display correctly.
Equipment with
VGA output
Notes:
To VGA input
To audio inputTo audio output
To VGA output

Installation
11
AV OUT connection
How to connect:
Connect the video/audio output terminals on the TV set to the signal input terminals of the VCR
equipment or the video/audio input terminals on other TV set through video/audio cable.
Connect the audio output terminals on the TV set to the Audio amplifier through audio cable.
How to record the TV program:
1. Turn on the LCD TV and select program.
2. Turn on the VCR and insert the tape.
3. Press the RECORD button to begin recording.
How to enjoy high quality sound by Audio amplifier:
1. Turn the volume of the Audio amplifier to minimum.
2. Turn on the LCD TV and select program.
3. Turn on the power amplifier and adjust the volume as favourite.
To audio inputs
Audio amplifier
To video output
To video input VCR
Yellow (video)
White (audio, L)
Red (audio, R)
W
Y
R
AUDIO
W
Y
R
W
Y
R
W
R
To audio input
To audio outputs

Installation
12
YPbPr/YCbCr input connection
If the signal/source is the equipment with YPbPr/YCbCr output terminals, we recommend you to use
the YPbPr/YCbCr terminals on the equipment. Please connect it with the YPbPr/YCbCr input terminals
on the TV set for better picture quality. And connect the audio outputs of it with the corresponding
audio input terminals on the TV set.
If you select YPbPr/YCbCr signal, please set the input signal source of the LCD-TV to YPbPr mode.
DVD, STB etc.
White (audio, L)
Red (audio, R/Pr)
Green (Y)
Blue (Pb)

Basic Operations
13
Turning On
Connect the Power correctly.
The indicator lights up, the unit is in STANDBY mode.
Press the POWER ( ) button on the remote control or on the unit to turn on the TV set.
Turning Off
With the power on, press the POWER ( ) button to turn off the TV and the TV is in STANDBY mode.
If you want to turn off the power completely, unplug the power cord from the wall outlet.
Notes:
The unit automatically goes to STANDBY mode by:
A. Without input signal for about 15 minutes ( the Blue Screen should be
set to On in advance)
B. Sleep timer function (needs to be set in advance).
Selecting Input Signal
Press the SOURCE button on the unit or button on the remote control.
The screen displays the menu as shown on the right.
Press UP/DOWN to highlight your desired input signal source. Press LEFT/RIGHT
or wait for about 4 seconds and the desired signal source will be selected.
Menu Operations
Press MENU to display menu page.
Press LEFT/RIGHT to select menu page.
Press DOWN to access sub-menu.
Press UP/DOWN to select menu item.
Press LEFT/RIGHT to adjust the selected item.
Setting OSD ( On-Screen Display)
From the OSD menu page, you may set OSD language, OSD position, OSD
background and OSD timeout.
Setting OSD language: From the OSD menu page, press UP/DOWN to
select language item. Press LEFT/RIGHT to select a desired OSD
language.
Setting OSD position: From the OSD menu page, press UP/DOWN to
select OSD position item. Press LEFT/RIGHT to select a desired OSD
position.
Setting OSD background: From the OSD menu page, press UP/DOWN to select OSD background
item. Press LEFT/RIGHT to select opaque or translucent.
Setting OSD timeout: From the OSD menu page, press UP/DOWN to select OSD timeout item.
Press LEFT/RIGHT to toggle between 5, 10, 15, ..., 55, 60 seconds.
Note:
To clearly introduce the menu operations, this operating manual provides a description based on
operation with the remote control.
1
2
1
2
3
1
2
3
4
1
2
brightness
contrast
color
sharpness
tint
50
50
16
32
0
language
OSD position
OSD background opaque translucent
OSD timeout
English
30 seconds

Channel Setting
14
There are two ways to preset channels: to preset channels automatically and to preset channels
manually. Below we will describe how to preset the channels by making use of the menu.
Auto Search
Access Channel Setting menu.
Press UP/DOWN button repeatedly to highlight auto search item.
Press LEFT/RIGHT to start Auto Search.
All active channels will be preset and stored into the memory
automatically.
During the process of Auto Search, pressing MENU will stop the process.
Manual Search
If Auto Search can not preset the desired channels, or you want to preset the desired channels one
by one with the preferred channel numbers, please make use of Manual Search.
Use channel select buttons to select a channel number.
Access Channel Setting menu.
Press UP/DOWN button repeatedly to highlight manual search item
and press RIGHT to enter.
Press LEFT/RIGHT button to perform the searching.
When a channel is located, the searching stops, this channel is then
memorised with the preset channel number.
Fine Tuning
Fine tuning is not necessary under normal conditions. However, in area of
inferior broadcast conditions where adjustment is necessary for a better
picture and sound, use Fine tuning.
Access the Channel Setting menu.
Press UP/DOWN button repeatedly to highlight fine tune item.
Press LEFT/RIGHT to fine tune to achieve best picture and sound.
To Skip Unnecessary Channel
After presetting the channels, you can skip unnecessary channels so that only the channels you
want to watch are selected when you press the CH+/- to change channels.
Select the channel number which you want to skip using the keypad.
Access the Channel Setting menu.
Press UP/DOWN to select skip item.
Press LEFT/RIGHT to select on.
Now when you press CH+/- to change channels, this channel will be
skipped.
If you want to resume a skipped channel, use the keypad buttons to enter the channel, then
access the Channel Setting menu and select skip, press LEFT/RIGHT to set skip off. When
you press CH+/- to change channels, the channel will be present.
1
2
3
1
2
3
1
2
3
1
2
3
4
4
VHFH Searching 20
65MHz
channel number
skip
manual search
auto search
fine tune
channel edit
off on
9
VHFH Searching 9
65MHz
channel number
skip
manual search
auto search
fine tune
channel edit
off on
9
VHFH Fine Tuning 22
75MHz
channel number
skip
manual search
auto search
fine tune
channel edit
off on
9
channel number
skip
manual search
auto search
fine tune
channel edit
off on
9

Channel Selection
15
Using Keypad Buttons
To select one-digit channel numbers:
Input the channel using the 0-9 number button, then wait for about 2 seconds.
To select two-digit channel numbers:
Press -/-- button to display --, then input the channel using the 0-9 number button.
To select three-digit channel numbers:
Press -/-- button to display ---, then input the channel using the 0-9 number button.
Note: The period between presses should be within 2 seconds.
Using CH+/- Buttons
Press CH+ button, the channel number increases;
Press CH- button, the channel number decreases.
Note: When you press CH+ or CH-, the unit cycles among those channels which are memorised
during auto search.
Using Previous Channel Button
Press button to switch between the current channel and previous channel.
Channel Edit
You can edit the channel programs in your favourite order.
Access the Channel Setting menu.
Press UP/DOWN to select channel edit. Press RIGHT to enter into
the sub-menu.
Press UP/DOWN to select current channel, press LEFT/RIGHT to
select a current channel number.
Press DOWN to select exchange to, press LEFT/RIGHT to select
a target channel number.
Press DOWN to select exchange channel, press LEFT/RIGHT then
these two channels' contents are exchanged.
Repeat the above steps to edit the programs in your favourite order.
1
2
3
1
2
1
2
3
4
5
channel number
skip
manual search
auto search
fine tune
channel edit
off on
9
current channel
exchange to
exchange channel
9
17

Adjusting Picture and Sound
16
Picture Adjustment
Access Picture Setting menu by pressing MENU button.
Press UP/DOWN to select the item that you want to adjust.
Press LEFT/RIGHT to adjust selected item.
Picture Mode
You can select picture mode by P.MODE button.
There are four picture modes: bright, nature, soft and user.
Adjusting Volume
Press VOL+/- to adjust volume. Press VOL+ button, the volume
increases. Press VOL- button, the volume decreases.
Muting the Sound
You can press the button on the remote control to mute the sound.
Press the button again to restore. You can also press VOL+ to restore the sound.
Sound Mode
You can select sound mode by S.MODE button.
There are four sound modes: movie, music, news and user.
1
2
3
Note: Tint is only for NTSC system.
To adjust picture's brightness
To adjust picture's contrast
To adjust picture's colour
To adjust pictures sharpness
To adjust picture's tint
0-100
0-100
0-32
0-63
-32-+31
Function Range
brightness
contrast
color
sharpness
Tint*
Item
soft
user
bright Nature
brightness
contrast
color
sharpness
tint
50
50
16
32
0
news
user
movie Music

Adjusting Picture and Sound
17
Setting Sound Output
Access Audio Setting menu.
Press UP/DOWN to select sound output item.
Press LEFT/RIGHT to select speaker, earphone or speaker + earphone.
Adjusting Bass or Treble
Access Audio Setting menu.
Press UP/DOWN to select bass or treble item.
Press LEFT/RIGHT to adjust.
Adjusting Balance
Access Audio Setting menu.
Press UP/DOWN to select balance item.
Press LEFT/RIGHT to adjust balance.
1
2
3
1
2
3
1
2
3
Stereo/Bilingual Selection
You can quickly select sound multiplex mode by using the STEREO button on the remote control.
NICAM Broadcast Selection
This enables the selection of the reception mode when receiving a NICAM signal. To let you enjoy
NICAM broadcasting, this TV set receives NICAM system stereo, bilingual, and monaural broadcasts.
Stereo
When the TV set is receiving a stereo broadcast, press the STEREO button to select NICAM
STEREO or MONO. When MONO is selected, the TV sound is output monaurally.
Bilingual
When the TV set is receiving a bilingual program, press the STEREO button to select NICAM A,
NICAM B or MONO.
IGR (German stereo system) Broadcasts
This enables the selection of the reception mode when receiving an IGR signal. To let you enjoy
IGR broadcasting, this TV set receives IGR system stereo and bilingual broadcasts.
Stereo
When the TV set is receiving a stereo broadcast, press the STEREO button to select FM STEREO
or MONO. When MONO is selected, the TV sound is output monaurally.
Bilingual
When the TV set is receiving bilingual program, press the STEREO button to select FM A or FM B
or MONO.
sound output
bass
treble
balance
0
0
0
Speaker
sound output
bass
treble
balance
0
0
0
Speaker
sound output
bass
treble
balance
0
0
0
Speaker

System Setting
18
blue screen
scaler mode
color sys.
sound sys.
sleep time
on off
fill all
Auto
B/G
10 minutes
Setting Blue Screen
Access System Setting menu.
Press UP/DOWN to select blue screen item.
Press LEFT/RIGHT to select on or off.
If you set this item to on, the unit displays a blue screen when there is
no input signal.
Note:
Only when the Blue Screen is On, the set will turn off automatically after 15 minutes if there is no
input signal (in TV or AV mode).
Setting Color System
Access System Setting menu.
Press UP/DOWN to select color sys. item.
Press LEFT/RIGHT to select a proper colour system. Normally, please
set the color system to auto.
Setting Sound System
Access System Setting menu.
Press UP/DOWN to select sound sys. item.
Press LEFT/RIGHT to select a proper sound system.
Setting scaler mode
Access System Setting menu.
Press UP/DOWN to select scaler mode item.
Press LEFT/RIGHT to select fill all or 16:9 aspect ratio.
Setting Sleep Timer
Access System Setting menu.
Press UP/DOWN to select sleep time item.
Press LEFT/RIGHT to adjust the sleep time.
You may quickly select a sleep time by using the SLP button on the
remote control. When the presetting time is elapsed, the set will auto
turn off and be in standby mode.
1
2
3
1
2
3
1
2
3
1
2
3
1
2
3
blue screen
scaler mode
color sys.
sound sys.
sleep time
on off
fill all
Auto
B/G
10 minutes
blue screen
scaler mode
color sys.
sound sys.
sleep time
on off
fill all
Auto
B/G
10 minutes
blue screen
scaler mode
color sys.
sound sys.
sleep time
on off
fill all
Auto
B/G
10 minutes
blue screen
scaler mode
color sys.
sound sys.
sleep time
on off
fill all
Auto
B/G
10 minutes
This manual suits for next models
1
Table of contents
Other Palsonic Flat Panel TV manuals