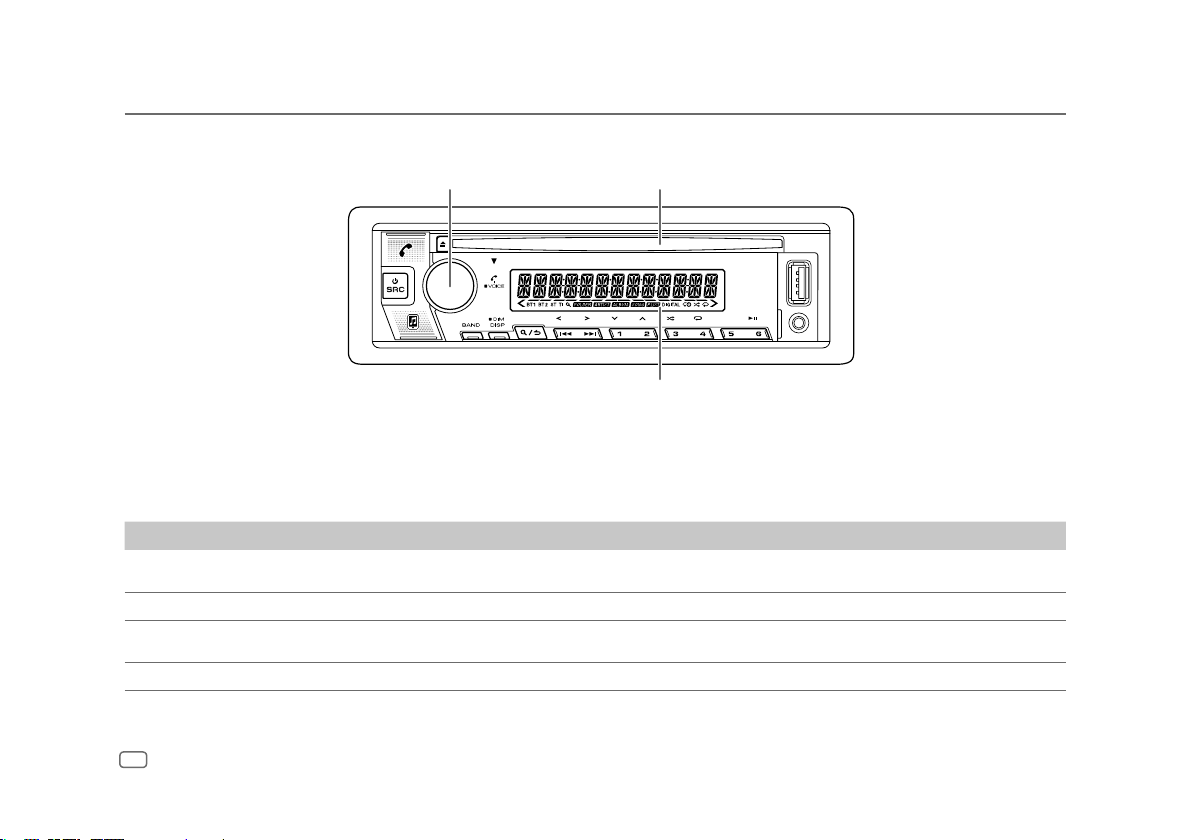
Pana-Pacific ALLIANCE ABP N54B CP137WK User manual

Brought to market by Pana-Pacic, Inc.
ABP N54B CP137WK
AM/FM CD PLAYER WITH BLUETOOTH
INSTRUCTION MANUAL
LECTEUR CD AM/FM AVEC BLUETOOTH
MODE D’EMPLOI
REPRODUCTOR DE CD CON AM/FM Y BLUETOOTH
MANUAL DE INSTRUCCIONES

2ENGLISH
$POUFOUT
Before Use................................................................................................. 3
Basics ......................................................................................................... 4
Getting Started ........................................................................................ 5
1 Set the clock and date
2 Set the other optional settings
Radio .......................................................................................................... 6
CD/USB/iPod............................................................................................. 7
Spotify ..................................................................................................... 10
AUX........................................................................................................... 11
Bluetooth® ..............................................................................................1
Bluetooth – Connection
Bluetooth – Mobile phone
Bluetooth – Audio
Audio Settings ........................................................................................1
Display Settings .....................................................................................2
Installation/Connection .......................................................................2
References ..............................................................................................2
More information
Change the display information
Troubleshooting....................................................................................2
Specifications .........................................................................................

ENGLISH 3
#FGPSF6TF
*.1035"/5
r 5PFOTVSFQSPQFSVTFQMFBTFSFBEUISPVHIUIJTNBOVBMCFGPSFVTJOHUIJT
QSPEVDU*UJTFTQFDJBMMZJNQPSUBOUUIBUZPVSFBEBOEPCTFSWF8BSOJOHTBOE
$BVUJPOTJOUIJTNBOVBM
r 1MFBTFLFFQUIFNBOVBMJOBTBGFBOEBDDFTTJCMFQMBDFGPSGVUVSFSFGFSFODF
8"3/*/(
r Do not operate any function that takes your attention away from safe
driving.
$"65*0/
Volume setting:
r "EKVTUUIFWPMVNFTPUIBUZPVDBOIFBSTPVOETPVUTJEFUIFDBSUPQSFWFOU
BDDJEFOUT
r -PXFSUIFWPMVNFCFGPSFQMBZJOHEJHJUBMTPVSDFTUPBWPJEEBNBHJOHUIF
TQFBLFSTCZUIFTVEEFOJODSFBTFPGUIFPVUQVUMFWFM
General:
r "WPJEVTJOHUIFFYUFSOBMEFWJDFJGJUNJHIUIJOEFSTBGFESJWJOH
r .BLFTVSFBMMJNQPSUBOUEBUBIBTCFFOCBDLFEVQ8FTIBMMCFBSOP
SFTQPOTJCJMJUZGPSBOZMPTTPGSFDPSEFEEBUB
r /FWFSQVUPSMFBWFBOZNFUBMMJDPCKFDUTTVDIBTDPJOTPSNFUBMUPPMTJOTJEF
UIFVOJUUPQSFWFOUBTIPSUDJSDVJU
r *GBEJTDFSSPSPDDVSTEVFUPDPOEFOTBUJPOPOUIFMBTFSMFOTFKFDUUIFEJTD
BOEXBJUGPSUIFNPJTUVSFUPFWBQPSBUF
5IJTTZNCPMPOUIFQSPEVDUNFBOTUIFSFBSFJNQPSUBOU
PQFSBUJOHBOENBJOUFOBODFJOTUSVDUJPOTJOUIJTNBOVBM
#FTVSFUPDBSFGVMMZSFBEJOTUSVDUJPOTJOUIJTNBOVBM
)PXUPSFBEUIJTNBOVBM
r 5IFEJTQMBZTTIPXOJOUIJTNBOVBMBSFFYBNQMFTVTFEUPQSPWJEFDMFBS
FYQMBOBUJPOTPGUIFPQFSBUJPOT'PSUIJTSFBTPOUIFZNBZCFEJGGFSFOU
GSPNUIFBDUVBMEJTQMBZT
r 0QFSBUJPOTBSFFYQMBJOFENBJOMZVTJOHCVUUPOTPOUIFGBDFQMBUF
r &OHMJTIJOEJDBUJPOTBSFVTFEGPSUIFQVSQPTFPGFYQMBOBUJPO:PVDBO
TFMFDUUIFEJTQMBZMBOHVBHFGSPNUIF
[FUNCTION]
menu. (Page6)
r
[XX]
JOEJDBUFTUIFTFMFDUFEJUFNT
r(PageXX) indicates references are available on the stated page.

4ENGLISH
#BTJDT
To On the faceplate
5VSOPOUIFQPXFS 1SFTTB43$
r 1SFTTBOEIPMEUPUVSOPGGUIFQPXFS
"EKVTUUIFWPMVNF 5VSOUIFWPMVNFLOPC
4FMFDUBTPVSDF r 1SFTTB43$SFQFBUFEMZ
r 1SFTTB43$UIFOUVSOUIFWPMVNFLOPCXJUIJOTFDPOET
$IBOHFUIFEJTQMBZJOGPSNBUJPO 1SFTT%*41SFQFBUFEMZ1BHF
'BDFQMBUF
7PMVNFLOPC -PBEJOHTMPU
%JTQMBZXJOEPX
* Only for illustration purpose.

ENGLISH 5
(FUUJOH4UBSUFE
4FUUIFDMPDLBOEEBUF
Press the volume knob to enter
[FUNCTION]
.
Turn the volume knob to select
[CLOCK]
, then press the knob.
To adjust the clock
Turn the volume knob to select
[CLOCKADJUST]
, then press the knob.
Turn the volume knob to make the settings, then press the knob.
Set the time in the order of “Hour” i.JOVUFu
Turn the volume knob to select
[CLOCK FORMAT]
, then press the knob.
Turn the volume knob to select
[12H]
or
[24H]
, then press the knob.
To set the date
Turn the volume knob to select
[DATEFORMAT]
, then press the knob.
Turn the volume knob to select
[DD/MM/YY]
or
[MM/DD/YY]
, then press
the knob.
Turn the volume knob to select
[DATESET]
, then press the knob.
Turn the volume knob to make the settings, then press the knob.
4FUUIFEBUFJOUIFPSEFSPGi%BZu i.POUIu i:FBSuPSi.POUIu i%BZu
i:FBSu
Press and hold to exit.
5PSFUVSOUPUIFQSFWJPVTTFUUJOHJUFNQSFTT
4FUUIFPUIFSPQUJPOBMTFUUJOHT
:PVDBOPOMZTFUUIFGPMMPXJOHJUFNTXIJMFUIFVOJUJTJO45"/%#:TPVSDF
Press BSRC repeatedly to enter STANDBY.
Press the volume knob to enter
[FUNCTION]
.
Turn the volume knob to select an item (see the following table), then
press the knob.
Repeat step 3 until the desired item is selected or activated.
Press and hold to exit.
5PSFUVSOUPUIFQSFWJPVTTFUUJOHJUFNQSFTT
Default: [XX]
[AUDIO CONTROL]
[SWITCH PREOUT] [REAR]/[SUB-W]: Selects whether rear speakers or a subwoofer are
connected to the line out terminals on the rear (through an external
amplifier). (Page 25)
[TUNER SETTING]
[PRESET TYPE] [NORMAL]: Memorizes one station for each preset button in each band
(FM1/FM2/FM3/AM). ; [MIX]: Memorizes one station for each preset
button, regardless of the selected band.
[SYSTEM]
[KEY BEEP] [ON]: Activates the keypress tone. ; [OFF]: Deactivates.

6ENGLISH
[SOURCE SELECT]
[SPOTIFY SRC] [ON]: Enables SPOTIFY/SPOTIFY BT in source selection. ;
[OFF]: Disables. (Page 10)
[BT AUDIO SRC] [ON]: Enables BT AUDIO in source selection. ;
[OFF]: Disables. (Page
)
[BUILT-IN AUX] [ON]: Enables AUX in source selection. ; [OFF]: Disables. (Page 11)
[CD READ] [1]: Automatically distinguishes between audio file disc and music CD. ;
[2]: Forces to play as a music CD. No sound can be heard if an audio file
disc is played.
[F/W UPDATE]
[UPDATE SYSTEM]
[F/W UP xxxx] (This feature is not available for this model.)
[YES]: Starts upgrading the firmware. ; [NO]: Cancels (upgrading is not
activated).
• Once you have upgraded the firmware, you are unable to downgrade
the firmware.
[FACTORY RESET] [YES]: Resets the settings to default (except the stored station). ;
[NO]: Cancels.
[ENGLISH] Select the display language for [FUNCTION] menu and music
information if applicable.
By default, [ENGLISH] is selected.
[ESPANOL]
[FRANCAIS]
(FUUJOH4UBSUFE 3BEJP
r i45uJOEJDBUPSMJHIUTVQXIFOSFDFJWJOHBO'.TUFSFPCSPBEDBTUXJUI
TVGGJDJFOUTJHOBMTUSFOHUI
r 5IFVOJUTXJUDIFTUP'.BMBSNBVUPNBUJDBMMZXIFOSFDFJWJOHBOBMBSN
TJHOBMGSPN'.CSPBEDBTU
4FBSDIGPSBTUBUJPO
Press BSRC repeatedly to select RADIO.
Press BAND repeatedly to select FM1/FM2/FM3/AM.
Press S/ Tto search for a station.
:PVDBOTUPSFVQUPTUBUJPOTGPS'.BOETUBUJPOTGPS".
r To store a station:1SFTTBOEIPMEPOFPGUIFOVNCFSCVUUPOTUP
r To select a stored station:
1SFTTPOFPGUIFOVNCFSCVUUPOTUP
0UIFSTFUUJOHT
Press the volume knob to enter
[FUNCTION]
.
Turn the volume knob to select an item (page 7), then press the
knob.
Repeat step 2 until the desired item is selected/activated or follow the
instructions stated on the selected item.
Press and hold to exit.
5PSFUVSOUPUIFQSFWJPVTTFUUJOHJUFNQSFTT

ENGLISH 7
Default: [XX]
[TUNER SETTING]
[SEEK MODE] Selects the searching method for
S
/
T
buttons when pressed.
[AUTO1]: Automatically search for a station. ; [AUTO2]: Search for a preset
station. ; [MANUAL]: Manually search for a station.
[AUTO MEMORY] [YES]: Automatically starts memorizing 6 stations with good reception. ;
[NO]: Cancels.
• Selectable only if [NORMAL] is selected for [PRESET TYPE]. (Page 5)
[MONO SET] [ON]: Improves the FM reception, but the stereo effect will be lost. ;
[OFF]: Cancels.
[TI] [ON]: Allows the unit to temporarily switch to Traffic Information if
available (“TI” indicator lights up). ; [OFF]: Cancels.
[PTY SEARCH] Select the available Program Type (see the following), then press
S
/
T
to start.
[CLOCK]
[TIME SYNC] [ON]: Synchronizes the unit’s time to the Radio Broadcast Data System
station time. ; [OFF]: Cancels.
r
[MONO SET]
[TI]
[PTY SEARCH]
JTTFMFDUBCMFPOMZXIFOUIFCBOEJT'.'.
'.
r *GUIFWPMVNFJTBEKVTUFEEVSJOHSFDFQUJPOPGUSBGGJDJOGPSNBUJPOPSOFXT
CVMMFUJOUIFBEKVTUFEWPMVNFJTNFNPSJ[FEBVUPNBUJDBMMZ*UXJMMCFBQQMJFE
UIFOFYUUJNFUSBGGJDJOGPSNBUJPOPSOFXTCVMMFUJOJTUVSOFEPO
r 1SPHSBN5ZQF
[SPEECH]
[NEWS]
[INFORM]
JOGPSNBUJPO
[SPORTS]
[TALK]
[LANGUAGE]
[REL TALK]
SFMJHJPVTUBML
[PERSNLTY]
QFSTPOBMJUZ
[PUBLIC]
[COLLEGE]
[HABL ESP]
TQBOJTIUBML
[WEATHER]
[MUSIC]
[ROCK]
[CLS ROCK]
DMBTTJDSPDL
[ADLT HIT]
BEVMUIJUT
[SOFT RCK]
TPGUSPDL
[TOP 40]
[COUNTRY]
[OLDIES]
[SOFT]
[NOSTALGA]
OPTUBMHJB
[JAZZ]
[CLASSICL]
(classical),
[R & B]
SIZUINBOECMVFT
[SOFT R&B]
TPGUSIZUINBOE
CMVFT
[REL MUSC]
SFMJHJPVTNVTJD
[MUSC ESP]
TQBOJTINVTJD
[HIP HOP]
3BEJP $%64#J1PE
*OTFSUBEJTD
Eject disc Label side
5IFTPVSDFDIBOHFTUP$%BVUPNBUJDBMMZBOEQMBZCBDLTUBSUT
$POOFDUB64#EFWJDF
USB device
USB input terminal USB cable*
(commercially available)
5IFTPVSDFDIBOHFTUP64#BVUPNBUJDBMMZBOEQMBZCBDLTUBSUT
* Do not leave the cable inside the
WFIJDMF
when not in use.
$POOFDUBOJ1PEJ1IPOF
USB input terminal
Accessory of the iPod/iPhone*
iPod/iPhone
5IFTPVSDFDIBOHFTUPJ1PE64#BVUPNBUJDBMMZBOEQMBZCBDLTUBSUT
rYou can also connect iPod/iPhone via Bluetooth. (Page1
* Do not leave the cable inside the
WFIJDMF
when not in use.

8ENGLISH
$%64#J1PE
'PSQMBZBCMFBVEJPGJMFTFFi1MBZBCMFGJMFTuPOQBHF
To On the faceplate
1MBZCBDLQBVTF 1SFTTIW
3FWFSTF'BTUGPSXBSE 1SFTTBOEIPMEST
4FMFDUBUSBDLGJMF 1SFTTST
4FMFDUBGPMEFS 1SFTT
3FQFBUQMBZ 1SFTT SFQFBUFEMZ
[TRACK REPEAT]
[ALL REPEAT]
"VEJP$%
[FILE REPEAT]
[FOLDER REPEAT]
[ALL REPEAT]
.1
8."""$8"7'-"$GJMF
[REPEAT ONE]
[REPEAT ALL]
[REPEAT OFF]
J1PE
3BOEPNQMBZ 1SFTT SFQFBUFEMZ
[DISCRANDOM]
[RANDOM OFF]
"VEJP$%
[FOLDERRANDOM]
[RANDOM OFF]
.18."""$
8"7'-"$GJMF
[SHUFFLE ON]
[SHUFFLE OFF]
J1PE
1SFTTBOEIPME UPTFMFDU
[ALL RANDOM]
*1 For CD: Only for MP3/WMA/AAC files. This does not work for iPod.
*2 For iPod: Applicable only when [MODE OFF] is selected.
4FMFDUNVTJDESJWF
While in USB source, press 5 repeatedly.
4UPSFETPOHTJOUIFGPMMPXJOHESJWFXJMMCFQMBZFECBDL
r 4FMFDUFEJOUFSOBMPSFYUFSOBMNFNPSZPGBTNBSUQIPOF.BTT4UPSBHF
$MBTT
r 4FMFDUFEESJWFPGBNVMUJQMFESJWFEFWJDF5IJTVOJUDBOTVQQPSUNVMUJQMF
ESJWFEFWJDFPGVQUPESJWFT)PXFWFSUIJTVOJUNBZUBLFTPNFUJNFUP
SFBEJGUISFFPSNPSFDBSETBSFDPOOFDUFE
:PVDBOBMTPTFMFDUUIFNVTJDESJWFGSPNUIF
[FUNCTION]
NFOV
Press the volume knob to enter
[FUNCTION]
.
Turn the volume knob to select
[USB]
, then press the knob.
Turn the volume knob to select
[MUSIC DRIVE]
, then press the knob.
Turn the volume knob to select
[DRIVE CHANGE]
, then press the knob.
5IFOFYUESJWF
[DRIVE 1]
UP
[DRIVE 4]
JTTFMFDUFEBVUPNBUJDBMMZBOE
QMBZCBDLTUBSUT
Repeat step 1 to step 4 to select the following drives.
Press and hold to exit.
5PSFUVSOUPUIFQSFWJPVTTFUUJOHJUFNQSFTT
4FMFDUDPOUSPMNPEF
While in iPodUSB source (or iPodBT source), press 5 repeatedly.
[MODE ON]
$POUSPMJ1PEJ1IPOFVTJOHUIFJ1PEJ1IPOFJUTFMG)PXFWFSZPV
DBOTUJMMQFSGPSNQMBZQBVTFGJMFTLJQGBTUGPSXBSEPSGBTUSFWFSTF
GSPNUIJTVOJU
[MODE OFF]
$POUSPMJ1PEJ1IPOFGSPNUIJTVOJU

ENGLISH 9
4FMFDUBGJMFUPQMBZ
'SPNBGPMEFSPSMJTU
r 'PSJ1PEBQQMJDBCMFPOMZXIFO
[MODE OFF]
JTTFMFDUFE1BHF
Press .
Turn the volume knob to select a folder/list, then press the knob.
Turn the volume knob to select a file, then press the knob.
4FMFDUFEGJMFTUBSUTQMBZJOH
2VJDLTFBSDI
(applicable only for CD source and USB source)
*GZPVIBWFNBOZGJMFTZPVDBOTFBSDIUISPVHIUIFNRVJDLMZ
Press .
Turn the volume knob to select a folder/list, then press the knob.
Turn the volume knob quickly to browse through the list quickly.
Turn the volume knob to select a file, then press the knob.
4FMFDUFEGJMFTUBSUTQMBZJOH
4LJQTFBSDI
(applicable only for iPod USB source and iPod BT source)
*GZPVIBWFNBOZGJMFTJOUIFTFMFDUFEMJTUZPVDBOQFSGPSNUIFGPMMPXJOHUP
TFBSDIGPSBGJMFCZTLJQQJOHUISPVHIUIFMJTUBUBSBUFTFMFDUFEJO
[SKIP SEARCH]
r 'PSJ1PEBQQMJDBCMFPOMZXIFO
[MODE OFF]
JTTFMFDUFE1BHF
Press .
Turn the volume knob to select a list, then press the knob.
Press S/ Tto search at a preset skip search ratio.
r 1SFTTJOHBOEIPMEJOHSTTFBSDIFTBUBSBUJPJSSFHBSEMFTTPG
UIF
[SKIP SEARCH]
TFUUJOHT
Turn the volume knob to select a file, then press the knob.
4FMFDUFEGJMFTUBSUTQMBZJOH
[SKIP SEARCH] setting
Press the volume knob to enter
[FUNCTION]
.
Turn the volume knob to select
[USB]
, then press the knob.
Turn the volume knob to select
[SKIP SEARCH]
, then press the knob.
Turn the volume knob to select the skip search ratio, then press the
knob.
[0.5%]
EFGBVMU
[1%]
[5%]
[10%]
5IFTLJQTFBSDISBUJPJTTIPXOBTBQFSDFOUBHFPGUIFUPUBMGJMFT
Press and hold to exit.
"MQIBCFUTFBSDI
(applicable only for iPod USB source and iPod BT source)
:PVDBOTFBSDIGPSBGJMFBDDPSEJOHUPUIFGJSTUDIBSBDUFS
r 'PSJ1PEBQQMJDBCMFPOMZXIFO
[MODE OFF]
JTTFMFDUFE1BHF
Press .
Turn the volume knob to select a list, then press the knob.
Turn the volume knob quickly to enter character search.
Turn the volume knob to select the character.
r 4FMFDUiuUPTFBSDIGPSBDIBSBDUFSPUIFSUIBO"UP;UP
Press S/ Tto move to the entry position.
r :PVDBOFOUFSVQUPDIBSBDUFST
Press the volume knob to start searching.
Turn the volume knob to select a file, then press the knob.
4FMFDUFEGJMFTUBSUTQMBZJOH
r 5PSFUVSOUPUIFSPPUGPMEFSGJSTUGJMFUPQNFOVQSFTT/PUBQQMJDBCMFGPS
#5"6%*0TPVSDF
r 5PSFUVSOUPUIFQSFWJPVTTFUUJOHJUFNQSFTT
r 5PDBODFMQSFTTBOEIPME
$%64#J1PE

10 ENGLISH
4QPUJGZ
:PVDBOMJTUFOUP4QPUJGZPOJ1IPOFJ1PEUPVDIWJB#MVFUPPUIPSWJB64#
JOQVUUFSNJOBMPS"OESPJEEFWJDFWJB#MVFUPPUI
Preparation:
r *OTUBMMUIFMBUFTUWFSTJPOPGUIF4QPUJGZBQQMJDBUJPOPOZPVSEFWJDFJ1IPOF
J1PEUPVDIPS"OESPJEEFWJDFUIFODSFBUFBOBDDPVOUBOEMPHJOUP
4QPUJGZ
r 4FMFDU
[ON]
GPS
[SPOTIFY SRC]
JO
[SOURCE SELECT]
. (Page6)
4UBSUMJTUFOJOH
Start up the Spotify application on your device.
Connect your device to the USB input terminal.
USB input terminal
Accessory of the iPod/iPhone*
iPhone/
iPod touch
:PVDBOBMTPDPOOFDUUIFJ1IPOFJ1PEUPVDIPS"OESPJEEFWJDFWJB
#MVFUPPUI1BHF
r .BLFTVSFUIF64#JOQVUUFSNJOBMJTOPUDPOOFDUFEUPBOZEFWJDFXIFO
ZPVDPOOFDUWJB#MVFUPPUI
Press BSRC repeatedly to select SPOTIFY (for iPhone/iPod touch) or
SPOTIFY BT (for Android device).
#SPBEDBTUTUBSUTBVUPNBUJDBMMZ
* Do not leave the cable inside the
WFIJDMF
when not in use.
To On the faceplate
1MBZCBDLQBVTF 1SFTTIW
4LJQBUSBDL 1SFTTST
4FMFDUUIVNCTVQPSUIVNCTEPXO 1SFTT
4UBSUSBEJP 1SFTTBOEIPME
3FQFBUQMBZ 1SFTT SFQFBUFEMZ
[REPEAT ALL]
[REPEAT ONE]
[REPEATOFF]
3BOEPNQMBZ 1SFTT SFQFBUFEMZ
[SHUFFLE ON]
[SHUFFLEOFF]
*1 Available for premium account users only.
*2 This feature is available for tracks in Radio only. If thumbs down is selected, the current track is
skipped.
*3 Available for tracks in Playlists only.
4BWFGBWPSJUFTPOHJOGPSNBUJPO
8IJMFMJTUFOJOHUPUIF3BEJPPO4QPUJGZ
Press and hold the volume knob.
i4"7&%uBQQFBSTBOEUIFJOGPSNBUJPOJTTUPSFEUPi:PVS.VTJDuPSi:PVS
-JCSBSZuPOZPVS4QPUJGZBDDPVOU
5PVOTBWFSFQFBUUIFTBNFQSPDFEVSF
i3&.07&%uBQQFBSTBOEUIFJOGPSNBUJPOJTSFNPWFEGSPNi:PVS.VTJDuPS
i:PVS-JCSBSZuPOZPVS4QPUJGZBDDPVOU

ENGLISH 11
4QPUJGZ
4FBSDIGPSBTPOHPSTUBUJPO
Press .
Turn the volume knob to select a list type, then press the knob.
5IFMJTUUZQFTEJTQMBZFEEJGGFSEFQFOEJOHPOUIFJOGPSNBUJPOTFOUGSPN
4QPUJGZ
Turn the volume knob to select the desired song or station.
Press the volume knob to confirm.
:PVDBOCSPXTFUISPVHIUIFMJTURVJDLMZCZUVSOJOHUIFWPMVNFLOPC
RVJDLMZ
5PDBODFMQSFTTBOEIPME
:PVDBOMJTUFOUPNVTJDGSPNBQPSUBCMFBVEJPQMBZFSWJBUIFBVYJMJBSZJOQVU
KBDL
Preparation:
4FMFDU
[ON]
GPS
[BUILT-IN AUX]
JO
[SOURCESELECT]
. (Page6)
4UBSUMJTUFOJOH
Connect a portable audio player (commercially available).
Portable audio player
3.5 mm (1/8") stereo mini plug with “L”
shaped connector (commercially available)
Auxiliary input jack
Press BSRC repeatedly to select AUX.
Turn on the portable audio player and start playback.
4FUUIFOBNFPGUIFFYUFSOBMEFWJDF
8IJMFMJTUFOJOHUPBQPSUBCMFBVEJPQMBZFSDPOOFDUFEUPUIFVOJU
Press the volume knob to enter
[FUNCTION]
.
Turn the volume knob to select
[SYSTEM]
, then press the knob.
Turn the volume knob to select
[AUX NAME SET]
, then press the knob.
Turn the volume knob to select an item, then press the knob.
[AUX]
EFGBVMU
[DVD]
[PORTABLE]
[GAME]
[VIDEO]
[TV]
Press and hold to exit.
5PSFUVSOUPUIFQSFWJPVTTFUUJOHJUFNQSFTT
"69

1BJSBOEDPOOFDUB#MVFUPPUIEFWJDFGPSUIFGJSTUUJNF
Press BSRC to turn on the unit.
Search and select the name of your receiver (“PP-BT-RADIO”) on the
Bluetooth device.
i1"*3*/(u i1"44999999u i%FWJDFOBNFu i13&44u i70-6.&
,/0#uBQQFBSTPOUIFEJTQMBZ
r 'PSTPNF#MVFUPPUIEFWJDFTZPVNBZOFFEUPFOUFSUIF1FSTPOBM
*EFOUJGJDBUJPO/VNCFS1*/DPEFJNNFEJBUFMZBGUFSTFBSDIJOH
Press the volume knob to start pairing.
i1"*3*/(0,uBQQFBSTXIFOQBJSJOHJTDPNQMFUFE
0ODFQBJSJOHJTDPNQMFUFE#MVFUPPUIDPOOFDUJPOJTFTUBCMJTIFE
BVUPNBUJDBMMZ
r i#5uBOEPSi#5uJOEJDBUPSPOUIFEJTQMBZXJOEPXMJHIUTVQ
r 5IJTVOJUTVQQPSUT4FDVSF4JNQMF1BJSJOH441
r 6QUPGJWFEFWJDFTDBOCFSFHJTUFSFEQBJSFEJOUPUBM
r 0ODFUIFQBJSJOHJTDPNQMFUFEUIF#MVFUPPUIEFWJDFXJMMSFNBJOSFHJTUFSFE
JOUIFVOJUFWFOJGZPVSFTFUUIFVOJU5PEFMFUFUIFQBJSFEEFWJDFTFF
[DEVICE DELETE]
POpage1
r "NBYJNVNPGUXP#MVFUPPUIQIPOFTBOEPOF#MVFUPPUIBVEJPEFWJDFDBO
CFDPOOFDUFEBUBOZUJNF5PDPOOFDUPSEJTDPOOFDUUIFSFHJTUFSFEEFWJDF
TFF
[PHONE SELECT]
PS
[AUDIO SELECT]
JO
[BT MODE]
1BHF
)PXFWFSXIJMFJO#5"6%*0TPVSDFZPVDBODPOOFDUUPGJWF#MVFUPPUI
audio devices and switch between these five devices. (Page1
r 4PNF#MVFUPPUIEFWJDFTNBZOPUBVUPNBUJDBMMZDPOOFDUUPUIFVOJUBGUFS
QBJSJOH$POOFDUUIFEFWJDFUPUIFVOJUNBOVBMMZ
r 3FGFSUPUIFJOTUSVDUJPONBOVBMPGUIF#MVFUPPUIEFWJDFGPSNPSF
JOGPSNBUJPO
r %FQFOEJOHPOUIF#MVFUPPUIWFSTJPOPQFSBUJOHTZTUFNBOEUIFGJSNXBSF
WFSTJPOPGZPVSNPCJMFQIPOF#MVFUPPUIGFBUVSFTNBZOPUXPSLXJUIUIJT
VOJU
r #FTVSFUPUVSOPOUIF#MVFUPPUIGVODUJPOPGUIFEFWJDFUPNBLFUIF
GPMMPXJOHPQFSBUJPOT
r 4JHOBMDPOEJUJPOTWBSZEFQFOEJOHPOUIFTVSSPVOEJOHT
#MVFUPPUI$POOFDUJPO
Supported Bluetooth profiles
m)BOET'SFF1SPGJMF)'1
m"EWBODFE"VEJP%JTUSJCVUJPO1SPGJMF"%1
m"VEJP7JEFP3FNPUF$POUSPM1SPGJMF"73$1
m4FSJBM1PSU1SPGJMF411
m1IPOFCPPL"DDFTT1SPGJMF1#"1
Supported Bluetooth codecs
m4VC#BOE$PEFD4#$
m"EWBODFE"VEJP$PEJOH""$
$POOFDUUIFNJDSPQIPOF
Adjust the
microphone angle
Secure using cord
clamps (not supplied)
if necessary.
Microphone
input jack
Microphone
(supplied)
Rear panel
#MVFUPPUI¥
1ENGLISH

"VUP1BJSJOH
8IFOZPVDPOOFDUJ1IPOFJ1PEUPVDIUPUIF64#JOQVUUFSNJOBMQBJSJOH
SFRVFTU WJB #MVFUPPUI JT BVUPNBUJDBMMZ BDUJWBUFE JG
[AUTO PAIRING]
JT TFU UP
[ON]
1BHF
Press the volume knob to pair once you have confirmed the device name.
#MVFUPPUI.PCJMFQIPOF
3FDFJWFBDBMM
8IFOUIFSFJTBOJODPNJOHDBMM
r 5IFVOJUBOTXFSTUIFDBMMBVUPNBUJDBMMZJG
[AUTO ANSWER]
JTTFUUPBTFMFDUFE
time. (Page1
%VSJOHBDBMM
r *GZPVUVSOPGGUIFVOJUPSEFUBDIUIFGBDFQMBUF#MVFUPPUIJTEJTDPOOFDUFE
#MVFUPPUI¥
5IFGPMMPXJOHPQFSBUJPOTNBZEJGGFSPSCFVOBWBJMBCMFEFQFOEJOHPOUIF
DPOOFDUFEQIPOF
To On the faceplate
'JSTUJODPNJOHDBMM
"OTXFSBDBMM 1SFTT PSUIFWPMVNFLOPCPSPOF
PGUIFOVNCFSCVUUPOTUP
3FKFDUBDBMM 1SFTT
&OEBDBMM 1SFTT
8IJMFUBMLJOHPOUIFGJSTUJODPNJOHDBMM
"OTXFSBOPUIFSJODPNJOHDBMMBOE
IPMEUIFDVSSFOUDBMM
1SFTT
3FKFDUBOPUIFSJODPNJOHDBMM 1SFTT
8IJMFIBWJOHUXPBDUJWFDBMMT
&OEDVSSFOUDBMMBOEBDUJWBUFIFME
DBMM
1SFTT
4XBQCFUXFFOUIFDVSSFOUDBMMBOE
IFMEDBMM
1SFTT
"EKVTUUIFQIPOFWPMVNF
[00]
UP
[35]
%FGBVMU
[15]
5VSOUIFWPMVNFLOPCEVSJOHBDBMM
4XJUDICFUXFFOIBOETGSFFBOE
QSJWBUFUBMLNPEFT
1SFTTIWEVSJOHBDBMM
*1 This adjustment will not affect the volume of the other sources.
*2 Operations may vary according to the connected Bluetooth device.
ENGLISH 13

.BLFBDBMM
:PVDBONBLFBDBMMGSPNUIFDBMMIJTUPSZQIPOFCPPLPSEJBMJOHUIFOVNCFS
$BMMCZWPJDFJTBMTPQPTTJCMFJGZPVSNPCJMFQIPOFIBTUIFGFBUVSF
Press to enter Bluetooth mode.
i'JSTUEFWJDFOBNFuBQQFBST
r *GUXP#MVFUPPUIQIPOFTBSFDPOOFDUFEQSFTT BHBJOUPTXJUDIUPUIF
PUIFSQIPOF
i4FDPOEEFWJDFOBNFuBQQFBST
Turn the volume knob to select an item (see the following table), then
press the knob.
Repeat step 2 until the desired item is selected/activated or follow the
instructions stated on the selected item.
Press and hold to exit.
5PSFUVSOUPUIFQSFWJPVTTFUUJOHJUFNQSFTT
[CALL HISTORY] (Applicable only if the phone supports PBAP.)
1
Press the volume knob to select a name or a phone number.
• “I” indicates call received, “O“ indicates call made, “M” indicates call
missed.
• Press DISP to change the display category (NUMBER or NAME).
• “NO DATA” appears if there is no recorded call history or call number.
2
Press the volume knob to call.
#MVFUPPUI¥
*NQSPWFUIFWPJDFRVBMJUZ
8IJMFUBMLJOHPOUIFQIPOF
Press the volume knob to enter
[FUNCTION]
.
Turn the volume knob to select an item (see the following table), then
press the knob.
Repeat step 2 until the desired item is selected or activated.
Press and hold to exit.
5PSFUVSOUPUIFQSFWJPVTTFUUJOHJUFNQSFTT
Default: [XX]
[MIC GAIN] [–10] to [+10] ([–4]): The sensitivity of the microphone increases as the
number increases.
[NR LEVEL] [LEVEL –5] to [LEVEL +5] ([LEVEL 0]): Adjust the noise reduction level
until the least noise is being heard during a phone conversation.
[ECHO CANCEL] [LEVEL –5] to [LEVEL +5] ([LEVEL 0]): Adjust the echo cancellation
delay time until the least echo is being heard during a phone conversation.
• Call quality may depend on mobile phone.
.BLFUIFTFUUJOHGPSBOTXFSJOHBDBMM
Press to enter Bluetooth mode.
Turn the volume knob to select
[SETTINGS]
, then press the knob.
Turn the volume knob to select
[AUTO ANSWER]
, then press the knob.
Turn the volume knob to select the time (in seconds) for the unit to
answer the call automatically, then press the knob.
[01]
UP
[30]
PSTFMFDU
[OFF]
UPDBODFMT%FGBVMU
[OFF]
Press and hold to exit.
5PSFUVSOUPUIFQSFWJPVTTFUUJOHJUFNQSFTT
1ENGLISH

[PHONE BOOK] (Applicable only if the phone supports PBAP.)
1
Turn the volume knob quickly to enter alphabet search mode (if the
phonebook contains many contacts).
The first menu (ABCDEFGHIJK) appears.
• To go to the other menu (LMNOPQRSTUV or WXYZ1 ), press 2/
1.
• To select the desired first letter, turn the volume knob or press
S
/
T
, then press the knob.
Select “1” to search with numbers and select “ ” to search with symbols.
2
Turn the volume knob to select a name, then press the knob.
3
Turn the volume knob to select a phone number, then press the knob to
call.
• For using phonebook with this unit, make sure to allow access to or transfer
from your smartphone. Depending on the connected phone, the process
may be different.
• Contacts are categorized as: HM (home), OF (office), MO (mobile),
OT (other), GE (general)
• This unit can display only non-accent letters. (Accent letters such as “Ú” are
shown as “U”.)
[NUMBER DIAL]
1
Turn the volume knob to select a number (0 to 9) or character ( , #, +).
2
Press
S
/
T
to move the entry position.
Repeat step 1 and step 2 until you finish entering the phone number.
3
Press the volume knob to call.
[VOICE] Speak the name of the contact you want to call or the voice command to
control the phone functions. (See also the following “Make a call using voice
recognition”.)
[LOW]/[MID]/[FULL]: Shows the strength of the battery.*
[NO SIGNAL]/[LOW]/[MID]/[MAX]: Shows the strength of the current received signal.*
* Functionality depends on the type of the phone used.
#MVFUPPUI¥
.BLFBDBMMVTJOHWPJDFSFDPHOJUJPO
Press and hold to activate the voice recognition of the connected
phone.
Speak the name of the contact you want to call or the voice command
to control the phone functions.
r 4VQQPSUFE7PJDF3FDPHOJUJPOGFBUVSFTWBSZGPSFBDIQIPOF3FGFSUPUIF
JOTUSVDUJPONBOVBMPGUIFDPOOFDUFEQIPOFGPSEFUBJMT
4UPSFBDPOUBDUJONFNPSZ
:PVDBOTUPSFVQUPDPOUBDUTJOUPUIFOVNCFSCVUUPOTUP
Press to enter Bluetooth mode.
Turn the volume knob to select
[CALL HISTORY]
,
[PHONE BOOK]
or
[NUMBERDIAL]
, then press the knob.
Turn the volume knob to select a contact or enter a phone number.
*GBDPOUBDUJTTFMFDUFEQSFTTUIFWPMVNFLOPCUPTIPXUIFQIPOF
OVNCFS
Press and hold one of the number buttons (1 to 6).
i4503&%uBQQFBSTXIFOUIFDPOUBDUJTTUPSFE
5PFSBTFBDPOUBDUGSPNUIFQSFTFUNFNPSZTFMFDU
[NUMBER DIAL]
JOTUFQ
TUPSFBCMBOLOVNCFSJOTUFQBOEQSPDFFEUPTUFQ
.BLFBDBMMUPBSFHJTUFSFEOVNCFS
Press to enter Bluetooth mode.
Press one of the number buttons (1 to 6).
Press the volume knob to call.
i/0.&.03:uBQQFBSTJGUIFSFJTOPDPOUBDUTUPSFE
ENGLISH 15

[INITIALIZE] [YES]: Initializes all the Bluetooth settings (including stored pairing,
phonebook, and etc.). ; [NO]: Cancels.
#MVFUPPUIUFTUNPEF
:PVDBODIFDLUIFDPOOFDUJWJUZPGUIFTVQQPSUFEQSPGJMFCFUXFFOUIF
#MVFUPPUIEFWJDFBOEUIFVOJU
r .BLFTVSFUIFSFJTOP#MVFUPPUIEFWJDFQBJSFE
Press and hold .
i1-&"4&1"*3:0631)0/&1*/uBQQFBSTPOUIFEJTQMBZ
Search and select the name of your receiver (“PP-BT-RADIO”) on the
Bluetooth device.
Operate the Bluetooth device to confirm pairing.
i5&45*/(uGMBTIFTPOUIFEJTQMBZ
The connectivity result (OK or NG) appears after the test.
1"*3*/( 1BJSJOHTUBUVT
)'$/5 )BOET'SFF1SPGJMF)'1DPNQBUJCJMJUZ
"6%$/5 "EWBODFE"VEJP%JTUSJCVUJPO1SPGJMF"%1DPNQBUJCJMJUZ
1#%- 1IPOFCPPL"DDFTTQSPGJMF1#"1DPNQBUJCJMJUZ
5PDBODFMUFTUNPEFQSFTTBOEIPMEB43$UPUVSOPGGUIFVOJU
#MVFUPPUI¥
#MVFUPPUINPEFTFUUJOHT
Press the volume knob to enter
[FUNCTION]
.
Turn the volume knob to select an item (see the following table), then
press the knob.
Repeat step 2 until the desired item is selected/activated or follow the
instructions stated on the selected item.
Press and hold to exit.
5PSFUVSOUPUIFQSFWJPVTTFUUJOHJUFNQSFTT
Default: [XX]
[BT MODE]
[PHONE SELECT] Selects the phone or audio device to connect or disconnect.
“” appears in front of the device name when connected.
“” appears in front of the current playback audio device.
• You can connect a maximum of two Bluetooth phones and one
Bluetooth audio device at a time.
[AUDIO SELECT]
[DEVICE DELETE]
1
Turn the volume knob to select a device to delete, then press the
knob.
2
Turn the volume knob to select [YES] or [NO], then press the knob.
[PIN CODE EDIT]
(0000)
Changes the PIN code (up to 6 digits).
1
Turn the volume knob to select a number.
2
Press
S
/
T
to move the entry position.
Repeat step 1 and step 2 until you finish entering the PIN code.
3
Press the volume knob to confirm.
[RECONNECT] [ON]: The unit is automatically reconnect when the last connected
Bluetooth device is within the connectable range. ; [OFF]: Cancels.
[AUTO PAIRING] [ON]: The unit is automatically paired with the supported Bluetooth
device (iPhone/iPod touch) when it is connected through USB input
terminal. Depending on the operating system of the connected device,
this function may not work. ; [OFF]: Cancels.
16 ENGLISH

#MVFUPPUI"VEJP
r 0QFSBUJPOTBOEEJTQMBZJOEJDBUJPOTNBZEJGGFSBDDPSEJOHUPUIFJSBWBJMBCJMJUZ
POUIFDPOOFDUFEEFWJDF
r %FQFOEJOHPOUIFDPOOFDUFEEFWJDFTPNFGFBUVSFTNBZOPUXPSLXJUI
ZPVSEFWJDF
8IJMFJO#5"6%*0TPVSDFZPVDBODPOOFDUUPGJWF#MVFUPPUIBVEJPEFWJDFT
BOETXJUDICFUXFFOUIFTFGJWFEFWJDFT
-JTUFOUPUIFBVEJPQMBZFSWJB#MVFUPPUI
Press BSRC repeatedly to select BTAUDIO.
r 1SFTTJOH FOUFST#5"6%*0EJSFDUMZ
Operate the audio player via Bluetooth to start playback.
To On the faceplate
1MBZCBDLQBVTF 1SFTTIW
4FMFDUHSPVQPSGPMEFS 1SFTT
3FWFSTFTLJQ'PSXBSETLJQ 1SFTTST
3FWFSTF'BTUGPSXBSE 1SFTTBOEIPMEST
3FQFBUQMBZ 1SFTT SFQFBUFEMZ
[ALLREPEAT]
[FILEREPEAT]
[GROUP REPEAT]
[REPEATOFF]
#MVFUPPUI¥
To On the faceplate
3BOEPNQMBZ 1SFTTBOEIPME UPTFMFDU
[ALLRANDOM]
PS
[GROUP RANDOM]
•
1SFTT UPTFMFDU
[RANDOMOFF].
4FMFDUBGJMFGSPNBGPMEFSMJTU 3FGFSUPi4FMFDUBGJMFUPQMBZuPOQBHF
4XJUDICFUXFFODPOOFDUFE
#MVFUPPUIBVEJPEFWJDFT
1SFTT
1SFTTJOHUIFi1MBZuLFZPOUIFDPOOFDUFE
EFWJDFJUTFMGBMTPDBVTFTTXJUDIJOHPGTPVOE
PVUQVUGSPNUIFEFWJDF
-JTUFOUPJ1PEJ1IPOFWJB#MVFUPPUI
:PVDBOMJTUFOUPUIFTPOHTPOUIFJ1PEJ1IPOFWJB#MVFUPPUIPOUIJTVOJU
Press BSRC repeatedly to select iPodBT.
r :PVDBOPQFSBUFUIFJ1PEJ1IPOFJOUIFTBNFXBZBTJ1PEJ1IPOFWJB64#
input terminal. (Page7)
r *GZPVQMVHJOBOJ1PEJ1IPOFUPUIF64#JOQVUUFSNJOBMXIJMFMJTUFOJOHUP
iPodBT source, the source automatically changes to iPodUSB source.
1SFTTBSRC to select iPodBT source if the device is still connected via
#MVFUPPUI
ENGLISH 17

"VEJP4FUUJOHT
Press the volume knob to enter
[FUNCTION]
.
Turn the volume knob to select an item (see the following table), then
press the knob.
Repeat step 2 until the desired item is selected or activated.
Press and hold to exit.
5PSFUVSOUPUIFQSFWJPVTTFUUJOHJUFNQSFTT
Default: [XX]
[AUDIO CONTROL]
[SUB-W LEVEL] [LEVEL –50] to [LEVEL +10] ([LEVEL 0]): Adjusts the subwoofer output
level.
[EASYEQ] Adjusts your own sound settings.
• The settings are stored to [USER] in [PRESET EQ].
• The settings made may affect the current settings of [MANUAL EQ].
[SW]: [LEVEL –50] to [LEVEL +10] (Default: [LEVEL 0]
[BASS]: [LEVEL –9] to [LEVEL +9] [LEVEL 0]
[MID]: [LEVEL –9] to [LEVEL +9] [LEVEL 0]
[TRE]: [LEVEL –9] to [LEVEL +9] [LEVEL 0])
[MANUAL EQ] Adjusts your own sound settings for each source.
• The settings are stored to [USER] in [PRESET EQ].
• The settings made may affect the current settings of [EASYEQ].
[62.5HZ] [LEVEL] [LEVEL–9] to [LEVEL+9] ([LEVEL0]): Adjusts
the level to memorize for each source.
(Before making an adjustment, select the source
you want to adjust.)
[BASS EXTEND] [ON]: Turns on the extended bass. ; [OFF]: Cancels.
[100HZ]/[160HZ]/
[250HZ]/[400HZ]/
[630HZ]/[1KHZ]/
[1.6KHZ]/[2.5KHZ]/
[4KHZ]/[6.3KHZ]/
[10KHZ]/[16KHZ]
[LEVEL –9] to [LEVEL +9] ([LEVEL 0]): Adjusts the level to memorize
for each source.
(Before making an adjustment, select the source you want to adjust.)
[Q FACTOR] [1.35]/[1.50]/[2.00]: Adjusts the quality factor.
[PRESET EQ] [NATURAL]/[ROCK]/[POPS]/[EASY]/[TOP40]/[JAZZ]/[POWERFUL]/
[USER]: Selects a preset equalizer suitable to the music genre.
(Select [USER] to use the settings made in [EASY EQ] or
[MANUALEQ].)
[BASS BOOST] [LV1] to [LV5]: Selects your preferred bass boost level. ; [OFF]: Cancels.
[LOUDNESS] [LV1]/[LV2]: Selects your preferred low or high frequencies boost to
produce a well-balanced sound at low volume. ; [OFF]: Cancels.
[SUBWOOFER SET] [ON]: Turns on the subwoofer output. ; [OFF]: Cancels.
[FADER] [R15] to [F15] ([0]): Adjusts the front and rear speaker output balance.
[BALANCE] [L15] to [R15] ([0]): Adjusts the left and right speaker output balance.
[VOLUME OFFSET] [–15] to [+6] ([0]): Presets the initial volume level of each source by
comparing to the FM volume level.
(Before adjustment, select the source you want to adjust.)
18 ENGLISH

[SOUND EFFECT]
[SOUND RECNSTR]
(Sound
reconstruction)
(Not applicable for RADIO source and AUX source.)
[ON]: Creates realistic sound by compensating the high-frequency
components and restoring the rise-time of the waveform that are lost in
audio data compression. ; [OFF]: Cancels.
[SPACE ENHANCE] (Not applicable for RADIO source.)
[SML]/[MED]/[LRG]: Virtually enhances the sound space. ;
[OFF]: Cancels.
[SND REALIZER] [LV1]/[LV2]/[LV3]: Virtually makes the sound more realistic. ;
[OFF]: Cancels.
[STAGE EQ] [LOW]/[MID]/[HI]: Virtually adjusts the sound position heard from the
speakers. ; [OFF]: Cancels.
[DRIVE EQ] [ON]: Boosts the frequency to reduce the noise heard from outside the
car or running noise of the tyres. ; [OFF]: Cancels.
[SPEAKER SIZE] The frequency and slope settings are automatically set for the crossover
of the selected speaker.
[FRONT] [SIZE] [3.5”]/[4”]/[4.75”]/[5”]/[6.5”]/[6.75”]/[7”]/[4×6]/
[5×7]/[6×8]/[6×9]/[7×10]: Selects according to the
connected speaker size for optimum performance.
[TWEETER] [SMALL]/[MIDDLE]/[LARGE]: Selects according to
the size range of the connected tweeter for optimum
performance. ; [NONE]: Not connected.
[REAR] [3.5”]/[4”]/[4.75”]/[5”]/[6.5”]/[6.75”]/[7”]/[4×6]/[5×7]/[6×8]/
[6×9]/[7×10]: Selects according to the connected speaker size for
optimum performance. ; [NONE]: Not connected.
[SUBWOOFER] [6.5”]/[8”]/[10”]/[12”]/[15” OVER]: Selects according to the
connected speaker size for optimum performance. ; [NONE]: Not
connected.
"VEJP4FUUJOHT
[X ‘ OVER]
[TWEETER] [FRQ] [1KHZ]/[1.6KHZ]/[2.5KHZ]/[4KHZ]/[5KHZ]/
[6.3KHZ]/[8KHZ]/[10KHZ]/[12.5KHZ]: Adjusts the
crossover frequency for the tweeter speaker.
[GAIN LEFT] [–8] to [0]: Adjusts the output volume of the left
tweeter.
[GAIN RIGHT] [–8] to [0]: Adjusts the output volume of the right
tweeter.
[FRONT HPF] [F-HPF FRQ] [30HZ]/[40HZ]/[50HZ]/[60HZ]/[70HZ]/[80HZ]/
[90HZ]/[100HZ]/[120HZ]/[150HZ]/[180HZ]/
[220HZ]/[250HZ]: Adjusts the crossover frequency
for the selected speakers (high pass filter). ;
[THROUGH]: All signals are sent to the selected
speakers.
[F-HPF SLOPE] [–6DB]/[–12DB]/[–18DB]/[–24DB]: Adjusts the
crossover slope.
(Selectable only if a setting other than [THROUGH] is
selected for [F -HPF FRQ].)
[F-HPF GAIN] [–8] to [0]: Adjusts the output volume of the
selected speaker.
[REAR HPF] [R-HPF FRQ]
Configure the settings for the rear speakers similarly
to the front speakers.
[R-HPF SLOPE]
[R-HPF GAIN]
[SUBWOOFER LPF] [SW LPF FRQ] [30HZ]/[40HZ]/[50HZ]/[60HZ]/[70HZ]/[80HZ]/
[90HZ]/[100HZ]/[120HZ]/[150HZ]/[180HZ]/
[220HZ]/[250HZ]: Adjusts the crossover frequency
for the subwoofer (low pass filter). ; [THROUGH]: All
signals are sent to the subwoofer.
ENGLISH 19

"VEJP4FUUJOHT
[SW LPF SLOPE] [–6DB]/[–12DB]/[–18DB]/[–24DB]: Adjusts the
crossover slope.
(Selectable only if a setting other than [THROUGH] is
selected for [SW LPF FRQ].)
[SW LPF
PHASE]
[REVERSE] (180°)/[NORMAL] (0°): Selects the
phase of the subwoofer output to be in line with the
speaker output for optimum performance.
[SW LPF GAIN] [–8] to [0]: Adjusts the output volume of the
subwoofer.
[DTA SETTINGS] For settings, see the following “Digital Time Alignment settings”.
[CAR SETTINGS]
r 5IFGPMMPXJOHJUFNJTTFMFDUBCMFPOMZJG
[SWITCH PREOUT]
JTTFUUP
[SUB-W]
QBHF
m
[SUB-W LEVEL]
m
[SUBWOOFER SET]
m
[SW LEVEL]
PG
[EASY EQ]
m
[SUBWOOFER]
PG
[SPEAKER SIZE]
m
[SUBWOOFER LPF]
PG
[X ‘ OVER]
m
[SUBWOOFER]
PG
[DISTANCE]
BOE
[GAIN]
JO
[DTA SETTINGS]
r 5IFGPMMPXJOHJUFNJTTFMFDUBCMFPOMZJG
[SUBWOOFER SET]
JTTFUUP
[ON]
QBHF
m
[SUB-W LEVEL]
m
[SW LEVEL]
PG
[EASY EQ]
m
[SUBWOOFER]
PG
[SPEAKER SIZE]
m
[SUBWOOFER LPF]
PG
[X ‘ OVER]
m
[SUBWOOFER]
PG
[DISTANCE]
BOE
[GAIN]
JO
[DTA SETTINGS]
r 5IFGPMMPXJOHJUFNJTTFMFDUBCMFPOMZJGBTFUUJOHPUIFSUIBO
[NONE]
JT
TFMFDUFEGPS
[TWEETER]
[REAR]
BOE
[SUBWOOFER]
PG
[SPEAKER SIZE]
m
[TWEETER]
[REAR HPF]
[SUBWOOFER LPF]
PG
[X ‘ OVER]
20 ENGLISH
%JTQMBZ4FUUJOHT
;POFJEFOUJGJDBUJPOGPSCSJHIUOFTTTFUUJOH
4FUUIFEJNNFS
Press and hold DISP (DIM) to turn on or off the dimmer.
r 0ODFZPVQSFTTBOEIPMEUIJTCVUUPO
[DIMMER]
TFUUJOHQBHFXJMMCF
PWFSXSJUUFO
$IBOHFUIFEJTQMBZTFUUJOHT
Press the volume knob to enter
[FUNCTION]
.
Turn the volume knob to select an item (page 2), then press the
knob.
Repeat step 2 until the desired item is selected/activated or follow the
instructions stated on the selected item.
Press and hold to exit.
5PSFUVSOUPUIFQSFWJPVTTFUUJOHJUFNQSFTT
Table of contents