manuals.online logo
Brands
  1. Home
  2. •
  3. Brands
  4. •
  5. Panasonic
  6. •
  7. CD Player
  8. •
  9. Panasonic RX-DT690 User manual

Panasonic RX-DT690 User manual

___E
PanasoniC
Portable Stereo Component CD System
RX-DT69O
Operating I nstructions
\ , ,;,,:,
:' 'i
jjt
:l
%E
Before connecting, operating or adjusting this product,
please read these instructions completely.
GN]
-- ':ii,.... q',-. r- --.-,* ., -.i.: ,.:a
ncoMpAcT
E][5G
DIGITAL AUDIO
RQT2845.IB
Ii
i
l
ti
Dear Customer Table o.f Contents
CAUTION!
THIS PRODUCT UTILIZES A LASER.
USE OF CONTROLS OR ADJUSTMENTS OR PER-
FOBMANCE OF PROCEDURES OTHER THAN THOSE
SPECIFIED HEREIN MAY RESULT IN HAZARDOUS
RADIATION EXPOSURE.
DO NOT OPEN COVERS AND DO NOT REPAIR YOUR'
SELF. REFER SERVICING TO QUALIFIED PERSONNEL'
Thank you for purchasing this product.
For optimum performance and safety, please read these operating
instructions caref ullY.
WARNING:
TO REDUCE THE RISK OF FIRE OR ELEC'
TRIC SHOCK, DO NOT EXPOSE THIS APPLI-
ANCE TO RAIN OR MOISTURE.
CLASS 1
LASER PRODUCT
ll o l
ll-ll [6n
llrrll
Before use
Precautions " "" 3
SuppliedAccessories " """3
PowerSources """ " 3
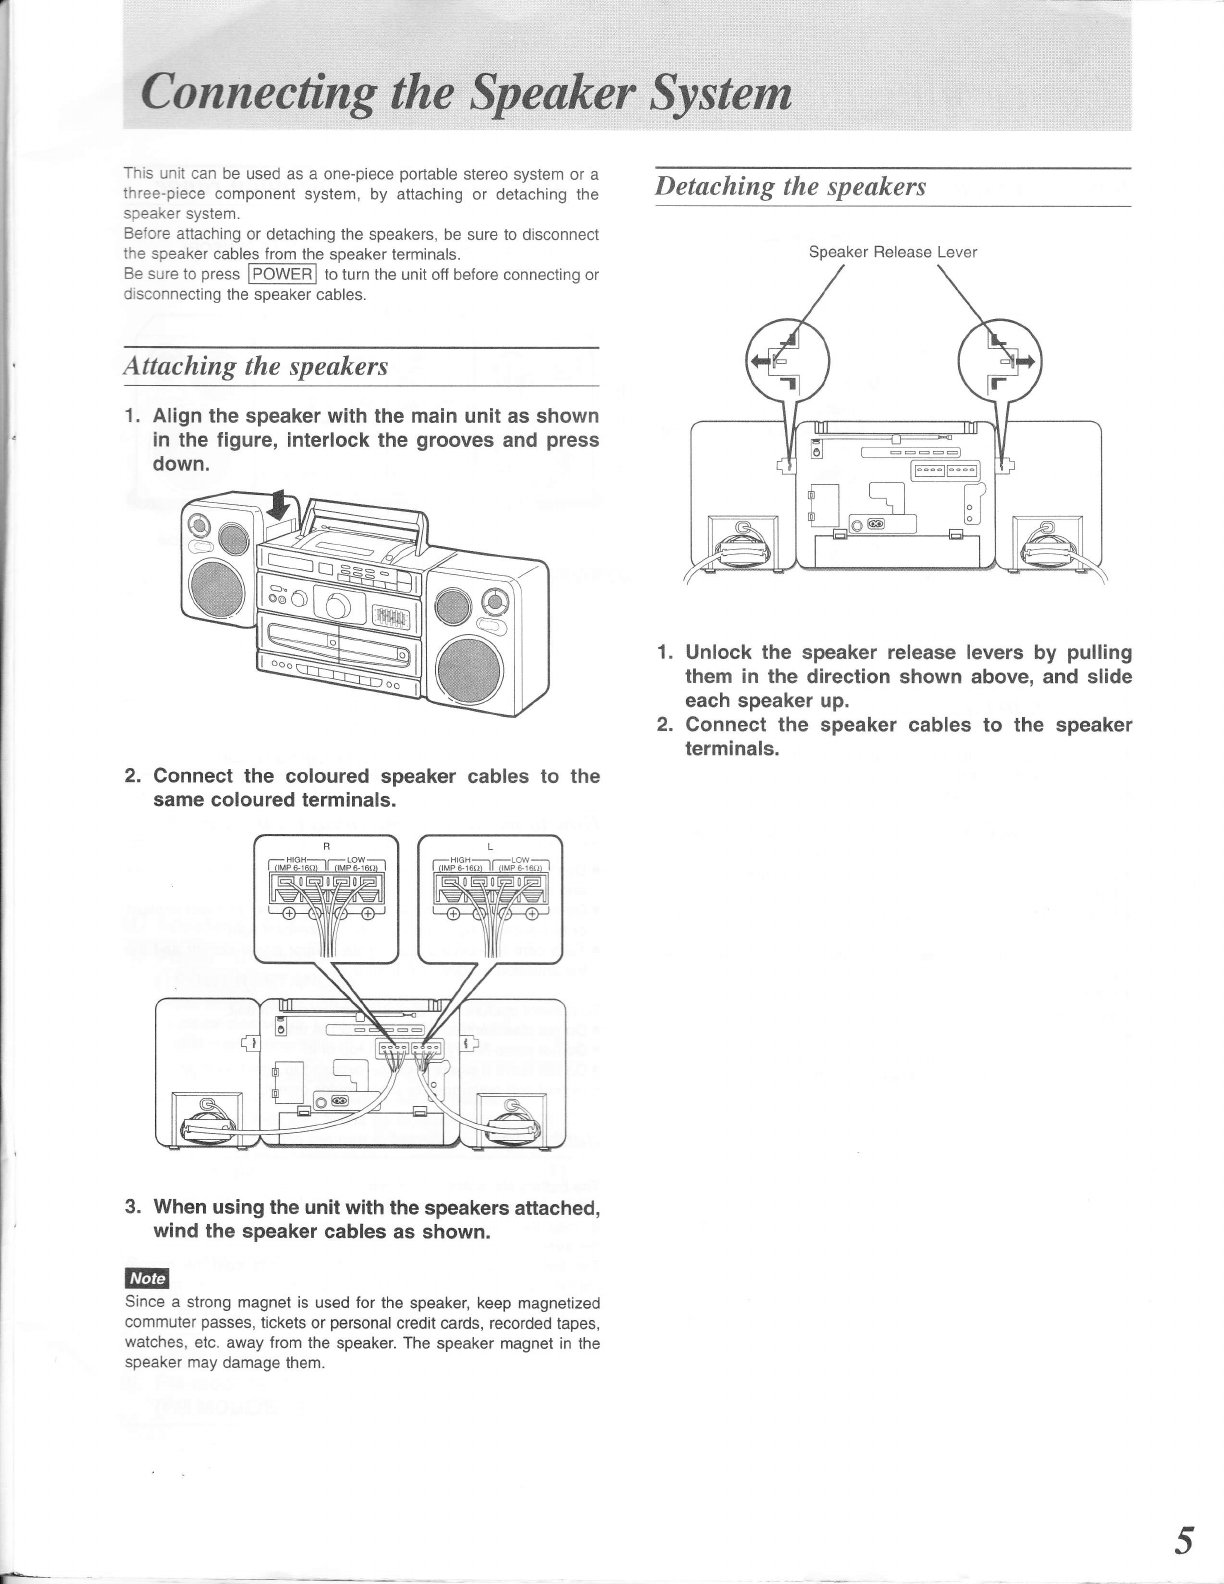
ConnectingtheSpeakerSystem " " "" '5
Concerning the Remote Control .. .. ..... " " " '6
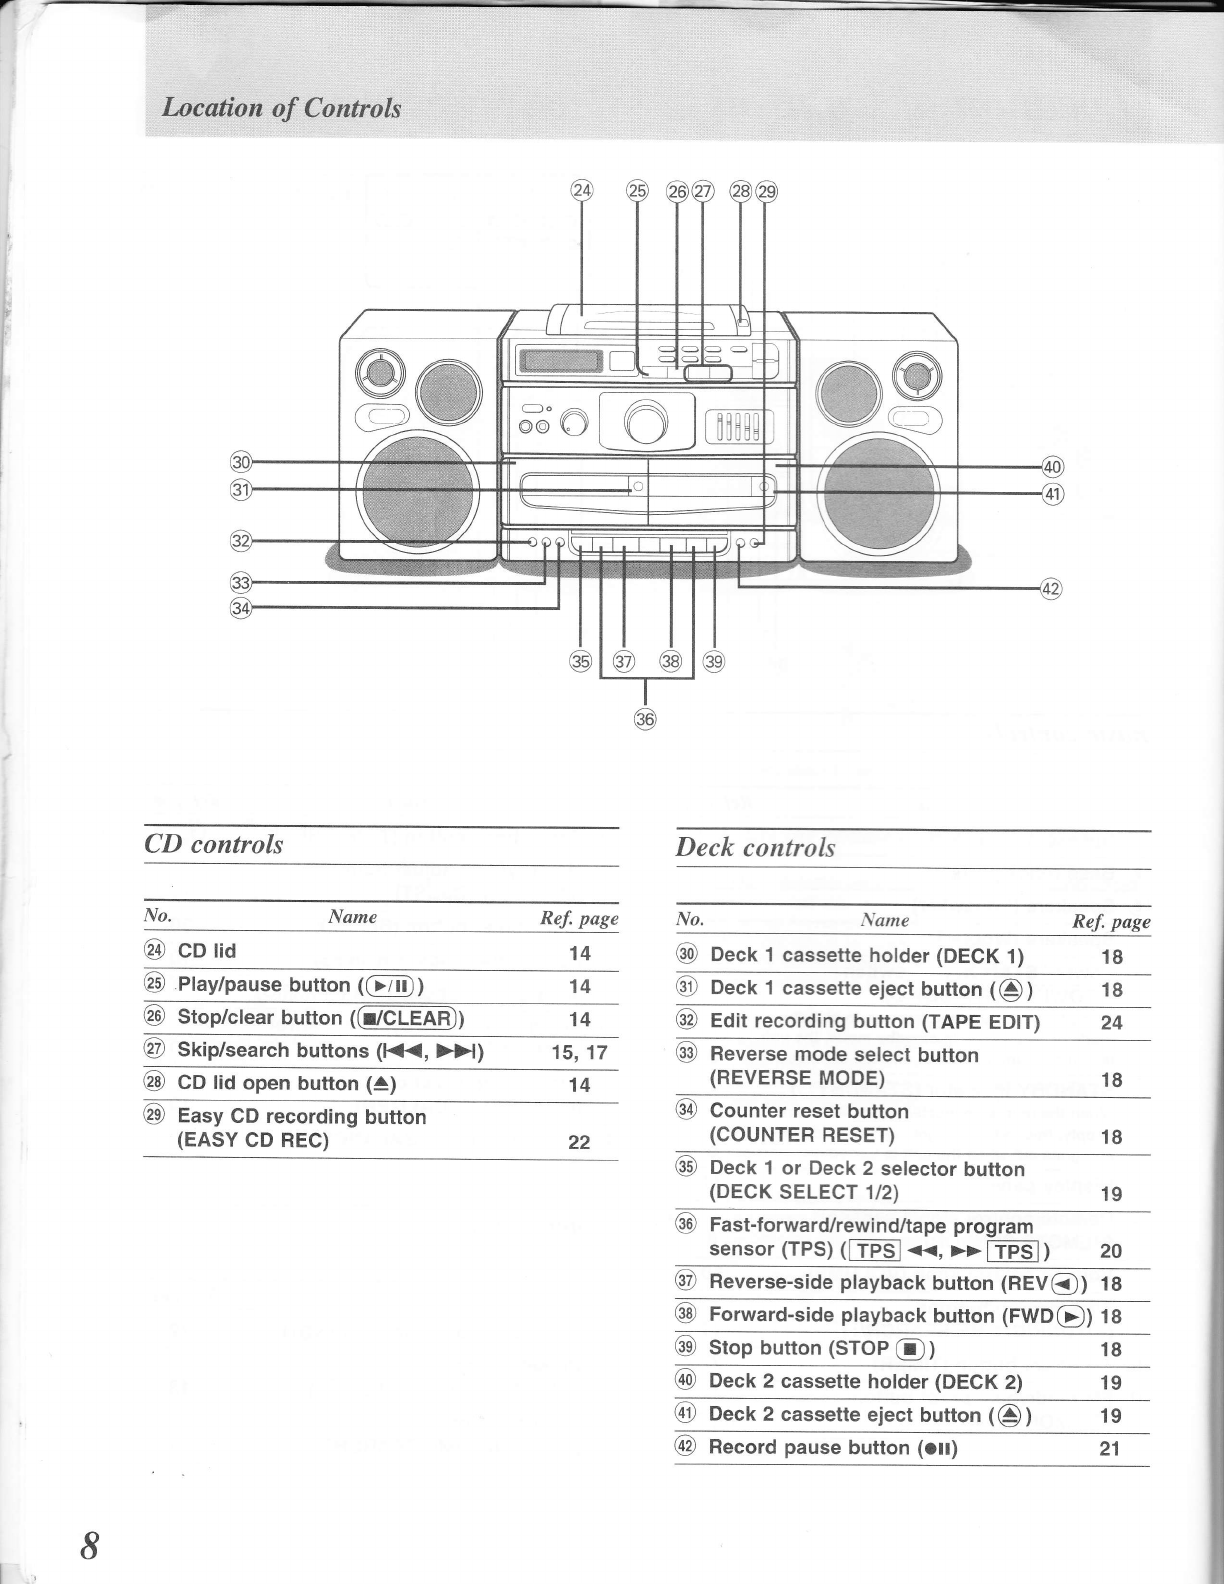
LocationsofControls ' ' - """""7
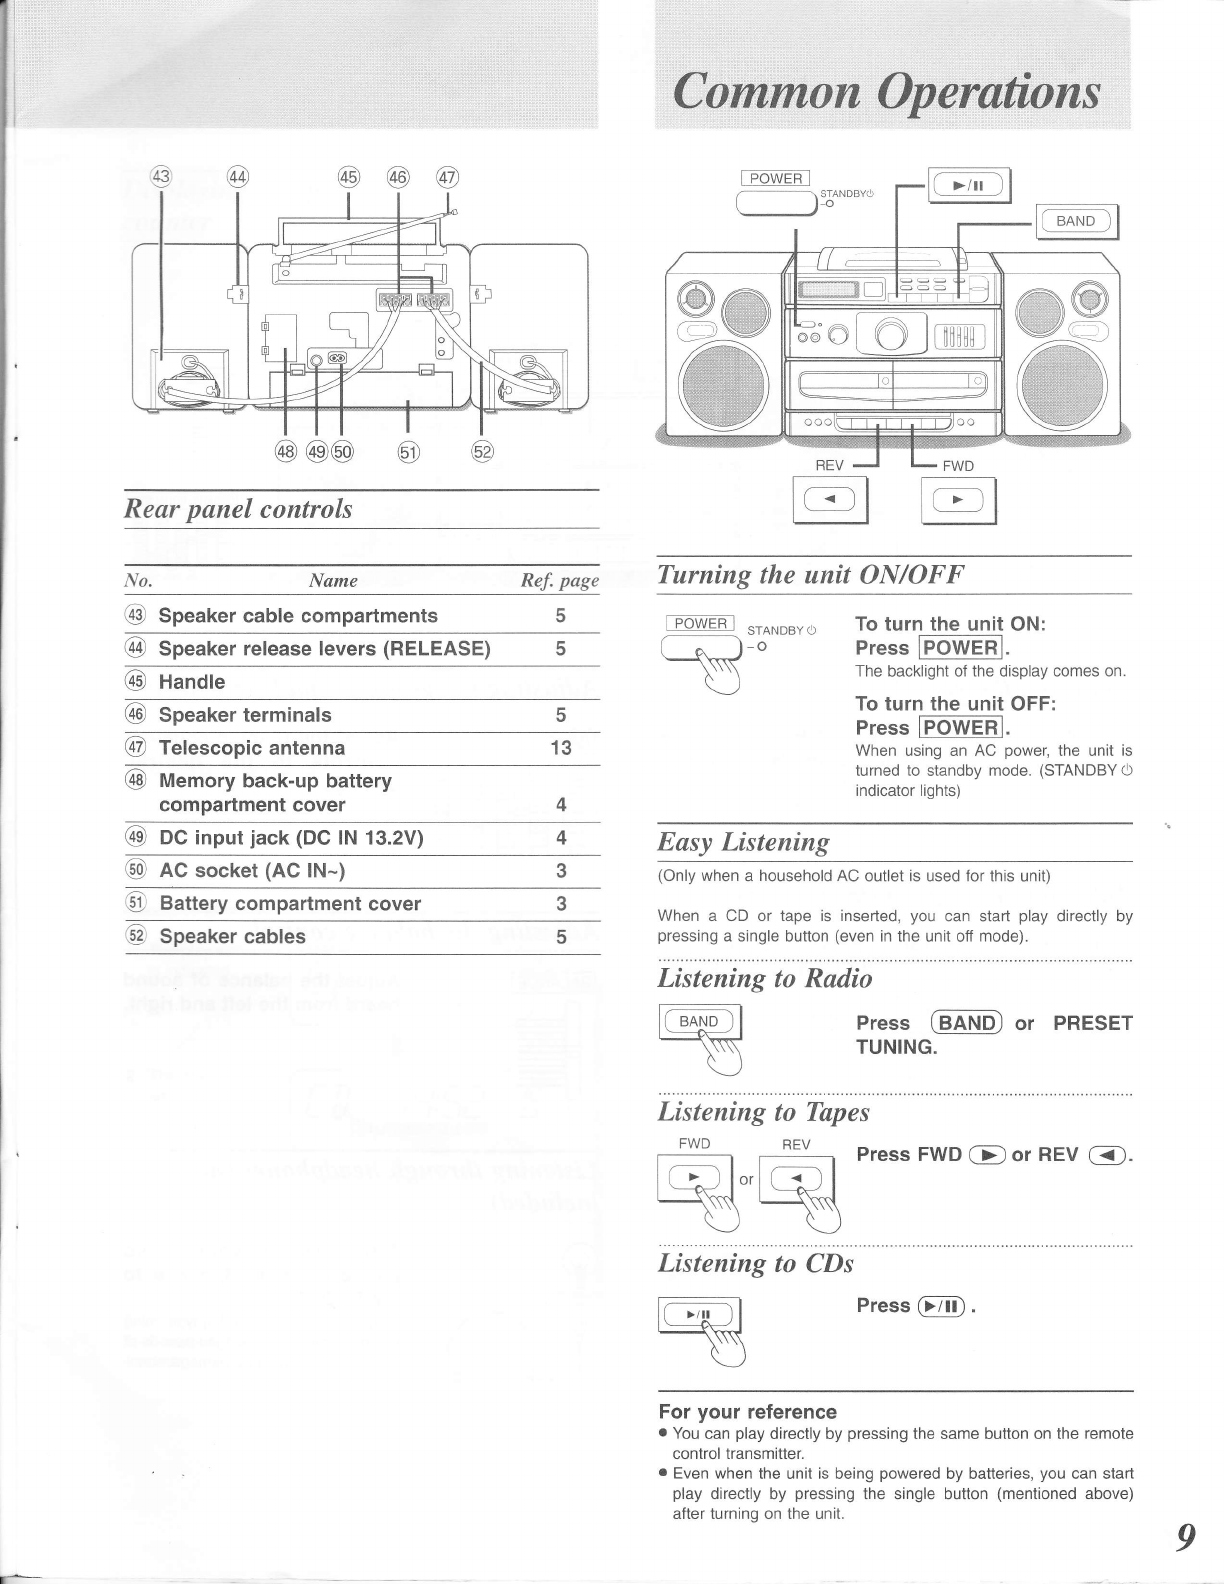
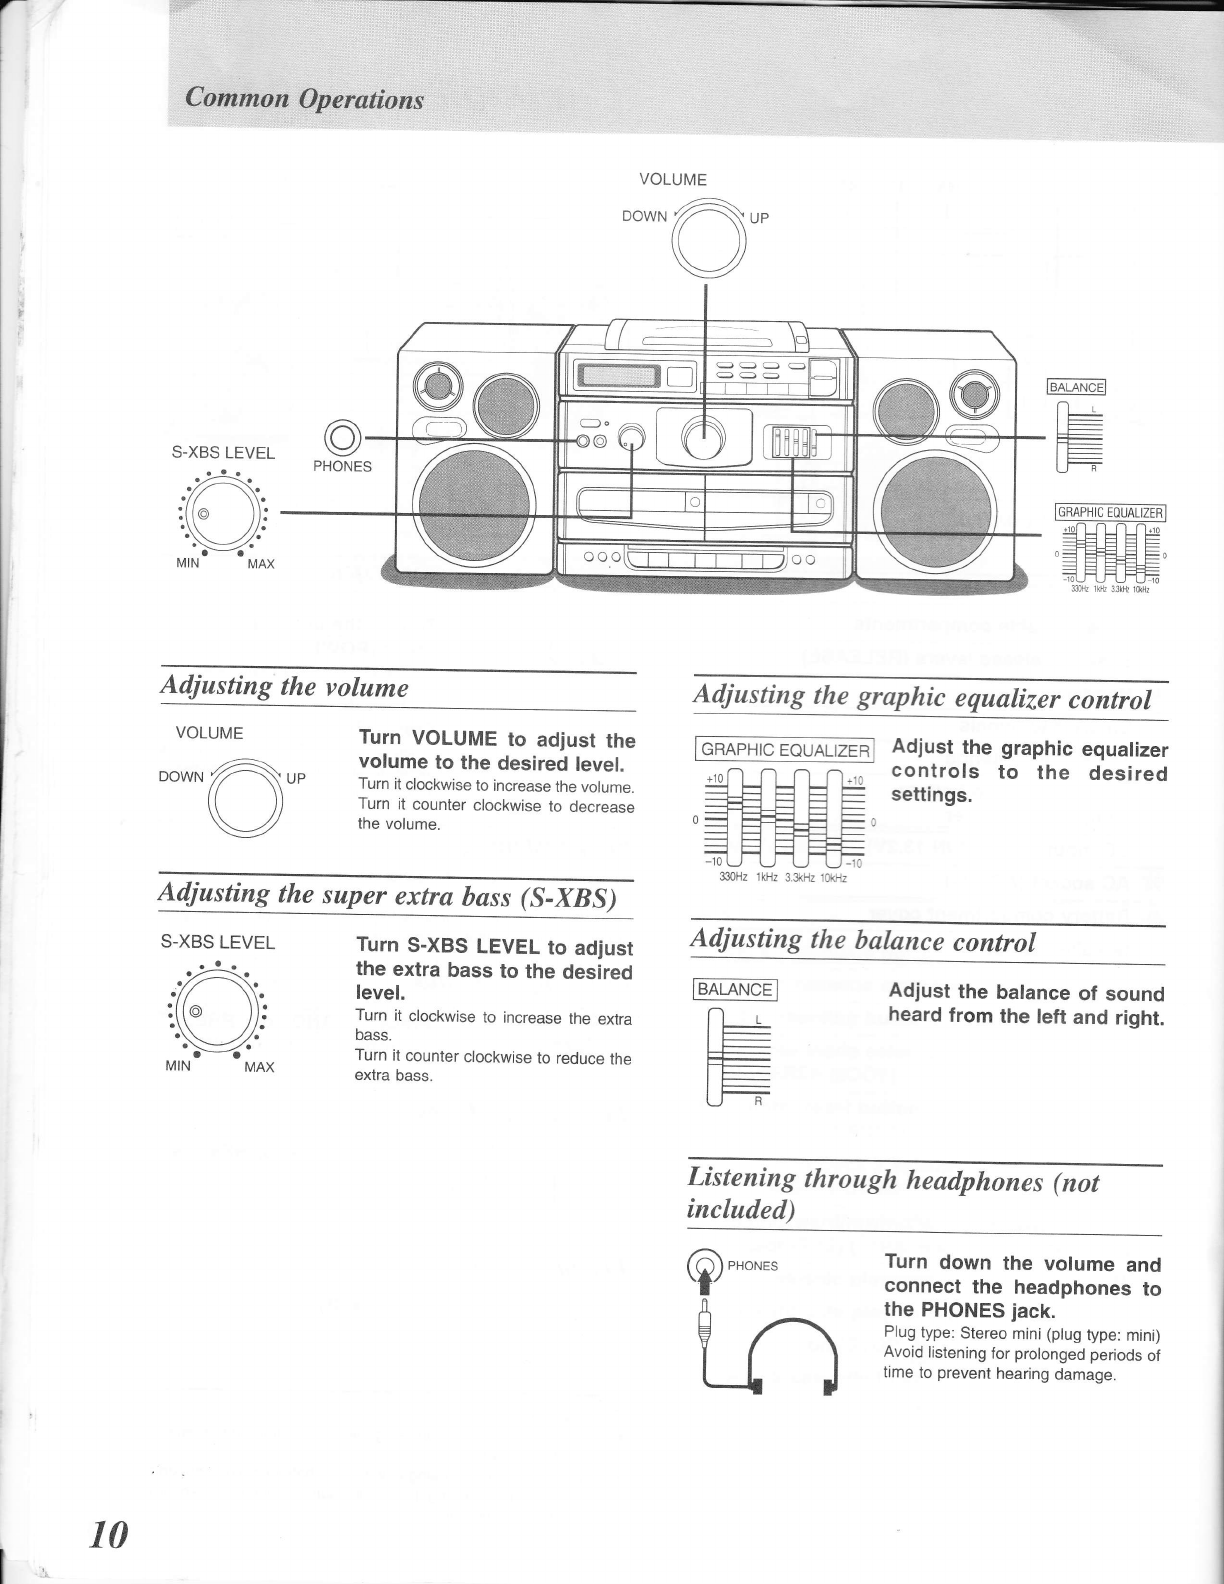
Common Operations " '"" " "9
Setting the Clock . ...,... ,.
Operations
Programming Broadcast Stations
Listening to Radio Broadcasts
Listening to CD .............
Listening to ThPes
Recording
12
..... ........13
.... ........14
............ 1B
Recording Radio Broadcasts ..."..........." """ " 21
Recording CD ..........'....... " """ ' 22
Recording Tape to Tape . .. . .... """""-"" """'24
Recording through the Microphone """""" " " 25
Timer
Using the Play Timer "" '. '" " " 26
usini tne Reiord Timer ' """"""28
UsinltneSleepTimerFunction ' """" " ""'30
General Information
Quick Reference of Remote Control Operations " " " 31
TroubleshootingGuide " "33
Maintenance 34
35
Concerning ComPact Discs.
Concerning Cassette TaPes
Technical Speci{ications
......35
Back Cover
;^ ".. \ B -r ' .6DI 0\x ""00-\r\D \ -t-0 0' r r)
ilrarnna;riApf( RFrlqlAM
.J L* -r,\..-'rB"\', r "_r"D!B\D_ot
AUVAH)LL .R n_r,, r.Jt[ r. A Dq[TL i_.0)oI-\.
r.AllAl SA A,J0.r )01 --a'', r0'tl drtr\a
VAcUr rai,[ia]n[aArgq],,, Ar].l0rtL1\
.^.....^ 0S!I b A)LD oIL\\uIooD'1\ID 6ooDD\trD0t!
VAH\l\U (praa,N aR R^npprAl B RAnlALl5_cALr\
.^ .^^- J rNLu.s-q loar N(l\ 00" t' io\t 0 t'tR+D(r15
AUVA*5iL BR 1 \\rr.iSDON.0to6 0p(tr r\
^^^^.- l'."Bro.,i.ror'qal 1 It\\rBDt'J\,,10-\l-
VUs5LIl uNDr, r.o-l.,lm,6i-,.r goBoU !
iia!Tnili!TRr!L AIqStT/lN
(lnside of product)
(lndersiden at apparatet)
(Tuotteen sisallA)
(Apparatens insida)
(Produktets innside)
(lm lnneren des Gerates)
2
Precautions
.lf the set is not used for a long period of time or is used only
from an AC power source, remove all the batteries to prevent
potential damage due to possible battery leakage.
.Avoid using or placing this unit near sources of heat. Do not
leave if in an automobile exposed to direct sunlight for a long time
with the doors and windows closed as this may deform the cabinet.
.Avoid cuts, scratches, or poor connections in the AC power cord,
as they may result in possible fire or electric shock hazard. Also,
excessive bending, pulling or splicing of the cord should be
avoided.
o Do not unplug the AC power cord by pulling on the cord. To do so
may cause premature failure or shock hazard.
. Do not operate the set on AC power in a bathroom, as a potential
shock hazard may result.
.When not in use, disconnect the AC power cord from the
household AC outlet.
Power Sources
To operate on AC power
Connect the included AC power cord to the AC lN- socket ol this
unit and your household AC outlet.
0v)
@
t
Household
AC outlet
(AC 230-24
Max -r\4.1
lrr r\?
!l\9,: \
r-\ " /'i
\d'
\l \t//
Tb operate on dry cell battery power
t ,,AQqC*iories
,_/Z Please check and identify the supplied acces-
/',//^t SOrleS.
/6< \
Yaw- \
lq'\
When using the memory back-up batteries (see the next page),
insert them first.
Please read "Use of batteries" on page 6.
Battery installation
Unplug the AC power cord from the household AC outlet and the
AC lN- socket of the unit.
Open the compartment for the batteries and insert ten R20/LR20
(UM-1, not included) batteries into the battery compartment. Making
sure that the batteries are installed in the designated numerical
order and that the proper polarities are maintained.
.Batteries installed with incorrect polarities may leak and damage
this unit.
. Do not mix batteries (old and new) or types (manganese and
alkaline, etc.).
.l{ the unit is not used for a long period of time or is used only from
an AC power source, remove the batteries to prevent potential
damage from possible battery leakage.
3
J/
l:
- Remote control transmitter .................................... 1 pc.
(EUR643820)
ft-------F-------
fEr."-T r-Tl
lL____________ ll
r--------.---.----l
| (rYmrYTTl I
(-----------:=J
Power Sources
Battery life
When the batteries are worn, "STANDBYO " indicator goes off (or
dims) during play, or the indication on the display panel flashes'
ln this cases, replace all the batteries with new ones'
Battery removal
Remove as shown in the figure below.
Bottom of the
unit
lnsert your finger into the opening and push the
batteries out.
Memory back-uP batteries
ln the event o{ a power failure, or if the AC power cord is
disconnected Irom the household AC power outlet (during AC
operation), or should the batteries fail, the memory back-up batteries
will preserve the preset memory and the timer functions o{ this unit'
Please read "Use of batteries" on page 6'
Battery installation
lnsert four R6/LR6 (UM-3 or equivalent, not included) batteries into
the battery compartment, making sure that the batteries are installed
in the designated numerical order that the proper polarities are
maintained.
Car Battery OPeration
lnsert the plug of the car battery cord into the DC lN jack'
Plug the other end into the cigarette lighter socket in your car'
UpJn plugging the car battery cord into the DC lN jack, the unit will
automatiCally switch from internal battery to car battery operation' Battery removal
Press the Q side of the battery No. 4
Battery lift
K@@
@
art
The life ol the memory back-up batteries is about one year'
o The life of the memory back-up batteries can be prolonged by
keeping the AC power cord plugged in the household power
outlet at all times.
r When disconnecting the AC power cord, switch off the power first
using the Power button.
o The life of the memory back-up batteries is reduced if the AC
power cord is disconnected from a household AC outlet with the
power still suPPlied.
o White exchanging the memory back-up batteries, be sure to
connect the AC power cord both to the unit and to the household
AC outlet.
4
STANDBYO indicator
-
lr I
r--=-:-l
I (mml
/ar ra
EE
n0
oo
Cigarette
lighter
socket
Conne*$*$l,tt&dl.l1l.i..$Ofu i.....,.Syiferz
This unit can be used as a one-piece portable stereo system or a
three-piece component system, by attaching or detaching the
speaker system.
Before attaching or detaching the speakers, be sure to disconnect
the speaker cables from the speaker terminals.
Be sure to press IFOWER-I to turn the unit ofl before connecting or
disconnecting the speaker cables.
Attaching the speakers
1. Align the speaker with the main unit as shown
in the figure, interlock the grooves and press
down.
Detaching the speakers
1.
2.
Unlock the speaker release levers by pulling
them in the direction shown above, and slide
each speaker up.
Connect the speaker cables to the speaker
terminals.
2. Connect the coloured speaker cables to
same coloured terminals. the
3. When using the unit with the speakers attached,
wind the speaker cables as shown.
trtr
Since a strong magnet is used for the speaker, keep magnetized
commuter passes, tickets or personal credit cards, recorded tapes,
watches, etc. away from the speaker. The speaker magnet in the
speaker may damage them.
5
Speaker Belease Lever
F-
Co.ncem@@'Nitubite Cointrol
Battery instullation
lnsert two RO3 (UM-4, not included) batteries as shown below
lnsert the batteries in
the correct polarities (@, e)
To remove the batteries, pull out the @ side
Use of batteries
. Do not mix old and new batteries, or batteries ol different types
(manganese with alkaline, etc.)'
. Always remove old, weak or worn-out batteries promptly and
dispose of them ProPerlY.
. Never subiect batteries to excessive heat or flame; do not attempt
to disassemble them; and be sure they are not short-circuited'
. lf the unit is not to be used for a long period o{ time, remove the
batteries and store them In a cool, dark place.
. lf a battery leaks, remove all batteries and dispose ol them
properly.
. Thoroughly clean the battery compartment belore inserting new
batteries.
. lf the electrolyte comes into contact with skin or clothes, flush
with water immediatelY.
. Keep batteries out of reach of children.
. Do not use rechargeable (nickel-cadmium) type batteries.
. Do not attempt to recharge alkaline or manganese batteries'
Remote control unit's operstion range
Face about 7 meters in front of the sensor.
How to use the remote control unit properly
. Do not place obstacles between the remote control signal sensor
and remote control unit.
. Do not expose the remote control signal sensor to direct sunlight
or to the bright light of an invertor lluorescent light.
. Take care by keeping the remote control signal sensor and the
transmission window free from dust.
To prevent malfunctioning of the remote control unit:
. Do not disassemble or reconstruct the unit.
. Do not place heavy objects on top o{ it.
. Do not leave it where it will be exposed to direct sunlight'
. Do not spill beverages or other liquids over it'
Battery life
The battery life is about one Year.
Although the battery life varies depending on how often the device
is used, the batteries should be replaced about once every year on
the average.
The batteries should be replaced if commands from the remote
control transmitter do not operate the unit even when transmitter is
held close to the front Panel.
6
Remote Control Signal Sensor (REMOTE SENSOR)
@@
@
of
fc
co
c
I-ocati"on of Con*ok
Basic controls
No. Name
O SpeaXers (Tweeter)
@ Bass reflex ports
@ Speakers (Squawker)
l, Speakers (Woofer)
€ Power "STANDBY cD" switch
(lFOWril STANDBY o)
Press to switch the unit from on to standby
mode or vice versa. In standby mode, the unit
is still consuming a small amount of power'
@ sraruoBY lndicator (STANDBY O)
When the unit is connected to the AC mains
supply, this indicator lights up in standby mode
and goes out when the unit is turned on.
@ Display panel
(REMOTE SENSOR) 6
g volume control knob (VOLUME) 10
@ fime search buttons
(-/TUNING/TIME SEARCH/+)
O Timer set button (TIMER)
g fnl mode/beat proof button
Ref. page Ref. page
@Time check button (TIME CHECK) 11,28
@ Memory/time adjust button
(MEMORY/ADJUST)
@ Sleep timer button (SLEEP)
@ Headphones iack (PHONES)
@ tvtixing microphone iack (MlX.MlC) 25
@ Super extra bass system control
(s-xBS LEVEL)
@ Graphic equalizer controls
(GRAPHIC EOUALIZER)
@Balance control (BALANCE)
11
Turuer controls
Name Re.f. page
11 @ Band selector button ( @ )12
@ Preset tuning button
(@ PRESET TUNTNG 8))
@ tuning buttons
(-/TUNING/TIME SEARCH/+)
11
30
10
10
10
10
I{o.
27 13
7
(FM MODE/B.P) 13,21 12
I-ocation of Controls
Q/ Skip/search buttons (l{{, }}l) 15,11
@ CO lid open button (r; 14
@ easy CD recording button
(EASY CD REC)
Deck controls
l,iame Re.f. page
@ Deck 1 cassette holder (DECK 1) 18
€) Deck 1 cassette eject button (@) 18
@ eOit recording button (TAPE EDIT)
@ Reverse mode select button
(REVERSE MODE)
QE Counter reset button
(couNTER RESET)
@ Oect 1 or Deck 2 selector button
(DECK SELECT 1/2)
@ Fast-forward/rewind/tape program
sensor (TPS) (lT-PSl (, ))tTps-l) 20
QD Reverse-side playback button (REV@) 18
@ Forward-side playback button (FWDC) 18
@ Stop button (STOP O)
CD controls
Ref. page
18
18
19
22
8
@ co lia 14
€D elaylpause button (@) 14
18
@ Oect 2 cassette holder (DECK 2) 19
@ Oect 2 cassette eject button (@)
@ Hecord pause button (olr) 19
Com,mon Opef ns
@
E@ @60
Rear panel controls
No. Name Ref. page Turning the unit ON/OFF
tP-WERI
s
Easy Listening
(Only when a household AC outlet is used lor this unii)
When a CD or tape is inserted, you can start play directly by
pressing a single button (even in the unit off mode).
Radio
Press G@ or PRESET
TUNING.
Listening to Tapes
FWD REV Press FWD a;) or REV C<).
['] ln,. ll] I
L:+d r<\d
\JU
@ Speafer cable compartments
@ Speater release levers (RELEASE) STANDBY.)
-o To turn the unit ON:
Press FowEEl.
The backlight of the display comes on.
To turn the unit OFF:
Press FowERl.
When using an AC power, the unit is
turned to standby mode. (STANDBY()
indicator lights)
6D Handle
@o) Speat<er terminals
+, Telescopic antenna 13
@ Uemory back-up battery
compartment cover
@ OC input jack (DC IN 13.2V)
6d nC socket (AC lN-)
.!! Battery compartment cover
1, Speaker cables
Listening to
ffit
-5
Listening to CDs
Press @.
For your reference
. You can play directly by pressing the same button on the remote
control transmitter.
. Even when the unit is being powered by batteries, you can start
play directly by pressing the single button (mentioned above)
after turning on the unit. 9
@@@ @
///A\\\ -^\
(\ff:t)'t /1 \\\
,_\\]!r!r!r!r!W//
( -l\ry
-,:;.G\
/P:-: : \\
l|:::.... -:- \\
:i tme*,,..,b,,iiiA&
VOLUME
'o*'ou'
S-XBS LEVEL
Adjusting the volume
Turn VOLUME to adjust the
volume to the desired level.
Turn it clockwise to increase the volume.
Turn it counter clockwise to decrease
the volume.
Adjusting the graphic equalizer control
GRAPHIC EQUALIZER Adjust the graphic equalizer
controls to the desired
settings.
Adjusting the balance control
Adjust the balance of sound
heard from the left and right.
VOLUME
/z-_\\
DowN Z--\ up
(())
V
Adjusting the super extra bass (S-XBS)
S-XBS LEVEL Turn S-XBS LEVEL to adjust
the extra bass to the desired
level.
Turn it clockwise to increase the extra
bass.
Turn it counter clockwise to reduce the
extra bass.
Listening through headphones (not
included)
Turn down the volume and
connect the headphones to
the PHONES jack.
Plug type: Stereo mini (plug type: mini)
Avoid listening for prolonged periods of
time to prevent hearing damage.
@,ro,..
Lrl
330H2 lkHz 3.3kHz iorHz
EALANce-l
nr.
IL
I f--
l-
tt___
l-
LJ R
10
$al@qgga':"':,,tfuQ| ck
The clock has a 24-hour display.
You can set the clock even in the
AC power). unit ofi mode (only when using
Displaying the present time or the tape
counter
This operation comes in handy to check the present time during
play or to check the tape counter during recording.
(Available only from the remote control)
Press DISPLAY.
Each time the button is pressed, the
display will change as follows:
Example: When DISPLAY is pressed during CD play;
1. The play status
is indicated.
IPress TIME CHECK to display
the present time.
r* Timer ON/OFF tifiteS
-
L Originat display - Present time J
(The display changes each time the
button is pressed.)
\'/
- t-t . t-t t-t-
t_t ',_t t_t
DISPLAY
CR,
\)
''---.' appears for the tape counter display when no tape has been
loaded.
2Press MEMORY/ADJUST.
- t-l , t-t l-t
t_t ' t_t t_t
The present
time is
indicated.
3. Tape counter
display is
indicated.
Press MEMORY/ADJUST.
(The clock now starts operating, and
the display returns to its original status.)
BANO V PRESETTUNE^
OOO
-IUNING +
OO
*cD*
CfCf
FANDOM ]CLEAR >,
OOC
uorur.(-f)
Panasonic
CD FADIO CASSETE
@@
/- -l \\&l&ry//
\_;v
/Zffi\
,A
ffiW
wGl
Example: Setting the clock to 16:20;
Preparation: Press IPOWERI .
ME]\,4ORY/ADJUST
eR
\J
_TTUNING,qMESEARCH/+ Press -/TUNING/TIME
c-ilQ SEARCH/+ to displav the
)l _; U minute (20).
t- Tt t t-t.t-t / -ob
l_lt t t l.t t t :)
-tlltzLlEtr-:s7EE mE
I\,,lE[/OBY/ADJUST
R,
\)
t- Tt tt t.t- -t -&"
t tt t--t.--ti- *;
-tr rEAi ea8! rcE
t- Tt t'n-tt-t lobl
t_ u t_n_il_t _ =)-E rltrEEtrtrElErlbtr
Press -/TUNING/TIME
SEARCH/+ to display the
hour (16).
\ l/- -
_il-_.t il I
I t_t , t_t t_l
Press MEMORY/ADJUST.
-ITUNING,TIME SEARCH/+
-eR
r.iA\ \,
il ilI
I t_t . t_ t_t
I\,lEMORY/ADJUST
R
\) 11
once broadcast stations have been programmed, they can easily be tuned in at the touch of a button on the unit or on the remote control.
Up to ten FM and AM stations each can be programmed.
2.4 _[FEt_ _ -
wge
oe- t_f
rlT- li 1
3.5 1
/ / // - --l\ \
@
(', @M+Effi
6z"cIo ]mml
--T:n
:1:
Example: Programming FM gg.1 MHz in preset channel 2i
IVEIVORY/ADJUST
cR
\i
clpts
Programndttg Broadcast statiorts
1
3.5
Press BAND to display,,FM,'.
fAM+FM-l
(The display changes each time the
button is pressed.)
2.4
Repeat steps 2 to 5 to pro-
gram the other stations.
6
I
Press -/TUNtNG/TtME
SEARCH/+ to setect the
station.
FM stations can be selected auto_
matically (see the right).
l-- l\/l
ltt t_t t_t t
l_il_t .t
Press MEMORY/ADJUST.
t- l\4
l', ,l I
-lFruMCl-.I
7t\
t_-tt_-tt
t_il_t . t
-/TUNING/TI I\,4E SEARCHA Press -/TUNING/TIME
Selecting FM stations automatically:
Keep pressing -,,TUNtNG,TIN4E SEARCH/+ until the frequency
display starts to change. A station with good reception is
automatically selected and the selection pro"".i then stops.
To stop the selection at any time:
Press -/TUNlNGrTltr,lE SEAHCFI _ agarn.
The selection may stop r.,,thc;t :uninc .to any station i{ there is
Irle_rf_elence in the vic,r:tr,. ir. 3-gr, a case. tap _,TUNINGiTIME
SEARCH/+ until a statrcn s f re1;e-cy is picked up.
Programming AM stations:
1. Press BAND in step 1 to orsplay AM.
2. Perform steps 2 to 5,
SEARCH/+ to disptay the
preset channel in which the
station is to be programmed.
While lFRocRAMl is flashing,
press MEMORY/ADJUST.
Preset Channel
12
5'ru'
Listen lt,.,,rfiO
Preset tuning
Make sure you have completed the procedure for "Programming
Broadcast Stations" (See page 12.) beforehand.
To listen to a station without programming it first, refer to "Listening
to broadcast stations which have not been programmed" (See page
14).
Press @ to display "FM"
or "AM".
[+AM+FM-.1
(The display changes each time the
button is pressed.)
t: t\/t
ttt l_-l u_-
l_lt._t
FIV1 IVODE/B,P
O
2
Press PRESET TUNING to
select the preset channel.
The station is changed each time the
button is pressed.
For better reception
When there is too much interference during a
FM stereo broadcast
(Available only from main unit)
Reduce the interference by setting the sound to monaural"
Press FM MODE/B.P.
Lights.
To return to stereo reception, repeat the same procedure and turn
ott tre I trlo[O I disptay.
NBil
rn" EIEEEO display witt not tight in the monaurat mode even
when a stereo broadcast is received.
Adjusting the antenna for better reception
FM
Pull out the telescopic antenna and adjust its length and angle for
optimum reception.
AM
Turn the unit in the direction which gives the best results.
F[/4 I\IODE/B,P
R
\J
1
2PRESET
TUNING Eq
B
C]
U
O
L]
clao 6[-,r
aao t-J
r- r-rJ rl
1
@
r.-@W-I-=$F:r.:
I - l
6',.'oto jmm
-:F:
:1-l
ooo[t-TT.T [--T_T-l,loo
t: t\/t t:tt:t t
I I I t_t t_t. I
I
l_- l\/l
ltt
lFrrm;Ml E
t:il:t t
Lil_L t
13
to CD
:@l r[@l 2
Press(i/ccLeAR)
'NO DISC' appears on the disPlaY.
Listening to broadcast stations which have
not been programmed (Manual tuning)
Press @ to display "FM"
or "AM".
l.AM*FM-l
(The display changes each time the
button is pressed.)
Press A to oPen the CD lid, in-
sert the CD then close the lid.
1
To stop play:
Press GrcLEARl.
To stop play temPorarilY:
Press@.
The elapsed PlaY time indication
flashes.
To resume play:
Press@ again.
lnterference may affect radio or TV reception when CDs are played
close to a radio or TV set. lf this occurs, place the unit as lar away
from the set as Possible'
When " lll " aPpears on the disPlaY:
It indicates there are 11 or more tracks on the disc at the playing
position.
,,A
f]ee\ (fr@*hr\l
/ffi\\ry/
W.--)
,"ffir
t- t\/t D -t t_
t t t l-l l.-l lnsed a CD with its label facing uP.
3re
r--:l
l[rrcrEAR) I
=N
ffit
t+lU
ntE
_,[UNINGIIIII/E SEARCH/+
OR \J
-,TUNINGTTIME SEARCH/+
f-^ -)r- -- l frequency.
-1\- FM stations can be selected auto-
v maticallY (see Page 12')
Liohts when an FM stereo
pr"ogram is picked uP.
Lights when a station is
tuned in ProPerlY
@
Pressing @ on the main unit or remote control will auto-
matically turn the unit on and receive the broadcast which was
previously tuned (only when AC power is supplied).
Frequency displaY stePs:
The frequency display changes in the following steps:
FM: 100 kHz steps
AM: 9 kHz steps
Prcss fTUNING/flME SEARCI-U+
to tune in the broadcast station.
Press this to increase the broadcast
frequency.
Press this to decrease the broadcast Press @ to start PlaY'
Play now starts in sequence from track
1 to the last track, after which it will
stop automatically.
Total number of tracks
Total play time
Elapsed play time of track in PlaY
14
Selecting and listening to your favourite tracks (Program play)
3
5
AAO C]
-.6Eo _l
_)
Fi, ,l,l
t_ ---------:-t 2
lE€!E4p ll
/-----------71 l.-
F.oto lm
oool\. l T T l__T ]oo
Up to 36 tracks can be programmed.
Example: Selecting tracks 2, 5 then 7;
CANCEL
C:)
Press(i/CLEAR).
Press K< or }) to select
the desired tracks.
When a track has been programmed in error:
(Available only from the remote control)
Press CANCEL in the stop mode.
Each time the button is pressed, the track programmed last is
cancelled.
To clear program play:
Press 6/clEAE) in the stop mode
3 -'ffi Press MEMORY/ADJUST.
Play time of programmed track 2.
Repeat steps 2 and 3, to
select tracks 5 and 7.
Press @to start play.
The programmed tracks are played in
the programmed sequence, and play
stops automatically.
SLEEP DISPLAY
OO
BAND V PFESET TUNE ^
OOO
TUN NG +
OO
-cD-
Programmed track Play sequence
tu_-t
t_u L
IFmMM E
t:.:t t
tt.tt
I
15
kSfu*ingta,.CD." ' '1,;;''1'""'' '- r""'."'
When "FULL" appears on the disPlaY:
The number of programmed tracks has exceeded 36. No more
tracks can be programmed.
When "-:-" appears on the display:
The total play time of the programmed tracks has exceeded 120
minutes. However, programming and play are still possible'
Memory retention of programmed tracks:
The contents of the memory will be retained even if play is stopped
or if the power is turned off before its completion'
To check what has been Programmed:
Press 1{{ or }}l while above display appears'
Each time this button is pressed, the number of the track and the
play sequence can be checked.
The program is erased in the following circumstances:
o When A has been pressed to open the CD lid.
. When the AC power cord is disconnected or the batteries are
removed without inserting memory back-up batteries beforehand'
To repeat trqcks (RePeat)
(Available only from the remote control)
Belore play or during PlaY:
Press REPEAT.
Playing selections
(Random play)
(Available only irom the remote control)
This function automatically selects a sequence of tracks to be played
in random order.
Press r/CLEAR.
Press RANDOM.
Lights
All the tracks are played at random, and play automatically stops'
To cancel random PlaY:
Press ICLEAR to turn FANDOMI indicator off.
@
Random play with the programmed tracks is not possible'
BEPEAT
,-\R
\J
REPEAT
O
To cancel rePeat PlaY:-
Press REPEAT again to turn lC)l indicator off.
For your reference:
o In piogram play (see page 15), the unit plays only the programmed
tracks in the programmed sequence repeatedly
. You can enioy the same track over and over by programming
only one track.
r When program play is cancelled, the repeat mode is also deleted'
tn random order
a BA!AoM Press HANUUM.
a r cr I r-l
-1\ | f Tt _t t-t.t-t t I
U I ,- 1/ t- t-t't-t t I
1
This appears when tracks have been programmed in the memory'
Lights
16
2
3
t-;;_-l
.N
re
1
Startirug CD play from a desired track To skip tracks
(Direct play)
Example: Starting disc play from track g;
Press EreIEAR.
Press l{{ or }}l to display
desired track number 9.
t il tt
t_il _t
&iZEt4ltdtrtrldre- E
Press @ to start play.
t- Tt t-t
l_ Lt _t t t,t n
I l:l ll
--- mf;
/ i\-._
All the tracks starting from the track
selected to the last track, are played in
sequence, and play automatically stops.
Press ))l to skip ahead to
the start of the next track.
Press K< to skip back to the
start of the current track.
By repeating this operation, you can
skip tracks in the number that
corresponds to the number of times you
pressed the button.
u@
ln random play (See page 16), you cannot skip to the beginning of
the track that has been already played.
For your reference:
ln program play (see page 1S), you can skip forward and backward
in the programmed sequence.
Tb search forward or backward
During play:
Keep pressing P; to ad-
vance the disc play rapidty.
Keep pressing 1{1 to review
disc play rapidly.
Release the button when the desired
position on the disc is reached.
For your reference:
During program play (see page i5) and random play (see page
16), search will only take place within the track in play.
t;r
L--cg-l
\\(\
U
r\\\
a.\
17
Youcanuseeitherdeck.lordeck2fortapeplaybackbyfollowingtheSameSteps (This page shows an example using deck 1 )
iO" S
COUNTER
RESET
oE
r:I EPSI
E
STOP
@
STOP
E
1Press STOP ai'=).
T lJnt:
tllll_
STOP
fr- -l
I \_ _-/ '
ITPSI trFs
E.,E
To stop PlaY:
Press STOP @
To rewind or fast forward the
tape while the taPe is in the
stop mode:
Press ifPS +< or TPSI >>
To reset the taPe counter to
"000":
Press COUNTER RESET.
Press @
tape and
holder.
button, insert the
close the cassette
With the side to be
played facing You COUNTER
RESET
o
Press REVERSE MODE to
select the reverse mode (see
right.)
7ltLrt_
I I ll t_
1_
l_-ll__ll__ Lool
_u_l _l _ ?
REVEBSE
MODE
($k
\J Selecting the reverse mode
4:=
tr$)
OR
REV
Press FWD @ or
Playback now starts.
While E is disPlaYed,
side is played back.
While { is displaYed,
side is played back.
REV @.
the forward
the reverse
Each time you press REVERSE MODE, one of the indicators will
light up.
;1" : The deck plays one side only, and then stops automatically'
l2 : The deck plays both sides and then stops automatically'
ijl : fne tape plays repeatly until the STOP C-) is pressed'
When you load tapes into both decks; sequential playback
will be made. (See Page 19)
Types of tape which can be used:
Normal/TYPE I
CrOz/TYPE II o
o
METAI/TYPE IV o
18
Listening to two tapes consecutively
STOP
@
43
Press STOP C-).
STOP
R
U
IPress DECK SELECT 112 to
select DECK 1.
Press @ insert
and close the
holders.
the tapes
cassette 'R
To stop play:
Press fWO O or REV (=)
button to start playback.
REVERSE
MODE
a
\J
3Press REVERSE MODE to
set the (:) mode.
T r-rCrt- t-u-t-t 6
I I ll l_ l_ll_ll_l _ (=)
The two tapes will play back as follows:
. You can also start playback from a
position other than the forward side
of the tape in deck 1. Press DECK
SELECT 112 and/or the opposite
playback button.
Press the STOP Cr) button.
I
t
I
STOP
@
DECK SELECT
T CtCrr_ t-n-n-t
II II t_ l_t t_il_t _
19
ITPE]
EITPS
r
To find the beginning of a Program To fast forwurd or rewind t\!l!!:
(TPS: tape program sensor)
Press ITPSI << or [TpS >> buttons while the
tape is playing.
lf the {orward side ( @ ) is PlaYing:
>>: The tape will play from the beginning of the next tune'
<<: The tape will rewind to the beginning of the present tune'
Then the tune will be PlaY again.
. 1-
I t ll tl I I --tt-- laei
t iii- t- t-t -t -t (=)*
-;*Jhi
/ tV\
While a TPS operation is taking place'
the tape direction indicator and the play
indicator will flash.
ll the reverse side ( { ) of the tape is playing:
The reverse of the above will take place.
Note:
TPS is the tunction that searches for the silent passages in a tape
program. So it may sometimes tail to operate correctly in the
following situations:
o When the interval between programs (blank space) is less than 4
seconds.
o When there is a particularly low-level passage or silent passages
in the middle of a Program.
. When there is no blank space between tape programs (for
example, tape recorded from a microphone)'
.When the program is less than 10 seconds, or when it is less
than 10 seconds ,rom the beginning of the program to the
beginning of the next Program.
. When a tape recorded with fade-ins or fade-outs'
Press lTpS << or [TpS >> buttons while the
tape is in the stoP mode.
>>: The tape will be fast forwarded.
<<: The tape will be rewound
For your reference:
You can fast forward or rewind the tape while you are playing a
tape in another deck. Press DECK SEIECT 1/2 to switch to the
non playing deck, and then press lrps.l << or lTp5l >>' After
above opeiation, be sure to press DECK SELECT 1/2 to select the
deck in which you are playing a tape.
20

Other manuals for RX-DT690

2

Other Panasonic CD Player manuals

Panasonic CQCB9900U - AUTO RADIO/CD DECK User manual

Panasonic

Panasonic CQCB9900U - AUTO RADIO/CD DECK User manual

Panasonic SL-SX291C User manual

Panasonic

Panasonic SL-SX291C User manual

Panasonic SLSX330 - PORTABLE CD PLAYER User manual

Panasonic

Panasonic SLSX330 - PORTABLE CD PLAYER User manual

Panasonic SL-S112 User manual

Panasonic

Panasonic SL-S112 User manual

Panasonic DVD-S27 User manual

Panasonic

Panasonic DVD-S27 User manual

Panasonic SL-CT345 User manual

Panasonic

Panasonic SL-CT345 User manual

Panasonic SL-J900 User manual

Panasonic

Panasonic SL-J900 User manual

Panasonic SL-SW660V User manual

Panasonic

Panasonic SL-SW660V User manual

Panasonic SL-S650 User manual

Panasonic

Panasonic SL-S650 User manual

Panasonic RXDS17 - RADIO CASSETTE W/CD User manual

Panasonic

Panasonic RXDS17 - RADIO CASSETTE W/CD User manual

Panasonic CQ-C1505N User manual

Panasonic

Panasonic CQ-C1505N User manual

Panasonic RX-D552 User manual

Panasonic

Panasonic RX-D552 User manual

Panasonic SLPS770D - COMPACT DISC PLAYER User manual

Panasonic

Panasonic SLPS770D - COMPACT DISC PLAYER User manual

Panasonic RXDS27 - RADIO CASSETTE W/CD User manual

Panasonic

Panasonic RXDS27 - RADIO CASSETTE W/CD User manual

Panasonic CQDFX501U - AUTO RADIO/CD DECK User manual

Panasonic

Panasonic CQDFX501U - AUTO RADIO/CD DECK User manual

Panasonic SL-SX469V User manual

Panasonic

Panasonic SL-SX469V User manual

Panasonic SC-MAX700 User manual

Panasonic

Panasonic SC-MAX700 User manual

Panasonic SLS232C - PORT. COMPACT DISC User manual

Panasonic

Panasonic SLS232C - PORT. COMPACT DISC User manual

Panasonic RXDS18 - RADIO CASSETTE W/CD User manual

Panasonic

Panasonic RXDS18 - RADIO CASSETTE W/CD User manual

Panasonic SL-SX285 User manual

Panasonic

Panasonic SL-SX285 User manual

Panasonic SLSX430 - PORTABLE CD PLAYER User manual

Panasonic

Panasonic SLSX430 - PORTABLE CD PLAYER User manual

Panasonic WJDR200 - DIGITAL VIDEO RECORD User manual

Panasonic

Panasonic WJDR200 - DIGITAL VIDEO RECORD User manual

Panasonic SL-MP353JP User manual

Panasonic

Panasonic SL-MP353JP User manual

Panasonic SLSX420 - PORT. CD PLAYER-LOW User manual

Panasonic

Panasonic SLSX420 - PORT. CD PLAYER-LOW User manual

Popular CD Player manuals by other brands

Sony CDX-G3100UP operating instructions

Sony

Sony CDX-G3100UP operating instructions

Onkyo DXC390 - CD Changer instruction manual

Onkyo

Onkyo DXC390 - CD Changer instruction manual

LENCO SCD-37 instruction manual

LENCO

LENCO SCD-37 instruction manual

Tascam CD-305 owner's manual

Tascam

Tascam CD-305 owner's manual

Seg RR 1103 instruction manual

Seg

Seg RR 1103 instruction manual

Saab 12 787 146 installation instructions

Saab

Saab 12 787 146 installation instructions

Sony MZ-N707 OpenMG Jukebox NOTES on installing &... operating instructions

Sony

Sony MZ-N707 OpenMG Jukebox NOTES on installing &... operating instructions

Arcam Alpha 9 Handbook

Arcam

Arcam Alpha 9 Handbook

Insignia NS-B4111 - CD Boombox With AM/FM Tuner quick start guide

Insignia

Insignia NS-B4111 - CD Boombox With AM/FM Tuner quick start guide

Coby CX-CD445 instruction manual

Coby

Coby CX-CD445 instruction manual

moon MOON CD-1 owner's manual

moon

moon MOON CD-1 owner's manual

Element E500-CD instruction manual

Element

Element E500-CD instruction manual

Sony CDP-M205 operating instructions

Sony

Sony CDP-M205 operating instructions

Tascam MDD-CCDD1 Service manual

Tascam

Tascam MDD-CCDD1 Service manual

Technics SL-PD1348 operating instructions

Technics

Technics SL-PD1348 operating instructions

Sony CDP-CA80 Service manual

Sony

Sony CDP-CA80 Service manual

Harman Kardon DVD 5 Service manual

Harman Kardon

Harman Kardon DVD 5 Service manual

Philips AZ 7356 owner's manual

Philips

Philips AZ 7356 owner's manual

manuals.online logo
manuals.online logoBrands
  • About & Mission
  • Contact us
  • Privacy Policy
  • Terms and Conditions

Copyright 2025 Manuals.Online. All Rights Reserved.