Panchromatic Eumig Mark 8 User manual

Panchromatic Eumig Mark 8 User Manual
1
The Place to find Antique, Vintage, Retro or just plain used, 8 mm Super 8 mm 9.5 mm,
16 mm Film Projectors, Slide Transparency Projectors, Cameras and Darkroom
Equipment.
Eumig Mark 8
Dual Format
Film Projector
User Manual
Service@Panchromatic.co.uk

Panchromatic Eumig Mark 8 User Manual
2
EUMIG MARK 8
Silent film projector for Standard 8, Super 8 and Single 8 mm films
Projection lens AUSTROVAR 1,4/15-25 mm. This projector is
equipped with. a 12V/100W halogen lamp 562 U 240.
The lid contains the following interchangeable parts for the
projection of Standard 8 films:
2 Sprocket Drums, dark grey 706 U 141
1 Film Guide, dark grey 706 U 136
1 Film pressure plate, dark grey 706 U 106
The following are also provided:
1 Supply Cable with Plug
1 Special Take-Up Reel596 U 121 1 lnstructon Booklet.
1 Guarantee Card
The projector is fitted with the following interchangeable parts for
the projection of Super 8-films:
2 Sprocket Drums, light grey 706 U 140
1 Film Guide light grey 706 U 135
1 Film pressure plate, light grey 706 U 107
1 Reel Adapter, light grey 706 T 335
Available as accessory:
film reel 400 ft capacity for Standard 596 F 017
film reel 400 ft capacity for super 596 F 020

Panchromatic Eumig Mark 8 User Manual
3
Before Use
Be sure that the nature of your electric supply, its voltage and frequency
are compatible with the specifications of your projector.
Should you find it necessary to adjust the voltage setting on your unit
this can be done in the following way.
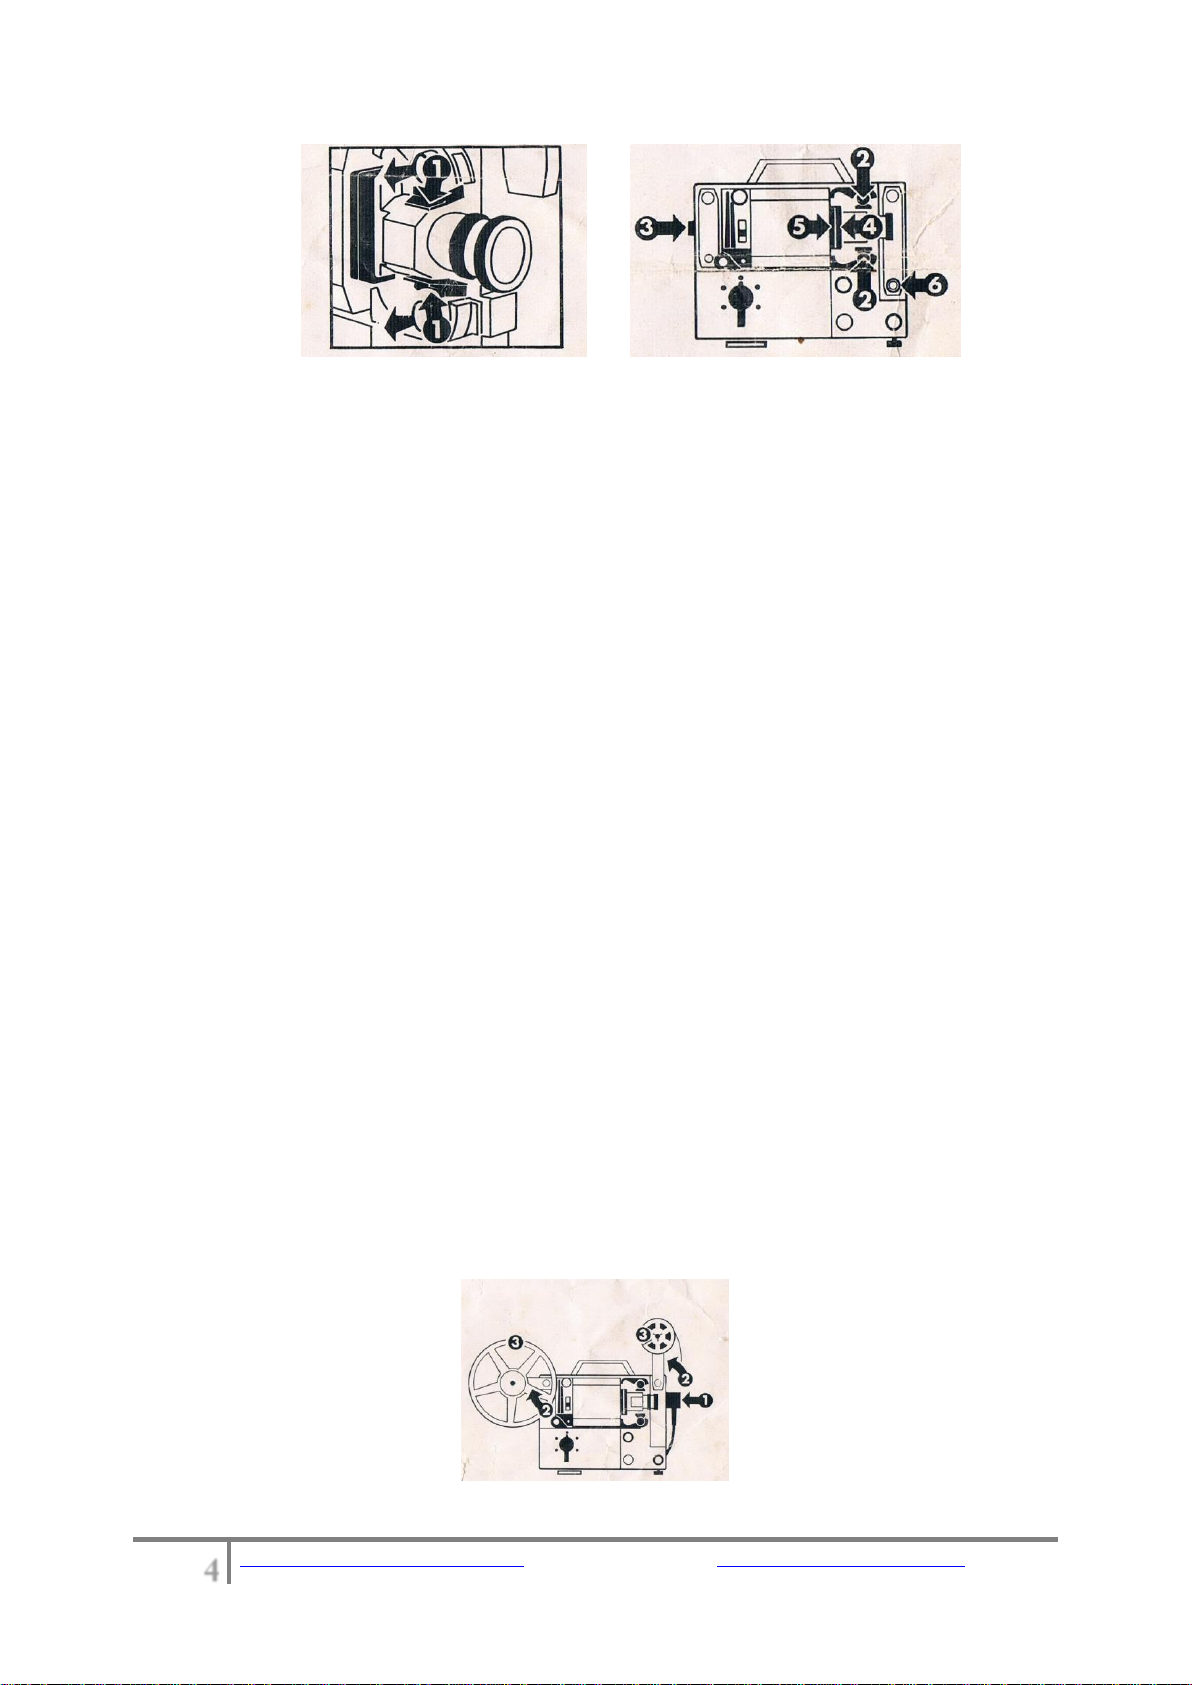
Remove back cover of projector after loosening the four fastening
screws.
1. Pull out the red plug on the transformer in an upward direction,
and replace it in the appropriate socket.
(To change the frequency (only possible in special projector models)):
2. Pull out the blue plug and replace it in the appropriate socket.
3. Adjust the lever at the top right in such a manner that the
required frequency value is legible horizontally.
Finally replace the back cover.
Adaption for Standard 8 projection
1. Release the pressure guide of the feed sproclet and the take-up
sprocket and remove the light grey sprocket drums.
2. Insert the dark grey sprocket drums, making sure that they click
into position (rotate them a little if necessary) Close the pressure
guides. Pull the lens forward a little.
3. Turn knurled knob, until red dot is in position above.
4. Push light grey film pressure plate towards the lens and take it
out.

Panchromatic Eumig Mark 8 User Manual
4
5. Push light grey film guide towards the lens take it out replace it by
dark grey film guide. (First push in until it comes to a stop, then
push toward the left until the two guide pins click into position.)
Replace the dark grey film pressureplate.
6. Remove the light grey reel adapter from the front reel support,
and secure it in the projector lid
For Super 8 projection the dark grey parts must be exchanged again for
the light grey parts.
Beforehand, knob 3must be turned so that red dot is in TOP position
Projection
Splice a sturdy leader strip of ample, length to the beginning of your
film. Make a straight cut through the front end of the film. The cut of a
Super 8 film must pass through a perforation hole, the cut of a Standard
film must pass between two perforation holes. For the faultless
functioning of the automatic film threading facility, the film must be
neither strongly buckled or bent.
1. Connect the projector to the mains. (The pilot lamp comes on.).
2. Swing out the reel supports.
3. Place the full reel on the front reel support. (The perforation must
be facing toward you.)

Panchromatic Eumig Mark 8 User Manual
5
Place the provided special take-up reel on the rear reel support in such a
way that it is firmly fastened. (The film length indication marks must be
facing toward you).
Wrongly spooled films (contrary to our illustration) must be rewound
twice to correct the error.
Height Adjustment
Raise the projector by the front end of the carrying handle until it is
inclined at the desired projection height. Rotate knob 1toward the left.
(Support foot slides out.) Rotate knob 1toward the right. (Support foot
is fastened in position.)
Still Picture Projection
2Turn the central switch to “still picture" (ev. adjust focusing). A heat
filter protects the film. (The image will be slightly less brilliant.)
Should the shutter cover the gate, turn knob 2. Turning this knob with
the fingers means that frame will follow frame on the screen as still
pictures.
Reverse Projection
Set the central switch to "Reverse Projection'. The film will now be
shown in the reverse direction. (Make frame line adjustment, if
necessary.)
Film Loop Adjustment
(With projector running in either forward or reverse direction.)
Faulty spicing or badly damaged sprocket holes can cause a shortening
of the film loop either before or after the film gate. (The running noise
becomes louder). Should this occur, the pin 4should first be raised and
then the key 5should be pressed. This restores the normal film loop.

Panchromatic Eumig Mark 8 User Manual
6
Adjustment of Running Speed
With the projector connected to the mains and the central switch in the
"0"' setting.
Push knob 6down as far as it will go = 18 frames per second.
Push knob 6up as far as it will go = 24 frames per second.
Rewinding
Lead the fully projected film directly from the special take-up reel to the
front reel, and fasten it there. Set the central switch to 'Rewind (i. e.
without light).
When Projection is Completed
1. Set central switch to "0".
2. Disconnect projector from mains.
3. Put film guide arms in the vertical position.
4. Remove Reels
5. Swing in the reel supports.

Panchromatic Eumig Mark 8 User Manual
7
Removal of a partially projected film
1. Set central switch to "0" and pull lens forward.
2. Pull out film pressure plate.
3. Release the pressure guides of the feed sprocket and take-up
sprocket.
4. Release the film carefully from its entire channel. (Remove lamp
housing if necessary.)
5. Re-insert film pressure plate.
The film can now be rewound in the normal manner.
Replacing the projection lamp
(with themains plug disconnected)
1. Lift off the cover of the lamp housing.
2. Turn down the protective plate and...
3. ... pull out the cooled-off projection lamp in an upward direction.
The new lamp is now inserted.

Panchromatic Eumig Mark 8 User Manual
8
Never touch the projection lamp with bare fingers; every finger-print will
burn into the quartz lamp, thus diminishing the light output. (Should you
inadvertently touch the lamp with bare fingers, immediately clean the
lamp with a clean cloth moistened with alcohol.)
Centring the projection lamp
Direct the projector towards the screen, turn the central switch to
"projection with lamp" and focus the frame-line sharp.
Service@Panchromatic.co.uk
Table of contents
Other Panchromatic Projector manuals