P&C DWVFI 18 User manual

Dishwasher / User ManualUSA/CAN
DWVFI 18

CONTENTS
1 IMPORTANT SAFETY INSTRUCTIONS........................................................ 5
2 RECYCLING ..................................................................................................... 9
3 INSTALLATION .............................................................................................. 10
4 TECHNICAL SPECIFICATIONS................................................................... 12
5 BEFORE USING THE APPLIANCE ............................................................. 13
6 LOADING YOUR DISHWASHER.................................................................. 17
7 PROGRAMS AND OPTIONS TABLE........................................................... 24
8 OPERATING THE PRODUCT....................................................................... 25
9 MAINTENANCE AND CLEANING................................................................ 29
10 TROUBLESHOOTING ................................................................................ 33
11 PRACTICAL INFORMATION ...................................................................... 35

USA-CAN - 3
Thank you for choosing this product.
This user manual contains important information on safety and instructions intended to
assist you in the operation and maintenance of your appliance.
Please take the time to read this user manual before using your appliance and keep this
book for future reference.
Icon Type Meaning
WARNING Serious injury or death risk
RISK OF ELECTRIC SHOCK Dangerous voltage risk
FIRE Warning; Risk of re / ammable materials
CAUTION Injury or property damage risk
IMPORTANT / NOTE Operating the system correctly

USA-CAN - 4
INTRODUCTION
Please read this user manual and particularly the
safety instructions completely and carefully. They will
save you time and eort and help to ensure optimum
dishwasher performance.
Be sure to observe all listed warnings and cautions.
Look particularly for the icons with exclamation marks
inside. The information icon will also provide important
references.
WARNING: Indicates a potentially hazardous
situation which, if not avoided, could result in death or
serious injury.
CAUTION: Indicates a potentially hazardous
situation which, if not avoided, may result in injury. It
may also be used to alert against unsafe practices.
NOTICE: Indicates a potentially hazardous
situation which, if not avoided, may result in damage
to the dishwasher, the tableware, the equipment or the
environment.

USA-CAN - 5
1 IMPORTANT SAFETY INSTRUCTIONS
WARNING: When using the dishwasher, follow
basic precautions. Read all instructions before using
the dishwasher! Save these operating instructions
and pass them on to any future user.
• Use the dishwasher only for its intended purpose as
described in this user manual. This appliance
is intended for normal household use only. Do not
change the specification of the appliance. The
manufacturer disclaims responsibility for damage
or injury caused by improper use of this appliance.
• The information in this user manual must be followed
to minimize the risk of fire or explosion and to prevent
property damage, personal injury or loss of life
• Use only detergents or cleaning agents recommended
for use in a dishwasher and keep them out of the reach
of children.
• When loading items to be washed.
1) Locate sharp items so that they are not likely to
damage the door seal, and
2) Load sharp knives with the handles up to reduce
the risk of injuries.
• Do not wash plastic items unless they are marked
“dishwasher safe”or the equivalent. For plastic
items not so marked,check the manufacturer’s
recommendations.
• Do not touch the HEATING ELEMENT during or
immediately after use.

USA-CAN - 6
• Do not operate your dishwasher unless all
ENCLOSURE panels are properly in place.
• Do not tamper with controls.
• Do not abuse, sit on, or stand on the door or dish
rack of the dishwasher.
• The cup racks are designed to support cups, glasses
and kitchen utensils. When the cup racks are in the
dishwasher do not lean on or use the cup racks to
support your body weight.
• This appliance must be grounded. In the event of
a malfunction or breakdown, grounding will reduce
the risk of electric shock by providing a path of least
resistance for electric current. This appliance is
equipped with a cord having an equipmentgrounding
conductor and a grounding plug. The plug must be
plugged into an appropriate outlet that is installed
and grounded in accordance with all local codes and
ordinances.
WARNING:
Improper connection of the equipmentgrounding
conductor can result in a risk of electric shock. Check
with a qualied electrician or service representative if
you are in doubt whether the appliance is
properly grounded. Do not modify the plug provided
with the appliance, if it will not fit the outlet, have a
proper outlet installed by a qualified electrician.
• Some dishwasher detergents are strongly alkaline.
They can be extremely dangerous if swallowed. Avoid

USA-CAN - 7
contact with the skin and eyes and keep children and
inrm persons away from the dishwasher when the
door is open.
Consult a doctor immediately if detergent has been
swallowed or inhaled.
• Do not remove the dishes from the appliance until
the program is complete. Some detergent may remain
on the dishes.
• Check that the detergent dispenser is empty after the
completion of each wash program.
• Do not drink and play with the water in the appliance.
harmful residues could be present.
• To reduce the risk of injury, do not allow children to
play in or on a dishwasher.
• When children become old enough to operate the
appliance, it is the responsibility of the parents/legal
guardians to ensure the children are instructed in safe
practices by qualied persons.
• Do not leave the appliance with the open door
unattended to avoid stepping accidentally onto it.
WARNING: Before any maintenance operation,
deactivate the appliance and disconnect the mains
plug from the socket.
• Do not use high pressure water sprays and/or steam
to clean the appliance.
• Ensure that there are no visible water leaks during
and after the rst use of the appliance.

USA-CAN - 8
• To avoid oor damage and possible mold growth,
do not allow wet areas to remain around or under the
dishwasher.
• To avoid dishwasher damage, do not allow water to
remain in your dishwasher systems through extended
periods of freezing.
RISK OF INJURY: To avoid risk of injury, always use
caution when opening the door during or following a
wash cycle as hot water or steam may escape.
• Do not store or use ammable liquids or vapors in
the area of the dishwasher, near or on the appliance.
• Under certain conditions, hydrogen gas may be
produced in a hotwater system that has not been
used for two weeks or more. HYDROGEN GAS IS
EXPLOSIVE. If the hot-water system has not been
used for such a period, before using the dishwasher
turn on all hot-water faucets and let the water ow
from each for several minutes. This will release any
accumulated hydrogen gas. As the gas is ammable,
do not smoke or use an open ame during this
time.
• Please check the water supply line periodically. It is
susceptible to breakage. It becomes less exible as
time goes by. Replace it immediately when it is torn,
cut, swollen or there is water leakage.

2 RECYCLING
Remove the door to the washing compartment when
removing an old dishwasher from service or discarding
it. Ensure that the appliance presents no danger
to children while being stored for disposal. Before
disposing the dishwasher:
• Disconnect the appliance from the mains supply.
•Cut o the mains cable and discard it.
• Remove the door catch to prevent children and pets
to get closed in the appliance
Old appliances may contain materials that can be
recycled. Please contact your local recycling authority
about the possibility of recycling these materials.
Please keep the dishwasher packaging out of the
reach of children after unpacking it.
WARNING!:
Risk of injury or suocation! Ensure that any plastic
wrappings, bags, small pieces etc. are disposed of
safely and kept out of the reach of children.
SAVE THESE INSTRUCTIONS
USA-CAN - 9

USA-CAN - 10
3 INSTALLATION
WARNING: When installing the dishwasher,
follow basic precautions, including the following:
Please check the standards and local codes for
placement of machine.
• Installation, maintenance and repair should be
performed by a qualied installer. Work by unqualied
persons could be dangerous and may void the
warranty.
• Do not operate the appliance if damaged,
malfunctioning, partially disassembled or if it has
missing or broken parts.
• Before installation or service, disconnect the power
supply to the work area by unplugging the unit,
“tripping” the circuit breaker or removing the fuse.
• Only connect the dishwasher to the power supply
when all installation and plumbing work is complete.
• Never connect the ground wire to gas lines, or hot
water pipes, plumbing lines.
• Do not install or store the dishwasher where it can be
exposed to below freezing temperatures or exposed to
weather.
• Dishwasher must be secured to adjacent cabinetry
using the brackets provided. Failure to do this may
cause damage to property or bodily injury.
• Connect to a properly rated, protected and sized
power supply

USA-CAN - 11
circuit to avoid electrical overload. The dishwasher is
designed for an electrical supply of 120 V (volts), 60
Hz (hertz), AC, connected to a dishwasher-dedicated,
properly grounded electrical circuit with a fuse or
breakers rated for 15 amperes.
Electrical supply conductors shall be a minimum of #
16 AWG copper wire rated at 75 °C (167 °F) or higher.
These requirements must be met to prevent injury and
machine damage. Consult a qualied electrician if in
doubt.
• Do not use any extension cord or portable outlet
device to connect the dishwasher to a power supply.
WARNING: Danger of suocation! Ensure that
any plastic wrappings, bags, small pieces etc. are
disposed of safely and kept out of the reach of
children.
USA-CAN - 12
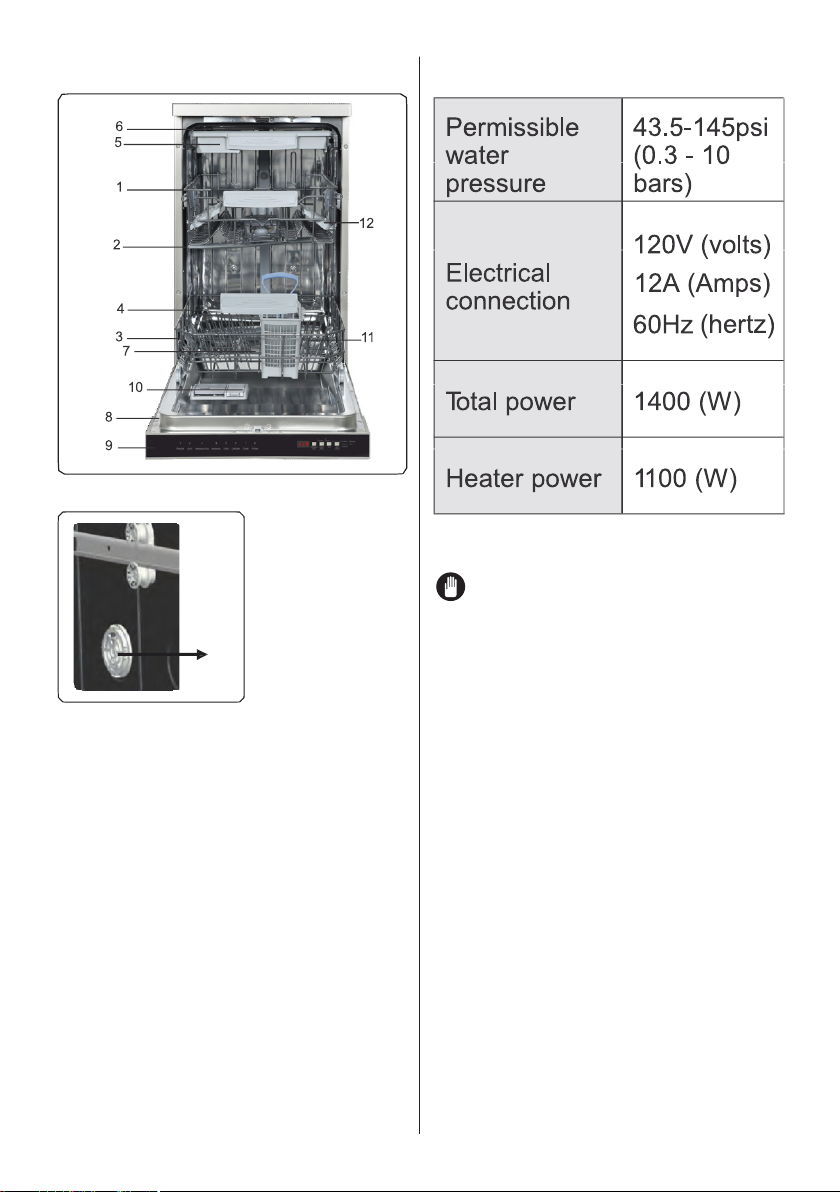
4 TECHNICAL SPECIFICATIONS
General Appearance
1. Upper basket with racks
2. Upper spray arm
3. Lower basket
4. Lower spray arm
5. 3rd basket( Model Depending)
6. Top nozzle( Model Depending)
7. Filters
8. Rating plate
9. Control panel
10. Detergent and rinse-aid dispenser
11. Upper basket track latch
12. Drying Unit: This system provides
better drying performance for your dishes.
Technical Specications
NOTICE: Because we continually
strive to improve our products, we
may change our specications and
design without prior notice. This device
corresponds to the following directives: UL
749 Household Dishwasher directive.
12

USA-CAN - 13
5 BEFORE USING THE
APPLIANCE
Preparing Your Dishwasher For
First Use
• Make sure the electricity and water supply
specifications match the values indicated in
the installation instructions for the machine.
• Open the door of the dishwasher.
• Remove all packaging material inside the
machine.
• Set the rinse aid dosage (See chapter on
filling the rinse-aid and setting).
• Fill the rinse aid compartment. (See
chapter on filling the rinse aid and setting).
• Place the dishes in accordance with the
instructions in the user manual.
• Put adequate amount of detergent into the
detergent dispenser. (See chapter on filling
the detergent).
• Make sure that the upper and lower
impellers rotate freely.
• Select program according to amount of dirt
(See chapter on Program table).
• Close the door of the dishwasher. (Push
the baskets in. Then lift the door upwards
and push until it clicks into position).
CAUTION: To prevent injuries,
ensure that your hand is not jammed or
crushed between the door and appliance
WARNING: While the appliance is
running if you open the door all functions
are automatically interrupted
CAUTION: There may be an
escape of hot steam when you open the
door of your machine. Be careful of
getting injured.

USA-CAN - 14
Detergent Usage
WARNING: Use a detergent
specically designed for use in domestic
dishwashers.
You can nd powder, gel,and tablet
detergents in the market that have been
designed for household dishwashers.
Detergent should be put into the
compartment prior to starting the machine.
Add the proper detergent for the selected
program to ensure the best performance.
Use less detergent if the dishes are only
lightly soiled. Using excess detergent can
leave a lm on dishes and in the
dishwasher resulting in poor wash
performance. Do not use detergent tablets
for shorter wash cycles. The tablet may not
dissolve completely, causing detergent
residue on dishes and inecient
cleaning.
NOTE: The amount of detergent
needed depends on the cycle, load size,
and soil level of dishes. Too much
detergent in soft water may cause glass
corrosion and does not dissolve in water.
WARNING: Do not use too much
detergent if your water supply is soft.
WARNING: Keep your detergents in
cool, dry places out of reach of children.
See the detergent manufacturer’s
instructions for further information.
WARNING: Detergent tablets do not
fully dissolve with short programmes.
To prevent detergent residues on the
tableware, we recommend that you use the
tablets with long programmes.
WARNING: Do not use detergent in
Rinse cycle (model depending).
If you do not know the hardness of your
water supply, use 15 ml / 3 tsp detergent.
Increase the amount of detergent if you see
white water marks especially on the surface
of the glassware.
Should you need more information
concerning the detergent you will use,
contact detergent manufacturers directly.
Check that the detergent dispenser is
empty after the completion of each wash
program
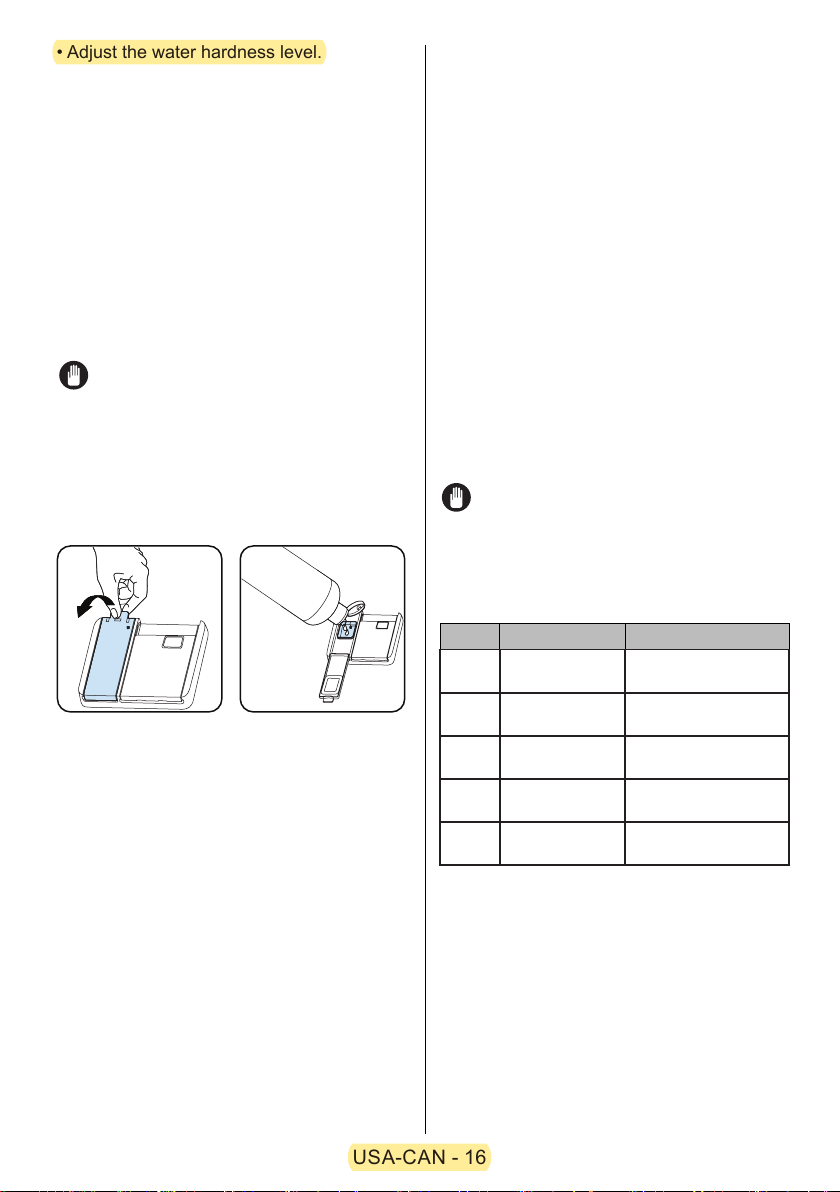
Filling The Detergent
NOTE: The dispenser should be
relled just before the start of each
program.
1. Push the latch to open the detergent
container as shown in the image( g 1).
DETERGENT
2. Pour/put the detergent into the
dispenser. ( fig 2)
3. Detergent pod has level lines inside.
Measure the correct amount of detergent
using these lines. Detergent pod can take
up to 40 cm³ detergent. Open the
dishwasher detergent and pour into the
larger compartment 25 cm³ if your dishes
are heavily soiled or 15 cm³ if they are less
soiled. You may have to add more
detergent into your machine, depending on
the degree of soil and on the water
hardness level in your area.
4. Close the ap of dispenser.
NOTE: The ap is always open at the
end of a program.
WARNING: Follow instructions on the
package of the detergent when using
liquid dishwasher detergent, concentrated

USA-CAN - 15
powder detergent, or tablet detergent.
WARNING: Amounts may vary if you
use liquid or concentrated powder
detergent. Tablet detergents should be
placed in detergent container.
WARNING: Deviations are possible
depending on how dirty the dishes are and
how hard the water is in your location.
WARNING: Use only the proper
amount
of detergent. Continued use of too much
detergent may cause machine damage.
Using Combined Detergents
Detergent manufacturers also manufacture
combined detergents that are called 2-in-1,
3-in-1, etc.
The 2-in-1 detergents contain detergent+
rinse aid . While using the 2-in-1
detergents, it should be observed which
functions the tablet consists of.
The other tablet detergents also have
detergent+rinse aid + various extra
functions.
Generally, combined detergents produce
sufficient results under certain usage
conditions only. Such detergents contain
rinse aid in preset amounts.
Points to consider when using these
types of products:
• Always make sure to check the
specifications of the product you will use or
whether or not it is a combined product.
• Check if the detergent used is appropriate
for the hardness of mains water.
• Observe the instructions on packagings
when using such products.
• If such detergents are in the form of
tablets, never put them into the interior
section or the cutlery basket of the
dishwasher. Always put the tablets into the
detergent compartment in the detergent
dispenser.
• They produce good results for certain
types of usage only. If you are using this
type of detergent, you need to contact the
manufacturers and find out about the
suitable conditions of use.
• When the conditions of use of such
products and the machine settings are
appropriate, they ensure savings in salt
and/or rinse aid consumption.
• Contact the detergent manufacturers if
you are not obtaining good wash results (if
your dishes stay calcareous and wet) after
having used 2-in-1 or 3-in-1 detergents.
The scope of warranty for your machine
does not cover any complaints caused by
the use of these types of detergents.
Recommended usage: If you want to
obtain better results while using combined
detergents, add rinse aid into your
machine and adjust the water hardness
setting and the rinse aid setting to the
lowest position.
CAUTION: Solubility of the tablet
detergents produced by dierent
companies
can vary depending on the temperature
and
time. Therefore, it is not recommended to
use such detergents in short programs. It is
more suitable to use powder detergents in
such programs.
Warning: Should any problem, which you
have not encountered before, arise with the
use of this type of detergents, contact the
detergent manufacturers directly.
When not using combined detergents
• Fill the rinse aid compartments.
• Adjust the water hardness setting to the
highest position and run an empty wash
remove
USA-CAN - 16
• Adjust the water hardness level.
• Make the suitable rinse aid setting.
Rinse Aid Usage
Rinse-aid makes dishes sparkle and helps
them to dry without spotting. Rinse Aid is
required for stain-free utensils and clear
glasses.
(!)Use only Rinse Aid for domestic
dishwashers.
(!)Filling the rinse aid reservoir with
detergent will damage the reservoir. Only
pour rinse aid formulated for residential
dishwashers into the reservoir.
NOTE: When the Rinse Aid indicator
lights up, the rinse aid reservoir contains
sucient rinse aid for 2 - 3 programs only.
When using “Tab” detergents rinse aid is
not needed.
Filling The Rinse Aid and Setting
1) To fill the rinse aid compartment, open
the rinse-aid compartment cap (Fig.A)
2) Fill the compartment with rinse aid to the
MAX level and then close the cap. Be
careful not to overfill the rinse aid
compartment and wipe up any spills.
3) Close the cap until it clicks. Otherwise
water can enter the rinse aid reservoir
during a program.
In order to change the rinse aid level,
follow the steps below before turning on
the machine
In order to add rinse aid to the machine,
1. Open the door of the machine,
2. Press and hold “Start/Pause + On/O”
key for 3 seconds,
3. The machine gives an audible warning
when it is ON,
4. Then, press and hold “Program Selection
+ Cancel” key until “rA” is represented on
the display, the machine will display the last
setting,
5. The amount of rinse aid is adjusted by
pressing “Program Selection + Cancel” key,
6. After the adjustment, turn o (by pressing
Start/Pause + On/O key) the machine to
save the selected rinse aid amount.
NOTE: If the dishes are not drying
properly or are spotted, increase the level.
If blue stains form on your dishes, decrease
the level.
Level Brightener Dose Indicator
1 Rinse-aid not
dispensed
r1 is shown on the
display.
2 1 dose is
dispensed
r2 is shown on the
display.
3 2 doses are
dispensed
r3 is shown on the
display.
4 3 doses are
dispensed
r4 is shown on the
display.
5 4 doses are
dispensed
r5 is shown on the
display.

USA-CAN - 17
6 LOADING YOUR DISHWASHER
If you properly place your dishes into the
machine, you will be using it in the best way
in terms of energy consumption, washing
and drying performance.
You can load into the lower basket round
and deep items such as pots with long
handles, pot lids, plates, salad plates,
cutlery sets. The upper basket has been
designed for dessert plates, salad bowls,
cups and glasses. When placing long stem
glasses and goblets, lean them against the
basket edge, rack or glass supporter wire
and not against other items. Do not lean
long glasses against one another or they
cannot remain steady and may get
damaged. It is more appropriate to place
thin narrow parts into the middle sections of
baskets. You can place spoons among the
other cutlery sets in order to prevent them
from sticking to one another. You are
recommended to use the cutlery grid in
order to obtain the best result. To avoid any
possible injuries, always place long-handle
and sharp-pointed cutlery such as serving
fork, bread knife etc. with their sharp points
facing down or horizontally on the baskets.
WARNING: Place your dishes into
your machine so they will not prevent the
upper and lower spray arms from spinning.
NOTE: Place all large and very dirty
items in the lower rack.
WARNING: Do not place items in the
appliance that can absorb water
(sponges,household cloths).
NOTE: Place all containers such as
cups, glasses and pots into the dishwasher
with the opening facing downwards (so that
no water can collect).
NOTE: Dishes and cutlery should not
be placed on top of each other.
NOTE: Do not overload your
dishwasher and pay attention to
manufacturer instructions regarding dishes
which are appropriate for use in a
dishwasher. Only with suitable dishes
(mentioned in section 5) will you obtain
optimal washing results with efficient
energy use.
High temperature water and dishwasher
detergent may form a chemical synthesis
that can damage certain items.
WARNING: Be careful when loading
and unloading sharp items. Load sharp
knives with the handles up to reduce the
risk of personal injury.
Follow the steps below before loading
dishwasher.
1. Open the door.
2. Remove coarse food leftovers from
tableware.
3. Load the dishwasher.
NOTE: While the appliance is running
if you open the door all functions are
automatically interrupted. Once the door is
closed functions will continue to work.
USA-CAN - 18
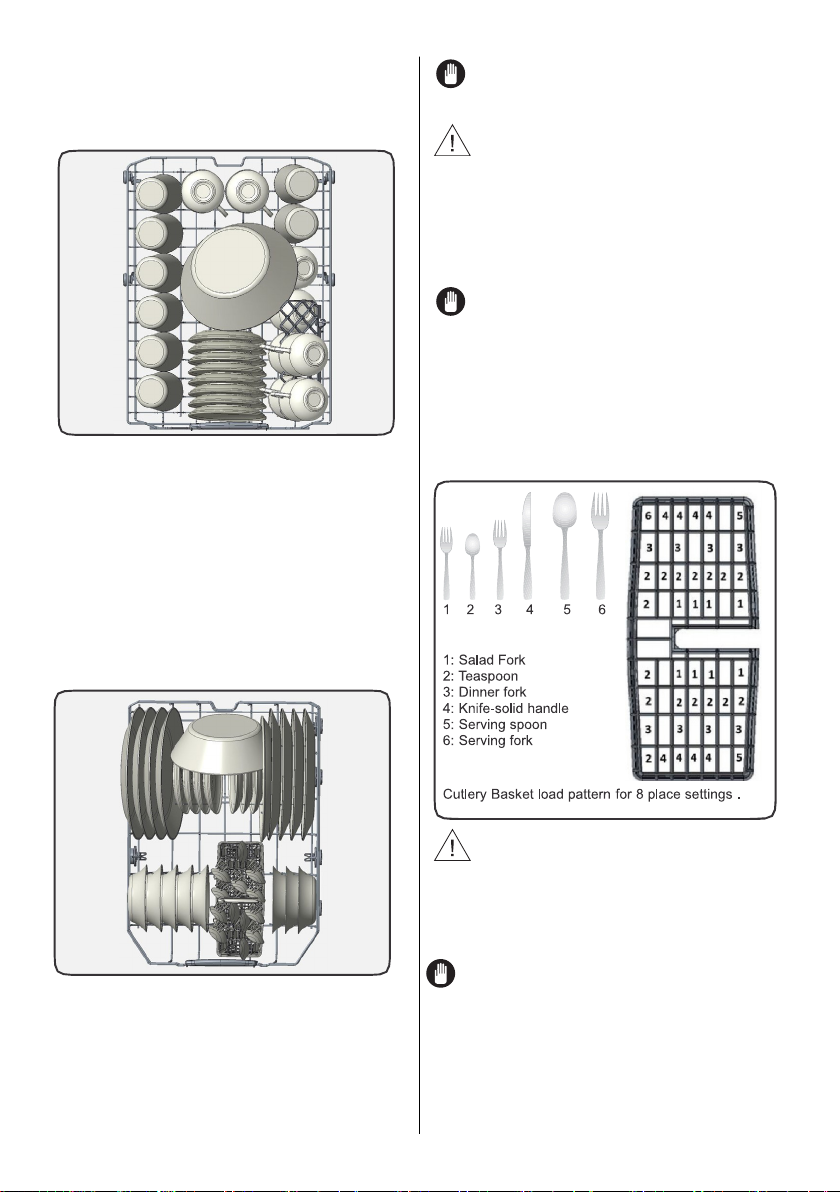
Upper Rack
Load the upper rack with dessert plates,
cups, glasses etc.
Top rack load pattern for 8 place settings.
Lower Rack
You can load into the lower basket round
and deep items such as pots with long
handles, pot lids, plates, salad plates,
cutlery sets. The lower rack should not be
used for small items such as cups, wine
glasses.
Bottom rack load patterns for 8 place
settings.
NOTE: Place all large and very dirty
items in the lower rack.
WARNING: Large knives and other
utensils with sharp tips and edges must be
placed horizontally into the upper rack due
to risk of injury. Other smaller knives and
sharp utensils should be placed with sharp
side down in the cutlery basket.
NOTE: Make sure that large items do
not interfere with the rotation of the spray
arms, and do not prevent the detergent
dispenser from opening.
Loading cutlery basket
( Model Depending )
WARNING: Sharp cutlery may have
shifted position during the wash operation
and can be also wet and slippery. Carefully
remove them to prevent injury.
NOTE: Small items should therefore be
placed in the cutlery tray or cutlery
basket (model depending). Small items
can fall through the holders from the
baskets. in the cutlery tray or cutlery
basket (model depending). Small
items... can fall through the holders from
the baskets.

USA-CAN - 19
Alternative Basket Loads Incorrect Loads
The basket height adjustment mechanism
on the top basket of your machine is
designed to let you adjust the height of your
top basket upwards or downwards, without
removing it from your machine when it is
USA-CAN - 20
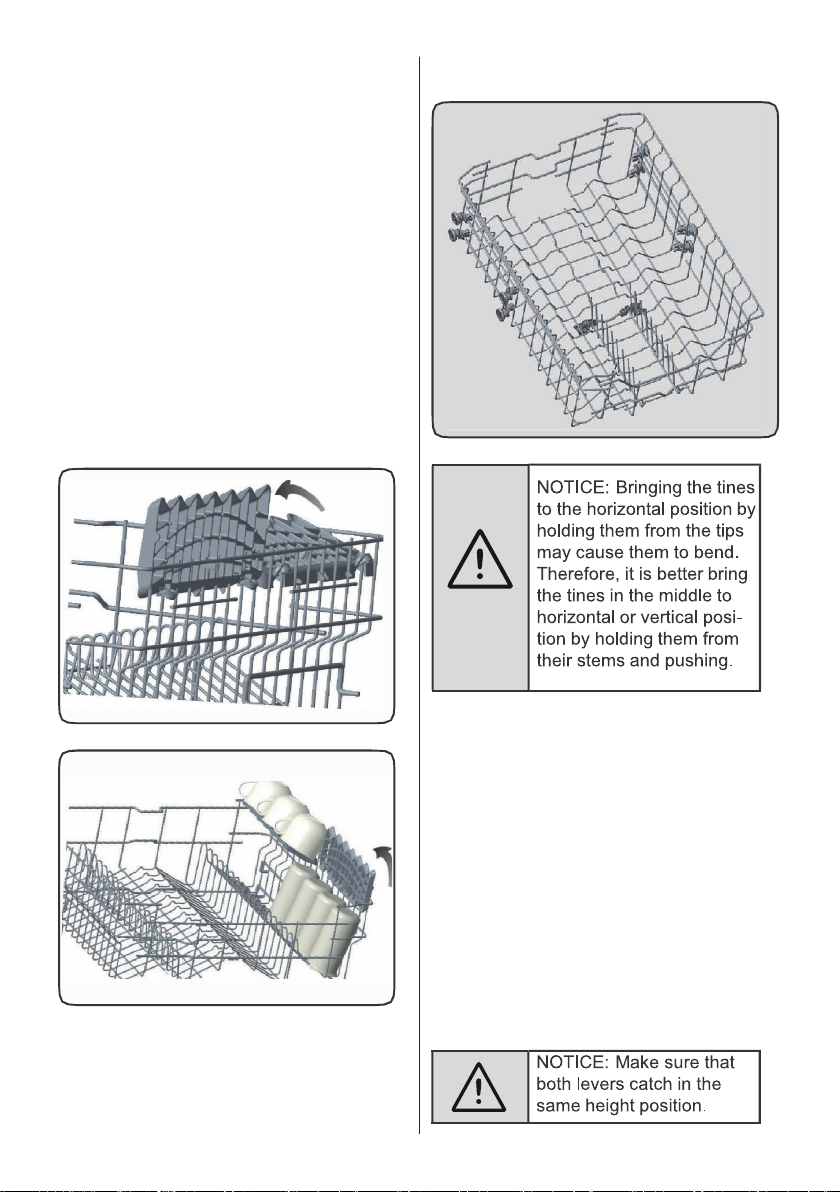
Top Basket
Rack with height adjustment
These racks are designed to increase the
capacity of top basket. You can place your
cups and glasses on these racks. Thanks
to adjustable feature of the racks, you can
place glasses of dierent sizes under the
racks.
Height adjustment xtures mounted on the
basket allow racks to be in 2 dierent
positions.
You can also place long knives, forks and
spoons on these racks horizontally to
prevent them from blocking the movement
of spray arms
The horizontal grid located on top basket
position. (up or down)
allows you to place your plates and bowls
where required. Also you can wash
kitchenware such as pans or pots by
closing the horizontal grid.
The basket height adjustment mechanism
on the top basket of your machine is
designed to let you adjust the height of your
top basket upwards or downwards, without
removing it from your machine when it is
full. This will create space at the top or
bottom area of your machine as needed.
The basket of your machine is set to upper
position in factory settings. In order to raise
your basket, hold it from both sides and
pull it upwards. In order to lower it, hold it
from both sides again, and level it down.
In loaded basket adjustment mechanism,
make sure that both sides are in the same
position. (up or down)
Table of contents
Languages:
Other P&C Dishwasher manuals


