P&C VE-DWVFI User manual

VE-DWVFI
Dishwasher / User Manual
EN

CONTENTS
1. IMPORTANT SAFETY INSTRUCTIONS ..........................................................................3
2.RECYCLING......................................................................................................................6
3. INSTALLATION ....................................................................................... .........................8
4.1.General Appearance......................................................................................................9
4.2.Technical Specifications ................................................................................................9
4.TECHNICAL SPECIFICATIONS .......................................................................................9
5.1. Preparing your Dishwasher for first use ......................................................................10
5.4. Salt refill indicator......................................................................................................14
5.3.Filling the Dishwasher Salt Dispenser ..........................................................................13
5.6. Filling the Detergent ............................................................................................14
5.7. Using combined detergents ........................................................................................15
5.8. Rinse-aid usage .................................................................................................... .......16
5.9. Filling the rinse-aid and setting ....................................................................................16
6.LOADING YOUR DISHWASHER ................................................................................... .17
6.1. Lower rack ..............................................................................................................19
7.PROGRAM TABLE .................................................................................................... .......27
8.THE CONTROL PANEL .................................................................................................. .29
8.1. KEYS ............................................................................................................................30
8.2. PREPARING THE MACHINE .......................................................................................30
8.3. PROGRAM SELECTION.............................................................................................30
5.5. Detergent usage ..................................................................................................14
5.BEFORE USING THE APPLIANCE .......................................................................... .....10
5.2.Setting the Water softener ............................................................................................11
6.2. Incorrect Loads................................................................................................21

9.CLEANING AND MAINTENANCE .................................................................................35
9.1. Cleaning the Machine and Filters ................................................................................36
9.2. Spray Arms ..................................................................................................................36
10. TROUBLESHOOTING .................................................................................................39
11.PRACTICAL INFORMATION ........................................................................................ 41

Thank you for choosing this product.
This User Manual contains important information on safety and
instructions intended to assist you in the operation and
maintenance of your appliance.
Please take the time to read this User Manual before using
your appliance and keep this book for future reference.
Icon Type Meaning
WARNING
RISK OF ELECTRIC SHOCK
FIRE
CAUTION
IMPORTANT / NOTE

USA/CAN
INTRODUCTION
WARNING:
CAUTION:
NOTICE:

1. IMPORTANT SAFETY INSTRUCTIONS
WARNING:
The manufacturer disclaims responsibility for
damage or injury caused by improper use of this appliance.
1) L
2) L
USA/CAN3

•
•
WARNING:
program
program
USA/CAN4

WARNING:
RISK OF INJURY:
USA/CAN5

2. RECYCLING
USA/CAN6

SAVE THESE INSTRUCTIONS
USA/CAN7
WARNING!:
Risk of injury or suocation! Ensure that any plastic wrappings,
bags, small pieces etc. are disposed of safely and kept out of the
reach of children.

3. INSTALLATION
WARNING:
d
WARNING:
USA/CAN8

4. TECHNICAL SPECIFICATIONS
13
4.2 Technical specifications
Load
capacity
oad
14 place
settings
Permissible
water
pressure
43.5-145psi
(0.3 - 10
bars)
Electrical
connection
120 V
(volts), 12
A (amps),
60Hz
(hertz)
Total power 1400(W)
Heater
power 1100 W
(watts)
NOTICE: Because we continually strive to
improve our products, we may change our
specifications and design without prior
notice. This device corresponds to the
following directives:
UL 749 Household Dishwasher directive.
4.1. General appearance
USA/CAN9
1.
2.
3.
Upper basket with racks
Upper spray arm
Lower basket
5.
6.Top nozzle( Model Depending)
4.
7. Filters
8. Rating plate
9. Control panel
10. Detergent and rinse-aid dispenser
11. Salt dispenser( Model Depending)
12.
13.
Upper basket track latch
Drying Unit: This system provides better
drying performance for your dishes.
Lower spray arm
3 basket( Model Depending)
rd
10
12
11
1
2
3
4
5
7
6
8
9

USA/CAN10
5.BEFORE USING THE APPLIANCE
5.1 Preparing your Dishwasher for first use
• Make sure the electricity and supply water specifications match the values indicated
in the installation instructions for the machine.
• Open the door of the dishwasher.
•Remove all packaging material inside the machine.
• Set the water softener level. (See chapter of setting the water softener))( model
depending)
•Set the rinse aid dosage ( See chapter of filling the rinse-aid and setting)
• Fill the salt container (see chapter of filling the dishwasher salt dispenser)
( model depending)
• Fill the rinse aid compartment. (See chapter of filling the rinse aid and setting )
•Place the dishes in accordance with the instructions in the user manual.
• Put adequate amount of detergent into the detergent dispenser. ( See chapter of
filling the detergent)
• Make sure that the upper and lower impellers rotate freely.
• Select program according to amount of dirt
• Close the door of the dishwasher.( Push the baskets in. Then lift the door upwards
and push until it clicks into position)
CAUTION: To prevent injuries, ensure that your hand is not jammed or crushed between
the door and appliance
WARNING: While the appliance is running if you open the door all functions are
automatically interrupted
CAUTION: There may be a escape of hot steam when you open the door of your machine.
Be careful of getting injured.

5.2. Setting the Water Softener ( Model Depending)
°f
9 °f
inactive)
WARNING:
Test Strip(If available)
WARNING:9 °f
USA/CAN11
Run water
through tap
(1min.)
Keep the
strip in
water (1sec)
Shake the
strip. Wait
(1min.) Set the hardness level of
your machine.
1
2
3
4
5
6

Water Hardness Table
Level German °dH French
°f British
°E Indicator
1
NOTE:
NOTE:
SALT INDICATOR
Please check the salt indicator on the control panel to see whether there is
adequate amount of softening salt in the dishwasher or not. You need to refill the salt
reservoir with salt whenever salt warning indicator appears on the control panel of your
machine. In order to add salt to the machine,
1. Open the door of the machine,
2. Press and hold Start/Pause + On/Off key for 3 seconds,
3. The machine gives an audible warning when it is ON,
4. Then, press and program Selection + Cancel key until “SL” is represented on
the display,
5. The amount of Salt is adjusted by pressing program Selection + Cancel key,
6. After the adjustment, turn off (by pressing Start/Pause + On/Off key) the
machine to save the selected salt amount.
USA/CAN1

5.3 Filling the Dishwasher Salt Dispenser ( Model Depending)
WARNING:
e.
NOTE
e
WARNING:
WARNING:°f
1.
2. dd
3.
1
2
SALT
4
3
WARNING:program
NOTE:
NOTE:illuminates
WARNING
WARNING:
USA/CAN13

5.4. Salt Refill Indicator (Model Depending)
WARNING:program
program
NOTE:
°f
5.5. Detergent usage
WARNING:
program
NOTE:
does notis
WARNING:
WARNING:
WARNING:
tablets
.
WARNING
program
5.6. Filling the Detergent
NOTE:program
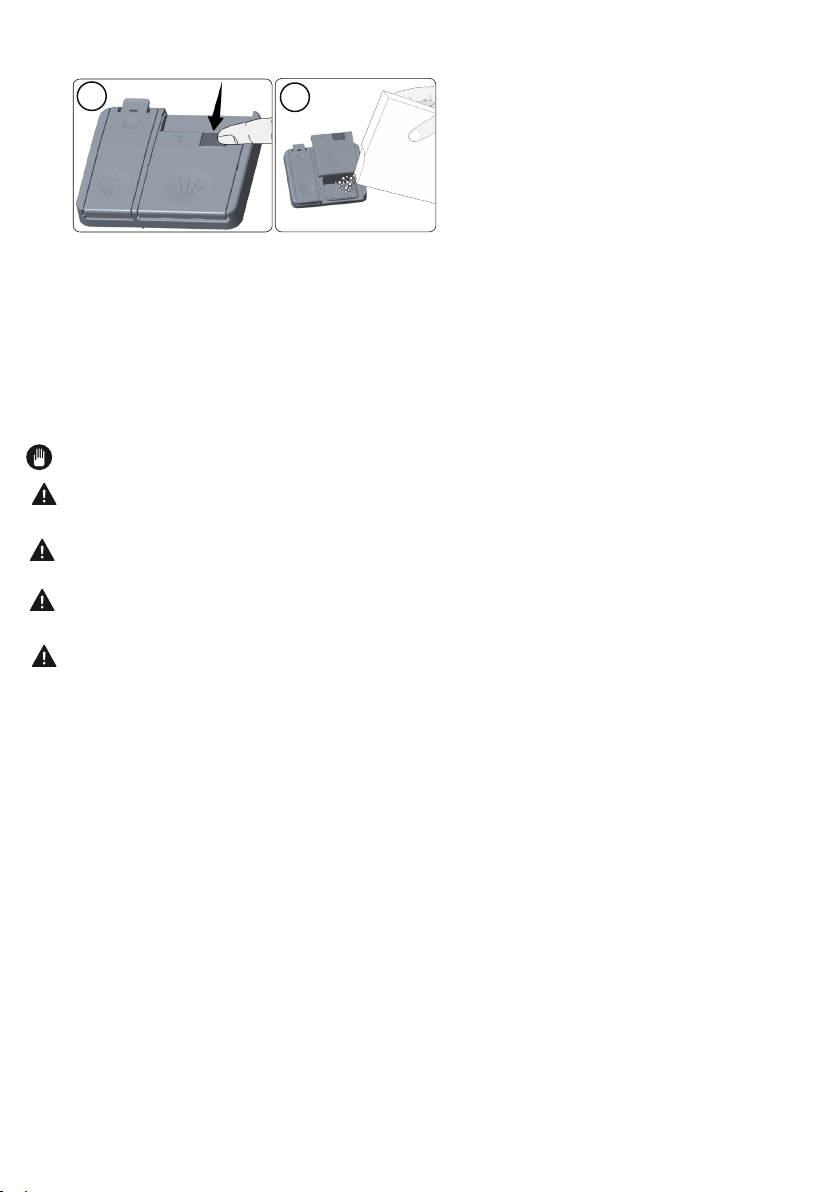
1. Push the latch to open the detergent container as shown in the image( fig 1).
USA/CAN14
2.
3.
cm
cm
cm
4. e
NOTE: .
WARNING:
WARNING:
WARNING:
WARNING:
5.7. Using combined detergents
Points to consider when using this type of products:
DETERGENT
12
USA/CAN15
3
3
3

• They produce good results for certain types of usage only. If you are using this
type of detergents, you need to contact the manufacturers and nd out about the suitable
conditions of use.
• When the conditions of use of such products and the machine settings are appro-
priate, they ensure savings in salt and/or rinse aid consumption.
• Contact the detergent manufacturers if you are not obtaining good wash results
(if your dishes stay calcareous and wet) after having used 2 in 1 or 3 in 1 detergents. The
scope of warranty for your machine does not cover any complaints caused by the use of
these types of detergents.
Recommended usage: If you want to obtain better results while using combined deter-
gents, add salt and rinse aid into your machine and adjust the water hardness setting and
the rinse aid setting to the lowest position.
CAUTION: Solubility of the tablet detergents produced by different companies can
vary depending on the temperature and time. Therefore, it is not recommended to use
such detergents in short programs. It is more suitable to use powder detergents in such
pro-grams.
Warning: Should any problem, which you have not encountered before, arise with the
use of this type of detergents, contact the detergent manufacturers directly.
When you give up using combined detergents
•Fill the salt and rinse aid compartments.
•Adjust the water hardness setting to the highest position and run an empty-
wash.
•Adjust the water hardness level.
•Make the suitable rinse aid setting.
5.8.Rinse-aid usage
Rinse-aid makes dishes sparkle and helps them to dry without spotting. Rinse-aid is re-
quired for stain-free utensils and clear glasses.
(!)Use only rinse-aid for domestic dishwashers..
(!)Filling the rinse aid reservoir with detergent will damage the reservoir. Only pour rinse aid
formulated for residential dishwashers into the reservoir
NOTE: When the Rinse Aid indicator lights up, the rinse aid reservoir contains sucient
rinse aid for 2 - 3 programs only.When using “Tab” detergents rinse aid is not need-
ed.
5.9 Filling the rinse-aid and setting
USA/CAN16

NOTE:
6. LOADING YOUR DISHWASHER
WARNING:
NOTE:
WARNING:
NOTE:
Level Brightener Dose Indicator
1
1) p
2)
3)
program
In order to change the rinse aid level, follow the below steps before turning on the
machine
In order to add rinse aid to the machine,
1. Open the door of the machine,
2. Press and hold Start/Pause + On/Off key for 3 seconds,
3. The machine gives an audible warning when it is ON,
4. Then, press and hold program Selection + Cancel key until “rA” is represented on
the display,
5. The amount of rinse aid is adjusted by pressing program Selection + Cancel key,
6. After the adjustment, turn off (by pressing Start/Pause + On/Off key) the machine
to save the selected rinse aid amount
USA/CAN17
Table of contents
Other P&C Dishwasher manuals


