Parlat LC-EL-055-B User manual

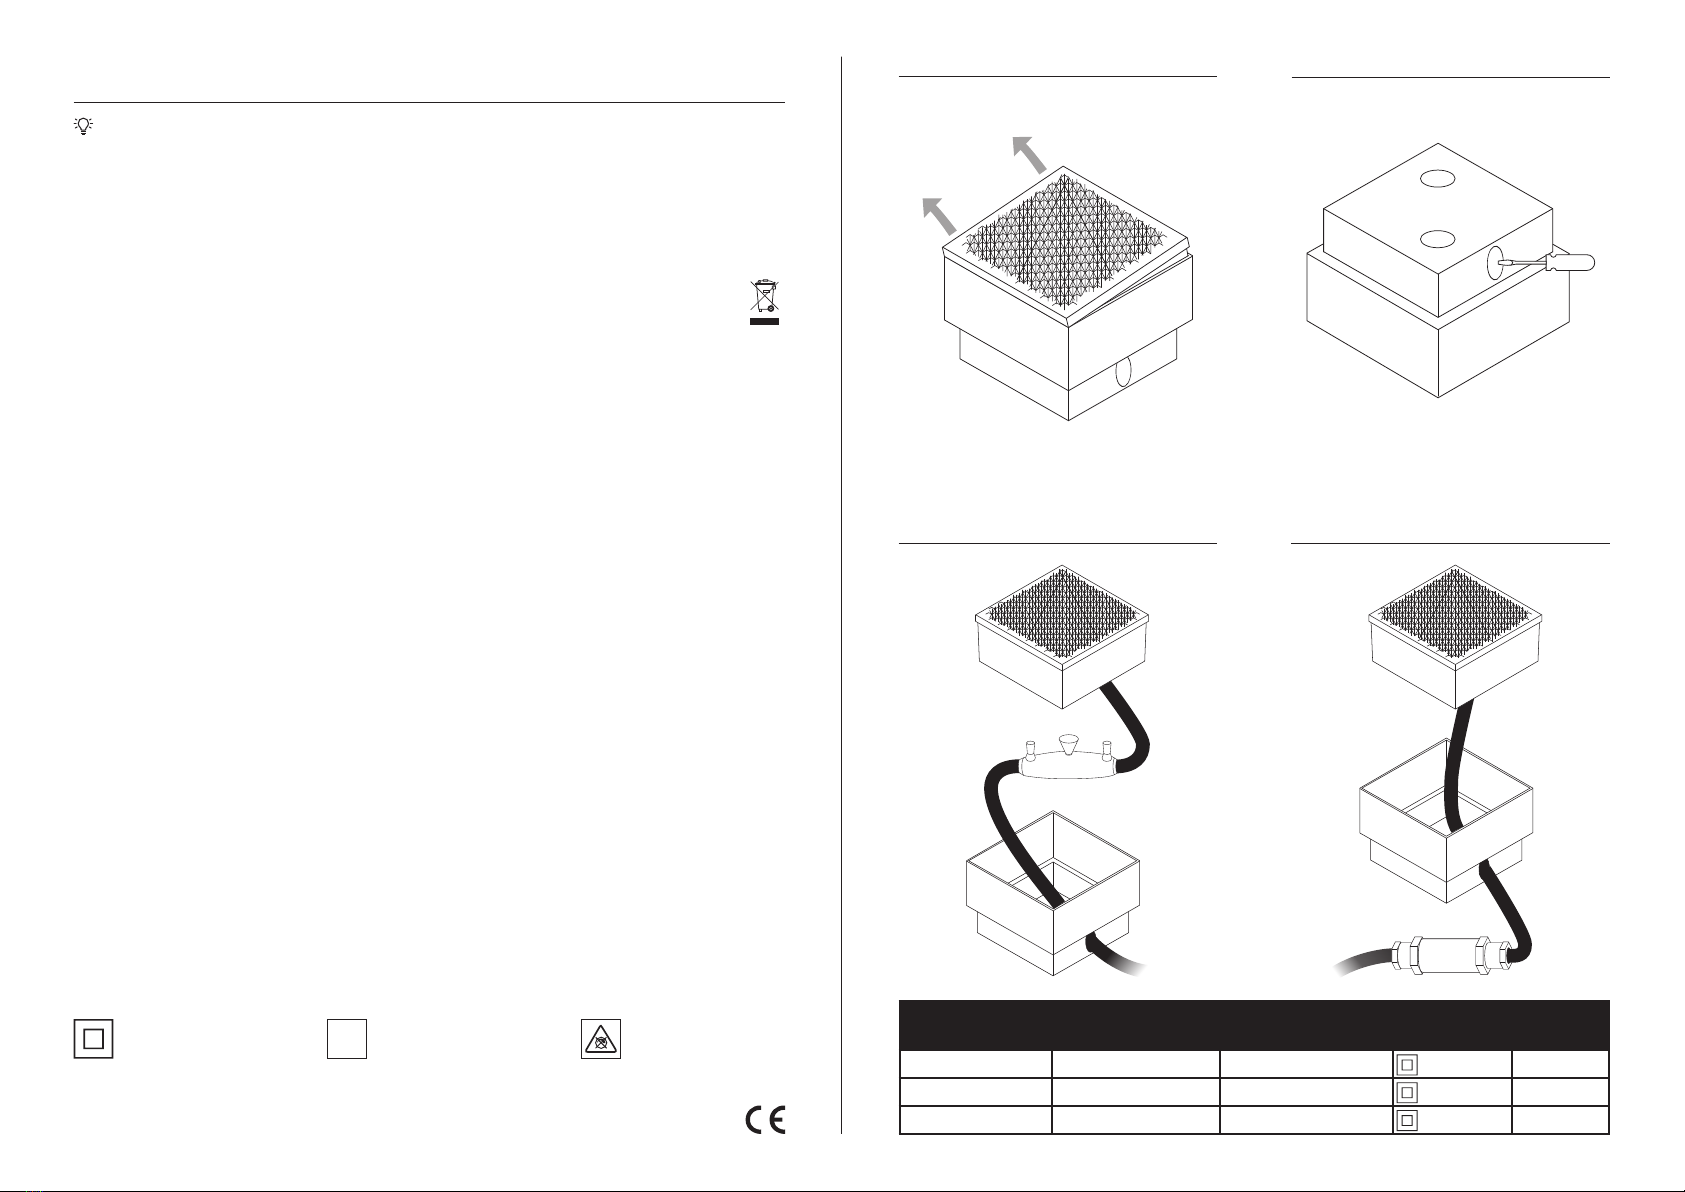
parlat® LED Pasterstein – Montageanleitung Abbildung 1
Abbildung 3 Abbildung 4
Abbildung 2
Produktnummer Betriebsspannung Leistungsaufnahme Schutzklasse Schutzart
LC-EL-055-B 230 Volt 50-60 Hz 1 Watt IP67
LC-EL-055-W 230 Volt 50-60 Hz 1 Watt IP67
LC-EL-055-WW 230 Volt 50-60 Hz 1 Watt IP67
05/2019
Technische Änderungen vorbehalten.
LEDs Com GmbH, Dohrweg 2a, 41066 Mönchengladbach, www.ledscom.de, Tel. +49 (0) 2161-5759976
Bitte lesen Sie diese Montageanleitung
sorgfältig, bevor Sie die Leuchte einbauen
und bewahren Sie diese für späteres Nach-
schlagen auf.
1. Sicherheitshinweise
Die Installation der Leuchte darf nur eine zugelassene
Elektrofachkraft durchführen.
Betreiben Sie das Produkt nur, wenn es einwandfrei
funktioniert.
Im Fehlerfall dürfen Sie das Produkt nicht berühren. Schal-
ten Sie das Produkt sofort an einem externen Schalter aus.
Bei Berührung oder weiterem Betrieb im Fehlerfall besteht
Lebensgefahr durch Verbrennung, elektrischen Schlag
oder Brand.
So erkennen Sie einen Fehler:
• das Produkt arbeitet nicht einwandfrei (z. B.: Flackern,
lässt sich nicht einschalten)
• das Produkt qualmt, knistert oder riecht verbrannt
• das Produkt überhitzt (Verfärbung, auch an angrenzen-
den Flächen)
Betreiben Sie das Produkt erst wieder nach Instandsetzung
und Überprüfung ausschließlich durch eine zugelassene
Elektrofachkraft!
2. Bestimmungsgemäße Verwendung
Diese Leuchte darf:
• nur mit einer Spannung von 230V ~50Hz betrieben
werden.
• nicht an einem Dimmer betrieben werden.
• nur entsprechend der Schutzklasse II (zwei) angeschlos-
sen werden.
• nur der Schutzart IP67 entsprechend angewendet
werden.
• nur fest montiert auf stabilem, ebenem Grund betrieben
werden.
• keinen starken mechanischen Beanspruchungen ausge-
setzt werden.
• nicht verändert oder modiziert werden.
Das Produkt ist nicht für die Bedienung durch Kinder
vorgesehen. Stellen Sie sicher, dass Kinder an dem Produkt
keinen Schaden nehmen, z. B. durch Verbrennungen an
heißen Oberächen oder durch elektrischen Schlag.
Wenn die Leuchte nicht bestimmungsgemäß verwendet
wird, insbesondere wenn Feuchtigkeit in die Leuchte
eindringt, besteht Lebensgefahr durch Verbrennung,
elektrischen Schlag oder Brand.
3. Wartung und Pege
Folgende umweltbedingte Einüsse können unerwünsch-
te Wirkungen auf die Oberäche des Produktes haben:
• saurer Regen und Boden, hoher Salzgehalt in der Luft
• Reinigungsmittel
• andere chemische Substanzen (z.B. Schimmelentferner)
Schützen Sie das Produkt durch geeignete Maßnahmen,
um Veränderungen der Oberäche zu vermeiden.
Schalten Sie erst das gesamte Produkt spannungsfrei und
lassen es abkühlen, bevor Sie Reinigungs- oder Pegemaß-
nahmen an dem Produkt vornehmen.
Reinigen Sie das Produkt regelmäßig - nur mit einem leicht
angefeuchteten, weichen und fusselfreien Tuch.
4. Lagerung
• Das Produkt muss trocken, vor Verschmutzungen und
mechanischen Belastungen geschützt, gelagert werden.
• Nach einer feuchten oder verschmutzenden Lagerung
darf das Produkt erst nach einer Zustandsprüfung durch
eine zugelassene Elektrofachkraft betrieben werden.
5. Entsorgung (Europäische Union)
Produkt nicht im Hausmüll entsorgen! Produkte mit
diesem Symbol sind entsprechend der Richtlinie
(WEEE, 2003/108) über Elektro- und Elektronik Altgeräte
über die örtlichen Sammelstellen für Elektro-Altgeräte zu
entsorgen!
6. Installationsanweisung
1. Schalten Sie die gebäudeseitige Anschlussleitung span-
nungsfrei und sichern Sie diese gegen Wiedereinschal-
ten. Lösen Sie hierzu den entsprechenden Sicherungsau-
tomaten der Hausinstallation aus.
2. Nehmen Sie die Leuchte aus dem Einbautopf (Abbildung
1).
3. Stechen oder schneiden Sie eine Kabelönung an einer
der dafür vorgesehenen Perforierungen in den Einbau-
topf (Abbildung 2).
4. Führen Sie wahlweise die gebäudeseitige Anschluss-
leitung (Abbildung 3) oder die der Leuchte (Abbildung
4) durch die eben geschaene Önung. Achten Sie
darauf, dass Sie anschließend ausreichend Platz in dem
Einbautopf haben, um die Kabel und den Verbinder zu
verstauen.
5. Verbinden Sie das Anschlusskabel der Leuchte mit dem
gebäudeseitigen Anschlusskabel. Die Kabel müssen was-
serdicht verbunden werden (z. B. mit einer Kabelmue).
6. Setzen Sie nun die Leuchte in den Einbautopf und
diesen an die dafür vorgesehene Stelle.
7. Schalten Sie die Stromzufuhr wieder ein. Die Installation
ist nun abgeschlossen.
Schutzklasse 2: Schutz vor Kon-
takt mit anderen spannungs-
führenden Teilen (Schutziso-
lierung)
Schutz gegen Eindringen von
Staub, Schutz beim Eintauchen
IP67 Nicht dimmbar

parlat® LED paving stone – Installation Instructions Picture 1
Picture 3 Picture 4
Picture 2
Product number Operating voltage Power consumption Protection
class
Protection
type
LC-EL-055-B 230 volts 50-60 Hz 1 watt IP67
LC-EL-055-W 230 volts 50-60 Hz 1 watt IP67
LC-EL-055-WW 230 volts 50-60 Hz 1 watt IP67
05/2019
Subject to technical modications.
LEDs Com GmbH, Dohrweg 2a, 41066 Mönchengladbach, www.ledscom.de, Tel. +49 (0) 2161-5 75 9976
Protection class 2: double insu-
lated, protected against electric
shock by touch
IP67: Protection against ingress
of dust and immersion in water
IP67 Not dimmable
Please read these installation instruc-
tions carefully before installing this light
and keep it for future reference.
1. Safety instructions
The installation of the light may only be performed by a
trained electrician.
Only operate this product, if it works correctly.
In the event of a fault, do not touch the product. Switch o
the product immediately by an external switch. Touching
the product or continuing its operation in the event of a
fault results in danger to life due to burn, electrical shock
or re.
How to detect a fault:
• the product does not work correctly (e.g. ickering of the
lamp, cannot be switched on)
• the product smokes, crackles or smells burnt
• the product overheats (discolouration, even on the
adjacent areas)
Operate the product again only after repair and testing
exclusively by a trained electrician.
2. Intended Use
This light may:
• only be operated at a voltage of 230V ~50Hz.
• not be operated by means of a dimmer.
• only be connected according to protection class II (2).
• only be used according to protection type IP67.
• only be operated if mounted rmly on a robust, at
bottom.
• not be exposed to strong mechanical stress.
• not be changed or modied.
The product is not intended for use by children. Make sure
that the product does not cause any damage to children,
e.g. burn by hot surfaces, electrical shock.
It the light is not used in accordance with these require-
ments, especially if moisture enters the lamp, it results in
danger to life due to burn, electrical shock or re.
3. Maintenance and care
The following environmental inuences can have undesira-
ble eects on the surface of the product:
• acid rain and soil, high salinity of the air
• cleaning agents
• other chemical substances (e.g. mold remover)
Protect the product by appropriate measures to avoid
changes to the surface.
First disconnect the whole product from the power supply
and let it cool down before cleaning and care. Clean the
product regularly - only by a slightly moistened, soft,
lint-free cloth.
4. Storage
• The product has to be stored under dry conditions, pro-
tected against contamination and mechanical impact.
• After a humid or contaminated storage the product has
to be tested by a trained electrician before operating.
5. Disposal (European Union)
The product must not be disposed of with the
household waste. Products marked with this symbol
have to be disposed of under the terms of the EU Waste
Electrical and Electronic Equipment (WEEE, 2003/108)
Directive by local return centres.
6. Installation instructions
1. De-energize the mains lead of the building by discon-
necting the building wiring fuse and protect it against
reconnection.
2. Remove the light from the installation box (picture 1).
3. Prick or cut an opening for the cable on one of the provi-
ded perforations of the installation box (picture 2).
4. Either put the mains lead of the building (picture 3) or
put the cable of the lamp (picture 4) through the such
created opening. Make sure that you still have enough
room in the installation box to hold the cables and the
connector.
5. Now connect the cable of the lamp with the mains lead
of the building. The cables need to be watertightly connec-
ted (e.g. by using a cable junction sleeve).
6. Place the lamp in the installation box and place the box
in the intended position.
7. Energize the mains lead of the building. The installation
is completed.
This manual suits for next models
2
Table of contents
Languages:
Popular Outdoor Light manuals by other brands

marset
marset FUNICULI Assembly instructions

Inspire
Inspire QUITO 3276000441809 Assembly, Use, Maintenance Manual

Home Decorators Collection
Home Decorators Collection 272 775 instruction manual

B-K lighting
B-K lighting Precision 2 CO2 Series installation instructions

JALEXANDER
JALEXANDER JAE0337 quick start guide

LUCIDE
LUCIDE TEXAS-IR instruction manual

BEGA
BEGA 84 239 Installation and technical information

SIGNIFY
SIGNIFY LUMEC HighFocus Plus Installation instruction

Philips
Philips 260962 User instructions

Eaton
Eaton Arbor Bollard installation instructions

Orion
Orion AL 11-1196 Mounting and safety instructions

Quoizel
Quoizel DNM8408EK installation guide