Parrot Products VC1080C User manual

User Manual
Tel: (RSA) 010 140 4900 / Email: [email protected]
www.parrot.co.za
Video Conference Camera Full HD 1080P
- VC1080C

1
Please read this manual in detail and use accordingly.
This manual introduces the functions and operations of the video conference camera.
This colour video camera is high-quality and flexible with a remote pan of 355° / tilt 120°
operation and image flip, and a DSP dealing integration module input. Support VISCA
and PELCO P/D protocol. Allowing install action on the ceiling / desk and a accurate
remote control of RS323/485.
Safety requirement
To avoid damage to the camera and connecting equipment, please follow the
instructions carefully.
• Ensure the device is properly installed and maintained.
• Only professional technicians can install and perform maintenance.
Do not expose the device to wet or humid
environments.
• Use original accessories as supplied.
• Once product exchange or repair occurs please use universal meter test before using,
should the device require any repairs.
• Please use a soft and dry cloth for cleaning.
• Do not use strong chemicals as this may damage the camera or lens.
• Mounting bracket must allow for 3 times the weight of camera
Features
• 1080p full HD PTZ camera
• Pan 355°, Tilt 60°
• The latest developed digital signal processor (DSP)
improves the image quality of digital zoom.
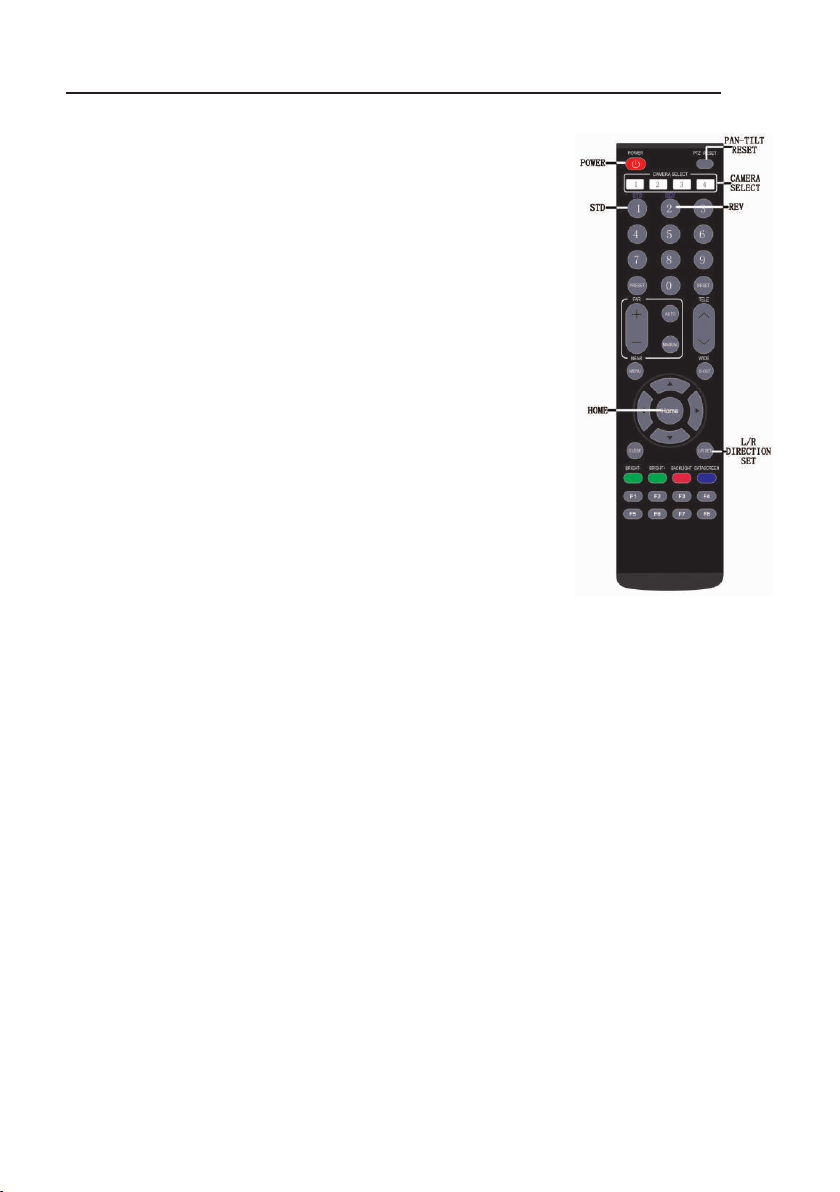
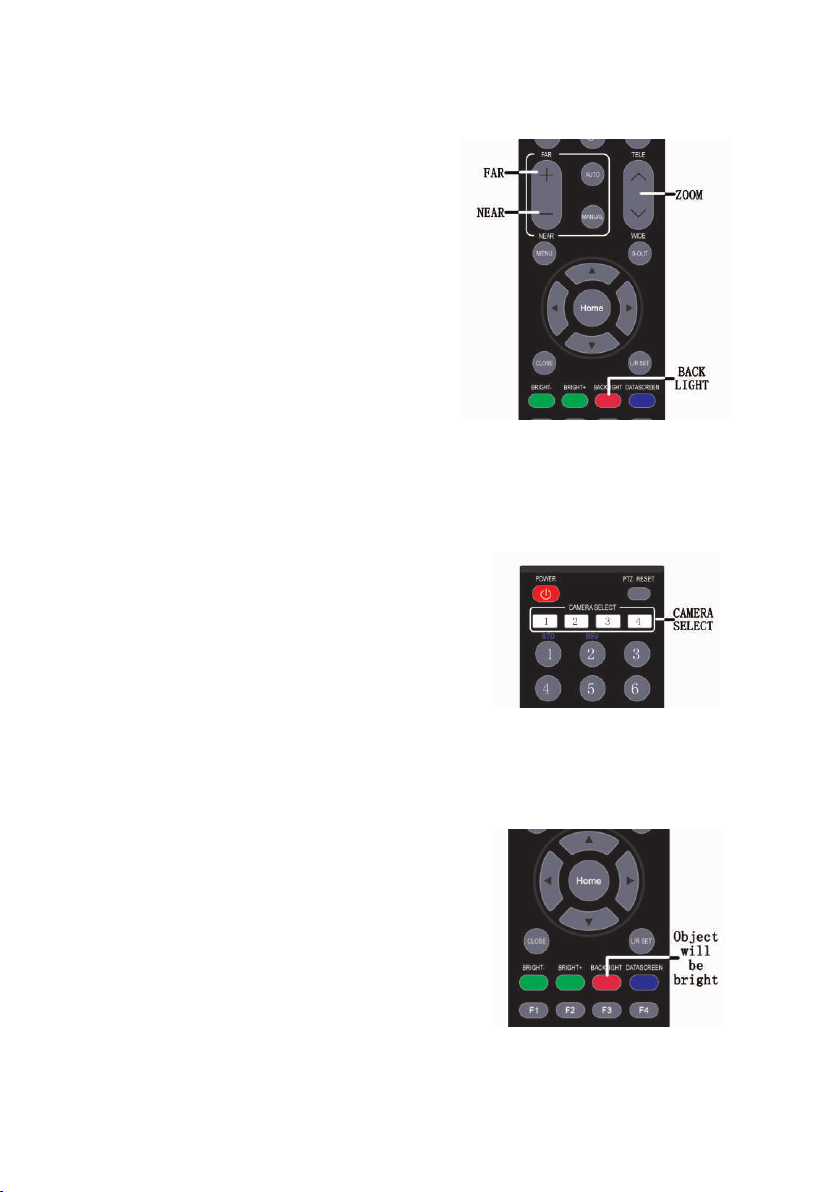
• Multi function IR remote controller can control PTZ,
Lens and other functions conveniently.
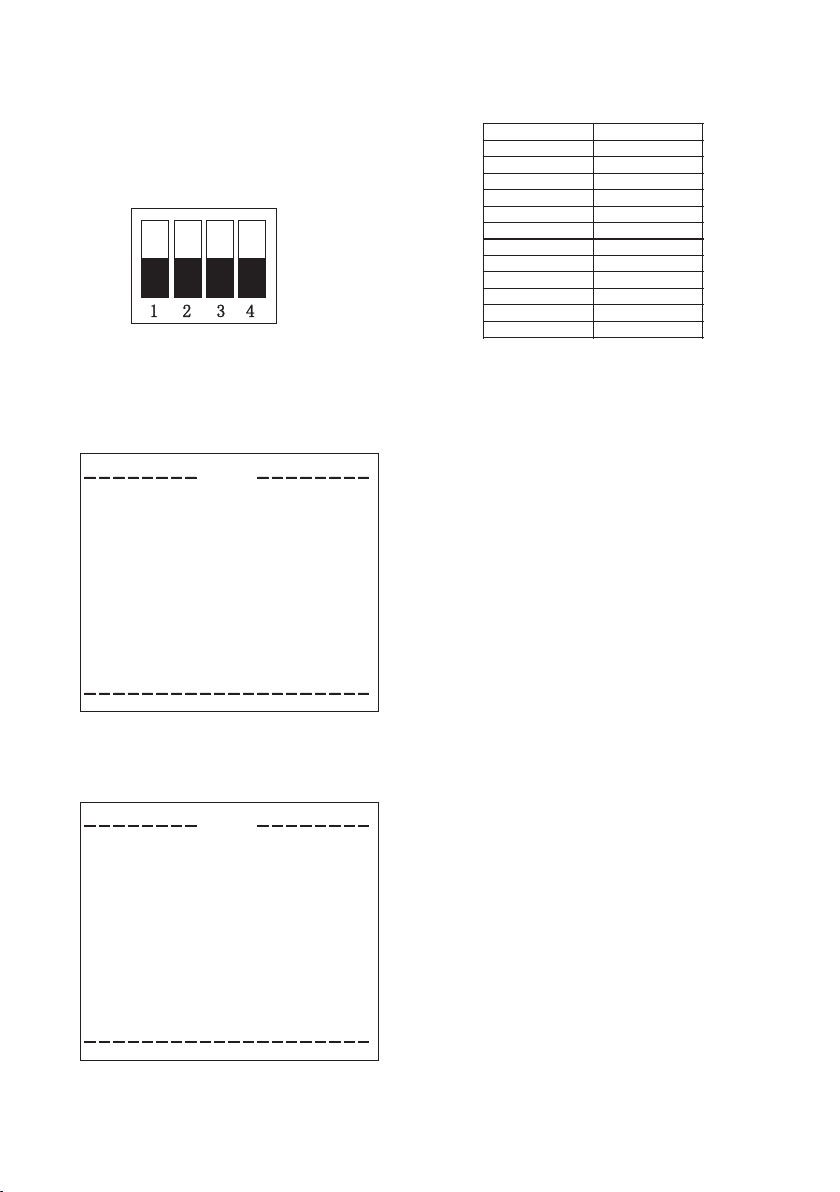
• Use the PC to control camera with VISCA or PELCO command.
Baud rate: 2400 / 4800 / 9600
• 9 preset positions by remote controller, 200 preset positions by PC or remote
control unit, memory auto saved when powered off.
• The maximum speed of horizontal rotation: 80°/s, Tilt: 60°/s.
• Providing accurate remote control.
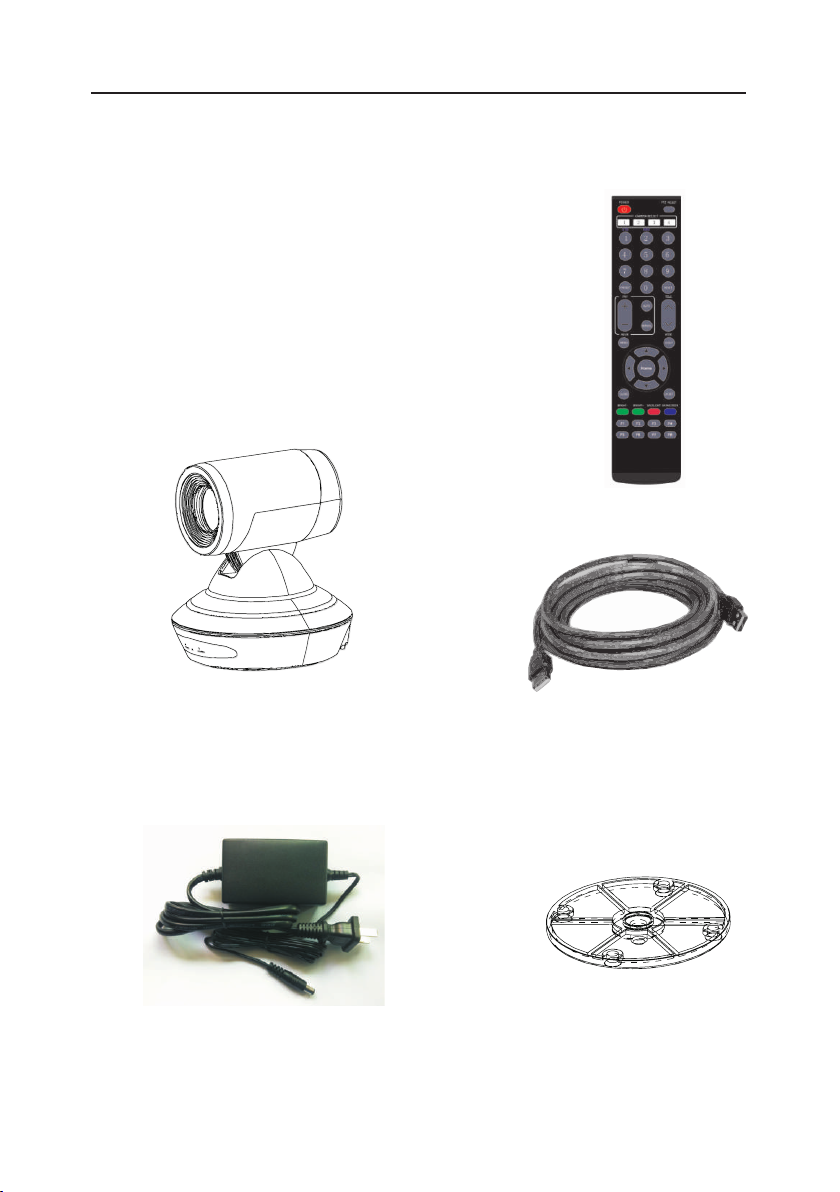
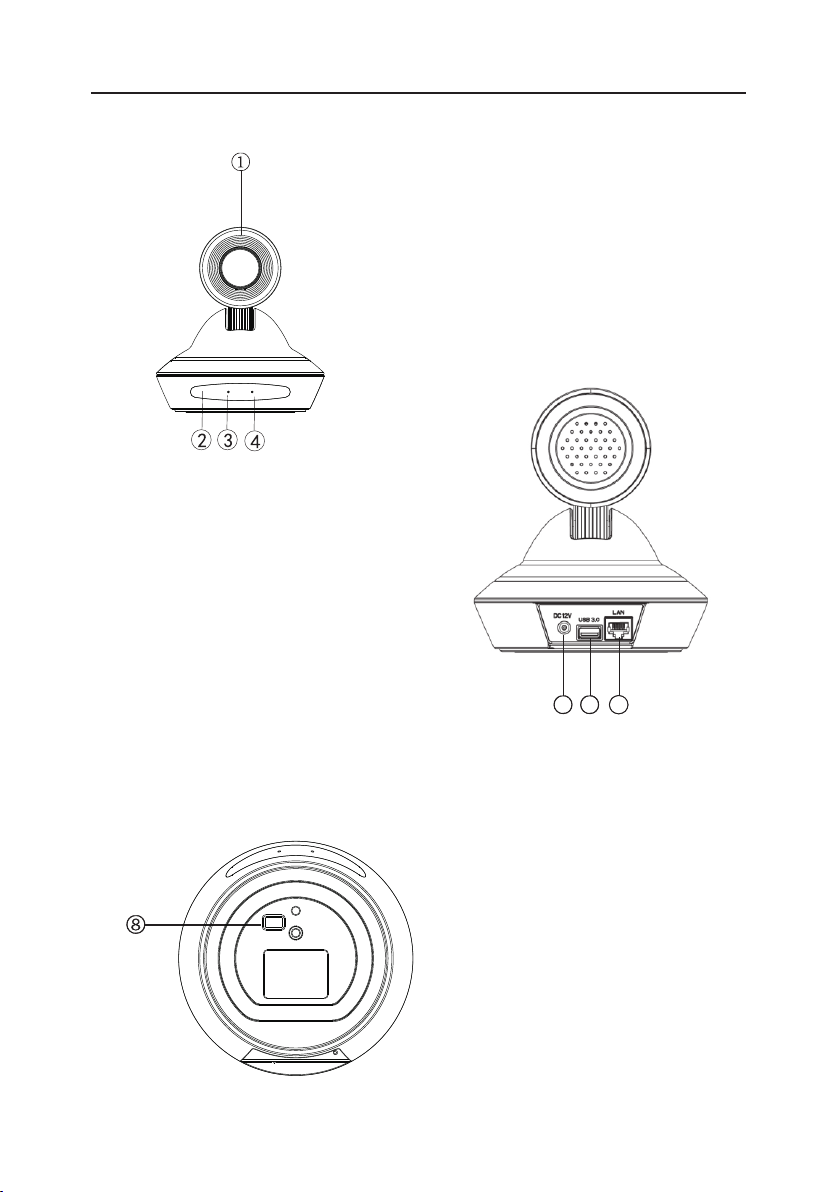
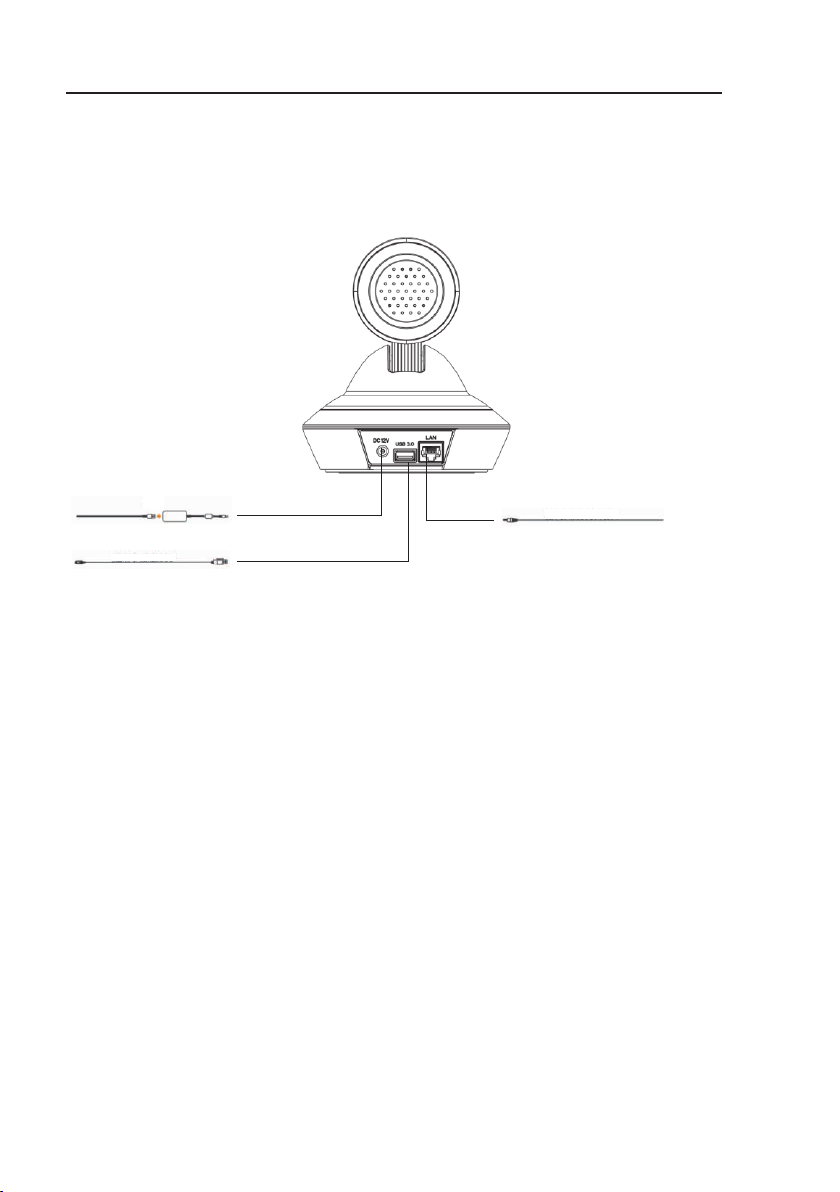
Video Conference Camera overview

Please ensure all parts are included.
1 x Video camera
1 x Power adapter
1 x Remote controller
1 x USB wire
1 x Ceiling bracket
Includes:
1 x USB wire
1 x Ceiling bracket
1 x Video camera
1 x Remote controller
1 x Power adapter
2

Parts and Introduction
Front
Rear
1 Lens
2 Sensor for the Remote Control
3 Power lamp
4 Standby lamp
5 DC IN 12V input
6 USB output
7 RJ-45 output
5 6 7
Bottom
8 Bottom switch
(See page 9 for details)
3

4
Connection instructions
If the preset number 1 is set, after the camera is switched on, the camera’s pan/tilt/zoom
will automatically call the present point 1. If the preset number 1 is not set, the camera
will return to the HOME position, that is, the lens will return horizontally and vertically to
the front, and the zoom will be minimized.
Please ensure all connections are correct before use.
RJ45 cable
USB cable
Power To Ethernet
To PC
Attention

5
Remote Controller
1. IR transmitter
2. Power
3. L/R Direction set
4. Focus: (auto or manual)
5. M-open: open the menu
6. Close the menu
7. Button for Brightness adjustment
8. PAN-tilt reset
9. Camera select: (match to IR Select back)
10. Position: (Number area; Preset: press PRESET then press 1-9 for
setup preset position)
11. Preset: (Press RESET and then press 1-9 for eliminate preset position)
12. ZOOM
SLOW T
SLOW W
FAST T
FAST W
13. Pan-tilt: HOME for return middle position
14. Std rev: (Press L/R Direction Set,
and then Press 1 or 2)
15. Back Light
16. Switch for screen information display
1
2
3
4
5
6
7
8
9
10
11
12
13
14
15
16

6
Remote Commander Operation
A. Pan/Tilt control
1. Power on, Pan/Tilt will be initial position.
2. Press arrow to adjust pan/tilt direction, when watching
a video on screen, the direction can be moved by pressing
the arrow step by step or continuously for wild turning direction.
If you want to fix direction, please press arrow (up or down)
and arrow (left or right) at the same time.
3. Press HOME for front direction.
4. Press PAN-TILT RESET or switch off and on to reset the
direction to the initial position.
5. Press L/R DIRECTION SET and STD or REV at the same
time, then by pressing the right or left arrow, the direction
can be moved right or left.
ATTENTION:
When you use more than one command, please repeat operation accordingly.
B. Adjust Camera
Focus
• Press AUTO for focus auto
• Press MANUAL and then adjust far or near by pressing FAR (+) or NEAR (-)
ATTENTION:
In the instance of far focus, it is normal for the image to blur during pan/tilt operation.
Maintenance Description

7
ZOOM
Adjust T and W for far or near zoom
One Remote controller for operating 3 or less cameras
1. Maximum of 3 cameras can be controlled by a
remote controller through back switch 1, 2, 3.
2. Press CAMERA SELECT 1 or 2 or 3, to control
corresponding 1, 2, 3 camera.
Camera select button 1, 2, 3 will
light up when selected.
Use back light compensation
• If there is lighting on the back of the focused
object, the object will appear black.
Press BACK LIGHT to avoid this happening
and turn select off button to close.

8
C. Preset Position Operation
• Store camera settings-presets up to 200 presets can
be set (Location, zoom, focus, and the background light)
set and call 9 preset positions by remote controller.
Through a user-defined protocol over 200 presets can
be set
1. Recognize that the STANDBY led is not blinking.
If the STANDBY indicator is flashing, press PAN-TILT
RESET to restore.
2. Adjust the camera position, zoom, focus and the
background light.
3. Press and hold the PRESET button, then press one of
the position 1-9.
• Use preset position
Press any button of 1-9 position.
• Cancel preset position
Press RESET, then press 1-9 simultaneously.
While
pressing
While
pressing

9
Bottom switch
Normal or ceiling setting the
remainder being reserve switch.
Bottom switch
OFF
ON
USB Dial Switch Control Select
1
ON
OFF
2
ON
OFF
3
ON
OFF
4
ON
OFF
ON
OFF
ON
OFF
NC
NC
NC
Firmware Upgrade
Motherboard Upgrade
Install method
Ceiling install
Normal install
Note: The 1st & 2nd bottom switch is for upgrade,
do not leave on during use.
The Menu
Main Menu
Communication sub menu
Main Menu:
COM SETTING: enter the communication
settings sub menu
PTZ SETTING: enter PTZ setting sub menu
PICTURE SETTING: enter image settings
sub menu
VIDEO FORMAT: cannot be set, displays
current resolution
VERSION: cannot be set, displays current
software version
FACTORY RESET: restore factory defaults
SAVE AND EXIT: save and exit
Communication sub menu:
PATCH: cannot be set
(only for binocular tracking)
PROTOCOL: set communication protocol,
VISCA / PELCO-P / PELCO-D / VISCA2
ADRESS: set the camera address ID
BAUD RATE: set the communication
baud rate, 2400/4800/9600/19200/38400
/115200
DIV GRADE: can set the speed range
of PTZ movement (only valid for the serial port
control speed), 1-24/1-64/1-100
SPEED ACC: PTZ motion acceleration can
be set (only valid for serial port control
speed), 1-10
COM SETTING
PTZ SETTING
PICTURE
SETTING
VIDEO FORMAT: 1080P30
VERSION
FACTORY RESET
SAVE AND EXIT
Menu
PATCH:
PROTOCOL:
ADDRESS:
BAUD RATE:
DIV GRADE:
SPEED ACC:
Menu
MAIN
VISCA
1
9600
100
1

The Menu
Menu
DZOOM :
FOCUS MODE :
REMOTE SPEED :
REMOTE ACC :
PTZ FLIP :
OFF
AUTO
7
4
ON
PTZ sub menu
Image sub menu
Menu
AE MODE
WB MODE
NR :
BRIGHT :
SATURABILITY :
ACUTANCE :
GAMA :
HUE :
MIRROR :
FLICK :
LOW
7
10
8
0
0
OFF
50HZ
PTZ sub menu:
DZOOM: electronic zoom, can be set to
open / close
FOCUS MODE: Focus mode can be set,
AUTO / MANUAL
REMOTE SPEED: can set the current
movement speed of the gimbal (only valid
for infrared remote control), 1 - 15
REMOTE ACC: PTZ motion acceleration
can be set (only for infrared remote control),
1 - 10
PTZ FLIP: Set image flip, on/off
Image sub menu:
AE MODE: Exposure mode can be set
WB MODE: White balance mode can be set,
AUTO / INDOOR / OUTDOOR / ONE PUSH
/ ATW / MANUAL
NR: Set the noise reduction value, OFF /
LOW / MIDDLE / HIGH
BRIGHT: You can set the screen brightness
value, you can set 1 - 15
SATURABILITY: can set the color saturation
of the screen, can be set 1 - 14
ACUTANCE: You can set the screen sharpness,
you can set 1 - 15
GAMA: Can set the screen gamma value,
can be set 1 - 4
HUE: Cannot be set, can display the current
tone value of the screen
MIRROR: Mirror effect can be set, on/off
FLICK: Can be set to anti-flicker,
OFF/50HZ/60HZ
10

Network Connections
Connection mode
Direct connection mode: Connect the camera directly to the computer with a network
cable.
Network connection mode: Connect the camera to the Internet Network, and access
the network through a router or switch. Users can log in to the device through the
browser.
First open the computer network local connection properties window, select
“Internet Protocol Version 4 (TCP / IPv4)” double click or click the property
“Internet Protocol Version 4 (TCP / IPv4)”, enter the properties window, click
“Advanced” to enter advanced TCP / IP set the IP address and subnet mask in the IP
address field. After the addition is complete, click OK to complete the IP network
segment addition. Users can add corresponding network segments according to their
modified camera IP address.
Network login
WEB login:
Enter the device IP address in the browser address bar to default to
192.168.1.118, and press Enter to enter the web client login interface. Enter admin in the
[User Name] field, enter admin in the [Password] field, and pass the verification to enter
the background preview interface.
Language selection: Select the language icon in the upper right corner of the login
interface, click to select the web interface language type.
Preview and pan/tilt
Image preview:
After logging in successfully, enter the management interface. The
default is to enter the video preview interface. On the left side of the preview interface,
the image preview area, you can click to output the main stream, sub-stream and the
display ratio of the screen output (16:9 & 4:3) and full-screen display function.
PTZ control:
On the right side of the preview interface, the PTZ control area can
specifically implement the following functions: The gimbal rotates upward, the gimbal
rotates downward, the gimbal turns to the left, the gimbal rotates to the right, the gimbal
restores the initial center position, the lens zooms out, the lens zooms in and the preset
position number is set. Number 0 starts counting, which is preset position 1; saves the
preset position currently set; deletes the corresponding preset position; calls the
corresponding preset position.
Configuration
Click “Settings” in the upper right corner to enter the software parameter configuration
interface. There are mainly the following options: video configuration,
network configuration, system configuration, etc.
11

12
Configuration
Video configuration - Video coding
• Encoding mode: Set the video compression format. The default primary/secondary
stream compression format is H. 264/H. 265.
• Stream: Set different video output modes and use different streams. Contains primary
and secondary streams. The primary stream is optional 1920*1080, 1280*720, and the
secondary stream is optional 1280*720, 1024*576, 640*360.
Configuration
• Rate (Kb/s): Set the video bit rate (the default stream is 4096Kb/s; the default stream is
2048Kb/s; 0-15360Kb/s is optional)
• Frame rate: set the video frame rate, the default frame rate is 30 frames
• Rate Control: Set the stream control mode, the primary/secondary stream default variable
bit rate (CBR), support for selectable bit rate (VBR)
• I frame interval: set the key frame interval, the primary/secondary stream defaults to 30,
1-100 is optional.
Image parameter
The image parameter interface allows you to make the following adjustments to the image effects:
• Focus: You can set the focus mode, focus distance, digital zoom on and off
• Exposure: Set the exposure mode, shutter speed, anti-flickering, gain, aperture and brightness
• White balance: white balance mode, red and blue gain effect can be set
• Image: Set mirror, flip, back light compensation, gamma curve, wide dynamic and other functions
• Picture quality: can set the screen brightness, sharpness, contrast, saturation and
other functions
• Noise reduction: can be set to enable 2D noise reduction, 3D noise reduction
Network Configuration
Ethernet parameters
• DHCP: Set whether to enable automatic IP acquisition. Chosen by default
• IP address: Set the IP address. The default is 192.168.1.118, where IP is the address
of the login web page.
• Subnet mask: Set the subnet mask (default is 255.255.255.0)
• Default gateway: Set the default gateway (default gateway is 192.168.1.1)
• HTTP port: set the HTTP port, the default is 80
• Web port: Set the web port, the default is 6087
• Main stream port: Set the main stream video acquisition port. the default is 554.
• Secondary stream port: Set the secondary stream video acquisition port. The default is 554.
System Configuration
• Version upgrade: The page displays version information, which can only be read by
the user and cannot be modified.
• File upgrade: Click the upgrade icon, in the pop-up window, select the upgrade file;
click Upload upgrade, after the upgrade is successful, the device automatically restarts.
Note: Ensure that the power and network of the device is properly connected during
the upgrade process, otherwise the upgrade will fail.
• Restore factory: You can select “Simple Recovery” to reset the image parameters,
select “Full Recovery” to reset and restart all parameters, and select “Restart”
to restart the device directly.
• Account settings: You can modify the user name and password of the login
management account. After modification, you need to restart and log in again.

Image Sensor
Image Effect
Video Output HD
Power
Operating Temperature
Weight
Accessories
Effective Pixels
Resolution
Signal System
Lens
Horizontal View Angle
Tilt
Focus System
3.10 Megapixels
Auto / Manual
White Balance
Exposure Control
72.5 & 84.5 wide angle° °
Pan 355 (max. speed: 80 /s)° °
5x & 12x Optical Zoom
S/N Ratio ≥50db
Preset Position
Minimum Illumination 0.1 Lux
Shutter Speed 1/1~1/10,000s
Gain Auto / Manual
0~40 C°
Control Protocol VISCA, PELCO P/D
Control Mode USB Control / UVC Control
Operating System Microsoft Windows XP / Vista / 7 / 8 / 10
Product Size (L)148x(W)148x(H)163.5mm
Full color, black and white / electronic flip
SONY 1/2.8" Progressive CMOS
1920*1080P / 1280*720P
PAL / NTSC
-30 30 (max. speed: 60 /s)° to + ° °
Auto / Manual / Indoor / Outdoor / ATW
885g
12V DC (10.8~13.0V DC)
USB 3.0 + IP
Power Consumption Max. 30W (DC12V)
9 presets by IR remote controller
255 presets by Keyboards or PC
Auto / Manual Priority AE /
Exposure Compensation / Bright
Power Cord, IR Remote, Remote Control,
User Manual, USB Cable
Technical Features:
13
Table of contents