Pasco Scientific ME-6977 User manual

Instruction Manual
012-10538D
Fan Cart
ME-6977
(*See the PASCO Catalog or www.pasco.com for details)
Initial Step: Connect the Battery
Connecting the Battery - Tools Required: #0 or #1 Phillips screw driver. Remove the single screw on the
bottom of the Fan Cart that holds the battery compartment door, and remove the battery door from the
Fan Cart. Slide out the Lithium Polymer (Li-Poly) battery pack and reach in to connect the battery cable
to the connector on the circuit board. Place the battery into the compartment. Replace the battery door
and the screw.
Included Equipment
1. Fan Cart 2. Sail
3. AC to 9 V DC power adapter plus plugs (not shown)
Compatible PASCO Tracks* Part Number*
PAStrack ME-6960
1.2 m and 2.2 m PAScar Dynamics Tracks (no carts) ME-6953 and ME-6954
12
Accessory
Tray
Control
Panel
IMPORTANT: The battery must be
connected and charged before the Fan Cart
can be operated.

®
Fan Cart Introduction
2012-10538D
Next Step: Charge the Fan Cart Battery
The red LED next to CHARGING blinks when the battery needs to be charged.
Connect the AC to 9 V DC power adapter to an appropriate outlet. Plug the
power cord into the socket on the left side of the Fan Cart. IMPORTANT! Use
only the power adapter that is supplied with the Fan Cart to charge the battery.
The red LED next to CHARGING shines continuously while the battery is
charging. The battery typically charges in less than two hours. When the red
LED stops shining, disconnect the AC power adapter.
The Fan Cart cannot be operated when the AC power adapter is connected.
Introduction
The PASCO Fan Cart produces Low, Medium, High or Variable Thrust either
continuously or for selectable time intervals of 1, 2, 4, or 6 seconds.
The direction of thrust can be adjusted from zero to 180 degrees to
demonstrate the vector nature of force.
The Fan Cart has a sophisticated rechargeable-battery powered electronic
controller that provides a constant voltage to the fan motor so that the Fan Cart
approaches constant fan speed operation that is not dependent on the battery
terminal voltage. The Fan Cart includes a power adapter with interchangeable
plugs.
The Fan Cart nests on top of the PASCO Dynamics Cart or PAScar to utilize
the Dynamics Cart’s or PAScar’s plunger and bumpers. The Fan Cart is also
compatible with the Compact Cart Mass (ME-6755).
The Fan Cart is compatible with all PASCO tracks (please see the PASCO
catalog) or can be used on a smooth surface without a track.
The Fan Cart comes with a Sail for the “Fan Cart with Sail” demonstration.
The Fan Cart has a light-emitting diode (LED) that indicates when the battery is
being charged. The LED flashes when the battery is low.
Battery
The Fan Cart’s high energy density lithium-polymer battery can run the fan
continuously at medium thrust for about 1.5 hours before the ‘low-battery’ LED
begins to flash. Since the battery recharges quickly (typically in one hour), even
short periords (10 - 20 minutes) with the charger plugged in will recharge the
battery sufficiently to continue.
• Partial charging and recharging will not adversely affect the battery life.
• The replaceable battery pack is designed to last at least five years in
normal application.
• Unlike nickel-cadmium batteries, for maximum battery life, the
lithium-polymer battery pack should not be run down completely before
recharging.
• The battery pack can be left in a partially charged state for long periods
without damage.

®
ME-6977 Introduction
3
012-10538D
• Maximum battery life can be attained by charging the battery after each
use.
• The charger may be left connected indefinitely because it shuts off
automatically after the battery reaches full charge.
Operation
The control section of the Fan Cart has eleven light-emitting diodes (LEDs), a
VARIABLE THRUST knob, and three selector switches: THRUST, PULSE
TIME, and FAN ON, STANDBY. The CHARGING LED flashes when the
battery needs to be recharged and stays lit while the Fan Cart is charging.
FAN ON, STANDBY, and OFF
To
turn on the Fan Cart
, press the FAN ON, STANDBY selector switch. The
LEDs will light momentarily, and then the green LED next to STANDBY will
remain lit.
To
turn on the fan
, press the FAN ON, STANDBY selector switch again. The
fan will turn on and the yellow LED next to FAN ON will remain lit. The default
setting is continuous blowing at LOW THRUST.
To
turn off the fan
, press the FAN ON, STANDBY selector switch again. The
fan will turn off and the green LED next to STANDBY will remain lit.
To
turn off the Fan Cart
, press-and-hold the FAN ON, STANDBY selector
switch for one or two seconds. The green LED next to STANDBY will stop
shining.
THRUST Settings
To change the THRUST setting from the default value (LOW), press the
THRUST selector switch once to select MEDIUM. Press the selector switch
again to select HIGH, and press the selector switch again to select VARIABLE.
Press the selector switch once again to return the THRUST setting to the
default value.
When the THRUST setting is set to VARIABLE, turn the VARIABLE THRUST
knob clockwise to increase the thrust or counterclockwise to decrease the
thrust.
THRUST
selector switch
VARIABLE
THRUST
knob
CAUTION!
Keep fingers and other
objects away from the moving
fan blade.
NOTE: The Fan Cart turns
itself off if is not used for ten
minutes.
FAN ON, STANDBY
selector switch
PULSE TIME
selector switch

®
Fan Cart Demonstrations and Experiments
4012-10538D
You can change the THRUST setting while the fan is in STANDBY, or while the
fan is on.
PULSE TIME Settings
You can change PULSE TIME settings only while the fan is in STANDBY.
Press the PULSE TIME selector switch once to select 1 s (one second). Press
the switch again to select 2 s (two seconds). Press the switch again to select 4
s (four seconds), and press the switch again to select 6 s (six seconds).
Press the PULSE TIME selector switch once again to return to the default
setting (continuous blowing). No LEDs in the PULSE TIME section will be lit.
Once you have set the PULSE TIME setting, press the FAN ON, STANDBY
selector switch. The green LED next to STANDBY will blink three times, and
then the fan will turn on and run for the selected amount of time.
If you want a PULSE TIME to repeat itself, press-and-hold the PULSE TIME
selector switch until the LED for the desired time interval begins to blink.
Press the FAN ON, STANDBY selector switch. The green LED next to
STANDBY will blink three times and the fan will turn on and run for the
selected time interval and then turn off. After a total of twelve seconds from
when the fan first turns on, it will turn on again and run for the selected time
interval. For example, if 2 s is selected and you press-and-hold the PULSE
TIME selector switch (and then press FAN ON, STANDBY), the fan will run for
two seconds and then turn off for ten seconds before turning on again for two
seconds.
NOTE: A summary of the operating instructions is on the battery compartment
door on the bottom of the Fan Cart.
Charging the Fan Cart
The red LED next to CHARGING blinks when the battery needs to be charged.
Connect the AC to 9 V DC power adapter to an appropriate outlet. Plug the
power cord into the socket on the left side of the Fan Cart. IMPORTANT! Use
only the power adapter that is supplied with the Fan Cart to charge the battery.
The red LED next to CHARGING shines continuously while the battery is
recharging. When the red LED stops shining, disconnect the AC power
adapter.
The Fan Cart cannot be operated when the AC power adapter is connected.
Demonstrations and Experiments
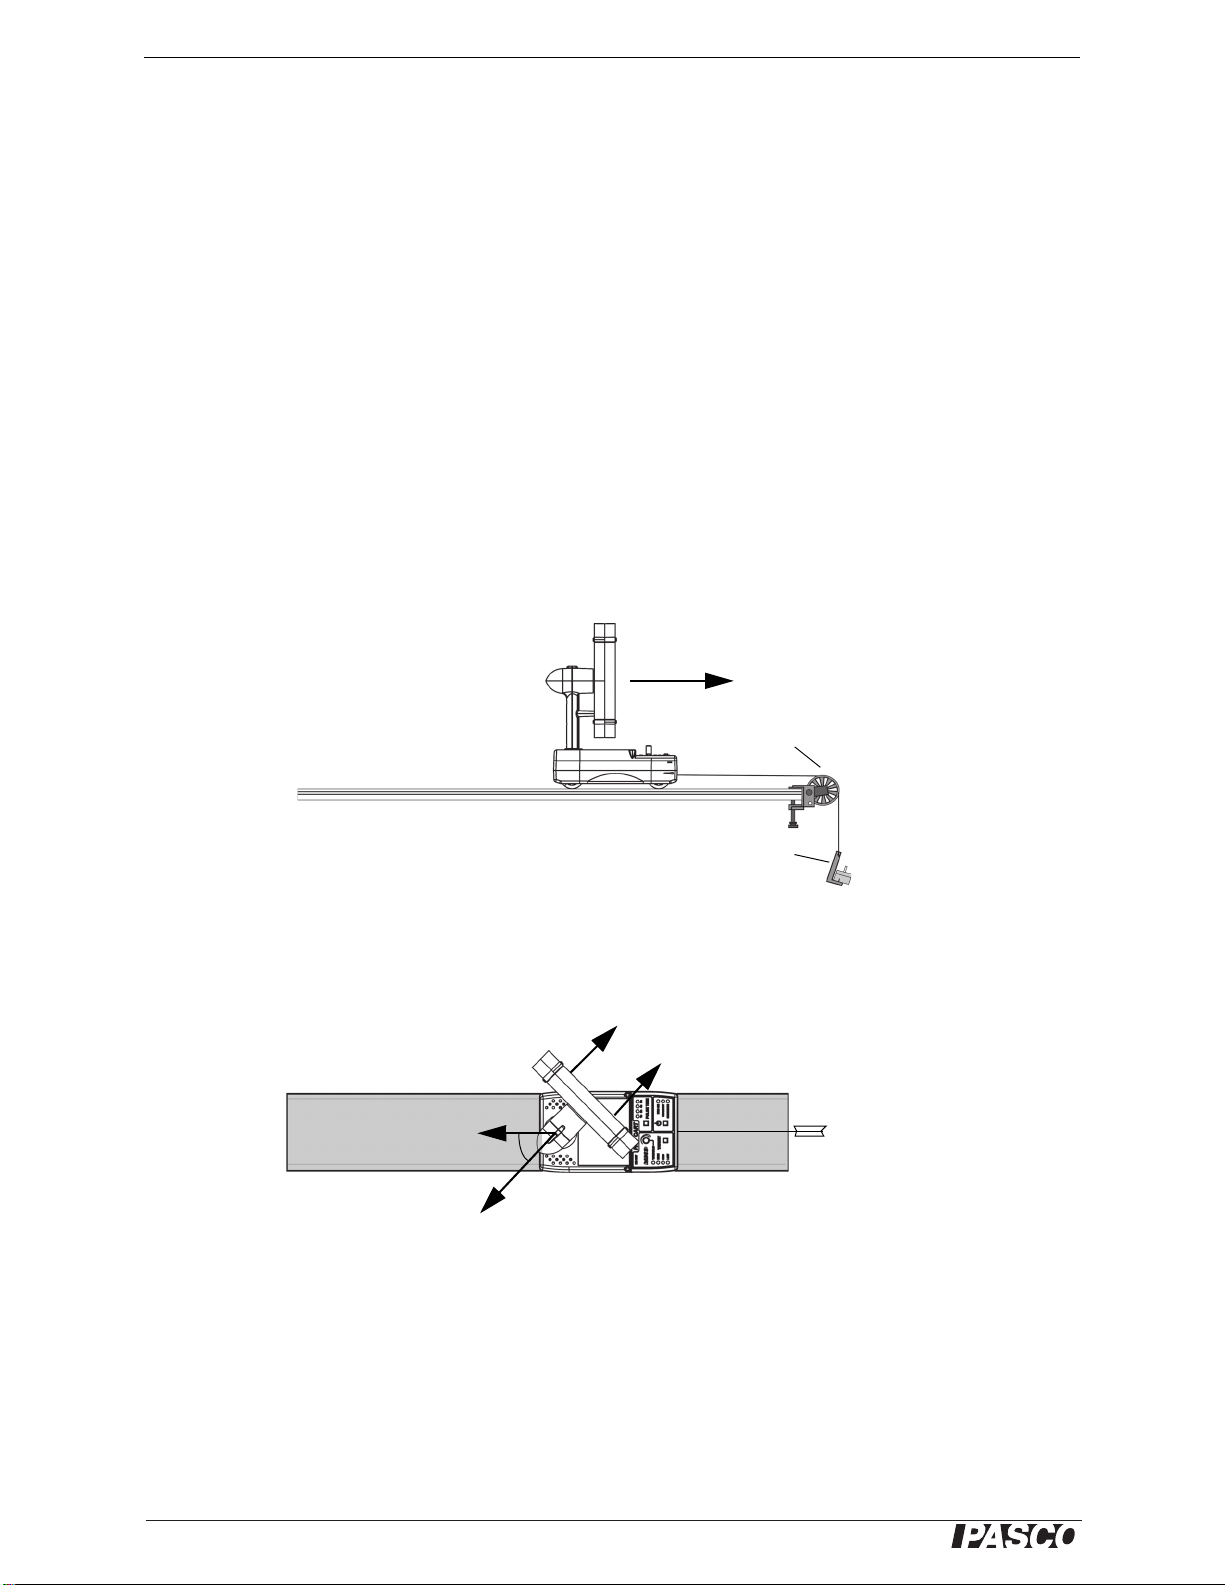
Using the Fan Cart and Sail
1. Place the Fan Cart on a level track.
2. Set the fan angle to zero degrees. Set the THRUST to MEDIUM and set
the PULSE TIME to 2 s (two seconds).
NOTE! If you ignore the
blinking red LED and the
battery pack becomes
severely discharged, the Fan
Cart will turn itself off and the
red LED will not shine. The
Fan Cart will not operate
when the battery becomes
severely discharged.
NOTE: To cancel the
PULSE TIME repeat
function, press the PULSE
TIME selector switch again.

®
ME-6977 Demonstrations and Experiments
5
012-10538D
3. Turn the fan on to demonstrate which way the Fan Cart moves without the
sail.
4. Attach the Sail to the Fan Cart by plugging the pegs of the sail into the
holes at the edge of the accessory tray on the cart. Attach the Sail so that
its flat side faces the fan.
5. Set the THRUST to VARIABLE, turn on the fan, and turn the VARIABLE
THRUST knob fully clockwise. Then, adjust the VARIABLE THRUST knob
so that the fan remains motionless. Turn the fan off after a short period of
time.
6. Leave the thrust at the same setting, but remove the Sail and re-attach it
so that its curved side faces the fan.
Force
Air Flow
v
Force
Air Flow
Equal
Force
Force
v
Air Flow
Greater
Force
NOTE: Many students will
expect the cart to not move.
However, the cart will have a
small acceleration opposite
to the acceleration without
the sail.

®
Fan Cart Demonstrations and Experiments
6012-10538D
7. Ask the students to predict which direction the cart will move with the sail
attached. Turn the fan on to show the direction of the cart’s motion.
Explanation: There is a force on the cart in one direction due to the fan pushing
air and there is another force on the cart in the opposite direction due to air
hitting and bouncing off of the sail. The bouncing air hitting the
curved
side of
the sail causes the force on the sail to be greater than the force of the air on the
fan.
Suggested Experiments
Experiment #1:
Use a Motion Sensor or Tape Timer to measure the acceleration of the Fan
Cart due to a constant force. Add mass to the accessory tray of the cart and
repeat. Determine the relationship of acceleration to mass for a constant force.
Experiment #2:
Determine the force of the Fan Cart by connecting the cart to a mass that
hangs over a pulley. Adjust the hanging mass until the cart doesn’t move.
Next, turn the fan at an angle and determine the component of the force.
Determine whether the force component in the direction of motion is F cos .
(This experiment must be performed on a PASCO track so the cart will go in a
straight line.)
Experiment #3:
Put the Fan Cart on a track and incline the track until the cart can’t climb the
incline.
Experiment #4:
Put the Fan Cart on top of the PASCO Friction Cart and adjust the friction (or
the VARIABLE THRUST on the Fan Cart) until the cart goes at a constant
speed.
Air Flow
Hanging
Mass
Pulley
Air Flow
Force, F
F cos

®
ME-6977 Specifications
7
012-10538D
Experiment #5: The Cart Race
Set up a “race” between the Fan Cart and a Motorized Cart (PASCO Model
ME-9781). Put two PASCO tracks side by side. Mount a Motion Sensor on the
left end of each track. Place the carts on the tracks approximately 15 cm in
front of the sensors. Position the carts so that they start at the same position.
Set the Fan Cart’s thrust to LOW. Adjust the Motorized Cart’s speed to
maximum. Start the carts going at the same time. Starting at the same point
and time, the constant speed Motorized Cart initially takes the lead but is
‘caught’ and passed by the Fan Cart moving at a constant acceleration.
Specifications
Technical Support
For assistance with any PASCO product, contact PASCO at:
Limited Warranty
For a description of the product warranty, see the PASCO catalog.
Copyright
The PASCO scientific 012-10538D
Fan Cart Instruction Manual
is copyrighted with all rights reserved.
Permission is granted to non-profit educational institutions for reproduction of any part of this manual,
providing the reproductions are used only in their laboratories and classrooms, and are not sold for
profit. Reproduction under any other circumstances, without the written consent of PASCO scientific, is
prohibited.
Trademarks
PASCO, PASCO scientific, PASPORT, and Xplorer GLX are trademarks or registered trademarks of
PASCO scientific, in the United States and/or in other countries. For more information visit
www.pasco.com/legal. Windows is a registered trademark of Microsoft Corporation in the United
States and/or other countries. Mac is a trademark of Apple Computer, Inc., registered in the U.S. and
other countries.
Product End of Life Disposal Instructions:
This electronic product is subject to disposal and recycling regulations that vary
by country and region. It is your responsibility to recycle your electronic
equipment per your local environmental laws and regulations to ensure that it
will be recycled in a manner that protects human health and the environment.
To find out where you can drop off your waste equipment for recycling, please
contact your local waste recycle/disposal service, or the place where you
purchased the product.
Mass, Fan Cart, and Mass, Sail Approximately 0.300 kg and approximately 0.100 kg
Battery Pack 7.2 volts, 1.25 amp-hour. One hour typical recharge time.
Thrust: LOW, MEDIUM, and HIGH Approximately 0.04 N, 0.15 N, and 0.22 N
Thrust: VARIABLE (minimum to maximum) Approximately 0.01 N to 0.23 N
Address: PASCO scientific
10101 Foothills Blvd.
Roseville, CA 95747-7100
Phone: 916-462-8384 (worldwide)
800-772-8700 (U.S.)
Web: www.pasco.com
Email: [email protected]

®
Fan Cart Technical Support
8012-10538D
The European Union WEEE (Waste Electronic and Electrical Equipment)
symbol above and on the product or its packaging indicates that this product
must not be disposed of in a standard waste container.
Fan Cart Battery Replacement and Disposal Instructions:
Removal/Replacement - Tools Required: #0 or #1 Phillips screw driver.
Remove the single screw holding the battery door, and remove the battery door
from the Fan Cart. Slide out the Lithium Polymer (Li-Poly) battery pack and
reach in to disconnect the battery cable connector. Reverse these instructions
for a battery replacement.
Battery Disposal: Batteries contain chemicals that, if released, may affect the
environment and human health. Batteries should be collected separately for
recycling, and recycled at a hazardous material disposal location adhering to
your country and local government regulations. To find out where you can drop
off your waste battery for recycling, please contact your local waste disposal
service, or the place where you purchased the product.
The Li-Poly rechargeable battery used in this product is marked with the
international symbols (to the right) to indicate the need for the separate
collection and recycling of batteries.
Summary of Operations
Table of contents
Popular Fan manuals by other brands

GVA
GVA G40PFS15 instruction manual

KDK
KDK K15VC Operating and installation instructions

COLORATO
COLORATO CLF-20WRC instruction manual

Monte Carlo Fan Company
Monte Carlo Fan Company 14PRR72 D Series Owner's guide and installation manual

Be Cool
Be Cool BC78TU200X manual

Helios
Helios KVD Series Operation and installation instructions