PATTA AAG07-100 User manual

Angle Grinder
AAG07-100/AAG07-115
OPERATION INSTRUCTIONS
Read through carefully and understand these instructions
before use.

- 1 -
General Power Tool Safety Warnings
(For All Power Tools)
WARNING! Read and understand all instructions. Failure to follow all
instructions listed below may result in electric shock, fire and/or serious
personal injury.
Save all warnings and instructions for future reference.
The term “power tool” in the warnings refers to your mains-operated (corded) power tool or
battery-operated (cordless) power tool.
Work Area Safety
1. Keep work area clean and well lit. Cluttered or dark areas invite accidents.
2. Do not operate power tools in explosive atmospheres, such as in the presence of
flammable liquids, gases, or dust. Power tools create sparks which may ignite the dust
or fumes.
3. Keep children and bystanders away while operating a power tool. Distractions can
cause you to lose control.
Electrical Safety
4. Power tool plugs must match the outlet. Never modify the plug in anyway. Do not
use any adapter plugs with earthed (grounded) power tools. Unmodified plugs and
matching outlets will reduce risk of electric shock.
5. Avoid body contact with earthed or grounded surfaces, such as pipes, radiators,
ranges and refrigerators. There is an increased risk o electric shock if your body is
earthed or grounded.
6. Do not expose power tools to rain or wet conditions. Water entering a power tool will
increase the risk of electric shock.
7. Do not abuse the cord. Never use the cord for carrying, pulling or unplugging the
power tool. Keep cord away from heat, oil, sharp edges or moving parts. Damaged

- 2 -
or entangled cords increase the risk of electric shock.
8. When operating a power tool outdoors, use an extension cord suitable for outdoor use. Use
of a cord suitable for outdoor use reduces the risk of electric shock.
9. If operating a power in a damp location is unavoidable, use a residual current device
(RCD) protected supply. Use of an RCD reduces the risk of electric shock.
NOTE: The term “residual current device (RCD)” may be replaced by the term “ground fault
circuit interrupter (GFCI)” or “earth leakage circuit breaker (ELCB)”.
Personal Safety
10. Stay alert, watch what you are doing and use common sense when operating a
power tool. Do not use a power tool while you are tired or under the influence of
drugs, alcohol, or medication. A moment of inattention while operating power tools
may result in serious personal injury.
11. Use personal protective equipment. Always wear eye protection. Protective
equipment such as dust mask, non-skid safety shoes, hard hat, or hearing protection
used for appropriate conditions will reduce personal injuries.
12. Prevent unintentional starting. Ensure the switch is in the off-position before
connecting to power source and /or battery pack, picking up or carrying the tool.
Carrying power tools with your finger on the switch or energising power tools that have
the switch on invites accidents.
13. Remove any adjusting key or wrench before turning the tool on. A wrench or a key
left attached to a rotating part of the power tool may result in personal injury.
14. Do not overreach. Keep proper footing and balance at all times. This enables better
control of the power tool in unexpected situations.
15. Dress properly. Do not wear loose clothing or jewellery. Keep your hair, clothing,
and gloves away from moving parts. Loose clothes, jewellery or long hair can be
caught in moving parts.
16. If devices are provided for the connection of dust extraction and collection
facilities, ensure these are connected and properly used. Use of dust collection can
reduce dust-related hazards.

- 3 -
Power Tool Use and Care
17. Do not force the power tool. Use the correct power tool for your application. The
correct power tool will do the job better and safer at the rate for which it was designed.
18. Do not use tool if switch does not turn it on or off. Any power tool that cannot be
controlled with the switch is dangerous and must be repaired.
19. Disconnect the plug from the power source and/or the battery pack from the
power tool before making any adjustments, changing accessories, or storing
power tools. Such preventive safety measures reduce the risk of starting the power
tool accidentally.
20. Store idle power tools out of the reach of children and do not allow persons
unfamiliar with the power tool or these instructions to operate the power tool.
Power tools are dangerous in the hands of untrained users.
21. Maintain power tools. Check for misalignment or binding of moving parts,
breakage of parts and any other condition that may affect the power tool’s
operation. If damaged, have the power tool repaired before use. Many accidents
are caused by poorly maintained power tools.
22. Keep cutting tools sharp and clean. Properly maintained cutting tools with sharp
cutting edges are less likely to bind and are easier to control.
23. Use the power tool, accessories and tool bits etc. in accordance with these
instructions, taking into account the working conditions and the work to be
performed. Use of the power tool for operations different from those intended could
result in a hazardous situation.
Service
24. Have your power tool serviced by a qualified repair person using only identical
replacement parts. This will ensure that the safety of the power tool is maintained.
VOLTAGE WARNING:
Before connecting the machine to a power source (receptacle, outlet, etc.), be sure the
voltage supplied is the same as that specified on the nameplate of the machine. A power
source with voltage greater than that specified for the machine can result in SERIOUS INJURY
to the user, as well as damage to the machine. If in doubt, DO NOT PLUG IN THE MACHINE.

- 4 -
Using a power source with voltage less than nameplate rating is harmful to the motor.
SPECIFICATIONS
Model AAG07-100 AAG07-115
Rated Power Input 710W 710W
Rated Speed 13000 r/min 11800 r/min
Wheel
Size
External dia.
Thickness
Internal dia.
100mm
115mm
4 mm
4 mm
16mm 22 mm
Net Weight 1.6 kg 1.6kg
※Due to the continuing program of research and development, the specifications herein are
subject to change without prior notice.
Safety Instructions For All Operations
General Safety Warnings for Grinding
a) This power tool is intended to function as a grinder. Read all safety warnings,
instructions, illustrations and specifications provided with this power tool. Failure to
follow all instructions listed below may result in electric shock, fire and/or serious
injury.
b) Operations such as sanding, wire brushing, polishing and cutting-off are not
recommended to be performed with this power tool. Operations for which the power
tool was not designed may create a hazard and cause personal injury.
c) Do not use accessories which are not specifically designed and recommended by the
tool manufacturer. Just because the accessory can be attached to your power tool, it
does not assure safe operation.
d) The rated speed of the accessory must be at least equal to the maximum speed marked
on the power tool. Accessories running faster than their rated speed can break and fly

- 5 -
apart.
e) The outside diameter and the thickness of your accessory must be within the capacity
rating of your power tool. Incorrectly sized accessories cannot be adequately guarded
or controlled.
f) Threaded mounting of accessories must match the grinder spindle thread. For
accessories mounted by flanges, the arbour hole of the accessory must fit the locating
diameter of the flange. Accessories that do not match the mounting hardware of the
power tool will run out of balance, vibrate excessively and may cause loss of control.
g) Do not use a damaged accessory. Before each use, inspect the accessory such as
abrasive wheels for chips and cracks, backing pad for cracks, tear or excess wear, wire
brush for loose or cracked wires. If power tool or accessory is dropped, inspect for
damage or install an undamaged accessory. After inspecting and installing an accessory,
position yourself and bystanders away from the plane of the rotating accessory and run
the power tool at maximum no-load speed for one minute. Damaged accessories will
normally break apart during this test time.
h) Wear personal protective equipment. Depending on application, use a face shield, safety
goggles or safety glasses. As appropriate, wear dust mask, hearing protectors, gloves
and workshop apron capable of stopping small abrasive or work piece fragments. The
eye protection must be capable of stopping flying debris generated by various
operations. The dust mask or respirator must be capable of filtrating particles
generated by your operation. Prolonged exposure to high intensity noise may cause
hearing loss.
i) Keep bystanders a safe distance away from work area. Anyone entering the work area
must wear personal protective equipment. Fragments of workpiece or of a broken
accessory may fly away and cause injury beyond immediate area of operation.
j) Hold the power tool by insulated gripping surfaces only, when performing an operation
where the cutting accessory may contact hidden wiring or its own cord. Cutting
accessory contacting a "live" wire may make exposed metal parts of the power tool "live"
and could give the operator an electric shock.
k) Position the cord clear of the spinning accessory. If you lose control, the cord may be
cut or snagged and your hand or arm may be pulled into the spinning accessory.
l) Never lay the power tool down until the accessory has come to a complete stop. The
spinning accessory may grab the surface and pull the power tool out of your control.

- 6 -
m) Do not run the power tool while carrying it at your side. Accidental contact with the
spinning accessory could snag your clothing, pulling the accessory into your body.
n) Regularly clean the power tool’s air vents. The motor’s fan will draw the dust inside the
housing and excessive accumulation of powdered metal may cause electrical hazards.
o) Do not operate the power tool near flammable materials. Sparks could ignite these
materials.
p) Do not use accessories that require liquid coolants. Using water or other liquid coolants
may result in electrocution or shock.
Further safety instructions for all operations
Kickback and Related Warnings
Kickback is a sudden reaction to a pinched or snagged rotating wheel, backing pad, brush or
any other accessory. Pinching or snagging causes rapid stalling of the rotating accessory
which in turn causes the uncontrolled power tool to be forced in the direction opposite of the
accessory’s rotation at the point of the binding.
For example, if an abrasive wheel is snagged or pinched by the workpiece, the edge of the
wheel that is entering into the pinch point can dig into the surface of the material causing
the wheel to climb out or kick out. The wheel may either jump toward or away from the
operator, depending on direction of the wheel’s movement at the point of pinching. Abrasive
wheels may also break under these conditions.
Kickback is the result of power tool misuse and/or incorrect operating procedures or
conditions and can be avoided by taking proper precautions as given below.
a) Maintain a firm grip on the power tool and position your body and arm to allow you to
resist kickback forces. Always use auxiliary handle, if provided, for maximum control
over kickback or torque reaction during start-up. The operator can control torque
reactions or kickback forces, if proper precautions are taken.
b) Never place your hand near the rotating accessory. Accessory may kickback over your
hand.
c) Do not position your body in the area where power tool will move if kickback occurs.
Kickback will propel the tool in direction opposite to the wheel’s movement at the point
of snagging.
d) Use special care when working corners, sharp edges etc. Avoid bouncing and snagging
the accessory. Corners, sharp edges or bouncing have a tendency to snag the rotating

- 7 -
accessory and cause loss of control or kickback.
e) Do not attach a saw chain woodcarving blade or toothed saw blade. Such blades create
frequent kickback and loss of control.
Additional Safety Warnings for Grinding Operation
a) Use only wheel types that are recommended for your power tool and the specific guard
designed for the selected wheel. Wheels for which the power tool was not designed
cannot be adequately guarded and are unsafe.
b) The grinding surface of centre depressed wheels must be mounted below the plane of
the guard lip. An improperly mounted wheel that projects through the plane of the
guard lip cannot be adequately protected.
c) The guard must be securely attached to the power tool and positioned for maximum
safety, so the least amount of wheel is exposed towards the operator. The guard helps
to protect operator from broken wheel fragments and accidental contact with wheel
and sparks that could ignite clothing.
d) Wheels must be used only for recommended applications. For example: do not grind
with the side of cut-off wheel. Abrasive cut-off wheels are intended for peripheral
grinding, side forces applied to these wheels may cause them to shatter.
e) Always use undamaged wheel flanges that are of correct size and shape for your
selected wheel. Proper wheel flanges support the wheel thus reducing the possibility of
wheel breakage. Flanges for cut-off wheels may be different from grinding wheel
flanges.
f) Do not use worn down wheels from larger power tools. Wheel intended for larger power
tool is not suitable for the higher speed of a smaller tool and may burst.
SAVE THESE INSTRUCTIONS.
WARNING! MISUSE or failure to follow the safety rules stated in this instruction manual
may cause serious personal injury.

- 8 -
Instructions For Operation
Spindle Lock
CAUTION:
Always be sure that the tool is
switched off and unplugged before
adjusting or checking function on the
tool.
Never actuate the spindle lock when
the spindle is moving. The tool may be
damaged.
Press the spindle lock to prevent spindle
rotation when installing or removing accessories. (Fig. 1)
Switch Operation
CAUTION:
Before plugging in the tool, always check
to see that the switch actuates properly
and returns to the “OFF” position when
the rear of the switch lever is depressed.
To switch ON, depress the rear of the
switch lever and push it forward. Then
depress the front of the switch lever to
lock it.
To switch OFF, depress the rear of the
switch lever. (Fig. 2)
- 9 -
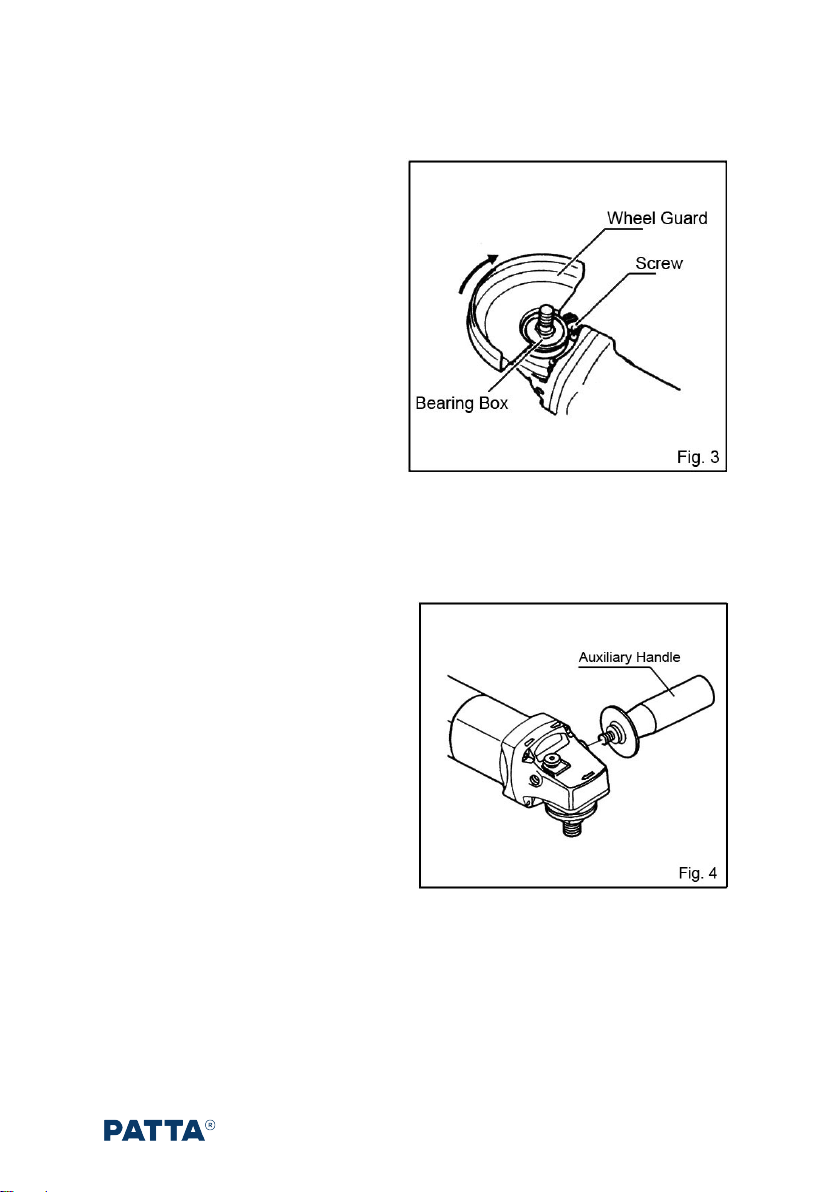
Installing or Removing the Wheel Guard
CAUTION:
Always be sure that the tool is switched
OFF and unplugged before installing or
removing the wheel guard.
Never actuate the shaft lock when the
spindle is moving. The tool may be
damaged.
Mount the wheel guard with the protrusion
on the wheel guard band aligned with the
notch on the bearing box. Then rotate the
wheel guard around 180 degrees. Be sure
to tighten the screw securely. (Fig. 3)
To remove the wheel guard, follow the installation procedure in reverse.
Installing the Auxiliary Handle
CAUTION:
Always be sure that the tool is switched
off and unplugged before carrying out any
work on the tool.
Always be sure that the auxiliary handle is
installed securely before operation.
Screw the auxiliary handle securely on
either side of the tool head (gear housing).
(Fig. 4)

- 10 -
Installing or Removing the Depressed Center Wheel
CAUTION:
Always be sure that the tool is switched
OFF and unplugged before installing or
removing the wheel.
When using a depressed center grinding
wheel, the wheel guard must be fitted
on the tool so that the closed side of the
guard always points toward the
operator.
Screw the inner flange onto the spindle.
Then fit the wheel on over the inner flange
and screw the outer flange onto the spindle. (Fig. 5)
Press the spindle lock firmly so that the spindle cannot revolve and then use the lock nut
wrench to tighten the outer flange securely.
To remove the wheel, follow the installation procedures in reverse.
Grinding and Sanding Operation
WARNING:
It should never be necessary to force the tool. The weight of the tool applies adequate pressure.
Forcing and excessive pressure could cause dangerous wheel breakage.
ALWAYS replace wheel if tool is dropped while grinding.
NEVER bang or hit grinding disc or wheel onto work.
Avoid bouncing and snagging the wheel, especially when working corners, sharp edges etc.
This can cause loss of control and kickback.
NEVER use tool with wood cutting blades and other sawblades. Such blades when used on a
grinder frequently kick and cause loss of control leading to personal injury.
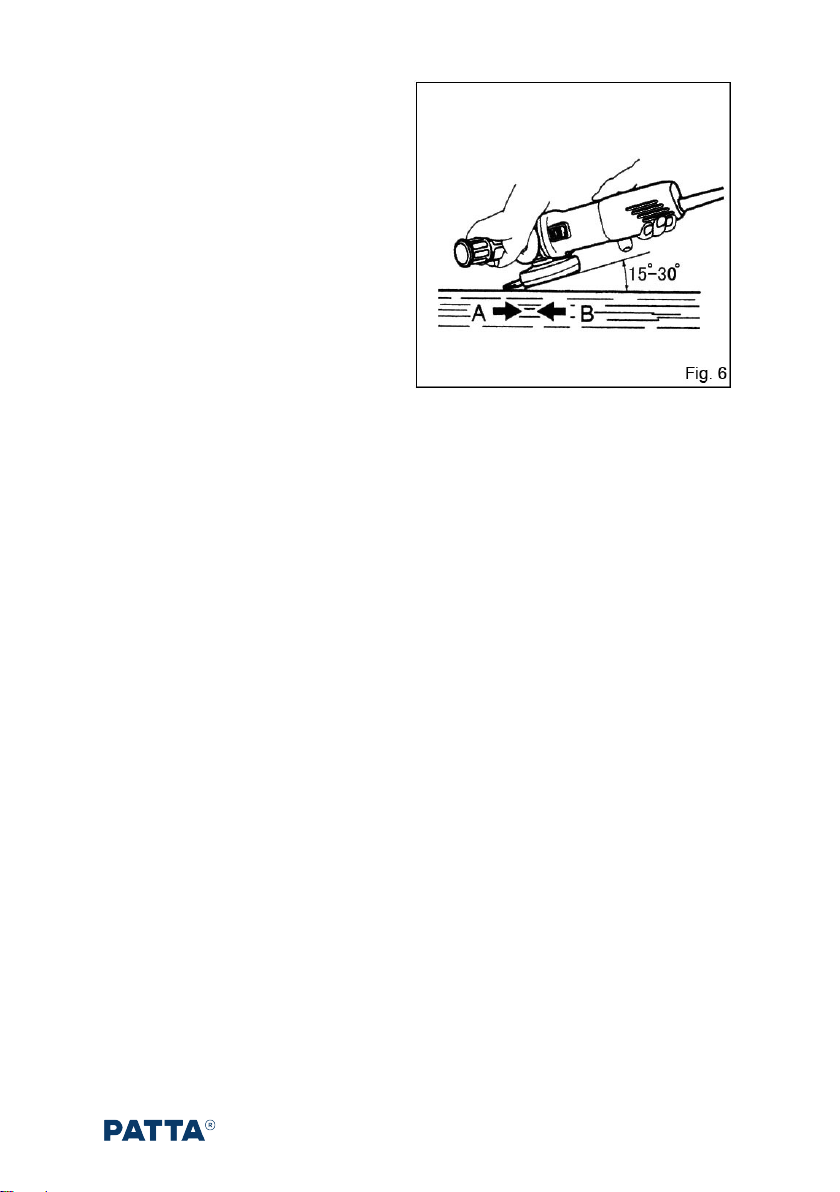
- 11 -
Hold the tool firmly, turn the tool on and
then apply the wheel or disc at an angle of
about 15° to the workpiece. (Fig. 6)
During the break-in period with a new
wheel, do not work the grinder in the B
direction, or it will cut into the workpiece.
Once the edge of the wheel has been
rounded off by use, the wheel may be
worked in both A and B directions. (Fig. 6)
CAUTION:
After operation, always switch off the tool and wait until the wheel has come to a complete
stop before putting the tool down.

- 12 -
Maintenance And Inspection
CAUTION!
Always be sure that the tool is switched off and unplugged before attempting to perform
inspection or maintenance.
After Use
Blow away dust from the inside of the tool by running the tool at an idle for a while.
Brush off accumulation of dust on the base.
Accumulation of dust in the motor or on the base may cause a malfunction of the tool.
Inspecting the Depressed Center Wheel
Ensure that the depressed center wheel is free of cracks and surface defects.
Inspecting the Mounting Screws
Regularly inspect all mounting screws and ensure that they are properly tightened. Should
any of the screws be loose, retighten them immediately. Failure to do so could result serious
hazard.
Maintenance of the Motor
The motor unit winding is the very “heart” of the power tool. Exercise due care to ensure the
winding does not become damaged and /or wet with oil or water.
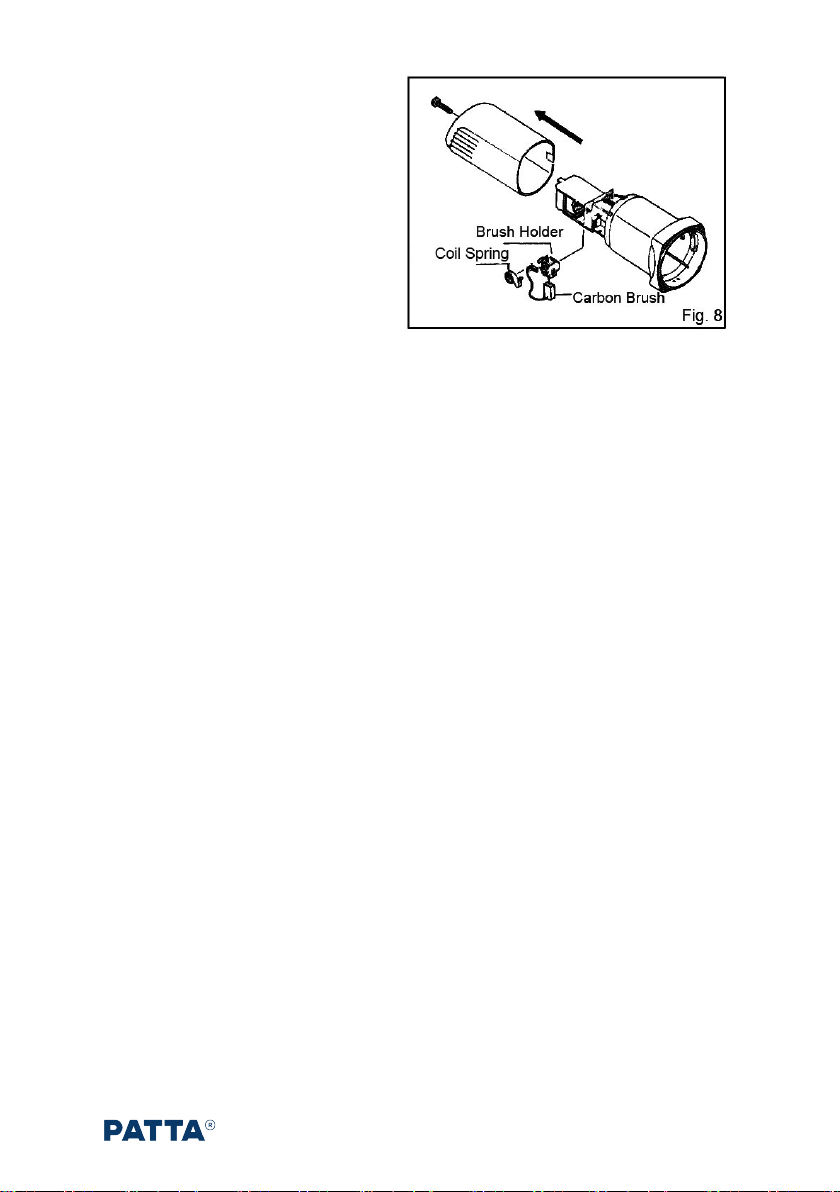
Replacing Carbon Brushes
Remove and check the carbon brushes
regularly. Replace when they wear down to
the limit mark. Keep the carbon brushes
clean and free to slip in the holders. Both
carbon brushes should be replaced at the
same time. Use only identical carbon
brushes. (Fig. 7)
- 13 -
Use a screwdriver to remove the rear
cover. Disconnect the carbon brush from
the brush holder, then draw the coil spring
and take out the worn carbon bush and
replace new one; Release the coil spring
and reconnect the carbon brush with the
brush holder. And then tighten the rear
cover securely. (Fig. 8)
※Damaged cord must be replaced by a special cord purchased from authorized service center.
※To maintain product SAFETY and RELIABILITY, repairs, any other maintenance or
adjustment should be performed by authorized centers, always using original replacement
parts.

- 14 -

- 15 -
EXPLANATION OF GENERAL VIEW
1 Bearing Cover 27 Inner Flange
2 Ball Bearing
3 Insulation Washer 28 Baffle Plate
5 Armature Assembly
6 Guide Plate 29 Stator Assembly
7 Oil Seal 30 Switch Knob
8 Shim 31 Nameplate
9 Ball Bearing 32 Strain Relief
10 Driving Spiral Bevel Gear 33 Pan Head Tapping Screw
11 Hex. Nut 34 Capacitor
12 Lock Nut 35 Switch Assembly
13 Autolocking Spring 36 Compression Spring
14 Pan Head Tapping Screw 37 Switch Lever
15 Gear Housing 38 Cord
16 Lock Pin 39 Cord Guard
17 Needle Bearing 40 Pan Head Tapping Screw
18 Driven Spiral Bevel Gear 41 Rear Cover
19 Circlip for Hole 42 Carbon Brush
20 Ball Bearing
21 Bearing Box 43 Pan Head Tapping Screw
22 Shim 44 Carbon Brush Holder
23 Cheese Head Screw
24 Wheel Cover 45 Belleville Spring
46 Motor Housing
25 Drive Spindle 47 Inductance
48 Pan Head Screw
26 Outer Flange 861 Wrench
862 Auxiliary Handle

- 16 -

- 17 -
ﺔﻗﺎطﻟا ةادﻷ ﺔﻣﺎﻌﻟا ﺔﻣﻼﺳﻟا تارﯾذﺣﺗ
(ﺔﻗﺎﻄﻟا تاودا ﻊﯿﻤﺠﻟ)
.تﺎﻤﯿﻠﻌﺘﻟا ﻞﻛ ﻢﮭﻓو ةءاﺮﻗ !ﺮﯾﺬﺤﺗ
عﺎﺒﺗا مﺪﻋ يدﺆﯾ ﺪﻗ ﺔﯿﻟﺎﺘﻟا ﺔﻠﺠﺴﻤﻟا تﺎﻤﯿﻠﻌﺘﻟا ﻞﻛ
ةﺮﯿﻄﺧ ﺔﯿﺼﺨﺷ تﺎﺑﺎﺻإ وأ / و ﻖﺋاﺮﺤﻟاو ،ﺔﯿﺋﺎﺑﺮﮭﻜﻟا ﺔﻣﺪﺼﻟا ﻰﻟا ﺔﻤﺋﺎﻘﻟا ﻦﻤﺿ
.
ﻘﺘﺴﻤﻟا ﻊﺟﺮﻤﻠﻟ تﺎﻤﯿﻠﻌﺘﻟاو تاﺮﯾﺬﺤﺘﻟا ﻞﻜﺑ ظﺎﻔﺘﺣا .ﻲﻠﺒ
ﻚﻠﺳﻻا) ﻲﺋﺎﺑﺮﮭﻜﻟا رﺎﯿﺘﻟﺎﺑ ﻞﻤﻌﺗ ﻲﺘﻟا ﺔﻗﺎﻄﻟا ةادأ ﻰﻟإ تاﺮﯾﺬﺤﺘﻟا ﻲﻓ "ﺔﻗﺎﻄﻟا ةادأ" ﺢﻠﻄﺼﻤﻟا ﺮﯿﺸﯾ
(ﻚﻠﺴﻟا ماﺪﺨﺘﺳا نود) ﺔﯾرﺎﻄﺒﻟﺎﺑ ﻞﻤﻌﺗ ﻲﺘﻟا ﺔﻗﺎﻄﻟا ةادأوأ (مﺪﺨﺘﺴﻤﻟا
.
ﻞﻤﻌﻟا نﺎﻜﻣ ﺔﻣﻼﺳ
1. .اﺪﯿﺟ ةءﺎﻀﻣو ﺔﻔﯿﻈﻧ ﻞﻤﻌﻟا ﺔﻘﻄﻨﻤﺑ ظﺎﻔﺘﺣﻻا
ﺒﺴﺗ ﺔﻨﻛاﺪﻟا وأ ﺔﺷﻮﺸﻤﻟا ﻖطﺎﻨﻤﻟاثداﻮﺤﻟا ﺐ
.
2.
وأ لﺎﻌﺘﺷﻼﻟ ﺔﻠﺑﺎﻘﻟا ﻞﺋاﻮﺴﻟا دﻮﺟو ﻞﺜﻣ ،ةﺮﺠﻔﺘﻤﻟا ءاﻮﺟﻷا ﻲﻓ ﺔﻗﺎﻄﻟا تاودأ ﻞﯿﻐﺸﺘﺑ ﻢﻘﺗ ﻻ
رﺎﺒﻐﻟا وأ تازﺎﻐﻟا.
.ةﺮﺨﺑﻷا وأ رﺎﺒﻐﻟا ﻞﻌﺸﺗ ﺪﻗ ﻲﺘﻟا تاراﺮﺸﻟا ﻖﻠﺨﺗ ﺔﯿﺋﺎﺑﺮﮭﻛ تاودأ
3.
ﺔﻗﺎﻄﻟا ةادأ ﻞﯿﻐﺸﺗ ءﺎﻨﺛأ اﺪﯿﻌﺑ ةرﺎﻤﻟاو لﺎﻔطﻷا ءﺎﻘﺑإ.
ﻰﻟإ يدﺆﯾ نأ ﻦﻜﻤﯾ تﺎﻓاﺮﺤﻧﻻا ناﺪﻘﻓ
. ة ﺮ ﻄ ﯿ ﺴ ﻟ ا
ﺔﯿﺋﺎﺑﺮﮭﻜﻟا ﺔﻣﻼﺴﻟا
4. .لﺎﺣ ﻞﻛ ﻰﻠﻋ اﺪﺑا ﺲﺑﺎﻘﻟا لﺪﻌﺗ ﻻ .ﻲﺋﺎﺑﺮﮭﻜﻟا رﺎﯿﺘﻟا ﺬﺧﺄﻣ ﻖﺑﺎﻄﺗ ﻰﻠﻋ ﺔﻗﺎﻄﻟا ةادا ﺲﺑاﻮﻗ ﺐﺠﯾ
ﺔﻗﺎﻄﻟا تاودا ﻊﻣ ﺊﯾﺎﮭﻣ ﺲﺑﺎﻗ يا مﺪﺨﺘﺴﺗ ﻻﻮﻤﺑضرﻷﺎﺑ لﻮﺻ ﺲﺑاﻮﻘﻟا .(ﺔﺿرﺆﻤﻟا )
ﺔﻟّﺪﻌﻤﻟاﺮﯿﻏ.
ﺣ ﺮﻄﺧ ﻦﻣ ﺔﻘﺑﺎﻄﺘﻤﻟا ﻲﺋﺎﺑﺮﮭﻜﻟا رﺎﯿﺘﻟا ﺬﺧﺄﻣ ﻞﻠﻘﯿﺳﺔﯿﺋﺎﺑﺮﮭﻛ ﺔﻣﺪﺻ ثوﺪ
.
5. ﻊﻣ ﺎﯾﺪﺴﺟ ﺲﻣﻼﺗ ﺐﻨﺠﺗﻟا ،ﺐﯿﺑﺎﻧﻷا ﻞﺜﻣ ﻼﺜﻣ ضرﻷﺎﺑ لﻮﺻﻮﻤﺑ وأ ﺔﺿرﺆﻤﻟا تﺎﺤﻄﺴ
تﺎﺟﻼﺜﻟاو تﺎﻗﺎﻄﻨﻟا ،تﺎﻌﺸﻤﻟا.
ﻮھ ﻚﻤﺴﺟ نﺎﻛ اذإ ﺔﯿﺋﺎﺑﺮﮭﻜﻟا ﺔﻣﺪﺼﻟا ﻦﻣ ﺪﯾاﺰﺘﻣ ﺮﻄﺧ كﺎﻨھ
ضرﻷﺎﺑ لﻮﺻﻮﻤﺑ وأ ضرﺆﻤﻟا
6.
وأ ﺔﻠﻠﺒﻟا تﻻﺎﺤﻟا ﻲﻓ ﺔﻗﺎﻄﻟا تاودا ضﺮﻌﺗ ﻻةﺮﻄﻤﻤﻟا
.ﯾا ﺪﯾﺰ ﺔﻗﺎﻄﻟا ةادا ﻲﻓ ﻞﺧﺪﯾ يﺬﻟا ءﺎﻤﻟ
.ﺔﯿﺋﺎﺑﺮﮭﻛ ﺔﻣﺪﺻ ثوﺪﺣ ﺮﻄﺧ
7..ﺊﯿﺴﺗ ﻻ ﻟ اﻚﻠﺴ اﺪﯿﻌﺑ ﻚﻠﺴﻟا ءﺎﻘﺑإ .ﺔﻗﺎﻄﻟا ةادأ ﻞﺼﻓوأ ﺐﺤﺳوأ ﻞﻤﺤﻟ اﺪﺑأ ﻚﻠﺴﻟا مﺪﺨﺘﺴﺗ ﻻ .
ﺔﻛﺮﺤﺘﻣ ءاﺰﺟأ وأ ةدﺎﺣ فاﻮﺣ ،ﻂﻔﻨﻟا ،ةراﺮﺤﻟا ﻦﻋ.
ﻰﻟإ ﺔﻜﺑﺎﺸﺘﻤﻟاوأ ةرﺮﻀﺘﻤﻟا كﻼﺳا يدﺆﺗ
ﺮﻄﺧ ةدﺎﯾز
ﺔﯿﺋﺎﺑﺮﮭﻛ ﺔﻣﺪﺻ ثوﺪﺣ
.
8.
ﺪﻨﻋ ءاﻮﮭﻟا ﻲﻓ ماﺪﺨﺘﺳﻼﻟ ﺐﺳﺎﻨﻣ ﺪﯾﺪﻤﺗ ﻚﻠﺳ مﺪﺨﺘﺳا ،ﻖﻠﻄﻟا ءاﻮﮭﻟا ﻲﻓ ﺔﻗﺎط ةادأ ﻞﯿﻐﺸﺗ
ﻖﻠﻄﻟا
ﺔﻣﺪﺻ ثوﺪﺣ ﺮﻄﺧ ﻦﻣ ﻖﻠﻄﻟا ءاﻮﮭﻟا ﻲﻓ ماﺪﺨﺘﺳﻼﻟ ﺐﺳﺎﻨﻤﻟا ﻚﻠﺴﻟا ماﺪﺨﺘﺳا ﻞﻠﻘﯾ .

- 18 -
.ﺔﯿﺋﺎﺑﺮﮭﻛ
9. ﻲﻤﺤﻤﻟا داﺪﻣﻹا مﺪﺨﺘﺳا ،ﮫﻨﻣ ﺮﻔﻣ ﻻ ﺮﻣأ ﺐطر نﺎﻜﻣ ﻲﻓ ﺔﻗﺎﻄﻟا ﻞﯿﻐﺸﺗ نﺎﻛ اذإﻟ ﻲﻟﺎﺤﻟا زﺎﮭﺠﻠ
ﻲﻘﺒﺘﻤﻟا) ﻲﻘﺒﺘﻤﻟا
RCD(.
ماﺪﺨﺘﺳا
RCD
.ﺔﯿﺋﺎﺑﺮﮭﻛ ﺔﻣﺪﺻ ثوﺪﺣ ﺮﻄﺧ ﻦﻣ ﻞﻠﻘﯾ
) ﻲﻘﺒﺘﻤﻟا ﻲﻟﺎﺤﻟا زﺎﮭﺠﻟا" ﺢﻠﻄﺼﻤﻟا ﻦﻜﻤﯾ :ﺔﻈﺣﻼﻣ
RCD ةﺮﺋاﺪﻟا ﻊطﺎﻗ" ﺢﻠﻄﺼﻤﺑ لﺪﺒﺘﺴﯾ ﺪﻗ "(
) ﻲﺿرﻷا ﻞﻄﻌﻟا
GFCI) ضرﻷا بﺮﺴﺗ ةﺮﺋاد ﻊطﺎﻗ" وأ "(ELCB . " (
ﺔﯿﺼﺨﺸﻟا ﺔﻣﻼﺴﻟا
10.ﺪﺨﺘﺳاو ﮫﺑ مﻮﻘﺗ ﺎﻣ ﺪھﺎﺷو ،ﺐھﺄﺗ ﺔﻟﺎﺣ ﻲﻓ ﻖﺑا ﻻ .ﺔﻗﺎﻄﻟا ةادأ ﻞﯿﻐﺸﺗ ﺪﻨﻋ ﻢﯿﻠﺴﻟا ﺲﺤﻟا ما
ءاوﺪﻟا وأ لﻮﺤﻜﻟاوأ تارﺪﺨﻤﻟا ﺮﯿﺛﺄﺗ ﺖﺤﺗوأ ﻚﺒﻌﺗ ءﺎﻨﺛأ ﺔﻗﺎﻄﻟا ةادأ مﺪﺨﺘﺴﺗ.
مﺪﻋ ﻦﻣ ﺔﻈﺤﻟ
.ةﺮﯿﻄﺧ ﺔﯿﺼﺨﺷ ﺔﺑﺎﺻإ ﻰﻟإ يدﺆﯾ ﺪﻗ ﺔﻗﺎﻄﻟا تاودأ ﻞﯿﻐﺸﺗ ءﺎﻨﺛأ هﺎﺒﺘﻧﻻا
11.
ﻦﯿﻌﻟا ﺔﯾﺎﻤﺣ ءاﺪﺗرا ﺎﻤﺋاد .ﺔﯿﺼﺨﺸﻟا ﺔﯾﺎﻗﻮﻟا تاﺪﻌﻣ ماﺪﺨﺘﺳا.
ﻤﺤﻟا تاﺪﻌﻣ ،رﺎﺒﻐﻟا عﺎﻨﻗ ﻞﺜﻣ ﺔﯾﺎ
فوﺮﻈﻟا ﻲﻓ ﺔﻣﺪﺨﺘﺴﻤﻟا ﻊﻤﺴﻟا ﺔﯾﺎﻤﺣ وأ ،ﺔﺒﻠﺼﻟا ﺔﻌﺒﻘﻟاو ،قﻻﺰﻧﻻا مﺪﻋ ﺔﻣﻼﺴﻟا ﺔﯾﺬﺣأو
ﺔﯿﺼﺨﺸﻟا تﺎﺑﺎﺻﻹا ﻦﻣ ﻞﻠﻘﯾ فﻮﺳ ﺔﺒﺳﺎﻨﻤﻟا
12.
رﺪﺼﻤﺑ ﻞﯿﺻﻮﺘﻟا ﻞﺒﻗ ﻞﯿﻐﺸﺘﻟا فﺎﻘﯾإ ﻊﺿو ﻲﻓ حﺎﺘﻔﻤﻟا نأ ﻦﻣ ﺪﻛﺄﺗ .دﻮﺼﻘﻣ ﺮﯿﻏ ءﺪﺑ ﻊﻨﻣ
طﺎﻘﺘﻟا وأ ،ﺔﯾرﺎﻄﺒﻟا ﺔﻋﻮﻤﺠﻣ وأ / و ﺔﻗﺎﻄﻟاﺎﮭﻠﻤﺣ وأ ةادﻷا
ﻰﻠﻋ ﻚﻌﺒﺻﺈﺑ ﺔﻗﺎﻄﻟا تاودأ ﻞﻤﺤﺗ .
.ثداﻮﺤﻟا ﺐﺒﺴﯾ حﺎﺘﻔﻣ ﺎﮭﯾﺪﻟ ﻲﺘﻟا ﺔﻗﺎﻄﻟا تاودأ ﻂﯿﺸﻨﺗ وأ حﺎﺘﻔﻣ
13.
ةادﻷا ﻞﯿﻐﺸﺗ ﻞﺒﻗ ﻂﺑر حﺎﺘﻔﻣ وأ ﻂﺒﺿ حﺎﺘﻔﻣ يأ لازا.
رﺎﺴﯿﻟا حﺎﺘﻔﻣ وأ ﻂﺑﺮﻟا حﺎﺘﻔﻣ يدﺆﯾ ﺪﻗ
ﺔﯿﺼﺨﺷ ﺔﺑﺎﺻإ ثوﺪﺣ ﻰﻟإ ﺔﻗﺎﻄﻟا ةادﻷ راوﺪﻟا ءﺰﺠﻟﺎﺑ ﻖﻓﺮﻤﻟا
14.
.طﺮﻔﺗ ﻻتﺎﻗوﻷا ﻊﯿﻤﺟ ﻲﻓ نزاﻮﺘﻟاو ﻢﯿﻠﺴﻟا سﺎﺳﻷﺎﺑ ظﺎﻔﺘﺣا.
ﻰﻠﻋ ةﺮﻄﯿﺴﻟا ﻞﻀﻓأ ﺢﯿﺘﯾ اﺬھو
ةادأ
.ﺔﻌﻗﻮﺘﻣ ﺮﯿﻏ تﻻﺎﺣ ﻲﻓ ﺔﻗﺎﻄﻟا
.
15.
ﻚﺴﺑﻼﻣو كﺮﻌﺸﺑ ظﺎﻔﺘﺣا .تاﺮھﻮﺠﻣوأ ﺔﺿﺎﻔﻀﻓ ﺲﺑﻼﻣ يﺪﺗﺮﺗ ﻻ .ﺢﯿﺤﺻ ﻞﻜﺸﺑ سﺎﺒﻟ
ﺔﻛﺮﺤﺘﻤﻟا ءاﺰﺟﻷا ﻦﻋ اﺪﯿﻌﺑ ﻚﺗازﺎﻔﻗو.
ﯾﻮﻄﻟا ﺮﻌﺸﻟا وأ تاﺮھﻮﺠﻤﻟاو ،ﺔﺿﺎﻔﻀﻓ ﺲﺑﻼﻤﻟا ﻞ
.ﺔﻛﺮﺤﺘﻣ ءاﺰﺟأ ﻲﻓ ﻞﻌﺘﺸﺗ نأ ﻦﻜﻤﯾ
16.
ﺎﮭﻠﯿﺻﻮﺗ ﻦﻣ ﺪﮐﺄﺗ ،ﻊﯿﻤﺠﺘﻟا تﻼﯿﺳوو رﺎﺒﻐﻟا جاﺮﺨﺘﺳا ﻖﻓاﺮﻣ ﻞﯿﺻﻮﺘﻟ ةﺰﮭﺟأ ﺮﯿﻓﻮﺗ ﻢﺗ اذإ
ﺢﯿﺤﺻ ﻞﮑﺸﺑ ﺎﮭﻣاﺪﺨﺘﺳاو.
رﺎﺒﻐﻟﺎﺑ ﺔﻘﻠﻌﺘﻤﻟا ﺮطﺎﺨﻤﻟا ﻦﻣ ﻞﻠﻘﯾ نأ ﻦﻜﻤﯾ رﺎﺒﻐﻟا ﻊﻤﺟ ماﺪﺨﺘﺳا
.
ﺎﮭﺑ ﺔﯾﺎﻨﻌﻟاو ﺔﻗﺎﻄﻟا ةادأ ماﺪﺨﺘﺳا
17. .ﺔﻗﺎﻄﻟا ةادأ ةﻮﻘﺑ ﻊﻓﺪﺗ ﻻﻚﺑ صﺎﺨﻟا ﻖﯿﺒﻄﺘﻠﻟ ﺔﺤﯿﺤﺼﻟا ﺔﻗﺎﻄﻟا ةادأ ماﺪﺨﺘﺳا.
ﺔﻗﺎﻄﻟا ةادأ
.ﮫﻤﯿﻤﺼﺗ ﻢﺗ يﺬﻟا لﺪﻌﻤﻟا ﻲﻓ ﺎﻨﻣأ ﺮﺜﻛأو ﻞﻀﻓأ ﻞﻜﺸﺑ ﺔﻤﮭﻤﻟا هﺬھ ﻞﻌﻔﺗ فﻮﺳ ﺔﺤﯿﺤﺼﻟا
18.ﺎﮭﻠﯿﻐﺸﺗ فﺎﻘﯾإ وأ ﺎﮭﻠﯿﻐﺸﺗ ﻢﺘﯾ ﻢﻟ اذإ ةادﻷا مﺪﺨﺘﺴﺗ ﻻ.
ةﺮﻄﯿﺴﻟا ﻦﻜﻤﯾ ﻻ ﻲﺘﻟا ﺔﻗﺎﻄﻟا ةادأ يأ
ﻊﻣ ﺎﮭﯿﻠﻋحﺎﺘﻔﻤﻟاﻮھﺐﺠﯾو ﺮﯿﻄﺧ ﺮﻣأ . ﮫ ﺣ ﻼ ﺻ إ

- 19 -
19. تﻼﯾﺪﻌﺗ يأ ءاﺮﺟإ ﻞﺒﻗ ﺔﻗﺎﻄﻟا ةادأ ﻦﻣ ﺔﯾرﺎﻄﺒﻟا ﺔﻋﻮﻤﺠﻣ وأ/و ﺔﻗﺎﻄﻟا رﺪﺼﻣ ﻦﻣ ﺲﺑﺎﻘﻟا ﻞﺼﻓا
ﺔﻗﺎﻄﻟا تاودأ ﻦﯾﺰﺨﺗ وأ تﺎﻘﺤﻠﻤﻟا ﺮﯿﯿﻐﺗوأ.
ءﺪﺑ ﺮﻄﺧ ﻦﻣ ﺔﯿﺋﺎﻗﻮﻟا ﺔﻣﻼﺴﻟا ﺮﯿﺑاﺪﺗ هﺬھ ﻞﻠﻘﺗو
.ﺄﻄﺨﻟا ﻖﯾﺮﻄﺑ ﺔﻗﺎﻄﻟا ةادأ ﻞﯿﻐﺸﺗ
20.
لوﺎﻨﺘﻣ ﻦﻋ اﺪﯿﻌﺑ ﺔﻠﻣﺎﺨﻟا ﺔﻗﺎﻄﻟا تاودأ ﻦﯾﺰﺨﺘﺑ ﻢﻗ ﻦﯿﻓﻮﻟﺄﻤﻟا ﺮﯿﻏ صﺎﺨﺸﻟﻷ ﺢﻤﺴﺗ ﻻو لﺎﻔطﻻا
ﺔﻗﺎﻄﻟا ةادأ ﻞﯿﻐﺸﺘﺑ تﺎﻤﯿﻠﻌﺘﻟا هﺬھ وأ ﺔﻗﺎﻄﻟا ةادﺄﺑ.
يﺪﯾأ ﻲﻓ ةﺮﯿﻄﺧ ﻲھ ﺔﻗﺎﻄﻟا تاودأ
ﻦﯿﺑرﺪﻤﻟا ﺮﯿﻏ ﻦﯿﻣﺪﺨﺘﺴﻤﻟا
.
21.
ﺔﯾأو ءاﺰﺟﻷا ﺮﺴﻛو ﺔﻛﺮﺤﺘﻤﻟا ءاﺰﺟﻷا ﻂﺑر وأ ﻖﻓاﻮﺗ مﺪﻋ ﻦﻣ ﻖﻘﺤﺗ .ﺔﻗﺎﻄﻟا تاودأ ﻰﻠﻋ ظﺎﻔﺤﻟا
ﯿﻐﺸﺗ ﻰﻠﻋ ﺮﺛﺆﺗ ﺪﻗ ىﺮﺧأ ﺔﻟﺎﺣﺔﻗﺎﻄﻟا ةادأ ﻞ.
ةادأ ﺎﮭﯾﺪﻟ ،ترﺮﻀﺗ اذإﺔﻗﺎﻄﻟا ﻞﺒﻗ ﺎﮭﺣﻼﺻإ ﺖﻤﺗ
.ﺔﻗﺎﻄﻟا تاودأ ﺔﻧﺎﯿﺻ ءﻮﺳ ﺐﺒﺴﺑ ثداﻮﺤﻟا ﻦﻣ ﺪﯾﺪﻌﻟا ﺐﺒﺴﺗو .ماﺪﺨﺘﺳﻻا
22..ﺔﻔﯿﻈﻧو ةدﺎﺣ ﻊﻄﻘﻠﻟ تاودأ ظﺎﻔﺘﺣا
ﻊﻣ ﺢﯿﺤﺻ ﻞﻜﺸﺑ ﺎﮭﯿﻠﻋ ظﺎﻔﺤﻟا ﻢﺘﯾ ﻲﺘﻟا ﻊﻄﻘﻟا تاودأ نإ
ﻞﮭﺴﺗو ﻂﺑﺮﻠﻟ ﺔﺿﺮﻋ ﻞﻗأ نﻮﻜﺗ ةدﺎﺤﻟا ﻊﻄﻘﻟا فاﻮﺣﻢﻜﺤﺘﻟاﺎﮭﯿﻓ
.
23.
ةادأ ﺖﺑو تاراﻮﺴﺴﻛﻻاو ﺔﻗﺎﻄﻟا ةادأ ماﺪﺨﺘﺳا...تﺎﻤﯿﻠﻌﺘﻟا هﺬﮭﻟ ﺎﻘﻓو ﺦﻟا ، ﻦﯿﻌﺑ ﺬﺧﻷا ﻊﻣ
ﮫﺑ مﺎﯿﻘﻟا ﻦﯿﻌﺘﯾ يﺬﻟا ﻞﻤﻌﻟاو ﻞﻤﻌﻟا فوﺮظ رﺎﺒﺘﻋﻻا
يدﺆﯾ ﺪﻗو .ماﺪﺨﺘﺳا ﺔﻔﻠﺘﺨﻤﻟا تﻼﯿﻐﺸﺘﻟا ةادأ
ةدﻮﺼﻘﻤﻟا ﻚﻠﺗ ﻦﻋ
ﺮﯿﻄﺧ ﻊﺿو ﻰﻟإ
.
ﺔﻣﺪﺨﻟا
24.ﺺﺨﺷ ﻞﺒﻗ ﻦﻣ ﻚﺑ ﺔﺻﺎﺨﻟا ﺔﻗﺎﻄﻟا ةادأ ﻚﯾﺪﻟ رﺎﯿﻐﻟا ﻊﻄﻗ ماﺪﺨﺘﺳﺎﺑ ﻦﯿﻠھﺆﻤﻟا حﻼﺻإ
ﻂﻘﻓ ﺔﻘﺑﺎﻄﺘﻣ.
ﻰﻠﻋ ظﺎﻔﺤﻟا ﻦﻤﻀﯾ اﺬھوﺔﻣﻼﺳ .ﺔﻗﺎﻄﻟا ةادأ
ﺮﯾﺬﺤﺗ ﺔﯿﺘﻟﻮﻔﻟا
نأ ﻦﻣ ﺪﻛﺄﺗ ،(ﻚﻟذ ﻰﻟإ ﺎﻣو ،ﻲﺋﺎﺑﺮﮭﻜﻟا ةرﺎﯿﺘﻟا ﺬﺧﺄﻣ ،ءﺎﻋو) ﺔﻗﺎط رﺪﺼﻤﺑ زﺎﮭﺠﻟا ﻞﯿﺻﻮﺗ ﻞﺒﻗ
ﺔﯿﺘﻟﻮﻔﻟاﻄﻟا رﺪﺼﻣ .زﺎﮭﺠﻟا ﺔﺣﻮﻟ ﻰﻠﻋ هﺪﯾﺪﺤﺗ ﻢﺗ يﺬﻟا ﮫﺴﻔﻧ ﻮھ ةدرﻮﻤﻟا ﻦﻣ ﺮﺒﻛأ ﺔﯿﺘﻟﻮﻔﻟا ﻊﻣ ﺔﻗﺎ
ﻰﻟإ يدﺆﯾ نأ ﻦﻜﻤﯾ زﺎﮭﺠﻠﻟ دﺪﺤﻤﻟا ﻚﻟذ
ةﺮﯿﻄﺧ ﺔﺑﺎﺻإ راﺮﺿﻷا ﻦﻋ ﻼﻀﻓ ،مﺪﺨﺘﺴﻤﻠﻟﻟ .زﺎﮭﺠﻠ
،ﻚﺷ ﻲﻓ ﺖﻨﻛ اذإ
زﺎﮭﺠﻟا ﻲﻓ ﺪﺳ ﻻ ﺔﺣﻮﻟ ﻒﯿﻨﺼﺗ ﻦﻣ ﻞﻗأ ﺔﯿﺘﻟﻮﻔﻟا ﻊﻣ ﺔﻗﺎﻄﻟا رﺪﺼﻣ ماﺪﺨﺘﺳﺎﺑ .
.كﺮﺤﻤﻠﻟ رﺎﺿ ﻮھ
This manual suits for next models
1
Table of contents


