PBN PBN-BV-WIFI User manual

PBN-BV-WIFI - WIFI Audio
Recorder 32GB
Compact WIFI remote live listening and recording device in a magnetized
enclosure
Control using your smartphone (Android or iPhone) to be able to listen live and
control this product (Free App Download Required)
Internal 1200mAh lithium battery –6 hours charge time required.
Microphone audio pick up range - 25 Ft Radius
Recordings stored on internal 32GB memory
Voice activated recording automatically for set periods of 1, 5, 10 or 30 minute
periods & option of Continuous recording.
Continuous record mode allows live listening and record time of up to 14 hours.
Power saving mode A: up to 28 days battery life based on 2 to 3 activations per day
Power saving mode B: up to 40 days battery life based on 2 to 3 activations per day
Features
Power Saving Modes
www.pbn-tec.com
WIFI
32GB

www.pbn-tec.com
Contents
USB Charging Cable WIFI Audio Recorder 32GB English User Manual
Charging your device
•BV-WIFI Requires a full charge before use, charge the device using any USB Port or
USB Accessible Electrical plug or Outlet.
•BB-WIFI requires between 6-7 hours to fully charge, depending on the type of outlet
that the USB is connected to.
•A Red light will flash on the device (flat side opposite magnets) during charging. This
Light will stop flashing and indicate Charge is Full with a Red light
•To switch ON press and hold the power button until a steady blue light is shown.
Downloading the CamSC App on your Smartphone
•Download and install the CamSC App either by searching your App Store or Google Play
•The App Icon will appear in the App
Search with this Icon :
•Users can also download the App using
the following QR Code :
www.pbn-tec.com
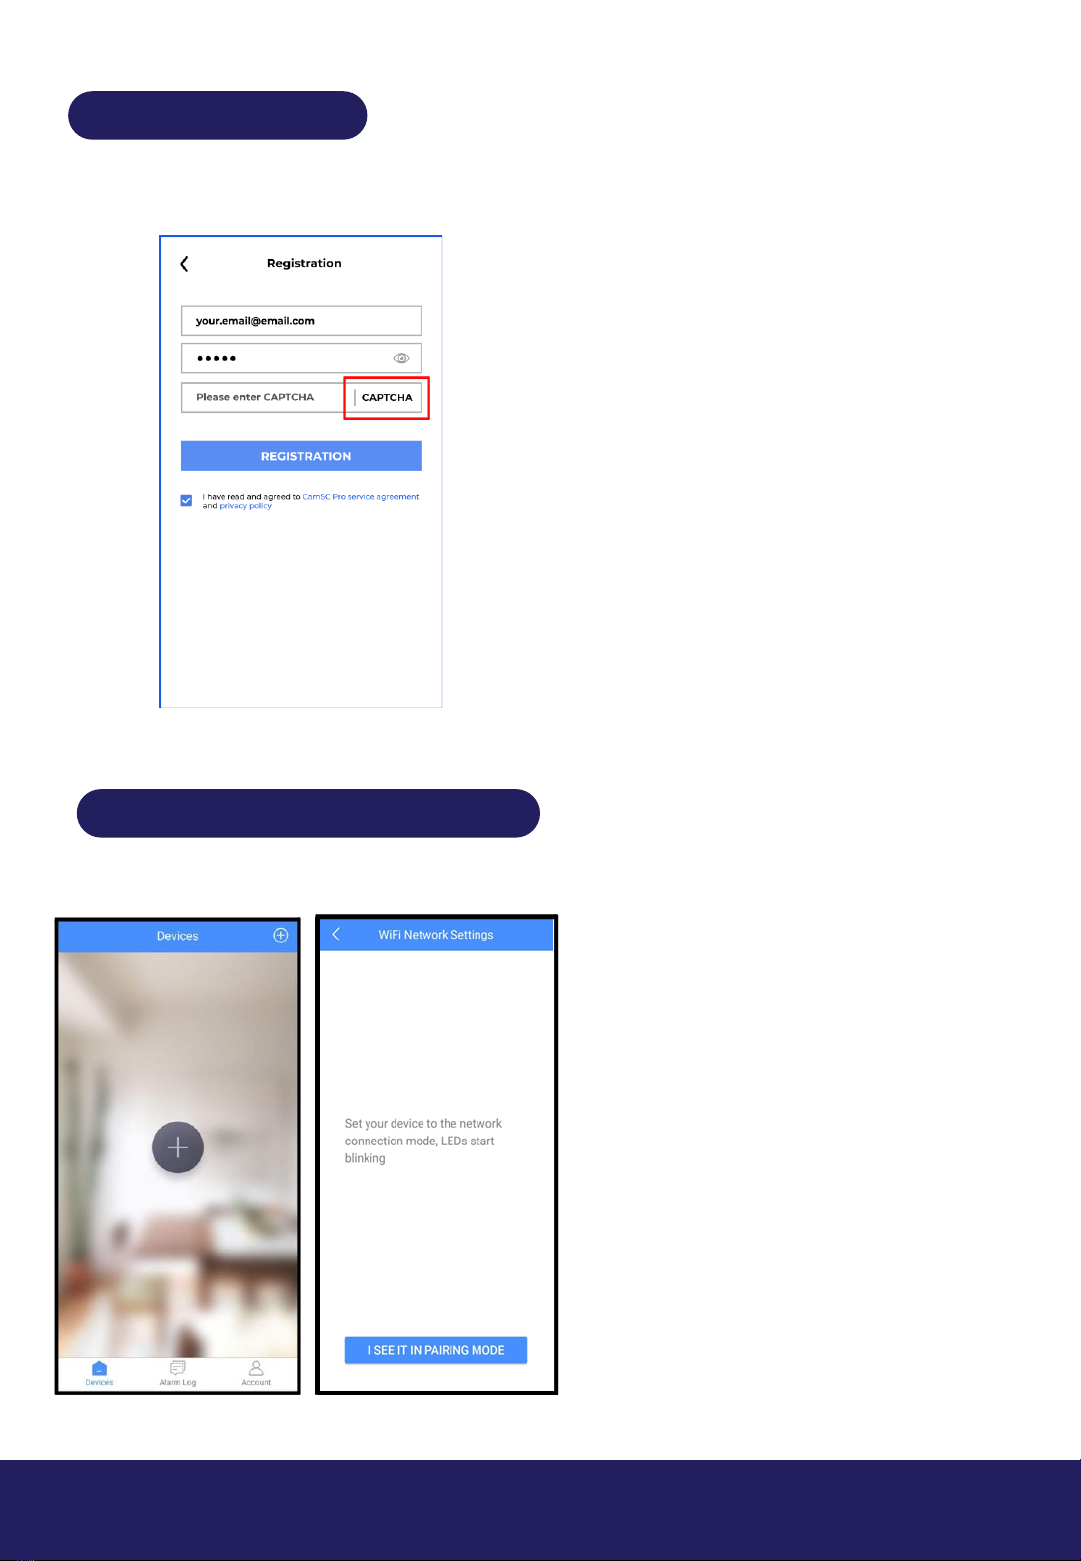
Registration
•Once the App is installed on your Phone, enter the CamSC App and Register :
•Open the App, Select your Region and
Register.
•Allow all permission and notifications
‘Whilst using the App’
•You will need to press the “Captcha”
button at which point you will be
emailed a captcha code.
•Enter the code into the box and press
“registration”
•Please note that the Captcha emails
often go to spam so please check there
if you do not receive it.
Connecting your Device
•Switch ON the PBN-BV-WIFI press
and hold the power button until a
steady blue light is shown.
•Once in Blue Light Mode, Short
Press the power button once more,
a flashing blue light will appear, the
device is now in pairing mode.
•Once the Device is in Pairing Mode,
go back to your Smartphone CamSC
App and the PBN-BV-WIFI, if the
device is blinking a blue light,
•Press the blue button at the bottom
of the App Screen which states: I
see it in Pairing Mode
Screen 1 Screen 2

www.pbn-tec.com
Connecting to a WIFI Network
Screen 1 Screen 2
•You will now be prompted to enter your
WIFI network details that you wish the
device to connect to:
•Some Routers have separate passwords
based on the Frequency 2.4GHz or 5GHz.
•Your router may have 1 password for both
frequencies, by default the PBN-BV-WIFI
will only connect to a 2.4GHz Connection.
•If you have a separate password for
2.4GHz on your router enter it.
•If you only have one password, press the
Continue button on Screen 2 to finish
Note :
Once the device is added it will be Visible on the App Devices Tab as shown on the
Screen below.
www.pbn-tec.com
Clicking the Device on your App will open up the live listening mode allowing you to hear
any sounds currently being heard by the device along with the current battery level of the
device.
Clicking the cloud button with the red box allows you to see all the recordings held on the
device.
Screen 1 Screen 2 Screen 3

www.pbn-tec.com
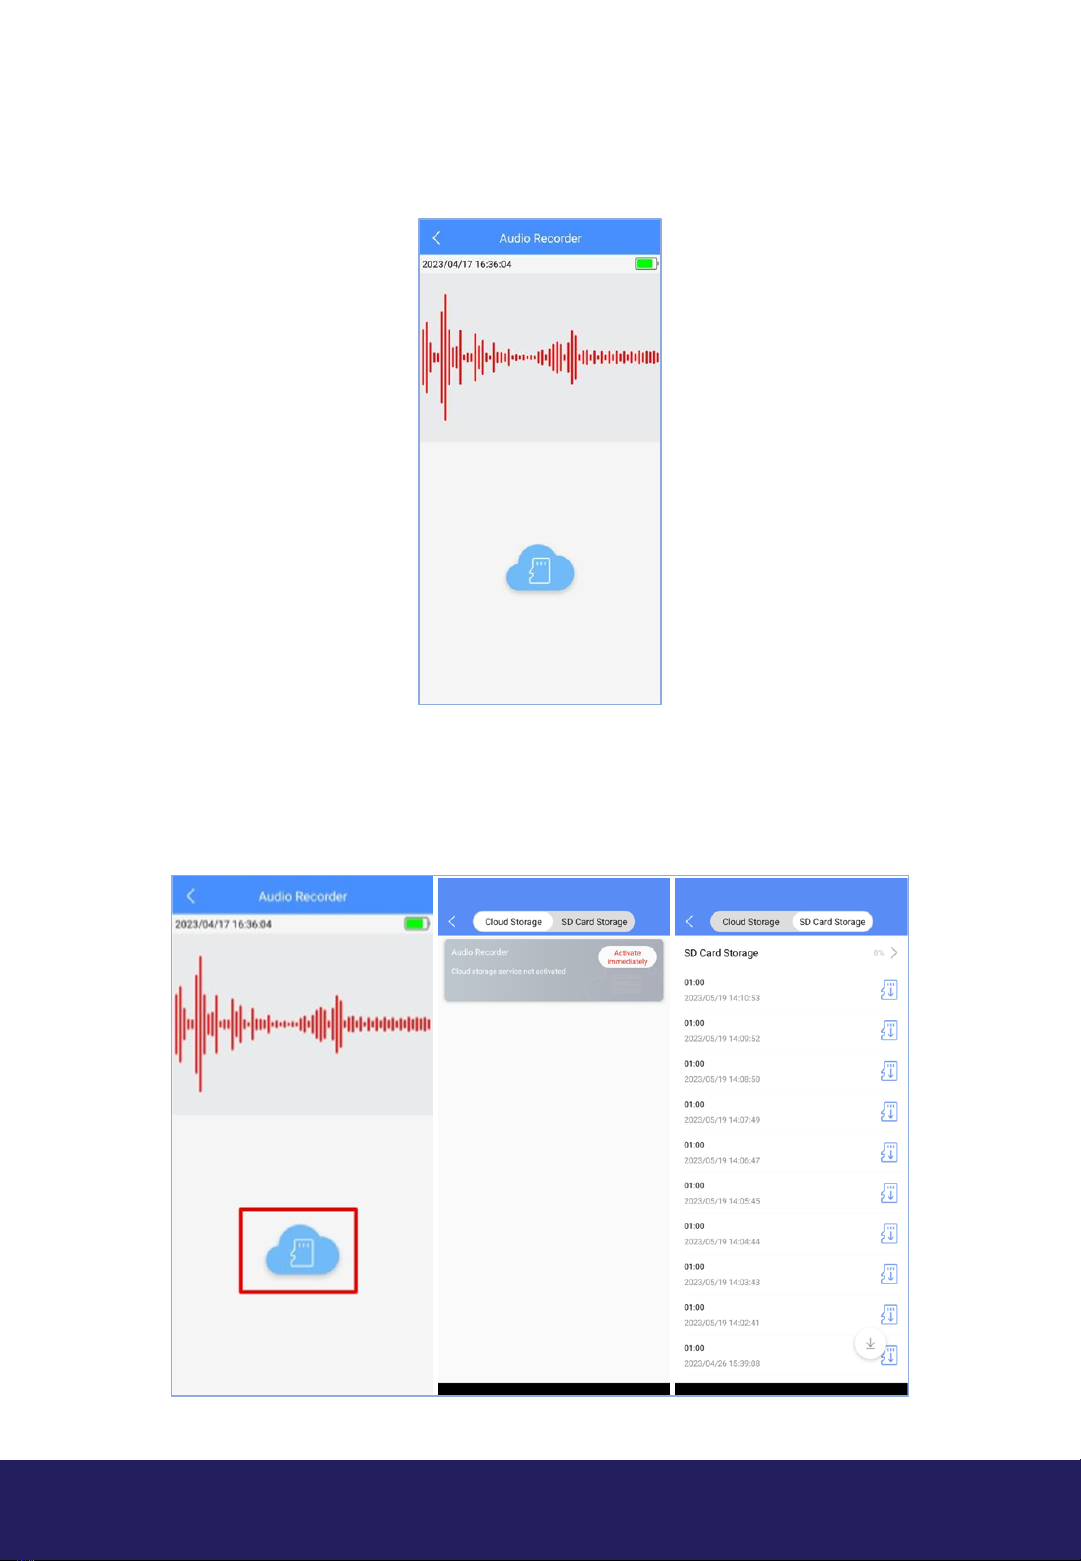
Storage and Accessibility of Audio Recordings
Cloud storage
Cloud Storage is not currently available for this device, the App indicates a Cloud Storage
Option but we do not provide a service for this and we do not recommend attempting to
use this feature.
SD Card Storage
•Access the recordings remotely on the memory card as long as the device is on and
connected to WIFI.
•Note: to Listen to a recording, you must download the audio file, first.
•To download the recording, click on the Blue Icon on the right of the Audio File as
shown on Screen 3 on page 3.
•Recording downloads will take seconds to complete, the files are small and download
very quickly.
•You can also delete or share a file from the device by clicking and holding on an
individual file and selecting either “delete” or “share”.
•Note: You will need to be friends with another account before you can share a file.
Screen 1 Screen 2
By clicking on the arrow at the top in RED box on the screen, you will be taken to a screen
that shows you the SD cards total used storage and capacity remaining.
By clicking on the download button in the RED box at the bottom of the screen you will
be able to download all recordings held on the device.

www.pbn-tec.com
Settings
Screen 1 Screen 2
Configure your devices settings by clicking the Cog icon in the RED Box as detailed on
Screen 1 above, this will then take you to the configuration screen (Screen 2) where you
can configure your device according to your needs.
1.
2.
3.
4.
5.
6.
7.
1. DEVICE NAME : By default the device name is Audio Recorder, click on the name and
change it to any name you wish.
2. WIFI CONFIG : This shows the network you are currently connected to, users can connect
to a new network if required, users will need to set up the device to a new network by
following the pairing mode steps as detailed in this manual.
3. RECORDING SETTINGS : IMPORTANT: These are the recorder settings and full details are
provided on the next page.
4. NOTIFICATIONS : When the device is active and switched on, the device will give you a
notification on your phone, each time a new sound is detected.
5. MICRO SD CARD CONFIG : Clicking on this field shows you the Storage Capacity used and
available for your device.
6. FIRMWARE VERSION : This will allow you to check for updates and easily update to the
latest version. It is recommended to check for updates at least once a month to ensure
you are using the most upto date version of the App.
7. REMOVE DEVICE : This option allows you to remove the device from your account.

www.pbn-tec.com
Recorder Settings
Screen 1 Screen 2
Recording mode
•The Recording modes are explained on Screen 2 in Recorder Settings
•You can select to either have the device recording all the time and allow you to access
the device live anytime.
•You can have the device record only when it hears noise but allows you to connect at
anytime
•You can have the device record when it hears a noise but you can only connect shortly
after the device starts recording.
•The sensitivity bar lets you change the noise threshold that triggers a recording to
begin
•The recording time determines how long the device will record for when a sound is
heard.

www.pbn-tec.com
Alarm Log
Clicking on Alarm Log button highlighted in
RED will take you a screen which consists of
three sections
1. Alarm Log
2. Cloud Storage
3. Album
1. Alarm Log
•This page shows a log of all the
notifications generated by the device
each time a sound is detected.
•A single click on each log will take you to
the live listening page of the device, to
download and listen to the recording
from that specific time.
•Clicking and holding will give you the
option to Delete that selected log
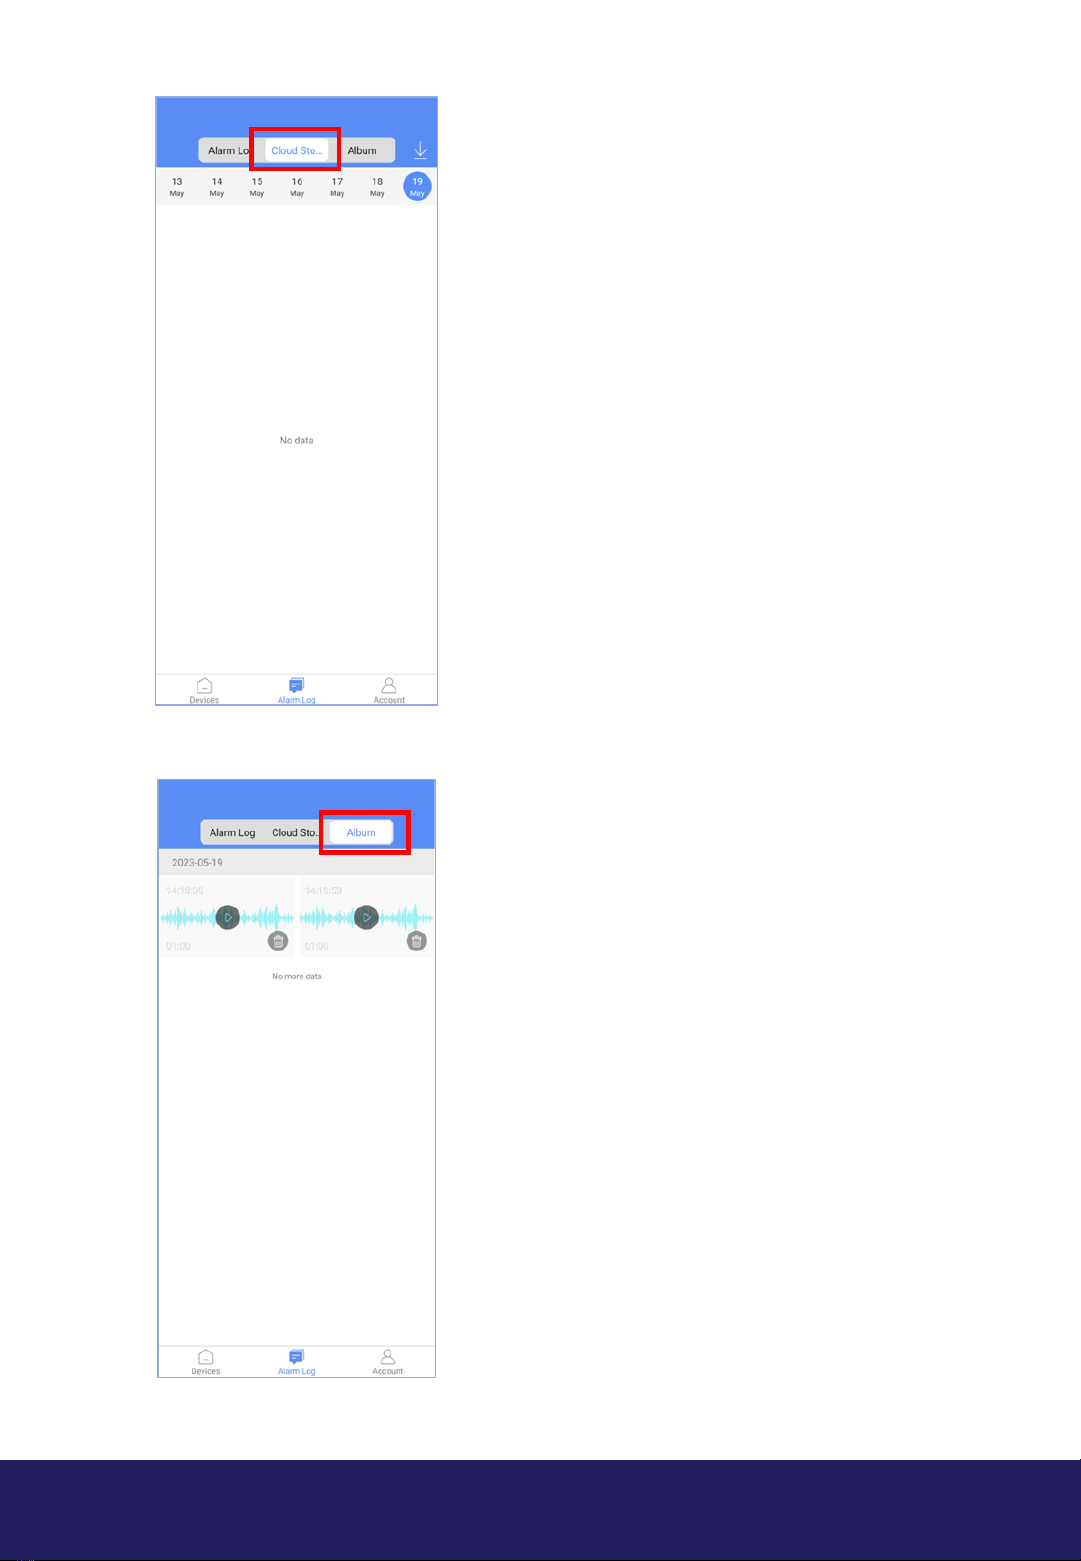
www.pbn-tec.com
2. Cloud Storage
•Cloud Storage is not currently available
for this device, the App indicates a Cloud
Storage Option but we do not provide a
service for this and we do not
recommend attempting to use this
feature.
3. Album
•This section holds any recordings that
you have downloaded from the device's
internal memory.
•These recordings are held on the
memory of your phone.
•From here you can either select to play
the recording back or delete it from your
device by clicking the Trash Icon.
Table of contents


