PCTEL SeeGull User manual

SeeGull CW Transmitter User Guide
Rev. D PCTEL 1
SeeGull® CW Transmitter
User Guide

SeeGull CW Transmitter User Guide
Rev. D PCTEL 2
SeeGull® CW Transmitter User Guide
Document Number: 100103-00
Revision D
August, 2017
Restrictions: This document contains proprietary information that is protected by copyright; it is
intended for use by PCTEL and its customers only. It is not to be disclosed to a third party. All
rights reserved. No part of this document may be photocopied or reproduced in any way without
the prior written permission of PCTEL, Inc. The information contained in this document is subject
to change without notice. PCTEL makes no warranty of any kind relating to this document.

SeeGull CW Transmitter User Guide
Rev. D PCTEL 3
COMMENT ON KNOWN DEFECTS AND OTHER ERRATA
This document lists problems known to be associated with the current release. PCTEL RF
Solutions is committed to releasing defect free products, and appreciates any reports of issues or
assistance in the identification of issues. Problems are prioritized and queued for remedy.
PCTEL RF Solutions is always interested in your feedback concerning our products, and the
features or additions that would make them better. Please feel free to contact PCTEL RF
Solutions using the support information below with any suggestions for improvements.
Trademarks
© 2017 PCTEL, Inc. All rights reserved. PCTEL, SeeHawk®Collect, SeeHawk Collect logo,
SeeHawk®Touch, SeeHawk Touch logo, SeeHawk Engage™, SeeHawk Engage logo,
SeeWave®, SeeWave logo, SeeGull®, MXflex®, IBflex®, EXflex®, and the PCTEL logo are
trademarks of PCTEL, Inc.
Android™is a trademark of Google Inc.
Bluetooth® is a registered trademark of Bluetooth SIG.
Samsung® and Galaxy Tab® S are registered trademarks of Samsung Electronics, Co. Ltd.
Windows® is a registered trademark of Microsoft Corporation.
Notices and Warranty Information
The information in this document is subject to change without notice. PCTEL assumes no
responsibility or makes no warranties for any errors that may appear in this document and
disclaims any implied warranty of merchantability or fitness for a particular purpose. Further,
PCTEL shall not be liable for incidental, consequential or other damages in connection with the
use of this document.
Copyright Information
No part of this document may be used or reproduced in any form or any means, in whole or in
part, without prior written consent of PCTEL.
All Rights Reserved
Copyright 1997-2017
PCTEL, Inc.
RF Solutions
20410 Observation Drive, Suite 200
Germantown, MD 20876 USA
Phone: +1 301 515 0036
Fax: +1 301 515 0037

SeeGull CW Transmitter User Guide
Rev. D PCTEL 4
Table of Contents
1Preface ...........................................................................................................5
1.1 Purpose.....................................................................................................5
2Introduction.....................................................................................................6
2.1 Overview...................................................................................................6
2.2 Feature List...............................................................................................6
2.3 Safety Compliances..................................................................................6
3Setup ..............................................................................................................7
3.1 Parts..........................................................................................................7
3.2 CW Transmitter Interface..........................................................................8
3.3 CW Transmitter Keypad............................................................................9
3.4 Screen Display........................................................................................10
4General Operations.......................................................................................11
4.1 Preparations............................................................................................11
4.2 Menus.....................................................................................................11
4.2.1 Start Test: .........................................................................................11
4.2.2 Saved Channels:...............................................................................11
4.2.3 New Channel: ...................................................................................12
4.2.4 Settings:............................................................................................12
4.2.5 Memory Status:.................................................................................13
4.3 Starting a Test Scenario..........................................................................14
4.3.1 Start a New Test...............................................................................14
4.3.2 Save a Reusable Configuration ........................................................14
4.3.3 Recall Saved Configuration...............................................................15
5Specifications................................................................................................16
6Support.........................................................................................................17
6.1 Contact Information.................................................................................17
6.2 Repair and Calibration Options...............................................................17
Figures
Figure 1 - Parts................................................................................................................................ 7
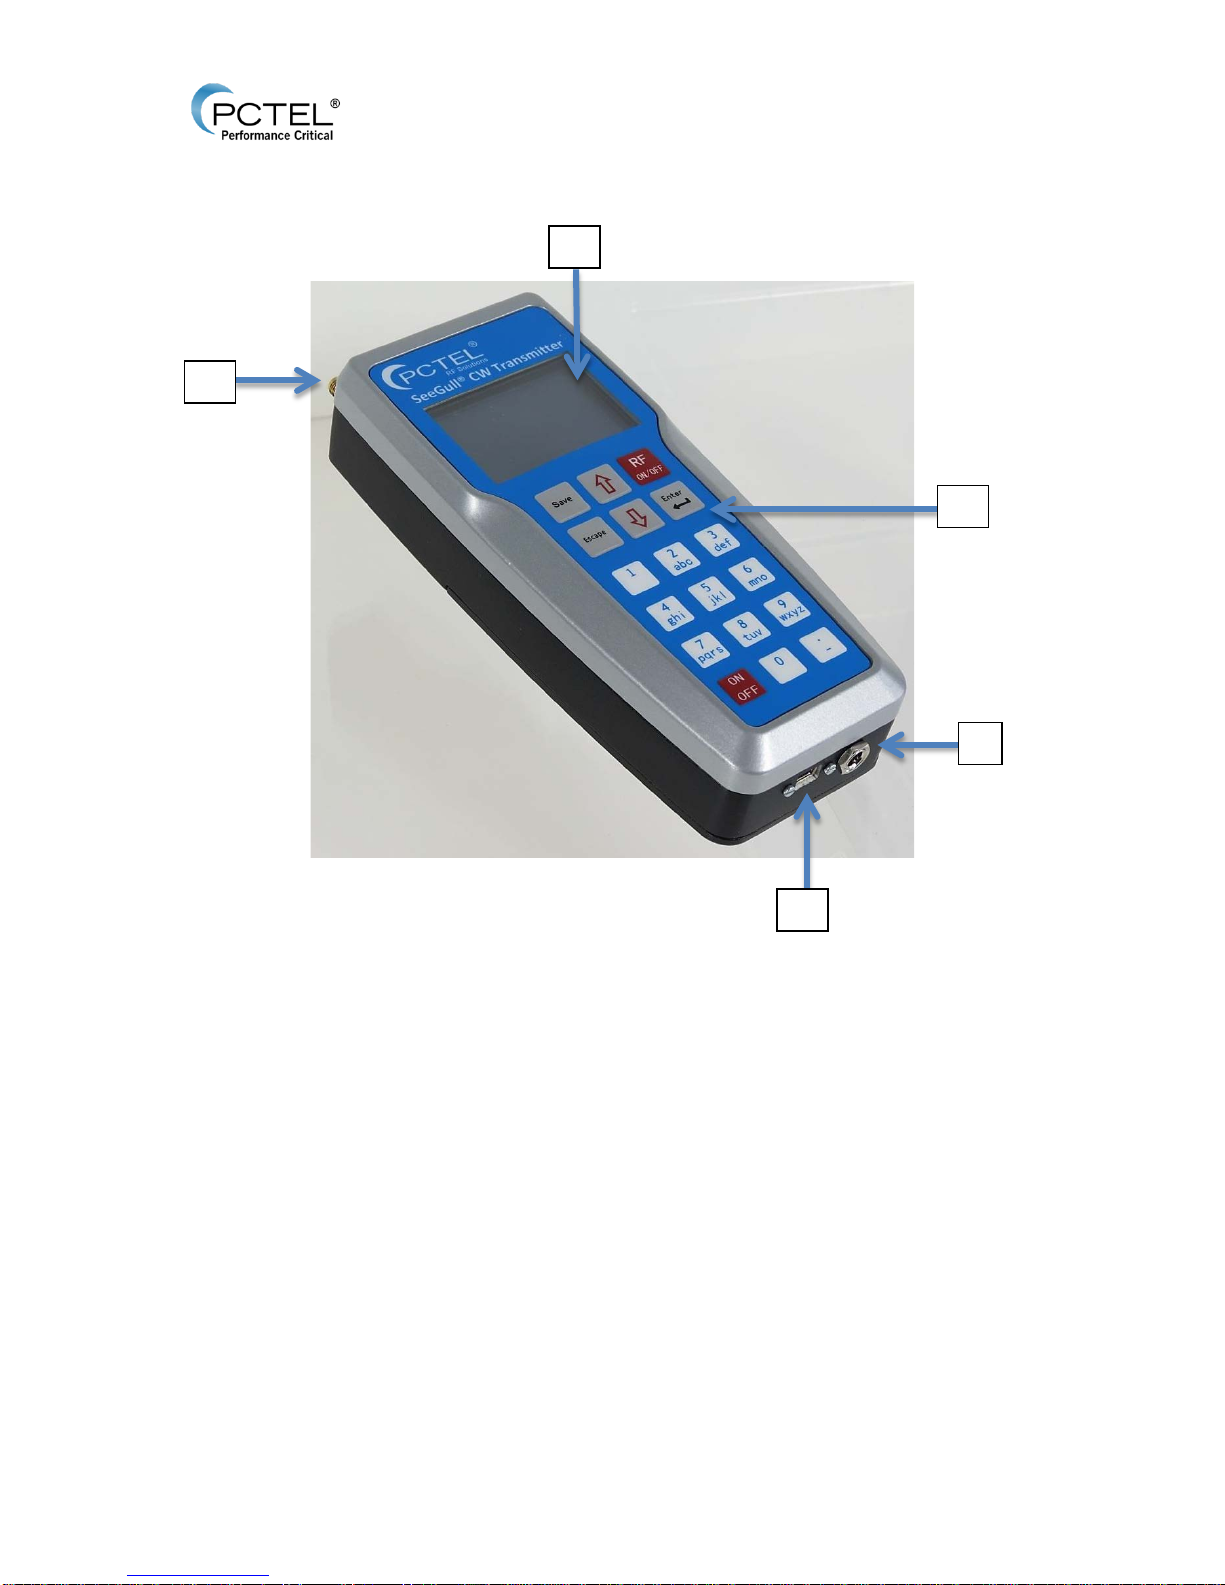
Figure 2 - Interface .......................................................................................................................... 8
Figure 3 - Keypad............................................................................................................................ 9
Figure 4 - Screen Display.............................................................................................................. 10
Figure 5 - Main Menu .................................................................................................................... 11
Figure 6 - Saved Channels Menu.................................................................................................. 11
Figure 7 - Add Channel ................................................................................................................. 12
Figure 8 - Settings Menu............................................................................................................... 12
Figure 9 - Battery Status................................................................................................................ 12
Figure 10 - Port Upgrade............................................................................................................... 13
Figure 11 - Memory Menu............................................................................................................. 13
Figure 12 - Ch. Info........................................................................................................................ 14

SeeGull CW Transmitter User Guide
Rev. D PCTEL 5
1 Preface
1.1 Purpose
This document walks the user through the menu setup and functionality of the CW Transmitter to
emit up to four continuous wave (CW) signals for network testing.

SeeGull CW Transmitter User Guide
Rev. D PCTEL 6
2 Introduction
2.1 Overview
PCTEL’s SeeGull CW Transmitter supports the design, verification, and optimization of in-building
networks. It emits up to four simultaneous continuous wave signals on any technology or band,
with a frequency range of 400 MHz to 2.7 GHz. This replicates a live network environment for RF
propagation testing. The data can be collected through a PCTEL scanning receiver and
processed using SeeHawk® or third party post processing tools. Results are used to validate or
modify design with optimal antenna locations and coverage capability for each segment of an in-
building cellular network.
2.2 Feature List
•Transmitter mode: Four-Port Continuous Wave.
•Adjustable frequency.
•Standard frequency step: 100 KHz.
•Adjustable output power range: -10 dBm to 10, 12, or 15 dBm depending on frequency
selected.
•Output power accuracy of 1 dBm.
•Up to 24 saved channel configurations for quick access.
•Intuitive interface with LCD display.
•Internal, rechargeable battery.
•Optional external battery for increased operation time.
•Portable and light weight ergonomic design.
•One year PCTEL warranty.
2.3 Safety Compliances
WARNING: These devices have no protection against lightning. Please turn off the CW
Transmitter during a thunderstorm and, if applicable, take the antenna(s) inside before a
thunderstorm approaches. The transmitter itself is not intended for “in weather” outdoor use.

SeeGull CW Transmitter User Guide
Rev. D PCTEL 7
3 Setup
3.1 Parts
Customer shipping will include two items. Please contact support if any piece is missing or
damaged.
Figure 1 - Parts
1. SeeGull CW Transmitter.
2. Charger.Note: use only supplied charger. Using other chargers may damage the CW
Transmitter and void the warranty.

SeeGull CW Transmitter User Guide
Rev. D PCTEL 8
3.2 CW Transmitter Interface
Figure 2 - Interface
1. Antenna port interface.
2. LCD menu screen.
3. Keypad.
4. Charger socket.
5. USB: Strictly for PCTEL calibration and firmware updates. Not intended for customer use.
1
2
3
4
5

SeeGull CW Transmitter User Guide
Rev. D PCTEL 9
3.3 CW Transmitter Keypad
Figure 3 - Keypad
1. ON/OFF: Power on and off the device by holding for one second.
2. Up/Down Arrows:
•Navigate through each menu screen.
•Adjust Freq MHz edit field in steps of 100 KHz.
•Adjust Amp dBm edit field in steps of 1 dBm.
•Space (Up Arrow) and backspace (Down Arrow) when naming saved channels.
3. Enter:
•Enters to selected submenus.
•Accepts choice or edit.
4. Escape:
a. Revert back to previous menu.
b. Cancel entered data.
5. Number Keypad:
•Inputs numbers and characters in selected field.
•Numbers 1-4 toggle corresponding antenna ports between active or inactive prior
to RF transmission.
•Number 1 key enters a space when naming a saved Channel.
1
5
4
8
6
3
2
7

SeeGull CW Transmitter User Guide
Rev. D PCTEL 10
6. Save: Save current configuration for future use.
7. Edit Key:
•Prompts edits of selected value or Channel name.
•When a Freq or Amp field is selected, pressing enables fine-tune
adjusting with arrow keys.
•Inputs decimals when entering a specific Freq MHz.
•Inputs negative symbol when editing Amp dBm.
8. RF ON/OFF: Starts or stops RF transmission.
3.4 Screen Display
Figure 4 - Screen Display
1. Charging Icon.
2. RF Transmission ON.
3. Menu Title.
4. Battery Life.
1
2
4
3

SeeGull CW Transmitter User Guide
Rev. D PCTEL 11
4 General Operations
4.1 Preparations
Steps:
1. Connect the charger if needed. Note: use only supplied charger. Using other chargers
may damage the CW Transmitter and void the warranty.
2. Power on the device by holding down the ON button for one second.
3. Connect antenna(s) to device.
4.2 Menus
Figure 5 - Main Menu
From the Main Menu, there are five major sub menus:
4.2.1 Start Test:
This will recall all configurations for the last test setup, including: Mode, Freq, Amp, and active
ports. All items can be modified to meet current testing parameters.
4.2.2 Saved Channels:
Figure 6 - Saved Channels Menu
This menu contains saved test channels including all previously saved configurations. Up to 24
channels can be stored at a time.
•From the saved channel list, highlight the desired channel with the Arrow Keys:
oPress Keypad-1 to delete.
oPress Keypad-2 to start RF transmission with these settings, or press RF ON.

SeeGull CW Transmitter User Guide
Rev. D PCTEL 12
4.2.3 New Channel:
Figure 7 - Add Channel
To add a new channel for transmission or to be saved for future use:
•Freq: Enters the required channel frequency from 400 MHz to 2.7 GHz in the relevant
band, with a standard frequency step of 100 KHz.
•Amp: Enters the desired channel amplitude from -10 dBm to10, 12, or 15 dBm
depending on frequency selected, with a standard frequency step of 1 dBm.
•Port On/Off: Use the number pad keys 1-4 to check or uncheck the corresponding
antenna ports 1-4. A box with an check depicts the port will be active when the RF ON
button begins RF transmission. A box with an X is inactive.
4.2.4 Settings:
Figure 8 - Settings Menu
•Factory Reset: Option to restore device to original factory settings. It will delete all saved
channel configurations, and will erase activated key-code license.
oPress Enter on this option, and Enter again on the “Are you sure?” prompt.
oPress Escape on the “Are you sure?” prompt to cancel.
•Battery Status: Provides battery information, including capacity percentage of battery life
remaining.
Figure 9 - Battery Status

SeeGull CW Transmitter User Guide
Rev. D PCTEL 13
•Port Upgrade: Displays Wideband 2 port or Wideband 4 port. A check box will indicate
the device’s current configuration. 2 port transmitters can be upgraded to 4 ports:
oContact PCTEL Sales for purchasing information to receive an upgrade code.
oSelect “Wideband 4 port” and press Enter.
oInput the upgrade code and press Enter.
oConfirm on the Port Upgrade menu that “Wideband 4 port” is checked, and begin
a four port transmission.
Figure 10 - Port Upgrade
•Device Information: Displays the product name, hardware version, firmware version (to
help determine if future firmware updates are needed), and serial number.
4.2.5 Memory Status:
Figure 11 - Memory Menu
Shows the number of used and free saved channels. CW Transmitter can store up to 24 test
channels.

SeeGull CW Transmitter User Guide
Rev. D PCTEL 14
4.3 Starting a Test Scenario
4.3.1 Start a New Test
Figure 12 - Ch. Info
1. Press the RF ON/OFF key. This will recall the last test configuration. The menu page is
labeled: “Ch. Info.”
2. To edit parameters:
oUse the Arrow Keys to scroll through Freq and Amp. A circle icon indicates which
value is highlighted for edit.
oPress Enter to select a value to edit.
oUse Keypad numbers and Edit Key (for negative sign or decimals) to
input desired value and press Enter to apply.
oExample: In Figure 12 - Ch. Info, the Amp of port 1 is currently 15. Press Enter to
select, then the number pad to enter a new Amp, and Enter again to confirm.
Max dBm is dependent on Freq range and will auto correct if the user
inputs a number out of range. Ex: 14 dBM for 2170.1 Freq will auto
correct to 10. See Spec Chart below for details.
3. Use the number Keypad 1-4 to check or uncheck the corresponding antenna ports 1-4. A
box with an check depicts the port will be active when RF transmission begins. A box with
an X is inactive. As seen in figure 12, all four ports are active.
oIf the transmitter is set to 2 port configuration, ports 3 and 4 will not be available.
4. Press RF ON/OFF again to begin transmitting. This will be indicated by the icon. A
temporary message will flash, indicating which ports are active. If no ports have been
activated, a “No Port is Selected” error message will display. Refer to step three to use
the check box to activate the desired ports for RF transmitting.
oA second method is to select “Start Test” from the Main Menu and press the
Enter Key.
4.3.2 Save a Reusable Configuration
After setting new test configuration parameters the user can save for quick access for future
testing needs. Up to 24 configurations can be stored on the CW Transmitter’s memory at a time.
1. When parameters are set, press the Save Key. A box will appear on the screen with a
default name.

SeeGull CW Transmitter User Guide
Rev. D PCTEL 15
•Press Enter to save with this name.
•Press the Edit Key to use the Keypad letters to change the name – press
the Enter Key to complete saving process (Note: 12 character limit).
4.3.3 Recall Saved Configuration
1. From Main Menu, use Arrow Keys to select Saved Channels Menu, press Enter.
2. Within Saved Channels Menu, previously saved test configurations are listed in
alphabetical order.
3. Use Arrow Keys to select the desired saved parameters.
•Unwanted saved Channels can be deleted by selecting and pressing Keypad-1.
4. Press Keypad-2 to activate settings and begin transmitting – RF indicator icon will
appear.

SeeGull CW Transmitter User Guide
Rev. D PCTEL 16
5 Specifications
RF Characteristics
Active RF Ports
2 or 4 Ports
Frequency Accuracy
1.1 ppm
Frequency Range
400 MHz to 2.7 GHz
Frequency Step
100 KHz
Modulation
Continuous Wave
Min. Output Power
-10 dBm
Max. Output Power
15 dBm: 400 MHz – 1900 MHz
12 dBm: 1900.1 MHz – 2170 MHz
10 dBm: 2170.1 MHz – 2700 MHz
Power Accuracy
+/- 1 dB
Off Transmit Power
-100 dBm
Non-Harmonic Spurious
-40 dBc
RF Output
50 ohm SMA Female
Power Supply
Input Power
12Vdc, 2A
Charger
12Vdc, 2A or 12V Car Lighter Power Cable
Battery Operating Time
(Continuous Maximum
Output Power of Four Ports)
105 Minutes
Battery Standby Time
7.5 Hours
Operation Time with
External Battery (Continuous
Maximum Output of Four
Ports
>7 Hours
Physical Characteristics
External Dimensions
7.5” L x 3.1” W x 1.7” H [191 mm L x 79 mm W x 43 mm H]
Weight
1.5 lb [0.7 kg]
Operating Range
-10° to + 40° C
Standard Package
Transmitter, Charger, and Manual
Safety (CE)
EN 61010-1: 2010
EMC
EN 55011:2009+A1:2010
RoHS
Compliant (6/6)

SeeGull CW Transmitter User Guide
Rev. D PCTEL 17
6 Support
6.1 Contact Information
PCTEL Department
Phone Number
E-Mail Address
Customer Support
+1 240-460-8833
Support.rfsg@pctel.com
Quality Manager
+1 301-444-2045
Quality.rfsg@pctel.com
Sales
+1 301-515-0036
RFS.Sal[email protected]om
6.2 Repair and Calibration Options
OPS140
Full Calibration, SeeGull CW Transmitter
OPS141
RMA Evaluation Fee, SeeGull CW Transmitter
Other manuals for SeeGull
1
Table of contents