Peiying PY-2H30R User manual

OWNER(S) MANUALOWNER(S) MANUAL
PY-2H30RPY-2H30R
CAR POWER AMPLIFIERCAR POWER AMPLIFIER
Polski 6-11
Românã 12-17 English 1-5

1
INSTRUCTIONS FOR FUNCTIONS AND CONTROLS
3
1
2
4
5
6
7
8
9
LOW INPUT Left and right channels inputs of the amplifier system. Preamplifier
outputs of a source ( head unit,CD player,DAT,etc. ) or of an external electronic
crossover must be connected to them.
X-OVER
Optional switches for high pass filter(HPF)/full pass filter(FLAT)/low pass filter(LPF).
INDICATOR LIGHT
When this LED sends out green light, it means that this amplifier have being working now.
When this LED sends out red light, it means that the self-protection of the amplifier.
BASS BOOST
Optional switches for 0dB / +6dB / +12dB .
GAIN Knob for volume adjustment.
HPF
High pass frequency adjusting knob,the frequency ranges from 45Hz to 300Hz.
LPF
Low pass frequency adjusting knob,the frequency ranges from 45Hz to 300Hz.
HIGH INPUT High level input terminals.
SPEAKER
Speaker connecting terminals.
FUSE
Standard automatic fuse, you must use the same power fuse if you need to change it.
REMOTE CON TRO LL ER
Bass boost knob ,the boost ranges from 0dB to +12dB.
REMOTE CON TRO LL ER O UT LE T
To be connected with the remote controller, which helps to boost the bass.
Pls turn the switch of BASS BOOST to 0dB before using the remote controller.
10
11
1212

2
SPECIFICATIONS
Model PY-2H30R
RMS Power@13.8VDC
Power @ 4 Ohms 200W x 2
Power @ 2 Ohms 300W x 2
Bridged Power @ 4 Ohm 500W x 1
Min. Speaker Impedance 2 Ohm
THD Distortion 0.08%
IMD Distortion 0.08%
Frequency Response 20Hz~20KHz
Input Sensitivity 200mV~6V
Input Impedance 15K
Signal-to-Noise Ratio 90 dB
Channel Separation 50 dB
Remote Bass Control 0dB~+12dB
Crossover Network
Low Pass Filter 45Hz~300Hz
Bass Boost 0dB~+12dB
High Pass Filter 45Hz~300Hz
Fuse Rating 30A x 2
Size L x W x H 510 x 245 x 60mm
CD PLAYER
SEL
ELECTRICAL CONNECTION
Connect to chassis
ground of vehicle*
Connect to remote
turn-on lead of
source unit.
Connect to +12V of battery with
appropriate FUSE value.
+12V
Anode of power connection terminals. Connect to the anode of car battery.
REM
Terminal to be connected with Remote cable, which comes from the source and which
controls the amplifier switching on. Applied voltage must be between 7 and 15 VDC.
GND
Ground terminal. Connect to the car chassis. Keep the length of the ground cable
to a minimum.
GNDGND
REMREM
+12V+12V
1313

3
SYSTEM WIRING
2 CHANNEL STEREO CONFIGURATION
SPEAKER IMPEDANCE 2~ 4 Ohm
Connect to chassis
ground of vehicle*
Connect to remote
turn-on lead of
source unit.

4
SYSTEM WIRING
BRIDGED MODE CONFIGURATION
SPEAKER IMPEDANCE 4~8 Ohm
Connect to remote
turn-on lead of
source unit.
Connect to chassis
ground of vehicle*

5
PROTECTION LED COMES ON WHEN THE AMPLIFIER IS POWERED UP.
Check for shorts on speaker leads.
Check that volume control on the head unit is turned down low.
Remove speaker leads ,and reset the amplifier. If the Protection LED still comes on ,
then the amplifier is faulty.
The amplifier will shut down automatically when the units temperature got up to 80 C
This will protect the unit damage.
TROUBLESHOOTING
Before removing your amplifier ,refer to the list below and follow the
suggested procedures. Always test the speakers and their wires first.
AMPLIFIER WILL NOT POWER UP.
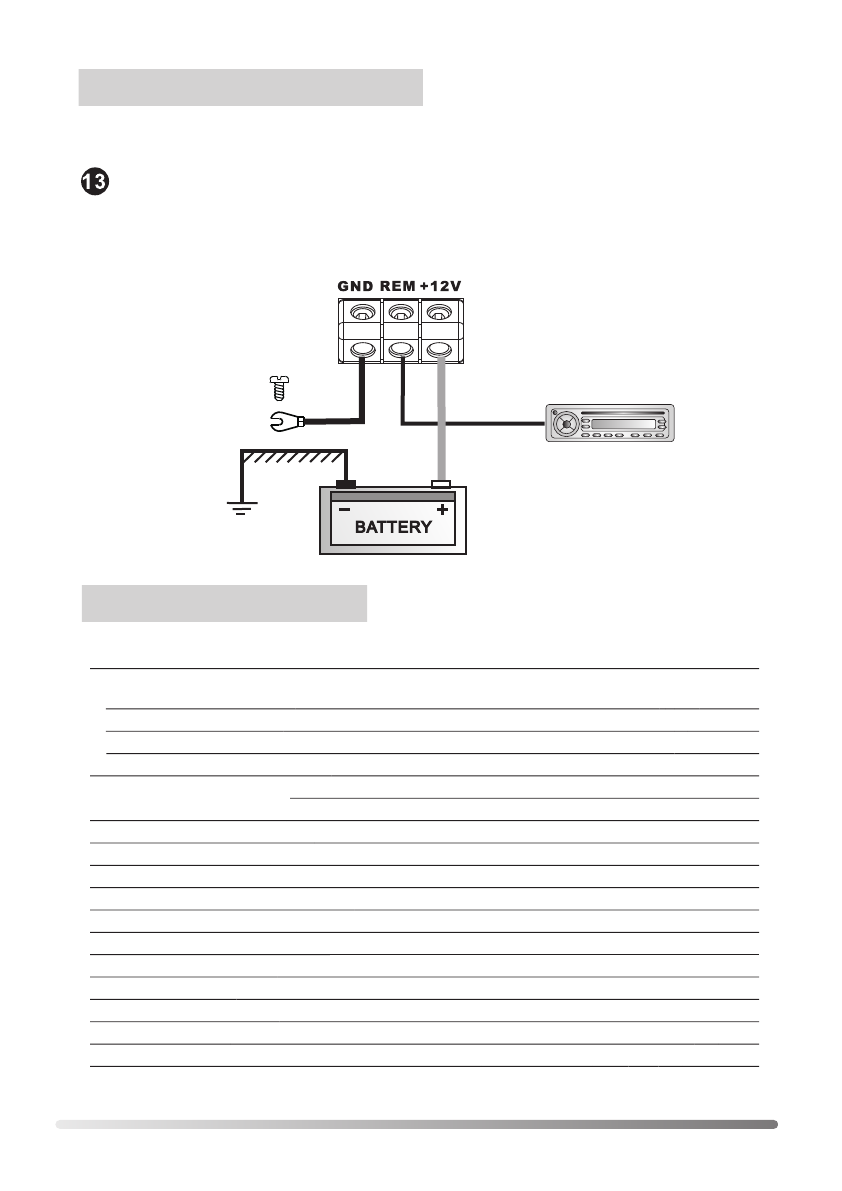
Check for good ground connection.
Check that remote DC terminal has at least 7V DC.
Check that there is battery power on the + terminal.
Check all FUSES.
Check that Protection LED is not lit. If it is lit, shut off amplifier briefly and then
repower it.
HIGH HISS OR ENGINE NOISE(ALTERNATOR WHINE) IN SPEAKERS.
Disconnect all RCA inputs to the amplifier , if hiss/ noise disappears , then
plug in the component driving the amplifier and unplug its inputs . If hiss/
noise disappears, go on until the faulty/noisy component is found.
It is best to set the amplifier input level as insensitive as possible. The best
subjective S/N ratio is obtainable this way . Try to drive as high a signal level
from the head unit as possible.
AMPLIFIER(S) GETS VERY HOT.
Check that the minimum speaker impedance for that model is correct.
Check for speaker shorts.
Check that there is good airflow around the amplifier . In some applications,
an external cooling fan may be required.
DISTORTED SOUND.
Check that the Level control(s) is set to match the signal level of the head unit.
Check that all crossover frequencies have been properly set .
Check for shorts on the speaker leads.
HIGH SQUEAL NOISE FROM SPEAKERS.
This is always caused by a poorly grounded RCA patch cord.
WARNING!WARNING!
1. Over high volume will damage your speakers.
2. Be cautious when you use the amplifier near gasoline tank and electric wires.
3. Protect the connecting wires and parts to avoid any damage or short circuit.
4. The power must belee from the anode of the battery via FUSE.
5. The sound system must be in turning-off situation when you check the amplifier.
6. Be sure that you use the same type of FUSE when you need to replace it .
* We reserve the right to make needed change or improvement to the product,
without informing customer about this in advance.

Polski 6-11
Românã 12-17 English 1 - 5
6
PY-2H30RPY-2H30R
INSTRUKCJA OBS£UGI
WZMACNIACZ SAMOCHODOWY
INSTRUKCJA OBS£UGI
WZMACNIACZ SAMOCHODOWY

7
OPIS FUNKCJI
3
1
2
4
5
6
7
8
9
10
11
1212
LOW INPUT Gniazda wejœciowe dla lewego i prawego kana³u. W to miejsce
pod³¹czamy sygna³ wyjœciowy z przedwzmacniacza (radio, odtwarzacz CD,
DAT, etc.) lub sygna³ pochodz¹cy z innego Ÿród³a.
HIGH INPUT Gniazda wejœciowe wysokiego poziomu dla lewego i prawego kana³u.
GAIN Pokrêt³o regulacji g³oœnoœci.
X-OVER Opcjonalny prze³¹cznik filtr górnego pasma (HPF)
/ filtr ca³ego pasma (FULL)/ filtr dolnego pasma (LPF).
HPF Pokrêt³o dostrojenia górnego pasma czêstotliwoœci,
zakres czêstotliwoœci od 45Hz do 300 Hz.
LPF Pokrêt³o dostrojenia dolnego pasma czêstotliwoœci,
zakres czêstotliwoœci od 45Hz do 300 Hz.
BASS BOOTS
Opcjonalny prze³¹cznik podbicia basu 0dB / +6dB / +12dB.
REMOTE CONTROLLER OUTLET Gniazdo pod³¹czenia zdalnego sterowania
podbicia basu. Przed pod³¹czeniem pilota ustaw prze³¹cznik BASS BOOTS na 0dB.
INDICATOR LIGHT Niebieski kolor kontrolki oznacza prawid³ow¹ pracê wzmacniacza.
Czerwony kolor kontroli oznacza uaktywnienie siê systemu bezpieczeñstwa
wzmacniacza.
REMOTE CONTROLLER
Zdalne sterowanie basem, wzmocnienie od 0dB do 12dB.
FUSE Automatyczny bezpiecznik.
W przypadku wymiany u¿yj bezpiecznika o tej samej wartoœci.
SPEAKER
Gniazda do pod³¹czenia g³oœników.

8
CD PLAYER
SEL
GNDGND
REMREM
+12V+12V
1313
+12V
Pod³¹cz gniazdo +12V z dodatnim biegunem w akumulatorze.
REM
Gniazdo do pod³¹czenia zdalnego sterowania, które bêdzie sterowa³o w³¹czaniem
i wy³¹czaniem wzmacniacza np. radio z wyjœciem REMOTE.
Napiêcie sygna³u steruj¹cego musi zawieraæ siê w przedziale od 7 do 15VDC.
GND
Uziemienie. Pod³¹cz do metalowego elementu samochodu (jak najkrótszym kablem).
SPECYFIKACJA
Model PY- 2H30R
Moc RMS 13,8 VDC
Moc dla 4 Ohms 200W x 2
Moc dla 2 Ohms 300W x 2
Moc pomostowa dla 4 Ohms 500W x 1
Min impedancja g³oœnika 2 Ohm
Zniekszta³cenie THD 0.08%
Zniekszta³cenie IMD 0.08%
Pasmo przenoszenia 20Hz~20KHz
Czu³oœæ na wejœciu 200mV~6V
Impedancja wejœciowa 15K
Stosunek sygna³u do szumu 90 dB
Separacja kana³ów 50 dB
Zdalne sterowane basem 0dB~+12dB
Filtr dolnego pasma 45Hz~300Hz
Podbicie basu 0dB~+12dB
Filtr górnego pasma 45Hz~300Hz
Bezpiecznik 30A x 2
Wymiary(d³ugoœæ/szerokoœæ/wysokoœæ) 510 x 245 x 60mm
POD£¥CZENIE ZASILANIA

9
POD£¥CZENIE DWU KANA£OWE
Impedancja g³oœników 2~ 4 OhmImpedancja g³oœników 2~ 4 Ohm

10
POD£¥CZENIE POMOSTOWE
Impedancja g³oœników 4~ 8Ohm

11
RZWI¥ZYWANIE PROBLEMÓW
Przeczytaj przed pod³¹czeniem, postêpuj zgodnie z procedurami.
Zawsze sprawdzaj najpierw g³oœniki i przewody
Nie mo¿na w³¹czyæ wzmacniacza.
SprawdŸ czy dobrze pod³¹czy³eœ uziemienie GND.
SprawdŸ czy sygna³ steruj¹cy wzmacniaczem ma odpowiednie napiêcie
w granicach 7-15 V DV.
SprawdŸ czy dobrze pod³¹czy³eœ przewód zasilaj¹cy.
SprawdŸ bezpiecznik.
SprawdŸ czy dioda zabezpieczenia siê nie œwieci.
Jeœli tak od³¹cz wzmacniacz i pod³¹cz ponownie.
S³ychaæ ha³as z alternatora
Od³¹cz wszystkie urz¹dzenia od wzmacniacza, jeœli ha³as zniknie pod³¹czaj
po kolei urz¹dzenia do wzmacniacza a¿ znajdziesz to, które powoduje zak³ócenia.
Najlepiej jest ustawiæ najni¿sz¹ jak to tylko mo¿liwe czu³oœæ na wejœciu wzmacniacza,
oraz wysoki poziom sygna³u na wyjœciu urz¹dzenia pod³¹czonego do wzmacniacza.
Jest to najlepsze sposób na uzyskanie najkorzystniejszego wspó³czynnika sygna³u szum.
Kontrolka zabezpieczenia zapala siê, kiedy wzmacniacz jest w³¹czony.
SprawdŸ czy niema zwarcia na kablach g³oœnikowych.
SprawdŸ czy jest ustawiony niski poziom dŸwiêku na urz¹dzeniu pod³¹czonym
do wzmacniacza.
Odepnij kable g³oœnikowe i w³¹cz ponownie wzmacniacz.
Jeœli kontrolka cna czerwono to wzmacniacz jest uszkodzony.
Wzmacniacz automatycznie siê w³¹czy, jeœli osi¹gnie temperaturê powy¿ej 80C
Ochroni to wzmacniacz przed uszkodzeniem.
Wzmacniacz bardzo siê nagrzewa.
SprawdŸ czy pod³¹czy³eœ g³oœniki o odpowiedniej impedancji.
SprawdŸ czy g³oœniki nie maja zwarcia.
SprawdŸ czy wzmacniacz ma odpowiedni¹ wentylacjê.
W niektórych przypadkach mo¿e byæ potrzebne dodatkowe ch³odzeni.
Zniekszta³cony dŸwiêk.
SprawdŸ czy jest ustawiony odpowiedni poziom dŸwiêku w stosunku
do poziomu z urz¹dzenia pod³¹czonego do wzmacniacz.
SprawdŸ czy pokrêt³a czêstotliwoœci s¹ poprawnie ustawione.
SprawdŸ czy niema zwarcia na kablach g³oœnikowych.
Piszcz¹ce odg³osy z g³oœników.
Przyczyn¹ jest zawsze s³abo uziemiony kabel RCA.
1. Zbyt g³oœny poziom dŸwiêku mo¿e uszkodziæ g³oœniki.
2. Zachowaj szczególn¹ ostro¿noœæ, gdy wzmacniacz znajduje siê blisko baku paliwa
lub przewodów elektrycznych.
3. Nie dopuœæ do uszkodzenia przewodów i powstania zwarcia.
4. Przewód zasilaj¹cy wzmacniacz musi zawieraæ bezpiecznik.
5. Nag³oœnienie w samochodzie musi byæ wy³¹czone, kiedy sprawdzasz wzmacniacz.
6. Przy wymianie bezpieczników upewnij siê, ¿e u¿y³eœ bezpiecznikó o tej samej wartoœci.
* Zastrzegamy sobie prawo do zmian lub udoskonaleñ w produkcie, bez uprzedniego
informowania o tym klientów.

12
Polski 6-11
Românã 12-17 English 1-5
PY-2H30RPY-2H30R
MANUAL DE UTILIZAREMANUAL DE UTILIZARE

13
FUNCTII SI COMENZI
3
1
2
4
5
6
INTRARE Canalele de intrare Stanga (S) si Dreapta (D) ale sistemului de
amplificare. Aici se conecteaza iesirile pre-amplificate ale unei surse
(CD player, DAT, etc.).
INTRARE DE SEMNAL MARE Terminale de intrare pentru semnal de nivel ridicat.
CASTIG Buton pentru reglarea volumului.
X-OVER Comutatoare optionale pentru filtre semnal: inalta (HPF), trece-banda
(FLAT) sau joasa (LPF).
HPF Buton reglare frecventa inalta de trecere
(interval de reglaj intre 45Hz si 300Hz).
LPF Buton reglare frecventa trecere joasa
(interval de reglaj intre 45Hz si 300Hz).
BASS BOOTS Comutatoare optionale pentru 0dB/+6dB/+12dB.
INTRARE PENTRU TELECOMANDA Pentru conectarea la telecomanda, care ajuta la
controlul bass-ului. Rotiti butonul pentru amplificare BASS la 0dB inainte de folosirea
telecomenzii.
INDICATOR LUMINA Cand acest LED emite culoare albastra, inseamna ca
amplificatorul este in functiune. Cand LED-ul emite culoare rosie, inseamna ca
amplificatorul a intrat in regim de protectie.
TELECOMANDA Buton pentru controlul bass-ului (intervalul de amplificare
este cuprins intre 0dB si +12dB).
DIFUZOR Terminale conectare difuzor.
SIGURANTA Siguranta standard, trebuie sa folositi aceelasi tip
de siguranta daca cea veche trebuie inlocuita.
7
8
9
10
11
1212

14
CD PLAYER
SEL
GNDGND
REMREM
+12V+12V
SPECYFIKACJA
Model PY- 2H30R
Putere RMS 13,8 VDC
Putere 4 Ohms 200W x 2
Putere 2 Ohms 300W x 2
Putere in punte 4 Ohms 500W x 1
Impedanta minima difuzor 2 Ohmi
Distorsiune THD 0.08%
Distorsiune IMD 0.08%
Raspuns in frecventa 20Hz~20KHz
Sensibilitate intrare 200mV~6V
Impedanta intrare 15K
Raport Semnal/Zgomot 90 dB
Separare canale 50 dB
Comanda bass indepartata 0dB~+12dB
Retea de intretaiere
Filtru trecere joasa 45Hz~300Hz
Bass Boost 0dB~+12dB
Filtru trecere inalta 45Hz~300Hz
Randament siguranta 30A x 2
Dimensiuni L x W x H 510 x 245 x 60mm
CONEXIUNEA ELECTRICA
+12V
Alimentare +12 V DC (de la bateria masinii).
REM
Terminalul care controleaza pornirea amplificatorului. Tensiunea aplicata trebuie sa fie
intre +7 si +15V DC.
GND
Terminal de masa. Conectati la sasiul caroseriei. Pastrati lungimea cablului de de
conectare la masa cat mai scurt posibil.
1313
Conectati la + 12V,
printr-o siguranta
adecvata.
Conectati la alimentarea
sursei de semnal
Conectati la sasiul masinii

15
CONEXIUNI POSIBILE ALE SISTEMULUI
CONEXIUNE STEREO
Conectati la alimentarea
sursei de semnal
Conectati la sasiul masinii Impedanta difuzor 2 ~ 4 Ohmi

16
CONEXIUNE IN PUNTE
Conectati la alimentarea
sursei de semnal
Conectati la sasiul masinii Impedanta difuzor 4 ~ 8 Ohmi

17
DEPANARE
AVERTISMENT!
In cazul aparitiei unei anomalii de functionare, consultati lista de mai jos si urmati procedurile
sugerate. Testati intotdeauna difuzoarele si cablurile acestora.
AMPLIFICATORUL NU PORNESTE
Verificati pentru o buna conectare la masa.
Verificati ca terminalul de alimentare +12 V DC sa aiba cel putin 7V DC.
Verificati ca terminalul + al bateriei sa aiba suficienta tensiune.
Verificati toate SIGURANTELE.
Verificati ca LED-ul de protectie sa nu fie aprins.
Daca este aprins, opriti scurt amplificatorul si porniti-l din nou.
ZGOMOT DE FOND PUTERNIC SAU BRUIAJ DE LA MOTOR (ZGOMOT DE LA
ALTERNATOR) CE SE AUDE IN DIFUZOARE
Deconectati toate intrarile RCA ale amplificatorului. Daca zgomotul de fond/ bruiajul dispare,
conectati sursa de semnal si opriti semnalul sursei de semnal. Daca zgomotul de fond/ bruiajul
dispare, continuati pana cand componenta care produce zgomot este gasita.
Cel mai bine este sa setati nivelul intrarii amplificatorului cat mai putin sensibil cu putinta.
Verificati de asemenea si conectarea alimentarii sistemului la masa (sasiul masinii).
LED-ul DE PROTECTIE SE APRINDE CAND AMPLIFICATORUL PORNESTE
Verificati sa nu existe scurtcircuite la conductorul de cablu al difuzorului.
Fiti atenti ca volumul unitatii centrale sa fie minim.
Deconectati difuzorul si resetati amplificatorul.
Daca LED-ul inca se aprinde, amplificatorul ar putea sa fie defect.
Amplificatorul se va opri automat cand temperatura dispozitivului atinge 80oC.
Acest lucru va proteja dispozitivul de deteriorare.
AMPLIFICATORUL SE SUPRAINCALZESTE
Verificati ca impedanta minima a difuzorului pentru modelul respective sa fie corecta.
Verificati sa nu existe scurtcircuite la nivelul difuzorului.
Verificati curentul de aer din jurul amplificatorului.
In unele cazuri, ar putea fi nevoie de un ventilator.
SUNET DISTORSIONAT
Verificati astfel incat controlul nivelului sa fie setat astfel incat sa se potriveasca cu nivelul
semnalului unitatii centrale.
Verificati ca filtrele de semnal sa fie corespunzator setate.
Verificati sa nu existe scurtcircuite la nivelul firelor de la difuzor.
ZGOMOT PUTERNIC IN DIFUZOARE
Acest lucru este provocat de o pamantare slaba (conectare la masa)
a cablului de conexiune RCA.
1. Volumul peste limita admisa poate defecta difuzoarele.
2. Fiti precauti cand utilizati amplificatorul in apropierea rezervorului de benzina si a cablurilor
electrice.
3. Protejati cablurile de conectare si partile acestora pentru a evita orice deteriorare a cablurilor
sau scurtcircuit.
4. Alimentarea sistemului trebuie facuta obligatoriu prin SIGURANTA.
5. Sistemul trebuie sa fie oprit cand verificati amplificatorul.
6. Asigurati-va ca folositi o siguranta de acelasi tip cu cea originala cand e nevoie sa o inlocuiti.
* Ne rezervam dreptul de a efectua schimbarile necesare sau de a aduce imbunatatiri produsului,
fara o instiintare prealabila a clientului.

(Applicable in the European Union and othor European countries with separate collection systems)
This marking shown on the product or Its literature, indicates that It should not be disposed with other
household wastes at the end of its working life. To prevent possible harm lo the environment or human health
from uncontrolled waste disposal, please separate this from other types of wastes and recycle it responsibly to
promote the sustainable reuse of material resources.
Household users should contact either the retailer where they purchased this product, or their local
government office, for details of where and how they can take this item for environmentally safe recycling.
Business users should contact their supplier and check the terms and conditions of the purchase contract This
product should not be mixed with other commercial wastes for disposal
Correct Disposal of This Product (Waste Electrical & Electronic Equipment)
Reciclarea corecta a acestui produs(reziduuri provenind din aparatura
electrica si electronica)
Marcajale de pe acest produs sau mentionate in instructiunile sale de folosire indica faptul ca produsul nu
trebuie aruncat impreuna cu alte reziduuri din gospod arie atunci cand nu mai este in stare de
functionare. Pentru a preveni posibile efecte daunatoare asupra mediului inconjurator sau a san ata tii
oamenilor datorate evacuarii necontrolate a reziduurilor, va rugam s¹ separati acest produs de alte tipuri
de rezuduuri si sá-l reciclati in mod responsabil pentru a promova refolosirea resurselor materiale.
Utilizatorii casnici sunt rugati s¹ ia legatura fie cu distribuitorul de la care au achizitionat acest produs, fie
cu autoritatile locale, pentru a primi informatii cu privire la locul si modul in care pot depozita acest produs
in vederea reciclarii sale ecologice.
Utilizatori institutionali sunt rugati s¹ ia legatura cu furnizorul si s¹ verifice conditiile stipulate in contractul
de vanzare. Acest produs nu trebuie amestecat cu alte reziduuri de natura comerciala.
Oznaczenie umieszczone na produkcie lub w odnosz¹cych siê do niego tekstach wskazuje, ¿e po up³ywie
okresu u¿ytkowania nie nale¿y usuwaæ z innymi odpadami pochodz¹cymi z gospodarstw domowych. Aby
unikn¹æ szkodliwego wp³ywu na œrodowisko naturalne i zdrowie ludzi wskutek niekontrolowanego usuwania
odpadów, prosimy o oddzielenie produktu od innego typu odpadów oraz odpowiedzialny recykling w celu
promowania ponownego u¿ycia zasobów materialnych jako sta³ej praktyki.
W celu uzyskania informacji na temat miejsca i sposobu bezpiecznego dla œrodowiska recyklingu tego
produktu u¿ytkownicy w gospodarstwach domowych powinni skontaktowaæ siê z punktem sprzeda¿y
detalicznej, w którym dokonali zakupu produkt, lub z organem w³adz lokalnych.
U¿ytkownicy w firmach powinni skontaktowaæ siê ze swoim dostawc¹ i sprawdziæ warunki umowy zakupu.
Produkt nie nale¿y usuwaæ razem z innymi odpadami komercyjnymi.
Prawid³owe usuwanie produktu (zu¿yty sprzêt elektryczny i elektroniczny)
18
RECYCLING
Table of contents
Languages:
Other Peiying Car Amplifier manuals