1: SAFETY
Safety instructions for power tools
For your own safety, please read the manual
before using this equipment
1. Keep the work area clean. A messy workplace
increases the risk of accidents and injuries.
2. Consider the circumstances. Do not use the
machine in damp, wet or poorly lit places.
Donot expose to rain.
3. Keep children away. All children must be kept
away from the work area. Do not let them
handle the machine or extension cords.
4. DO NOT LEAVE UNUSED ACCESSORIES IN
FRONT. When not in use, accessories should be
stored in a dry place to inhibit rust. If possible,
store in an area out of the reach of children.
5. DO NOT OVERLOAD THE MACHINE. It will
do the job better and safer at the rate it was
intended for.
6. USE THE RIGHT TOOLS. Don't force a smaller
machine or accessory to do the same job as
a larger industrial tool. Do not use a tool for
apurpose for which it was not intended.
7. Dress accordingly. Do not wear loose clothing
or jewellery. They can be caught in moving
parts. Protective gloves and non-slip shoes are
recommended when working. Use protective
hair clothing to keep long hair out of the way,
sothat it does not get caught in the machine.
8. USE EYE PROTECTION. Use ISO-approved
safety glasses.
9. SAFE WORK. Use clamps or a screw to hold
theworkpiece if possible. It is safer than using
your hands and it frees both hands to operate
the machine.
10. DO NOT OVER STRETCH. Keep the right footing
and balance at all times.
11. HANDLE TOOLS WITH CARE. Keep them clean
for better and safer performance. Follow the
instructions for lubrication and replacement
ofaccessories. Inspect tool cords regularly
and if damaged, have them repaired by an
authorized service centre. Keep handles dry,
clean and free from oil and grease.
12. REMOVE ADJUSTMENT KEYS AND GUARDS.
Make it a habit to check that wrenches and
wrenches are removed from the tool or
machine work surface before use.
13. BE ALERT. Always watch what you are doing,
use common sense. Do not use the machine
when you are tired.
14. CHECK DAMAGED PARTS. Before using any
tool, any part that appears damaged should
be carefully inspected to determine that it
is functioning properly and can perform its
intended function. Check alignment of moving
parts, breakage of parts, assembly and other
conditions that may affect its operation.
Any part that is damaged must be properly
repaired by an authorized service center unless
otherwise specied in the instruction manual.
15. EXCHANGE OF PARTS AND ACCESSORIES.
Only use identical spare parts when servicing.
Only use accessories intended for use with this
tool. Approved accessories are available from
the dealer.
16. DO NOT USE THE MACHINE IF YOU ARE UNDER
THE INFLUENCE OF ALCOHOL OR DRUGS.
Read prescription warning labels to determine
if your judgment or reexes are impaired while
taking drugs. If there is any doubt, do not use
the machine.
17. NEVER STAND ON THE MACHINE. Serious
injury can occur if the machine tips over
18. KEEP PROTECTION IN PLACE AND IN
WORKING ORDER. Never use the machine
unless all guards are working properly.
19. NEVER USE A TOOL IF ITS HOUSING OR ANY
BOLTS ARE MISSING. If covers or bolts have
been removed, replace them before use.
Maintain that all parts are in good condition.
20. WIPE UP SPILLS, ETC., TO AVOID SLIP
ACCIDENTS. Keep the oor clean and free of
all liquids and other spills that could cause
slipping. Check the material data sheet for
proper cleaning procedures.
You need this manual for safety instructions,
assembly instructions, operating instructions,
partslist and diagrams. Write your invoice number
on the inside of the front page. Put both your
manual and invoice in a safe, dry place for future
reference.
Additional safety instructions for a Floor
Drill Press.
1. ALWAYS USE YOUR FLOOR DRILL PRESS
AT SPEEDS appropriate for drill size and the
material you are drilling.
2. LOWER THE DRILL EVENLY INTO THE
WORKPIECE. Back the drill out of deeper holes
and clean the residue with a brush after turning
off the machine.
3. BE SURE THAT THE DRILL YOU ARE USING
IS SECURED PROPERLY. Use only round,
hexagonal or triangular shank drills.
4. NEVER PERFORM MAINTENANCE OR CHANGE
SPEED WITH THE MACHINE ON.
5. NEVER USE TOOLS THAT ARE IN POOR
CONDITION, Dull or damaged cutting tools are
difcult to control and can cause serious injury.
6. NEVER DRIL IN SHEET METAL UNLESS IT IS
PROPERLY FIXED INTO THE WORK TABLE.
7. THE WORKPIECE SHOULD BE PLACED IN
SUCH A MANNER AS TO AVOID DRILLING INTO
THE WORK TABLE.
8. A FACE PROTECTION ALONG WITH GOGGLES
SHOULD BE USED.
9. ALWAYS CLAMP THE WORKPIECE TO THE
TABLE BEFORE STARTING DRILLING. Never
hold a workpiece by hand while drilling.
10. If in any way you experience problems
performing the intended work, stop using
themachine! Contact our service department
or ask a qualied expert how the work should
be carried out.
11. REMOVE ADJUSTMENT KEYS AND OTHER
KEYS. Before turning on the machine, make
ita habit to check that all adjustment keys
andkeys have been removed.
12. HABITS, GOOD OR BAD, are hard to break.
Develop good habits in your business and
thatsafety becomes second nature to you.
2: INTRODUCTION
Unpacking
If the machine is moved up or down stairs,
the machine must be disassembled and moved
in smaller pieces. Ensure that floors and stair
structures can support the combined weight of
the machine parts and the people moving them.
The oor drill press is delivered from the
manufacturer in a carefully packed carton. If you
discover that the machine is damaged after receiving
it, call the Toolbox immediately for advice. Once you
are completely satised with the condition of your
shipment, you should inventory your parts.
TABLE OF CONTENTS:
A complete list of parts and exploded views
canbe found at the end of this manual. For easier
assembly, or to identify specic parts, refer to the
detailed illustrations at the end of the manual.
Once all the parts have been removed from the box,
you should have:
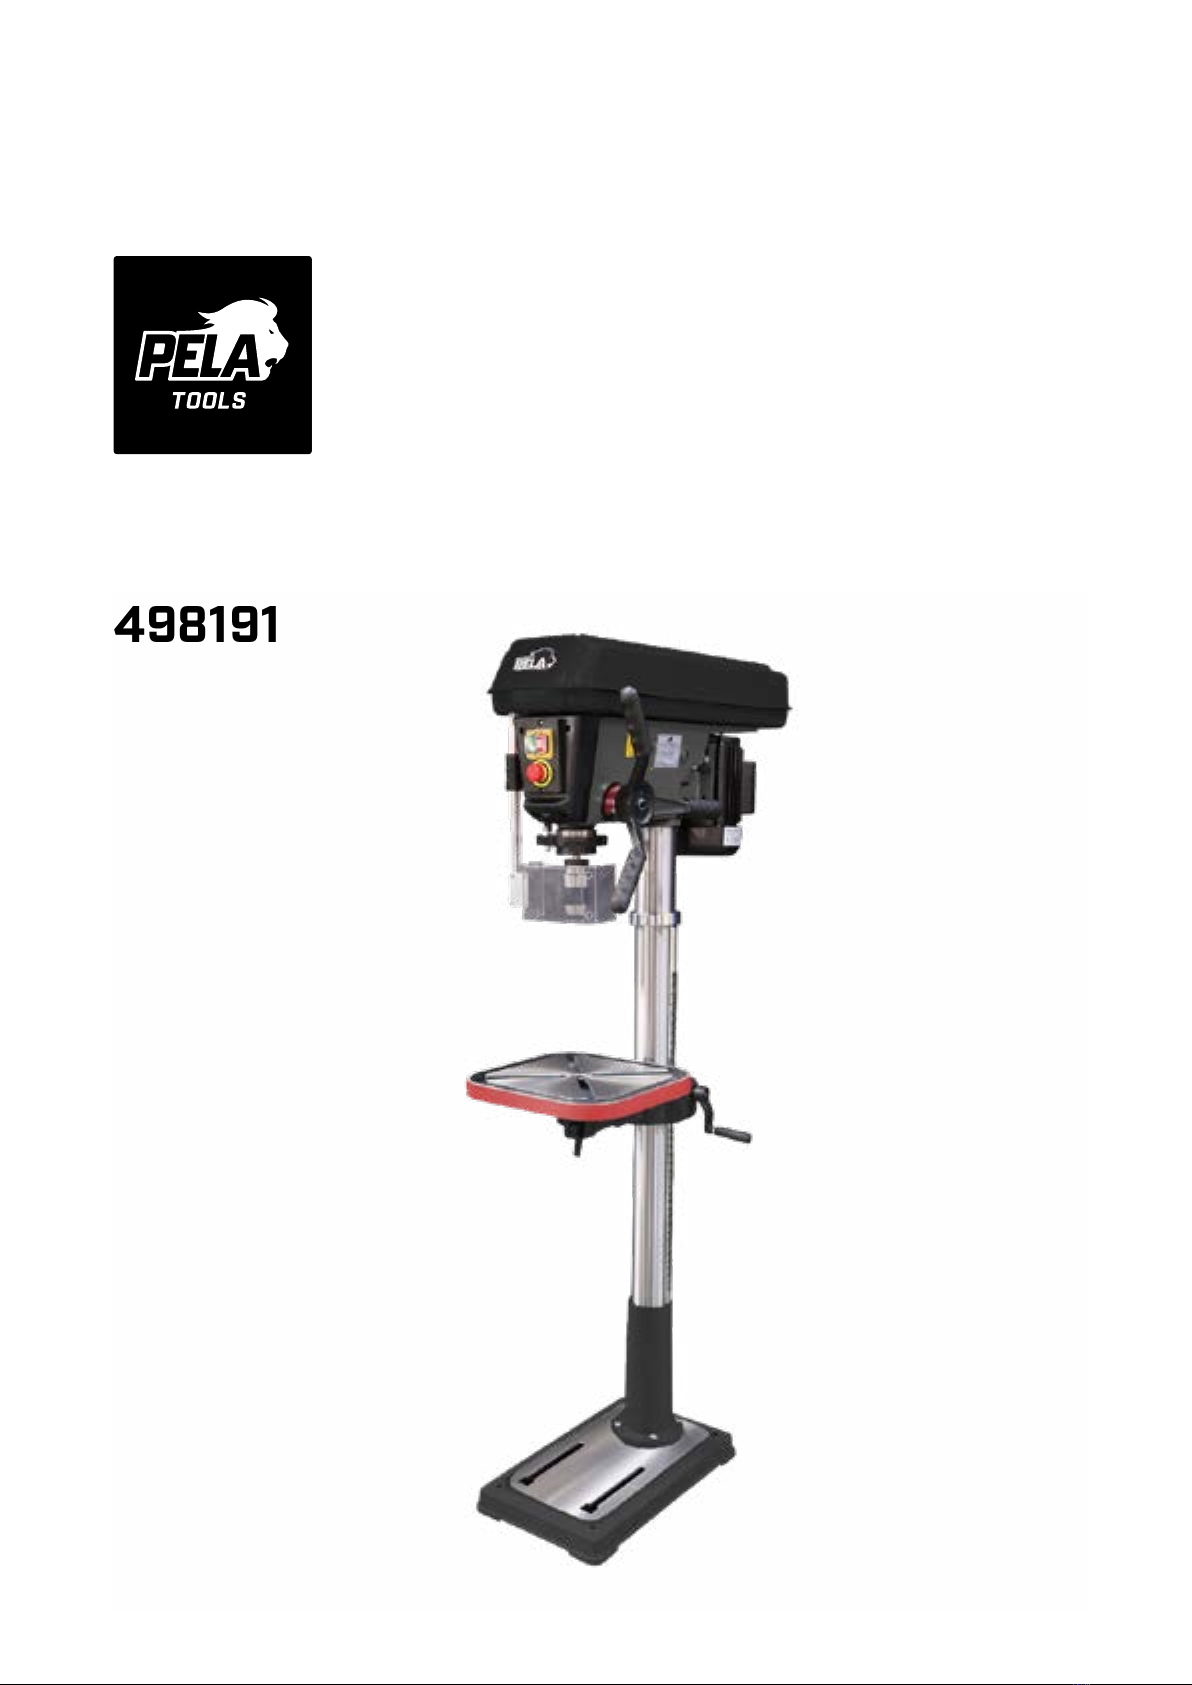
• Spindle Chuck
• Work table
• Column mounting
• Base
• Drill chuck and key
• Wedge chaser
• Hex bolts, M10 x 25 or 40 (4)
In the event that any non-proprietary parts are
missing (eg a nut or washer) we are happy to
replace them or, if more convenient, replacements
can be obtained from your local hardware store.
Fig. 2A