manuals.online logo
Brands
  1. Home
  2. •
  3. Brands
  4. •
  5. Pentax
  6. •
  7. Film Camera
  8. •
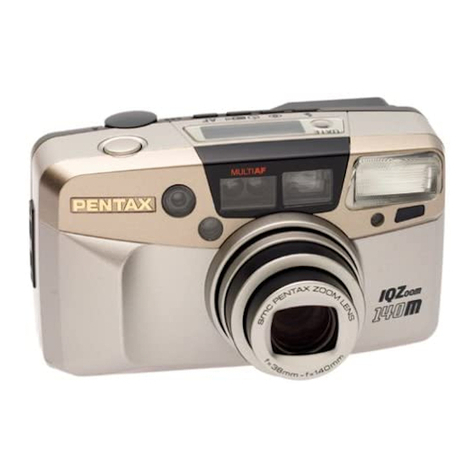
  9. Pentax IQZoom 140 User manual

Pentax IQZoom 140 User manual

www.orphancameras.com
.
Congratulations on your purchase of the
PENTAX IQ Zoom 140 and welcome to the
world of Pentax zoom compact photography!
Your compact, light weight camera is a great
companion to preserveyour favorite memories. Its
built-in 38-l40mm lens givesyou the freedom to
frame everything from breathtaking landscapesto
family portraits, even detailed close-ups. The
built-in auto flash helps you capture subjects in
dimlyJit palces or photograph indoor scenes
with
clarity and brilliance. Also included are panorama
./standard format mid-roll switching capability
and a wirelss remote control feature. Multi (6)-
segment metering system ensuresvery precise me-
tering for otimum exposure under any given
lighting conditions. Since most of the operation -
including film loading, film speed setting,
winding/rewinding, focus and exposure control -
are automatic, you can take great pictures effort-
lessly.The DATE model makesit easy
to remem-
ber the dateswhen you took pictures.
o Please
read this manual carefully before operat-
ing the camera to take consistently superior pic-
tures.
o Pay special attention to the cautions and notes
in this Operating Manual. Pictures and illustra-
tions shown herein may differ from the cam-
era's actual appearance.
The name of the camera's working parts are listed
on the front and back flaps of this manual. Keep
the flaps unfolded for quick reference while read-
ing the manual.
Icon indications used in this manual
Operation
direction -
Automatic
operation frrrrf
Attention tl
Lamp
lighted
Lamp
blinking
Correct o
I
ncorrect X
www.orphancameras.com
NAMES OF WORKING PARTS
O Strap lug (p.7)
@ Shutter release
button (p.21)
O Drive button (p.27)
@ l.P,/ mrnity-lindscape
button (p.27)
@ I,CO panel (p.55)
@ Mode button (p.26)
O Red-eye reduction flash
button (p.26)
@ Autofocus window
@ Built-in flash
@ Lens
C) Viewfinder window
(D Focus aid illuminator window
(p.18)
@ Self-timer lamp (p.31)
@ Remote control receiver
(p.34)
(D Light sensor
window
www.orphancameras.com
OUTLII{N OF BASIC OPERATIONS
Open the back cover
(see
page13).
Frame your subject and
operate the zooming
lever to compose the
shot (see
page1l).
Load the film and close
the back cover (see
page
13).
Focus on your subject
(see
page
21).
The film will automati-
cally advance to the
first frame (see page
14).
Depress the shutter re-
lease button. In dark
conditions, the flash
will discharse auto-
matically (seipage 22).
Push the main switch
button to switch on
power (see
page8).
When the film is fin-
ished. the camera will
automaticallv rewind it
(see
page24).
ffiJ
t-l
www.orphancameras.com
PRECAUTIONS FOR YOUR CAMARA
Precaution when taking pictures
o Do not use the camera in a place where the
camera may come in contact with rain or
water because the camera is not weather-
resistance. Should the camera get wet from
rain or splashing water, wipe it off immedi-
ately with a dry soft cloth.
o Do not drop the camera or allow it to hit a
solid object. If the camera suffers a severe
shock or impact, take it to a Pentax service
center for inspection.
o Be careful not to subject the camera to strong
vibrations, shock or pressure. Use a cushion
to protect the camera when carrying it in a
motorcycle, car, boat, etc.
o Condensation on the interior or the exterior
of the camera may be extremely harmful to
the camera mechanism as it may cause rust
and/or corrosion. Furthermore, if the cam-
era is taken from warm temperature to a sub-
freezing one or vice versa, the formation of
icelets may causethe damage. In such a case,
put the camera into a case or plastic bag so
that any changes in temperature will be as
gradual aspossible. After temperature differ-
ence is minimized, take it out of the bag.
o Do not apply force to the zoom lens; do not
place the camera with lens facing downward.
o Dirt, mud, sand, moisture, toxic gas, water,
salt water, etc.,penetrating the inside of the
camera may cause damage or render it inop-
erable. Damage of any kind will not be pre-
pared under the terms of the warranty and
charges may be assessed.
Therefore, handle
the camera with great care.
Precaution for taking care
r Use a blower and lens brush to remove dust
accumulated on the lens or the viewfinder
window.
o Never use solvents such as paint thinner, al-
cohol or benzine to clean the camera. To
clean the external camera surfaces, - but not
glass surfaces; using a dry or silicone-treated
cloth is recommended.
o The electric circuitry inside the camera
containts high voltage working parts. Never
attempt to disassemblethe camera.
www.orphancameras.com
PRACTICAL SHOOTING GUIDE iri4@@OrrA::,:,ii@F
Focusing
Taking a picture
througha window." .....'.......p.37
Taking a picture of distantlandscape
scenery. .........'.... .p.37
Focusingon a particular
spot. ...'....p.38
Flash photography
Takinga picture
in low light situations.
'.'..... ...'...p.19
Minimizing the red-eye
effect. """""'p.26
Taking a portrait picture whose
faceis cast
in the shadow """""."""p.28
Taking a picture of peoplewith sunsetsceneryin the background ...""p.29
Taking a picture of people
with night scenery
in the background ......' .
'p.30
Making a subject larger or smaller.
www.orphancameras.com
Taking pictures of people in various situations
Taking a portrait picture whose
face
is castin shadow."" """"""""'p-28
Taking a picture of people with sunsetsceneryin the background """'p.29
Taking a picture of peoplewith night sceneryin the background """"'p.30
Putting yourself into a picture. ""'p.31
Landscape photography
Taking a picture of peoplewith sunset
sceneryin the background ""'p-29
Taking a picture of night scenery." """'p.30
Taking a picture of peoplewith night scenery
in the background """"'p-30
Taking more than 2 pictures on the sameframe ""p.36
Taking a picture at the distant place from the camera. """p-32
Imprinting date on a picture. """"'p-44
www.orphancameras.com
TABLB OF CONTENTS
o Namesof working parts """"""""""'Flaps
o Introduction " " "'' " " " " "" " ""'Front foldout
o Outline of basicoperations """"'Inside cover
o Precautions
for your camera """'"''""""''1
o Precautionsfor battery' """"3
o Practical
shooting
guide """""""""""""'4
o Table of contents """6
PREPARATIONS BEFORE TAKING
PHOTOGRAPHS
1.Strap
attachment """7
2.Main switch """"""8
3.Batterycheck """"'9
4. How to hold the camera """"'10
5. Operating
the 38-l40mm zoom lens """"'11
TAKING PHOTOGRAPHS
1.Usable
fiIm""' """"""'12
2. Film loading """"'13
3. Viewfinder displaysand shooting ranges "'15
4. Lamp indications '"' " " 18
5.
Ordinary
photography"""""::""""""'"19
6. Diopter adjustment """""""'20
7. Aut-omatic-LCD illuminator """""""""20
8.Taking pictures """"""'21
9. Unloading film """24
6
TAKING BBTTER PHOTOGRAPHS
How to select modes
/Red-eye reduction flash mode' " " " " " " " "'26
Daylight-synchro
shooting'' """""" " " ""'28
Taking a picture at a slow shutter speed""""'29
Slow-speed
synchro photography' "" " " " " " "'29
Bulbshooting
"""' """""""30
Bulb-synchro
shooting """""""'30
Self-timer
photography
"""" ":"""""'31
Using wirelessremote control (option) """"'32
Multi-exposure
shooting'' """"' """""""''36
Infinity-landscape
shooting """"""'37
Spot
AF shooting """38
Fbcus
lock shooting """" """""39
Taking Panoramicformat picture """"""'''41
DATE MODEL... """""44
MAINTENANCE CONSIDERATIONS
Batteryexhaustion
warning """""""46
lnstalling/Replacing the battery """""""'47
Troubleshooting
"" """""'48
Flash effective range with films other than
$O 100,200,
or 400 ""'49
Specifications
''""' """"'''50
Warranty policy """"'52
LCD panel """""""'55
Itr
www.orphancameras.com
i pnnpARATIoNs BEFORE ",
,. TAKING
PHOTOGRAPHS ,.8
., :j"rg,
; For optimum performance you should fa-
i miliarize yourself with certain fundamen-
i ,lr before taking any photographs. :
---
CT STRAP ATTACHMEIYT
Fit the strap on the camera as illustrated. Use the
illustrated part of the strap to open the battery
chamber cover, adjust the data on the Date model,
or push the auxiliary rewind button to rewind a
film trefore exposing all the frames.
t
I
www.orphancameras.com
[f ]r.{r\s\r'rcH
o The lens cover automatically opens and closes
when the main switch is turned on and off.
Never attempt to open the lens cover manually.
Main Switch
To switch on, push the main switch button. The
lens extendsslightly to the wide-angle 38mm and
the LCD panel is on. To switch off, push the main
switch button again.When not in use,
ensurethat
the camera is switched off.
r lJse one 3V lithium battery, type CRI23A or
the equivalent. Do not remove the battery be-
fore it is exhausted, since it is used by the date
function on the DATE model to keep constant
track of time.
8
www.orphancameras.com
67 B-{rrERY.HECK
Battery check
After you turn the main switch ON, the lens
slightly extendsand the lenscover opens.
You are
now ready to shoot. See
page46 when the battery
exha_ustionsymbol ( ! ) unn"ras on the LCD
panel.
e If the camera is on and left unused for over 3
minutes, the lens automatically retracts and the
power switchesoff to savethe battery power.
o If the main switch is turned on within 60 min-
utesof auto-power off, the previous setting will
automatically return.
l
I
www.orphancameras.com
&How ro H'LD rHE 'AMERA
When shooting, hold the camera securely with
both hands. Keep the camera as still as possible,
and gently depressthe shutter releasebutton. (If
too much force is applied, the camera is likely to
shake, and the picture will be blurred.) Try to
brace your elbows against a stable, stationary ob-
ject such asa wall. When using the flash with the
camera positioned vertically, hold the camera so
that the flash is above the lens.
Notes:
o Do not hold the zoom lens becauseit moves
back and forth while in operation.
r Make sure not to obstruct the autofocus win-
dow, lens, light sensor window or the built-in
flash with your fingers, hair or other object.
1il
10
www.orphancameras.com
-,
-/-
--_-
U OPERATING 38-140rnm
ZoOM LENS
A
H
v
vWhen you move the zooming lever to the right ( | ), the
lens moves towards the 140mm telephoto setting and
frames the subiect more closely. When you move the
zooming lever to the left (l0l), the lensmovestowards the
wide-angle 38mm setting. When the lens zoomsto the de-
sired seiting, release the zooming lever and depress the
shutter release
button fully to take pictures.
11
www.orphancameras.com
drrs{BLE FrL\r
Automatic film speed setting
This camera is c.,esigned
to use DX-coded films
with ISO rating frorn 25 to 3200. When any of
these films are loadcd, the proper film speed is
automatically setfor the camera.
TAKING PHOTOGRAPHS
After reading this instruction manual you
should be familiar with the funetions available
on the camera, and you're ready to insert the
film.
Notes:
r Use only DX-coded films.
o Non-DX coded film cannot be used. If non-DX
coded film is used, the camera automatically
setsthe film speed
to ISO 25.
o A film with ISO400 film speedis recommended
to get lessimage blur and to cover more of the
photographic situations.
o Use high-speed films with ISO 800 or higher
mainly for shooting indoors or in dimly-lit con-
ditions.
12
www.orphancameras.com
fiFILML,ADIIYG (Ensure the power is off before inserting the film.)
I Slide the back cover release lever down in the
direction of the arrow to open the back as illus-
trated.
2 Place the film cartridge in the film chamber by
fitting its flat side on top of the rewind shaft
first and then slide the top end into the camera.
3 Pull the film leader out far enough from the
cartridge to reach the take-up spool O. Align
the tip of ttre film with the film leader end mark
@.
Notes:
o Ensure the film is placed properly between the
film guides @.
. If thele is dirt on the film detector @, film can-
not be wound properly.
V
/1
X Slack No! O Flat Yes! 13
www.orphancameras.com
E
4 After the back cover is closed. the film auto-
matically advances to the first frame.
o Even if no film is loaded, the motor operatesfor
a secondor two after the back cover is closed.
. Ensure the film is taut as illustrated on the pre-
vious page. Take up any slack in the film by
pushing it back into the cartridge.
o If the end of the film leader is extremely bent,
straighten it or cut off the bent portion.
5 When " I " appears in the exposure counter on
the LCD panel, the film automatically stops
winding. The indication appears as shown
above. If (, ) does not appear on the LCD
panel,it indicates that the films is not prope;ly
loaded. If this occurs,reload the film. If ( t )
blinks on the LCD panel, it means the film is
not properly loaded.
o The exposure counter indication will remain on
even if the main switch is turned off.
o If the camera is placed in a condition where
static electricity may be discharged on or near
the camera,the LCD film counter may change
to number one,but you can continue to use all
other functions of the camera normally.
14
www.orphancameras.com
VIEWFINDER DISPLAYS
Ordinary photography
o
fo ol
fo ol
(Switch on power by depressing the main switch buttsn.)
when the autofocusframe in the viewfinder is not clearly
seen,rotatethediopter adjustment dial until the autofocus
frame appearsin the sharpest focus. $eepage 20.
The autofocus frame and the picture ar-ea-inthe view-
finder automatically vary in accordance
with the distance
to the subject and focus length you have set.See
page 16
and 17.
Ordinary photography (standard format)
OAutofocus frame. Autofocus is referred to as"AF".
Focus on the subjectwith this frame.
(DPicture area
When taking a normal picture, compose the scene
within this frame.
Panoramic format picture
OAutofocus frame
@Pictur
e area
When taking panoramic pictures, compose the scene
within this frame.
Shooting rangesfor standard and panoramic format pic-
fures (effective camera-to subject distance)
o The ordinary photography and panoramic mode allow
a shooting range from lm (:.9 ft) to infinity (tele-
photo 140mm side) ?nd 0.73m (2.+ ft) to infinity
wide-angle
38mm side).
. Subjects
closer
than lm at l40mm or 0.73m at 38mm
cannot be focused properly. 15
www.orphancameras.com
Close distance compensation freme
When the distance to the subject becomes closer,
the picture area of this camera is automatically
chenged and compensated. Compose the scene
within this frame.
Standard fomat
www.orphancameras.com
Autofocusfrsme
Theautofocusframeofthis camera
variesin threestepsin accordancewith the focal length you haveset.
Focusonthesubjectwithin theautofocusframe.Theautofocus
frameiswidenedwhenthelensiszoomed
toward the telephoto l4omm side.
Multi (S-points) focusing
()
tl
Spot focusins
()
f l
fl
www.orphancameras.com
LAMP INDICATIONS
When you depressthe shutter releasebutton half-
way down, the lamp O, @ and,/ or @ lights up or
blinks asshown above.
O Green lamp : When the subjectis in focus, it
will light up to indicate that you
can take the picture; when the
subject is not in focus, it will
blink, indicating that you can-
not take the picture because
the
:lff
'3-Jt':ojffilsl':iff
"""::i:
subject.See
page 23.
@ Red lamp : When the flash is ready to dis-
charge, it will light up. When
the flash is beingcharged,it will
blink.
18
@ Infinity-landscape
lamp :
Note:
. If the subjectis too close,the greenlamp blinks.
Adjust the camera-to-subject distance so that
the greenlamp lights continuously, then release
the shutter. The shutter can be released
even it
is blinking. In this case,the camera will not
focus properly.
Focus aid illuminator
In low light situations and,/or hard-to-autofocus
subjects,
the red light is automatically projected to
assistthe autofocus system when the shutter re-
leasebutton is depressed
halfway down.
When the inflrnity-landscape
mode is set,it will light up.
www.orphancameras.com

Other manuals for IQZoom 140

2

This manual suits for next models

1

Other Pentax Film Camera manuals

Pentax K2 User manual

Pentax

Pentax K2 User manual

Pentax IQZoom 80S User manual

Pentax

Pentax IQZoom 80S User manual

Pentax ES User manual

Pentax

Pentax ES User manual

Pentax 35 User manual

Pentax

Pentax 35 User manual

Pentax 90 User manual

Pentax

Pentax 90 User manual

Pentax EZY User manual

Pentax

Pentax EZY User manual

Pentax Espio User manual

Pentax

Pentax Espio User manual

Pentax IQZoom 105G Date User manual

Pentax

Pentax IQZoom 105G Date User manual

Pentax IQZoom 120 Mi User manual

Pentax

Pentax IQZoom 120 Mi User manual

Pentax IQZoom 60 User manual

Pentax

Pentax IQZoom 60 User manual

Pentax PZ-20 User manual

Pentax

Pentax PZ-20 User manual

Pentax IQzoom - IQezy 38-70mm Zoom User manual

Pentax

Pentax IQzoom - IQezy 38-70mm Zoom User manual

Pentax IQZoom 150SL / IQZoom 170SL User manual

Pentax

Pentax IQZoom 150SL / IQZoom 170SL User manual

Pentax IQZoom 130M User manual

Pentax

Pentax IQZoom 130M User manual

Pentax IQZoom 160 User manual

Pentax

Pentax IQZoom 160 User manual

Pentax IQZoom 28-W User manual

Pentax

Pentax IQZoom 28-W User manual

Pentax SP500 Setup guide

Pentax

Pentax SP500 Setup guide

Pentax Bracket 645 User manual

Pentax

Pentax Bracket 645 User manual

Pentax 24 EW User manual

Pentax

Pentax 24 EW User manual

Pentax IQZoom 60R User manual

Pentax

Pentax IQZoom 60R User manual

Pentax ES User manual

Pentax

Pentax ES User manual

Pentax H1a User manual

Pentax

Pentax H1a User manual

Pentax IQZoom 120 User manual

Pentax

Pentax IQZoom 120 User manual

Pentax Spotmatic Spotmatic F User manual

Pentax

Pentax Spotmatic Spotmatic F User manual

Popular Film Camera manuals by other brands

Minolta MAXXUM 600SI - FOCUS LOOK manual

Minolta

Minolta MAXXUM 600SI - FOCUS LOOK manual

Kodak KB32 user manual

Kodak

Kodak KB32 user manual

Canon T90 instructions

Canon

Canon T90 instructions

Minolta Freedom Action Zoom 90 instruction manual

Minolta

Minolta Freedom Action Zoom 90 instruction manual

Canon EOS A2/A2E instruction manual

Canon

Canon EOS A2/A2E instruction manual

Kodak KB 22 user manual

Kodak

Kodak KB 22 user manual

Minolta MAXXUM 2XI - PART 1 manual

Minolta

Minolta MAXXUM 2XI - PART 1 manual

Nikon 200 - One Touch 200 user guide

Nikon

Nikon 200 - One Touch 200 user guide

Minolta GX-3 instruction manual

Minolta

Minolta GX-3 instruction manual

FujiFilm GX680III owner's manual

FujiFilm

FujiFilm GX680III owner's manual

ALPA 10d Instructions for use

ALPA

ALPA 10d Instructions for use

Canon AF 35 ML instructions

Canon

Canon AF 35 ML instructions

Kodak KB60 manual

Kodak

Kodak KB60 manual

Minox Leica III f brochure

Minox

Minox Leica III f brochure

Canon Model IV Directions for using

Canon

Canon Model IV Directions for using

Minox BL user guide

Minox

Minox BL user guide

Minolta MAXXUM 5000 owner's manual

Minolta

Minolta MAXXUM 5000 owner's manual

Samsung VEGA 290W user guide

Samsung

Samsung VEGA 290W user guide

manuals.online logo
manuals.online logoBrands
  • About & Mission
  • Contact us
  • Privacy Policy
  • Terms and Conditions

Copyright 2025 Manuals.Online. All Rights Reserved.