PERIBIT SR-80 User manual

SR-80/SR-100 QUICK START
10/100/1000 BaseT Ethernet Interfaces
Welcome to the Peribit SR-80/SR-100 Sequence Reducer. This 2-rack-unit (2u) network
infrastructure device with 10/100/1000 BaseT Ethernet interfaces is deployed on the LAN
side of the edge router. Using this quick start card, the SR-80/SR-100 can be installed and
operational in a matter of minutes.
Peribit Networks, Inc.
2300 Central Expressway
Santa Clara, CA
95050
1.866.PERIBIT
1.408.330.5600
www.peribit.com
Before you begin:
•Inspect the package contents. Refer to the package contents document
enclosed with the product.
•Ensure sufficient power is available. Supply circuits should be protected by a
maximum 20A circuit breaker.
•Ensure a minimum of 6 inches clearance in the front and back of the chassis.
•Reserve sufficient rack space to connect client Peribit devices to the SR-100.
•If your network architecture restricts specific ports along the communication
path between Peribit Sequence Reducers, ensure ports 3577 and 3578 are
open for TCP and UDP data transmission.
•Identify a 10/100/1000 BaseT Ethernet LAN port for the SR-80/SR-100 that
transmits data to your WAN router. This port is typically from an aggregation
switch, or from another LAN device connected directly to the router.
•Obtain a license key for the Sequence Reducer. The license key determines
the throughput levels for the device, and properly registers the product with
Peribit Networks. To obtain a permanent license key, go to
http://license.peribit.com.
sr80c_qs_9x75_EFDJ.qxd 6/22/2004 5:50 PM Page 1

Installation:
➊Set up the chassis.
•For rack mount installation, install the supplied brackets, front panel
forward, to the sides of the device.
•For desktop installation, install the supplied rubber stands in the
recessed areas on the bottom of the chassis.
NOTE: Do not connect the power cable to the SR-80/SR-100 until Step 4.
➋Connect the network cables.
To connect the network cables:
•Locate the cable that connects from the switch (or other aggregating
device) to the router.
•Disconnect this cable from the router port and then connect it to the
Sequence Reducer’s LOCAL port.
•Using a straight-through cable (not provided), connect one end to
the Sequence Reducer’s REMOTE port and the other end to the
router port.
➌Verify connectivity between devices on both sides of the SR-80/SR-100.
One method of testing connectivity between devices is to Ping a host on
the remote side of the SR-80/SR-100 from a host on the local side of the SR-80/SR-100.
NOTE: If you are not able to verify connectivity on both sides of the SR-80/SR-100,
do not proceed to the next step. Ensure that you are using the correct cables
(crossover vs. straight-through), and verify that there is network connectivity
before applying power to the Sequence Reducer.
SR-80/SR-100 QUICK START
SR-80/SR-100
Router (remote device)
Switch (local device)
sr80c_qs_9x75_EFDJ.qxd 6/22/2004 5:50 PM Page 2

➍Connect the power.
The SR-80/SR-100 Sequence Reducer has dual, hot-swappable power
supplies that can be removed during operation.
Connect a power cable to each of the power supplies on the back of the
SR-80/SR-100 chassis, and then connect the other end of the power
cables to your local power source.
NOTE: The Sequence Reducer’s power usage is 250 Watts Max or
850 BTU/hr.
➎Configure SR-80/SR-100 Network Settings.
Use the front-panel keypad and LCD to assign an IP address, the subnet
mask, and the default gateway for the SR-80/SR-100 as follows:
5•Press Enter (center button) three times to initiate
configuration.
5•Use the up and down arrow buttons to display a
number (between 0-9).
5•Use the left and right arrow buttons to move to
the previous or next character.
5•Use the Enter button (center) to make a selection.
NOTE: By default, the Sequence Reducer’s interfaces are set to auto-negotiate. However, depending on the interface
settings of the switch and router (auto-negotiate or 1000/Full) it is recommended that you use the front panel to set the
interface speed for the Sequence Reducer. The Sequence Reducer’s LOCAL port settings should match the interface settings
of the switch, and the REMOTE port settings should match the interface settings of the router. It is also recommended that
the Sequence Reducer’s LOCAL and REMOTE interface settings be the same.
After you have entered SR-80/SR-100 network settings, choose Save to save the device configuration.
➏Check the LEDs next to the 10/100/1000 Ethernet ports.
5•The LINK LEDs indicate the device is properly connected.
5•The 1000 LEDs indicate the device is running at 1000 Mbps.
5•The 100/10 LEDs indicate the device is running at 100 Mbps.
5•If the neither the 1000 nor the 100/10 LEDs light, the device is
running at 10 Mbps.
After checking the LEDs, verify connectivity between the devices on
both sides of the SR-80/SR-100 again (as described in Step 3).
10.10.255.20
255.255.255.0
10.10.255.1
IP Address:
Subnet Mask:
Gateway:
SR-80/SR-100 QUICK START
sr80c_qs_9x75_EFDJ.qxd 6/22/2004 5:50 PM Page 3

Quick Setup:
After powering on the Peribit Sequence Reducer and assigning IP parameters, the next step is to log in to the SRS Web
console and run the Quick Setup program. The first time you log in to the Web console, the Quick Setup program initiates
automatically and guides you through initial configuration options for the device.
You can log in to the Web console from any workstation within your network. The Web console supports Microsoft Internet
Explorer version 5.5 and 6.0. Data is securely transmitted through HTTPS.
To log in to the Web console and run Quick Setup, follow these steps:
➊From a workstation within your network, start your Web browser and enter the following URL:
https://(ip address of the Sequence Reducer)
5•Depending on your browser settings, the Security Alert dialog box may appear. Click Yes to proceed.
5•In the Enter Network Password dialog box, type admin for the user name and peribit for the password.
NOTE: This is a factory-configured password for the device. You will be asked to change the default password during the
Quick Setup.
➋Select an Operating Mode.
A Peribit Sequence Reducer can be set up to run in Inline mode or Profile Mode.
•Inline Mode — Active operation where the Sequence Reducer reduces data, accelerates TCP applications, and manages
bandwidth. If you have installed the Sequence Reducer inline (e.g., between a router and a switch), select this option for
operation.
•Profile Mode — Passive operation where the Sequence Reducer can calculate potential data reduction statistics for all
traffic, individual applications, and specific remote subnets. The actual traffic is not affected.
NOTE: To use Profile Mode, the Sequence Reducer’s Local interface must be connected to a mirrored port on the switch,
and the Remote interface must be disconnected. If you have installed the Sequence Reducer inline, do not select Profile
Mode as data will be dropped by the Sequence Reducer.
For more information about setting up and using a Sequence Reducer in Profile Mode, refer to “Peribit Profile Mode” in the
SRS 4.0 Operator’s Guide.
•Click Next to continue.
SR-80/SR-100 QUICK START
sr80c_qs_9x75_EFDJ.qxd 6/22/2004 5:50 PM Page 4

➌Registration Server Setup.
Within a Peribit community, one Sequence Reducer must be designated as the Registration Server.
•To designate this device as the registration server, select the option and assign a registration server
password in the appropriate fields.
The registration server password authenticates the Sequence Reducers within a Peribit community, and
should be different from the Sequence Reducer’s administrator password. When you set up additional
Sequence Reducers, you supply each device with the registration server IP address and password.
•If this Sequence Reducer is not the registration server, enter the IP address of the current (or future)
registration server, and then enter the registration server password in the appropriate field.
If this device is not the registration server and you have not yet configured the registration server for the
Peribit community, enter the IP address of the Sequence Reducer that will be the registration server and the chosen
registration server password. Note that the Sequence Reducer will not process data until a registration server is
configured.
•You can also delay the formation of reduction tunnels to other Sequence Reducers in the Peribit community. If you
select this option, the Sequence Reducer will not reduce or assemble data from other Peribit Sequence Reducers
until you enable reduction tunnel formation in the Endpoints page of the SRS Web console.
•Click Next to continue.
➍Set the Time.
•The time settings page displays the local time of the Sequence Reducer. If the time settings are not correct, enter
the current time, date, and local time zone for the Sequence Reducer. If applicable, select the Daylight Savings
checkbox.
NOTE: If your network uses an NTP server for device time settings, you can configure the Sequence Reducer to use the
NTP server after completing the Quick Setup. For more information, refer to the
Sequence Reducer Operator’s Guide
.
•Click Next to continue.
➎Specify Topology.
When you create a Peribit community of devices, you can select the Topology setting that best describes your network. The
topology setting ensures that a Sequence Reducer’s resources are efficiently used to reduce and assemble data between
devices.
•Choose the topology setting that best describes your network and the Sequence Reducer’s relationship to the network
(Hub, Spoke, or Mesh). If you choose Hub or Mesh, select a range for the number of Sequence Reducers in the Peribit
community.
•Click Next to continue.
SR-80/SR-100 QUICK START
sr80c_qs_9x75_EFDJ.qxd 6/22/2004 5:50 PM Page 5

➏ Advertise Local subnet.
By default, a Sequence Reducer’s local subnet is not advertised to the other Sequence Reducers in the Peribit community. As
a result, data destined for this subnet is not reduced — even if there is a Sequence Reducer in the path.
•If you want other Sequence Reducers to reduce data destined for this subnet, select the Advertise checkbox.
If you choose not to advertise the local subnet for this Sequence Reducer, you should review the Reduction Subnets page
of the SRS Web console after completing the Quick Setup.
•In the Device name field, you can assign a name for the Sequence Reducer.
•Click Next to continue.
❼Enter a license key.
Each Peribit Sequence Reducer requires a unique license key for operation. When the Sequence Reducer is powered on, it
will attempt to detect its unique serial number. If the Sequence Reducer cannot detect its serial number, you can find the
serial number on the back of the device and then manually enter it in the Serial Number field.
If you have purchased the SR-80/SR-100 and have the serial number, you can obtain a permanent license key for the device
through Peribit’s Online License Service. The License Key server is accessible by clicking Online Service or by calling Peribit
Support at 1-866-737-4248 (or 408-330-5600).
•Enter the license key for the Sequence Reducer in the License key field.
•Click Next to continue.
❽Change Administrator password.
•Enter a new Administrator password in the New password and Verify new password fields, and then click Finish.
NOTE: If you deselect the “automatic save” option, configuration settings will be reset upon a power cycle of the Sequence
Reducer.
Where to go next:
The initial configuration is complete. To connect client Peribit devices to the SR-100 and configure all policy settings, refer to
the
Sequence Reducer Operator’s Guide
, which is located on the Peribit Documentation/Utilities CD. For additional product
support information, visit our Web site at http://www.peribit.com/support.
SR-80/SR-100 QUICK START
sr80c_qs_9x75_EFDJ.qxd 6/22/2004 5:50 PM Page 6

SR-80/SR-100 KURZANLEITUNG
10/100/1000-BaseT-Ethernet-Schnittstellen
Willkommen beim Peribit SR-80/SR-100 Sequence Reducer. Dieses Netzwerkinfrastrukturgerät
in zwei Rackhöheneinheiten (2HE) mit 10/100/1000-BaseT-Ethernet-Schnittstellen wird zwischen
LAN und Edge Router eingesetzt. Anhand dieser Kurzanleitung können Sie den SR-80/SR-100 in
wenigen Minuten installieren und in Betrieb nehmen.
Peribit Networks Ltd.
Rollenhagenstrasse 40
81739 Munich
Germany
+49 89 453 610 55
+1 408 330 5600
www.peribit.de
Erste Schritte:
•Überprüfen Sie den Paketinhalt. Ziehen Sie dabei die Stückliste hinzu,
die dem Produkt beiliegt.
•Stellen Sie eine ausreichende Netzspannung sicher. Stromkreise sollten
durch eine Sicherung mit maximal 20A geschützt werden.
•Stellen Sie sicher, dass vor und hinter dem Gehäuse mindestens 15 cm
Abstand gegeben ist.
•Bitte lassen Sie ausreichend Platz für das Rack, um die Client Peribit-
Geräte an den SR-100 anzuschließen.
•Wenn Ihre Netzwerkarchitektur spezielle Ports auf dem
Kommunikationsweg zwischen Peribit Sequence Reducern einschränkt,
stellen Sie sicher, dass die Ports 3577 und 3578 für die Übertragung von
TCP- und UDP-Daten offen sind.
•Suchen Sie den 10/100/1000-Ethernet-LAN-Port für den SR-80/SR-100,
der die Daten zum WAN Router überträgt. Dies ist in der Regel der Port
eines Aggregation Switchs oder eines anderen LAN-Geräts, das direkt
mit dem Router verbunden ist.
•Beziehen Sie einen Lizenzschlüssel für den Sequence Reducer. Der
Lizenzschlüssel bestimmt die Durchsatzstufen des Geräts und sorgt für
eine ordnungsgemäße Registrierung des Produkts bei Peribit Networks.
Besuchen Sie http://license.peribit.com, um einen zeitlich nicht
beschränkten Lizenzschlüssel zu beziehen.
sr80c_qs_9x75_EFDJ.qxd 6/22/2004 5:50 PM Page 7

Installation:
➊Stellen Sie das Gehäuse auf.
•Bei der Befestigung in einem Rack bringen Sie die mitgelieferten
Montagewinkel an den Geräteseiten an, wobei die Vorderseite nach
vorne zeigt.
•Bei einer Aufstellung als Tischgerät befestigen Sie die mitgelieferten
Gummifüße in den Einbuchtungen auf der Gehäuseunterseite.
HINWEIS: Warten Sie mit dem Anschließen des Netzkabels an den
SR-80/SR-100 bis Schritt 4.
➋Schließen Sie die Netzwerkkabel an.
So schließen Sie die Netzwerkkabel an:
•Suchen Sie das Kabel, das den Router mit dem Switch (oder einem
anderen aggregierenden Gerät) verbindet.
•Trennen Sie dieses Kabel vom Routerport, und verbinden Sie es mit
dem Port LOCAL am Sequence Reducer.
•Schließen Sie ein Patchkabel (nicht im Lieferumfang) mit einem
Ende am Port REMOTE des Sequence Reducers und mit dem
anderen Ende am Routerport an.
SR-80/SR-100 KURZANLEITUNG
SR-80/SR-100
Router (Remotegerät)
Switch (lokales Gerät)
sr80c_qs_9x75_EFDJ.qxd 6/22/2004 5:50 PM Page 8

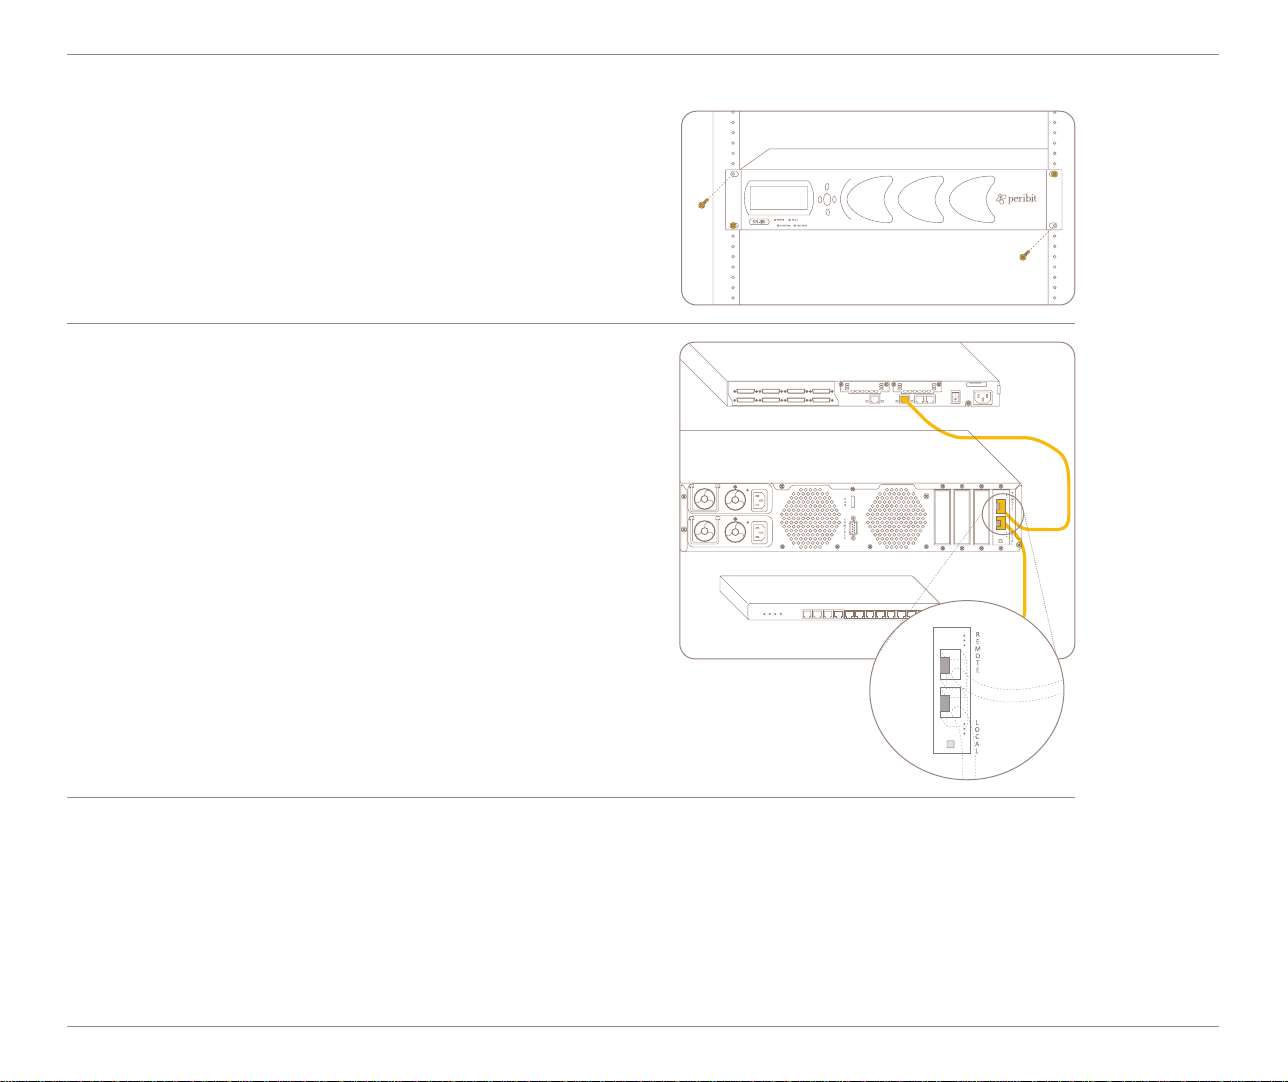
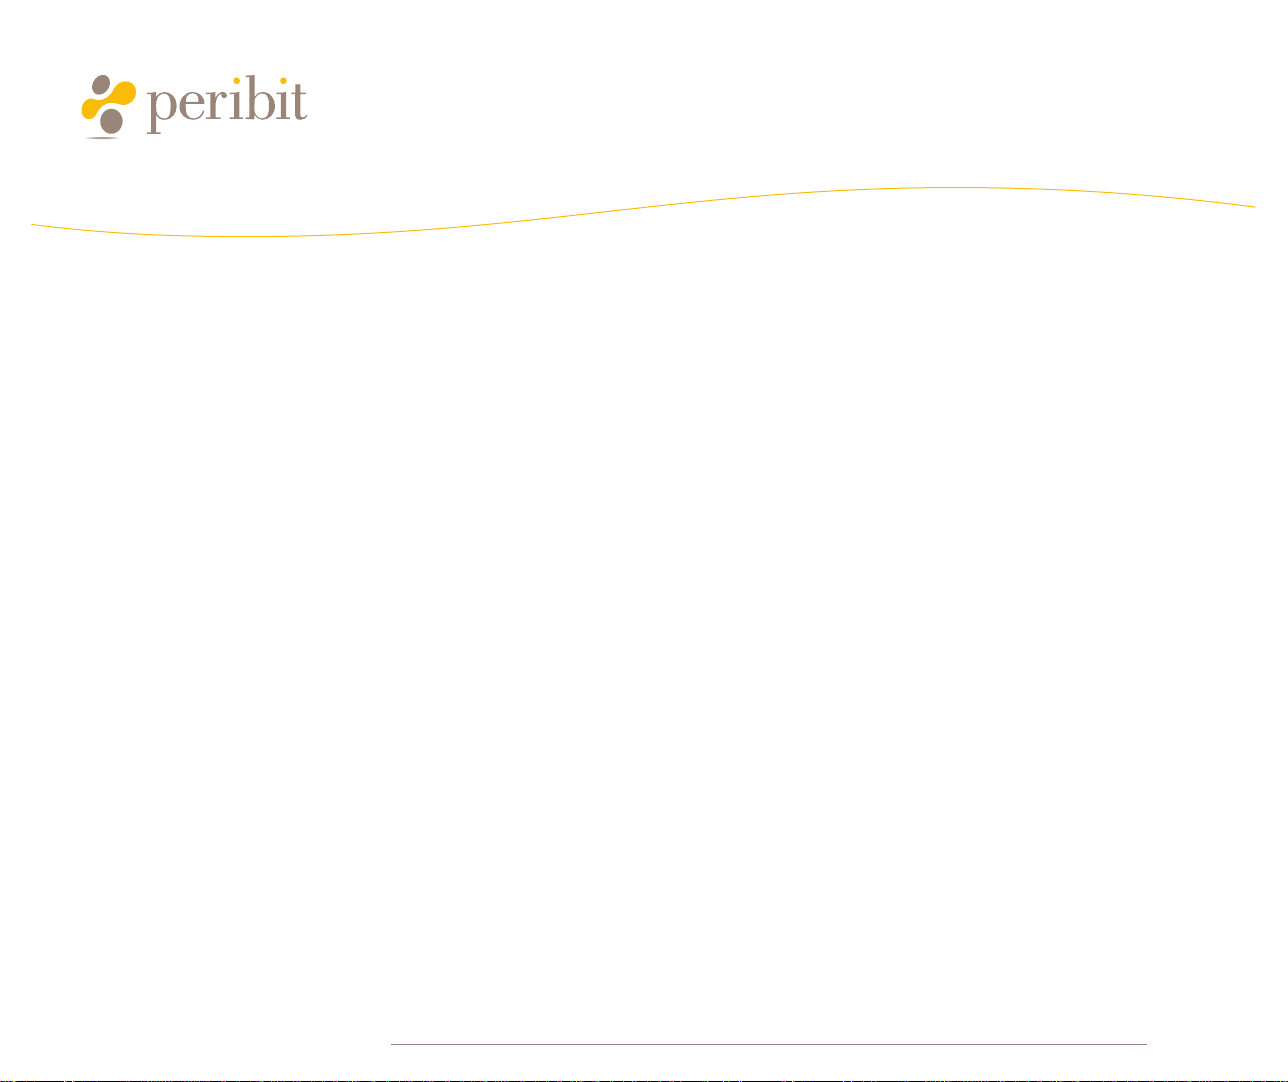
➌Prüfen Sie die Verbindung zwischen den Geräten zu beiden Seiten des SR-80/SR-100.
Ein Verfahren zum Testen der Verbindung zwischen den Geräten besteht im Senden eines Pingsignals von einem Host auf
der lokalen Seite des SR-80/SR-100 an einen Host auf der Remoteseite des SR-80/SR-100.
HINWEIS: Fahren Sie mit dem nächsten Schritt erst fort, wenn Sie die Verbindung auf beiden Seiten des SR-80/SR-100
überprüft haben. Stellen Sie sicher, dass die richtigen Kabel verwendet werden (gekreuztes- bzw. gerades Patchkabel),
und überprüfen Sie die Netzwerkverbindungen, bevor Sie den Sequence Reducer an das Stromnetz anschließen.
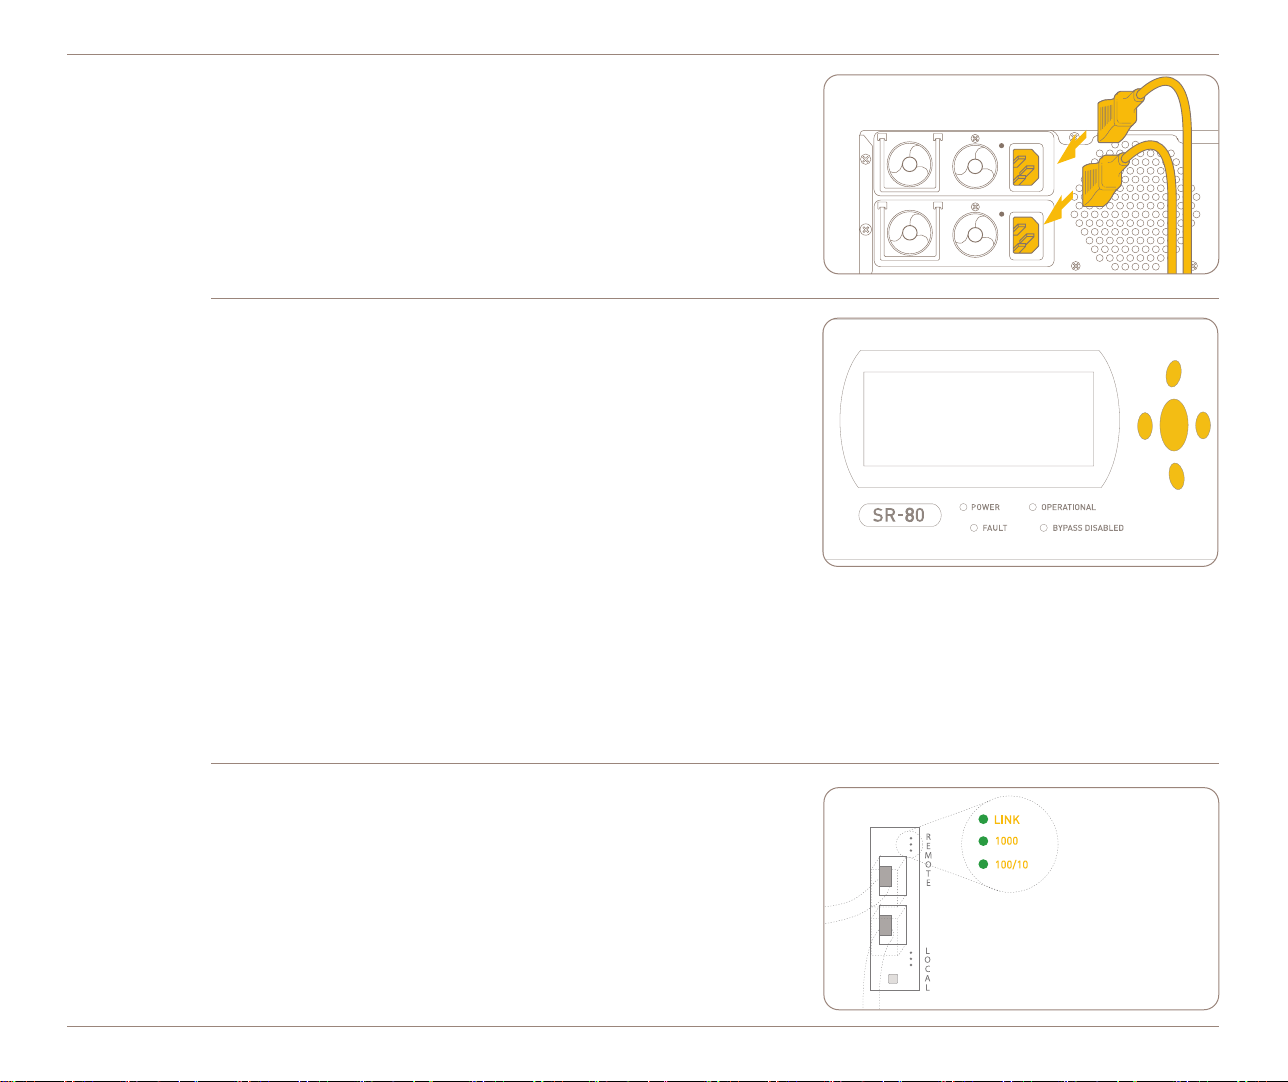
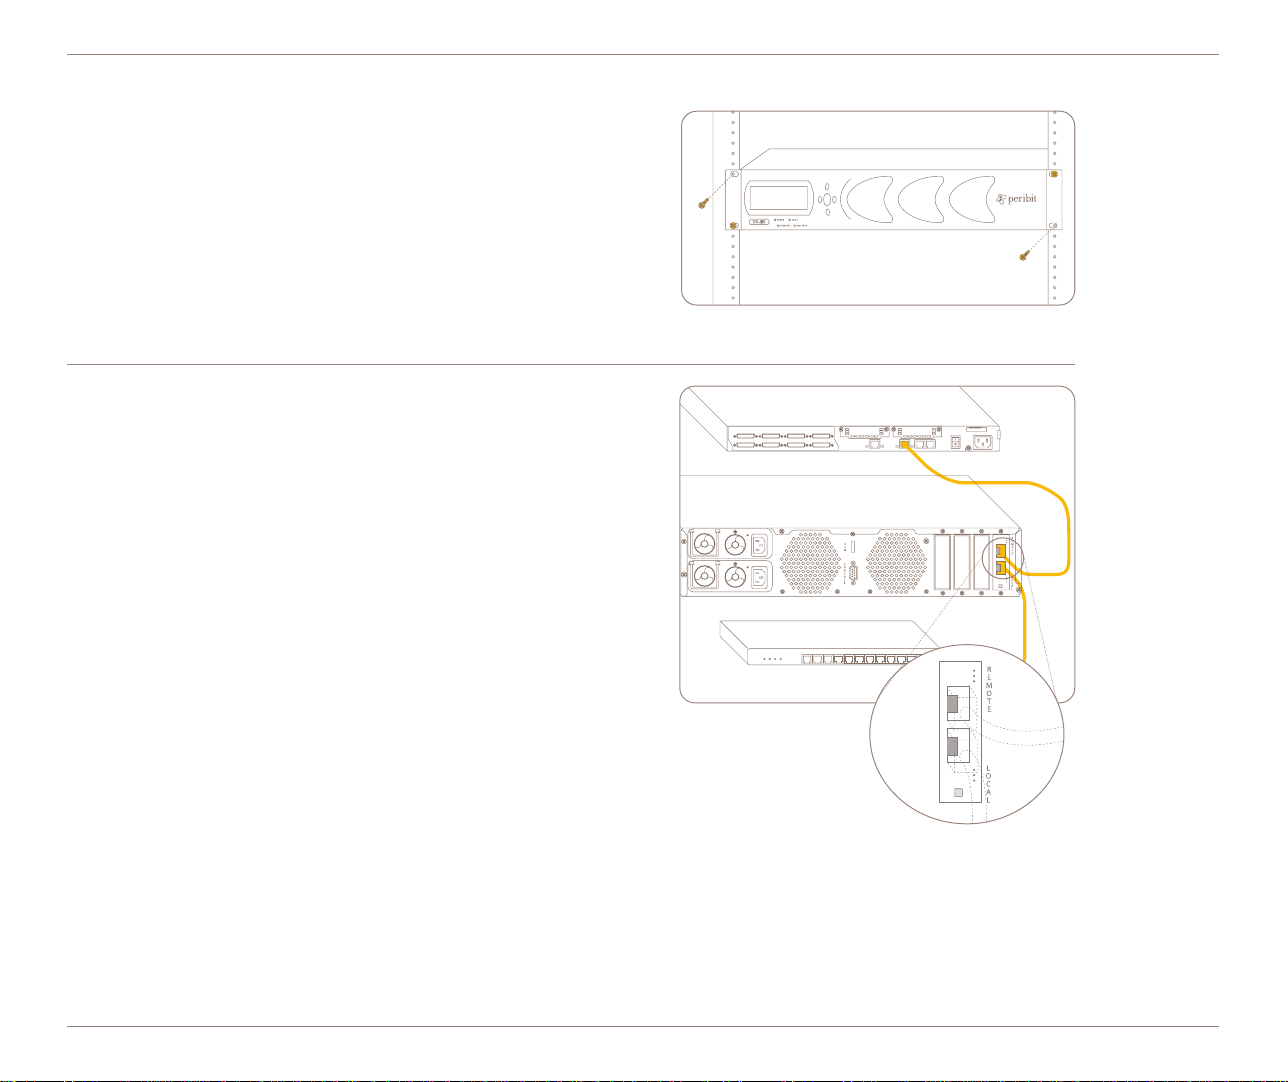
➍Schließen Sie den Strom an.
Der Sequence Reducer SR-80/SR-100 verfügt über doppelt ausgelegte
Hotswap-Netzteile, die im laufenden Betrieb entfernt werden können.
Schließen Sie das Netzkabel an beide Netzteile auf der
Gehäuserückseite des SR-80/SR-100 an, und schließen Sie dann das
andere Ende des Netzkabels an die Stromquelle vor Ort an.
HINWEIS: Der Stromverbrauch des Sequence Reducers liegt bei
250 Watt Maximum bzw. 850 BTU/h.
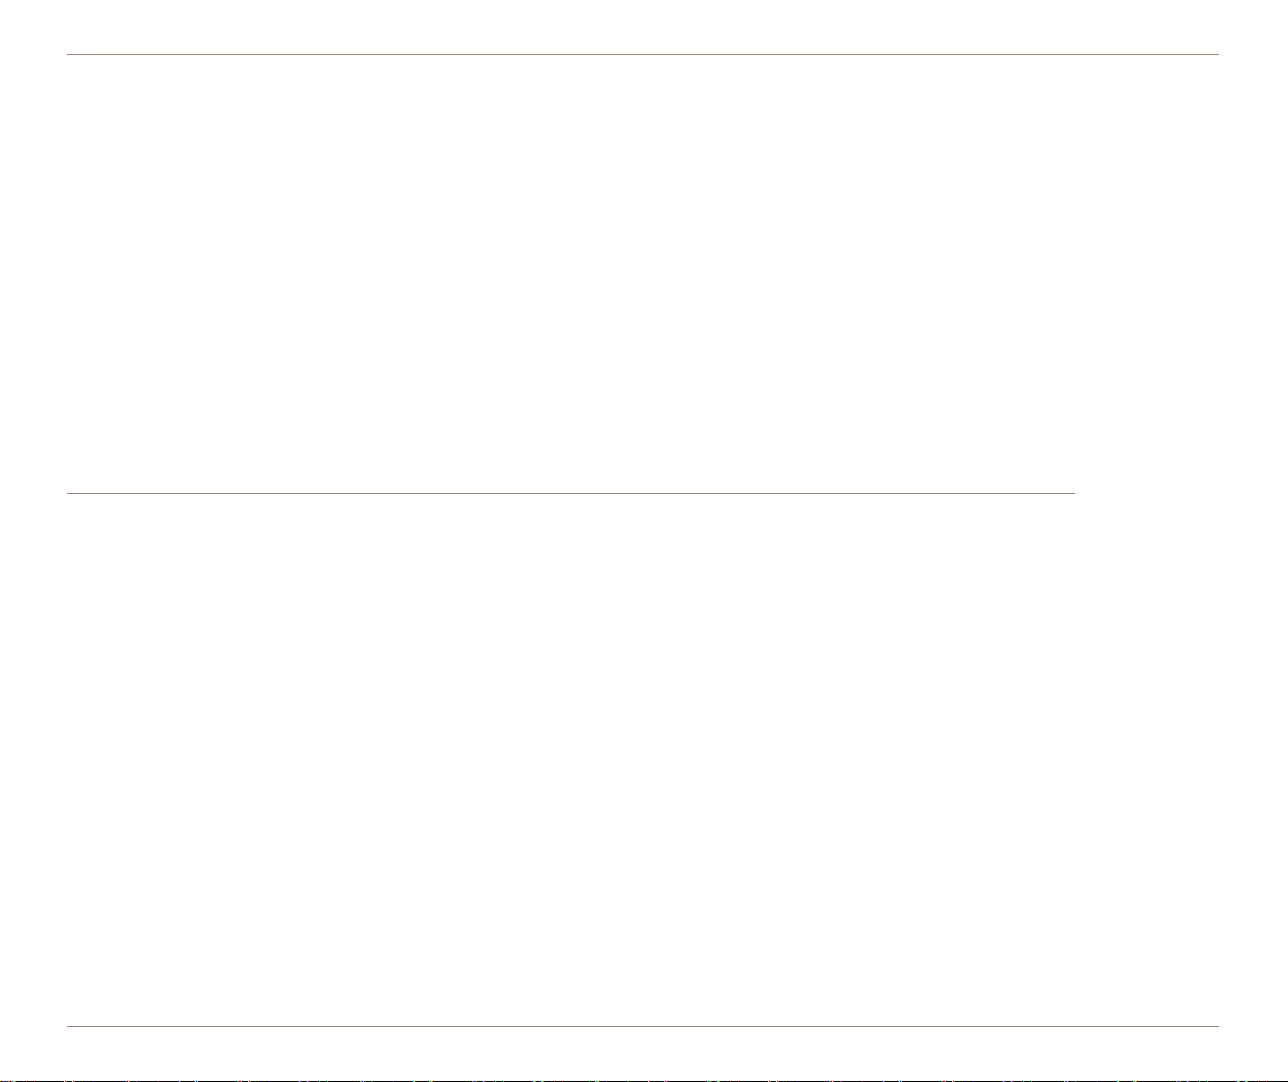
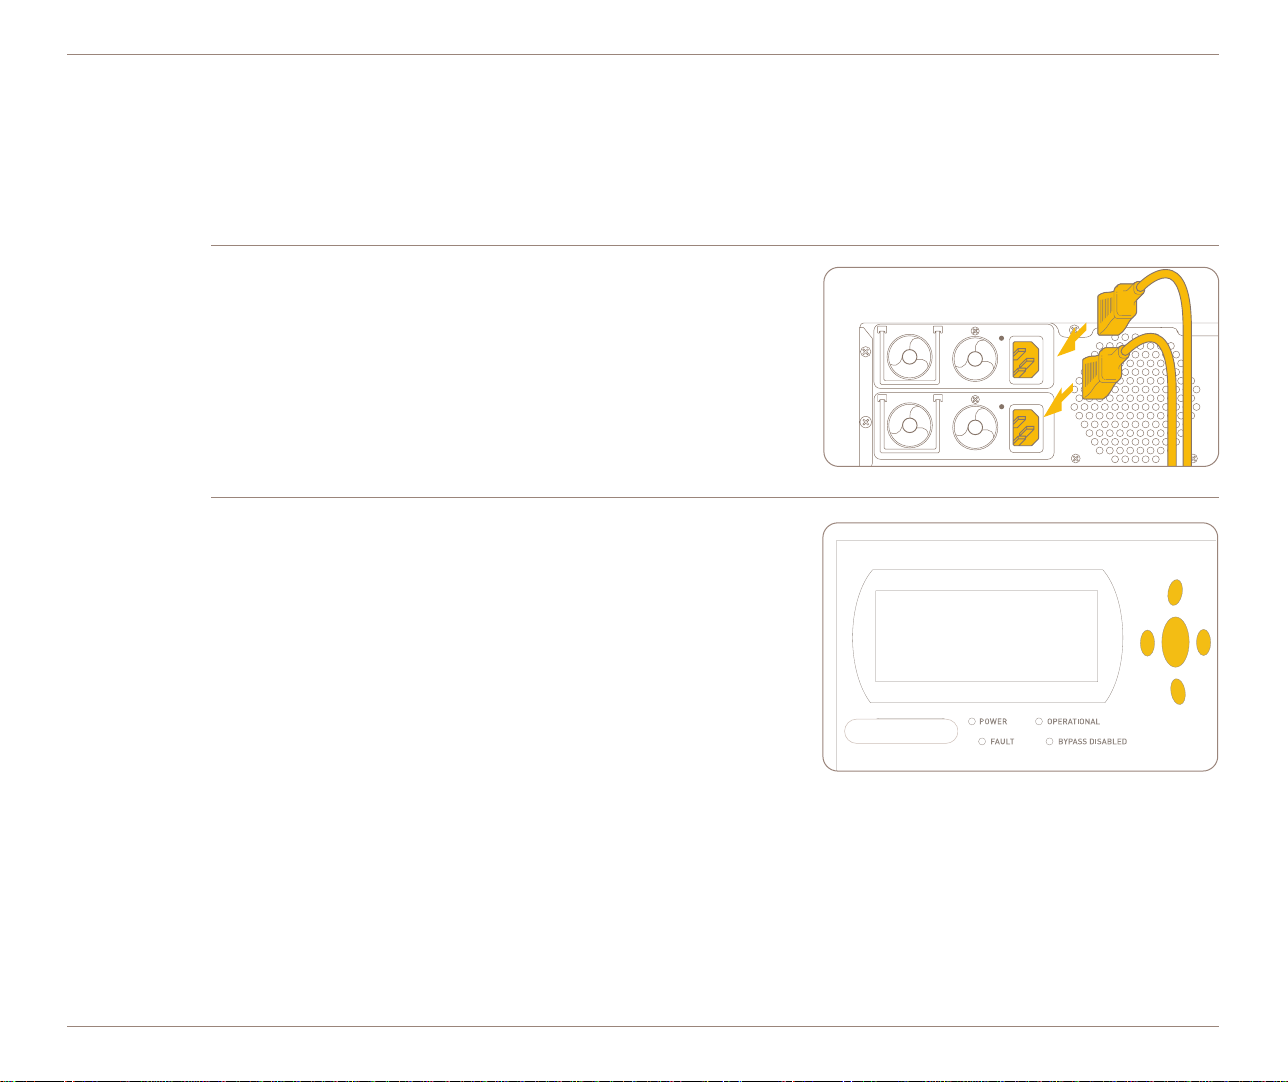
➎Konfigurieren Sie die Netzwerkeinstellungen des SR-80/SR-100.
Verwenden Sie die Tastatur und die LCD-Anzeige des Bedienungsfelds
zum Zuweisen einer IP-Adresse, der Subnetzmaske und des
Standardgateways für den SR-80/SR-100 wie folgt:
5•Drücken Sie zum Starten der Konfiguration dreimal „Enter“
(mittlere Taste).
5•Verwenden Sie die Tasten mit dem Pfeil nach oben bzw. nach unten,
um eine Zahl (0-9) auszuwählen.
5•Verwenden Sie die Tasten mit dem Pfeil nach rechts bzw. nach links,
um zum vorhergehenden bzw. nächsten Zeichen zu wechseln.
5•Mit der Taste „Enter“ (Mitte) übernehmen Sie eine Auswahl.
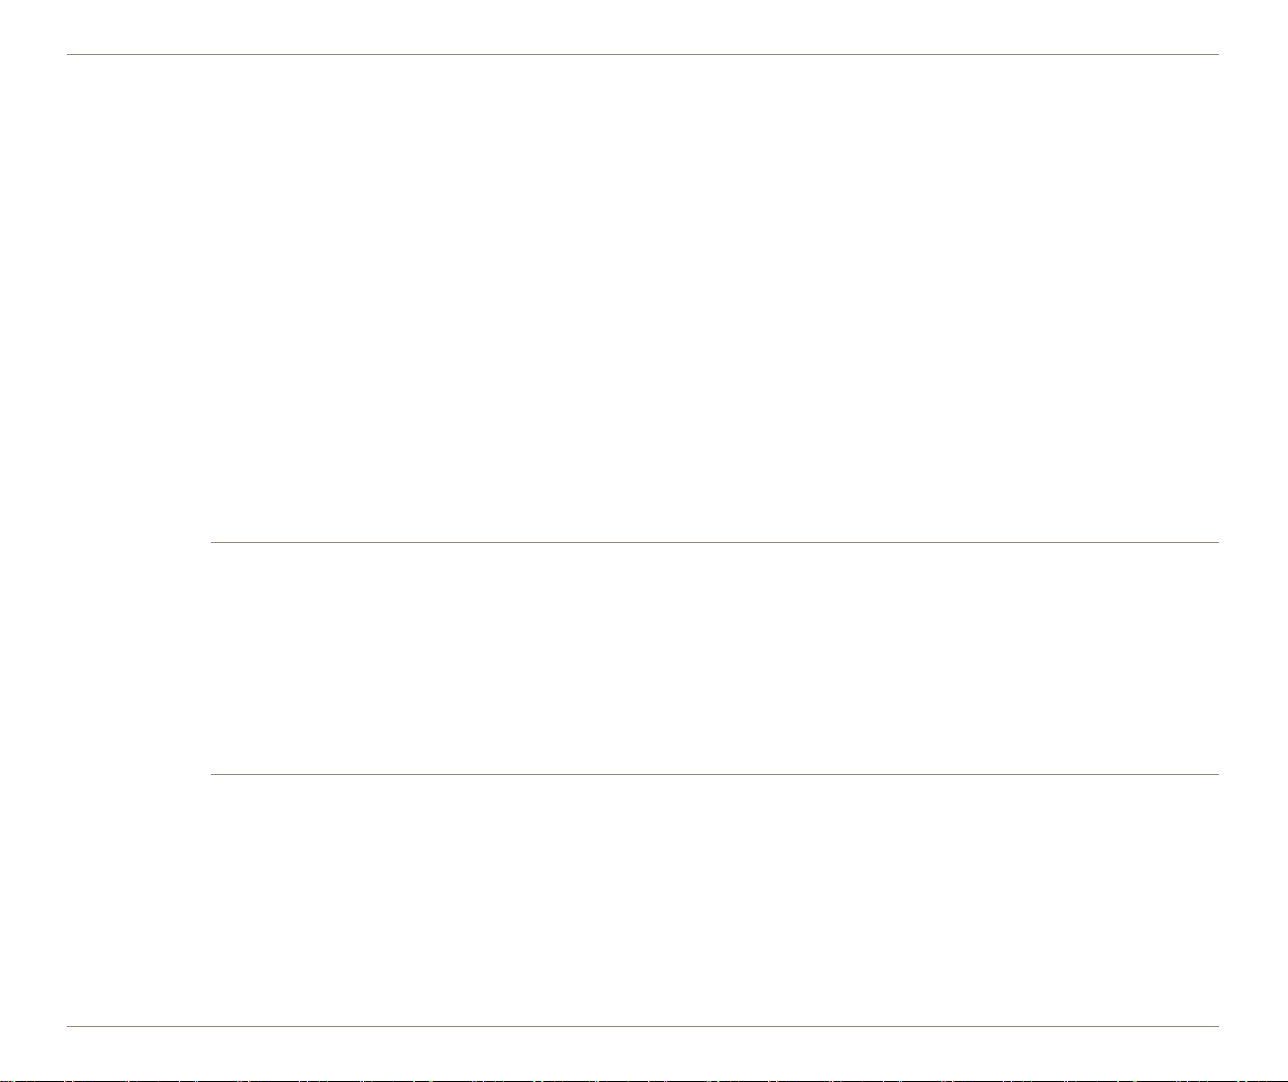
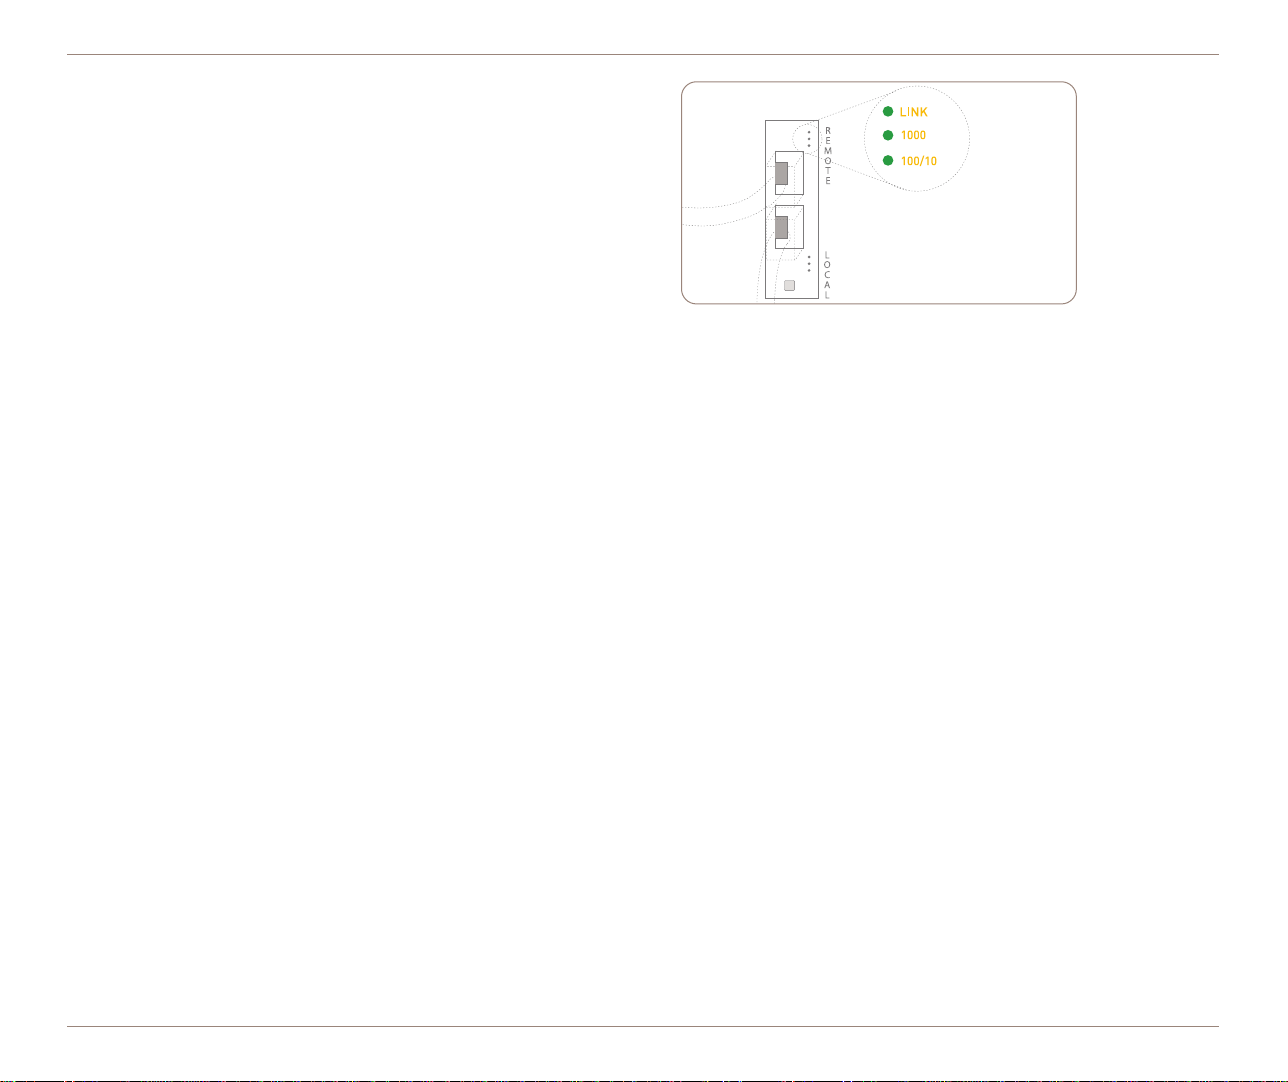
HINWEIS: Als Standard sind die Schnittstellen des Sequence Reducers für eine automatische Aushandlung eingerichtet. Je
nach Schnittstelleneinstellungen des Switchs und des Routers (automatische Aushandlung oder 1000/Full) wird jedoch
empfohlen, die Schnittstellengeschwindigkeit für den Sequence Reducer mithilfe des Bedienungsfelds festzulegen. Die
Einstellungen des Ports LOCAL des Sequence Reducers müssen den Schnittstelleneinstellungen des Switchs entsprechen,
und die Einstellungen des Ports REMOTE müssen den Schnittstelleneinstellungen des Routers entsprechen. Darüber
hinaus wird empfohlen, für LOCAL und REMOTE die gleichen Schnittstelleneinstellungen zu verwenden.
Nachdem Sie die Netzwerkeinstellungen für den SR-80/SR-100 eingegeben haben, wählen Sie Save aus, um die
Gerätekonfiguration zu speichern.
10.10.255.20
255.255.255.0
10.10.255.1
IP Address:
Subnet Mask:
Gateway:
SR-80/SR-100 KURZANLEITUNG
SR-80/SR-100
sr80c_qs_9x75_EFDJ.qxd 6/22/2004 5:50 PM Page 9

➏Überprüfen Sie die LEDs an den 10/100/1000-Ethernet-Ports.
5•Die LEDs LINK zeigen an, dass das Gerät ordnungsgemäß
angeschlossen ist.
5•Die LEDs 1000 zeigen an, dass das Gerät bei 1000 Mbps
betrieben wird.
5•Die LEDs 100/10 zeigen an, dass das Gerät bei 100 Mbps
betrieben wird.
5•Wenn weder die LEDs 1000 noch 100/10 leuchten, wird das
Gerät bei 10 Mbps betrieben.
Nach dem Überprüfen der LEDs sollten Sie erneut die Verbindung zwischen den Geräten zu beiden Seiten des
SR-80/SR-100 sicher stellen (wie in Schritt 3 beschrieben).
SR-80/SR-100 KURZANLEITUNG
sr80c_qs_9x75_EFDJ.qxd 6/22/2004 5:50 PM Page 10

Schnellkonfiguration:
Nach dem Einschalten des Peribit Sequence Reducers und dem Zuweisen von IP-Parametern besteht der nächste Schritt im
Anmelden an der SRS-Webkonsole und dem Ausführen des Schnellkonfigurationsprogramms. Wenn Sie sich zum ersten Mal
an der Webkonsole anmelden, wird automatisch das Schnellkonfigurationsprogramm gestartet, das Sie durch die Optionen
für die Erstkonfiguration des Geräts führt.
Sie können sich von jeder beliebigen Workstation im Netzwerk aus an der Webkonsole anmelden. Die Webkonsole
unterstützt Microsoft Internet Explorer, Version 5.5 und 6.0. Die sichere Datenübertragung erfolgt über HTTPS.
Führen Sie die folgenden Schritte aus, um sich an der Webkonsole anzumelden und die Schnellkonfiguration auszuführen:
➊Starten Sie auf einer Workstation im Netzwerk den Webbrowser, und geben Sie den folgenden URL ein:
https://(IP-Adresse des Sequence Reducers)
5•Je nach Browsereinstellungen wird nun möglicherweise das Dialogfeld „Sicherheitshinweis“ angezeigt. Klicken Sie zum
Fortfahren auf Ja.
5•Geben Sie im Dialogfeld „Netzwerkkennwort eingeben“ als Benutzernamen admin und als Kennwort peribit ein.
HINWEIS: Dieses Kennwort wurde werksseitig für das Gerät festgelegt. Im Verlauf der Schnellkonfiguration werden zum
Ändern des Standardkennworts aufgefordert.
➋Wählen Sie einen Betriebsmodus aus.
Ein Peribit Sequence Reducer kann für den Betrieb im Inlinemodus oder im Profilmodus eingerichtet werden.
•Inlinemodus — Aktive Betriebsart, in welcher der Sequence Reducer Datenreduktion durchführt, TCP-Anwendungen
beschleunigt und die Bandbreite verwaltet. Wählen Sie bei einer Inlineinstallation des Sequence Reducers (z. B. zwi-
schen einem Router und einem Switch) diese Betriebsoption aus.
•Profilmodus — Passive Betriebsart, in welcher der Sequence Reducer statistische Berechnungen über die potenzielle
Datenreduktion für den Gesamtdatenverkehr, für einzelne Anwendungen und bestimmte Remotesubnetze durchführt.
Der eigentliche Datenverkehr wird nicht beeinflusst.
HINWEIS: Um den Profilmodus verwenden zu können, muss die lokale Schnittstelle des Sequence Reducers an einem
gespiegelten Port am Switch angeschlossen sein, und die Remoteschnittstelle muss getrennt werden. Wählen Sie bei einer
Inlineinstallation des Sequence Reducers den Profilmodus nicht aus, da andernfalls Datenverluste durch den Sequence
Reducer die Folge sind.
Weitere Informationen über das Einrichten und Verwenden eines Sequence Reducers im Profilmodus finden Sie im
„SRS 4.0 Operator’s Guide“ unter „Peribit Profile Mode“.
•Klicken Sie zum Fortfahren auf Next.
SR-80/SR-100 KURZANLEITUNG
sr80c_qs_9x75_EFDJ.qxd 6/22/2004 5:50 PM Page 11

➌Richten Sie den Registrierungsserver ein.
In einer Peribit-Community muss ein Sequence Reducer als Registrierungsserver bestimmt werden.
•Um das aktuelle Gerät als Registrierungsserver zu bestimmen, wählen Sie die entsprechende Option
aus, und geben Sie ein Kennwort für den Registrierungsserver in die dafür vorgesehenen Felder ein.
Anhand des Kennworts für den Registrierungsserver werden die Sequence Reducer in einer Peribit-Community
authentifiziert. Dieses Kennwort sollte nicht mit dem Administratorkennwort für die Sequence Reducer identisch sein.
Beim Einrichten weiterer Sequence Reducer geben Sie bei jedem Gerät IP-Adresse und Kennwort für den
Registrierungsserver an.
•Wenn der aktuelle Sequence Reducer nicht der Registrierungsserver ist, geben Sie die IP-Adresse des aktuellen (oder
geplanten) Registrierungsservers sowie das Kennwort für den Registrierungsserver in das vorgesehene Feld ein.
Wenn es sich bei dem aktuellen Gerät nicht um den Registrierungsserver handelt und Sie noch keinen
Registrierungsserver für die Peribit-Community konfiguriert haben, geben Sie die IP-Adresse des Sequence Reducers
ein, der als Registrierungsserver dienen wird, sowie das ausgewählte Kennwort für den Registrierungsserver. Beachten
Sie, dass der Sequence Reducer erst Daten verarbeitet, nachdem ein Registrierungsserver konfiguriert wurde.
•Außerdem können Sie die Bildung von Reduktionstunnels zu anderen Sequence Reducern in der Peribit-Community
hinauszögern. Wenn Sie diese Option auswählen, findet so lange keine Datenreduktion oder -assemblierung von anderen
Peribit Sequence Reducern statt, bis Sie auf der Seite „Endpoints“ in der SRS-Webkonsole die Bildung von
Reduktionstunneln aktivieren.
•Klicken Sie zum Fortfahren auf Next.
➍Stellen Sie die Uhrzeit ein.
•Auf der Seite mit den Uhrzeiteinstellungen wird die Lokalzeit des Sequence Reducers angezeigt. Wenn die
Zeiteinstellungen nicht korrekt sind, geben Sie aktuelle Zeit, Datum und lokale Zeitzone für den Sequence Reducer ein.
Aktivieren Sie bei Sommerzeit ggf. das Kontrollkästchen Daylight Savings.
HINWEIS: Wenn im Netzwerk für Zeiteinstellungen der Geräte ein NTP-Server verwendet wird, können Sie den Sequence
Reducer im Anschluss an die Schnellkonfiguration so konfigurieren, dass er den NTP-Server verwendet. Weitere
Informationen finden Sie im
Sequence Reducer Operator’s Guide
.
•Klicken Sie zum Fortfahren auf Next.
SR-80/SR-100 KURZANLEITUNG
sr80c_qs_9x75_EFDJ.qxd 6/22/2004 5:50 PM Page 12

➎Geben Sie die Topologie an.
Beim Erstellen einer Peribit-Community können Sie die Topologieeinstellung auswählen, die Ihrem Netzwerk am genauesten
entspricht. Die Topologieeinstellung stellt sicher, dass die Ressourcen eines Sequence Reducers effizient für die Reduktion
und Assemblierung von Daten zwischen Geräten verwendet werden.
•Wählen Sie die Topologieeinstellung aus, die Ihrem Netzwerk am genauesten entspricht, sowie die Position des
Sequence Reducers im Verhältnis zum Netzwerk (Hub/Nabe, Spoke/Speiche oder Mesh/Masche). Wählen Sie bei den
Optionen für Hub oder Spoke einen Bereich für die Anzahl an Sequence Reducern in der Peribit-Community aus.
•Klicken Sie zum Fortfahren auf Next.
➏ Aktivieren Sie die Bekanntmachung des lokalen Subnetzes.
Als Standard wird das lokale Subnetz eines Sequence Reducers den anderen Sequence Reducern in der Peribit-Community
nicht bekannt gemacht. Folglich findet keine Reduktion von Daten statt, die für dieses Subnetz bestimmt sind — selbst dann,
wenn sich im Pfad ein Sequence Reducer befindet.
•Wenn die für das aktuelle Subnetz bestimmten Daten von anderen Sequence Reducern reduziert werden sollen,
aktivieren Sie das Kontrollkästchen Advertise.
Wenn Sie die Bekanntmachung des lokalen Subnetzes für den aktuellen Sequence Reducer nicht aktivieren, sollten Sie im
Anschluss an die Schnellkonfiguration die Seite „Reduction Subnets“ in der SRS-Webkonsole überprüfen.
•Im Feld „Device name“ können Sie dem Sequence Reducer einen Namen zuweisen.
•Klicken Sie zum Fortfahren auf Next.
SR-80/SR-100 KURZANLEITUNG
sr80c_qs_9x75_EFDJ.qxd 6/22/2004 5:50 PM Page 13

❼Geben Sie einen Lizenzschlüssel ein.
Für den Betrieb jedes Peribit Sequence Reducers ist jeweils ein eigener Lizenzschlüssel erforderlich. Beim Einschalten des
Sequence Reducers versucht dieser, die eindeutige Seriennummer zu erkennen. Wenn die Seriennummer nicht automatisch
erkannt wird, können Sie diese von der Geräterückseite ablesen und von Hand in das Feld „Serial Number“ eingeben.
Wenn Sie den SR-80/SR-100 erworben haben und über die Seriennummer verfügen, können Sie über den Online License
Service von Peribit einen Lizenzschlüssel ohne zeitliche Beschränkung für das Gerät beziehen. Klicken Sie auf Online
Service, um auf den Lizenzschlüsselserver zuzugreifen, oder rufen Sie Peribit Support unter +49.89.453.610.55 (oder
+1.408.330.5600) an.
•Geben Sie den Lizenzschlüssel für den Sequence Reducer im Feld „License key“ ein.
•Klicken Sie zum Fortfahren auf Next.
❽Ändern Sie das Administratorkennwort.
•Geben Sie in den Feldern „New password“ und „Verify new password“ ein neues Administratorkennwort ein, und klicken
Sie auf Finish.
HINWEIS: Wenn Sie die Option zum automatischen Speichern deaktivieren, werden die Konfigurationseinstellungen
zurückgesetzt, sobald der Sequence Reducer aus- und wieder eingeschaltet wird.
Nächste Schritte:
Die Erstkonfiguration ist abgeschlossen, und Sie können nun mit der Konfiguration der Policy-Einstellungen für den
Sequence Reducer fortfahren. Weitere Informationen finden Sie im
Sequence Reducer Operator’s Guide
auf der Peribit
Documentation/Utilities CD. Weitere Informationen zur Produktunterstützung erhalten Sie auf der Peribit-Website unter
http://www.peribit.com/support.
SR-80/SR-100 KURZANLEITUNG
sr80c_qs_9x75_EFDJ.qxd 6/22/2004 5:50 PM Page 14

SR-80/SR-100 - DÉMARRAGE RAPIDE
Interfaces Ethernet 10/100/1000 BaseT
Bienvenue dans le Sequence Reducer Peribit SR-80/SR-100. Ce périphérique d’infrastructure
réseau, qui comporte des interfaces Ethernet 10/100/1000 BaseT, se présente sous la forme d’un
boîtier d’une hauteur égale à 2U et se déploie du côté LAN du routeur d’accès. À l’aide de cette carte
de démarrage rapide, le SR-80/SR-100 peut être installé et opérationnel en quelques minutes.
Peribit Networks France
EURL Les Bureaux de Sèvres
2 rue Troyon
92316 Sèvres Cedex
France
+33 (0)1 41 14 83 33
1.408.330.5600
www.peribit.fr
Avant de commencer :
•Identifiez les composants contenus dans l’emballage. Reportez-vous au
document relatif au contenu de l’emballage fourni avec le produit.
•Veillez à ce que la puissance électrique disponible soit suffisante. Les
circuits d’alimentation doivent être protégés par un coupe-circuit de 20 A
au maximum.
•Veillez à laisser un espace d’au moins 15 cm devant et derrière le
châssis.
•Réservez de l'espace sur le rack pour connecter les périphériques
clients Peribit au SR-100.
•Si votre architecture réseau restreint certains ports du canal de
communication entre les Sequence Reducers Peribit, veillez à ce que les
ports 3577 et 3578 soient ouverts pour la transmission de données TCP
et UDP.
•Identifiez un port LAN Ethernet 10/100/1000 BaseT pour le SR-80/
SR-100 afin qu’il transmette les données vers votre routeur WAN.
Ce port se trouve généralement sur un commutateur d’agrégation ou
sur un autre périphérique LAN connecté directement au routeur.
•Procurez-vous une clé de licence pour le Sequence Reducer. La clé de
licence détermine les niveaux de débit pour le périphérique et assure un
enregistrement en bonne et due forme du produit auprès de Peribit
Networks. Pour obtenir une clé de licence permanente, visitez le site
Web à l’adresse suivante : http://license.peribit.com.
sr80c_qs_9x75_EFDJ.qxd 6/22/2004 5:50 PM Page 15

Installation :
➊Installez le châssis.
•Pour réaliser une installation en rack, installez les supports fournis
sur les côtés du périphérique, en plaçant le panneau avant vers
l’avant.
•Pour réaliser une installation sur un plateau, installez les pieds en
caoutchouc fournis dans les renfoncements situés sous le châssis.
REMARQUE : Ne connectez pas le câble d’alimentation au SR-80/SR-100
avant l’étape 4.
➋Connectez les câbles réseau.
Pour connecter les câbles réseau :
•Identifiez le câble assurant la connexion entre le commutateur (ou
un autre périphérique d’agrégation) et le routeur.
•Déconnectez ce câble du port du routeur et branchez-le sur le port
LOCAL du Sequence Reducer.
•À l’aide d’un câble droit (non fourni), connectez l’une des extrémités
au port DISTANT (REMOTE) du Sequence Reducer et l’autre
extrémité au port du routeur.
SR-80/SR-100 - DÉMARRAGE RAPIDE
SR-80/SR-100
Routeur (périphérique distant)
Commutateur (périphérique local)
sr80c_qs_9x75_EFDJ.qxd 6/22/2004 5:50 PM Page 16

➌Vérifiez la connectivité entre les périphériques des deux côtés du SR-80/SR-100.
Il existe une méthode pour tester la connectivité entre les périphériques. Elle consiste à exéctuer une commande ping sur un
hôte du côté distant du SR-80/SR-100 à partir d’un hôte du côté local du SR-80/SR-100.
REMARQUE : Si vous ne parvenez pas à vérifier la connectivité des deux côtés du SR-80/SR-100, ne passez pas à l’étape
suivante. Vérifiez que vous utilisez les câbles appropriés (câble croisé ou câble droit) et vérifiez la connectivité du réseau
avant de mettre le Sequence Reducer sous tension.
➍Branchez le câble d’alimentation.
Le Sequence Reducer SR-80/SR-100 possède deux prises d’alimentation
remplaçables à chaud, qui peuvent être débranchées au cours du
fonctionnement du Sequence Reducer.
Connectez un câble d’alimentation à chacune des prises d’alimentation à
l’arrière du châssis du SR-80/SR-100, puis connectez l’autre extrémité
des câbles à une prise secteur.
REMARQUE : La puissance électrique du Sequence Reducer est de 250
watts au maximum.
SR-80/SR-100 - DÉMARRAGE RAPIDE
sr80c_qs_9x75_EFDJ.qxd 6/22/2004 5:50 PM Page 17

➎Configurez les paramètres réseau du SR-80/SR-100.
Utilisez le pavé numérique et l’écran LCD situés sur le panneau avant
pour attribuer au SR-80/SR-100 une adresse IP, un masque de sous-
réseau et une passerelle par défaut, comme indiqué ci-dessous :
5•Appuyez trois fois sur Enter (bouton du centre) pour démarrer
la configuration.
5•Utilisez les flèches vers le haut et vers le bas pour
afficher un chiffre (entre 0 et 9).
5•Utilisez les flèches vers la gauche ou vers la droite pour
passer au caractère suivant ou précédent.
5•Utilisez le bouton Enter (bouton du centre) pour effectuer une
sélection.
REMARQUE : Par défaut, les interfaces du Sequence Reducer sont configurées en mode autodetect. Toutefois, en fonction
des paramètres d’interface du commutateur et du routeur (auto-negotiate ou 1000/Full), il est recommandé d’utiliser le
panneau avant pour définir la vitesse de l’interface du Sequence Reducer. Les paramètres du port LOCAL du Sequence
Reducer doivent correspondre aux paramètres d’interface du commutateur et les paramètres du port REMOTE doivent
correspondre aux paramètres d’interface du routeur. Il est également recommandé d’utiliser des paramètres identiques
pour les interfaces LOCALE et DISTANTE (REMOTE) du Sequence Reducer.
Après avoir configuré les paramètres réseau du SR-80/SR-100, sélectionnez Save pour enregistrer la configuration du
périphérique.
➏Consultez les diodes situées à proximité des ports Ethernet
10/100/1000.
5•Les diodes LINK indiquent que le périphérique est correctement
connecté.
5•Les diodes 1000 indiquent que le périphérique fonctionne avec un
débit de 1000 Mbps.
5•Les diodes 100/10 indiquent que le périphérique fonctionne avec un
débit de 100 Mbps.
5•Si les diodes 1000 et 100/10 ne s’allument pas, le périphérique
fonctionne avec un débit de 10 Mbps.
Après avoir vérifié les diodes, vous devez de nouveau vérifier la connectivité entre les périphériques des deux côtés du
SR-80/SR-100 (comme décrit à l’étape 3).
SR-80/SR-100 - DÉMARRAGE RAPIDE
10.10.255.20
255.255.255.0
10.10.255.1
IP Address:
Subnet Mask:
Gateway:
SR-80/SR-100
sr80c_qs_9x75_EFDJ.qxd 6/22/2004 5:50 PM Page 18

SR-80/SR-100 - DÉMARRAGE RAPIDE
Configuration rapide :
Àprès avoir mis le Sequence Reducer Peribit sous tension et avoir défini les paramètres IP, l’étape suivante consiste à vous
connecter à la console Web SRS et à exécuter le programme de configuration rapide. La première fois que vous vous
connectez à la console Web, le programme de configuration rapide est lancé automatiquement et vous guide à travers les
options de configuration initiale pour le périphérique.
Vous pouvez vous connecter à la console Web à partir de tout poste de travail de votre réseau. La console Web prend en
charge Microsoft Internet Explorer 5.5 et 6.0. Les données sont transmises de manière sécurisée grâce au protocole HTTPS.
Pour vous connecter à la console Web et exécuter le programme de configuration rapide, procédez comme suit :
➊À partir d’un poste de travail de votre réseau, lancez un navigateur Web et saisissez l’URL suivante :
https://(adresse IP du Sequence Reducer)
5•Selon les paramètres de votre navigateur, la boîte de dialogue Security Alert peut s’afficher. Cliquez sur Yes pour
continuer.
5•Dans la boîte de dialogue Enter Network Password, saisissez admin comme nom d’utilisateur et peribit comme mot
de passe.
REMARQUE : Il s’agit d’un mot de passe configuré en usine pour le périphérique. Vous serez invité à modifier le mot de
passe par défaut lors de la configuration rapide.
➋Sélectionnez un mode de fonctionnement.
Un Sequence Reducer Peribit peut être configuré pour fonctionner en mode Inline ou en mode Profile.
•Mode Inline — Fonctionnement actif dans lequel le Sequence Reducer compresse les données, accélère les applications
TCP et gère la bande passante. Si vous avez installé le Sequence Reducer en ligne (c’est-à-dire entre un routeur et un
commutateur), sélectionnez cette option de fonctionnement.
•Mode Profile — Fonctionnement passif dans lequel le Sequence Reducer peut calculer des statistiques relatives à la
réduction potentielle des données pour l’ensemble du trafic, des applications individuelles et des sous-réseaux distants
spécifiques. Le trafic réel n’est pas affecté.
REMARQUE : Pour fonctionner en mode Profile, l’interface locale du Sequence Reducer doit être connectée à un port miroir
sur le commutateur, et l’interface distante doit être déconnectée. Si vous avez installé le Sequence Reducer en ligne, ne
sélectionnez pas le mode Profile, car le Sequence Reducer effacera les données.
Pour plus d’informations sur la configuration et l’utilisation d’un Sequence Reducer en mode Profile, reportez-vous à la
section « Peribit Profile Mode » du SRS 4.0 Operator’s Guide.
•Cliquez sur Next pour continuer.
sr80c_qs_9x75_EFDJ.qxd 6/22/2004 5:50 PM Page 19

➌Configurez le serveur d’administration.
Au sein d’une communauté Peribit, un Sequence Reducer doit être désigné en tant que serveur d’administration.
•Pour désigner ce périphérique en tant que serveur d’administration, sélectionnez l’option souhaitée et saisissez un mot
de passe de serveur d’administration dans les champs appropriés.
Le mot de passe du serveur d’administration permet d’authentifier les Sequence Reducers au sein d’une communauté
Peribit et doit être différent du mot de passe de l’administrateur du Sequence Reducer. Lorsque vous ajoutez des
Sequence Reducers, vous devez fournir à chaque périphérique l’adresse IP et le mot de passe du serveur
d’administration.
•Si ce Sequence Reducer n’est pas le serveur d’administration, saisissez l’adresse IP du serveur d’administration
actuel (ou futur), puis saisissez le mot de passe du serveur d’administration dans le champ approprié.
Si ce périphérique n’est pas le serveur d’administration et que vous n’avez pas encore configuré ce dernier pour la
communauté Peribit, saisissez l’adresse IP du Sequence Reducer qui sera défini comme serveur d’administration ainsi
que son mot de passe. Notez que le Sequence Reducer ne traitera pas les données tant qu’un serveur d’administration
n’aura pas été configuré.
•Vous pouvez également retarder la formation de tunnels de compression vers d’autres Sequence Reducers de la
communauté Peribit. Si vous sélectionnez cette option, le Sequence Reducer ne compressera pas ou n’assemblera pas
de données provenant d’autres Sequence Reducers Peribit tant que vous n’aurez pas activé la formation de tunnels de
compression sur la page Endpoints de la console Web SRS.
•Cliquez sur Next pour continuer.
➍Réglez l’heure.
•La page des paramètres d’heure affiche l’heure locale du Sequence Reducer. Si les paramètres d’heure sont incorrects,
saisissez l’heure et la date actuelles, ainsi que le fuseau horaire local pour le Sequence Reducer. Le cas échéant, activez
la case à cocher Daylight Savings.
REMARQUE : Si votre réseau utilise un serveur NTP pour gérer les paramètres de temps des périphériques, vous pouvez
configurer le Sequence Reducer de façon à ce qu’il utilise le serveur NTP une fois la configuration rapide effectuée. Pour
plus d’informations, reportez-vous au
Sequence Reducer Operator’s Guide
.
•Cliquez sur Next pour continuer.
SR-80/SR-100 - DÉMARRAGE RAPIDE
sr80c_qs_9x75_EFDJ.qxd 6/22/2004 5:50 PM Page 20
This manual suits for next models
1
Table of contents
Languages: