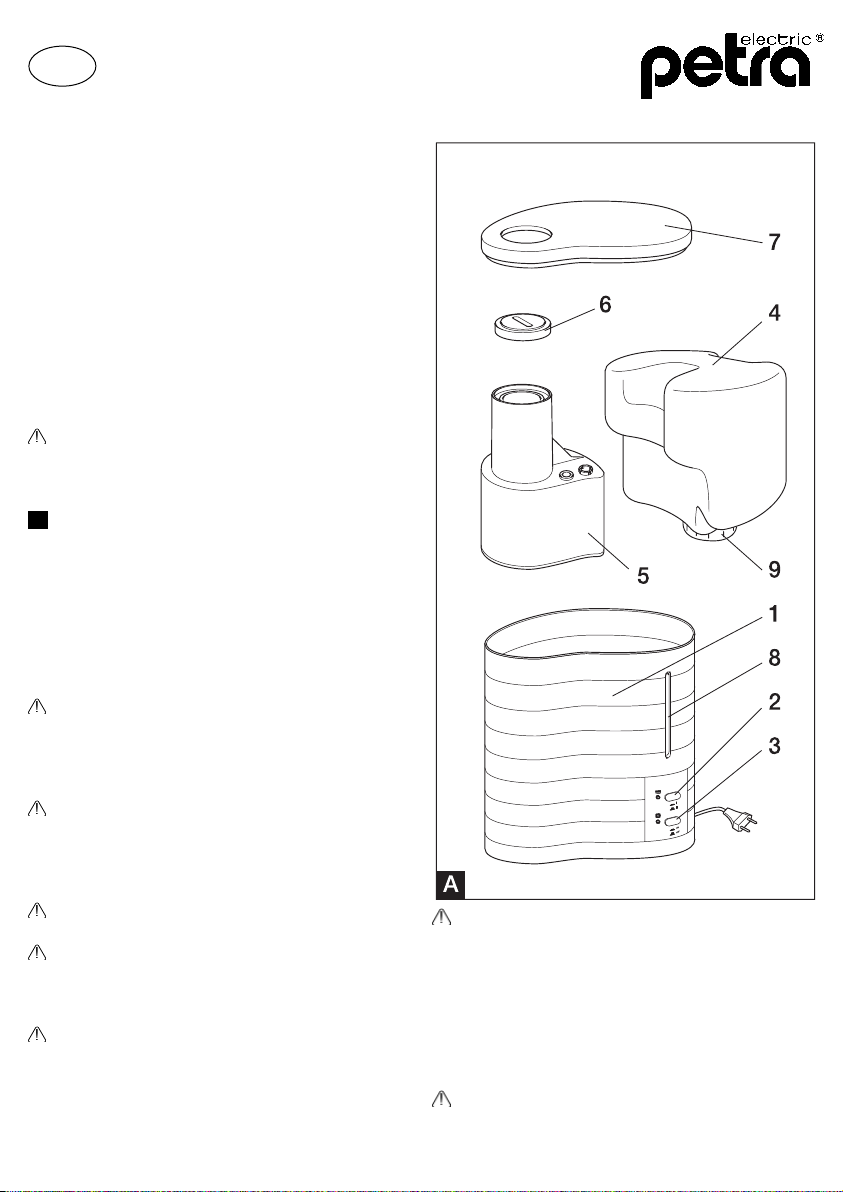
Petra electric LB 40 User manual

LuftBefeuchter LB 40
Gebrauchsanweisung
Instructions for use
Mode d’emploi
D
GB
F

2
Vor dem Benutzen
Der Luftbefeuchter LB 40 darf nur für den vorgesehe-
nen Zweck gemäß dieser Gebrauchsanweisung ver-
wendet werden. Lesen Sie die Gebrauchsanweisung
deshalb vor der Inbetriebnahme sorgfältig. Sie gibt
Anweisungen für den Gebrauch, die Reinigung und
die Pflege des Gerätes. Bei Nichtbeachtung überneh-
men wir keine Haftung für eventuelle Schäden.
Bewahren Sie die Gebrauchsanweisung sorgfältig auf
und geben Sie diese gemeinsam mit dem Gerät an
Nachbenutzer weiter. Beachten Sie auch die Garan-
tiehinweise am Ende.
Das Gerät ist nicht für den gewerblichen Gebrauch
bestimmt.
Das Warndreieck kennzeichnet alle für die Sicher-
heit wichtigen Anweisungen. Befolgen Sie diese
immer, andernfalls könnten Sie sich verletzen oder
das Gerät könnte beschädigt werden.
ABuchstaben verweisen auf Abbildungen.
(3) Zahlen in Klammern verweisen auf Einzelteile, die
in den Abbildungen benannt sind.
Die Originalverpackung ist speziell gestaltet, um im
Servicefall einen sicheren Transport zu gewährlei-
sten. Bewahren Sie deshalb die Verpackung zumin-
dest für den Garantiezeitraum auf.
Sicherheitshinweise
Der Luftbefeuchter LB 40 arbeitet mit heißem
Wasser und erreicht eine Temperatur bis circa 90°
C. Stellen Sie das Gerät daher aus Sicherheits-
gründen nie auf Möbel, sondern immer auf einen
wasserbeständigen Boden.
Obwohl das Gerät über eine sehr gute Standfe-
stigkeit verfügt, empfehlen wir Ihnen, es nicht in
unmittelbarer Nähe von Kleinkindern oder von
spielenden Kindern aufzustellen, Verbrennungs-
gefahr!
Fassen Sie nie direkt in den Dampfaustritt oder in
die Heißwasserkammer, Verbrennungsgefahr!
Das Gerät nie ohne Wassertank in Betrieb neh-
men. Lassen Sie das Gerät komplett abkühlen,
bevor Sie es entleeren oder seinen Standort ver-
ändern.
Das Gerät nur an Wechselstrom mit einer Span-
nung von 230 V / 50 Hz anschließen. Die Steck-
dose muss von autorisiertem Fachpersonal instal-
liert worden sein. Wir empfehlen, das Gerät über
FI-Schutzschalter max. 30 mA anzuschließen. Im
Zweifelsfalle fragen Sie eine Fachperson.
Das Gerät niemals mit beschädigtem Netzkabel
verwenden. Defekte Kabel und Stecker sofort
durch unseren zentralen Kundendienst oder eine
ähnlich qualifizierte Person ersetzen lassen. Netz-
kabel nicht über Ecken und scharfe Kanten ziehen
oder einklemmen. Das Kabel nicht über heiße
Gegenstände legen oder hängen sowie vor Öl
schützen. Den Stecker niemals am Netzkabel
oder mit nassen Händen aus der Steckdose ziehen.
Personen, die mit der Bedienungsanleitung nicht
vertraut sind, Kinder sowie Personen unter Alko-
Gebrauchsanweisung
D

3
hol-, Drogen- oder Medikamenteneinfluss dürfen
das Gerät nicht oder nur unter Aufsicht bedienen.
Dieses Gerät ist nicht dafür bestimmt, durch Per-
sonen (einschließlich Kinder) mit eingeschränkten
physischen, sensorischen oder geistigen Fähig-
keiten oder mangels Erfahrung und/oder mangels
Wissen benutzt zu werden, es sei denn, sie wer-
den durch eine für ihre Sicherheit zuständige Per-
son beaufsichtigt oder erhielten von ihr Anweisun-
gen, wie das Gerät zu benutzen ist.
Achten Sie darauf, dass Kinder keine Gelegenheit
erhalten, mit dem Gerät zu spielen.
Stellen Sie den Luftbefeuchter so auf, dass er all-
seitig frei steht. Er darf weder Wände noch Möbel
berühren. Richten Sie den Dampfaustritt niemals
direkt gegen Mauern. Achten Sie darauf, dass der
Apparat mindestens einen Meter vom nächsten
Heizkörper entfernt platziert ist, nie direkt durch die
Sonne beschienen wird und dass das Kabel nie
unter dem Gerät zu liegen kommt. Stellen Sie ihn
an einem standsicheren Ort auf. Das Gerät nicht
auf heiße Flächen oder in die Nähe von offenen
Flammen stellen. Brand- und Kurzschlussgefahr!
Vor dem Reinigen unbedingt den Netzstecker zie-
hen und Gerät komplett auskühlen lassen. Gerät
niemals ins Wasser tauchen. Nie scharfe oder
kratzende Gegenstände oder ätzende Chemikali-
en zur Reinigung verwenden.
Bei Störungen, defektem Gerät oder Verdacht auf
Defekt nach einem Sturz sofort den Netzstecker
ziehen. Niemals beschädigtes Gerät in Betrieb
nehmen. Reparaturen dürfen nur durch unseren
zentralen Kundendienst oder eine ähnlich qualifi-
zierte Person ausgeführt werden. Bei unfachge-
rechten Reparaturen wird keine Haftung für even-
tuelle Schäden übernommen.
Allgemeines zum Thema Luftbefeuchtung
Das Ziel der Luftbefeuchtung ist es, für eine, der
Raumtemperatur stets angepasste Luftfeuchtigkeit zu
sorgen, damit unser Wohlbefinden nicht gestört wird
und Einrichtungsgegenstände keine Trockenschäden
erleiden können. Als Regel gilt, bei einer Temperatur
von
18°C eine relative Feuchte von 50 %
20°C eine relative Feuchte von 45 %
22°C eine relative Feuchte von 40 %
zu halten. Diese Angaben sind Richtwerte und hän-
gen natürlich von verschiedenen Faktoren wie der
Bausubstanz, Isolation, Lüftung usw. ab. Ihre Raum-
feuchtigkeit können Sie mit einem Hygrometer messen.
Setzen Sie das Gerät gleich zu Beginn der Heizperi-
ode in Betrieb. Sie erreichen damit, dass die in den
Möbeln, Teppichen usw. vorhandene Feuchtigkeit
gleichmäßig erhalten bleibt. Wir empfehlen Ihnen,
während der ersten paar Wochen der Heizperiode Ihr
Gerät so einzusetzen, dass Sie 50% Luftfeuchtigkeit
erreichen.
Inbetriebnahme
Aus hygienischen Gründen empfehlen wir Ihnen, vor
der ersten Inbetriebnahme das Gerät sowie den Was-
sertank mit kaltem Wasser gründlich auszuspülen.
BEntfernen Sie den Deckel (7) und entnehmen Sie
den Wassertank (4).
CÖffnen Sie den Wassertank (4) indem Sie den
Verschluss (9) entgegen dem Uhrzeigersinn drehen.
Spülen Sie ihn mit klarem Leitungswasser aus.
DEntnehmen Sie jetzt die Abdeckung (5) mit der
dazugehörigen Dampfaustrittskappe (6).
Auf der darunterliegenden Heißwasserkammer (10)
finden Sie den Kalkfilter (11). Entnehmen Sie auch
diesen und reinigen Sie ihn unter fließendem Lei-
tungswasser. Füllen Sie in das Gerät etwas kaltes
Wasser und spülen Sie es gründlich aus. Entleeren
Sie das Gerät komplett und setzen Sie es in umge-
kehrter Reihenfolge wieder zusammen. Vergessen
Sie nicht, den Kalkfilter (11) wieder einzusetzen. Die-
ser verhindert, dass sich übermäßig Kalk in der Heiß-

4
wasserkammer absetzt.
• Kontrollieren Sie vor Inbetriebnahme, ob die Netz-
spannung mit der Nennspannung des Gerätes
übereinstimmt (230 V).
• Stellen Sie das Gerät auf einen ebenen, wasser-
unempfindlichen Boden.
• Füllen Sie den Wassertank (4) mit kaltem Wasser.
Verwenden Sie ausschließlich Leitungswasser. Es
dürfen keinerlei Zusätze ins Wasser gegeben wer-
den.
Achtung! Gerät darf niemals ohne Wassertank (4)
und/oder Abdeckung (5) in Betrieb genommen
werden.
• Setzen Sie den Wassertank (4) wieder im Gerät
ein. Achten Sie darauf, dass die Abdeckung (5)
samt Dampfaustrittskappe (6) richtig im Gerät ein-
gesetzt ist. Kontrollieren Sie auch, dass der Was-
sertank richtig eingesetzt ist. Wenn nicht, beginnt
das Gerät nicht zu heizen. Setzen Sie den Deckel
(7) auf und schließen Sie das Gerät jetzt am Netz
an.
• Schalten Sie das Gerät am Schalter (3) ein. Die
Kontrollanzeige links neben dem Schalter leuchtet
grün.
• Wählen Sie die Dampfmenge am Schalter (2).
Stufe l wenig Dampf ca. 1,5 dl Wasser/h
Stufe ll viel Dampf ca. 4 dl Wasser/h
• Nach wenigen Minuten beginnt das Gerät mit der
Dampfabgabe.
• Sobald nicht mehr genügend Wasser im Gerät ist,
wird die Dampfabgabe automatisch unterbrochen,
die Heizung schaltet sich aus und die Wasser-
Kontrollanzeige leuchtet rot auf. Das Gerät
schaltet sich automatisch wieder ein sobald genü-
gend Wasser im Tank vorhanden ist.
Reinigung, Wartung und Entkal-
kung
Vor dem Reinigen, Warten, Entkalken oder Aus-
spülen des Gerätes ist der Netzstecker zu ziehen.
Warten Sie mit Reinigungs- oder Wartungsarbeiten
immer ab, bis das Gerät vollständig ausgekühlt ist.
Gerät nie unter fließendes Wasser halten oder kom-
plett ins Wasser stellen.
Einzelteile dürfen nicht in den Geschirrspüler gege-
ben werden!
Reinigung
Bekanntlich wird beim Verdampfersystem nur reiner
Wasserdampf an die Raumluft abgegeben, die in
der Luft nicht erwünschten Rückstände wie Kalk,
Mineralsalze usw. bleiben im Gerät zurück. Darum
sollten Sie, auch aus hygienischen Gründen, das
Restwasser alle 8 Tage wegschütten und das Gerät
mit frischem Wasser ausspülen. Achten Sie dabei
darauf, dass die elektrischen Teile nicht mit Wasser
in Berührung kommen. Wir empfehlen Ihnen außer-
dem, den Wassertank vor jedem Nachfüllen gründ-
lich mit klarem Wasser auszuspülen.
Geben Sie 1x wöchentlich etwas Spülmittel in den
Tank, füllen Sie ihn mit warmem Wasser und reini-
gen Sie ihn gründlich. Deckel (7), Abdeckung (5),
Dampfaustrittskappe (6) sowie der Verschluss (9)
sollten ebenfalls mit Leitungswasser und etwas
Spülmittel gereinigt werden. Achten Sie dabei dar-
auf, dass Sie die Dichtung am Verschluss (9) nicht
beschädigen.
Das Gerätegehäuse mit einem feuchten Lappen
abwischen. Keine scheuernden Reinigungsmittel
verwenden.
Wartung
D Über der Heißwasserkammer (10) befindet sich
der Kalkfilter (11). Dieser dient dazu, dass sich der
Kalk welcher im Wasser vorhanden ist, nicht direkt
in der Heißwasserkammer ablagert. Waschen Sie
diesen Filter regelmäßig, mindestens aber 1x wö-
chentlich, mit klarem Wasser aus. Hartnäckige Kalk-
ablagerungen können Sie entfernen indem Sie ihn
in eine schwache Entkalkungslösung legen.
Es empfiehlt sich, den Kalkfilter spätestens nach
einer Befeuchtungssaison zu ersetzen.
EAuf der Rückseite des Gerätes befindet sich der
Luftfilter (12). Waschen Sie diesen gelegentlich
ebenfalls unter klarem Wasser aus. Um ihn abzu-
nehmen, drücken Sie leicht auf den Schnapper.
Entkalkung
Damit Sie die maximale Dampfleistung erhalten und
auch damit Ihr Gerät nicht beschädigt wird, muss
Ihr Luftbefeuchter regelmäßig entkalkt werden. Den
Verkalkungsgrad können Sie leicht selbst feststel-
len. Nehmen Sie den Deckel (7), den Wassertank
(4) und die Abdeckung (5) ab. Spätestens wenn die
gesamte Oberfläche der Heißwasserkammer (10)
mit Kalk bedeckt ist, muss das Gerät entkalkt wer-
den. Verwenden Sie dazu ein handelsübliches Ent-

5
kalkungsmittel nach der Anwendungsvorschrift des
Herstellers. Wir empfehlen die Verwendung von
durgol®express. Dieses ist hochwirksam und
materialschonend.
Gehen Sie wie folgt vor.
• Gerät vom Netz nehmen und komplett auskühlen
lassen.
• Entfernen Sie Deckel (7), Wassertank (4),
Abdeckung (5) und Kalkfilter (11).
• Spülen Sie zuerst das Gerät gründlich mit Lei-
tungswasser aus.
• Anschließend füllen Sie die Heißwasserkammer
(10) bis zum Rande mit Entkalkungslösung.
• Lassen Sie diese solange einwirken, bis sich
aller Kalk gelöst hat. Nach einiger Zeit sollten Sie
das Gerät etwas schwenken, damit die Lösung
durchgemischt wird. Bei hartnäckiger Verkalkung
kann es notwendig sein, die Entkalkungslösung
zu erneuern.
• Nach Beendigung des Entkalkungsvorganges
entleeren Sie das Gerät und spülen es gründlich
mit klarem Leitungswasser aus. Setzen Sie das
Gerät in umgekehrter Reihenfolge wieder zusam-
men.
• Achtung! Verwenden Sie zur Entfernung von Kal-
kablagerungen unter keinen Umständen scharfe
oder kratzende Gegenstände. Sie könnten damit
das Gerät beschädigen, oder es könnte undicht
werden.
Was tun bei Störungen?
Störung Ursache Behebung
kein Dampf Wassertank leer Wasser nachfüllen
Wassertank nicht Tank richtig ein-
richtig eingesetzt setzen
Gerät undicht Wassertank un- Tank ersetzen
dicht
Wassertank nicht Verschluss richtig
richtig verschlos- schließen
sen
Abdeckung nicht Abdeckung richtig
oder nicht richtig einsetzen
eingesetzt
verzögerte Gerät stark ver- Gerät entkalken
Dampfabgabe kalkt
Sollte die Störung nicht behoben werden können,
das Gerät zur Reparatur geben.
Garantie-Information
Für unsere Geräte übernehmen wir gegenüber dem
Endkunden eine 24-monatige Haltbarkeitsgarantie.
Sie beginnt mit dem Kauf des Gerätes durch den
Endkunden und gilt im Gebiet der Bundesrepublik
Deutschland.
Ansprüche aus dieser Garantie sind unter Vorlage
des Kaufbelegs direkt gegenüber unserem zentra-
len Kundendienst geltend zu machen.
Von der Garantie ausgeschlossen sind Schäden
durch normalen Verschleiß, unsachgemäßen
Gebrauch, Nichteinhaltung der Entkalkungsanwei-
sung sowie unterbliebene Pflege.
Der Endkunde besitzt zusätzlich zu den
Ansprüchen aus dieser Garantie gesetzliche
Ansprüche wegen Mängeln des Gerätes gegenüber
seinem direkten Verkäufer/Händler, die durch diese
Garantie nicht eingeschränkt werden.
petra-electric
Kundendienst
Greisbacherstr.6
D-89331 Burgau
www.petra-electric.de
Das Gerät entspricht den
EU-Richtlinien Nr. 2006/95/EG und
Nr. 89/336 EWG.
Dieses Produkt darf am Ende seiner Le-
bensdauer nicht über den normalen Haus-
haltsabfall entsorgt werden, sondern muss
an einem Sammelpunkt für das Recycling
von elektrischen und elektronischen Geräten
abgegeben werden.
Die Werkstoffe sind gemäß ihrer Kennzeichnung
wiederverwertbar. Mit der Wiederverwendung, der
stofflichen Verwertung oder anderen Formen der
Verwertung von Altgeräten leisten Sie einen wichti-
gen Beitrag zum Schutze unserer Umwelt.
Bitte erfragen Sie bei der Gemeindeverwaltung die
zuständige Entsorgungsstelle.
Änderungen vorbehalten

6
Universal-Schnell-Entkalker
durgol®express
durgol®express befreit alle
Gegenstände im Haushalt schnell
und einfach von Kalk. Seine For-
mel steht für eine effiziente und
gleichzeitig materialschonende,
lebensmittelsichere und umwelt-
verträgliche Entkalkung.
durgol®express ist im ausgewähl-
ten Fachhandel oder bei petra-
electric in einer 500 ml-Flasche
erhältlich.

7
Before using
The AirHumidifier may only be used for the purpose
mentioned in these instructions. Therefore read these
instructions carefully. They contain important notes
for the use, cleaning and maintenance of the applian-
ce. In case of non-observance of this instruction
manual no liability will be taken for possible damages.
Keep these instructions manual in a safe place and
transfer them to a possible succeeding user.
The appliance is not designed for commercial purpo-
ses.
The warning triangle indicates all the important
instructions for the safety. They should always be
observed, otherwise you might get injured or the
appliance might get damaged.
A Letters refer to pictures.
(3) Numbers in brackets refer to single parts indicated
in the pictures.
The original packing is specially created in order to
have a safe transport in case of service. Therefore
keep the packing at least up to the end of the guaran-
tee period.
Safety advice
The AirHumidifier LB 40 works with hot water and
reaches a temperature of approx. 90° C. Therefo-
re, for security reasons, never place the applian-
ces on furniture, but always on a water-resistant
surface.
Although the appliance has a very good stability,
we recommend not to install it close to babies or
playing children due to the scalding danger!
Never touch directly the steam outlet or inside the
hot-water chamber - scalding danger!
Never operate the appliance without water in the
container. Let the appliance cool down completely
before you empty it or change its location.
Only connect the appliance to alternating current-
with a voltage of 230 V / 50 Hz. The plug socket
has to be installed by authorised specialist. We
recommend that you make an indoor installation
of a safety device against voltage irregularities
with a trigger mechanism of not more than 30 mA.
If in doubt, please ask a specialist.
Never use the appliance with the damaged cable.
Defective cables and plugs should immediately be
replaced by our central after-sales service or a
similarly qualified person.
Do not pull or jam the connection cord and protect
it from sharp edges. Do not allow to hang down
and protect it from heat and oil. Do not pull the
plug by the cord or touch it with wet hands.
Persons who are not familiar with the instructions
manual, as well as children and people under
influence of alcohol, drugs or medicine are not
allowed to operate the appliance, or may only
operate it under supervision.
This appliance is not meant to be used by persons
(including children) with reduced physical, sensori-
al or mental capacities or in absence of the neces-
sary experience and/or knowledge - unless they
Instructions for use
GB

8
are supervised by a person responsible for their
safety and from whom they get instructions on
how to use the appliance.
Keep out of reach from children.
Place the AirHumidifier in a way that it has enough
room around it. It must not touch neither the walls
nor the furniture.
Never place the steam outlet directly against walls.
Make sure that the appliance is placed at least 1
meter away from heaters / radiators, store it away
from direct sunlight and never allow that the cable
lies under the appliance. Place it on a stable sur-
face. Never put the appliance on hot surfaces or in
proximity of open flames! Danger of fire and short
circuit!
Prior to cleaning you must unplug the appliance
first and let it cool down completely! Never immer-
se the appliance into water.
Never use sharp or scratching objects or corrosive
solutions for cleaning.
Always unplug the appliance in case of disturban-
ces, defect or suspicion of defect after a plunge.
Never operate damaged appliance. Repairs may
only be effected by our central after-sales service
or a similarly qualified person. In case of non-pro-
fessional repair, no liability will be taken for possi-
ble damage.
General information about the air humidi-
fication
The aim of the air humidification is to ensure the air
humidification always adapted to the room temperatu-
re, in order to maintain our well-being and in order to
avoid that the furnishings do not suffer any damage
from too much dryness.
As a rule, in case of a temperature of
18°C you should keep a relative humidity of 50 %
20°C you should keep a relative humidity of 45 %
22°C you should keep a relative humidity of 40 %
These indications are approximate values and
depend of course on different factors like e.g. the
building substance, insulation, ventilation etc. You
can measure your room humidity with a hygrometer.
Put the appliance into operation immediately at the
beginning of the heating season. By this you will
cause the humidity in the furniture, carpets etc. to
remain equal.
We recommend you to use your appliance during the
first weeks of the heating period in a way that you
reach 50 % of air humidity.
Putting into operation
Because of reasons of hygiene, we recommend you
to rinse the appliance as well as the water container
with cold water thoroughly.
BRemove the lid (7) and take out the water contai-
ner (4).
COpen the water container (4) by turning the clasp
(9) anti-clockwise. Rinse it with clear tap water.
DNow remove the cover (5) together with its steam
outlet top (6).
On the underlying hot-water chamber (10) you will
find the lime filter (11). Remove it also and clean it
under flowing tap water. Fill in the appliance a small
quantity of cold water and rinse it thoroughly. Empty
the appliance completely and re-place it in reverse
sequence. Do not forget to put the lime filter (11)
back in its place. This prevents the accumulation of
too much lime deposits in the hot-water chamber.
• Prior to operation, always check whether the supply
voltage corresponds to the nominal voltage of the
appliance (230 V).
• Place the appliance on an even, water resistant sur-
face.
• Fill the water container (4) with cold water. Only use
tap water. You must not put any additives into water.
Attention! Never operate the appliance without the

9
water container (4) and/or cover (5).
• Place the water container (4) again into the applian-
ce. Pay attention that the cover (5), together with
the steam outlet top (6), are properly inserted into
the appliance. Please also ensure that the water
container is properly placed in. If this is not the
case, the appliance does not start to heat. Place the
lid (7) and now connect the appliance to the plug.
• Switch on the appliance by switch (3). The con-
trol lamp at the left side besides the switch illumina-
tes in green.
• Choose the steam quantity on the switch (2).
Stage l less steam approx. 1,5 dl water/h
Stage ll much steam approx. 4 dl water/h
• After a few minutes, the appliance starts producing
steam.
• As soon as there is not enough water in the applian-
ce, the steam flow is automatically interrupted, the
heating switches off and the water control indicator
illuminates in red. The appliance switches on
again automatically as soon as there is enough
water in the container.
Cleaning, maintenance and de-
scaling
You must unplug the appliance prior to cleaning,
maintenance, de-scaling or rinsing. Prior to cleaning
and maintenance, always wait until the appliance has
completely cooled down. Never hold the appliance
under running water or never immerse in water.
Single components are not dishwasher-proof!
Cleaning
As already known, the evaporation system only deli-
vers clean water steam in the room air, and the non-
wanted residues in the air like e.g. chalk, mineral
salts etc. remain in the appliance. Therefore, also for
reasons of hygiene, you should pour out the remai-
ning water every 8 days and rinse the appliance with
fresh water. Thereby, please pay attention that the
electric parts do not come in contact with water.
Moreover, we recommend you to rinse the water con-
tainer thoroughly with clear water prior to every re-filling.
Once a week, put some detergent into water contai-
ner, fill it with warm water and clean it thoroughly. Lid
(7), cover (5), steam outlet top (6) as well as the
clasp (9) should also be cleaned with tap water and
some detergent. Thereby please pay attention not to
damage the seal on the clasp (9).
Clean the outside of the appliance with a damp cloth.
Do not use any scouring cleaning agents.
Maintenance
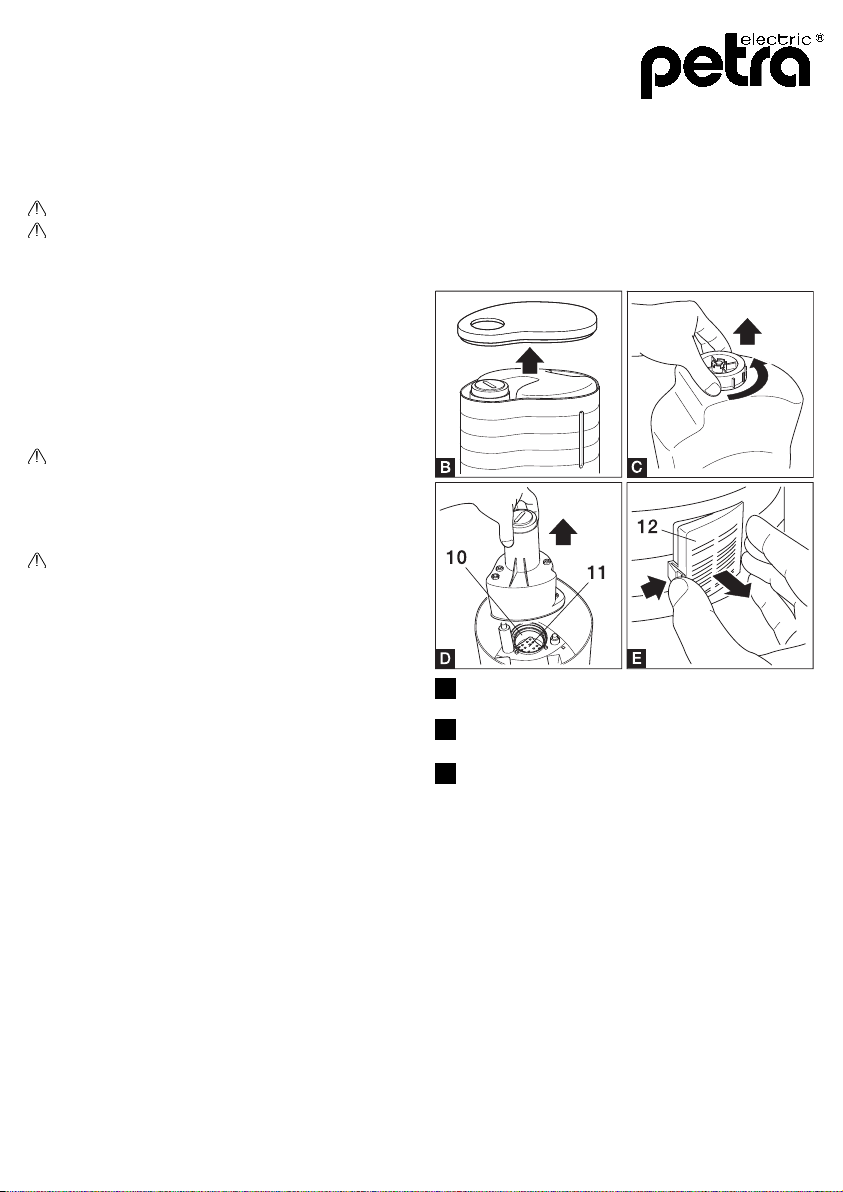
DAbove the hot-water chamber (10) there is a chalk
filter (11). This one serves a purpose to avoid that the
chalk contented in water deposits itself in the hot-
water chamber.
Wash this filter regularly with clear water, however at
least once a week.
Persistent lime deposits can be removed by putting
the filter into a weak de-scaling solution.
It is recommended to replace the chalk filter at least
after one humidification season.
EOn the backside of the appliance there is an air fil-
ter (12). From time to time, rinse it also under clear
water.
In order to remove it, press slightly on the clip.
De-scaling
In order to get the maximum steam performance, and
also in order to prevent the damage on appliance,
your air humidifier has to be de-scaled regularly. You
can determine the calcifying degree by yourself.
Remove the lid (7), the water container (4) and the
coverage (5).
When the whole surface of the hot-water chamber
(10) is covered with a layer of chalk, you have to de-
scale the appliance at the latest.
For this, use a standard de-scaling agent according
to the user instructions of the manufacturer.
We recommend the use of durgol®express. This is
highly efficient and yet gentle.
Observe the following steps:
• Unplug the appliance and let it cool down completely.
• Remove the lid (7), water container (4), coverage
(5) and chalk filter (11).
• First rinse the appliance thoroughly.
• Afterwards, fill the hot-water chamber (10) with the
de-scaling solution up to the edge.
• Let it react as long as all the chalk deposits dissol-
ved completely. After some time, you should swivel
the appliance a bit in order to mix the solution. In
case of persistent calcification it might be neces-
sary to renew the de-scaling solution.
• After the end of the de-scaling procedure, empty
the appliance and rinse it thoroughly with clear tap
water. Re-assemble the appliance in reversed
sequence.
• Attention! For removing the lime deposits, never

10
use sharp or scratching objects. With this you
might damage the appliance, or it might become
leaky.
What to do in case of disturban-
ces?
Disturbance Reason Repair
No steam Empty water Re-fill water
container
Water container Place the container
is not correctly correctly.
placed
Appliance is Water container Replace the
leaking is leaky container
Water container Close the clasp pro-
is not closed perly
properly
Cover is not in- Place the cover
serted properly properly
in place
Delayed steam Appliance is too De-scale the
emission calcified appliance
If the failure cannot be removed have the appliance
repaired.
The appliance corresponds to the EC-Regu-
lations No. 2006/95/EG and No. 89/336
EWG.
At the end of its lifetime this product must not
be disposed of through the normal domestic
waste, but it should be handed to an assemb-
ly point for the recycling of electrical and elec-
tronical appliances. You can inquire about
details at the local administration.
For UK use only
• This product is supplied with a 13 A plug conforming
to BS 1363 fitted to the mains lead. If the plug is
unsuitable for your socket outlets or needs to be
replaced, please note the following. If the plug is a
non-rewireable one, cut it from the mains lead and
immediately dispose of it. Never insert it into a
socket outlet as there is a very great risk of an elec-
tric shock.
• The replacement of the plug at the mains lead has
to be done according to the following instructions:
Warning - This appliance must be earthed
Important: The wires in this mains lead are coloured
in accordance with the following code:
green/yellow Earth
blue Neutral
brown Live
As the colours of the wires in the mains lead of this
appliance may not correspond with the coloured
markings identifying the terminals in your plug, pro-
ceed as follows:
- the wire which is coloured green and yellow must
be connected to the terminal which is marked with
the letter E or by the earth symbol , or colou-
red green or green and yellow,
- the wire which is coloured blue must be connected
to the terminal which is marked the letter N or
coloured black,
- the wire which is coloured brown must be connec-
ted to the terminal which is marked with the letter L
or coloured red.
• If a 13 A (BS 1363) plug is used it must be fitted
with a 3 A fuse conforming to BS 1362 and be
ASTA approved. If any other type of plug is used,
the appliance must be protected by a 5 A fuse eit-
her in the plug or adapter or at the distribution
board. If in doubt - consult a qualified electrician.
• Never use the plug without closing the fuse cover.
Universal fast decalcifier
durgol®express
durgol®express is a fast decalcifier
which frees all household items of
lime quickly and simply. Its formula
guarantees efficient yet gentle,
food-safe and environmentally-
friendly decalcification.
durgol®express ist available at se-
lected specialized retailers and
from petra-electric in a bottle of
500ml.

11
Mode d’emploi
F
Avant l’utilisation
L ‘humidificateur LB40 ne doit être utilisé que dans le
but prévu pour celui-ci, conformément à ce mode
d’emploi. Lire attentivement le mode d’emploi. Il com-
prend des informations importantes pour l’utilisation,
le nettoyage et l’entretien de l’appareil. Dans le cas
d´une utilisation non conforme, notre responsabilité
ne sera pas engagée et nous n´assumerons aucun
dommage.
Veuillez le conserver soigneusement et, le cas
échéant, le transmettre aux utilisateurs qui s’en servi-
ront ultérieurement. Tenir compte des recommandati-
ons de sécurité lors de son utilisation.
L´appareil n´est pas conçu pour un emploi profes-
sionnel.
Le triangle de signalisation signale les indications
importantes de sécurité. Merci de toujours les respec-
ter, sinon vous pourriez vous blesser ou l´appareil
pourrait être endommagé.
ALes chiffres renvoient aux images
(3) Les chiffres entre parenthèses renvoient aux élé-
ments indiqués sur les images.
L´emballage original a spécialement été créé pour
garantir un transport sécurisé en cas de remplace-
ment ou de réparation. Il doit être conservé soigneu-
sement durant toute la période de garantie.
Indications de sécurité
L’humidificateur LB 40 fonctionne avec de l’eau
très chaude et atteint une température d’environ
90° C. Pour des raisons de sécurité, ne placez
jamais l’appareil sur un meuble, mais toujours sur
une surface résistante à l’eau.
Bien que cet appareil soit d’une grande stabilité,
nous vous recommandons de ne jamais le placer
à proximité immédiate d’enfants en bas âge ou
d’enfants en train de jouer. Danger de brûlures!
Ne mettez jamais les doigts devant l’échappement
de vapeur ou dans la chambre de chauffe, danger
de brûlures!
N’allumez jamais l’appareil s’il n’y a pas d’eau
dans le réservoir. Laissez l’appareil refroidir ent-
ièrement avant de le vider ou de le déplacer.
Ne raccorder l’appareil qu’à une tension de 230 V
/ 50 Hz. Veillez à ce que la prise soit installée par
du personnel qualifié autorisé. Nous recomman-
dons l’installation d’un dispositif de protection
dans la maison contre les irrégularités de voltage
avec un mécanisme de déclenchement (maximum
30mA) assurant une protection supplémentaire.
Adressez vous pour ce faire à votre électricien.
Ne jamais utiliser l’appareil avec un câble de
réseau endommagé. Faire remplacer immédiate-
ment les câbles et prises endommagés par notre
service après-vente central ou par une personne
qualifiée. Ne jamais tirer ou coincer le câble de
réseau par des angles ou des arêtes vives. Ne
pas poser ou suspendre le câble sur des surfaces
ou objets chauds et le protéger des matières gras-

12
ses. Ne jamais tirer la prise par le câble ou avec
les mains mouillées.
Les personnes qui ne sont pas familiarisées avec
le mode d’emploi, les enfants ainsi que les per-
sonnes sous l’influence d’alcool, de drogue ou de
médicaments ne doivent pas utiliser l’appareil ou
alors seulement sous surveillance.
Cet appareil n’est pas prévu pour être utilisé par
des personnes (inclus les enfants) ayant des
facultés physiques, sensorielles ou mentales
réduites ou à défaut un manque d’expérience
et/ou de connaissance - sauf s’ils sont surveillés
par une personne responsable de leur sécurité ou
s’ils recoivent de celle-ci des instructions sur la
manière d’utiliser l’appareil.
Bien veiller à ce que les enfants ne jouent pas
avec cet appareil.
Placez votre humidificateur dans un espace ent-
ièrement dégagé. Il ne doit pas toucher ni
meubles ni murs. Ne dirigez jamais l’échappe-
ment de la vapeur directement contre un mur.
Assurez-vous que l’appareil soit toujours à au
moins un mètre du radiateur le plus proche, qu’il
ne soit jamais exposé directement au soleil et que
le câble ne soit jamais sous la partie centrale du
fond de l’appareil. Placez l’appareil dans un
endroit stable.
Ne le posez jamais sur une surface chaude ou à
proximité de flammes. Danger d’incendie et de
court-circuit!
Avant de nettoyer l’appareil, n’oubliez pas de reti-
rer la prise et de laisser refroidir l’appareil complè-
tement. Ne trempez jamais l’appareil dans l’eau,
ne le mettez pas en contact avec de l’eau! N’utili-
sez jamais d’objets tranchants ni de produits chi-
miques abrasifs pour le nettoyage.
En cas de perturbations de fonctionnement, de
défaut ou de soupçon de défaut de l’appareil
après une chute, retirer immédiatement le câble
de réseau. Ne jamais mettre en marche un
appareil endommagé. Les réparations ne doivent
être exécutées que par notre service après-vente
central ou par un spécialiste. Aucune garantie ne
sera accordée pour des dégâts éventuels en cas
de réparations non conformes.
Généralités sur l’humidification de l’air
Le but de l’humidification de l’air est d’assurer une
humidité toujours adaptée à la température ambiante
de la pièce, afin que votre bien-être ne soit pas per-
turbé et que les meubles et objets ne subissent
aucun dégât qui serait dû à un air trop sec. En règle
générale, il faut maintenir, pour
une température de :
18° C, une humidité relative de 50 %
20° C, une humidité relative de 45 %
22° C, une humidité relative de 40 %
Ces valeurs sont indicatives et dépendent, bien
entendu, de divers facteurs, comme par ex. la nature
du bâtiment, l’isolation, etc. Vous pouvez mesurer
l’humidité de vos locaux avec un hygromètre.
Dès que vous commencez à mettre le chauffage,
vous pouvez utiliser l´appareil. Il vous permettra de
conserver le taux d’humidité dans les meubles, les
tapis etc. au même niveau. Pendant les premières
semaines où le chauffage fonctionne, nous vous
recommandons de régler l´appareil de manière à
atteindre 50 % d´humidité dans l’ air.
Mise en marche
Pour des raisons d’hygiène, nous vous recomman-
dons de bien rincer l’appareil et le réservoir à eau à
l’eau froide avant la première utilisation.
BOtez le couvercle (7) et sortez le réservoir à eau (4).
COuvrez le réservoir à eau (4) en tournant l’obtura-
teur (9) dans le sens inverse des aiguilles d’une mon-
tre. Rincez le réservoir à l’eau du robinet.
DRetirez ensuite le boîtier (5) avec la soupape pour

13
l’échappement de la vapeur (6).
Le filtre anti-calcaire (11) se trouve sur la chambre
de chauffe (10) située sous le boîtier. Retirez égale-
ment ce filtre et nettoyez-le à l’eau courante. Mettez
un peu d’eau dans l’appareil et rincez-le bien. Videz
entièrement l’appareil et remontez-le en remettant
chaque pièce à sa place. N’oubliez pas le filtre anti-
calcaire (11) lors du remontage. Il empêche qu’un
dépôt de calcaire trop important ne se forme dans
la chambre de chauffe.
• Avant d’utiliser l’appareil, vérifiez que la tension
du réseau correspond à la tension nominale de
l’appareil (230 V).
• Placez l’appareil sur une surface plane et rési-
stante à l’eau.
• Remplissez le réservoir (4) d’eau froide. Utilisez
uniquement de l’eau du robinet. N’ajoutez aucun
produit dans l’eau. Attention! L’appareil ne doit
jamais être mis en marche si le réservoir à eau (4)
et/ou le boîtier (5) avec la soupape ne sont pas en
place.
• Replacez le réservoir à eau (4) sur l’appareil.
Assurez-vous que le boîtier (5) et sa soupape
d’échappement de vapeur (6) soient correctement
en place. Vérifiez aussi que le réservoir à eau soit
correctement installé. S’il ne l’est pas, le proces-
sus de chauffe ne pourra pas se mettre en route.
Replacez le couvercle (7) et branchez l’appareil.
• Allumez l’appareil avec le bouton (3). Le témoin
vert de mise en marche s’allume.
• Sélectionnez la quantité de vapeur désirée au
moyen du bouton (2).
Position l = peu de vapeur environ 1,5 dl eau/h
Position ll = beaucoup de vapeur environ 4 dl eau/h
• Au bout de quelques minutes, l’appareil commen-
ce à dégager de la vapeur.
• Dès qu’il n’ y a plus assez d’eau dans l’appareil,
l’émission de vapeur s’interrompt automatique-
ment, le processus de chauffe cesse et le voyant
de contrôle du réservoir devient rouge.
L’appareil se remet automatiquement en marche
dès qu’il y a de nouveau assez d’eau dans le
réservoir.
Entretien, nettoyage et détartrage
Avant de procéder au nettoyage, à l’entretien, au
détartrage ou au rinçage de l’appareil, il faut retirer
la fiche de raccordement au réseau. Avant les tra-
vaux de nettoyage ou d’entretien, attendez toujours
que l’appareil soit complètement refroidi. Il ne faut
jamais tenir l’appareil sous l’eau courante ni le plon-
ger dans l’eau. Ne mettez aucun élément de
l’appareil dans le lave-vaisselle!
Nettoyage
Le système d’humidification par évaporation ne pro-
jette dans l’air ambiant que de la vapeur d’eau pure.
Les substances en suspension telles que calcaire,
sels minéraux etc. restent dans le récipient. Voilà
pourquoi il est conseillé, et également pour des
questions d’hygiène, de vider tous les huit jours
l’eau restante dans l’appareil et de le rincer à l’eau
fraîche.
Pendant cette opération, veillez à ce qu´ aucun élé-
ment électrique ne soit en contact avec l´eau. Nous
vous recommandons également en règle générale
de bien nettoyer le récipient à eau sous l´eau cou-
rante avant chaque remplissage.
Une fois par semaine, mettez un peu de liquide
vaisselle dans le réservoir, remplissez-le d’eau
chaude et lavez-le bien. Le couvercle de l’appareil
(7), le boîtier (5), la soupape d’échappement de
vapeur (6) ainsi que l’obturateur du réservoir à eau
(9) peuvent aussi également être lavés à l’eau du
robinet, avec un peu de liquide vaisselle. Veillez à
ne pas endommager le joint de l’obturateur (9).
Essuyez l’extérieur de l’appareil avec un chiffon
humide. N’utilisez pas de produit de nettoyage
abrasif.
Entretien
D Au-dessus de la chambre de chauffe (10) se
trouve le filtre anti-calcaire (11). Celui-ci permet
d’empêcher que le calcaire se trouvant dans l’eau
ne se dépose directement dans la chambre de
chauffe. Lavez ce filtre à l’eau claire, au moins 1
fois par semaine. Vous pouvez ôter les dépôts per-
sistants en faisant tremper le filtre dans une soluti-
on contenant une faible proportion de produit détar-
trant. Il est recommandé de changer ce petit filtre
au minimum après chaque saison d’humidification.
EAu dos de l’appareil se trouve un filtre à air (12).
Nettoyez-le aussi à l’occasion, à l’eau courante clai-
re. Pour le retirer, appuyez légèrement sur le cli-
quet.
Détartrage
Pour obtenir un bon rendement de vapeur et ne pas
endommager votre humidificateur, il faut effectuer

14
des détartrages réguliers. Vous pouvez facilement
voir vous-même dans quelle mesure il est entartré.
Enlevez le couvercle de l’appareil (7), le récipient à
eau (4) et le boîtier (5). Vous devez détartrer
l’appareil au minimum chaque fois que la chambre
de chauffe (10) est recouverte de calcaire. Pour
cela, nous vous recommandons d’utiliser un détar-
trant standard selon les instructions du fabricant.
Nous recommandons l´utilisation de durgol®express.
Celui-ci est très efficace et soignant les matériaux.
Procédez comme suit:
• Débranchez l’appareil et laissez-le complètement
refroidir.
• Enlevez le couvercle (7), le réservoir à eau (4), le
boîtier (5) et le filtre anti-calcaire (11).
• Rincez d’abord soigneusement l’appareil à l’eau
du robinet.
• Remplissez ensuite à ras bord la chambre de
chauffe (10) avec une solution détartrante.
• Laissez agir la solution jusqu’à ce que tout le cal-
caire soit dissout. Remuez ensuite légèrement
l´appareil afin de mélanger la solution. Si néces-
saire, vous pouvez renouveler le procédé.
• Une fois le processus de détartrage terminé,
videz l’appareil et rincez le bien à l’eau du robi-
net. Remontez l’appareil en remettant chaque
pièce à sa place.
• Attention! N’utilisez jamais d’objets tranchants ou
abrasifs pour enlever les dépôts de calcaire.
Vous pourriez endommager l’appareil, par exem-
ple le tuyau situé dans la chambre de chauffe, ce
qui peut entraîner une fuite d’eau.
Que faire en cas de panne?
Panne Cause Réparation
Pas Le réservoir est Mettez de l’eau
d´émission vide
Le réservoir n’a Remettez le réser-
pas été installé voir correctement
correctement en place
L’appareil fuit Réservoir non Changez le réser-
étanche voir
Réservoir mal Fermez bien
fermé l’obturateur
Boîtier manquant Mettez le boîtier
ou mal installé correctement en ^
place
L’émission de L’appareil est Détartrez l’appareil
vapeur tarde fortement entartré
à venir
Si vous n’arrivez pas à régler ces perturbations en
suivant ces indications, donnez l’appareil à réparer.
L’appareil répond aux directives CE no
2006/95/EG et no 89/336 EWG.
Quand il n'est plus utilisable (fin de vie),
vous ne devez pas jeter ce produit avec les
ordures ménagères mais le remettre au
point de recyclage des appareils électriques
et électroniques le plus proche (ou déchetterie). Si
vous avez besoin de détails supplémentaires, vous
pouvez également vous adresser à la mairie de
votre commune.
Détartrant instantané universel
durgol®express
durgol®express détartre rapide-
ment et de manière aisée tous les
objets dans la maison. Sa formule
est synonyme d’un détartrage effi-
cace et en même
temps hygiénique, écologique et
protégeant les matériaux.
durgol®express est vendu en
bouteilles de 500ml dans des
commerces spécialisés sélec-
tionnés et par petra-electric.

15

petra - electric
Kundendienst
Greisbacherstraße 6
D-89331 Burgau
www.petra-electric.de
Änderungen vorbehalten - 070625 - 6796 0015
Table of contents
Languages:
Popular Humidifier manuals by other brands

Keystone
Keystone KSTHU40LAG instruction manual

Express
Express SERIES "H" Installation, operation and maintenance manual

Hoffrichter
Hoffrichter AquaTREND uni user manual

Trion
Trion Herrmidifier G100 TECHNICAL ENGINEERING SPECIFICATION

Walton
Walton SF-10 Installation and maintenance instructions

HoMedics
HoMedics HUM-CM50B-EU instruction manual