Phantom Flex4K User manual

PN: ZDOC-64105-MA-0001 Rev 1
Flex4K
MANUAL
PHANTOM
When it’s too fast to see, and too important not to.®

Phantom Flex4K Manual
PN: ZDOC-64101-MA-0001 Rev 1
Last Updated: June 2014
Phantom Flex4K
MANUAL
when it’s too fast to see, and too important not to.®
100 Dey Road
Wayne, NJ 07470 USA
+1.973.696.4500
www.visionresearch.com
w w w . v i s i o n r e s e a r c h . c o m

Phantom Flex4K Manual
Contents
11
Camera Overview
25
39
413
533
639
753
857
Connectors
Quick Start Guide
On-Camera Controls
Phantom CineMag IV & CineStation IV
Control via Phantom Software
Download & Image Processing
Video Configurations
961
Accessories
10 69
Support
Written and produced by the Marketing Department at Vision Research.
The contents of this manual are subject to change without notification.
PN: ZDOC-64101-MA-0001 Rev 1
Last Updated: June 2014Updated: 06.10.2012
w w w . v i s i o n r e s e a r c h . c o m

Chapter 1: Camera Overview
1
Phantom Flex4K Manual
Camera Overview
1
•Maximum 938 fps at full resolution of 4096 x 2304; 1000 fps at
4096 x 2160; 1984 fps at 2048 x 1080 or 1920 x 1080; 2949 fps
at 1280 x 720
•Minimum frame rate: 15 fps
•Super-35 mm sensor; 31.7 mm diagonal (27.6 mm x 15.5 mm)
•Exposure Index range 250-800 (recommended EI 400-640 Color)
•Ultra-fast (1 millisecond) rolling shutter adjustable from 1˚ to 360˚
•Exposure time (shutter speed) from 5 µs to 1/frame-rate
•32 GB or 64 GB of internal volatile RAM memory
•Phantom CineMag IV non-volatile recording media (1 TB & 2 TB)
•Monitoring: Three main 3G HD-SDI outputs, which can be configured
as independent 4:4:4 1080p signals, or used together to supply a
dual-link 4K output while maintaining a live HD signal
•Video outputs can switch between Rec709 and Phantom Log
•Viewfinder: Camera supports both component and HD-SDI-based
viewfinders. Vision Research offers a full HD OLED EVF.
•Optional interchangeable battery mounts
•Lens mount: PL standard, interchangable w/ Nikon F and
Canon EF
•2x 12V and 2x 24V unregulated accessory outputs
•Both Mac and Windows based software for download and file
conversion
•Full featured on-camera control interface
•Playback and save controls on both sides of the camera
•Memory can be partitioned for multi-cine
•Genlock for simplified 3D shooting and synchronizing video playback
•Phantom Remote Control Unit (RCU) compatible
key features
Introduction The Phantom Flex4K is a digital cinema camera capable
of shooting standard sync-sound or ultra slow-motion
frame rates up to 1,000 frames-per-second (fps) at
4K resolution, and up to approximately 2,000 fps at 2K.
A proprietary super-35mm 4K CMOS sensor provides
ultra low-noise images with exceptional detail and a wide
dynamic range.
The on-camera control menu is designed to adjust all
important camera settings and eliminate the need for a
computer on set or in the field.
Raw and video workflows are supported. CineMag IV
recording media uses the latest in non-volatile storage
technology to store uncompressed raw files quickly
and safely.

Chapter 1: Camera Overview
32
Phantom Flex4K Manual
Like previous Phantom cameras, the Flex4K records
Vision Research’s proprietary Cine Raw format. These
files are captured in 12-bit and efficiently saved to the
CineMag IV in a 10-bit ‘packed’ format. The Cine Raw
files are compatible with many of the industry’s top editing
and post production software packages, or they can be
converted to a variety of formats using software provided
with the camera.
Vision Research has plans to introduce in-camera
compression as an alternative for the Phantom Flex4K.
When available, the user can choose to record either
raw or industry-standard compressed files directly to the
CineMag IV. This increases record duration, decreases file
size, and simplifies the process straight out of the camera.
A third workflow option is recording the 3G-SDI video
playback with a video-based field recorder. These devices
are easy to find, easy to use, and take advantage of the
camera’s in-camera video scaling for high-quality 4:4:4
1080p or 4:2:2 4K video via two 3G HD-SDI outputs.
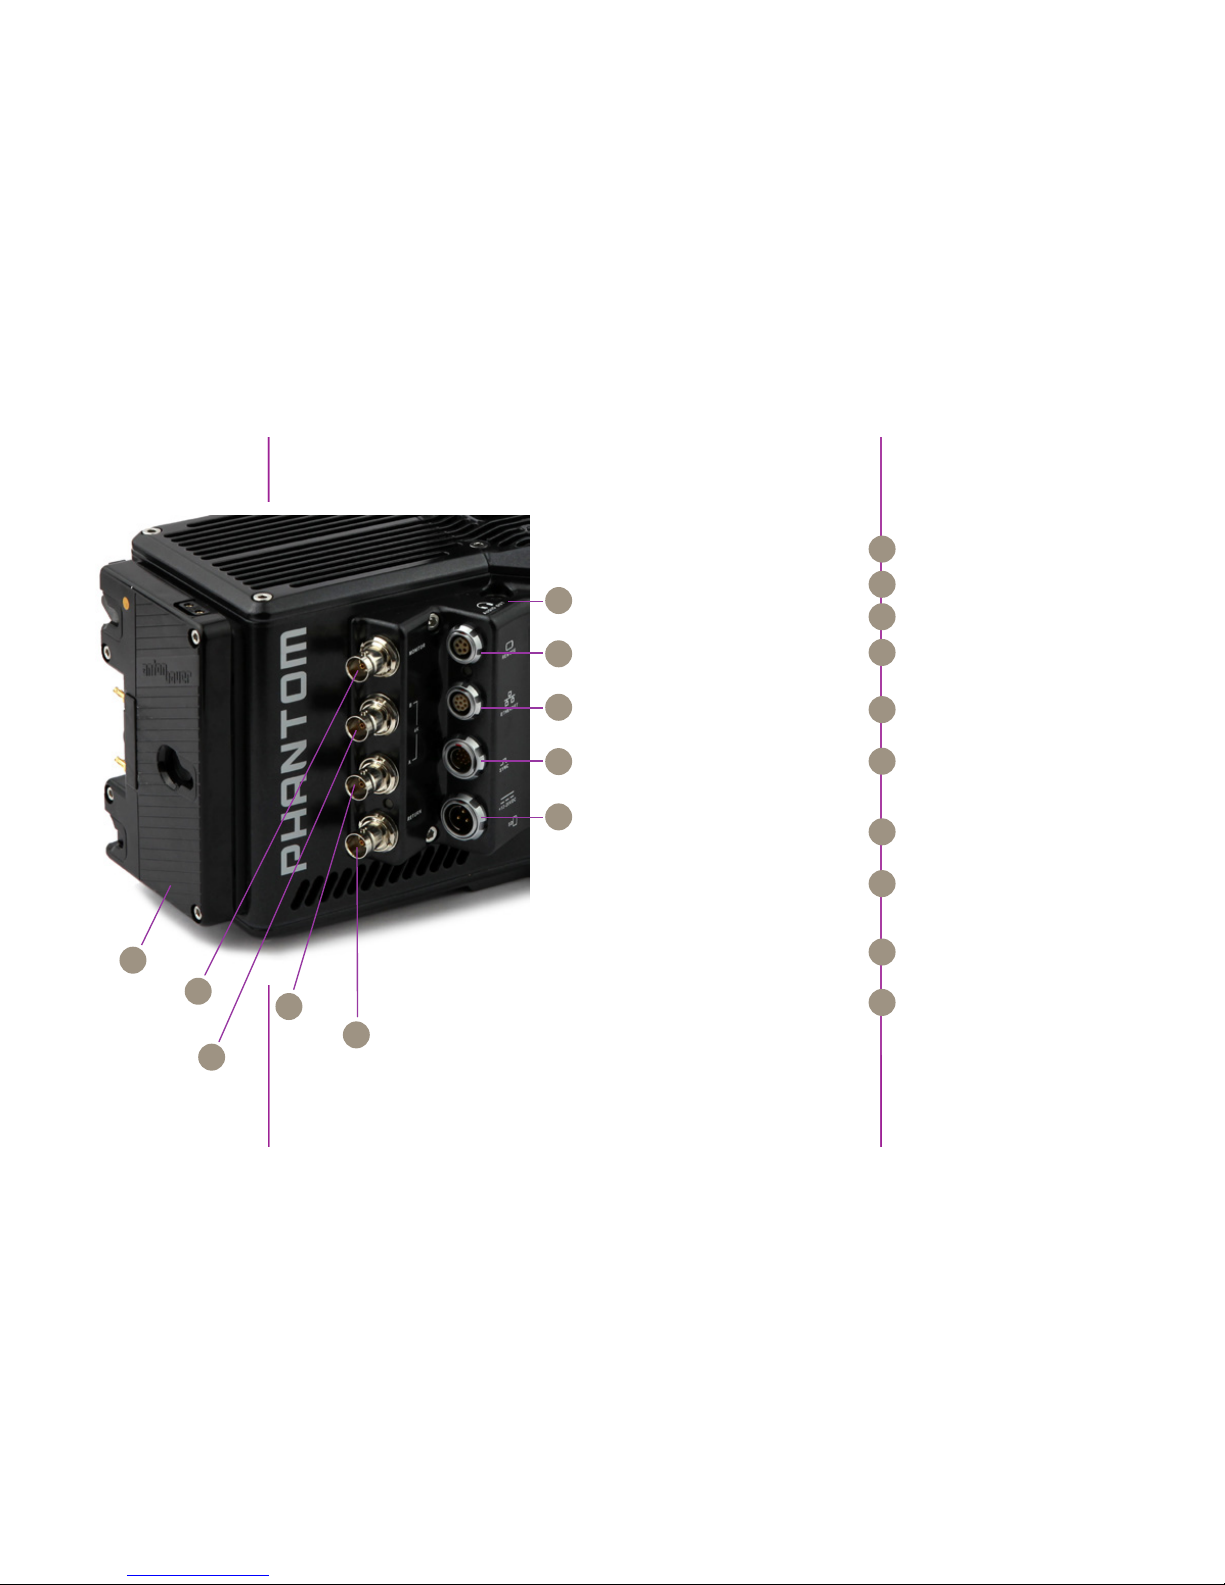
The Flex4K allows various configurations for monitoring
the image via the camera’s four total HD-SDI outputs,
and one return. Each output is customizable for monitoring
with frame guides, or as a clean output for use with field
recorders. The outputs can also be switched from
displaying standard gamma to a pre-set Log curve.
All HD-SDI outputs support video scaling for a sharp
4:4:4 1080p output of the camera’s full sensor. Two
of the 3G HD-SDI outputs can also be combined for a
4:2:2 ultra-HD signal, which will allow the full resolution
to be viewed on 4K production monitors.
The viewfinder and monitor feeds can be set to always
show a live feed, so the DP can follow the action and
frame up the next shot while the last shot is still being
saved or reviewed from the other outputs. Zoom (focus
assist) and threshold (exposure assist) functions are
also available.
Recording Options
Sensitivity & Exposure Index The low noise performance of the Flex4K sensor allows
for the ‘effective ISO’ to be dialed in with the camera’s
Exposure Index function, with minimal compromise to
image quality.
Exposure index (EI) range: from 250 to 800
Recommended EI: 400 – 640
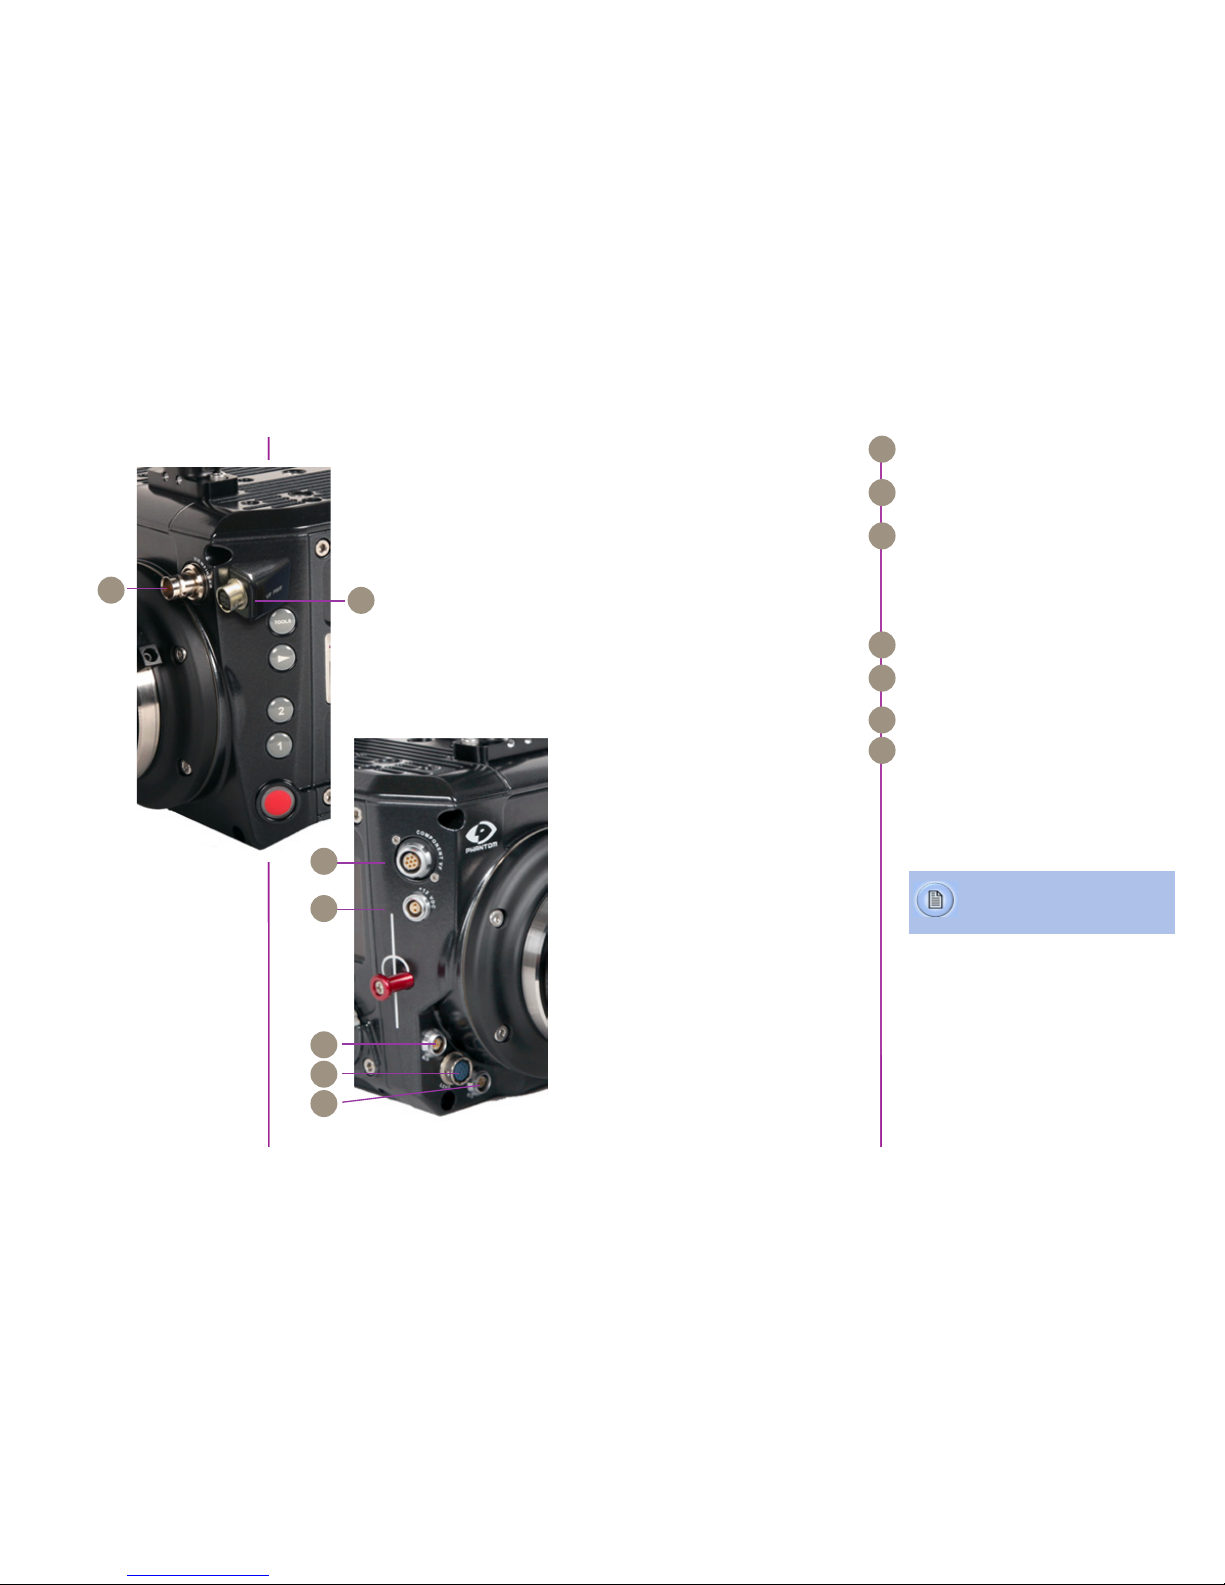
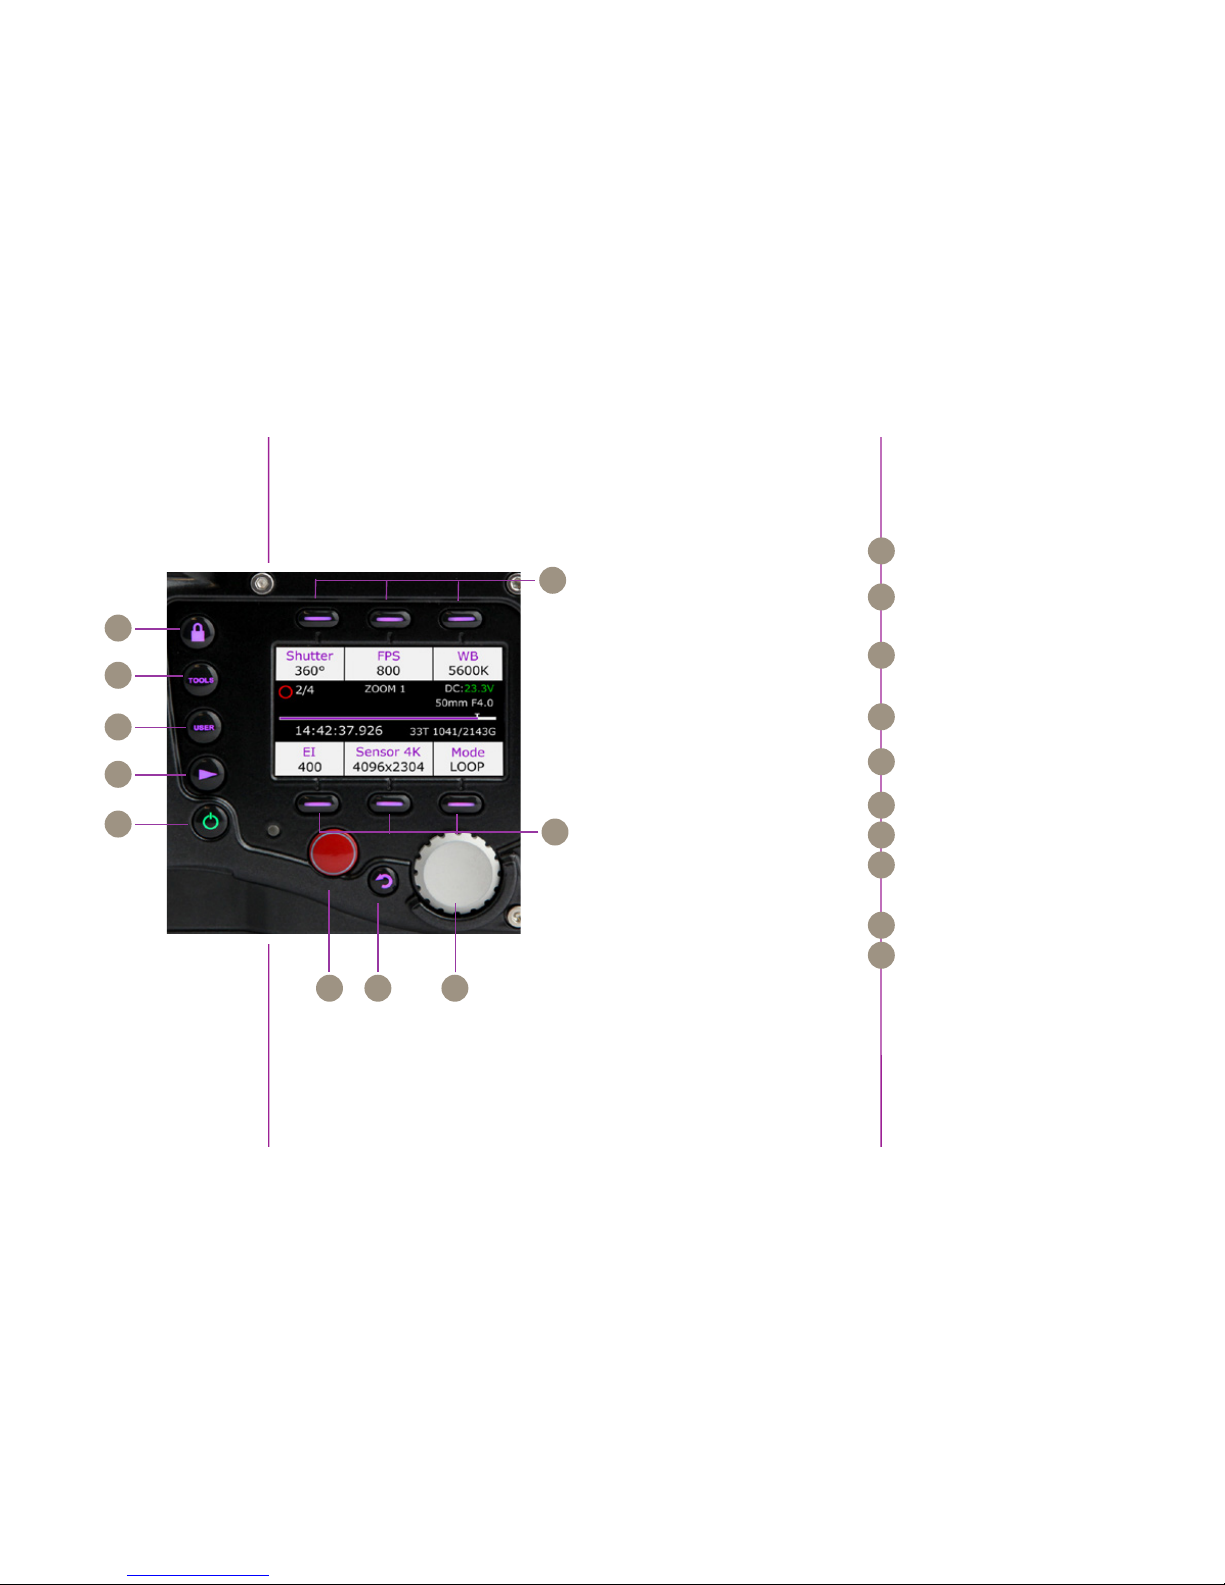
Controlling the Phantom Flex4K is easier than ever with
a full-featured on-camera control interface for both basic
and advanced camera operation. Set up universal capture
and recording parameters before the shoot, while retaining
access to the more commonly adjusted parameters like
frame rate and exposure settings at the push of a button.
Capture, trigger, playback and save controls can be found
on both sides of the camera in order to provide a seamless
workflow for different shooting environments.
Control is also possible with Phantom PCC software or a
handheld Phantom Remote Control Unit (RCU).
Each Phantom Flex4K ships standard with both Windows
(PCC) and Mac-based download solutions. Vision Research
is providing one license of the popular Glue Tools Cine
Toolkit, and Séance™download software for the Mac. This
provides the ability to download Flex4K raw files in Mac
OSX, and direct compatibility with most Quicktime-based
edit and color grading software.
Select ‘Loop mode’ for the fastest high-speed workflow.
Loop mode records into the RAM buffer at the camera’s
top speeds, then once the camera is triggered the files
can be quickly offloaded to an installed Phantom
CineMag IV.
For longer record times use run/stop (R/S) mode and
record directly to a 2TB CineMag IV at up to 120 frames-
per-second at 4K (max 90 fps to the 1TB CineMag IV).
This is an excellent option when ultra high-speed is not
required.
Camera Controls
Workflow Solutions Image Monitoring & Video Outputs
File formats

Chapter 2: Connectors
54
Phantom Flex4K Manual
Connectors
2
rear panel
3G HD-SDI output – Supports 1080/720p standards.
3G HD-SDI output – Both Rec A and Rec B support
1080/720p standards or combine them for a dual-link
4K video output.
3G HD-SDI input – Accepts feed from separate source,
switches monitor output. Also supports Genlock.
Not active at the time of initial shipments – Will be
activated via future firmware update.
7-pin Fischer – For RS-232 and 24V power – Used
with Phantom RCU and Bluetooth Dongle (BT-Dongle II).
8-pin Fischer – Gb Ethernet CAT-5 UTP – for software
connection.
12-pin Fischer – For F-Sync, TC In, TC Out, Audio,
Trigger signal via Capture cable or Flex4K Mini Break-
Out-Box (Mini-BOB).
3-pin Fischer – For Primary power (+12 - 28 VDC
unregulated) input.
Remove the back plate to gain access to a power tap
for optional battery mounts. Options are available for
a 26V Hawk Woods mount, 14.4V Anton Bauer Gold
mount (pictured), and 14.4V V-Lock (new) standards.
Monitor
Rec B
Rec A
Return
Audio Out
Remote
Ethernet
Sync
12 - 28 VDC Power
Battery Interface (optional)
B
C
D
I
H
G
F
E
A
J
A
B
C
D
E
F
G
H
I
J

Chapter 2: Connectors
76
Phantom Flex4K Manual
front panels
Camera view front (left)
Camera view front (right)
Standard BNC – For SDI-based viewfinders – Including
the Phantom OLED HD EVF.
4-pin Hirose – For 12V viewfinder or on-camera
monitor power.
7-pin Fischer – Provides +12V power and component
signal for viewfinders such as the Sony HDVF35W.
Also works with the Phantom YPRPB cable.
This connector can be factory-replaced with a 20-pin
Hirose for Panasonic viewfinders, contact your sales
rep for more details.
2-pin Lemo – 12V accessory power.
3-pin Fischer – +12 - 28 VDC unregulated
(matches input voltage) auxiliary power + trigger.
12-pin Hirose connector for ENG style lenses.
3-pin Fischer – +12 - 28 VDC unregulated
(matches input voltage) auxiliary power + trigger.
(HD-SDI) Viewfinder
VF PWR
Component VF
+12 VDC
R/S
Lens
R/S
A complete cable connector reference and
pin-out guide is available in the last section
of this manual.
AB
C
D
E
F
G
A
B
C
D
E
F
G

Chapter 3: Quick Start Guides
98
Phantom Flex4K Manual
cinemag door
Latch to open and close the Phantom CineMag door.
Phantom CineMag Door Release
Quick Start Guide
3
via on-camera controls
Connect the Phantom power supply or suitable power
(+12 - 28 VDC) to the Power input.
Connect and power an HD-SDI monitor and/or viewfinder
to the Mon or VF HD-SDI connectors
Insert a Phantom CineMag IV, if available. For detailed
instruction see ‘Phantom CineMag IV & CineStation IV’
chapter.
From any of the ‘Home’ menu options; press the button
above / below the parameter to be set.
Rotate the knob, in ether direction, to change the selected
parameter, then press the center of the knob to confirm.
•Set ‘Resolution’ to the required Width x Height
•Choose the required ‘FPS’ (speed / frame rate)
and ‘Shutter’ (exposure time).
•Select ‘Loop’ mode or ‘R/S’ (Run/Stop directly
records to a CineMag at lower frame rates) mode
by holding in the ‘Mode’ button for 2 seconds.
•In ‘Loop’ mode, set the Trigger position (‘T’) by
holding in the select knob. It can be set to the end
(default), the beginning, or some position in be-
tween to determine where the circular buffer stops
when a trigger signal is detected.
•In ‘R/S’ mode the trigger is automatically set to the
end, and the trigger is used to both start and stop
the recording.
The Flex4K is unlike previous Phantom cameras in that a
black reference is not required under most circumstances.
However, if you notice the black level shift, hold down the
‘Tools’ button to close the internal shutter and perform a
black reference.
Power Up Camera
Setup Video Monitor
Insert Phantom CineMag IV
Set Recording Parameters
Perform Black Reference
A
A

Chapter 3: Quick Start Guides
1110
Phantom Flex4K Manual
From the ‘Home’ menu; press the button above WB (White
Balance). Choose one of the pre-sets, or perform an Auto
WB by pointing the camera towards a non-saturated white
area to fill the center of the frame. Press the button above
‘Auto’ in the WB menu and select ‘OK’.
Basic ‘Loop’ mode recording:
Hold in the ‘Trigger’ button for 2 seconds to put the
camera into capture mode. The button will glow red when
the camera is recording.
Press the ‘Trigger’ button when the event happens, keep
in mind the trigger position
Press the on-camera ‘Playback’ button to start playback.
The camera should start playing the latest RAM cine
captured.
Rotate the knob or apply long press to the play-forward
button to fast forward. A longer press increases fast
forward playback. Same with reverse play.
Locate the first image to be saved and tap the forward or
reverse buttons to pause playback. Then press the ‘Mark
In’ button to define a new start point. Play forward and
select the ‘Mark out’ position.
Press the button above ‘Save’ to save the marked
portion of the selected cine to a Phantom CineMag IV
(This option is disabled when playing back a cine from
the mag).
Perform White Balance
(Color Cameras Only)
Playback
Save to Phantom CineMag IV
Arm Camera
Trigger
Edit Cine
In ‘Loop’ mode the images are first recorded to
the internal RAM buffer, then previewed
and saved.
Switch from playing the RAM cine to the latest CineMag
cine and scrub through the playback to confirm the save.
Tap the trigger to return to live. Hold down the trigger
button for 2 seconds to start the next recording.
Basic ‘R/S’ mode recording:
To begin recording, hold in the ‘Trigger’ button for
2 seconds. The button will glow red when the camera
is recording.
The menu and video display will indicate the take
number and update the amount of space available in
the CineMag IV as it records.
Press the ‘Trigger’ button again to stop the recording.
Press the on-camera ‘Playback’ button to start playback.
The camera should start playing the latest cine captured
in the CineMag IV.
Rotate the knob or apply long press to the play-forward
button to fast forward. A longer press increases fast
forward playback. Same with reverse play.
Tap the trigger button to return to live on the video display.
Hold down the trigger for 2 seconds to start the next
recording.
Review the File Saved to CineMag
Re-Arm the Camera
In ‘Run/Stop (R/S)’ mode the images are
recorded directly to the CineMag IV at a lower
maximum frame rate but a longer possible
duration.
Playback
Arm Camera
Trigger
Re-Arm the Camera
A long-press of the Mark In or Mark Out
buttons will re-set those points.

Chapter 4: On-Camera Controls
1312
Phantom Flex4K Manual
On-Camera
Controls
4
By default, long press locks all menu buttons.
Cycles through video tools: Zoom 1; Zoom 2; and
threshold for exposure assist. Long press initiates
BREF (black reference).
Enters user preset sub-menu allowing for setting and
recalling settings. Note: User menu is not active in early
camera firmware.
Enters playback menu allowing takes to be played,
edited, and saved to Phantom CineMag IV.
Powers up camera when running on battery.
Hold for 5 seconds to power-off camera.
Functions change based on active menu.
Same as above.
Trigger camera when in recording (capture) mode.
Long press starts recording, Short press stops
recording.
Returns to the previous screen.
Press to enter main menu. Scroll through settings in
all menus, and press to select.
right side buttons
Lock
Tools
User
Play
Power
Soft Buttons 1, 2, 3
Soft Button 4, 5, 6
Trigger
Return
Menu Button and Control Knob
A
B
C
D
E
F
G
H
I
J
A
B
C
D
E
F
G
H I J

Chapter 4: On-Camera Controls
1514
Phantom Flex4K Manual
left side buttons
Tools
Playback
User 2 / Reverse
User 1 / Forward
Trigger
Left side button functions vary based on the operational
mode of the camera, as follows:
Live Mode - Short press to trigger camera when in
recording (capture) mode.
Live Mode - Long press will erase the contents of RAM
and start recording again.
Playback Mode - Tap trigger to return camera to ‘live’
mode.
Live Mode - Short press starts playback of last take
(whether in RAM or CineMag IV).
Live Mode - Long press will enter select mode, where user
can toggle between various RAM and CineMag takes.
Playback Mode - Plays forward.
Hold in to fast-forward. Tap to Pause.
Live Mode - Short press cycles through video tools:
Zoom 1; Zoom 2; Threshold.
Live Mode - Long press initiates BREF (black reference).
Playback Mode - Tap to set ‘Mark In’ point.
Long press re-sets ‘Mark In’ point.
Live Mode - Not active with initial camera firmware
Playback Mode - Short press reverse playback;
Playback Mode - Long press fast reverse.
Live Mode - Not active with initial camera firmware.
Playback Mode - Tap to set ‘Mark out’ point.
Playback Mode - Long press re-sets ‘Mark Out’ point.
Trigger
Playback
Tools
User 2 / Reverse
User 1 / Mark Out
The left side ‘Save to CineMag’ function
will be added in an upcoming firmware update.
A
B
C
D
E
A
B
C
D
E

Chapter 4: On-Camera Controls
1716
Phantom Flex4K Manual
A long press switches the camera between Loop mode
and Run/Stop Mode (for longer duration direct CineMag
recording).
The symbol changes based on the camera’s state:
Live: The camera is not recording and a live image is
displayed from all SDI ports. Generally, this is the state
when camera first booted up.
Capture: The camera is recording to internal memory
(RAM), and awaiting a trigger signal.
Triggered: The camera has been triggered, and is
filling RAM memory (‘Post-Trigger’ frames) or is writing
to CineMag in R/S mode.
Cine Stored: Recording has ended, and a Cine is
stored in RAM memory. This Cine must be erased from
the RAM to begin recording again.
Playback: The camera is in PLAYBACK mode. RAM
Cines can be reviewed and saved to a CineMag IV.
CineMag takes can also be selected for playback.
Indicates the time code stamped to each frame.
This timeline represents all frames available in camera
RAM (Loop mode), or the CineMag (Run/Stop) mode.
In ‘Loop’ mode, the ‘T’ indicator represents the user-
defined trigger point. In R/S mode the bar indicates
used space.
Indicates the memory size of the CineMag (if present)
and the total recording time available.
Displays the focal length and aperture setting of the
lens (Canon EF mount only).
Displays the supplied DC voltage level. The status color
will change from green (good charge) to yellow to red
(indicates low battery).
This field displays the ‘Tools’ function status when
active (Zoom 1; Zoom 2; Threshold; and the BREF
status).
home screen
Shutter
FPS (Frames Per Second)
WB (White Balance)
EI (Exposure Index)
Resolution
Mode
Navigation Press the ‘soft’ button above or below the respective
field to display a sub-menu used to define the field’s
parameters.
See ‘Menu Displays’ for details.
Sets the exposure time of the camera by adjusting
the shutter angle. Displays the shutter in degrees.
Sets the frame rate for camera capture.
Sets the white balance for the current lighting
conditions, manually or automatically.
EI (Exposure Index) represents the camera’s apparent
light sensitivity & is derived from the base ‘ISO’ plus
image adjustments.
Sets the acquisition resolution (width x height),
in pixels.
Camera Status
Time Code
Buffer Bar w/Trigger Point
CineMag Status
Lens Status
DC / Battery Status
Tools Display
A B C
D E
L
G
K
I
J
H
M
F
A
B
C
D
E
F
G
H
I
J
K
L
M

Chapter 4: On-Camera Controls
1918
Phantom Flex4K Manual
menu displays
‘Shutter’ controls the exposure time (the amount of
time each frame is exposed to light) and is measured in
degrees of shutter angle. The higher the value, the longer
the exposure time. A smaller shutter angle reduces the
amount of motion blur.
Use the control knob to scroll through available settings,
and push to select. Presets are also available, (User 1,
User 2, 90, 180, or maximum).
A long press above the ‘User < >’ fields will save the
current exposure time for quick future access.
The ‘Shutter’ field also provides a reference for the
exposure time in milliseconds / microseconds and
fractional units. Tap to change.
Shutter Use the control knob to scroll through the available
settings, and push to select. A long press above the User
< > fields will save the current frame rate, for easy
access later.
‘Sync’ instructs the camera to utilize one of the following
frame sync clock sources:
•Internal - (most common) the camera uses its’
internal crystal oscillator to drive the frame rate.
•External - Should be selected when an externally
supplied frame sync clock pulse is connected to
‘F-Sync’ to drive the camera’s frame rate.
•Time code - Should be selected when an external
SMPTE or IRIG time code device connected to the
‘Timecode in’ port to drive the camera’s frame rate.
•Video - Should be selected to run the camera at -
or in multiples of - its current video rate. This is a
good option for sync-sound recording.
Scroll through the available sync options by pressing the
soft button under the ‘Sync’ button.
Frame Rate (FPS) /
Sync (Clock)
‘FPS’ defines the speed (Frame Rate) of camera
capture. The available speeds will change according to
the resolution and mode selected. Smaller resolutions
generally allow for higher speeds.
White Balance
The camera’s white balance can be set automatically, or
manually by adjusting the color temperature and color
compensation.
User can have the camera automatically perform a White
Balance by pressing ‘Auto’ while pointing the camera at
an area the represents white, or place a gray card or white
object in front of the camera. The white subject area must
not be fully saturated in order to accurately perform the
Auto WB.

Chapter 4: On-Camera Controls
2120
Phantom Flex4K Manual
Optionally, the user can select common white balance
settings of 3200, 4300 and 5600, or manually adjust
the Color Temperature (Kelvin) for the red and blue
components of white balance, and Color Compensation
(CC) for the magenta and green components of the white
balance.
Exposure Index
EI (Exposure Index) is a reference value for the
apparent light sensitivity determined by the current
image processing settings. The available presets range
from an EI of 250 through 800.
The EI value can change based on the gamma, toe,
gain, ped, tone curve, and other settings of the camera.
By adjusting the EI with one of these presets, most image
settings will go back to their default value.
When the camera’s video output is set to ‘Log’ mode,
the EI can not be adjusted, and must be used as a
reference only.
Mode
Mode specifies the operational ‘Mode’ of the camera in
relation to CineMag recording
•Loop Mode - image data is recorded to camera
internal memory (RAM buffer / circular buffer) prior
to saving it to an attached Phantom CineMag IV or
external hard drive.
•R/S (Run/Stop) Mode - images are recorded
directly into an attached CineMag IV. The maximum
possible frame rate to a 2TB CineMag IV is limited
to 120 fps at full resolution in R/S mode.
A long press of the ‘Mode’ button switches the camera
between Loop and R/S modes.
Trigger Point (only active in ‘Loop’ mode) specifies the
percentage of ‘Post Trigger’ frames recorded AFTER the
camera has been triggered.
A long press of the control knob allows you to dial in
the post trigger in 10% increments. To set it, the camera
must be in ‘Loop’ mode, and the home menu must be
displayed.
When the camera is capturing, it is continuously rolling
into its circular RAM buffer, which is represented by the
‘Timeline’. If you have approximately 5 seconds of record
time, a trigger point in the middle will keep the previous
2.5 seconds and when triggered will record for an
additional 2.5 seconds until the RAM is full.
In R/S mode there is no trigger point, and the time line
represents the space in the CineMag.
Post Trigger

Chapter 4: On-Camera Controls
2322
Phantom Flex4K Manual
The Flex4K sensor can run in either 4K mode (4096 pixels
across) or 2K mode (2048 pixels across).
In 4K mode the image format is Super-35mm, and in
2K mode the image format is windowed (closer to
Super-16mm).
As you lower the camera’s vertical resolution, higher
frame rates are possible. Horizontal resolution changes
alone will have no effect on the top frame rate.
The resolution menu is set up to show exactly what the
sensor is doing, whether the resolution is considered
‘Native’, ‘Cropped’, or ‘Downscaled’ – and also what the
current Aspect ratio is.
Use the control knob to cycle through the available options
for either 4K or 2K sensor mode, and push to select.
More on the way resolution works can be found in the
Support section of this manual.
Resolution
sensor formats
4K (35mm) sensor mode
4096 x 2304 native 16:9
3840 x 2160 overscan 16:9
2752 x 2304 anamorphic 2.0
1920 x 1080 scaled 16:9
4096 x 2160 native DCI
4096 x 2216 native 1.85:1
4096 x 1712 native 2.39:1
3840 x 2160 cropped 16:9
2K (windowed) sensor mode
2048 x 1536 native 4:3
2048 x 1152 native 16:9
1920 x 1080 overscan 16:9
2048 x 1080 native DCI
1920 x 1080 crop 16:9
1280 x 720 scaled 16:9
1280 x 720 crop 16:9
*subject to change
Supported resolutions* are as follows:
Common 4K resolutions
Common 2K &
windowed resolutions

Chapter 4: On-Camera Controls
2524
Phantom Flex4K Manual
Press ‘Playback’ button to start playback of last take
(whether in RAM or Phantom CineMag IV).
Tap the ‘Return’ button to access previous screen.
Tap ‘Trigger’ button to jump to ‘Home’ menu. The video
will return to ‘Live’ state, unless multi-cine (partitions)
are in use.
Press button to define a new start point of the selected
RAM cine. A long press re-sets the in point.
Press to save the RAM cine to an installed CineMag IV.
Also displays the CineMag save progress.
Press button to define a new end point of the selected
cine. A long press resets the out point.
Press to play selected cine in reverse; long press to
fast reverse; longer press to increase reverse speed;
tap to pause.
Press button then Rotate the control knob to cycle
through available cines in RAM or CineMag IV.
Press to play selected cine; long press to fast forward;
longer press to increase fast forward speed; tap to
pause.
The Control knob also allows you to quickly scrub
through the selected Cine, and fine-tune the mark-in
and mark-out position. Scroll forward to play forward,
the further you scroll the faster the playback - same in
reverse.
Single frame stepping is also possible with the control
knob. In playback mode, tap the knob to switch
between single frame and 2% scrub increments.
playback screen
Mark In
B
Save
Mark Out
Reverse
Cine Select
Play forward
Navigation
Control knob
Center menu display The center menu display in playback shows the
following parameters:
Green arrow indicates that playback mode is active.
DC voltage (with low battery indication).
Above the bar shows the frame rate, exposure and
resolution of the selected take.
Cine timeline bar with trigger point, play head position
and in/out point indicators.
Selected frame count and playback duration based
on current video settings.
Playhead position.
Scrub setting to fine tune play position (tap the select
knob to change).
A
A
B
B
C
C
D
D
D
E
E
F
F
G
G

Chapter 4: On-Camera Controls
2726
Phantom Flex4K Manual
From the home screen, tap the the control knob to
access the ‘Main Menu’, then rotate to desired option.
Press again to select.
Note: Main menu is not accessible while in Playback
mode.
These image processing options are intended to adjust
the overall look of the image. The adjustments are applied
on Cine Raw files only in the metadata, and thus are
non-destructive and can be further modified or removed
in software.
Master Gamma: Adjusts the relationship between signal
level and brightness output of the image. A linear gamma
would have the value of 1.0. The camera’s default gamma
setting is 2.2, which is a standard Rec709 compensation
for most video monitors.
Saturation: Adjusts the overall color intensity of the
image. A default value of 1.0 represents a realistic
saturation level, a saturation of 0 will display black & white
images, and a maximum saturation of 2.0 will produce
extremely vibrant images.
Toe: Adjusts the lower portion of the gamma curve only.
Lowering the toe value will lift the shadow detail without
affecting the highlights. By default, this setting is 1.0,
however a change in Exposure Index (E.I.) can change
this value, so it will commonly display a value between
0.1 and 1.0.
main menu
Navigation
Image Processing
Gain: Adjusts the overall signal level of the image in a
linear manner. Increasing Gain will raise the image level
evenly from shadows to highlights. Adjusting Gain will
also affect the Exposure Index (E.I.) value, and allow
you to achieve equivalent ISO values higher than the
recommended 800. Vision Research recommends not
adding too much Gain (keep it around the default value
of 1.0) in order to maintain the highest image quality.
Pedestal: Adjusts the baseline black level of the Red,
Green, and Blue channels independently. A default of
0 should produce images with black at 0 on a waveform.
Pedestal can be raised or lowered to a value of 0.10 on
each channel.
Gamma RGB: Adjusts the gamma curve for individual
Red Green and Blue channels independently. By default,
the Master Gamma value will populate each field - then
the gamma curve can be fine tuned for each channel.
There is not a common need for this - this option exists
primarily for video engineers to match the video output
across multiple camera types.
The Video & Playback functions allow you to set the
overall video system, playback modes, activate Log mode,
anamorphic mode, color bars and set automatic play
settings. Most of these settings are saved to the raw Cine
file as non-destructive metadata tags, and also applied in
real time to the camera’s various video outputs.
A description for each function is as follows:
Interface: Switches the camera between its acceptable
video output modes: HD-SDI (1080p 4:2:2:); 3G-SDI
(1080p 4:2:2 50P & 60P) and 4K (4:2:2) modes.
Future support of 3G-SDI 4:4:4 is planned.
Video & Playback

Chapter 4: On-Camera Controls
2928
Phantom Flex4K Manual
Color Bars: This will switch all video outputs to display
SMPTE HD Color bars.
Auto Playback: When enabled, RAM Cines will automati-
cally play back after a trigger signal is received and the
RAM buffer or partition is filled.
Auto Save: Enabling this will automatically save the RAM
cine to an installed CineMag IV after a trigger signal is
received and the RAM buffer or partition is filled.
Erase CineMag: Erasing the CineMag will permanently
delete ALL Cines from the CineMag IV. You will have to
accept the confirmation with a long-press of the button
under the ‘Erase’ command. The erase progress will
appear on all menu displays on the camera.
The ‘Camera’ sub-menu controls advanced features and
the Sync port’s auxiliary signals.
Partitions can be setup to segment the camera’s RAM
buffer into multiple segments. This is sometimes referred
to as ‘multi-cine’ recording. The RAM is divided evenly,
and the same frame rate and recording parameters will
apply for each partition. There are 63 maximum segments
allowed.
TC Out specifies whether the Timecode-out port should
output either SMPTE or IRIG standards
Aux 1 sets the Auxiliary 1 port of the Flex4K Mini-BOB
(or black labeled cable on the capture cable) to switch
between: F-Sync, Memgate, Event and Strobe signals.
Aux 2 allows the Auxiliary 2 port of the Flex4K Mini-BOB
(or green labeled cable on the capture cable) to switch
between: Strobe, Ready and AES out signals.
CineMag
Format: Sets the video output to one of the valid video
systems available for the chosen Interface. For example:
in 4K mode, valid formats are 2160 23.98p, 24p, 25p,
29.97p, 30p.
Output Mode: Switches between ‘Production’ and
‘Broadcast’ modes:
•Production mode: VF, Mon, and output B all switch
between live and replay. Output A remains live.
•Broadcast mode: VF and Mon outputs provide an
uninterrupted live feed, outputs A and B switch
between live & replay.
Zoom: Provides four overall zoom levels for the video
image.
Log: The Flex4K video outputs can be switched between
Rec709 and a factory installed log curve. At this time all
outputs are linked together.
Phantom Log maps the sensor’s linear data using a low
contrast, high dynamic range curve. This is accompanied
by an apparent boost in sensitivity and disables most
image processing parameters.
Genlock: Enables genlocking of the video output to a
suitable signal connected to the video return connector.
Frame Lines: Select to display a variety of popular output
resolutions to overlay on the video image - generally used
as a guide for framing the shot.
OSD: Sets whether to display on-screen information on
the VF and/or MON outputs.
Anamorphic: The camera can accommodate a 2.0x or
1.33x de-squeeze compensation for anamorphic lenses.
This only applies to the video outputs, and only to 1080p
23.98, 24, 25, 29.9 and 30 signals.
In 4K and 3G mode, the viewfinder outputs
are always running in 1080p 1.5G mode in
order to provide a compatible signal.
Camera
In addition to Auto-play and Auto-save there
is an Auto-restart recording function, initially
available from software only.
Description of the Flex4K Mini-BOB can be
found on page 31.

3130
Phantom Flex4K Manual
mini-BOB
About
When set to ‘AES out’ the camera will pass through the
audio input to the Aux 2 port and the ‘Audio Out’ jack on
top of the camera. The Audio input is not active in early
Flex4K firmware.
Factory defaults can be recalled to bring the camera
back to its original settings, including all capture, calibra-
tion, image processing and video parameters. This is an
excellent troubleshooting step. The settings can take
approximately 30 seconds to load once selected.
The ‘About’ sub-menu displays unique information
about the camera including: Camera name, serial number,
IP address, the current firmware, and the current
temperature information of the camera.
Definitions of the available auxiliary signals:
F-Sync (input / output): Connect an external source,
including the F-Sync from a second Phantom camera,
to drive the camera’s frame rate. Use in combination
with Sync: External in the FPS menu.
Memgate (input): When Memgate signal is active the
camera stops recording into it’s internal memory (frames
are discarded).
Event (input): When the Event signal is active, frames
are tagged with an Event marker (as metadata). These
events can be searched or referenced during playback.
Ready (output): When Ready signal is high it indicates
that the camera is in capture mode. Using PCC, signal
can be set to go low at trigger or at the end of recording.
Strobe (output): Signal goes low for the duration of each
frame’s exposure.
AES Out: Will provide a loop-through of the digital audio
signal from the ‘AES In’ port.
The Flex4K’s Sync port is compatible with a multi-bnc
capture cable and Phantom Mini-Break out Box
(commonly known as the Mini-BOB). Both of these
accessories provide the same functions, however the
Mini-BOB is designed to mount to the top of the camera
(as pictured) for better cable management.
There are six ports available:
AES in - When enabled in camera this will be the digital
AES/EBU (stereo) input.
TC in - Timecode input.
TC out - Timecode output.
Aux 1 - Switches between Memgate, F-Sync, Event
and Strobe.
Aux 2 - Switches between Strobe, Ready and AES Out
(when enabled in camera).
Trigger - Accepts external trigger.
A functional description of the Aux signals can be found
on the previous page, and a pin-out of the Sync port can
be found on page 74 of this manual. The pin-out includes
a guide on how to identify the ports on the capture cable.
Flex4K Mini-BOB and
Capture Cable

Chapter 5: Phantom CineMag & Phantom CineStation
3332
Phantom Flex4K Manual
phantom cinemag iv
On the back of the Phantom CineMag IV are a number
of LED indicators that show the current Phantom
CineMag IV status.
Phantom CineMag IV
Indicators
Phantom CineMag IV
& CineStation IV
5
The Phantom CineMag IV is a high-speed solid-state
storage module, compatible with the Phantom Flex4K
for recording, and the CineStation IV for downloading.
It records raw sensor data in 10-bit packed format, and
differs significantly from a traditional hard drive or solid-
state disk in that there is no file system.
For high-speed recording, you must record to the
camera’s RAM buffer first, review, and then transfer to
the CineMag - this is known as ‘Loop’ mode. For lower
speed recording, the camera can run in Run/Stop mode,
writing direct to the CineMag, allowing several minutes of
recording. A 2TB CineMag IV allows up to 120 fps at full
resolution (96 fps to a 1TB CineMag IV).
It is not possible to delete individual clips from a CineMag
IV because all frames are recorded contiguously. This is
an important consideration when saving clips – once the
CineMag is full; you can only re-record on it by deleting
its entire contents. For this reason it’s recommended that
RAM cines are reviewed and trimmed by setting in and
out points prior to transfer from the RAM buffer to the
CineMag.
.cine files are downloaded over Ethernet (either 1Gb or
10Gb) using Windows-based Phantom PCC or Mac-based
Glue Tools Séance software.
There have been a few generations of Phantom CineMags.
The newer Phantom CineMag IV is thinner, lighter, smaller
and higher capacity than the earlier generations. The
original CineMag and CineMag II are not compatible with
the Phantom Flex4K.
Introduction
Phantom CineMag, CineMag II
and CineMag IV
Erase protect switch:
When the erase-protect switch is
in the lock position, the CineMag IV
cannot be erased. Use an appropriate
tool, such as a micro-flathead
screwdriver to flip the switch.
Mag Capacity Indicator:
When a Phantom CineMag IV
is empty, all lights will be
illuminated. As material
is recorded to the mag,
the lights will turn off.
The last light will always
stay on to indicate power.
Activity LED:
Green for read activity
Red indicates recording
Orange indicates erasing
Table of contents